1
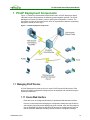
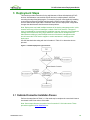
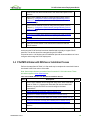
PCoIP® Infrastructure Deployment Guide TER0903005 Issue 1 2 PCoIP Infrastructure Deployment Guide Teradici Corporation #101-4621 Canada Way, Burnaby, BC V5G 4X8 Canada p +1 604 451 5800 f +1 604 451 5818 www.teradici.com The information contained in this document represents the current view of Teradici Corporation as of the date of publication. Because Teradici must respond to changing market conditions, it should not be interpreted to be a commitment on the part of Teradici, and Teradici cannot guarantee the accuracy of any information presented after the date of publication. This document is for informational purposes only. TERADICI MAKES NO WARRANTIES, EXPRESS, IMPLIED OR STATUTORY, AS TO THE INFORMATION IN THIS DOCUMENT. Complying with all applicable copyright laws is the responsibility of the user. Without limiting the rights under copyright, no part of this document may be reproduced, stored in or introduced into a retrieval system, or transmitted in any form or by any means (electronic, mechanical, photocopying, recording, or otherwise), or for any purpose, without the express written permission of Teradici Corporation. Teradici may have patents, patent applications, trademarks, copyrights, or other intellectual property rights covering subject matter in this document. Except as expressly provided in any written license agreement from Teradici, the furnishing of this document does not give you any license to these patents, trademarks, copyrights, or other intellectual property. © 2009 Teradici Corporation. All rights reserved. Teradici, PC-over-IP, and PCoIP are registered trademarks of Teradici Corporation. The names of actual companies and products mentioned herein may be the trademarks of their respective owners. TER0903005 Issue 1 2 PCoIP Infrastructure Deployment Guide Revision History Version 1 TER0903005 Issue 1 Date July 28, 2009 Description Initial release 3 PCoIP Infrastructure Deployment Guide Contents REVISION HISTORY ...................................................................................................... 3 CONTENTS .................................................................................................................... 4 TABLE OF FIGURES ..................................................................................................... 6 TABLES.......................................................................................................................... 7 DEFINITIONS ................................................................................................................. 8 INTRODUCTION............................................................................................................. 9 1 PCOIP DEPLOYMENT COMPONENTS................................................................. 10 1.1 Managing PCoIP Devices ................................................................................................................ 10 1.1.1 Device Web Interface................................................................................................................ 10 1.1.2 PCoIP Management Console ................................................................................................... 11 1.1.3 Connection broker..................................................................................................................... 11 1.2 2 DNS Server ...................................................................................................................................... 11 PREPARING TO DEPLOY PCOIP DEVICES ........................................................ 12 2.1 Host/Portal Interconnect Options ..................................................................................................... 12 2.1.1 Shared Network Connection ..................................................................................................... 12 2.1.2 Dedicated Connection............................................................................................................... 13 2.2 Host/Portal IP Address Configuration .............................................................................................. 14 2.2.1 Host IP Address Configuration.................................................................................................. 14 2.2.2 Portal IP Address Configuration................................................................................................ 14 2.3 Will the Deployment Install a Connection Broker?........................................................................... 14 2.4 Select Connection Broker Vendor & Acquire Tool ........................................................................... 15 2.5 Will the Deployment Install the PCoIP Management Console? ....................................................... 15 3 DEPLOYMENT STEPS........................................................................................... 16 3.1 Dedicated Connection Installation Process ..................................................................................... 16 3.2 No Device Management Tools Installation Process ........................................................................ 17 3.3 PCoIPMC with DNS SRV Record Installation Process.................................................................... 18 3.4 PCoIPMC & Broker with DNS Server Installation Process .............................................................. 19 TER0903005 Issue 1 4 PCoIP Infrastructure Deployment Guide 3.5 Procedures ....................................................................................................................................... 20 3.5.1 Configure the Portal session settings using the OSD............................................................... 20 3.5.2 Log into the device’s administrative web interface ................................................................... 20 3.5.3 Configure the Host network settings statically .......................................................................... 21 3.5.4 Configure the Portal network settings statically ........................................................................ 22 3.5.5 Determine a device’s IP address .............................................................................................. 22 3.5.6 Determine the Host IP and MAC addresses............................................................................. 22 3.5.7 Install and start the PCoIPMC................................................................................................... 23 3.5.8 Install the PCoIPMC DNS SRV record ..................................................................................... 23 3.5.9 Verify the DNS SRV record(s) are installed.............................................................................. 23 3.5.10 Install the connection broker DNS SRV record......................................................................... 23 3.5.11 Discover the PCoIP devices using the PCoIPMC..................................................................... 23 3.5.12 Verify the PCoIPMC discovered the PCoIP devices................................................................. 24 3.5.13 Peer Host and Portal devices using the PCoIPMC................................................................... 24 4 TIPS AND RECOMMENDATIONS ......................................................................... 25 4.1 PCoIPMC Usage .............................................................................................................................. 25 4.1.1 Get Familiar with the PCoIPMC ................................................................................................ 25 4.1.2 Begin Using the PCoIPMC in the Deployment ......................................................................... 25 4.1.3 Configure the PCoIP Device Profiles ........................................................................................ 25 4.1.4 Organize the PCoIP Devices into Groups ................................................................................ 25 4.1.5 Backup the PCoIPMC Database............................................................................................... 26 4.2 Device Configuration Recommendations......................................................................................... 26 4.3 Troubleshooting Tips........................................................................................................................ 28 5 EVALUATION ......................................................................................................... 31 5.1 Monitor Network Traffic Using SNMP .............................................................................................. 31 5.2 Tests................................................................................................................................................. 31 TER0903005 Issue 1 5 PCoIP Infrastructure Deployment Guide Table of Figures Figure 1-1: PCoIP Deployment Components 10 Figure 2-1: PCoIP Devices Connected over a Shared Network 13 Figure 2-2: PCoIP Host and Portal Directly Connected 13 Figure 3-1: PCoIP Deployment Type Flowchart 16 TER0903005 Issue 1 6 PCoIP Infrastructure Deployment Guide Tables Table 2-1: PCoIP Deployment Preparation Checklist 12 Table 3-1: Dedicated Connection Installation Process 17 Table 3-2: No Device Management Tools Installation Process 18 Table 3-3: PCoIPMC with DNS Server Installation Process 18 Table 3-4: PCoIPMC & Broker with DNS Server Installation Process 19 Table 4-1: Highlighted Device Configuration Settings 27 Table 4-2: Troubleshooting Tips 29 TER0903005 Issue 1 7 PCoIP Infrastructure Deployment Guide Definitions DNS Domain Name System ESP Encapsulation Security Payload IP Internet Protocol IPSec Internet Protocol Security IPv4 Internet Protocol version 4 IT Information Technology NAT Network Address Translation OSD On Screen Display ® PCoIP Personal Computer over Internet Protocol (PC-over-IP®) PCoIPMC PCoIP Management Console PCoIP Host Host side of PCoIP system PCoIP Portal Portal (desktop) side of PCoIP system UDP User Datagram Protocol VPN Virtual Private Network WAN Wide Area Network TER0903005 Issue 1 8 PCoIP Infrastructure Deployment Guide Introduction Most PCoIP deployments are not identical; below are just some of the characteristics that may differ across deployments. • A connection broker may be installed • The PCoIP Management Console may be installed • Some deployments will use DHCP to assign device IP addresses while others will do this statically • Some deployments connect each Host and Portal device using dedicated cables, while others connect the devices to a shared network • The bandwidth available for each PCoIP session may vary based on available network capacity • The host operating system may be different • In bandwidth restricted deployments some customers require high quality lower frame rate images versus reduced quality higher frame rate images This document walks the person responsible for deploying PCoIP devices through the steps that must be performed before, during and after installation. Section 1 describes the components found in a typical PCoIP deployment. The administrator should read through this section to become familiar with the components discussed throughout this document. Section 2 contains a checklist that must be completed before the devices are installed. Section 3 uses the checklist information along with a flowchart to determine what specific installation process should be followed. This section also explains the installation steps referenced by the installation processes. After completing the installation process, administrators should be able to establish PCoIP sessions using the devices. Section 4 provides tips and recommendations administrators should find useful. Section 5 includes information that may be useful in evaluating and monitoring a PCoIP deployment. Note: The administrator using this guide is expected to have a good base of IT knowledge. TER0903005 Issue 1 9 PCoIP Infrastructure Deployment Guide 1 PCoIP Deployment Components Figure 1-1 shows the recommended components found in a PCoIP deployment where individual Host and Portal devices are statically grouped together (peered). The PCoIP Management Console (PCoIPMC), used for peering and configuration, is shown. The figure does not show a connection broker, which is required when Hosts are dynamically assigned to Portals as users log in. Figure 1-1: PCoIP Deployment Components 1.1 Managing PCoIP Devices A PCoIP deployment is made up of one or more PCoIP Host and Portal devices. Each device has multiple configuration settings that can be accessed and controlled using the following mechanisms: 1.1.1 Device Web Interface Each device can be configured individually via web-based administration interface. However, users should avoid changing the configuration settings through the device web interface, especially as the deployment grows. Instead, users are encouraged to use the PCoIPMC; this ensures that all PCoIP devices are configured uniformly and that the PCoIPMC database accurately reflects the device configuration settings. TER0903005 Issue 1 10 PCoIP Infrastructure Deployment Guide Refer to the PCoIP Administrative Interface User Manual (TER0606004) for information on the web interface. 1.1.2 PCoIP Management Console The Teradici PCoIP Management Console (PCoIPMC) enables administrators to centrally manage a PCoIP deployment. Administrators can use the PCoIPMC to do the following: • Access and update the configuration of all PCoIP devices • Apply the same configuration settings to groups of devices • Update device firmware • Reset devices • Control the power state of Host devices that support power management • View status information • Retrieve device event logs The PCoIPMC is packaged as a VMware virtual machine (VM) and runs on VMware Player. This allows users to install and run the PCoIPMC on any host machine that can run VMware Player. A web browser is used to access and control the PCoIPMC. Note: For additional information on the PCoIPMC refer to the PCoIP Management Console User Manual (TER0812002). 1.1.3 Connection broker A connection broker is an optional component that allows an administrator to manage user access to computing resources. This component is not shown in Figure 1-1. In a PCoIP deployment, a connection broker is used to assign connections between PCoIP Host and Portal devices. Deployments requiring dynamic assignments of Hosts to Portals require a connection broker. 1.2 DNS Server Figure 1-1 shows a DNS Server with the PCoIPMC DNS SRV record. This component is optional but highly recommended. The PCoIPMC must discover the PCoIP Host and Portal devices, and the PCoIPMC DNS SRV record facilitates automatic device discovery. A Connection Broker DNS SRV record can also be installed on the DNS Server. PCoIP devices use this record to notify the connection broker of their existence. When a PCoIP device boots it reads these records, which contain the addresses of the PCoIPMC and/or connection broker. After reading the records, the device sends messages to the PCoIPMC and/or connection broker notifying them of the devices existence. This ensures the PCoIPMC and/or connection broker is aware of all the devices in the deployment as they are powered on. TER0903005 Issue 1 11 PCoIP Infrastructure Deployment Guide 2 Preparing to Deploy PCoIP Devices Prior to installing PCoIP devices, the administrator must make some decisions that affect how the devices are installed and configured. Complete the checklist shown in Table 2-1. The rest of this section provides information that will help complete the table. Table 2-1: PCoIP Deployment Preparation Checklist Section Question Answer n/a How will the Host and Portal devices be connected? ___ Shared Network Connection ___ Dedicated Connection (go to section 3.1) 2.2 If the devices connect to a shared network, how will the device IP addresses be configured? Host: ___ DHCP (dynamic) ___ DHCP (lease reservation) ___ Static Portal: ___ DHCP (dynamic) ___ Static 2.3 Will the deployment include a connection broker? ___ Yes ___ No 2.4 If the deployment needs a connection broker select the connection broker vendor and acquire a copy of the tool. Vendor: ________________________ 2.5 Will the deployment install the PCoIPMC? ___ Yes ___ No Note: the table above and section 2.2.2 below do not list DHCP lease reservation as an option for configuring the IP address for Portal devices. Users can configure the Portal IP address using this mechanism but users are not required to do this. In some deployments the Portal must know the IP address of the Host, which is why DHCP lease reservation is sometimes required. 2.1 Host/Portal Interconnect Options PCoIP Host and Portal devices communicate with each other over an Ethernet connection. Users have the option of connecting the devices over a traditional Ethernet network shared with other devices (see Figure 2-1) or directly over a dedicated cable (see Figure 2-2). Note: It is important to point out that deployments with PCoIP devices operating over a shared network connection (see Figure 2-1) can connect non-PCoIP devices such as printers and workstations to the network. PCoIP devices generate standard Ethernet traffic which will be transported in conjunction with non PCoIP packets. 2.1.1 Shared Network Connection Typical deployments connect PCoIP devices to a shared network. This provides the following benefits over dedicated connections. TER0903005 Issue 1 12 PCoIP Infrastructure Deployment Guide • The device administrative web interface is accessible from other machines on the network, allowing the administrator to access the device configuration settings and debug information. • The administrator can use the PCoIP device management tools (connection broker and PCoIPMC) to manage the PCoIP devices in the deployment. Figure 2-1: PCoIP Devices Connected over a Shared Network 2.1.2 Dedicated Connection A dedicated connection may be useful for first-time users wishing to quickly begin using a pair of PCoIP devices. This type of connection may also be used in highly secure deployments wishing to isolate the PCoIP traffic. Below is a list of limitations associated with this type of deployment. • The device administrative web interface is not accessible. This prevents the administrator from accessing the Host device configuration settings or debug information. The administrator can only access some of the Portal configuration settings and debug information using the Portal on-screen display (OSD). • The PCoIP device management tools cannot be used because these tools communicate with the devices over the network interface. Note: If using a dedicated connection, skip the rest of this section and proceed to section 3.1. Figure 2-2: PCoIP Host and Portal Directly Connected TER0903005 Issue 1 13 PCoIP Infrastructure Deployment Guide 2.2 Host/Portal IP Address Configuration Each PCoIP device deployed on a shared network must be assigned a unique IP address. The device default network settings enable DHCP. Users can reconfigure the devices to use static IP addresses. The Portal network settings are configured using either the administrative web interface or the OSD. The Host network settings are configured using the administrative web interface. This section helps the administrator determine how to configure these settings. 2.2.1 Host IP Address Configuration When a PCoIP session starts, the Portal sends a message to the Host. To do this the Portal must know the Host’s IP address. This means the Host IP address must be constant or some mechanism must be in place that tells the Portal the Host’s IP address. Dynamic IP addresses can be assigned to Hosts using DHCP if a connection broker is used. The Host IP address must be statically configured if the deployment does not include a connection broker. The administrator should choose one of the following methods. Static IP addresses assigned by a DHCP server using lease reservation: This is the recommended method of statically configuring Host IP addresses. To use DHCP lease reservation, the deployment must have a DHCP server active on the network that the Host connects to and the DHCP server must be configured to assign a unique IP address to each Host. The user should not modify the device network settings because the Host is shipped with DHCP enabled. Static IP addresses: The administrator will need to log into the administrative web interface of each Host card and configure the device network settings using the Configuration->Network web page.. 2.2.2 Portal IP Address Configuration Users are recommended to use DHCP to configure the network settings of the Portal. If DHCP is used, the deployment must have a DHCP server active on the network the Portal connects to. The user should not modify the device network settings because the Portal is shipped with DHCP enabled. If DHCP is not used the administrator will need to access each Portal’s OSD Options>Configuration->Network interface to configure the network settings. Note: DHCP lease reservation can be used to configure the Portal IP address, but there’s little value in doing this for PCoIP configuration. Users are recommended to dynamically assign the IP address using DHCP or configure the Portal IP address statically using the web interface. 2.3 Will the Deployment Install a Connection Broker? Section 1.1.3 describes the function of a connection broker. A connection broker is not required if each PCoIP Portal in the deployment always connects to the same host system (static assignment). A connection broker is required if one or more PCoIP Portals must support connecting to different host systems (dynamic assignment). For example a TER0903005 Issue 1 14 PCoIP Infrastructure Deployment Guide connection broker would be needed if users were connected to specific Host machines based on their login credentials when a PCoIP session is established. 2.4 Select Connection Broker Vendor & Acquire Tool Multiple connection broker vendors support brokering PCoIP sessions. If a connection broker will be installed, contact the PCoIP equipment supplier and ask what connection broker(s) they recommend. After selecting a vendor, acquire a copy of the connection broker and installation instructions. 2.5 Will the Deployment Install the PCoIP Management Console? The PCoIPMC is a free tool developed by Teradici that simplifies the management of all PCoIP devices in a deployment. Section 1.1.2 describes the features of the PCoIPMC. All deployments that connect Host and Portal devices over a shared network are recommended to install and use this tool. Deployments that do not use the PCoIPMC must use the administrative web interface to configure the devices. This may be sufficient for deployments with small numbers of devices, but it becomes difficult to use across multiple devices because the administrator must log into and set the configuration settings of each device individually. This can be a tedious and error-prone task. Note: Some connection brokers support managing a subset of the device configuration settings. Consult your chosen broker vendor for configuration details. TER0903005 Issue 1 15 PCoIP Infrastructure Deployment Guide 3 Deployment Steps This section provides instructions for the administrator to follow while deploying PCoIP devices. Administrators can install the PCoIP devices in multiple phases, each time executing the steps listed below again. For example, first time users might skip installing a connection broker and PCoIPMC and just setup a PCoIP Host and Portal. At a later time the administrator might add the PCoIPMC. Each time the deployment configuration changes the administrator should execute the steps below. Note: Deployments can install multiple instances of the device management tools. In this scenario each copy of the tool manages a subset of the PCoIP devices. This type of setup is supported but it complicates the installation process. Users are recommended to manage all PCoIP devices using single instances of each device management tool. Administrators wishing to install multiple instances of the device management tools should contact the PCoIP device supplier to receive assistance in setting up their deployment. Use the flowchart below along with the information in Table 2-1 to determine how to proceed. Figure 3-1: PCoIP Deployment Type Flowchart 3.1 Dedicated Connection Installation Process Perform the steps listed in Table 3-1. After each step is complete the user should insert a checkmark in the Done column of the table. Note: Some steps reference procedures found in section 3.5 of this document. These procedures appear in blue underlined text. TER0903005 Issue 1 16 PCoIP Infrastructure Deployment Guide Table 3-1: Dedicated Connection Installation Process Step Description 1 Inspect the Host PCoIP card and write down the card’s MAC address. 2 Connect a network cable between the Host and Portal. Power on the devices and wait at least 3 minutes. Verify the Portal IP address equals 192.168.1.50 on the OSD Options->Configuration->Network settings. 3 Configure the Portal to use the static IP address 192.168.1.50. To do this, uncheck Enable DHCP and select Apply. Done Note: The default network configuration settings of Host and Portal devices enable DHCP. If the network interface of device that has enabled DHCP is connected to another network device (switch, Host or Portal) and a DHCP server does not assign the device a network address within 3 minutes then the network interface is reconfigured to use the following static IP addresses: Host=192.168.1.100, Portal=192.168.1.50. 4 Configure the Portal session settings using the OSD (refer to section 3.5.1). The Host IP address is 192.168.1.100. 5 Click the Connect button on the Portal screen which will start the PCoIP session. At this point the PCoIP devices have been installed and are ready to support PCoIP sessions. Note: Users should temporarily connect the network interface of the PCoIP Host device to a laptop whose NIC is configured with a static IP address on the 192.168.1.x/24 network. The laptop can be used to change the Host’s network settings to a static IP address. This will eliminate the need for the user to wait up to 3 minutes for the device to abort using DHCP after the device is powered on or reset. Note: Users should consider enabling the auto-reconnect feature on the Portal session configuration settings. When this feature is enabled, the Portal will always reconnect with the previously connected Host if a session is disconnected, eliminating the need for the user to select the connect button on the OSD. This is particularly important if there is no user at the portal to reconnect it, such as in a remote signage application. A session may be disconnected for multiple reasons such as a device reset/reboot, network outage or power outage. Note that with auto-reconnect enabled, the Portal will reconnect even when the user presses the disconnect button to terminate the session. Proceed to section 4 of this document for additional tips and recommendations on how to configure and manage the PCoIP deployment. 3.2 No Device Management Tools Installation Process Perform the steps listed in Table 3-2. After each step is complete the user should insert a checkmark in the Done column of the table. Note: Some steps reference procedures found in section 3.5 of this document. These procedures appear in blue underlined text. TER0903005 Issue 1 17 PCoIP Infrastructure Deployment Guide Table 3-2: No Device Management Tools Installation Process Step Description 1 If the Host IP address will be configured using DHCP lease reservation (refer to Table 2-1), inspect each Host card and note the card’s MAC address. Log into the DHCP server and configure the lease reservations. 2 Connect the Host and Portal devices to the network and power on the devices. 3 If the Host IP address will not be configured using DHCP (refer to Table 2-1), Configure the Host network settings statically (refer to section 3.5.3) and power cycle the host PC to activate the new network settings. 4 If the Portal IP address will not be configured using DHCP (refer to Table 2-1), Configure the Portal network settings statically (refer to section 3.5.4) and power cycle/reset the Portal to activate the new network settings. 5 Determine the Host IP and MAC addresses (refer to section 3.5.6). 6 Configure the Portal session settings using the OSD (refer to section 3.5.1). 7 Click the Connect button on the Portal screen which will start the PCoIP session. Done At this point the PCoIP devices have been installed and are ready to support PCoIP sessions. The devices should be managed using the administrative web interface. Proceed to section 4 of this document for additional tips and recommendations on how to configure and manage the PCoIP deployment. 3.3 PCoIPMC with DNS SRV Record Installation Process Perform the steps listed in Table 3-3. After each step is complete the user should insert a checkmark in the Done column of the table. Note: Some steps reference procedures found in section 3.5 of this document. These procedures appear in blue underlined text. Table 3-3: PCoIPMC with DNS Server Installation Process Step Description 1 If the Host IP address will be configured using DHCP lease reservation (refer to Table 2-1), inspect each Host card and note the card’s MAC address. Log into the DHCP server and configure the lease reservations. 2 Install and start the PCoIPMC (refer to section 3.5.7). 3 Install the PCoIPMC DNS SRV record (refer to section 3.5.8). 4 Verify the DNS SRV record(s) are installed (refer to section 3.5.9). TER0903005 Issue 1 Done 18 PCoIP Infrastructure Deployment Guide 5 Connect the Host and Portal devices to the network and power on the devices. 6 If the Host IP address will not be configured using DHCP (refer to Table 2-1), Configure the Host network settings statically (refer to section 3.5.3) and power cycle the host PC to activate the new network settings. 7 If the Portal IP address will not be configured using DHCP (refer to Table 2-1), Configure the Portal network settings statically (refer to section 3.5.4) and power cycle/reset the Portal to activate the new network settings. 8 Verify the PCoIPMC discovered the PCoIP devices (refer to section 3.5.12) automatically after devices are reset or powered on. 9 Peer Host and Portal devices using the PCoIPMC (refer to section 3.5.13). 10 Click the Connect button on the Portal screen which will start the PCoIP session. At this point the PCoIP devices have been installed and are ready to support PCoIP sessions. The devices should be managed using the PCoIPMC. Proceed to section 4 of this document for additional tips and recommendations on how to configure and manage the PCoIP deployment. 3.4 PCoIPMC & Broker with DNS Server Installation Process Perform the steps listed in Table 3-4. After each step is complete the user should insert a checkmark in the Done column of the table. Note: Some steps reference procedures found in section 3.5 of this document. These procedures appear in blue underlined text. Table 3-4: PCoIPMC & Broker with DNS Server Installation Process Step Description 1 If the Host IP address will be configured using DHCP lease reservation (refer to Table 2-1), inspect each Host card and note the card’s MAC address. Log into the DHCP server and configure the lease reservations. 2 Install and start the PCoIPMC (refer to section 3.5.7). 3 Install the PCoIPMC DNS SRV record (refer to section 3.5.8). 4 Install the connection broker DNS SRV record (refer to section 3.5.10). 5 Verify the DNS SRV record(s) are installed (refer to section 3.5.9). 6 Connect the Host and Portal devices to the network and power on the devices. 7 If the Host IP address will not be configured using DHCP (refer to TER0903005 Issue 1 Done 19 PCoIP Infrastructure Deployment Guide Table 2-1), Configure the Host network settings statically (refer to section 3.5.3) and power cycle the host PC to activate the new network settings. 8 If the Portal IP address will not be configured using DHCP (refer to Table 2-1), Configure the Portal network settings statically (refer to section 3.5.4) and power cycle/reset the Portal to activate the new network settings. 9 Verify the PCoIPMC discovered the PCoIP devices (refer to section 3.5.12) automatically after devices are reset or powered on. 10 Set the PCoIPMC Brokered environment setting on the PCoIPMC Settings web page equal to Yes to indicate the deployment includes a connection broker. Doing this disables the peering feature of the PCoIPMC. 11 Install the connection broker and configure it to peer Host and Portal devices. Refer the to connection broker documentation for instructions on how to do this. 12 Click the Connect button on the Portal screen which will start the PCoIP session. At this point the PCoIP devices have been installed and are ready to support PCoIP sessions. The devices should be managed using the connection broker and the PCoIPMC. Proceed to section 4 of this document for additional tips and recommendations on how to configure and manage the PCoIP deployment. 3.5 Procedures This section contains procedures referenced by the installation processes. 3.5.1 Configure the Portal session settings using the OSD 1. Open the Portal OSD Options->Configuration->Session settings page and configure the following settings: Session Type: PCoIP Identify Peer by: IP Address Peer IP Address: <Host IP Address, gathered earlier> Peer MAC Address: <Host MAC Address, gathered earlier> Enable Auto-Reconnect: <make sure this box is not checked> 2. Click the Apply button followed by the OK button. 3. Return to the installation process or procedure you were following prior to executing this procedure. 3.5.2 Log into the device’s administrative web interface All Host and Portal devices support an administrative web interface that is accessed using a web browser. The web interface has been tested with the following browsers: TER0903005 Issue 1 20 PCoIP Infrastructure Deployment Guide • Firefox 1.5, 2.0 and 3.0 • Internet Explorer 6.0 and 7.0 Other browsers may also be compatible. 1. Obtain the Host or Portal device’s IP address or hostname. If DHCP is disabled the device will use a static IP address, which must be known. If DHCP is enabled the address is assigned by a DHCP server. An administrator can find the device IP addresses from the configuration settings or by querying the DHCP server. If DHCP is enabled AND the deployment’s DHCP server is configured to register device hostnames with the DNS server then the device web interface can be accessed using the device hostname instead of the IP address. The host hostname equals pcoip-host-<MAC address> and the portal hostname equals pcoip-portal-<MAC address>. “<MAC address>” is the device MAC address. For example, the hostname of a portal with MAC address 010203040506 equals pcoip-portal-010203040506. 2. Start a web browser and enter the device IP address or hostname in the browser’s address bar. The device login web page or homepage will appear if the browser connects to the device web server. 3. If the login web page appears the administrator must enter the device administrative password. The default password is a blank/empty string. Note: Some PCoIP devices are shipped with the password disabled. The password can be enabled and configured using the PCoIPMC. If a device has disabled the password feature the user will not be asked to supply a password when logging into the web interface 4. Return to the installation process or procedure you were following prior to executing this procedure. 3.5.3 Configure the Host network settings statically The Host card network settings are configured via the administrative web interface. 1. Log into the device’s administrative web interface (refer to section 3.5.2). 2. Open the Configuration->Network web page and configure the following settings: Enable DHCP: <make sure this box is not checked> IP Address, Subnet Mask, Gateway: <configure these settings> Primary & Secondary DNS Server: <optional configuration settings> Domain Name: <optional configuration setting> Ethernet Mode: Auto Maximum MTU Size: 1400 3. Click the Apply, Reset and then the OK button. 4. Restart or power-cycle the host PC, which will reset the PCoIP Host. 5. Return to the installation process or procedure you were following prior to executing this procedure. TER0903005 Issue 1 21 PCoIP Infrastructure Deployment Guide 3.5.4 Configure the Portal network settings statically The administrator can configure the Portal network settings using the web interface or the OSD. To use the web interface follow the instructions that describe how to statically configure the Host network settings (3.5.3). The follow instructions describe how to use the OSD. 1. Open the Options->Configuration->Network page. 2. Select the Unlock button and enter the device administrative password. The default password is a blank/empty string. 3. Configure the following settings: Enable DHCP: <make sure this box is not checked > IP Address, Subnet Mask, Gateway: <configure these settings> Primary & Secondary DNS Server: <optional configuration settings> Ethernet Mode: Auto 4. Click the Apply and then the Reset button. 5. Return to the installation process or procedure you were following prior to executing this procedure. 3.5.5 Determine a device’s IP address Below is a list of tips that might help a user determine the IP address of a PCoIP device. 1. The Portal IP address can be viewed on the Options->Configuration->Network page. 2. If the device has enabled DHCP and a DHCP server is on the network, log into the DHCP server and find the IP address assigned to the PCoIP device. 3. When a device is connected to a network without a DHCP server for more than 3 minutes, the device will stop using DHCP and assign a static IP address. Portal devices use 192.168.1.50 and Host devices use 192.168.1.100. 4. The PCoIP Host Software can display the PCoIP Host device’s IP address. If the PCoIP Host Software is installed and running on the host workstation, open the PCoIP Agent application, select the Network tab and then select the Host device. Note: The PCoIP Host Software is a software package that can be installed on a host workstation. This package is primarily intended for use in WAN deployments. Refer to the PCoIP Host Software User Guide (TER0810001) for details on installing and using the software. 5. The PCoIPMC can be used to determine device IP addresses. The Manual Discovery feature can scan a range of IP addresses searching for PCoIP devices. 6. Attach a network sniffer such as Wireshark and capture the packets sent and received by the PCoIP device. Review the packets to see what IP address the device is using. 7. Return to the installation process or procedure you were following prior to executing this procedure. 3.5.6 Determine the Host IP and MAC addresses 1. There are few ways to find the MAC address of a Host. TER0903005 Issue 1 22 PCoIP Infrastructure Deployment Guide a. The PCoIP Host card should have a label with the address. Inspect the Host card to determine the MAC address. b. Log into the device’s administrative web interface (refer to section 3.5.2). Open the Info->Version web page. 2. Use a method listed in Determine a device’s IP address (refer to section 3.5.5) to find the Host IP address. 3. Return to the installation process or procedure you were following prior to executing this procedure. 3.5.7 Install and start the PCoIPMC 1. Contact the PCoIP equipment supplier and acquire a copy of the PCoIPMC tool and the PCoIP Management Console User Manual (TER0812002). 2. Follow the Start the PCoIPMC instructions found in the tool’s User Manual. 3. Return to the installation process or procedure you were following prior to executing this procedure. 3.5.8 Install the PCoIPMC DNS SRV record 1. Refer to the PCoIP Management Console User Manual (TER0812002) for instructions that describe how to install this record. 2. Return to the installation process or procedure you were following prior to executing this procedure. 3.5.9 Verify the DNS SRV record(s) are installed 1. Start a web browser and log into the web interface of the PCoIPMC. Refer to the PCoIP Management Console User Manual (TER0812002) for details on how to do this. 2. Open the Home web page. 3. Click the Update DNS SRV Records button. If the record(s) are not found, the PCoIPMC will display No record found for the Management Console or Connection Broker record. 4. Return to the installation process or procedure you were following prior to executing this procedure. 3.5.10 Install the connection broker DNS SRV record 1. Refer to the connection broker documentation for instructions that describe how to install this record. 2. Return to the installation process or procedure you were following prior to executing this procedure. 3.5.11 Discover the PCoIP devices using the PCoIPMC 1. Open the PCoIPMC Device Management web page. TER0903005 Issue 1 23 PCoIP Infrastructure Deployment Guide 2. Expand the Device Discovery menu by clicking on the box next to the Device Discovery (optional) text. 3. Enter the starting and ending IP addresses for a subnet Host and/or Portal devices are connected to. 4. Click the Discover Devices button and wait for the discovery process to complete. When this completes the PCoIPMC should discover all of the devices connected to the subnet. 5. Repeat steps 3 through 4 for each subnet PCoIP devices are connected to. 6. Using the PCoIPMC Device Management web page verify the PCoIPMC discovered all of the PCoIP devices. 7. Return to the installation process or procedure you were following prior to executing this procedure. 3.5.12 Verify the PCoIPMC discovered the PCoIP devices At this point the PCoIPMC should be running and the PCoIP devices should be configured to automatically register with the PCoIPMC when they boot. 1. Open the PCoIPMC Device Management web page. 2. Set the dropdown field equal to Last updated. 3. Power cycle/reset one or more PCoIP devices. 4. Refresh the PCoIPMC Device Management web page and verify the device timestamp is updated within a minute of booting. 5. Return to the installation process or procedure you were following prior to executing this procedure. 3.5.13 Peer Host and Portal devices using the PCoIPMC At this point the PCoIPMC should be running and the PCoIP devices should be discovered by the PCoIPMC. 1. Open the PCoIPMC Device Management web page. 2. Proceed to the next step if the devices have been added to a group. If not, add the devices to the Default group. 3. Peer each Host and Portal by selecting them and then click the Link Devices button, which will update the devices session settings so that the Portal will connect with the Host. 4. Repeat the previous step for each pair of Host and Portal devices. 5. Return to the installation process or procedure you were following prior to executing this procedure. TER0903005 Issue 1 24 PCoIP Infrastructure Deployment Guide 4 Tips and Recommendations 4.1 PCoIPMC Usage This section provides some recommendations on how to use the PCoIPMC. 4.1.1 Get Familiar with the PCoIPMC Perform the steps outlined in the Getting Started section of the PCoIP Management Console User Manual (TER0812002). 4.1.2 Begin Using the PCoIPMC in the Deployment At this point the administrator should be familiar with most features of the PCoIPMC. The following steps are recommendations that should be followed in setting up the tool at the deployment. • Configure the name of each device in the deployment using the PCoIPMC Device Management web page. • Users must enter a password when logging into the PCoIPMC web interface. The default password is blank. Users are recommended to change this. Refer to the PCoIP Management Console User Manual (TER0812002) for instructions on how to do this. 4.1.3 Configure the PCoIP Device Profiles At this point the administrator should review some material and decide how to set the device configuration settings. Keep in mind that not all of the device settings need to be set at this time, but users are encouraged to review the following material and configure some if not all of the settings discussed in the material. • Review sections 4.2 and 4.3 of this document, which provide guidance on how to configure some device settings. After reviewing this material the user should have a list of device configuration settings and values. • Create one or more profiles that contain the desired configuration settings using the PCoIPMC Profile Management web page. Remember that a single profile can be associated with more than one group, so there is no need to create multiple identical profiles. • If any device settings were configured using the PCoIPMC in section 3 of this document, ensure the settings are configured properly in the newly created profiles. 4.1.4 Organize the PCoIP Devices into Groups The PCoIPMC allows administrators to organize devices with the same configuration settings in groups. Most administrators prefer to organize devices in multiple groups. The devices can be organized using various criteria such as device location or department; administrators must determine what grouping is most appropriate. Bear in mind that all TER0903005 Issue 1 25 PCoIP Infrastructure Deployment Guide devices in a group share the same profile, so devices that require different device configuration settings must be in separate groups. • Determine how the PCoIP devices will be partitioned into groups. • Create the necessary groups and assign the appropriate profile to each group using the PCoIPMC Group Management web page. • Add the appropriate devices to each group using the PCoIPMC Device Management web page. • Apply the profiles to the groups using the PCoIPMC Group Management web page. • Use the PCoIPMC Power Management web page to reset the PCoIP devices in each group that have a profile with device settings that require a restart. Sometimes it’s safest just to reset all the devices to ensure they are using the correct settings. 4.1.5 Backup the PCoIPMC Database Users should periodically backup and export the PCoIPMC database. Refer to the PCoIP Management Console User Manual (TER0812002) for instructions on how to do this. 4.2 Device Configuration Recommendations Users should ensure the PCoIP devices are loaded with the latest firmware release. Contact your PCoIP equipment supplier to determine if your system is loaded with the latest firmware. The PCoIPMC or the web administrative interface can be used to upload new firmware on Host and Portal devices. Table 4-1 provides guidance on how to configure some device configuration settings. The table does not include every setting. Instead it lists the settings typical users may want to modify. TER0903005 Issue 1 26 PCoIP Infrastructure Deployment Guide Table 4-1: Highlighted Device Configuration Settings Category Setting Comments Connection Management Configuration CMS Address This field should equal the IP address of the connection broker if a connection broker is included in the deployment AND a connection broker DNS SRV record is not installed on the DNS server. Discovery Configuration PCoIPMC DNS-Based Discovery Prefix This field should equal the Hostname of the PCoIPMC managing the PCoIP devices if a PCoIPMC DNS SRV record is not installed on the DNS server. Note: this field can only be configured using the PCoIPMC. Discovery Configuration PCoIPMC Notification Delay This field should equal 300 if the PCoIPMC manages the PCoIP devices. Discovery Configuration Enable SLP Discovery This field should equal False if the PCoIPMC is managing the PCoIP devices. Discovery Configuration Enable Host Discovery This field should equal FALSE if the device peering is statically configured or managed by a connection broker. Discovery Configuration Enable DNSSRV Discovery This field should equal False if no DNS-SRV records are installed on the DNS server. Discovery Configuration DNS-SRV Discovery Timeout This field should equal 300 if DNS-SRV records are installed on the DNS server, otherwise it should equal 9999. Session Configuration Enable Auto Reconnect Set this field equal to True if the Host and Portal should always remain connected. This is useful in digital signage deployments or deployments that do not include a connection broker. Bandwidth Configuration Multiple settings Refer to PCoIP Technology User Guide (TER0806003) for recommendations on how to configure the bandwidth settings. Image Configuration Multiple settings Refer to PCoIP Technology User Guide (TER0806003) for recommendations on how to configure the image quality settings. Time Configuration NTP Server Hostname Set this field equal to the hostname or IP address of an NTP server connected to the network the PCoIP devices connect to. When this is configured the timestamp of the messages in the device event log will display the actual time of day, which is useful in debugging system problems. Time Configuration Enable DST Set this field equal to True if you want to enable Daylight Savings Time. TER0903005 Issue 1 Note: this field can only be configured using the PCoIPMC. 27 PCoIP Infrastructure Deployment Guide Category Setting Comments Time Configuration Time Zone Offset Set this field equal to the Time Zone the device is located in. Password Configuration Password Set this field equal to the password you wish to use to protect devices administrative interface. All devices in the deployment should be configured to use the same password. Note: this field can only be configured using the PCoIPMC. Password Configuration Enable Password Protection Some PCoIP devices support disabling the administrative interface password. This field should equal False if you wish to disable this password. Audio Permissions Enable HD Audio Set this field equal to True on both the Host and Portal when enabling audio. Audio Permissions Enable Audio Compression Set this field equal to True on both Host and Portal devices. This field is ignored on devices loaded with firmware versions greater than or equal to 2.0. Audio Permissions Enable Vista 64-bit Mode Set this field equal to True if 64-bit Vista is loaded on the host PC/Workstation AND audio is enabled. Event Log Control Event Log Filter Mode Set this field equal to Verbose while debugging problems otherwise set this field equal to Terse. Profile USB Authorization Multiple settings Each Portal can be configured to authorize and/or not authorize USB devices based on device vendor ID or device type, such as storage. By default all PCoIP Portals are shipped with the settings configured to enable all USB devices. Refer to the PCoIP Administrative Interface User Manual (TER0606004) for instructions on how to modify the USB device permissions. Profile USB Unathorization 4.3 Troubleshooting Tips Table 4-2 describes some tips that administrators might find useful. TER0903005 Issue 1 28 PCoIP Infrastructure Deployment Guide Table 4-2: Troubleshooting Tips Item TER0903005 Issue 1 Description Solution 1 What should I do when the system is not working? PCoIP devices have a persistent event log that contains messages that may help determine the cause of a problem when something is not working. Refer to the PCoIP Management Console User Manual (TER0812002) or the PCoIP Administrative Interface User Manual (TER0606004) for instructions on how to view a device event log. 2 What performance data is available? All PCoIP devices maintain PCoIP session statistics (packets sent/received, lost packets, bytes sent/received, round trip latency, bandwidth and frame update rate). The statistics may be useful when diagnosing system performance problems. Refer to the PCoIP Administrative Interface User Manual (TER0606004) for instructions on how to access these statistics. 3 Can I access the host system BIOS settings? The host system BIOS settings are accessible when a host system boots. Some users may not be able to access these settings from the Portal because the host PC boots before the PCoIP session is established or the host PC BIOS does not include OHCI USB support. If you cannot access these settings from the PCoIP Portal you should do this using a monitor and keyboard connected directly to the host system. 4 Is there a quick way to find Host or Portal devices that are not in a session? The PCoIPMC Device Management web page supports filtering devices based on session state (in session or not in session). Viewing devices that are not in session is useful in deployments that have enabled the Portal auto-reconnect feature. In these deployments the feature allows the administrator to find disconnected devices that may require further investigation. 5 What happens when I send a PCoIP processor reset command to a Host or Portal? A PCoIP processor reset command can be sent from the PCoIPMC Power Management web page. Portal devices reset immediately after receiving the reset command. Host devices will not reset if the host PC/Workstation is powered on, instead the device enters a deferred reset state where it schedules the reset to occur when the host system is powered off or restarted. 6 When does a PCoIP device begin using updated configuration settings? When some PCoIP device configuration settings are updated the new setting does not take effect until after the PCoIP processor is reset. Because of this it’s a good idea to reset devices after updating the device configuration settings. This ensures the devices are using the configured settings. 29 PCoIP Infrastructure Deployment Guide Item 7 TER0903005 Issue 1 Description Can I customize the appearance of the Portal OSD? Solution When a PCoIP Portal does not have an active session, the OSD displays a Connect button with a logo above it. Users can update this logo. Refer to the PCoIP Administrative Interface User Manual (TER0606004) for instructions on how to do this. 30 PCoIP Infrastructure Deployment Guide 5 Evaluation 5.1 Monitor Network Traffic Using SNMP All PCoIP devices include an SNMP agent capable of reporting various performance statistics. The agent supports industry standard MIBs along with a PCoIP specific MIB. The PCoIP MIB includes the following statistics along with additional information. • PCoIP packets sent/received • PCoIP bytes sent/received • Round trip latency • Packet loss counts Install a SNMP Manager and configure it to monitor the PCoIP devices and other network equipment over an extended period of time (>= 1 week). When this is complete review the performance data to determine whether the network carrying the PCoIP traffic is adequately sized. If the network is routinely congested you may need to reduce the maximum bandwidth used by some devices or upgrade some of the network infrastructure. Refer to the Using SNMP with a PCoIP Device User Guide (TER0805002) for additional details on the SNMP support found in PCoIP devices. 5.2 Tests This section lists some tests users should consider implementing to evaluate the performance of their PCoIP system. TER0903005 Issue 1 • Adjust the bandwidth settings of the PCoIP Host while executing different applications on the host computer. Monitor the Bandwidth Utilization and Display Frame Rate shown on the Home web page of the Host device. • Adjust the Minimum Image Quality setting of the PCoIP Portal while a PCoIP session is active and a large number of pixels are changing on the screen. This can be done by viewing an HD video in full screen mode. Reduce the Device Bandwidth Limit setting on the Host to 5 or 10 Mbps. Observe the frame update rate as the Minimum Image Quality is modified. The frame rate will increase as the image quality is lowered because a lower quality image is sent from the Host to the Portal. • PCoIP sessions can operate over WAN connections with a maximum latency of 150 ms and a minimum bandwidth of 1 Mbps per session. Deployments operating PCoIP sessions over WAN connections should use firmware release 2.2 or greater. These deployments should also install the PCoIP Host software on the host computer. Refer to the PCoIP Host Software User Guide (TER0810001) for details on installing and using the software. • Administrators wishing to deploy PCoIP Portals at off-site locations such as employees’ homes must install networking equipment that implements a hardware VPN tunnel. This is typically implemented in routers. Refer to the PCoIP VPN Deployment Guide (TER0902002) for details on configuring and operating sessions over a VPN connection. 31