1
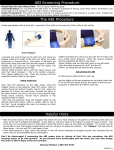
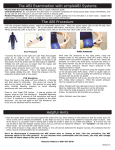
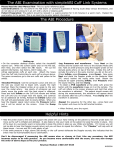
TM
Quick Guide
ABI with Doppler Pressures and
PVR Waveforms (Dual Pressures Per Ankle)
PLEASE READ THE USER'S MANUAL PRIOR TO OPERATING THE VISTA AVS.
SET UP INSTRUCTIONS
Step # 1: Turn on the Vista AVS system by pressing the power button.
Step # 2: Press the ENTER/MENU key to open the OPTIONS menu. Press the number 2 key for SYSTEM SETTINGS. Set "Dual Ankle Pressure" to either HIGH
or LOW by pressing the number 5 key until the desired setting appears. Press the number 6 key to select DOPPLER for obtaining pressures. Press the
ENTER/MENU key to exit SYSTEM SETTINGS.
Step # 3: Press the ENTER/MENU key to open the OPTIONS menu. Press the number 1 key for CONFIGURE EXAMINATION. Press the number 1 key again for the
"ABI with PVR Waveform" option.
Step # 4: Wrap a cuff at each arm and ankle to prepare for the exam. Typically, use a 12 cm cuff for the arms and a 10 cm cuff for the ankles.
ABI EXAMINATION INSTRUCTIONS
Step # 1: Start at the right brachial artery site and connect the hose to the cuff.
Step # 2: Apply gel to the right brachial artery site and use the Doppler probe to listen to the blood flow.
Step # 3: While holding the probe steady on the artery, press and hold the PUMP key until the blood flow is no longer audible. Release the PUMP key and the
cuff will automatically start to deflate.
Step # 4: When the arterial blood flow is audible again, press the SAVE key. If the pressure is correct, press the SAVE key again. If the pressure needs adjusting,
use the UP or DOWN key to enter the desired number from the keypad and then press SAVE again. The marker will then move to the Right WAV.
Step # 5: Move the hose to the right ankle and connect it to the cuff.
Step # 6: Press and hold the PUMP key to inflate the cuff to 75 mmHg. Release the key when the inflation automatically stops. Pressure will deflate to 65
mmHg for optimum PVR. Wait for the "Cuff Deflating" message (on screen) to disappear.
Step # 7: After the waveform stabilizes, press the FREEZE key to hold the waveform. The pressure will automatically deflate pressure from the cuff. If the
waveform is acceptable, press the SAVE key. Or, use the UP or DOWN key to move the waveform to the optimum view and press the SAVE key. Press SAVE
again and the marker will move to the Right PT.
Step # 8: Apply gel to the posterior tibial (PT) artery and use the Doppler probe to listen to the blood flow.
Step # 9: While holding the probe steady on the PT artery, press and hold the PUMP key until the blood flow is no longer audible. Release the PUMP key and
the cuff will automatically begin to deflate.
Step # 10: When the arterial blood flow is audible again, press the SAVE key. If the pressure is correct, press the SAVE key again. If the pressure needs adjusting,
use the UP or DOWN key or enter the desired number from the keypad and then press SAVE again. The marker will then move to Right DP.
Step # 11: Apply gel to the dorsalis pedis (DP) artery and use the Doppler probe to listen to the blood flow.
Step # 12: While holding the probe steady on the DP artery, press and hold the PUMP key until the blood flow is no longer audible. Release the PUMP key
and the cuff will automatically begin to deflate.
Step # 13: When the arterial blood flow is audible again, press the SAVE key. If the pressure is correct, press the SAVE key again. If the pressure needs adjusting,
use the UP or DOWN key or enter the desired number from the keypad and then press SAVE again. The marker will then move to Left WAV.
Step # 14: Switch the hose to the cuff at the left ankle and repeat steps 6 through 13 to obtain the left ankle waveform and the left PT and DP pressures.
Step # 15: Switch the hose to the cuff at the left brachial and repeat steps 2 through 4 to complete the exam.
REPORT FORM RESULTS
Step # 1: Review the pressure, ABI values and waveforms and press the PRINT key to print the results.
Step # 2: Peel the adhesive backing off the paper and apply to the report form.
Step # 3: Complete the report form by including the patient information.
Step # 4: To save the exam to one of the 10 storage locations, open the OPTIONS menu, select FILE MANAGEMENT and save the current exam as described
in Section 11 of the manual.
TM
Quick Guide
ABI with Doppler Pressures and Waveforms
(Dual Pressures Per Ankle)
PLEASE READ THE USER'S MANUAL PRIOR TO OPERATING THE VISTA AVS.
SET UP INSTRUCTIONS
Step # 1: Turn on the Vista AVS system by pressing the power button.
Step # 2: Press the ENTER/MENU key to open the OPTIONS menu. Press the number 2 key for SYSTEM SETTINGS. Set "Dual Ankle Pressure" to either HIGH
or LOW by pressing the number 5 key until the desired setting appears. Press the number 6 key to select DOPPLER for obtaining the pressures, then press
ENTER/MENU again to exit SYSTEM SETTINGS.
Step # 3: Press the ENTER/MENU key again to open the OPTIONS menu. Press the number 1 key for CONFIGURE EXAMINATION. Press the number 2 key to
select the "ABI with Doppler Waveform" option.
Step # 4: Wrap a cuff at each arm and ankle to prepare for the exam. Typically, use a 12 cm cuff for the arms and a 10 cm cuff for the ankles.
ABI EXAMINATION INSTRUCTIONS
Step # 1: Start at the right brachial artery site and connect the hose to the cuff.
Step # 2: Apply gel to the right brachial artery site and use the Doppler probe to listen to the blood flow.
Step # 3: While holding the probe steady on the artery, press and hold the PUMP key until the blood flow is no longer audible. Release the PUMP
key and the cuff will automatically start to deflate.
Step # 4: When the arterial blood flow is audible again, press the SAVE key. If the pressure is correct, press the SAVE key again. If the pressure needs
adjusting, use the UP or DOWN key to enter the desired number from the keypad and then press SAVE again. The marker will move to the Right WAV.
Step # 5: Move the hose to the right ankle and connect it to the cuff.
Step # 6: Apply gel to the posterior tibial (PT) artery and use the Doppler probe to listen to the blood flow.
(NOTE: The PT or dorsalis pedis (DP) artery can be used to obtain an ankle waveform.)
Step # 7: Once the desired waveform is obtained, press the FREEZE key to hold the waveform. If the waveform is correct, press the SAVE key again.
Or, use the UP or DOWN key to scroll to the optimum waveform view, then press SAVE to record it. Press SAVE again and the marker will then move
to to the Right PT.
Step # 8: While holding the probe steady on the PT artery, press and hold the PUMP key until the blood flow is no longer audible. Release the PUMP
key and the cuff will automatically start to deflate.
Step # 9: When the arterial blood flow is audible again, press the SAVE key. If the pressure is correct, press the SAVE key again. If the pressure needs
adjusting, use the UP or DOWN keys or enter the desired number from the keypad and then press SAVE again. The marker will move to the Right DP.
Step # 10: Apply gel to the dorsalis pedis (DP) artery and use the Doppler probe to listen to the blood flow.
Step # 11: While holding the probe steady on the DP artery, press and hold the PUMP key until the blood flow is no longer audible. Release the PUMP
key and the cuff will automatically start to deflate.
Step # 12: When the arterial blood flow is audible again, press the SAVE key. If the pressure is correct, press the SAVE key again. If the pressure needs
adjusting, use the UP or DOWN keys or enter the desired number from the keypad and then press SAVE again. The marker will move to the Left WAV.
Step # 13: Switch the hose to the left ankle cuff and repeat steps 6 through 12 to obtain the left ankle waveform and the left PT and DP pressures.
Step # 14: Switch the hose to the cuff at the left brachial site and repeat steps 2 through 4. to complete the exam.
REPORT FORM RESULTS
Step # 1: Review the pressure, ABI values and waveforms and press the PRINT key to print the results.
Step # 2: Peel the adhesive backing off the paper and apply to the report form.
Step # 3: Complete the report form by including the patient information.
Step # 4: To save an exam to one of the 10 storage locations, open the OPTIONS menu, select FILE MANAGEMENT and save the current exams
described in Section 11 of the manual.
TM
Quick Guide
ABI with PPG Pressures and PVR Waveform
(Single Pressures Per Ankle)
PLEASE READ THE USER'S MANUAL PRIOR TO OPERATING THE VISTA AVS.
SET UP INSTRUCTIONS
Step # 1: Turn on the Vista AVS system by pressing the power button.
Step # 2: Press the ENTER/MENU key to open the OPTIONS menu Press the number 2 key for SYSTEM SETTINGS. Ensure "Dual Ankle Pressure" is OFF by
pressing the number 5 key until the setting is OFF. Press the number 6 key to select PPG for obtaining pressures and then press the ENTER/MENU key to exit
SYSTEM SETTINGS.
Step # 3: Press the ENTER/MENU key again to open the OPTIONS menu. Press the number 1 key for CONFIGURE EXAMINATION. Press the number 1 key again
to select the "ABI with PVR Waveform" option.
Step # 4: Wrap a cuff at each arm and ankle to prepare for the exam. Typically, use a 12 cm cuff for the arms and a 10 cm cuff for the ankles (see pages 18 of
the manual). Place the PPG probe on the right index finger with the blue side of the probe against the skin.
ABI EXAMINATION INSTRUCTIONS
Step # 1: Start at the right brachial artery site and connect the hose to the cuff.
Step # 2: Wait several seconds for the waveform to stabilize and press the SCALE key to properly size the waveform on the screen. Once the waveform is stable,
press the PUMP key to inflate the cuff until the PPG pulsations disappear on the display. Release the PUMP key and the cuff will begin to deflate.
Step # 3: When the first pulsation returns, press the FREEZE key. Use the caliper by pressing the UP or DOWN key to adjust the pressure reading. Move the
caliper to the beginning of the first upward slope at the start of the pulsation. Press the SAVE key to save the systolic pressure and the marker will move to
obtain a PVR waveform at the ankle.
Step # 4: Move the PPG probe from the finger to the great toe. Move the hose to the ankle site and connect it to the cuff.
Step # 5: Press and hold the PUMP key to inflate the cuff to 75 mmHg. Release the key when the inflation automatically stops. Pressure will deflate to 65
mmHg for optimum PVR. Wait for the "Cuff Deflating" message (on screen) to disappear.
Step # 6: After the waveform stabilizes, press the FREEZE key to hold the waveform. The pressure will automatically deflate pressure from the cuff. If the
waveform is acceptable, press the SAVE key. Or, use the UP or DOWN key to move the waveform to the optimum view and press the SAVE key. Press SAVE
again and the marker will move to the Right ANK.
Step # 7: Obtain the pressure using PPG probe as described in steps 2 and 3 above. Press and hold the PUMP key to inflate the cuff until the PPG pulsations
disappear on the display. Release the PUMP key and the cuff will begin to deflate.
Step # 8: When the first pulsation returns, press the FREEZE key. Use the caliper tool to adjust the pressure reading. Press the SAVE key to save the
systolic pressure and the marker will move to obtain a waveform from the next site location.
Step # 9: Continue these steps to measure the remaining sites to complete the exam.
REPORT FORM RESULTS
Step # 1: Review the pressure, ABI values and waveforms.
Step # 2: Press the PRINT key to print the results.
Step # 3: Peel the adhesive backing off the paper and apply to the report form.
Step # 4: Complete the report form by including the patient information.
Step # 5: To save the exam to one of the 10 storage locations, open the OPTIONS menu, select FILE MANAGEMENT and save the current exam as described in
Section 11 of the manual.
TM
Quick Guide
TBI with PPG Pressures and PVR Waveforms
(Single Pressure Per Ankle)
PLEASE READ THE USER'S MANUAL PRIOR TO OPERATING THE VISTA AVS.
SET UP INSTRUCTIONS
Step # 1: Turn on the Vista AVS system by pressing the power button.
Step # 2: Press the ENTER/MENU key to open the OPTIONS menu. Press the number 2 key for SYSTEM SETTINGS. Press the number 6 key to select PPG for
obtaining pressures. Press the ENTER/MENU key again to exit SYSTEM SETTINGS.
Step # 3: Press the ENTER/MENU key to open the OPTIONS menu again. Press the number 1 key for CONFIGURE EXAMINATION. Press the number 3 key to
select the "TBI with PVR Waveform" option.
Step # 4: Wrap a cuff at each arm and ankle to prepare for the exam. Typically, use a 12 cm cuff for the arms and a 10 cm cuff for the ankles.
TBI EXAMINATION INSTRUCTIONS
Step # 1: Start at the right brachial artery site and connect the hose to the cuff. Place the PPG probe on the index finger with the blue side of the probe
against the skin. The patient must remain still to acquire a PPG signal.
Step # 2: Wait several seconds for the waveform to stabilize and press the SCALE key to properly size the waveform on the screen. Once stable, press
the PUMP key to inflate the cuff to approximately 20 mmHg above the pressure where the PPG pulsations disappear. The cuff will begin to deflate
automatically once the pump stops.
Step # 3: Press the FREEZE key when the pulsations return and press the UP or DOWN key to move the caliper tool to the beginning of the first upward
slope. This is the systolic pressure. Press the SAVE key to record it and the protocol marker will move to the next location.
Step # 4: Now, obtain the ankle waveform using PVR. Move the hose to the right ankle and connect it to the cuff.
Step # 5: Press and hold the PUMP key to inflate the cuff to 75 mmHg. Release the PUMP key when the inflation automatically stops. Pressure will deflate
to 65 mmHg for optimum PVR. Wait for the "Cuff Deflating" message (on screen) to disappear.
Step # 6: Once the desired waveform is obtained, press the FREEZE key to hold the waveform. The pressure will automatically deflate pressure from the
cuff. If the waveform is acceptable, press the SAVE key again. Or, use the UP or DOWN key to scroll to the optimum waveform view and press SAVE to
record it. Press the SAVE key again and the marker will then move to the Right Toe.
Step # 7: Move the hose to the digit cuff at the right toe. Apply the PPG probe to the underside of the great toe, opposite the toe nail and
above the digit cuff. Wait several seconds for the waveform to stabilize and press the SCALE key to properly size the waveform on the screen.
Step # 8: Once a valid waveform is viewable on the screen, press and hold the PUMP key until the PPG pulsations disappear. Release the PUMP key
and the cuff will automatically start to deflate.
Step # 9: Press the FREEZE key when the pulsations return and press the UP or DOWN key to move the caliper tool to the beginning of the first
upward slope. This is the systolic pressure. Press the SAVE key to record it and the protocol marker will move to the next location.
Step # 10: Switch the hose to the left ankle cuff and repeat steps 5 through 9. The marker will then move to Left BRA.
Step # 11: Switch the hose to the left brachial cuff and repeat steps 1 through 3. The marker will move to Right BRA at the completion of the exam.
REPORT FORM RESULTS
Step # 1: Review the pressure, TBI values and waveforms.
Step # 2: Press the PRINT key to print the results.
Step # 3: Peel the adhesive backing off the paper and apply to the report form.
Step # 4: Complete the report form by including the patient information.
Step # 5: To save an exam to one of the 10 storage locations, open the OPTIONS menu, select FILE MANAGEMENT and save the current exams
described in Section 11 of the manual.
TM
Quick Guide
Segmental Study with Doppler Pressures
and PVR Waveforms (3 Cuff Method)
PLEASE READ THE USER'S MANUAL PRIOR TO OPERATING THE VISTA AVS.
SET UP INSTRUCTIONS
Step # 1: Press the ENTER/MENU key to open the OPTIONS menu again and press the number 2 key to open the SYSTEM SETTINGS menu. Press the number
6 key to select DOPPLER for obtaining pressures. Press the ENTER/MENU key to exit SYSTEM SETTINGS.
Step # 2: Press the ENTER/MENU key to open the OPTIONS menu and press the number 1 key to configure the exam. Press the number 5 to select the
"Segmental with PVR Waveform" option.
Step # 3: Press the numbers 1 through 5 to toggle through the various arterial sites to select desired sites to measure. Press the number 6 key to choose
between performing the exam "In-Line" down the leg. Press ENTER/MENU when finished.
Step # 4: Wrap a cuff at each site to prepare for the exam. Commonly, a 10 cm cuff is used at the ankle, a 12 cm cuff is used at the calf and a 17 cm-contoured
thigh cuff is used at the thigh.
SEGMENTAL EXAMINATION INSTRUCTIONS
Step # 1: Start at the right brachial artery and connect the hose to the cuff. Apply gel to over the site and use the Doppler probe to listen to the blood flow.
Step # 2: While holding the probe steady, press and hold the PUMP key to about 20 mmHg above the occlusion pressure. Release the PUMP key and the cuff
will automatically begin to deflate.
Step # 3: When the first pulsation returns, press the SAVE key. If you were late pressing SAVE, use the UP or DOWN keys to adjust the pressure reading. Press
the SAVE key to record the systolic pressure and the marker will move to the first leg site.
Step # 4: Move the hose to the next site to be measured and connect it to the cuff.
Step # 5: Press and hold the PUMP key to inflate the cuff to 75 mmHg. Release the PUMP key when the inflation automatically stops. Pressure will deflate to
65 mmHg for optimum PVR. Wait for the "Cuff Deflating" message (on screen) to disappear. If needed, use the SCALE key to optimize the waveform.
Step # 6: Once the desired waveform is obtained, you have two options: press the FREEZE key and use the UP or DOWN key to scroll to the optimum view.
If the waveform view is acceptable, press the SAVE key to record it. Press SAVE again and the marker will move to obtain the site pressure.
Step # 7: Next, obtain the pressure using the Doppler probe. Apply gel to the arterial ankle site and hold the probe steady on the site until you have a good
signal. Press and hold the PUMP key to about 20 mmHg above the occlusion pressure. Release PUMP and the cuff will begin to deflate.
Step # 8: When the first pulsation returns, press the SAVE key. If you were late pressing SAVE, use the UP or DOWN keys to adjust the pressure reading. Press
the SAVE key to record the systolic pressure and the marker will move to the next site.
Step # 9: Continue these steps as described above to measure the remaining sites to complete the segmental exam.
REPORT FORM RESULTS
Step # 1: After completing the segmental exam, review the pressures, index values and waveforms.
Step # 2: Press the PRINT key to print the results and carefully tear the label from the printer.
Step # 3: Peel the adhesive backing off the paper and apply to the report form.
Step # 4: Complete the report form by including the patient information.
Step # 5: To save the exam to one of the 10 storage locations, open the OPTIONS menu, select FILE MANAGEMENT, and save the current exam as described
in Section 11 of the manual.
TM
Quick Guide
Segmental Study with PPG Pressures and
PVR Waveforms (3 Cuff Method)
PLEASE READ THE USER'S MANUAL PRIOR TO OPERATING THE VISTA AVS.
SET UP INSTRUCTIONS
Step # 1: Press the ENTER/MENU key to open the OPTIONS menu again and press the number 2 key to open the SYSTEM SETTINGS menu. Press the
number 6 key to select PPG. Please the ENTER/MENU key to exit SYSTEM SETTINGS.
Step # 2: Press the ENTER/MENU key to open the OPTIONS menu and press the number 1 key to configure the exam. Press the number 5 to select the
"Segmental with PVR Waveform" option.
Step # 3: Press the numbers 1 through 5 to toggle through the various arterial sites to select desired sites to measure. Press the number 6 key to choose
between performing the exam "In-Line" down the leg. Press ENTER/MENU when finished.
Step # 4: Wrap a cuff at each site to prepare for the exam. Commonly, a 10 cm cuff is used at the ankle, a 12 cm cuff is used at the calf and a 17 cm-contoured
thigh cuff is used at the thigh.
Step # 5: Place the PPG probe on the right index finger with the blue side of the probe against the skin. The patient must remain still to acquire a PPG signal.
SEGMENTAL EXAMINATION INSTRUCTIONS
Step # 1: Start at the right brachial artery and connect the hose to the cuff. Wait a few seconds for the waveform to stabilize after applying the probe. If
needed, use the SCALE key to optimize the waveform.
Step # 2: Once the waveform is stable, press the PUMP key to inflate the cuff until the PPG pulsations disappear. Release the PUMP key and the cuff will begin
to deflate.
Step # 3: When the pulsations return, press the FREEZE key. Use the caliper by pressing the UP or DOWN key to move the caliper to the beginning of the
first upward slope at the start of the pulsation. This is the systolic pressure. Press the SAVE key to save the systolic pressure and the marker will move to the
first leg site.
Step # 4: Move the PPG probe from the finger to the great toe. Move the hose to the cuff at the next site to be measured.
Step # 5: Press and hold the PUMP key to inflate the cuff to 75 mmHg. Release the PUMP key when the inflation automatically stops. Pressure will deflate to
65 mmHg for optimum PVR. Wait for the "Cuff Deflating" message (on screen) to disappear. If needed, use the SCALE key to optimize the waveform.
Step # 6: Once the desired waveform is obtained, you have two options: press the FREEZE key and use the UP or DOWN key to scroll to the optimum view or,
if the waveform view is acceptable, press the SAVE key to record it. Press SAVE again and the marker will move to obtain the pressure.
Step # 6: Next, obtain the pressure at the next site using the PPG probe. Once a stable waveform is obtained, press the PUMP key to inflate the cuff to about
20 mmHg above the occlusion pressure and release the PUMP key. The cuff will begin to deflate automatically once the pump stops.
Step # 7: After the pulsations reappear, press the FREEZE key and use the UP or DOWN key to move the caliper tool to the first upward slope. Press the SAVE
key to record the systolic pressure and the marker will move to the next arterial site.
Step # 8: Continue these steps for the remaining sites to complete the segmental exam.
REPORT FORM RESULTS
Step # 1: After completing the segmental exam, review the pressures, index values and waveforms.
Step # 2: Press the PRINT key to print the results and carefully tear the label from the printer.
Step # 3: Peel the adhesive backing off the paper and apply to the report form.
Step # 4: Complete the report form by including the patient information.
Step # 5: To save the exam to one of the 10 storage locations, open the OPTIONS menu, select FILE MANAGEMENT, and save the current exam as described
in Section 11 of the manual.
TM
Quick Guide
Seated ABI with Doppler Pressures and
PVR Waveform (Single Pressure Per Ankle)
PLEASE READ THE USER'S MANUAL PRIOR TO OPERATING THE VISTA AVS.
SET UP INSTRUCTIONS
Step # 1: Turn on the Vista AVS system by pressing the power button.
Step # 2: The patient must sit erect in a chair so that their knees are at a 90-degree angle and feet rest flat on the floor or on an elevated platform - feet should
not be dangling. Wrap the cuffs around the arms and ankles. Typically, use a 12 cm cuff for the arms and a 10 cm cuff for the ankles.
Step # 3: Using a tape measure or a yardstick, measure the vertical distance in centimeters between the middle of the arm cuff to the floor and the middle of
the ankle cuff to the floor. Next, subtract the ankle distance from the arm distance to acquire the vertical distance between cuffs.
Step # 4: Press the ENTER/MENU key to open the OPTIONS menu and press the number 1 key to configure the exam. Press the number 1 key to select the
"ABI with PVR Waveform" option.
Step # 5: Press the ENTER/MENU key again to open the OPTIONS menu and press the number 2 key for the SYSTEM SETTINGS menu. Press the number 5 key
to turn the "Dual Ankle Pressure" setting to OFF. Press the number 6 key to use the Doppler probe to obtain pressures and press the ENTER/MENU key to exit.
Step # 6: Press the ENTER/MENU key again to open the OPTIONS menu and press the number 7 key for the hydrostatic correction. Enter the vertical distance
between cuffs in centimeters and press the SAVE key when finished.
SEATED ABI EXAM INSTRUCTIONS
Step # 1: Start at the right brachial artery site and connect the hose to the cuff. Apply gel to the site and use the Doppler probe to listen to the blood flow.
Step # 2: While holding the probe steady on the artery site, press and hold the PUMP key to about 20 mmHg above the occlusion pressure. Release PUMP and
the cuff will automatically begin to deflate.
Step # 3: Press the SAVE key when you hear the pulsation return. If you were late pressing SAVE, adjust the pressure reading by using the UP or DOWN key.
Press the SAVE key again to record the systolic pressure and the marker will move to the next protocol location.
Step # 4: Now, obtain the ankle waveform using PVR. Move the hose to the ankle site and connect it to the cuff.
Step # 5: Press the PUMP key to inflate the cuff to 75 mmHg and release with the inflation automatically stops. Pressure will deflate to 65 mmHg for optimum
PVR. Wait for the "cuff deflating" message on the display to disappear. If needed, use the SCALE key to optimize the waveform.
Step # 6: After the waveform stabilizes, press the FREEZE key. If the waveform is acceptable, press SAVE to record it. Or, use the UP or DOWN key to scroll to
the optimum waveform, then press the SAVE key to record it. Press SAVE again to move the marker to the next protocol location.
Step # 7: Next, obtain the ankle pressure by applying gel to either the posterior tibial (PT) artery or the dorsalis pedis (DP) artery and using the Doppler probe
to listen to the blood flow.
Step # 8: While holding the probe steady on the artery site, press and hold the PUMP key to about 20 mmHg above the occlusion pressure. Release PUMP and
the cuff will automatically begin to deflate.
Step # 9: Press the SAVE key when you hear the pulsation return. If you were late pressing SAVE, adjust the pressure reading by using the UP or DOWN key.
Press the SAVE key again to record the systolic pressure and the marker will move to the next protocol location.
Step # 9: Continue these steps to measure the remaining sites to complete the exam. The Vista AVS makes the hydrostatic correction based on the vertical
distance entered prior to obtaining pressures. The corrected values are displayed.
REPORT FORM RESULTS
Step # 1: Review the pressure, corrected ABI values and waveforms.
Step # 2: Press the PRINT key to print the results.
Step # 3: Peel the adhesive backing off the paper and apply to the report form.
Step # 4: Complete the report form by including the patient information.
Step # 5: To save the exam to one of the 10 storage locations, open the OPTIONS menu, select FILE MANAGEMENT and save the current exam as described in
Section 11 of the manual.
TM
Quick Guide
File Management - Save, Recall, Delete
and Download Data
PLEASE READ THE USER'S MANUAL PRIOR TO OPERATING THE VISTA AVS.
SAVING INSTRUCTIONS
Step # 1: Perform an exam in any of the automated modes as described in the previous Quick Guides. Exams can be stored in either numeric or alpha
characters. To change the filename configuration, press the ENTER/MENU key to open the OPTIONS menu and press the number 4 key to select NAME or
NUMBER. Press ENTER/MENU to exit SYSTEM SETTINGS.
Step # 2: Press the ENTER/MENU key again to open the OPTIONS screen. Press the number 3 key for "File Management". Press the number 1 key to select
"Save Current Exam to File". There are 10 storage locations that retain data if power is lost.
Step # 3: Press the number of a file location that is open. When the area is highlighted, enter the patient name or ID in the location using the numeric keypad.
Use the DOWN key to backspace and the UP key to toggle between letters on the same key. Press the SAVE key to complete the storage process.
RECALLING A SAVED EXAM INSTRUCTIONS
Step # 1: Press the ENTER/MENU key to open the OPTIONS menu. Press the number 3 key for "File Management". Press the number 3 key to "Recall Exam
Step # 2: Press the number of a file location to recall. Note: Recalling a file will overwrite the current examination. Save current data prior to recall if desired.
RESTORING DATA INSTRUCTIONS
Step # 1: Press the ENTER/MENU key to open the OPTIONS menu.
Step # 2: Press the number 3 key for "File Management" and press the number 3 key again for "Recall Exam from File".
Step # 3: Press the UP key to highlight "Restore Data" and press ENTER/MENU to open the exam.
DELETING A SAVED EXAM INSTRUCTIONS
Step # 1: Press the ENTER/MENU key to open the OPTIONS menu. Press the number 3 key for "File Management". Press the number 2 key for "Delete Exam
from File".
Step # 2: Press the number of a file location to delete. Press that number key again to confirm file selection.
Step # 3: Alternatively, select DELETE ALL to clear the entire stored memory. Press ENTER/MENU to confirm or any other key to cancel.
NEW EXAM INSTRUCTIONS
Step # 1: Press the ENTER/MENU key for the OPTIONS menu. Press the number 6 key to clear all data and start a new exam. You may enter a filename at this
time using the keypad (see "Saving Instructions" above). Alternatively, press the number 5 key to start a new exam on a current patient in which the brachial
pressures can be used again.
DOWNLOADING AN EXAM - AVS REPORT INSTRUCTIONS
NOTE: File to be downloaded was previously saved.
Step # 1: Perform an exam in any of the automated modes as described in the previous Quick Guides or recall a previously saved exam.
Step # 2: Set up the AVS Report software by double-clicking on the application icon on the installed PC. Consult the user manual if the AVS Report software
has not already been installed on the PC.
Step # 3: Connect the USB cable from the PC to the Vista AVS.
Step # 4: Press the ENTER/MENU key to open the OPTIONS menu. Press the number 3 key for "File Management". Press the number 4 key for "Download Exam
from File".
Step # 5: Press the number of a file location to recall and download. Note: Recalling a file will overwrite the current examination. Save current data prior to
recalling if desired. To download all files at once, use the UP or DOWN key to move the marker to "DOWNLOAD ALL" and press ENTER/MENU.
Step # 6: Data will be transferred to the AVS Report software. Consult the Vista AVS User's Manual to save, recall or export and AVS Report file on the PC.
MKT0124E