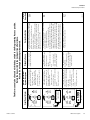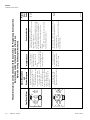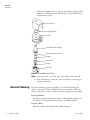
1
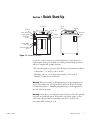
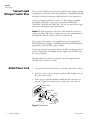
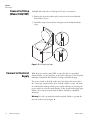
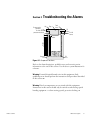
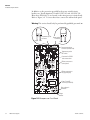
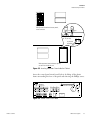
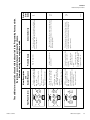
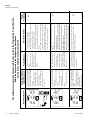
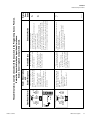
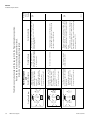
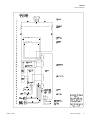
User Manual
CRYO Plus 1, 2, 3, and 4
Model 7400 Series Liquid Nitrogen Storage System
Operating and Maintenance Manual 7007400 Rev. 21
Visit us online to register your warranty
www.thermoscientific.com/labwarranty
Preface
MANUAL NO. 7007400
21
40080/FR-2782
9/25/15
Added RJ-11 cable to Parts List on page 6-1
ccs
20
40080/40131
4/2/15
Added lid closure warnings, gas spring note and RJ-11 to parts list
ccs
19
30520/SI-12108
3/12/14
Added T/C probe replacement kit numbers to pg 6-2
ccs
18
30510/FR-2563
10/24/13
Updated spring part numbers and added lid magnet on Parts List.
ccs
17
30016/FR-2488
5/29/13
Corrected switch position on pg 3-4
ccs
16
29194/FR-2440
1/23/13
Updated schematics to current production, no TS outlet, misc.
ccs
15
28511/FR-2371
7/26/12
Corrected elec schematics (RS-232 connector wiring), RS-232 & remote alarm connectors
- Section 1, opt. printer kit - pg 2-6
ccs
14
26806/SI-10941
9/22/11
Updated schematics with level sensors, various other clarifications
ccs
13
27339
7/5/11
Revised pgs 1-3 through 1-6, 2-1, 5-1 and removed accessories from Section 6
ccs
12
25696
10/6/10
Added S1 settings to pg 3-4 per D. Ponder
ccs
11
25763/FR-2099
10/29/09
Added vent port warnings and thawing notes (pgs 2-2 & 4-3)
ccs
Thermo Scientific
7400 Series Cryoplus
i
Preface
CAUTION
Contains Parts and Assemblies
Susceptible to Damage by
Electrostatic Discharge (ESD)
Important Read this instruction manual. Failure to read, understand and follow the instructions in this manual
may result in damage to the unit, injury to operating personnel, and poor equipment performance. s
Caution All internal adjustments and maintenance must be performed by qualified service personnel. s
Material in this manual is for information purposes only. The contents and the product it describes are subject
to change without notice. Thermo Fisher Scientific makes no representations or warranties with respect to this
manual. In no event shall Thermo be held liable for any damages, direct or incidental, arising out of or related to
the use of this manual.
Note This equipment is Installation (Overvoltage) Category II, Pollution Degree 2. s
©1998 Thermo Fisher Scientific. All rights reserved.
ii
7400 Series Cryoplus
Thermo Scientific
Preface
Important operating and/or maintenance instructions. Read the accompanying text carefully.
Potential electrical hazards. Only qualified persons should perform procedures associated with this
symbol.
Extreme temperature hazards. Only qualified persons should perform procedures associated with this
symbol.
Equipment being maintained or serviced must be turned off and locked off to prevent possible injury.
Potential biological hazards. Proper protective equipment and procedures must be used.
Marking of electrical and electronic equipment, which applies to electrical and electronic equipment
falling under the Directive 2002/96/EC (WEEE) and the equipment that has been put on the market
after 13 August 2005.
This product is required to comply with the European Union’s Waste Electrical & Electronic
Equipment (WEEE) Directive 2002/96/EC. It is marked with the WEEE symbol. Thermo Fisher
Scientific has contracted with one or more recycling/disposal companies in each EU Member State
European Country, and this product should be disposed of or recycled through them. Further
information on Thermo’s compliance with this directive, the recyclers in your country and
information on Thermo Scientific products will be available at www.thermofisher.com.
Warning Whenever working with liquid nitrogen storage equipment in a closed environment, the use
of personal O2 detection equipment is strongly recommended. s
4
Always use the proper protective equipment (clothing, gloves, goggles, etc.)
4 Always dissipate extreme cold or heat and wear protective clothing.
4 Always follow good hygiene practices.
4 Each individual is responsible for his or her own safety.
Thermo Scientific
7400 Series Cryoplus
iii
Preface
Do You Need Information or Assistance on
Thermo Scientific Products?
If you do, please contact us 8:00 a.m. to 6:00 p.m. (Eastern Time) at:
1-740-373-4763
1-800-438-4851
1-877-213-8051
http://www.thermoscientific.com
[email protected]
www.unitylabservices.com
Direct
Toll Free, U.S. and Canada
FAX
Internet Worldwide Web Home Page
Tech Support Email Address
Certified Service Web Page
Our Sales Support staff can provide information on pricing and give you quotations. We can
take your order and provide delivery information on major equipment items or make
arrangements to have your local sales representative contact you. Our products are listed on the
Internet and we can be contacted through our Internet home page.
Our Service Support staff can supply technical information about proper setup, operation or
troubleshooting of your equipment. We can fill your needs for spare or replacement parts or
provide you with on-site service. We can also provide you with a quotation on our Extended
Warranty for your Thermo Scientific products.
Whatever Thermo Scientific products you need or use, we will be happy to discuss your
applications. If you are experiencing technical problems, working together, we will help you
locate the problem and, chances are, correct it yourself...over the telephone without a service
call.
When more extensive service is necessary, we will assist you with direct factory trained
technicians or a qualified service organization for on-the-spot repair. If your service need is
covered by the warranty, we will arrange for the unit to be repaired at our expense and to your
satisfaction.
Regardless of your needs, our professional telephone technicians are available to assist you
Monday through Friday from 8:00 a.m. to 6:00 p.m. Eastern Time. Please contact us by
telephone or fax. If you wish to write, our mailing address is:
Thermo Fisher Scientific
401 Millcreek Road, Box 649
Marietta, OH 45750
International customers, please contact your local Thermo Scientific distributor.
iv
7400 Series Cryoplus
Thermo Scientific
Table of Contents
Thermo Scientific
Section 1
Quick Start-Up . . . . . . . . . . . . . . . . . . . . . . . . . . . . . . . . . . . . . . . . . . . . . . .1-1
Connect Liquid Nitrogen Transfer Hose . . . . . . . . . . . . . . . . . . . . . .1-2
Attach Power Cord . . . . . . . . . . . . . . . . . . . . . . . . . . . . . . . . . . . . . .1-2
Connect Lid Strap (Model 7406/7407) . . . . . . . . . . . . . . . . . . . . . . .1-4
Connect to Electrical Supply . . . . . . . . . . . . . . . . . . . . . . . . . . . . . . .1-4
Install Optional Platform Riser . . . . . . . . . . . . . . . . . . . . . . . . . . . . .1-5
Install Temperature Sleeve . . . . . . . . . . . . . . . . . . . . . . . . . . . . . . . . .1-5
Fill Unit . . . . . . . . . . . . . . . . . . . . . . . . . . . . . . . . . . . . . . . . . . . . . . .1-5
Remote Alarm Connector . . . . . . . . . . . . . . . . . . . . . . . . . . . . . . . . .1-6
RS-232 Interface Connector . . . . . . . . . . . . . . . . . . . . . . . . . . . . . . .1-7
Installation Verification . . . . . . . . . . . . . . . . . . . . . . . . . . . . . . . . . . .1-7
Section 2
Operation . . . . . . . . . . . . . . . . . . . . . . . . . . . . . . . . . . . . . . . . . . . . . . . . . . . .2-1
Bar Graph . . . . . . . . . . . . . . . . . . . . . . . . . . . . . . . . . . . . . . . . . . . . .2-3
Program Controller . . . . . . . . . . . . . . . . . . . . . . . . . . . . . . . . . . . . . .2-3
Change High Level (Stop Filling) Setpoint . . . . . . . . . . . . . . . . . . .2-4
Change Low Level (Start Filling) Setpoint . . . . . . . . . . . . . . . . . . .2-4
Set Microprocessor Internal Clock . . . . . . . . . . . . . . . . . . . . . . . . .2-5
Change High Temperature Alarm Setpoint . . . . . . . . . . . . . . . . . .2-5
The Optional Control Printer Kit . . . . . . . . . . . . . . . . . . . . . . . . . . .2-6
Section 3
Troubleshooting the Alarms . . . . . . . . . . . . . . . . . . . . . . . . . . . . . . . . . . .3-1
7400 Series Cryoplus
v
Table of Contents
vi
7400 Series Cryoplus
Section 4
Maintenance . . . . . . . . . . . . . . . . . . . . . . . . . . . . . . . . . . . . . . . . . . . . . . . .4-1
General Cleaning . . . . . . . . . . . . . . . . . . . . . . . . . . . . . . . . . . . . . . . .4-2
Defrosting the Vent Port . . . . . . . . . . . . . . . . . . . . . . . . . . . . . . . . . .4-3
Defrosting the Storage Tank . . . . . . . . . . . . . . . . . . . . . . . . . . . . . . .4-3
Section 5
Specifications . . . . . . . . . . . . . . . . . . . . . . . . . . . . . . . . . . . . . . . . . . . . . . .5-1
Section 6
Parts List . . . . . . . . . . . . . . . . . . . . . . . . . . . . . . . . . . . . . . . . . . . . . . . . . . . .6-1
Section 7
Electrical Schematics . . . . . . . . . . . . . . . . . . . . . . . . . . . . . . . . . . . . . . . .7-1
Section 8
Warranty Information . . . . . . . . . . . . . . . . . . . . . . . . . . . . . . . . . . . . . . . . .8-1
Appendix A
Handling Liquid Nitrogen . . . . . . . . . . . . . . . . . . . . . . . . . . . . . . . . . . . . . .9-1
Introduction . . . . . . . . . . . . . . . . . . . . . . . . . . . . . . . . . . . . . . . . . .9-1
Thermo Scientific
Section 1
Quick Start-Up
Tank Vent
Lid Stop
Control
Panel
Lid Lock
Bypass Vent
Power Switch\
Circuit Breaker
Lid Stop
Power Cord
Socket
Bar Graph
Scale
LN2 Connector
Remote Alarm
Connector
RS-232 Connector
(RJ11)
Figure 1-1. Component Locations
Locate the storage container in a well ventilated area of the laboratory,
with adequate work space available for loading and unloading specimens.
Allow for adequate lid opening clearance.
This unit is designed to operate in the following environmental conditions:
Temperature: 5°C (41°F) to 40°C (104°F)
Humidity: 80% at <31°C, decreasing linearly to 50% at 40°C.
Altitude: < 2,000 meters (6,650 feet)
Warning Whenever working with liquid nitrogen storage equipment in a
closed environment, the use of personal O2 detection devices is strongly
recommended. Refer to “Handling Liquid Nitrogen” in the appendix at
the end of this manual. s
Warning Ensure there are no physical objects that can contact the open lid
and cause an accidental closure. If the unit is not placed against a solid
wall, verify a physical barrier is installed at the base to prevent unit
movement while working in it. s
Thermo Scientific
7400 Series Cryoplus
1-1
Section 1
Quick Start-Up
Connect Liquid
Nitrogen Transfer Hose
The container should be located near the liquid nitrogen supply, allowing
enough space for nitrogen source tank replacement. Arrangements should
be made to collect the condensate, which will form on the transfer hose.
A four foot nitrogen transfer hose with a 1/2" flare fittings is supplied
with Model 7400/7401. A six foot hose is standard with Models
7402/7403, 7404/7405 and 7406/7407. The use of a transfer hose longer
than six feet may degrade system performance.
Caution The flair connection on the ends of the transfer hose does not
require any sealant. Pipe dope or sealing tape may cause contamination of
the liquid fill solenoid, or leaks at the hose connections. s
The storage system requires a user supplied low pressure regulated (22
PSIG) liquid nitrogen supply. Anything higher than 22 PSI will degrade
performance of the CryoPlus storage container.
Connect the transfer hose packed with the CryoPlus unit between the low
pressure, liquid outlet of the liquid nitrogen supply tank (22 PSIG) and
the storage container.
After the transfer hose has been connected, open the supply tank valve
and check the connections for leaks.
Attach Power Cord
1. Loosen screw located on the power cord retainer. Spread the retainer.
2. Insert the power cord into the power outlet module. Tighten screw on
the power cord retainer.
3. Fit the power cord/outlet module assembly into the connection on
the unit. Tighten the module screws to secure the cord to the unit.
Cord connection
on unit
Power outlet
module
Module
screw
Retainer screw
Power cord
Figure 1-2. Power Cord
1-2
7400 Series Cryoplus
Thermo Scientific
inches (centimeters)
Select
Scale
2 (5.1)
3 (7.6)
4 (10.1)
5 (12.7)
6 (15.2)
7 (17.7)
2 inch to 7 inch
low (vapor) scale
Level
indicator
Choose high (liquid)
or low (vapor)
phase scale
(12.7) 5
(25.4) 10
(38.1) 15
(50.8) 20
( 63.5) 25
1 inch to 25 inch
high (liquid) scale
Alarm indicator
Bypass Sensor
fault indicator
Level Sensor
fault indicator
Bypass
Valve
Bypass
Sensor
Open
Valve
LN 2
Source
Platform Riser
(optional)
Platform
Storage
Low
Level
High
Level
High
Temp
Manual
Fill
Fill Valve
Open
No more than 6 ft
in distance
Vent - Do not block!
Low LN2 Level
VAPOR STATE
High LN2 Level
Control Panel
Programming access position
of key switch
Lock
Lock position
of key switch
No sealer
Open valve after both ends of the
transfer hose are connected
Down arrow Low Level Manual Fill
button
button
Enter
No sealer
o
Temperature C
Open Valve
Bypass Valve
fault indicator
fault indicator
Silence
button
Silence
Fill
Valve
Level
Sensor
High Temp
Alarm
Display
Up arrow button
indicator
Fill Valve
Fill Valve Open
Enter High Level
LN2 Source
fault indicator
indicator light
button
button
fault indicator
Supply 22 PSI
Liquid side
Vent - Do not
connect or open
Section 1
Quick Start-Up
Connect Lid Strap
(Model 7406/7407)
Included with each unit is a lid strap for the user’s convenience.
1. Remove the protective white nylon screws from the areas indicated.
Discard these screws.
2. Install the strap as shown below, using the screws included with the
strap.
Figure 1-3. Lid Strap Installation
Connect to Electrical
Supply
With the power switch turned OFF, connect the unit to a grounded
electrical outlet. See the data plate on the back of the unit, or the electrical
schematics included in this manual, for voltage and full load amps.
The power switch on the back of the unit is the mains disconnect and is
also a reset-type circuit breaker. If an overload condition occurs, the builtin circuit breaker will trip and the power switch will turn off. Turning the
power switch on resets the circuit breaker. If the circuit breaker trips again
within a short time period, the unit should be checked by a qualified
electrician.
Warning Use only a grounded electrical receptacle. Failure to ground the
unit can result in serious injury. s
1-4
7400 Series Cryoplus
Thermo Scientific
Section 1
Quick Start-Up
Install Optional
Platform Riser
Depending on the inventory control system chosen, install the platform
riser (if applicable) as shown in Figure 1-4.
Note In the liquid phase, the standard platform remains in the bottom of
the tank. s
Lid
Plug
Tank
Vent
Level
Tube
Lid
Plug
Tank
Vent
Fill
Tube
Fill
Tube
Tank
Inventory
Racks
w/boxes
Inventory
Racks
w/boxes
Platform
Platform Riser
LN2
Level
LN2
Level
Vapor Phase
Storage
Platform
Liquid Phase
Storage
Figure 1-4. Platform Riser
Install Temperature
Sleeve
A Temperature Sleeve is designed to assist the temperature gradient within
the unit so that in a normal vapor phase setting of 3-5 inches of liquid, the
air temperature encompassed within the sleeve remains below -130°C. The
sleeve is standard on all CryoPlus units and is installed when shipped from
the factory.
When properly installed, the ends of the sleeve are aligned with the
temperature probe at the rear of the tank, and the square holes in the
bottom of the sleeve are aligned with the fill and pressure ports.
Caution It is imperative that the positioning of the sleeve not block either
the fill or liquid level tube orifices located at the bottom rear of the tank.
Should blockage occur, it will cause filling and liquid level indicator
problems. s
Fill Unit
When shipped from the factory, the liquid nitrogen level settings of all
CryoPlus units are set at Vapor Phase settings of five inches high limit,
three inches low limit (factory defaults). It is not recommended that these
settings be changed until the unit has been filled for the first time and
allowed to stabilize.
Caution The lid must remain open throughout the initial filling of the
storage container. s
Thermo Scientific
7400 Series Cryoplus
1-5
Section 1
Quick Start-Up
Fill (continued)
When electric power and LN2 have been connected, open the lid and turn
on the power switch to begin filling the unit. Because the unit must go
from ambient room temperature to -196°C, considerable boiling of the
liquid nitrogen takes place, turning into super-cooled nitrogen gas which
flows over the side of the open chamber. As this occurs, frost becomes
visible around the top of the unit. This is normal during the initial fill
with the lid open and disappears once the unit has stabilized.
As the unit fills, the bar graph on the front of the cabinet monitors the
progress by displaying the liquid level (green lights), the high and low limit
set points (flashing orange). Refer to Section 2. The storage container fills
until the liquid Nitrogen reaches the high level set point and the 5-inch
flashing orange LED changes to flashing red. The LN2 storage container is
now in full automatic operation.
After the initial fill is complete, close the lid and allow the unit to stabilize
for a minimum of 8 hours, before changing the high or low level setpoints
or adding inventory.
Caution Some popping or cracking noises may be heard after the unit is
initially filled and the lid is opened and closed the first few times. This is
normal and quickly disappears. s
Note If the lid is opened frequently, condensation can occur on the vent
port, causing icing of the port. See the maintenance section for defrost
information. s
Remote Alarm
Connector
The CryoPlus control system provides remote alarm contacts, wired to an
RJ-11 connector on the back of the cabinet. Figure 1-4 identifies the pin
designations.
Alarm Contacts
30V max / 1A max
RS-232
Interface
(NO)
yellow wire
(COM)
green wire
(NC)
black wire
(NO)
red wire
Alarm Contacts
Junction Box
(2) COM
(3) N.O.
(2) SIG. GRD
(4) N.C.
(4) RXD
(3) TXD
Figure 1-4. RS232 and Remote Alarm
Connector Pin Designations
1-6
7400 Series Cryoplus
Stock #190392
RJ-11 to screw
terminal converter
All outputs shown
in alarm state
Figure 1-5. Optional Alarm Contacts Junction
Box Wiring
Thermo Scientific
Section 1
Quick Start-Up
RS-232 Interface
Connector
The CryoPlus storage system is equipped with an RS-232 Serial
Communication Interface for the remote transmission of data. An RJ-11
telephone style connector is located on the rear of the cabinet. Figure 1-4
identifies the pin designations.
The RS-232 provides information to a serial printer or terminal via the
following protocol:
9600 Baud
1 Stop Bit
No Parity
8 Data Bits
Installation
Verification
The following procedures test key elements of the CryoPlus Freezer system
and verify the unit's installation. These tests can be performed at the
operator's discretion. If any of these tests fail, contact the Technical Service
Department or your local Thermo sales representative.
LN2 Supply
The source tank should indicate that it is full and the pressure to the
Cryo unit regulated at 22 PSIG. Check all connections.
Temperature Sleeve
When installed, the ends of the sleeve must align with the temperature
probe at the back of the tank and the pressure and fill ports are visible
through the square holes at the bottom of the sleeve.
Power Switch
Turn the unit on with the power switch located on the back of the unit.
Under normal conditions, all LEDs on the control panel and bar graph,
with the exception of the alarm LEDs illuminates for approximately 2-3
seconds. The power switch is the main disconnect for the system.
Keypad
Press each button on the control panel, listening for a "beep" response.
Control Panel Key Switch
Turn the key switch to the Programming Access position (.). Control
panel temperature display indicates alarm setpoint temperature. Turn
the key to Lock position and the display shows actual chamber temperature.
Thermo Scientific
7400 Series Cryoplus
1-7
Section 1
Quick Start-Up
Installation
Verification (cont.)
LED Test
Turn the unit off. Turn the key switch to the Programming Access position. Turn the unit on while pressing and holding the Low Level button
for four seconds. Press Manual Fill to begin the test. When all LEDs
have cycled, turn the unit off to reset the system.
Remote Alarm Contacts
With the contacts wired to a remote alarm, turn the unit on, wait a few
seconds, then turn the unit off. The alarm should activate immediately.
Manual Fill
Turn the key switch to the Programming Access position. Press the
Manual Fill but-ton. The fill indicator will light and the unit will begin
filling the cham-ber. If the LN2 level is more than one inch below the
high level setpoint, the liquid nitrogen will continue to flow after
Manual Fill is released until the high level setpoint is reached. To stop
filling before high level, turn the unit off, then on. If LN2 is already in
the tank and the level is less than one inch below the high level setpoint,
filling will stop when Manual Fill is released.
Programming Access Test
With the unit turned on, turn the key to the Programming Access position. The control panel display shows the high temperature alarm setpoint.
Press High Level, then the up or down arrow. The setpoint moves
accordingly.
Press Low Level, then the up or down arrow. The setpoint moves
accordingly. Return the key to Lock. The control panel display shows
thermocouple temperature and bar graph shows new high and low level
setpoints.
Note The unit returns to factory default settings unless setpoints were
saved in above tests by pressing Enter. s
Dip Level Test
This test compares the liquid level shown on the bar graph with the
actual level in the tank, using the ruler supplied with the unit. With the
tank filled and stable, lower the ruler along the edge of the tank until it
is at the bottom. (Take subsequent measurements at this same location.)
When the LN2 stops boiling, pull out the ruler. The actual liquid level
will be approximately one inch lower than the frost line on the ruler.
Compare this with the level shown on the bar graph. Measuring tolerance for the low scale (2" to 7") is ±1/2 inch. Measuring tolerance for
the high scale (1" to 25") is ±1 inch.
Caution Some shrinkage of the ruler may occur, depending on the level of
liquid nitrogen in the tank. s
1-8
7400 Series Cryoplus
Thermo Scientific
Section 2
Operation
High Temp
Alarm
Display
Up arrow button
indicator
Fill Valve
Fill Valve Open
Enter High Level
LN2 Source
fault indicator
indicator light
button
button
fault indicator
Level Sensor
fault indicator
Bypass Sensor
fault indicator
High
Temp
Level
Sensor
Fill
Valve
LN 2
Source
Bypass
Sensor
Bypass
Valve
Open
Valve
Enter
Lock position
of key switch
Lock
Fill Valve
Open
High
Level
o
Temperature C
Low
Level
Silence
Open Valve
Bypass Valve
fault indicator
fault indicator
Silence
button
Manual
Fill
Down arrow Low Level Manual Fill
button
button
Programming access position
of key switch
Figure 2-1. Control Panel Elements
Alarm indicator
All functions of this CryoPlus
storage unit are controlled by a
programmable microprocessor.
Commands to the control
system are given using the
control panel on the cabinet
lid (Figure 2-1). A multicolored bar graph on the front
of the cabinet shows the status
of the system, indicating the
liquid level inside the chamber,
and the high level (stop fill)
and low level (start fill) points.
See Figure 2-2.
1 inch to 25 inch
high (liquid) scale
( 63.5) 25
7 (17.7)
(50.8) 20
6 (15.2)
5 (12.7)
(38.1) 15
4 (10.1)
(25.4) 10
3 (7.6)
(12.7) 5
2 (5.1)
Warning Do not use the unit
as a work surface. The lid
should be closed except during
loading and unloading. s
Choose high (liquid)
or low (vapor)
phase scale
Select
Scale
2 inch to 7 inch
low (vapor) scale
inches (centimeters)
Figure 2-2. Level Indicators and Setpoints
Thermo Scientific
7400 Series Cryoplus
2-1
Section 2
Operation
The elements on the left side of the control panel illuminate when fault
conditions occur, providing information about the alarm state. Refer to
Section 3 of this manual.
A three element alarm bar illuminates during an alarm condition to
visually alert the operator. The Silence button is used to silence the audible
alarm. Refer to the alarm descriptions and corrective actions in Section 3
of this manual.
Other elements of the control panel are:
2-2
7400 Series Cryoplus
•
A three digit display, showing the thermocouple temperature when the
keyswitch is in the Lock position. The thermocouple junction is
located 4½ to 5½ inches below the lid on Models 7400 through 7405,
and 5½ to 6½ inches below the lid on Models 7406 through 7407.
When the key is in the Programming Access (.) position, the display
shows the High Temperature Alarm set point.
•
Enter button, used to send programming changes to the
microprocessor.
•
Up and down arrows that change the high and low level settings when
making programming changes, are also used to change the high
temperature alarm setpoints.
•
High Level button, changing the level at which the system stops filling.
•
Low Level button, pressed to change the level at which the system
starts filling.
•
High Temp button, changing the temperature at which the high
temperature alarm activates.
•
Manual Fill button, pressed to manually fill the tank. The level must
be at least 1-1/4 inches below the high level setpoint to start a manual
fill.
•
Fill Valve Open light, indicating the fill valve is open.
•
Key switch, used to allow program changes when the key is in the (.)
Programming Access position and to protect the system from
tampering or accidental button presses when the key is in the Lock
position.
Thermo Scientific
Section 2
Operation
Bar Graph
Located on the front of the CryoPlus cabinet, the tri-color, 24 light bar
graph displays the liquid level inside the chamber, and (start fill) low level
and (stop fill) high level setpoints (Figure 2-2).
A Scale Select button at the base of the bar graph toggles the scale between
the high (liquid phase) and low (vapor phase) scales. Refer to Figure 2-2.
Numbers in parenthesis are the metric equivalents.
The left side scale is for settings from 1-inch to 25-inches in 1 inch
increments.
The right side scale is for settings from 2-inches to 7-inches in 1/4"
increments (vapor scale). The three light bars at the top of the level panel
are visible alarm lights that coincide with the alarms indicated on the top
control panel on the lid.
The three colors of the bar graph (Figure 2-3) are:
Orange (steady) indicates the remaining
space above the high level setpoint.
orange
Orange (flashing): Under normal conditions,
the flashing upper LED is the high level
high level
setpoint
(stop fill) setpoint, and the flashing lower
LED is the low level (start fill) setpoint.
Green indicates the actual liquid Nitrogen
level.
Red (steady) indicates the amount of space
below or above setpoint from the actual
liquid level.
Red (flashing) indicates that the liquid level
is above or below the level set points. A
possible alarm condition is pending.
flashing
red
green
low level
setpoint
flashing
orange
green
Figure 2-3. Bar Graph Colors
Single Red (flashing) after a fill operation indicates that the liquid level is
at the high level setpoint. This is not an alarm condition.
Program Controller
Thermo Scientific
Caution The Key Switch must be in the Programming Access (.) position
to program the controller or to access any Touch Pad function. The
Controller will automatically return to the lock position, even though the
key is in the Access (.) Position, if no entry is made on the key pad within
four (4) minutes. On the high scale (left side, 2"- 25"), the high and low
level setpoints must be at least 3" apart. On the low scale (right side, 1.5"7.25"), the high and low level setpoints must be at least 1.25" apart. s
7400 Series Cryoplus
2-3
Section 2
Operation
Change High Level
(Stop Filling) Setpoint
Refer to Figures 2-1 and 2-2.
1. Turn the key switch to the Programming Access position (.) and verify
that the desired scale is selected on the Bar Graph.
2. If the yellow Fill Valve Open indicator is lit, the system is in Fill
Mode.
3. Press High Level.
4. Press the up arrow to raise the high level setpoint. A flashing orange
LED will begin to move upward. Release the up arrow when it reaches
the desired level on the bar graph. If lowering the high level (stop
filling) setpoint, press the down arrow. The flashing orange LED will
begin to move downward.
5. Release the down arrow when the stop filling (high level) setpoint is
reached.
6. Press Enter to store the new setting in the microprocessor memory.
Return the key switch to the Lock position.
Change Low Level
(Start Filling) Setpoint
Refer to Figures 2-1 and 2-2.
1. Turn the key switch to the Programming Access position (.) and verify
that the Bar Graph is set to the desired scale.
2. If the yellow Fill Valve Open indicator is lit, the system is in the fill
mode.
3. Press Low Level.
4. Press the up arrow to raise the low level (start filling) setpoint. A
flashing orange LED will begin to move upward. Release the up arrow
when it reaches the desired level on the bar graph.
5. If lowering the low level (start filling) setpoint, press the Down Arrow.
The flashing orange LED will begin to move downward. Release the
Down Arrow when the low level (start filling) setpoint is reached.
6. Press Enter to store the new setting in the microprocessor memory.
Return the key switch to the Lock position.
Note Depending on the new setpoints, filling will not begin until the
chamber liquid level falls below the new low level setpoint. s
2-4
7400 Series Cryoplus
Thermo Scientific
Section 2
Operation
Change High Temperature
Alarm Setpoint
The High Temperature Alarm Setpoint is the temperature at which the
high temperature alarm activates.
1. Turn the key switch to the Programming Access position (.). The
digital display will indicate the current High Temperature Alarm set
point.
2. Press High Temp. Three decimal points in the digital display will flash
on and off.
3. Press the up arrow to raise the temperature alarm setpoint or the down
arrow to lower it.
4. The Enter button must be pressed after the desired high temperature
alarm point is displayed.
When programming is complete, turn the key switch to the Lock position
[.]. The thermocouple temperature will be displayed once again, and the
controller will now operate at the new setpoint.
Set Microprocessor
Internal Clock
The "real time” internal clock enables alarms, program changes, and
current system status to be printed relative to the actual time and date of
occurrence. This information is made available through the RS-232 data
port.
The factory default setting is Eastern Standard Time (USA).
To set the clock, start with the unit turned off.
1. Turn the key switch to Full Access (.). Press the High Level button on
the key pad while turning on the power switch located on the back of
the unit.
2. Starting from the bottom of the bar graph, the first LED on the bar
graph lights and the numeric display on the control panel shows the
current time hundredths of seconds.
3. Press the up arrow (to increase) or down arrow (to decrease) the
setting.
Thermo Scientific
7400 Series Cryoplus
2-5
Section 2
Operation
Set Clock (continued)
4. Press the Enter key to lock in the value and advance to the next setting.
The chart below shows the settings in sequence.
LED lights* . . . . . . . . . . . . . . . . . . .Clock Setting
1 . . . . . . . . . . . . . . . . . . . . .hundredths of seconds
2 . . . . . . . . . . . . . . . . . . . . . . . . . . . . . . . . .seconds
3 . . . . . . . . . . . . . . . . . . . . . . . . . . . . . . . .minutes
4 . . . . . . . . . . . . . . . . . . . .hours (in military time)
5 . . . . . . . . . . . . . . . . . . . . . . . . . .day of the week
6 . . . . . . . . . . . . . . . . . . . . . . . . .day of the month
7 . . . . . . . . . . . . . . . . . . . . . . . . . . . . . . . . .month
8 . . . . . . . . . . . . . . . . . . . . . . . . . . . . . . . . . . .year
*LED on the Bar Graph, starting at the bottom of the graph and counting
upward.
The Optional Control
Printer Kit
Note Install the Modular Line Filter included with the kit into the RS-232
interface connector on the rear of the unit. s
The printer (kit P/N 4000565 US/4000665 EU) provides the following
information:
Note All functions and error codes, when printed, include the current LN2
level, temperature, time, and date. s
• Power up
• Auto fill cycle
• Manual fill start and scale selection
• Manual fill stop and scale selection
• Changes in program settings
• Cover opened (tank lid opened)
• All error codes
Note Automatic printing every two hours is the factory default. This
feature can be programmed to occur from once every hour to once every
24 hours. Contact the Technical Services Department. s
2-6
7400 Series Cryoplus
Thermo Scientific
Section 3
Troubleshooting the Alarms
To temp probe
connector
To circuit board
pressure transducer
Lid
Tank
Vent
Plug
Fill
Tube
To LN2
source
inches
28
25
24
23
22
21
20
19
18
17
16
15
14
13
12
11
10
9
8
7
6
5
4
3
2
1
0
Temperature
Sensor
Pressure
Port
Fill
Port
Figure 3-1. Component Locations
Refer to the alarm descriptions, probable causes and corrective action
information at the end of this section. Use the above system illustration for
reference.
Warning Potential electrical hazards exist in this equipment. Only
qualified persons should perform the instructions and procedures described
in this section. s
Warning Ultra low temperatures are associated with this equipment.
Instructions in this section should only be carried out when using special
handing equipment or when wearing special, protective clothing. s
Thermo Scientific
7400 Series Cryoplus
3-1
Section 3
Troubleshooting the Alarms
In addition to the protection provided by the power switch/ circuit
breaker, two North American UL and/or CSA, 125 mA, 250 VAC SloBlow fuses (P/N 230173) are located on the microprocessor circuit board.
Refer to Figure 3-2. To access these fuses, remove the cabinet back panel.
Warning This service should only be performed by qualified personnel. s
Temperature probe
connector
copper silver
Bypass probe
connector
copper silver
Pressure transducer
connector (reverse side)
Temperature probe
DIP switch
180179 REV 0
Connector for RS232
and remote alarm
21
Ribbon connector to
control panel
Ribbon connector to
bar graph display
F2
F1
Fuses F1 and F2
125 mA (P/N 230173)
High voltage in
connector
115V
Voltage
selector
Figure 3-2. Microprocessor Circuit Board
3-2
7400 Series Cryoplus
Thermo Scientific
J3
1
2
180179 REV 0
Forma Scientific
U30
C41
Section 3
Troubleshooting the Alarms
J1
F2
33
34
+
5V
1115V
Microprocessor board and access panels,
covers removed
silver
silver
copper
copper
Hose must connect
to “B” port only
B
A
to pressure
transducer
Microprocessor board and access panels,
as seen from inside the unit
Figure 3-3. Inserting Connectors From Inside the Cabinet
Access the control panel circuit board (below) by lifting off the plastic
frame surrounding the front of the panel and removing the Phillips screws.
LD5
R1
R2
LD1
J1
LD3
LD6
LD8
LD9
2
1
40
39
LD10
AL1
J2
LD11
R3
LD2
LD4
LD7
J3
1
LABEL
R4 R5 R6
R7 R8 R9 R10 R11
R12 R13 R14 R15 R16
R17 R18
R19
6
Figure 3-4. Control Panel Circuit Board
Thermo Scientific
7400 Series Cryoplus
3-3
Section 3
Troubleshooting the Alarms
Bypass Sensor
To Tank Fill
Tube
Vent
Fill Valve
Bypass Valve
Optional Gas Bypass
Components - Factory Installed
P/N 195021 - 120VAC
P/N 195023 - 220VAC
Qualified Field Installation
P/N 195700 - 120VAC
P/N 195701 - 220VAC
Replacement Bypass Probe Kit
P/N 195008 - all versions
Replacement Bypass Solenoid Kit
P/N 1950704 - 120VAC
P/N 1950705 - 220VAC
Connectors
From LN2
Source
Pressure
Relief Valve
Figure 3-5. Mechanical Block Diagram
DIP Switch Settings
No By-pass
With By-pass
1. Up
1. Down
LABEL
180181 REV B
R1
2. Down
2. Up
1
LD6
R2
LD7
LD1
3. Up
J2
2
LD8
R3
3. Up
LD9
R4
R5
R6
LD10
LD11
LD31
R31
R32
R33
R34
LD12
LD2
LD13
R7
R8
R9
LD14
LD15
R10
LD32
R35
R36
R37
R38
LD16
LD33
LD17
LD3
Access the bar graph circuit board
(right) by lifting off the plastic frame
surrounding the front of the panel and
removing the Phillips screws.
LD18
R11
LD19
R12
R13
R14
R39
R40
R41
R42
LD20
LD21
LD22
LD4
LD23
R15
R16
R17
LD34
R43
R44
R45
R46
LD24
LD25
R18
LD26
LD27
LD5
LD35
R47
R48
R49
R50
LD28
R19
33
34
LD36
LD29
R20
R21
R22
LD30
R51
R52
R53
R54
R23
R55
R24
R25
R26
R27
R28
R29
R30
R56
R57
R58
R59
R60
R61
R62
1
2
J1
Figure 3-6. Bar Graph Circuit Board
3-4
7400 Series Cryoplus
Thermo Scientific
Thermo Scientific
Bypass
Valve
Bypass
Sensor
Bypass
Sensor
Level
Sensor
Bypass
Valve
Bypass
Sensor
Silence
Bypass
Valve
Fill
Valve
Silence
Fill
Valve
Level
Sensor
Silence
Fill
Valve
Level
Sensor
LN2
Source
Open
Valve
LN2
Source
Open
Valve
LN2
Source
Open
Valve
Front Panel Alarm
Fill Valve warning lamp and the
alarm bars light. The audible
alarm sounds.
Fill and Bypass valves close.
The remote alarm contacts set to
activate in 30 minutes.
Printer prints Error Code 3.
Bottom three warning lamps
flash and the alarm bars light.
The
audible alarm sounds.
Fill and Bypass valves close.
Remote alarm contacts activate
immediately.
Printer prints Error Code 2.
Top three warning lamps flash.
The alarm bars light. The audible
alarm sounds.
The Fill and Bypass valves
close.
Remote alarm contacts activate
immediately.
Printer prints Error Code 1.
Alarm Description
and
System Response
System does not detect that
the valve is connected or
operating.
Valve coil may be open.
Wires may be cut or
broken.
Electrical connector may
be unplugged from the valve
or from the circuit board
(Figures 3-2 and 3-4).
Check connectors on the valve and on the circuit
board. Check all wires for cuts or breaks. Check the
electrical continuity of the fill valve coil. Repair or
replace as necessary.
Turn the unit off for five to ten minutes and turn it
back on. If alarm condition persists, call the Technical
Services Department.
Turn the unit off for five to ten minutes and turn it
back on. If alarm condition persists, call the Technical
Services Department.
Bad AC input error.
Analog to digital power
converter error.
Corrective Action
Probable Cause
The audible alarm can only be silenced with the key switch in the Programming Access position.
Return the key switch to the Lock position after silence.
Alarms do not ring back except where noted.
alarm7a.cdr
3
2
1
Printer
Error
Code
Section 3
Troubleshooting the Alarms
7400 Series Cryoplus
3-5
3-6
7400 Series Cryoplus
Bypass
Valve
Bypass
Sensor
Bypass
Valve
Bypass
Sensor
Silence
Fill
Valve
Level
Sensor
Silence
Fill
Valve
Red LED's
Set point
Level
Sensor
and
Bypass
Valve
Bypass
Sensor
Silence
Fill
Valve
Level
Sensor
LN 2
Source
Open
Valve
LN 2
Source
Open
Valve
LN 2
Source
Open
Valve
Front Panel Alarm
The fill command has been
issued by the microprocessor,
but the system senses a failure
in the fill circuit.
OpenValve warninglamp flashes and
the alarm bars light.The audiblealarm
sounds.
Fill and Bypass valvesattempttoclose.
The Remote alarm contacts setto
activate in 30minutes.
Printer prints Error Code5.
Turn off the unit for 10 to 15 minutes, then turn
it back on. If the alarm state persists, call the
Technical Service Department.
Seeif LN2 orgasisstillbeinginjectedintothetank.Ifso,turn
offthetank.
Disassembleandcheckthefillvalveforice,dirt,orother
contaminates.(RefertoSection4)
If LN2 isNOTbeinginjectedintothetankandthefillvalve
appearstobeclosed,verifythatthe LN2 supplytankpressureis22
psiorless.AhighpressureLN2 sourcemaycausetheunitto
overfillpastthehighlevelsetpoint.
Note:Thisconditioncanresultwhenseveralstorageracksare
placedintothecontainer,raisingtheleveloftheliquidnitrogen
abovetheHighLevelsetpoint,within10minutesofafill.
Listen for flow of gas or liquid.
Check the supply tank for LN2.
Review any changes or conditions which may
have impact on the system, such as:
Longer hoses or pipes installed.
Flow obstructing or restricting fittings installed.
Heat emitting source moved to proximity of
system.
Note: An LN2 Source Alarm is normally a LN2
supply problem and not a fault of the Cryo Plus
Storage System. Refer to Section 1.2 of this
manual and make sure that the unit is receiving
liquid nitrogen and not just nitrogen gas.
Liquid Nitrogen tank is
empty.
Bypass valve is open but
the system does not see a ¼inch rise of LN2 in 20
minutes Printer prints Error
Code 4.
The command to close has
been given to the fill valve
but the level of LN2 in the
unit continues to rise.
The system will go into
alarm if the liquid nitrogen
rises more than 1/4-inch
above the high limit setpoint
within 3-10 minutes after the
fill valve closes.
Corrective Action
Probable Cause
Open Valve warning lamp and
the alarm bars light. The audible
alarm sounds.
Fill and Bypass valves attempt
to close.
The Remote alarm contacts
activate immediately
Alarm system resets if condition
corrects.
Printer prints Error Code 5.
LN2 Source warning lamp and
the alarm bars light, indicating
that no liquid nitrogen is flowing
to the unit.
Fill and Bypass valves close.
The audible alarm sounds.
The remote alarm contacts set to
activate in 30 minutes.
This alarm will ring back in 30
minutes if the alarm condition is
not corrected.
Alarm Description /
System Response
alarm1a.cdr
5
5
4
Printer
Error Code
The audible alarm can only be silenced with the key switch in the Programming Access Position.
Return the key switch to the Lock position after silence.
Alarms do not ring back except where noted.
Section 3
Troubleshooting the Alarms
Thermo Scientific
Thermo Scientific
Bypass
Valve
Bypass
Sensor
Silence
Fill
Valve
Red LED's
Setpoint
Level
Sensor
and
Bypass
Valve
Bypass
Sensor
Silence
Fill
Valve
Level
Sensor
LN 2
Source
Open
Valve
LN 2
Source
Open
Valve
Front Panel Alarm
Bypass Valve warning lamp and
the alarm bars light. The audible
alarm sounds.
The Remote alarm contacts set to
activate in 30 minutes.
Bypass valve closes.
Printer prints Error Code 7.
LN2 Source warning lamp and
the alarm bars light, indicating that
no liquid nitrogen is flowing to the
unit.
Fill and Bypass valves close.
The audible alarm sounds.
The remote alarm contacts set to
activate in 30 minutes.
This alarm will ring back in 30
minutes if the alarm condition is
not corrected.
Alarm Description
and
System Response
The system does not detect
that the valve is connected or
operating.
Valve coil may be open.
Wires may be cut or broken.
. The electrical connector may
be unplugged from the valve or
from the circuit board (Figures
3-2 and 3-4).
The Bypass Sensor does not see
the supply line temp drop
below -130°C in 60 minutes.
Printer prints Error Code 8.
LN2 level does not reach the
setpoint in 60 minutes. Printer
prints Error Code 6.
Probable Cause
Check the connectors on the valve and on the circuit
board. (Figures 3-2 and 3-4)
Check all wiring for cuts or breaks.
Check the electrical continuity of the valve coil.
If the alarm state cannot be corrected, call the
Technical Services Department.
Listen for flow of gas or liquid.
Check the supply tank for LN2.
Review any changes or conditions which may have
impact on the system, such as:
Longer hoses or pipes installed.
Flow obstructing or restricting fittings installed.
Heat emitting source moved to proximity of system.
Note: An LN2 Source Alarm is normally a LN2 supply
problem and not a fault of the Cryo Plus Storage System.
Refer to Section 1.2 of this manual and make sure that the
unit is receiving liquid nitrogen and not just nitrogen gas.
Corrective Action
alarm1a.cdr
7
8
6
Printer
Error
Code
The audible alarm can only be silenced with the key switch in the Programming Access Position.
Return the key switch to the Lock position after silence.
Alarms do not ring back except where noted.
Section 3
Troubleshooting the Alarms
7400 Series Cryoplus
3-7
3-8
7400 Series Cryoplus
Bypass
Valve
Bypass
Sensor
Bypass
Valve
Bypass
Sensor
Silence
Fill
Valve
Level
Sensor
Silence
Fill
Valve
Level
Sensor
Open
Valve
LN 2
Source
Open
Valve
LN 2
Source
Open
Valve
Bypass
Valve
Bypass
Sensor
Silence
LN 2
Source
Fill
Valve
Level
Sensor
Front Panel Alarm
Level Sensor warning lamp and
the alarm bars light. The audible
alarm sounds.
Fill and Bypass valves close.
Remote alarm contacts set to
activate in 30 minutes.
Printer prints Error Code 10.
Bypass Sensor and Open Valve
warning lamps and the alarm bars
light. Audible alarm sounds.
Fill and Bypass valves close.
Remote alarm contacts activate
immediately.
Printer prints Error Code 9.
Bypass Sensor and Open Valve
warning lamps flash and the
alarm bars light. The audible
alarm sounds.
Fill and Bypass valves close.
Remote alarm contacts set to
activate in 30 minutes.
Printer prints Error Code 9.
Alarm Description
and
System Response
Level sensor or pressure
transducer malfunction.
Dirt or ice in the fill valve.
Fill command has been
issued by the microprocessor,
but the system senses a failure
in the bypass circuit.
Probable Cause
Pressure transducer port in bottom of tank may be
clogged or blocked. Vinyl tubing to the circuit board
leaks, may be kinked or cracked, or has come off the
fitting.
If alarm persists, call Technical Services Department.
(The pressure transducer is not a field-service item)
Caution! Do NOT blow into the vinyl tubing or apply
pressure greater than 1 PSI.
If liquid nitrogen runs out of the bypass valve,
shut off the LN2 supply source, then remove and
refurbish or replace the fill valve.
Turn off the unit for 10 to 15 minutes, then turn it
back on. If the alarm state recurs, call Technical
Services Department.
Corrective Action
The Alarm can only be silenced with the key switch in the Programming Access position.
Return the key switch to the Lock position after silence.
Alarms do not ring back except where noted.
alarm4a.cdr
9
9
Printer
Error
Code
Section 3
Troubleshooting the Alarms
Thermo Scientific
Thermo Scientific
and
and
Bypass
Valve
Bypass
Sensor
Bypass
Valve
Bypass
Sensor
LN 2
Source
Open
Valve
LN2
Source
Open
Valve
Bypass
Valve
Bypass
Sensor
LN 2
Source
Open
Valve
o
7400 Series Cryoplus
Temperature C
o
+ 199
Silence
Fill
Valve
Level
Sensor
Temperature C
(Chamber temperature
display flashes)
Silence
Fill
Valve
Level
Sensor
Silence
Fill
Valve
Level
Sensor
Front Panel Alarm
The alarm bars light and the
temperature display flashes. The
display shows +199. The audible
alarm sounds.
Remote alarm contacts set to
activate in 30 minutes.
Alarm system resets if condition
corrects.
Printer prints Error Code 12.
High temperature alarm:
The alarm bars light and the
temperature display flashes the
thermocouple temperature. The
audible alarm sounds.
Remote alarm contacts set to
activate in 30 minutes.
Alarm system resets if condition
corrects.
Printer prints Error Code 11.
Level Sensor warning lamp
flashes and the alarm bars light.
The audible alarm sounds.
Fill and Bypass valves close.
Remote alarm contacts set to
activate in 30 minutes.
Printer prints Error Code 10.
Alarm Description /
System Response
Temperature probe wires
cut or broken.
The Temperature probe
connector is unplugged from
the circuit board. (Figure 3-2)
Probe circuit failure.
The thermocouple
temperature is warmer than
the high temperature
setpoint.
The lid has been open too
long.
An excessive heat load
(warm product) has been
placed into the chamber.
Level sensor or pressure
transducer out of calibration.
Probable Cause
Replace or repair the temperature probe wires.
Verify the circuit board connector.
Make sure the temperature sleeve is properly installed
to lower the chamber temperature.
Raise the high temperature setpoint.
The temperature is measured using a T-type
thermocouple with an accuracy of ±3C for 196C. The
temperature gradient within the tank is dependent upon
changes to the LN2 which affects it’s stabilization (fill,
evaporation, introduction of warmer product, etc.). The
higher the level of LN2, the colder the unit will be. Make
sure the high temperature alarm set point is not lower
than the height of the LN2 is capable of maintaining.
Pressure transducer port in bottom of tank may be
clogged or blocked. Vinyl tubing to the circuit board
may leak, be kinked or cracked, or has become
disconnected from the fitting.
If alarm persists, call Technical Services Department.
(The pressure transducer is not a field-service item.)
Caution! Do NOT blow into the vinyl tubing or
apply pressure greater than 1 PSI.
Corrective Action
The Alarm can only be silenced with the key switch in the Programming Access position.
Return the key switch to the Lock position after silence.
Alarms do not ring back except where noted.
alarm5a.cdr
12
11
10
Printer
Error Code
Section 3
Troubleshooting the Alarms
3-9
3-10
7400 Series Cryoplus
Bypass
Valve
Bypass
Sensor
Bypass
Valve
Bypass
Sensor
Silence
Fill
Valve
Level
Sensor
Silence
Fill
Valve
Level
Sensor
LN 2
Source
Open
Valve
LN 2
Source
Open
Valve
Front Panel Alarm
The system does not
detect that the sensor is
connected or operating.
Wires may be cut or
broken.
The electrical connector
may be unplugged from the
circuit board (Figure 3-2).
The microprocessor sees
a circuit board fault on
initial power up and the
sum check is wrong.
All warning lamps light.
System will not operate.
Printer prints Error Code 14.
Probable Cause
Bypass Sensor warning lamp
and the alarm bars light. The
audible alarm sounds.
The Remote alarm contacts
set to activate in 30 minutes.
The Alarm system resets if
the condition corrects.
When the system recognizes a
bypass circuit failure, it will not
open the Bypass Valve and
continue the fill without the
bypass active.
Alarm Description
and
System Response
Turn the system off for five to ten minutes, then
turn it back on. The system should reset by
restoring default limits.
If system does not self-correct, call the Technical
Services Department.
Check all wiring for cuts or breaks.
Verify that the sensor connector is secure on the
circuit board (Figure 3-2).
The alarm is cleared by turning the key switch to
Full Access and back to Lock. The system will go
into the alarm state the next time an LN2 fill
command is issued if the bypass fault is not
corrected.
If the alarm state cannot be corrected, call the
Technical Services Department.
Corrective Action
The audible alarm can only be silenced with the key switch in the Programming Access position.
Return the key switch to the Lock position after silence.
Alarms do not ring back except where noted.
alarm2a.cdr
14
13
Printer
Error
Code
Section 3
Troubleshooting the Alarms
Thermo Scientific
Thermo Scientific
low level
setpoint
high level
setpoint
green
flashing
orange
green
red
red
Front Panel Alarm
The liquid nitrogen level is one
inch or more above the high level
set point.
The remote contacts set to
activate in 30 minutes.
The alarm system resets if the
alarm condition corrects.
Printer prints Error 15.
Alarm Description
and
System Response
The liquid nitrogen level is
one inch or more above the
high level set point.
Probable Cause
Move the high level set-point to the current LN2 level.
(The set-point can be changed back after the LN2 has
evaporated to the desired level.)
Corrective Action
The Alarm can only be silenced with the key switch in the Programming Access position.
Return the key switch to the Lock position after silence.
Alarms do not ring back except where noted.
alarm6a.cdr
15
Printer
Error
Code
Section 3
Troubleshooting the Alarms
7400 Series Cryoplus
3-11
Section 4
Maintenance
Valve maintenance is described below.
Warning These procedures must be performed by qualified service
technicians. s
Operation
Normally closed: Valve is closed when solenoid is de-energized, valve is
open when solenoid is energized.
Positioning/Mounting
The valve is designed to perform properly when mounted in any position. However, for optimum life and performance, the solenoid should
be mounted upright to reduce the possibility of foreign matter accumulating in the core tube area.
Maintenance
Warning Turn OFF electrical power supply and de-pressurize valve before
making repairs. It is not necessary to remove valve from pipe line for
repairs. s
Cleaning
A periodic cleaning of all solenoid valves(s) is desirable. The time
between cleanings will vary, depending upon media and service conditions. Generally, if the voltage to the coil is correct, sluggish valve operation, excessive noise, or leakage will indicate that cleaning is required.
Valve Disassembly and Reassembly
De-pressurize valve and turn OFF electrical power supply. Proceed in
the following manner:
1. Remove retaining clip and slide entire solenoid enclosure from
solenoid base sub-assembly.
Caution When metal retaining clip disengages, it springs upward. s
2. Unscrew solenoid base sub-assembly and remove body gasket, core
assembly with rider ring and core spring attached.
Thermo Scientific
7400 Series Cryoplus
4-1
Section 4
Maintenance
3. Clean and assemble in reverse order of disassembly, paying careful
attention to exploded view provided (Figure 4-1) for identification
and placement of parts.
Housing
Spring Washer
Coil
Solenoid Base Sub-assembly
Core Assembly with Rider Ring
Core Spring
Body Gasket
Valve Seat
Valve Body
Figure 4-1. Exploded View of Valve
Note Use thread sealant, not Teflon tape. Tape could get into valve. s
4. After maintenance, operate the valve a few times to ensure proper
opening and closing.
General Cleaning
Protective clothing and gloves should be worn whenever cleaning the
inside of this unit. Follow established laboratory procedures. Allow the
interior of the unit to warm to ambient and use an appropriate germicide.
Freezing chamber
The interior of the CryoPlus unit is made of high quality stainless steel
and should not be cleaned with any cleanser containing chlorine.
Exterior cabinet
Wash the outside of the cabinet with a mild detergent.
4-2
7400 Series Cryoplus
Thermo Scientific
Section 4
Maintenance
Defrosting the
Storage Tank
To defrost the storage tank, remove the product and LN2 from the tank.
Allow the tank to warm at room temperature.
Caution Do not attempt to speed up LN2 evaporation, or frost removal, by
blowing direct heat. Avoid using a heater or blowing compressed air into
the storage tank. s
Defrosting the Vent
Port
To defrost the vent port, open the lid and allow to warm at room
temperature. See Caution above.
The opening of the storage container can be loosely covered while the vent
port thaws.
After the port has thawed, remove all moisture from the vent port area
before returning the tank to service.
Gas Springs
Thermo Scientific
The gas springs should be checked periodically, and ideally every six
months. The opening force, as measured from the front lip from a closed
position, should be below 100 N (22.5 lbf) maximum. If the force is above
this value, the gas springs should be replaced. If a force measurement is
not possible, the gas springs should be replaced every two years.
7400 Series Cryoplus
4-3
Section 5
Specifications
Table 5-1. Specifications
Series
CryoPlus 1
CryoPlus 2
CryoPlus 3
CryoPlus 4
LN2 capacity (liters)
90
200
340
552
Static evaporation rate (liters/day)*
3
5
8
10
Static Holding Time (days)
30
40
42.5
55
Exterior Height
41.0" (104.1 cm)
41.0" (104.1 cm)
41.0" (104.1 cm)
47.0" (119.4 cm)***
Exterior W x D
21.5"W x 26.0" F-B**
28.5"W x 34.0" F-B**
34.5"W x 41.5" F-B**
43.5"W x 50.0" F-B**
(54.6 cm x 66.0 cm)
(72.4 cm x 86.4 cm)
(87.6 cm x 105.4 cm)
(110.5 cm x 127.0 cm)
Usable Interior Height
27.5" (69.9 cm)
27.5" (69.9 cm)
27.5" (69.9 cm)
29.5" (74.9 cm)
Usable Interior Diameter
16.0" (40.6 cm)
24.0" (61.0 cm)
31.0" (78.7 cm)
39.5" (100.3 cm)
Electrical
100 - 120 VAC, 1 PH, 50/60 Hz, 0.8 FLA (Operating Range 90-132V)
200 - 230 VAC, 1 PH, 50/60 Hz, 0.5 FLA (Operating Range 180-253V)
Utility Connections
1/2" 45° Flare
1/2" 45° Flare
1/2" 45° Flare
1/2" 45° Flare
4-foot hose
6-foot hose
6-foot hose
6-foot hose
Weight Empty
194.0 lbs. (88.0 kg)
325.0 lbs. (147.4 kg)
416.0 lbs. (188.7 kg)
680.0 lbs. (308.4 kg)
Weight Full
354.0 lbs.(160.6 kg)
680.0 lbs. (308.4 kg)
1021.0 lbs.(463.1 kg)
1620.0 lbs. (734.8 kg)
Shipping Weight
260.0 lbs. (117.9 kg)
400.0 lbs. (181.4 kg)
540.0 lbs. (244.9 kg)
892.0 lbs. (404.6 kg)
Continuing research and improvements may result in specification changes at any time.
* Static evaporation rates are based on new container performance, no product load, styrofoam plug/lid, and no lid openings. Actual working performance may
vary with individual applications, ambient conditions, and/or scale accuracy; excludes supply tank evaporation.
** Add 5.0" (12.7 cm) for utilities and lid opening
*** 93.5" (237.5 cm) total unit height of CryoPlus 4 with lid open
Thermo Scientific
7400 Series Cryoplus
5-1
Section 6
Parts List
Table 6-1. Parts List
Models
Stock No.
Description
7400/7401
7402/7403
7404/7405
7406/7407
103067
Tank trim gasket
5-foot
7-foot
8.5-foot
11-foot
107406
Lid seal gasket
5-foot
7-foot
8.5-foot
11-foot
120054
Dual wheel caster
4
4
4
120059
Caster
122010
Lid tumbler lock
1
129063
Lid pneumatic spring
1
129064
Lid pneumatic spring
129065
Lid pneumatic spring
129066
Lid pneumatic spring (210 lbs.)
190526
CryoPlus microprocessor board
1
1
1
1
195000
Ribbon cable - level to main
1
1
1
1
195721
Ribbon cable - control board to main
1
1
1
1
195002
CryoPlus main wiring harness
1
1
1
1
195007
CryoPlus temperature probe
1
1
1
195214
CryoPlus temperature probe
195024
120V valve assy. 7400,7402, 7404, 7406
1
1
1
1
195025
220V valve assy. 7401,7403, 7405, 7407
1
1
1
1
400142
RJ-11 output cable
1
1
1
1
195027
CryoPlus control panel assembly
1
1
1
1
195028
CryoPlus level panel assembly
1
1
1
1
Thermo Scientific
4
1
1
1
2
2
2
1
7400 Series Cryoplus
6-1
Section 6
Parts List
Table 6-1. Parts List (continued)
Models
6-2
Stock No.
Description
7400/7401
7402/7403
7404/7405
7406/7407
251008
Pressure relief valve 1/4" MPT
1
1
1
1
990027
Magnetic lid gasket
1
990028
Magnetic lid gasket
990029
Magnetic lid gasket
990031
Magnetic lid gasket
180143
LN2 dip measuring ruler
1
4000400
4 foot transfer hose
1
4000401
6 foot transfer hose
195884
Lid closing strap
123037
1
1
1
1
1
1
1
1
1
1
1
1
1
Lid magnet
1
1
1
1
4000412
T/C Probe Tubing Replacement Kit (12”)
1
1
1
4000413
T/C Probe Tubing Replacement Kit (15”)
1
400142
RJ-11 Cable
1
7400 Series Cryoplus
Thermo Scientific
Section 7
Electrical Schematics
Thermo Scientific
7400 Series Cryoplus
7-1
Section 7
Electrical Schematics
7-2
7400 Series Cryoplus
Thermo Scientific
Section 7
Electrical Schematics
Thermo Scientific
7400 Series Cryoplus
7-3
Section 7
Electrical Schematics
7-4
7400 Series Cryoplus
Thermo Scientific
Thermo Scientific
Rev. 4 4/09
REGISTERED
ISO
9001
If equipment service is required, please call your Technical Services Department at 1-800-438-4851 (USA and Canada) or
1-740-373-4763. We're ready to answer your questions on equipment warranty, operation, maintenance, service and
special application. Outside the USA, contact your local distributor for warranty information.
Your local Thermo Sales Office is ready to help with comprehensive site preparation information before your equipment
arrives. Printed instruction manuals carefully detail equipment installation, operation and preventive maintenance.
THIS WARRANTY IS EXCLUSIVE AND IN LIEU OF ALL OTHER WARRANTIES, WHETHER WRITTEN, ORAL OR
IMPLIED. NO WARRANTIES OF MERCHANTABILITY OR FITNESS FOR A PARTICULAR PURPOSE SHALL APPLY.
Thermo shall not be liable for any indirect or consequential damages including, without limitation, damages relating to lost
profits or loss of products.
Replacement or repair of components parts or equipment under this warranty shall not extend the warranty to either the
equipment or to the component part beyond the original warranty period. The Technical Services Department must give prior
approval for return of any components or equipment. At Thermo's option, all non-conforming parts must be returned to
Thermo postage paid and replacement parts are shipped FOB destination.
During the first year, component parts proven to be non-conforming in materials or workmanship will be repaired or replaced
at Thermo's expense, labor included. LN2 Vacuum Integrity is covered for two years. Installation and calibration are not
covered by this warranty agreement. The Technical Services Department must be contacted for warranty determination and
direction prior to performance of any repairs. Expendable items, glass, filters and gaskets are excluded from this warranty.
The Warranty Period starts two weeks from the date your equipment is shipped from our facility. This allows for shipping
time so the warranty will go into effect at approximately the same time your equipment is delivered. The warranty protection extends to any subsequent owner during the first year warranty period.
THERMO FISHER SCIENTIFIC STANDARD PRODUCT WARRANTY
(LN2 Vacuum)
Section 8
Warranty Information
7400 Series Cryoplus
8-1
8-2
7400 Series Cryoplus
Rev. 4 2/09
REGISTERED
ISO
9001
Contact your localdistributor for warranty information. We’re ready to answer your questions on equipment warranty, operation, maintenance, service and special application.
Your local Thermo Sales Office is ready to help with comprehensive site preparation information before your equipment
arrives. Printed instruction manuals carefully detail equipment installation, operation and preventive maintenance.
THIS WARRANTY IS EXCLUSIVE AND IN LIEU OF ALL OTHER WARRANTIES, WHETHER WRITTEN, ORAL OR
IMPLIED. NO WARRANTIES OF MERCHANTABILITY OR FITNESS FOR A PARTICULAR PURPOSE SHALL APPLY.
Thermo shall not be liable for any indirect or consequential damages including, without limitation, damages relating to lost
profits or loss of products.
Replacement or repair of components parts or equipment under this warranty shall not extend the warranty to either the
equipment or to the component part beyond the original warranty period. The Technical Services Department must give prior
approval for return of any components or equipment. At Thermo's option, all non-conforming parts must be returned to
Thermo postage paid and replacement parts are shipped FOB destination.
During the first year, component parts proven to be non-conforming in materials or workmanship will be repaired or replaced
at Thermo's expense, labor excluded. Installation and calibration are not covered by this warranty agreement. The Technical
Services Department must be contacted for warranty determination and direction prior to performance of any repairs.
Expendable items, glass, filters, reagents, tubing, and gaskets are excluded from this warranty.
The Warranty Period starts two months from the date your equipment is shipped from our facility. This allows for shipping
time so the warranty will go into effect at approximately the same time your equipment is delivered. The warranty protection extends to any subsequent owner during the first year warranty period. Dealers who stock our equipment are allowed
an additional six months for delivery and installation, provided the warranty card is completed and returned to the Technical
Services Department.
THERMO FISHER SCIENTIFIC INTERNATIONAL DEALER WARRANTY
Section 8
Warranty Information
Thermo Scientific
Section 9
Appendix
Handling Liquid Nitrogen
Warning Contact of liquid nitrogen or cold gas with the skin or eyes may
cause serious freezing (frostbite) injury. s
Handle liquid nitrogen carefully.
The extremely low temperature can freeze human flesh very rapidly.
When spilled on a surface, the liquid tends to cover it completely and
intimately, cooling a large area. The gas issuing from the liquid is also
extremely cold. Delicate tissue, such as that of the eyes, can be damaged
by an exposure to the cold gas which would be too brief to affect the
skin of the hands or face.
Never allow any unprotected part of your body to touch objects cooled by
liquid nitrogen.
Such objects may stick fast to the skin and tear the flesh when you
attempt to free yourself. Use tongs to withdraw objects immersed in the
liquid, and handle the object carefully.
Wear protective clothing.
Protect your eyes with a face shield or safety goggles (safety glasses without side shields do not give adequate protection). Always wear gloves
when handling anything that is, or may have been, in immediate contact
with liquid nitrogen. Insulated gloves are recommended, but heavy
leather gloves may also be used. The gloves should fit loosely, so that
they can be thrown off quickly if liquid should splash into them. When
handling liquid in open containers, it is advisable to wear high-top
shoes. Trousers (which should be cuffless if possible) should be worn
outside the shoes.
Introduction
The safe handling and use of liquid nitrogen in cryogenic refrigerators and
dewar flasks is largely a matter of knowing the potential hazards and using
common-sense procedures based on that knowledge. There are two
important properties of liquid nitrogen that present potential hazards:
1. It is extremely cold. At atmospheric pressure, liquid nitrogen boils at 320° F (-196° C).
2. Very small amounts of liquid vaporize into large amounts of gas. One
liter of liquid nitrogen becomes 24.6 cu. ft. (0.7 m3) of gas.
Thermo Scientific
7400 Series Cryoplus
9-1
Section 9
Appendix
The safety precautions in this manual must be followed to avoid potential
injury or damage which could result from these two characteristics. Do not
attempt to handle liquid nitrogen until you read and fully understand the
potential hazards, their consequences, and the related safety precautions.
Keep this booklet handy for ready reference and review.
Note Because argon is an inert gas whose physical properties are very similar
to those of nitrogen, the precautions and safe practices for the handling and
use of liquid argon are the same as those for liquid nitrogen. s
Use containers designed for low temperature liquids.
Cryogenic containers are specifically designed and made of materials that
can withstand the rapid changes and extreme temperature differences
encountered in working with liquid nitrogen. Even these special containers should be filled SLOWLY to minimize the internal stresses that occur
when any material is cooled. Excessive internal stresses can damage the
container.
Do not cover or plug the entrance opening of any liquid nitrogen refrigerator or dewar. Do not use any stopper or other device that would interfere with venting of gas.
These cryogenic liquid containers are generally designed to operate with
little or no internal pressure. Inadequate venting can result in excessive gas
pressure which could damage or burst the container. Use only the loosefitting necktube core supplied or one of the approved accessories for closing the necktube. Check the unit periodically to be sure that venting is
not restricted by accumulated ice or frost.
Use proper transfer equipment.
Use a phase separator or special filling funnel to prevent splashing and
spilling when transferring liquid nitrogen into or from a dewar or refrigerator. The top of the funnel should be partly covered to reduce splashing.
Use only small, easily-handled dewars for pouring liquid. For the larger,
heavier containers, use a cryogenic liquid withdrawal device to transfer liquid from one container to another. Be sure to follow instructions supplied
with the withdrawal device. When liquid cylinders or other large storage
containers are used for filling, follow the instructions supplied with those
units and their accessories.
Do not overfill containers.
Filling above the bottom of the necktube (or specified maximum level)
can result in overflow and spillage of liquid when the necktube core or
cover is placed in the opening.
9-2
7400 Series Cryoplus
Thermo Scientific
Section 9
Appendix
Never use hollow rods or tubes as dipsticks.
When a warm tube is inserted into liquid nitrogen, liquid will spout
from the top of the tube due to gasification and rapid expansion of liquid inside the tube.
Warning Nitrogen gas can cause suffocation without warning! s
Store and use liquid nitrogen only in a well-ventilated place.
As the liquid evaporates, the resulting gas tends to displace the normal
air from the area. In closed areas, excessive amounts of nitrogen gas
reduce the concentration of oxygen and can result in asphyxiation.
Because nitrogen gas is colorless, odorless and tasteless, it cannot be
detected by the human senses and will be breathed as if it were air.
Breathing an atmosphere that contains less than 18% oxygen can cause
dizziness and quickly result in unconsciousness and death.
Note The cloudy vapor that appears when liquid nitrogen is exposed to
the air is condensed moisture; not the gas itself. The issuing gas is
invisible. s
Never dispose of liquid nitrogen in confined areas or places where others
may enter.
Disposal of liquid nitrogen should be done outdoors in a safe place.
Pour the liquid slowly on gravel or bare earth where it can evaporate
without causing damage. Do not pour the liquid on pavement.
First Aid
If a person seems to become dizzy or loses consciousness while working
with liquid nitrogen, move to a well-ventilated area immediately. If
breathing has stopped, apply artificial respiration. If breathing is difficult,
give oxygen. Call a physician. Keep warm and at rest.
If exposed to liquid or cold gas, restore tissue to normal body temperature
(98.6°F) as rapidly as possible, followed by protection of the injured tissue
from further damage and infection.
Remove or loosen clothing that may constrict blood circulation to the
frozen area. Call a physician. Rapid warming of the affected part is best
achieved by using water at 108°F. Under no circumstance should the
water be over 112°F, nor should the frozen part be rubbed either before or
after rewarming. The patient should neither smoke nor drink alcohol.
Thermo Scientific
7400 Series Cryoplus
9-3
Thermo Fisher Scientific
401 Millcreek Road
Marietta, Ohio 45750
United States
www.thermofisher.com