1
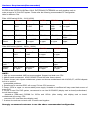
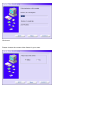
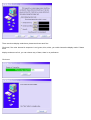
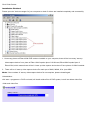
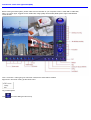
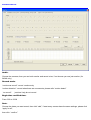
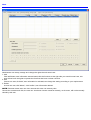
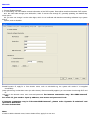
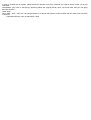
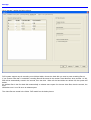
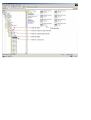
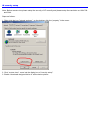
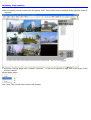
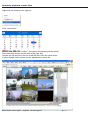
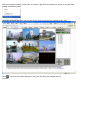
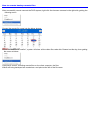
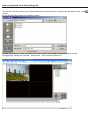
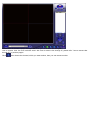
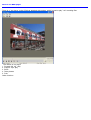
DVR
User Manual
(Please read manual carefully before using products)
Summarization
Summarization
Windows 2000/xp, Vista (Microsoft Windows XP Professional sp2 recommended)
Compression format: H.264/MPEG-4(optional)
Multiple Cards: One PC system support up to 4 cards
Multi language support: more than 50 languages
Date Size: 30-150M/C/H
1. Each channel Image color can be adjusted independently by software
2. Ether 9000 series cards(9404,9404A,9808) can work together to make more channels, so are Ether 10000
series(10104,10416,10816)
3. Multi screen monitoring, 1,4,9,16,25, 32 split Screen available, support rotate display
4. Support multi-hard disks cycle recording
5. Recording both flow trends yard and fix yard are available
6. Intelligent searching for historical DVR files, up to 16 screen playback
7. Multi-user's authority management setup, support to set up user's operating authority
8. Support motion detection touch off the video recording, sending E-mail (monitoring pictures in the enclosure),
sending alarm by phone, and by sound.
9. Setting up motion detection area discretionarily, the sensitivity is adjustable
10. Through IE realize such perfect network management functions as remote spot monitoring, remote historical
playback, remote spot video recording, remote historical video recording, etc
11. Support Intranet IP to remote monitoring
12. Support one IE remote monitors several DVR of different public IP.
13. Support one IE remote monitors several different DVR of different private IP within same public IP.
14. Support the watermark of the characters and time, the particular format of video files prevent being edited,
the
security is high.
15. The video file supports electronic enlarge, taking pictures and instant print and exe format back up.
Support local and remote PTZ control .
Hardware Requirements(Recommended)
EHTER10104/ EHTER10416/Ether 10816, EHTER9404/ EHTER9808 can work together each to
make at most a 32 CHs DVR system. Please refer the following recommended PC configuration
table for different CHs.
Ether 10000 series(10104、10416,10816)
4CHs
8CHs
9-16CHs
17-24CHs
25-32CHs
CPU
CeleronD
2.2G
CeleronD
2.66G
Celeron D
2.8G
RAM
256M
256M
512M
Celeron
2.8G
upper
512M
Display card
ATI 32M
ATI 64M
ATI 64M
ATI 128M
ATI 128M
upper
Mother
Board
Intel 865PE
or upper
Intel 865PE
or upper
Intel 865PE
or upper
Intel 915PE
or upper
Intel915PE or
upper
Ether 9000 series (9404A 、9404+、9808+)
4-8CHs
9-16CHs
D
or
17-24CHs
25-32CHs
CeleronD 2.93G
or upper
512M or upper
CPU
CeleronD
2.4G
Celeron D
2.66G
Celeron D 2.8G
or upper
Celeron D 2.8G
or upper
RAM
256M
512M
512M
512M or upper
Display
card
ATI 64M
ATI 64M
ATI 128M
ATI 128M or
upper
Mother
board
Intel 865PE
or upper
Intel 865PE
or upper
Intel 915PE
or upper
Intel 945PE
or upper
or
NOTE:
1.Intel cpu recommended, AMD not recommended. Support intel dual-core CPU.
2.Mother board recommend: ASUS,GIGABYTE and the other famous brand.
3.Please choose intel chipset motherboard, please not choose motherboard with VIA,SIS,ATI, nVIDIA chipsets
built in to avoid of
incompatible problems.
4.Recommend to use dual DDR, will occupy 5% less CPU resources.
5.Power: 350W or upper to ensure stable power supply. Unstable or insufficent will may cause black screen of
some CHS.
6.16CHs or less CHs DVR system, recommend to use Intel 915G/945G (display card on board) motherboard,
but will have a larger
demand on RAM,need 512RAM for 12CHs and 16CHs. (after testing, with didplay card on board
motherboard will occupy CPU
resources 10% less than alone display card)
7.9 series dvr cards can not work with 10 series card together.
Strongly recommend customer to use the above recommended configuration.
Software Requriement
1. Windows XP Professional/Vista (Microsoft Windows XP Professional sp2 recommended),
not support sever version, not support WIN9x,please choose NTFS file format for Hardisk.
2. Please install Directx9.0c or upper.
3. Please install the latest display card driver.
4. It is better to not run the other applications when DVR system is running.
Note:Please install the motherboard driver before install display card driver, otherwise
maybe will Influlence the
normal running of display card and DVR.
Hardware Requirements(Recommended)
Wave-p series DVR board
CD driver
8BNC Cable*1/2(8CHs, 16CHs only)
Please make sure you have all the attachments when you are purchasing.
Hardware Installation
1. Power off
2. Open the computer case
3. Insert DVR cards in PCI slots carefully and fasten them with screws (note: please not touch the golden finger
and the non-insulating parts of DVR cards)
4. Close the computer case and finish all the connections correctly.
5. Power on and start the computer (windows will detect the hardware automatically and remind users to install
driver, if hardware not be detected, it is possibly that DVR cards were installed incorrectly, please clean the
golden finger and reinstall the dvr cards.
6. Installation finished
Software Installation(client software)
DVP Installation (client software, which is also player of ?dvr?video files). DVP can be used to remote monitor also
can
playback both remote and local video files. The installation of DVP is easy, just need to put the CD driver attached
with
dvr board in CD-ROM, find the dvp folder, click and coming into the installation interface,
DVR installation (host software)
Note: if there is any other video capture cards installed on your computer, please uninstall them completely first to
avoid
hardware conflicts.
(1) Insert DVR cards in PCI slot and start the computer.
(2) Windows system will defect the hardware and remind you to install driver.
(3) Insert CD in CD-ROM, installation interface will show automatically, then please do as follows to finish installation:
Choose “DVR System? click “next?
If it is the first time to install video device driver (wave-p cards), please choose “install video device driver? then click
“next?
Please continuously click ”Continue Anyway?until the below dialog box bounce up:
Note: please not click “STOP Installation?before the “Digital Video Record setup? diaglog box
(the below picture)
bounce up.
Click next:
Please choose the correct video format in your area:
There are three display mode there, please test them each first.
Click test, if the color showed in sequence is red, green, blue, white, you could choose the display mode. If these
three
display modes are all ok, you can choose any of them, there is no preference.
Click next:
Click “finish?button:
Installation Finished.
Please open the “device manager?of your computer to check if drivers are installed completely and successfully.
1. How many pieces of Ether10104 DVR card are installed on your computer, there will be how many “wave-p
video capture device? one piece of Ether 10416 equals 4pcs of 10104 card, Ether10816 equals 8pcs of
Ether10104, which means there will be 8 “wave-p video capture device there?if one pieces of 10816 installed.
2. There will be 4 “wave-p video capture device?for each pcs of 9404, 9404A, 8 for 1pcs 9808.
Note: If the numbers of “wave-p video capture device?is not complete, please reinstall again.
Uninstallation:
click start > programme-> DVR->uninstall, will install relative files of DVR system, but will not delete video files
folder and video files.
Operation Explanation
Introduction of the main application(DVR)
Before running the DVR system, please make sure the resolution of your computer screen is 1024*768 or 1280*1024,
32bit. (17 inches upper, suggest choose 1280*1024, image quality will be better).DVR system support 4/9/16/25/36
screen division
Click “ full screen” button,going into full screen mode,all the other buttons invisible.
Right click in full screen mode, get the below menu:
Log in DVR system:
Click
, the below dialog box bounce up:
The default user name and password is empty, please click “confirm” directly.
Suggest user to setup a new user name and password, (Please refer “user” in “config”)
Video
Resolution:suggest 640*480;
(Chs)Switch Mode:For 10104, 10416, 10816 only, 1pcs of chip on DVR board of 10104,10416 and
10816 can
capture video sources from 4CHs or 16CHs, then they share the total frame rates together, not as
9404,9040A, 9808,
1pcs chip on board can just capture video source from one channel, so for 10104,10416,10816, the total
frame rates
can be divided averagely in each channel. For example, the total frame rates of 10416 is 100fps, if you
choose 4CHs
here, you will get 4CHs real time (25fps each), if you choose 16CHs here, you will get 16CHs non real
time (each 6.5fps).
Code:H.264/ MPEG 4(optional)
Rotate interval: support rotate 4 screens once circularly (Note: the dvr system must be 8
channels or upper)
Camera list:ETHER9404/9808/9404A support “recording at reduced frame rates”,the frame rates will
showed at the
left top of the screen.
Enable time sign:enabled,will show time at the right corner of the screen when playback.
Limit of file size:limit of file size per hour.
Video loss alarm:when video loss, will alarm to remind.
As the above picture show:you can name every camera in ”text”, such as name camera1 as “street”.
Correspondingly
at the left top of the channel screen in the main interface, you can see the name “street” ,
Scheduled Record
Audio:
Choose the cameras, then you can both monitor and record voice, if not choose you can just monitor. (for
9404A only)
Record mode:
“continuous record”: record continuously
“motion detection”: record when there are movements, please refer “motion-detect”
“no record”:
just view lively,do not record
Begin time and End time:
From 0:00 to 23:00
Date:
Choose the dates you want record, then click “add”, if want every camera have the same settings, please click
“apply for all”,
then click “ confirm”.
If need change the settings, please click “reset”, then setup again.
Can setup different record modes for same camera in different time period,
User
Administrator can setup, manage and change the rights the sub-users have:
1: Add
Click“add”button,user information was activated,click the functions at the right side you want this user have, this
user will not have the rights to operate the functions that have not been choosen.
2: Edit
Choose one user,click“edit”,user information is activated,can change the setting according to your requirements.
3: Delete
choose one user,click“delete”, click“confirm”,user information deleted.
NOTE:Cameras remote user can view: cameras this user can remotely view.
Choose the cameras and click, the user can view these choosen cameras remotely, not choosen, will not be remotely
viewed by this user.
Network
1: Choose“Enable Network”
2: In “networking”,can see relative network information of the DVR system. Data will be transferred between DVR system
and the client side through ports 9000,9001, 9002. If remote view through IE, generally speaking, the default http
server port is
80, you also can change it to the other digits, which is not conflicted with theother networking softwares in pc system
and pc
system, such as 90,8080.
Enable Dynamic IP ,apply for a free domain name, such as abc.dvr99.org, the system will remind if it is applied
successfully.
(wave-p.dvr99.org is shenzhen wave-p’s online demo). After successfully applied, you can remote view through DVP and
IE.
Just type in the domain name, user name and password. For internet connection way “ PC- ADSL-internet”
only.
For static IP, just need to input ip address, user name and password is ok.
If internet connection way is “PC-router-ADSL-internet”, please refer “dynamic IP solutions” and
“private IP Solutions”
for more information.
Note:
If need to edit the domain name, have to delete it first, apply for a new one.
If need to reinstall the dvr system, please delete the domain name first, otherwise the original domain name can be not
used after
reinstallation, only have to wait wave -p.dvr99.org delete the original domain name one month later, then you can apply
the same domain
name again.
Note: 9000、9001、9002 can be changed,better to be larger than 9000 to avoid conflicts with the other ports and have
to be three
sequential numbers, such as 9004,9005, 9006.
Running
Reboot:Reboot system on selected time and date;
DVR Auto startup with window:DVR system will start when the pc system is runningShut down window OS along
with DVR program:PC system will be closed along with you Close the DVR system.
Note:Suggest users to reboot DVR once a week to make the system more stable.
Storage
Click “storage”, getting the below picture:
DVR system support recycle recording on multi-hard disks, choose the hard disk you need to save recording files on,
if you choose more than 1 hard disks, recording files will be saved in the number1 hard disk first, when number 1 is full,
files will be automatically saved in the second, then the third. When all the hard disks are almost full, the system will
delete
the earliest files in the first hard disk automatically to release some space for the new video files, then the second, the
third.
Will delete one 1 hour file once to release space.
The video files are saved in the folder ”DVR media” as the below picture:
PTZ
Note:need decoder, RS232-RS485 and PTZ to realize control cameras.
Procedure:
1. Enable camera control;
2. According to the specification of decoder (camera1 to address 1,camera 2 to address 2…), choose correct
protocol,baudrate;
3. Choose the com port connected with RS232-RS485.
Preset function:need the PTZ also support preset function.
For example, you can add “east”, ”west”, ”south”, ”north” four preset positions as the below picture show:
Support automatically Cruise :
Adjust color
According different requirements of different users, can adjust the brightness, contrast, hoe and Saturation.
Motion-Detection
Motion-detection mainly is used under the condition that there is little movements in the monitored environment to help
to save hard disk space.
Choose one camera,then setup an a motion detection area(press the left button of mouse, then drag to make an area
marked by broken line, then release)
If need sound alarm, please enable sound warning and can also setup the duration, which
at the least is 40 seconds default.
Email alarm:
Choose “send email” first and input email address.
Note:email will be sent through Microsoft outlook.
Before enable “email alarm” function, please make sure that your Microsoft outlook can send and
receive
email with no problems.
Audio
Only 9404A, there will be the icon
Click the icon
on the interface of the main dvr application.
, choose corresponding channels to monitor:
If want to record the voice or want to remote monitor, need to go to “scheduled recording –audio” to choose
the corresponding channels.
Playback
Click“
” playback button,coming into playback interface:
a: Support 1/4/9/16 screen division(support playback 16 channels at the same time)
b: Can select date as the below picture:
c: Pause、1fps play、playback voice。
d: Support speed up x1,x2,x4,x8,x16 and quickly browse(playback 1 hour file in one minute)
e: Zoom、take picture、print, backup and so on.。
The interface of “DVR backup”:
1. Choose the camera you want backup
2. Setup begin time and end time
3. Choose the format of backup files(“.dvr” format files can be played via DVR player, “.exe” format files can be
played without any player, just double click the file is ok, “.dvr” format is suggested)
4. Choose the path to backup.
f: Time positioned play.
g: Blue strip means continuous recording, red strip means motion detection
Playback: Choose the camera need to playback first, drag the green handle to the begin time or direct input the
begin time using time positioned function.
PTZ and camera control
At the lower right side of the main interface of DVR is the control panel of PTZ, please see as the below picture:
Click arrows: up、down、left、right to realize up, down, left, right.
If need turn from left to right automatically, need choose the screen (the channel) first, then click the button in the
middle as the below picture: (the button in green)
Zoom, iris, light, wiper and so on functions, need the cameras also support these functions.
How to remote view via IE
Dynamic IE solutions
Please refer network setup( for internet connections “ pc-ADSL-internet)
Private IP solutions
There is no public IP in Lan, there are just private ip like”192.168.1.3”, which can not be
Visited by internet directly. With the universalization of ADSL, the methods to connect
internet in most companies and families are as follow:
1. PC ---router--- modem ADSL ---Internet
(Note: recommend to choose router with firewall to protect the network security of DVR system)
2. PC—modem ADSL ---Internet.
If is the first way to connect internet,then need to forward ports in router.
All the Network Data received by router transferred through the ports of DVR (default 9000,9001,9002) needed
to be transferred to
the DVR server (private 192.168.1.3) to realize remote view, but how can it be transferred to 192.168.1.3, not
the other private ips like
192.168.1.4, 192.168.1.32 and so on?
We need to process port forwarding to realize it.
Then all the data received by router(218.13.28.118) through 9000,9001,9002,80 will be forwarded to DVR
server(private ip: 192.168.1.3)
The detailed router setup, please refer the specification of router.
Here we will make a sample (Tp -link router) to show how to process port forwarding:
Click “Internet Explorer”, open the IE browser, type in http://192.168.1.1, then confirm,
coming into the next interface:
Please input user name and password, click confirm and come into the main interface
of the router, click “port forwarding” in the list at the left side:
According to the above picture show: forward the ports 80 、9000、9001、9002 to corresponding private
IP(192.168.1.3, private
ip of the DVR server), then save it.
Note: also support remote view several DVRs with different private IPs in the same LAN
For example: 80,9001,9002,9003-----192.168.1.3
80,9004,9005,9006-----the other private ip, for example: 192. 168. 1. 4.
80,9012,9013,9014-----private IP like 192.168.1.42
IE security setup
Note: Before remote view,please setup the security of IE correctly and please setup the resolution as 1024*768
and 32bit.
Steps as follows:
1. Right click the icon ”internet explorer” on the desktop,click the “property” in the menu:
2. Click “custom level’, come into the dialog box of “security setup”.
3. Enable “download unsigned Active X” as the below picture:
4. Click confirm.
IE security setup finished, you can remote view through IE now.
How to remote view through IE
connet DVR server
Please type in ip address or domain name in IE, confirm then will get the below dialog box:
Type in IP、user name、password,click confirm,if connect successfully, you will get camera number list at the
right side of the interface:
User also can click
, come into the log in dialog box again, type in the ip of the other dvr servers, user
name and
password, then can realize monitor several DVRs under same IE.
Reomtely lively monitor
After successfully remote connect the dvr system via IE, there will be a list of cameras at the right side of the IE
interface:
If need stop viewing, single click “camera1””camera2”… in the list at right side or right click in the screen of the
choosen camera,
get the below menu:
click “stop”,Stop remote lively monitor this channel.
Remotely playback remote files
Right click one camera in the right list:
Click “remote files”
Select a date, then click “confirm”, the system will searching all the remote
Files under this camera and list them at the right side
Choose one file and click, the icon at the left side of the file name will be
a green triangle, which means you are playback the remote file:
Click the file name again, playback will be stopped
After successfully remotely connect the dvr system, right click the cameras in the list at the right side,
getting the following menu:
Click“play & record”,then you can remotely lively record and also can remotely lively view。
, come into the below dialog box, then you can setup the storage path by
Click
Yourself.
How to remote backup remote files
After successfully remote connect the DVR stystem, right click the choosen cameras in the right side, getting the
following menu:
Choose the remote file,come into the below picture:
Select one date, click ”confirm”, system will show all the video files under this Channel on this day, then getting
the menu as below:
Click“play & record”,recording remote files on the client computer, the files
Which are being backuped are marked as a red point at the left of the file name.
How to playback local files through IE
The ActiveX of wave-p card not only have the remote monitor function, but also have the play function. Click
button,
go into the DVR files dialog box as below picture:
Finding and choose a ”*.dvr” video file,then click “confirm” button,begin playing(the below picture).
During playing, having the “forward”, ”take picture”, ”print” functions and so on.
Note:
1. Before remote connect via IE, please setup the firewall correctly to make it not prohibit
Internet to visit the software.
2. The most Chs can be viewed via IE is 16 at the same time in one computer.
Because of the most CHs can be remote viewed is 62 CHs at the same time in many computers, so if the total
amount of CHs
which are remote viewed via IE by many computers are more than 62CHs at the same time, the IE side will get
the messenge”
please “close the other cameras” or “ please connect later”.
How to use DVP(client software)
DVP has a “remember the spot” function, which IE do not have.
It is when you are processing” remote connect”, after type in” user name” and “password”, click the “remember” button
as below picture:
Then when you open the DVP next time, you will find the domain name (IP) at the right side remembered as the below
picture:
Double click the domain name in the right side, then you can remote monitor again.
How to remote view via DVP is almost same with how to remote view through IE, please refer “ how to remote view
through IE” in previous pages.
Click
, then choose the channel, which you want monitor, then you can remote monitor.
How to use DVR player
There is a ” dvr player” in the CD driver attached with product, which is used to play ”.dvr” recording files.
The feature of dvr player
1. Forward (2X, 4X, 16X)
2. Support “1fps” play
3. Zoom
4. Take pictures
5. Print
Other functions