1
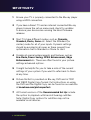
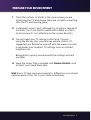
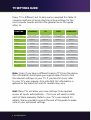
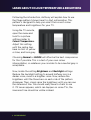
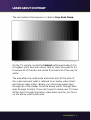
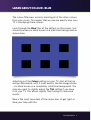
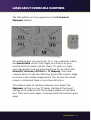
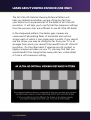
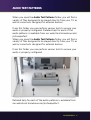
PICTURE PERFECT PLUS
RECOMMENDED SET UP
USER GUIDE
TABLE OF CONTENTS
Introduction
3
Set up your TV
4
Prepare your Environment
5
TV Settings Guide
6
Getting started
7
Learn about Colour Temperature & Brightness
8
Learn about Contrast
9
Learn about Colour
10
Learn about Colour - Blue
11
Learn about Colour - Red & Green
12
Learn about Overscan & Sharpness
13
Learn about Viewing Distance
14
Summary/Additional Features
15
Ambient Light
16
Audio Test Pattern
17
FAQs
18
Your Optimised Settings
19
INTRODUCTION
Knowhow Picture Perfect will show you how you
can optimise your TV to achieve stunning picture
quality.
The Recommended Set Up section is ideal for
first time users and provides easy to follow stepby-step instructions. The Recommended Set Up
usually takes around 30 minutes to complete.
As you will need to pause the screen when making
adjustments to your TV settings, we suggest you
keep this guide close at hand to refer to.
Important information
Before you begin, it’s important to follow the ‘Set
Up’ and ‘Prepare your Environment’ instructions
on pages 4 & 5. If your TV or the environment is
not set up correctly for TV optimisation you are
unlikely to achieve the best results.
PICTURE PERFECT 3
SET UP YOUR TV
1
Ensure your TV is properly connected to the Blu-ray player
using a HDMI connection.
2
If you have a Smart TV and an internet connected Blu-ray
player, browse the set up menus and check for updates
to ensure your devices are running the latest firmware
releases.
3
Most TVs have different modes, such as Dynamic,
Standard, Movie, Game etc. Select the Standard (or
similar) mode for all of your inputs. Dynamic settings
should be avoided in all cases as these prevent true
optimisation. Set to Standard or Movie to start.
4
Disable all special enhancements and features such as
Eco-Mode, Power Saving, MPEG Enhancement, Edge
Enhancement etc. These are often found in your picture
settings advanced options.
5
It might be helpful for you to take a note of the current
settings of your system if you want to refer back to them
at any time.
6
Picture Perfect is provided on Blu-ray, DVD and in 720P
and 1080P Digital Copy format. Full instructions on using
the DVD and the Digital Copy can be found on our website
at knowhow.com/pictureperfect.
7
All format versions of the Recommended Set Up include
the option to playback with hard-of-hearing subtitles.
Note: Digital Copy options for subtitles may not be
available on all devices.
4 PICTURE PERFECT
PREPARE YOUR ENVIRONMENT
1
Close the curtains or blinds in the room where you are
optimising the TV and ensure there are no lights projecting
onto the TV and causing glare.
2 A darkened room is best, although try to apply a degree of
normality (i.e. if you tend to watch with a lamp on, turn it
on but ensure it’s not reflecting on the screen directly).
3 You will need your TV remote control and, if you’re
using the Blu-ray disc, your Blu-ray remote control. It’s
suggested you familiarise yourself with the menus on both,
in particular how to adjust TV settings such as contrast,
brightness etc.
Being able to quickly move around the settings will help
you later.
4 Keep the colour filters included with Picture Perfect close
to hand, you’ll need them later.
Hint: Every TV and room environment is different so you should
optimise each of the TVs in your home individually.
PICTURE PERFECT 5
TV SETTINGS GUIDE
Every TV is different, but to help we’ve compiled this table of
common methods of accessing the picture settings for the
most popular brands and also the general terms this guide
refers to.
FUNCTION
SAMSUNG
LG
SONY
PANASONIC
Picture Settings
Menu > Picture
Menu > Picture
Home > Settings
> Picture
Home > Settings
Brightness
Brightness
Brightness
Brightness
Contrast
Contrast
Contrast
Contrast
Sharpness
Sharpness
Sharpness
Sharpness
Colour
Colour
Colour
Colour
Colour Tone
Colour Temp
Colour Temperature
Colour Temperature
ScreenFit
JustScan
Display Area
> Full Pixel
16:9 Overscan
Tint
Tint
Tint
Tint
Aspect Ratio P.Size
Ratio
Screen Format
Aspect
Brightness
Contrast
Sharpness
Colour
Colour Temperature
Overscan
Tint
Aspect Ratio
Note: Even if you have a different brand of TV from the above,
this information should give you a good idea of how to find
the relevant settings on your TV. If you are still stuck, refer
to your TV’s user manual. Also note that this information is
general to the brand but specific models may vary.
Hint: Many TVs will allow your new settings to be applied
across all inputs automatically – if not you will need to enter
each of them manually. Refer to your TV’s user manual for
details. We’ve provided room at the end of the guide to make
note of your optimised settings.
6 PICTURE PERFECT
GETTING STARTED
Once you’ve set up your TV and room environment, you’re
ready to start optimising your TV.
USB Users:
•
Insert the Picture Perfect USB into the USB 3.0 port of your TV.
•
Select the Play Me First file and our Knowhow colleague Anthony will introduce you to the contents on the USB
stick. First time users should then select the Recommended
Set Up folder and work through the video guides.
Blu-ray/DVD Users:
•
Insert the Picture Perfect disc into your Blu-ray/DVD player.
•
When the menu appears, our Knowhow colleague Anthony
will introduce you to the menu. First time users should
choose the Recommended Set Up option and then select
Play Step by Step Guide. The programme will then begin.
PICTURE PERFECT 7
LEARN ABOUT COLOUR TEMPERATURE & BRIGHTNESS
Following the introduction, Anthony will explain how to use
the Pluge pattern (shown here) to start optimisation. This
pattern is designed to help you select the correct colour
temperature and brightness for your TV.
Using the TV remote,
open the menu and
look for a picture
setting similar to
Colour Temperature.
Adjust this setting
until the centre bars
have no hint of yellow
or blue, and look grey.
Choosing Normal or 6500K will often be the best compromise
for this if possible. This is a test of your own colour
interpretation, so whatever you consider to be a neutral grey is
acceptable.
Now, locate the setting Brightness and Backlight settings.
Reduce the backlight setting to around halfway, less in a
darker room, more in a brighter room. Now, reduce the
brightness until the three bars on each side of the pattern
disappear. Then, slowly raise the brightness until you can see
the outermost line. You should really have to strain to see
it. If it never appears, which can happen on some TVs, the
innermost line should be visible instead.
8 PICTURE PERFECT
LEARN ABOUT CONTRAST
The next pattern that appears is called a Grey Scale Ramp.
On the TV remote, locate the Contrast setting and adjust it to
its highest point and work down step by step. You need to try
to ensure all of the bars are visible from black all of the way to
white.
The area after the small white and black dots at the ends of
the scale represent what is referred to as ‘below video black’
and ‘above video white’. Ideally, you should see equal steps
through all of the shades from the ‘above white’ through dark
grey through to black. If you can’t seem to make your TV show
all the steps through the below video black section, just focus
on the above video white area.
PICTURE PERFECT 9
LEARN ABOUT COLOUR
Now the programme will move to the Colour pattern.
The pattern is shown here:
The number of adjustments you can make here really depends
on the make and model of your TV. Some TVs will allow you to
go into some depth but you may find you only have a single
setting to adjust.
On your TV menu, look for the Colour setting, along with other
settings called Tint, Hue and Saturation. Also, some TVs go
much further and allow real fine tuning of individual colours,
that’s something we should stay away from for now. You
can always come back to them later. Once you’ve found the
setting, it’s time to use the red/green/blue colour filters on the
card included with the disc.
Hint: You will need to use the colour filters provided with
Picture Perfect for the colour test patterns.
10 PICTURE PERFECT
LEARN ABOUT COLOUR - BLUE
The colour filter bars work by blocking all of the other colours
from your vision. This means that we can see exactly how your
TV is displaying these colours.
Look through the Blue filter at the pattern on the screen. You
should now see six black boxes on a plain blue background as
shown here:
Adjusting just the Colour setting on your TV, start at the top
and go downwards, until it looks exactly like the image shown
– six black boxes on a completely solid blue background. You
may also want to slightly adjust the Tint setting if you have
it on your TV. This allows slightly finer tuning for improved
results.
Blue is the most important of the colour bars to get right so
take your time with this.
PICTURE PERFECT 11
LEARN ABOUT COLOUR - RED & GREEN
Now things get a little more complicated - the outcome will
generally depend on your particular model of TV. We’re going
to move onto the Red and Green filter bars.
Starting with the
red, adjust your
Colour, Tint and
Hue options if
you have them
and try to match
the red pattern
shown here.
Keep checking back to blue as you go, remembering that the
blue is still the most important.
Next, move to the
green bars - just
try to get as close
as possible to the
example shown
her using the
same adjustments
as above.
Green is where you often need the individual colour
adjustment, so this is definitely one to try when you’re a little
more experienced.
12 PICTURE PERFECT
LEARN ABOUT OVERSCAN & SHARPNESS
The final pattern on the programme is the Overscan &
Sharpness pattern.
This pattern helps you see if your TV is ‘over scanning’. Adjust
the Aspect Ratio control (this might be a button on your
remote and not a menu option). Every TV varies so check
your user guide if you are unsure and look for an option like
ScreenFit, JustScan, Full Pixel or 1:1 Mapping. Your ideal
scenario here is to see the ‘hatching’ around the screen’s edge
as shown in the smaller image above. This ensures the whole
screen is visible and there is no picture distortion.
This pattern helps to optimise sharpness too. Select the
Sharpness setting on your TV menu, starting at the lowest
setting, work upwards until fuzzy edges appear on lines and
text. Then work down again, stopping when the fuzziness goes
away.
PICTURE PERFECT 13
LEARN ABOUT VIEWING DISTANCE (USB ONLY)
The 4K Ultra HD Optimal Viewing Distance Pattern will
help you determine whether you are sitting too far from
your television to experience all of the detail of 4K Ultra HD
resolution. It will help you to verify that the sharpness settings
from the previous step are sufficient to see 4K Ultra HD detail.
In the chequered pattern, the darker grey squares are
composed of alternating fields of horizontal and vertical
stripes, each of which is one single pixel in width. If you cannot
see the stripes you may be sitting too far from your TV or at
an angle from which you cannot fully benefit from 4K Ultra HD
resolution. On the other hand, if viewing non-4K content, or
highly-compressed video on your TV, you may find that you
would benefit from being further away with less visible detail
or from a soft sharpness setting.
14 PICTURE PERFECT
SUMMARY
You’ve now completed your TV’s optimisation. You can see the
results by playing the series of demo content in the Additional
Features folder. Also in this section is the Troubleshooting
section, containing some extra personalisation help,
information on setting the ambient light of your room
optimally and a link into the Audio Test Patterns section.
Remember to make a note of your settings in case you need to
manually copy them across to each input if they are connected
other devices, such as your satellite/cable equipment and
games console (AV1, AV2, HDMI 1, 2 etc.).
You can repeat the procedure as many times as you like on
any TV in your home. You may find you get even better results
the more experienced you become.
TROUBLESHOOTING
Optimising your TV picture settings using Picture Perfect will
provide you with the correct baseline settings so you that you
can see the correct colours, have minimal picture distortion
and ensure you are seeing the whole picture. All of this is
very important, but beauty is in the eye of the beholder and,
while we’re confident you’ll be impressed with the Picture
Perfect results, you might still want to make some adjustments
afterwards.
The Troubleshooting section provides help on how to make
specific changes to your picture, without affecting where
possible, your optimised picture settings.
PICTURE PERFECT 15
AMBIENT LIGHT
Your eyes will perceive the colours on your TV differently
depending on the ambient light around it. So, if your TV backs
on to a white wall, the whites on your TV will appear darker than
normal, whereas if your TV backs on to a dark wall, the whites
will appear brighter and more intense. In Check your Results
> Additional Features there is an Ambient Light section which
runs through how to set up different picture modes.
To enjoy a perfect picture all the time, we suggest you run
through our Recommended Set Up in the daytime and save the
settings to one of the picture modes (such as Standard). Now
wait until the evening, close the curtains and go through the
Recommended Set Up once more with no lights on at all. This
time save the results to a different picture mode (such as Movie).
You will find both methods will provide subtly different
settings with a much wider range if you have light walls versus
dark walls.
16 PICTURE PERFECT
AUDIO TEST PATTERNS
When you open the Audio Test Patterns folder, you will find a
variety of files designed to be played directly from your TV, as
well as some tests designed for external devices.
From this folder you can perform various tests to ensure your
audio is properly configured. Detailed help for each of the
audio patterns is available from our website at knowhow.com/
pictureperfect
When you open the Audio Test Patterns folder, you will find a
variety of files designed to be played directly from your TV, as
well as some tests designed for external devices.
From this folder you can perform various tests to ensure your
audio is properly configured.
Detailed help for each of the audio patterns is available from
our website at knowhow.com/pictureperfect.
PICTURE PERFECT 17
FAQs
How do I turn subtitles on?
You can either press the Subtitles button on your remote
control or select Help from the menu.
What is the Digital Copy?
The digital copy is a version of the Picture Perfect
Recommended Set Up programme, designed for playback on
Smart TVs and Apple TV (via iTunes Home Sharing from your
PC). It is supplied in both 720P and 1080P formats.
Should I use the 720P or 1080P version of the Digital Copy?
In general, it is recommended you use the 1080P version of the
video, however, for older Smart TVs that are HD Ready only or
for slower 54G Wireless networks 1080P HD video streaming
can be unreliable. For those cases, we recommend the 720P
version found on the DVD disc.
Can I use Picture Perfect on my Apple TV?
Yes, by using the Digital Copy version of Picture Perfect.
Full instructions can be found by going to knowhow.com/
pictureperfect
Why is my USB Stick playback choppy/jerky or stopping?
Ensure you connect the Picture Perfect USB stick to the blue
coloured USB port on the TV. This port is a USB 3.0 port and
will ensure the USB stick can transmit data fast enough to your
TV.
How do I access the USB playback options on my TV?
Every TV is different. We recommend you locate and refer to
your TVs user guide or your TV manufacturer’s website for
information on this.
18 PICTURE PERFECT
YOUR OPTIMISED SETTINGS
Enter your newly optimised settings here for future reference and safe keeping:
Television 1
Make & Model
Date of Last Optimisation
Brightness
Colour
Contrast
Hue
Sharpness
Overscan
Other Settings
Television 2
Make & Model
Date of Last Optimisation
Brightness
Colour
Contrast
Hue
Sharpness
Overscan
Other Settings
NOTES
PICTURE PERFECT 19
FOR MORE
SUPPORT…
visit us at:
knowhow.com/pictureperfect