1
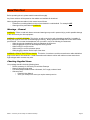
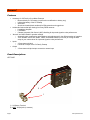
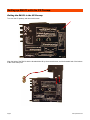
TM
juicedLink
User’s Manual
DN101 – Accessory for CX Family of Low-Noise Preamps
© 2007-2010 juicedLink, LLC.
All Rights Reserved.
ENGLISH
DN101 User Manual: Rev1.03
Contents
Contents.......................................................................................................................................2
Read This First .............................................................................................................................3
Warnings - General ...................................................................................................................3
Checking Supplied Items .........................................................................................................3
General.........................................................................................................................................4
Features....................................................................................................................................4
Panel Descriptions ...................................................................................................................4
Setting up DN101 with the CX Preamp........................................................................................6
Bolting the DN101 to the CX Preamp.......................................................................................6
Battery Tray Modification ........................................................................................................8
Operation....................................................................................................................................11
Powering.................................................................................................................................11
Input / Output Connection ......................................................................................................11
Normal Operation ...................................................................................................................11
AGC Disable Operation...........................................................................................................11
Notes on Specific Cameras .......................................................................................................13
Canon 5D MarkII, 7D, 1D Mark IV ...........................................................................................13
Panasonic Lumix GH1 ............................................................................................................13
Nikon D300s, D3s ...................................................................................................................13
Appendix ....................................................................................................................................14
Care and Maintenance ...........................................................................................................14
Warranty, Service, and Returns .............................................................................................14
Compliance.............................................................................................................................14
Page 2
www.juicedLink.com
Read This First
Before operating the unit, please read this manual thoroughly.
Any future revisions will be posted on the website and available for download.
Notes regarding documentation in this manual are as follows:
- References to markings/labels on the unit are denoted in underline/bold. For example: HPF.
- Warnings will be preceded with WARNING.
Warnings - General
WARNING: Failure to read and observe notes and warnings may result in personal injury, and/or possible damage
to this device and your other equipment.
WARNING - LOSS OF HEARING: This device, as well as any device with a headphone amplifier, is capable of
driving the signal at levels that can be damaging to hearing. Always operate the headphone volume at the lowest
practical level. Do not wear the headphones over your ears in any of the following circumstances:
- While plugging the headphones into the headphone driving device.
- While plugging the mixer into the headphone driving device.
- While turning on or off the mixer.
- While turning on or off the phantom power.
- While plugging a device into the input of the mixer.
WARNING - RISK OF ELECTRICAL SHOCK: This device, its enclosure, and the connections to cable shields that
plug into this device are conductive. Avoid electrocution and observe caution with cable runs near areas where
high-voltages and/or currents may exist.
Checking Supplied Items
Your package should include the following items:
- DN101 Accessory for CX Family of Low-Noise Preamps
- Stereo 3.5mm mini plug cable
- Flat head Phillips machine screw 4-40 thread, 3/16” length, undercut head
- Welcome Card:
o Read this User Manual
o Save your receipt in the event you require warranty service.
DN101 – Accessory for CX Family of Low-Noise Preamps
Page 3
General
Features
•
•
•
•
•
Accessory for CX Family of Low-Noise Preamps
o Mounts directly to CX Preamp (requires minor modification to battery tray)
o Utilizes the battery of the CX Preamp
o Small size
o Aluminum chassis (black anodized) for EMI protection and rugged use
Adds audio features that are missing from many DSLR cameras
o Headphone Amplifier
o Level Meter
o Camera Automatic Gain Control (AGC) disabling for improved signal-to-noise performance
“Normal” and “AGC Disable” operation settings
o Automatic meter recalibration and headphone gain adjustment for the different modes of operation
o “AGC Disable” uses a safe, stable, robust, and reliable method (not a tone) of forcing the AGC
amps in your camera down for improved signal-to-noise performance.
Inputs
o 3.5mm stereo minijack
o Connects to output of the CX Family Preamp
Output
o 3.5mm stereo minijack output connects to camera input
Panel Descriptions
LEFT SIDE
2
1
1) 9V Battery Terminal
2) OUT - Output jack (to camera)
Page 4
www.juicedLink.com
RIGHT SIDE
2
1
1) IN - Input jack (from CX Preamp output
2) Headphone output jack
FRONT PANEL
7
8
1
2
3
6
4
5
1)
2)
3)
4)
5)
6)
7)
8)
ON - Power Switch
Power LED
Level Meter
AGC DIS – “AGC Disable” / “Normal Operation” Switch
Headphone amplifier gain adjustment
LEV - AGC Disable signal level adjustment
M1 - Meter Level Adjustment for “Normal” operation
M2 - Meter Level Adjustment for “AGC Disable” operation
DN101 – Accessory for CX Family of Low-Noise Preamps
Page 5
Setting up DN101 with the CX Preamp
Bolting the DN101 to the CX Preamp
Turn over the CX preamp, and remove this screw:
Align the holes of the DN101 with the threaded hole left by the removed screw, and the threaded hole of the bottom
of the circuit board post:
Page 6
www.juicedLink.com
Replace the screw that was just removed back into the same position:
Use the additional screw provided with the DN101 to secure this position:
DN101 – Accessory for CX Family of Low-Noise Preamps
Page 7
Battery Tray Modification
Remove the battery tray from the CX Pramp:
Remove the spring in the back of the battery try:
Make sure that you save the spring, in case you want to replace it later.
Page 8
www.juicedLink.com
Take a pair of cutters, and cut off this tongue:
Use the cutters to cut a notch in the front of the battery tray for a place for the DN101 wires to escape:
DN101 – Accessory for CX Family of Low-Noise Preamps
Page 9
Attach the battery leads to the 9V alkaline battery. Place the battery and leads into the battery tray with the correct
orientation (+ to +, - to -):
Insert the battery tray into the CX preamp. It will take some more force to insert it all of the way to get the latch to
engage. It will also take some more force to de-latch. This is normal.
Page 10
www.juicedLink.com
Operation
This DN101 User Manual does not go into the detailed operation of the CX Family XLR Adapter / Preamp. For
details regarding the operation of the preamp, please refer to the preamp User Manual.
The DN101 will NOT operate without the use, and being connected to, one of the CX Family of XLR Adapter /
Preamps.
Powering
Switch the DN101 power switch to the ON position. The power indicator LED should light up.
You must also power the CX Family Preamp, by selecting the ON position for its power switch. The preamp PWR
LED should light up. If not, then check that the battery has been placed into the battery tray with the correct
orientation, and that you are using a fresh 9V alkaline battery.
Input / Output Connection
Use the stereo minijack cable to connect the CX Preamp OUT to the DN101 IN.
Use the CX Preamp stereo minijack cable to connect the DN101 OUT to the camera’s microphone input.
Normal Operation
Select the down position for the AGC DIS switch. This places the DN101 in the normal operating mode.
In the normal operating mode, the DN101 is simply providing headphone monitoring and metering.
The meter has been calibrated for levels assuming that the camera’s AGC is free running. The peaks of your audio
should hit the 3rd LED (green), but remain below the 4th LED (yellow).
Adjustment to the level meter in the normal mode can be made with a small screwdriver with the M1 potentiometer.
Adjustment to the headphone amplifier gain can be made with a small screwdriver with the trim potentiometer next
to the “headphone” symbol. The headphone monitoring in mono, meaning that both the right and left inputs are
present in each of the headphone ear cups.
In this operating mode, the headphone amp requires significantly more gain. Therefore, the signal is fairly noisy.
Of course, this noise is not present in the recorded audio.
WARNING: Since this mode requires more gain from the headphone amp, you must be careful if you are wearing
your headphones and switching back and forth between the two operating modes. The signal in the headphone in
the normal mode will be very LOUD.
AGC Disable Operation
Select the up position for the AGC DIS switch. This places the DN101 in the AGC disable operating mode.
The meter has been calibrated for levels assuming that the camera’s AGC amplifiers are being forced to turn down
rd
th
their gain. The peaks of your audio should hit the 3 LED (green), but remain below the 4 LED (yellow).
Adjustment to the level meter in the AGC disable mode can be made with a small screwdriver with the M2
potentiometer.
Adjustment to the headphone amplifier gain can be made with a small screwdriver with the trim potentiometer next
to the “headphone” symbol.
DN101 – Accessory for CX Family of Low-Noise Preamps
Page 11
In the AGC disable mode, the DN101 is injecting an uncorrelated broadband noise signal into the camera’s right
channel. The right channel is not available for recording audio.
CX Preamp
DN101
Camera
L
Left
R
Right
Disable
Signal
A broadband noise signal is the most reliable and repeatable, and safest, method of spoofing the camera AGC.
Tones are coherent signals, and can be picked up by the human ear and brain, even at very low levels. Using a
tone means that you are depending on unspecified aspects of the camera to prevent the tone from corrupting your
audio (Nyquist anti-aliasing filter effectiveness, frequency stability, crosstalk, etc). The most evil part of using a
tone is that these problems could be happening in your camera, and you would have no way of knowing, because
you can’t monitor with headphones inside the camera. Using an uncorrelated broadband noise source, if your
camera does have any of these issues, then the signal simply tucks itself away with the rest of the electronic noise
in your system. There is no coherent tone artifacts for your ear and brain to pick out.
Each of your XLR inputs on the CX preamp that you wish to record need to be panned left in the preamp. For
example, if you were using the CX431 with 4 mics, you would pan all 4 mics to the left channel.
CX Preamp
Mic 1
Mic 2
DN101
Camera
L
Left
R
Right
Mic 3
Disable
Signal
Mic 4
When you pull your clip into your editor, your right track will be a noise signal, and your clean audio will remain on
the left track:
(disable signal)
Right Track
(clean audio)
Left Track
In your editor, you will select the left track to be used for your final mix (deleting the right track). This is easily done
in your editor. For example, in Sony Vegas, right click on the audio track, and select the left track for the final mix.
You will notice that the audio level of the clean track will be a little lower than a separate clip where you did not use
the AGC disable technique and let the AGC amps run free. This is normal. The meter for the AGC disable mode
has been calibrated intentionally for this level to provide adequate headroom inside the camera (since the signal no
longer has the AGC operation at its disposal to further throttle back its gain for high signal levels).
Page 12
www.juicedLink.com
Notes on Specific Cameras
Canon 5D MarkII, 7D, 1D Mark IV
The microphone input on the camera does not get activated until the camera begins to RECORD for the first time.
Until you hit RECORD and activate the microphone input, you will hear noise in the DN101 headphones. Once you
hit RECORD, the noise in the headphones goes away, and doesn’t return until the camera power gets cycled. After
the camera power gets cycled, you will need to hit RECORD again to eliminate the noise in the headphones.
Panasonic Lumix GH1
The microphone input is a 2.5mm stereo minijack. The cables provided in the CX preamps and DN101 are 3.5mm
stereo minijack. There are inexpensive adapters that can be purchased. A 8” 3.5mm to 2.5mm cable can be
purchased (part number CMC-T1772022) from Bay Electronics, 731 Airport Road, Panama City, FL 32405.
Nikon D300s, D3s
These cameras have different level settings for the AGC (Low, Med, High). Using the Low setting with one of the
CX preamps will yield great audio. However, the DN101 is still useful for headphone monitoring and metering.
You will want to use the DN101 in the Normal operating mode, but you will need to re-calibrate the meter M1 for the
camera’s Low setting. Matching the Normal operating mode meter level to the AGC Disable mode can work well.
Here is a simple procedure for doing this: 1) in the AGC Disable mode, set the CX gain/trim such that speaking at a
constant level yields peaking at the 3rd meter LED, 2) switch over to the Normal mode and turn back M1 so it yields
peaking at the 3rd meter LED (matching the AGC Disable mode)
DN101 – Accessory for CX Family of Low-Noise Preamps
Page 13
Appendix
Subscribe to the juicedLink Blog
Get notified on new revisions of this User Manual, product updates, new product releases, and tutorial videos.
Subscribe to the blog: www.juicedlink.com/blog/index.html
Care and Maintenance
There is no specific maintenance regimen recommended.
Warranty, Service, and Returns
The design of the juicedLink family of ultra portable mixers is uncompromising in quality and performance, and
utilizes top grade professional components. We are proud of our product, and are committed to servicing you to
make your customer experience positive.
The Policies page on the juicedLink.com website describes the details of the conditions for returns, limited one year
warranty, and instructions for obtaining service for your product.
Compliance
This device falls under the classification of FCC part 15, subpart B, section 15.103. Please refer to the FCC part 15
manual for details on conditions of operation.
This device has also been tested to meet CE certification standards.
Page 14
www.juicedLink.com