1
Image Alchemy
and
Image Alchemy PS
Version 1.11
Handmade Software, Inc.
Notice
Handmade Software, Inc. makes no warranty of any kind either
expressed or implied. In particular we make no warranty as to
merchantability or fitness for a particular purpose.
In no event shall Handmade Software, Inc. be liable for any
errors contained herein or for incidental or consequential
damages in connection with the furnishing, performance, or use
of the Image Alchemy or Image Alchemy PS product or
documentation.
This document contains proprietary information which is
protected by copyright. No part of this document may be
photocopied, reproduced, or translated without the prior written
consent of Handmade Software, Inc.
The information in this document is subject to change without
notice.
Trademarks
Image Alchemy and Image Alchemy PS are trademarks of
Handmade Software, Inc.
All other products or services mentioned in this manual are
trademarks, registered trademarks, service marks, or registered
service marks of their respective companies or organizations.
Copyright
Copyright © 1990-1998 Handmade Software, Inc.,
Fremont, California
Portions Copyright © 1993 Soft Horizons
Portions Copyright © 1988-1998 Aladdin Enterprises,
Menlo Park, California
All Rights Reserved
Printed in the United States of America.
First Printing, April 1998
ii
Image Alchemy was written by:
Marcos H. Woehrmann
Allan N. Hessenflow
David Kettmann
Paul H. Yoshimune
Handmade Software, Inc.
48860 Milmont Drive, Suite 106
Fremont, CA 94538
+1 800 252 0101
+1 510 252 0101
+1 510 252 0909 fax
http://www.handmade.com/
iii
iv
Contents
Chapter 0
Introduction ........................................................................ 15
About This Manual ............................................................ 16
Document Conventions...................................................... 17
Chapter 1 Installation
Overview ............................................................................ 19
IBM PC
Required Equipment ..................................................... 20
Optional Equipment ..................................................... 21
Packing List .................................................................. 21
Floppy Disk Installation Instructions ........................... 22
CD-ROM Installation Instructions ............................... 23
Environment Variables and config.sys ......................... 23
UNIX
Required Equipment ..................................................... 27
Packing List .................................................................. 27
Floppy Disk and Tape Installation Instructions............ 27
CD-ROM Installation Instructions ............................... 29
Environment Variables ................................................. 29
Differences between UNIX and MS-DOS ................... 30
Chapter 2 Introduction
Introduction ........................................................................ 31
Basic Instructions............................................................... 31
v
Limitations on Filename .................................................... 34
Using Response Files ......................................................... 35
Using Output Filename Response Files ............................. 37
Using Paired Filename Response Files .............................. 38
Using Sequential Filenames ............................................... 38
Multiple Runs of Alchemy................................................. 39
Chapter 3 Reading PostScript, EPS, and PDF Files
Introduction ........................................................................ 41
Converting PostScript files ................................................ 41
PostScript Conversion Parameters
Antialias ........................................................................ 45
Clip ............................................................................... 46
Color Mode................................................................... 47
Image Offset ................................................................. 49
Input Page Size ............................................................. 51
Margins ......................................................................... 53
Output Page Size........................................................... 55
Output Page Width ....................................................... 57
Output Page Height....................................................... 58
Page .............................................................................. 59
Pre-load Fonts............................................................... 61
Preserve Aspect Ratio ................................................... 62
Rotate Page ................................................................... 63
Specify Image Resolution............................................. 64
Use Bounding Box........................................................ 65
Examples ............................................................................ 66
Generating PostScript Files................................................ 71
Generating PostScript files from Microsoft Windows . 71
Generating PostScript files from a Macintosh ............. 79
Chapter 4 PostScript Fonts
alchfont .............................................................................. 87
Usage Instructions.............................................................. 88
Missing Fonts ..................................................................... 89
Multiple Fontmaps ............................................................. 90
vi
Chapter 5 Conversion Options
Introduction ........................................................................ 91
Identifying Image Files ...................................................... 92
Input Options ..................................................................... 93
MacBinary ......................................................................... 93
Other Information............................................................... 93
File Formats ....................................................................... 93
Image File Formats
ADEX ........................................................................... 95
Adobe Acrobat PDF ..................................................... 96
Adobe Photoshop ......................................................... 98
Alias Pix ..................................................................... 100
Alpha Microsystems BMP.......................................... 101
ALPS .......................................................................... 102
Autodesk PIC/CEL ..................................................... 103
Autologic .................................................................... 104
AVHRR ...................................................................... 105
AVS X ........................................................................ 107
Binary Information File (BIF) .................................... 108
Calcomp CCRF .......................................................... 111
CALS .......................................................................... 113
Core IDC .................................................................... 114
Cubicomp PictureMaker ............................................. 116
Dr. Halo CUT ............................................................. 118
Encapsulated PostScript ............................................. 119
Epson Stylus ............................................................... 122
ER Mapper Raster ...................................................... 124
Erdas LAN/GIS/IMG ................................................. 126
Explore TDI................................................................ 129
Fargo Primera ............................................................. 130
FBM............................................................................ 132
First Publisher ART.................................................... 133
FLC............................................................................. 134
Freedom of Press ........................................................ 135
GEM VDI Image File ................................................. 136
GIF .............................................................................. 138
vii
GOES .......................................................................... 144
Histogram ................................................................... 146
Hitachi Raster Format ................................................. 148
HP Printer Command Language (PCL) ...................... 149
HP PhotoSmart ........................................................... 156
HP Raster Transfer Language (RTL) ......................... 158
HP-48sx Graphic Object (GROB) .............................. 164
HSI JPEG ................................................................... 165
HSI Palette .................................................................. 166
HSI Raw ..................................................................... 167
IBM Picture Maker..................................................... 168
IDRISI ........................................................................ 169
IFF/ILBM ................................................................... 171
Imaging Technology................................................... 172
Img Software Set ........................................................ 173
Intergraph ................................................................... 174
Iris CT ........................................................................ 175
JEDMICS CCITT4 ..................................................... 176
Jovian VI .................................................................... 177
JPEG/JFIF................................................................... 178
Lumena CEL .............................................................. 181
Macintosh PICT/PICT2 .............................................. 182
MacPaint..................................................................... 184
MIFF ........................................................................... 185
Mimaki MRL-1 .......................................................... 186
MTV Ray Tracer......................................................... 187
Multi-Image Palette .................................................... 188
OS/2 Bitmap ............................................................... 190
OS/2 Icon.................................................................... 191
PCPAINT/Pictor Page Format ................................... 193
PCX ............................................................................ 196
PDS............................................................................. 199
PhotoCD ..................................................................... 201
Pixar PIC .................................................................... 202
Pixel Power Collage ................................................... 203
PNG (Portable Networks Graphics) ........................... 204
Portable BitMap (PBM).............................................. 206
viii
Puzzle.......................................................................... 208
Q0 ............................................................................... 209
QDV ........................................................................... 210
QRT Raw.................................................................... 211
Raster Graphics .......................................................... 212
RIX ............................................................................. 213
RLC ............................................................................ 214
Scitex CT .................................................................... 215
Scodl ........................................................................... 216
SGI Image .................................................................. 218
Sharp GPB .................................................................. 219
Spaceward Graphics ................................................... 220
SPOT Image ............................................................... 221
Stork ........................................................................... 223
Sun Icon ...................................................................... 225
Sun Raster................................................................... 226
Targa ........................................................................... 228
TIFF ............................................................................ 230
US Patent Image ......................................................... 234
Utah Raster Toolkit..................................................... 235
Verity Image Format (VIF) ........................................ 237
VIFF ........................................................................... 238
VITec .......................................................................... 239
Vivid ........................................................................... 240
Wavefront RLA/RLB ................................................. 241
Windows Bitmap ........................................................ 242
WordPerfect Graphic File........................................... 245
XBM ........................................................................... 246
XIM ............................................................................ 247
XPM ........................................................................... 248
XWD........................................................................... 251
Chapter 6 General Options
Introduction ...................................................................... 253
Control Memory Usage ................................................... 254
Display Image Stats ......................................................... 255
Do Not Alter Output Filename......................................... 256
ix
Do Not Remove Old Extension ....................................... 257
Help .................................................................................. 258
Multi-Page Input .............................................................. 259
Multi-Page Output ........................................................... 261
Override Input Type......................................................... 263
Overwrite ......................................................................... 265
Program Information........................................................ 266
Quiet................................................................................. 267
Response Files.................................................................. 268
Response Output Filenames ............................................. 270
Response Paired Filenames.............................................. 272
Sequential Filenames ....................................................... 273
Use Input Directories for Output ..................................... 276
Use Input File Format for Output .................................... 277
Use Input Filename for Output ........................................ 278
Use 3 Letter Extensions ................................................... 279
Warnings .......................................................................... 280
Wildcard........................................................................... 281
Chapter 7 Color and Palette Options
Introduction ...................................................................... 283
Alpha Channel.................................................................. 284
Black and White............................................................... 285
Brightness ........................................................................ 287
CMYK.............................................................................. 288
Color Correction .............................................................. 289
Colors ............................................................................... 290
Contrast ............................................................................ 292
Dither ............................................................................... 293
EGA Palette...................................................................... 295
False Color ....................................................................... 295
Gamma Correction ........................................................... 297
Match Palette ................................................................... 299
Negate .............................................................................. 301
Palette............................................................................... 302
Palette Selection: Heckbert Tuning.................................. 304
Palette Selection: Palette Selection .................................. 305
x
Palette Selection: Palette Sorting ..................................... 306
Palette Selection: Palette Swapping ................................. 307
Palette Selection: Palette Weighting ................................ 308
Preserve Palette While Scaling ........................................ 309
Spiff.................................................................................. 310
Swap RGB ....................................................................... 312
Transparency .................................................................... 313
True Color (15 bits).......................................................... 314
True Color (16 bits).......................................................... 315
True Color (24 bits).......................................................... 316
True Color (32 bits).......................................................... 318
Uniform Palette ................................................................ 319
Chapter 8 Scaling and Filtering Options
Introduction ...................................................................... 321
Center Image .................................................................... 322
Change Image Resolution ................................................ 324
Convolve Image ............................................................... 326
Flip Image ........................................................................ 327
Mirror Image .................................................................... 328
Offset Image .................................................................... 329
Only Scale If Too Large .................................................. 331
Only Scale If Too Small .................................................. 332
Preserve Aspect Ratio ...................................................... 333
Preserve Palette While Scaling ........................................ 334
Scale Image in Horizontal Direction ............................... 335
Scale Image in Vertical Direction .................................... 338
Set Horizontal DPI ........................................................... 340
Set Vertical DPI ............................................................... 342
Specify Image Aspect Ratio ............................................. 344
Specify Image Resolution ................................................ 346
Chapter 9 Viewing Options (MS-DOS Only)
Introduction ...................................................................... 349
Display Hardware............................................................. 349
Display Resolution ........................................................... 352
Wrong RGB Order ........................................................... 352
xi
Actions During Viewing .................................................. 352
Viewing Options
Offset View................................................................. 354
Slide Show .................................................................. 355
View Image................................................................. 356
View Image in True Color Mode ............................... 357
View Scaled Image..................................................... 359
View Scaled Image in True Color Mode.................... 361
Appendix A Answers to Frequently Asked Questions
.................................................................................... 363
Appendix B Color and Dithering
.................................................................................... 375
Appendix C JPEG Description
.................................................................................... 381
Appendix D Customer Support
.................................................................................... 385
Appendix E Binary Information Files (BIF)
.................................................................................... 387
Appendix F HSI Raw Files
.................................................................................... 397
Appendix G Undercolor Removal Files
.................................................................................... 403
Appendix H HSI PAL Files
.................................................................................... 407
Appendix I Acknowledgments
.................................................................................... 409
xii
Appendix J Other Useful Software
.................................................................................... 411
Appendix K Configuring DOS/4GW Pro (MS-DOS Only)
.................................................................................... 415
Glossary
.................................................................................... 419
References
.................................................................................... 421
Colophon
.................................................................................... 425
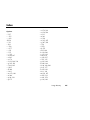
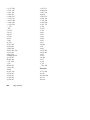
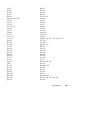
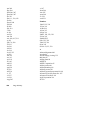
Index
.................................................................................... 427
xiii
xiv
0
Introduction to Image Alchemy
What is Image
Alchemy?
Image Alchemy is a software utility that manipulates computer
image files.
Image Alchemy converts between various graphics file formats,
including industry standard file formats as well as vendor
specific file formats. For example, from GIF to TIFF or from
Sun Raster to Scodl. Currently Alchemy supports over 90
different formats, and new formats are always being added.
Image Alchemy can also resize an image, change the number of
colors in an image, change an image from color to black and
white, and change the color space an image uses.
In addition Image Alchemy PS converts PostScript, EPS, and
PDF files to over 90 different raster file formats, such as TIFF
and PCX. Alchemy PS also allows you to print PostScript, EPS,
and PDF files on non-PostScript printers and plotters, such as
HP LaserJet printers, HP DesignJet plotters, and Novajet
plotters.
Image Alchemy
15
About this
manual
Chapter 0
Chapter 1
Chapter 2
Chapter 3
Chapter 4
Chapter 5
Chapter 6
Chapter 7
Chapter 8
Chapter 9
Appendix A
Appendix B
Appendix C
Appendix D
Appendix E
Appendix F
Appendix G
Appendix H
Appendix I
Appendix J
Appendix K
Glossary
References
Colophon
Index
16
Image Alchemy
This manual is divided into 11 chapters, 11 appendices, a
glossary, references, a colophon, and an index.
Introduction and Conventions
Installation Instructions
Introduction to Alchemy
Reading PostScript Files
PostScript Fonts
Conversion Options
General Options
Color and Palette Options
Scaling and Filtering Options
Viewing Options (MS-DOS only)
Answers to Frequently Asked Questions
Color and Dithering
JPEG Description
Customer Support
Binary Information Files (BIF)
HSI Raw Files
Undercolor Removal Files
PAL Files
Acknowledgments
Other Useful Software
Configuring DOS/4GW (MS-DOS only)
Document
conventions
Type style
Used for
italic
Parameters. You supply values for the items
shown in italic. For example, if the
description of a command includes filename,
you would type in the name of the desired
file.
[]
Brackets. Indicate optional items.
…
Ellipses. Indicates a list of items or items
which may be repeated.
fixedspace
Examples of Alchemy usage which can be
typed in exactly as written. Many of the
examples give file names which probably
don't exist on your system; substitute
different file names as appropriate.
Image Alchemy
17
18
Image Alchemy
1
Installing Image Alchemy
Overview
Installation of Image Alchemy is straightforward; it involves
copying the Alchemy program and support files off of the
supplied floppy disks or tape onto your hard drive or network
and setting some environment variables.
The PC versions of Alchemy includes a setup program which
copies the files for you.
You need to be familiar with the tar command if doing a UNIX
installation. If you are unsure of how to use this command you
may wish to read the manuals which came with your computer or
ask someone to assist you.
The installation instructions are divided into different sections
for Image Alchemy for PC, including MS-DOS, Windows 95,
and Windows NT and Image Alchemy for UNIX. Please refer to
the section which corresponds to the version of Image Alchemy
you have.
Image Alchemy and Image Alchemy PS for PC include an
executable named alchlong.exe. Alchlong.exe is a 32 bit
Windows 95/NT console application; it is run from the command
line. Alchlong.exe has two advantages over alchemy.exe (or
alch386.exe): when converting Postscript files it uses up to 2
processors on a multi-processor Windows NT machine and it can
process files with long filenames.
Image Alchemy
19
PC Installation
Depending on which version of Image Alchemy you purchased
there are up to three executable files included: alchemy.exe,
alch386.exe, and alchlong.exe.
The alchemy.exe program is the standard version of Image
Alchemy, and can be used to process files up to 2550 pixels by
3300 pixels (8.5" x 11" at 300 dpi).
The alch386.exe program is an extended 32-bit version of Image
Alchemy which can be used to process files up to 65000 pixels
by 65000 pixels. It is also slightly faster than alchemy.exe. The
disadvantage that alch386.exe has is that it has a longer startup
time, so much so that converting small images takes longer than
using alchemy.exe, and it does not support image viewing.
The alchlong.exe program is a Windows 95/Windows NT
console application. It is also a 32-bit version of Image
Alchemy. In addition to supporting larger files than
alchemy.exe, it has the ability to read and write files which have
long filenames, which are supported by Windows 95 and
Windows NT 4.0.
If you need to use alch386.exe or alchlong.exe simply substitute
it for alchemy.exe in the examples shown in the manual.
Required
equipment
At a minimum you must have the following hardware and
software to run Image Alchemy.
Computer
An MS-DOS computer equipped with an 80386, 80486,
Pentium, or other 32-bit Intel processor.
Many of the conversions that Alchemy does are CPU intensive,
so a faster computer is definitely an advantage.
Memory
20
Image Alchemy
At least 4 megabytes of memory.
Hard drive
A hard drive with as much free space possible.
Converting very high resolution images can require large
amounts of disk space (for example, a 8.5" x 11" color PostScript
file converted at 300 dpi will require up to 50 megabytes of disk
space).
Operating system
Windows 95, Windows NT, or MS-DOS 3.x or greater (because
of the additional free memory available, use of MS-DOS 5.0 or
higher is recommended).
Note that the setup.exe program used by Image Alchemy is a
Windows 32-bit application. If you need to install Image
Alchemy on a computer which is running Windows 3.1 or MSDOS contact us for an alternate set of install disks.
Optional
equipment
The following hardware is optional.
Display
A supported SVGA, 8514/A, or XGA board, if you wish to view
images.
Supported SVGA boards include those with a VESA driver or
with the Paradise, Everex, Trident, Video 7, ATI, Ahead, NCR,
or Tseng Labs chipsets.
Supported 8514/A boards include IBM and those with the
Western Digital chipset.
Supported XGA boards include those from IBM.
Math co-processor
Packing list
A math co-processor will increase the speed of converting a
PostScript file and raster scaling types c and d.
The enclosed diskettes contain the following files:
SETUP.EXE
The Image Alchemy installation program.
Image Alchemy
21
Floppy disk
installation
instructions
ALCHEMY.EXE
The Alchemy software.
ALCH386.EXE
The 32-bit version of Alchemy (only
included with Alchemy/386 and Alchemy
PS).
ALCHLONG.EXE
The long filename version of Alchemy.
ALCHFONT.EXE
A tool for installing PostScript fonts for use
by Alchemy PS (only included with
Alchemy PS).
ALCHPS.EXE
The PostScript rendering overlay used by
Alchemy (only included with Alchemy PS).
ALCHEMY.PDF
This document in Adobe Acrobat PDF form.
README.TXT
A text document describing any last minute
revisions.
\SAMPLES
A directory containing sample data files and
images. See the README2.TXT file in this
directory for further information.
\PS
A directory containing the fonts supplied
with Alchemy PS (only included with
Alchemy PS).
1. Insert disk 1 in your disk drive.
2. Open the disk drive icon.
3. Double-click on the setup.exe icon.
4. When prompted, change diskettes and press any key to
continue. Repeat this step for each diskette.
5. You have now successfully installed Image Alchemy.
6. The file readme.txt contains information which has
changed since the manual was printed. To display this file
double-click on it.
22
Image Alchemy
CD-ROM
installation
instructions
1. Insert the CD-ROM in your CD-ROM drive.
2. Open the CD-ROM drive icon.
3. Double-click on the setup.exe icon.
4. You have now successfully installed Image Alchemy.
5. The file readme.txt contains information which has
changed since the manual was printed. To display this file
double-click on it.
Environment
variables and
config.sys
Image Alchemy uses several different environment variables to
determine its behavior. These control, among other things, how
Image Alchemy uses memory, where PostScript fonts are stored,
which display resolutions are available for image viewing, and
where temporary files are stored.
config.sys
autoexec.bat
path
PostScript fonts
To insure that Image Alchemy can open the various files it needs
while running, you should verify that the files value in your
\config.sys file is set to at least 30 and the buffers value is
set to at least 20 if you are running MS-DOS or Windows 95. If
you are running Windows NT these values do not need to be set.
There are several changes you may wish to make to your
autoexec.bat file. These consist primarily of set commands,
which are used to configure Image Alchemy.
You must either add c:\alchemy to your path, copy the .exe
files to a directory which is already in your path, or be in the
c:\alchemy directory when executing Alchemy.
The fonts that ship with Image Alchemy PS are normally found
in the c:\alchemy\ps directory, but this can vary depending
on where you installed Alchemy.
Image Alchemy
23
Alchemy can find the c:\alchemy\ps directory if the
c:\alchemy directory is in your path, if it is the current
directory, or if the alchemy.exe program is explicitly executed
from the c:\alchemy directory. Alternatively, you can set the
alchemyps environment variable to point to this directory, for
example: set alchemyps=c:\alchemy\ps.
Virtual memory
Alchemy can require a lot of memory when converting some
images.
If you will be converting large images and using alch386.exe you
may run out of physical memory, in this case Alchemy will
automatically create a virtual memory file on your hard disk.
This file will be created in the directory indicated by the TMP
environment variable (see below for more information). If you
are using alchlong.exe to convert large images Windows 95 /
Windows NT will manage virtual memory for you.
For more information on virtual memory please refer to
Appendix K.
Temporary disk files
Alchemy uses the environment variable TMP to determine where
to open temporary files. If the TMP environment variable is not
set these files will be opened in the current directory.
The temporary files that Alchemy PS uses may be very large
when rendering high-resolution PostScript images. For example,
rendering a 8.5" x 11" PostScript file at 300 dpi in full color may
create up to 50 megabytes of temporary files. If Alchemy PS
runs out of disk space while writing to a temporary file it will
report an error.
An example of setting the TMP variable to the \temp directory
on drive e: would be set TMP=e:\temp.
24
Image Alchemy
Use of extended
and expanded
memory
If you are using alchemy.exe and there is enough extended or
expanded memory available, Alchemy will use it instead of some
of the temporary files it would otherwise use during some
conversions. To use extended memory you must have an XMS
driver installed in the config.sys file (such as HIMEM.SYS,
QEMM, or 386MAX). To use expanded memory you must have
a LIM 3.2 or LIM 4.0 expanded memory driver installed (such as
EMM386, QEMM, or 386MAX).
Alchemy's use of extended/expanded memory can be disabled.
To disable the use of extended and expanded memory, set the
environment variable alchemy to x (type set alchemy=x at
the DOS prompt).
The availability of extended or expanded memory will not allow
you to convert larger images, it will just increase the speed of
conversions. If you need to convert very large images use
alch386.exe, which is the 386 Enhanced version of Image
Alchemy.
Checking for
8514/A boards
Alchemy will normally check to determine if there is an 8514/A
board installed in the computer when viewing images. However,
this can interfere with some network boards, as they use the
same I/O addresses that 8514/A boards use. To disable 8514/A
checking, set the environment variable alchemy to 8 (type
set alchemy=8 at the DOS prompt).
Note that this can be combined with other options; for example,
to disable both 8514/A checking and extended/expanded
memory usage, use set alchemy=8x.
Image Alchemy
25
Limiting maximum
display resolution
Alchemy will automatically choose the lowest resolution which
will fit the entire image when viewing images without specifying
a display resolution with a VESA compatible VGA board.
However, depending on the monitor and VGA board
combination you have, this can be bad since the monitor may not
support the particular resolution the SVGA board is trying to
switch to. To avoid this problem, the environment variable
alchemy may be set to indicate the maximum display resolution
which Alchemy should use. Set the alchemy variable to the
highest horizontal resolution which your monitor is capable of.
Valid values are 1280, 1024, 800, and 640. For example, type
set alchemy=800 at the DOS prompt if your monitor only
supports 640x480 mode and 800x600 mode.
To disable 8514/A checking, disable extended/expanded memory
usage, and limit the viewing resolution to 640x480 use
set alchemy=8x640.
Disabling time
estimation
information
When performing a long conversion Alchemy will automatically
display an estimate of the time needed to complete the operation.
To disable the display of this information, set the environment
variable alchemy to p (type set alchemy=p at the DOS
prompt).
Note that during PostScript conversions a completion time
estimate is not displayed. This is because the speed of various
PostScript operations varies widely, and any time estimate would
be inaccurate.
To disable 8514/A checking, disable extended/expanded memory
usage, limit the viewing resolution to 640x480, and disable time
estimation use set alchemy=8x640p.
26
Image Alchemy
UNIX Installation
Required
equipment
Disk space
At a minimum you must have the following hardware to run
Image Alchemy.
A hard drive with as much free space possible.
Converting very high resolution images can require large
amounts of disk space (for example, a 8.5" x 11" color PostScript
file converted at 300 dpi will require up to 50 megabytes of disk
space).
Packing list
Floppy disk or
tape installation
instructions
The enclosed diskettes, CD-ROM, or tape is in tar format and
contains the following files:
alchemy
The Alchemy software.
alchfont
A tool for installing PostScript fonts for use
by Alchemy PS.
read.me
A text document describing any last minute
revisions.
/samples
A directory containing sample data files and
images. See the read.me2 file in this
directory for further information.
/ps
A directory containing the fonts supplied
with Alchemy PS.
Use tar to copy the files from each of the distribution disks or
tape to a subdirectory of the current directory called alchemy.
The examples below assume you are installing Alchemy in
$HOME/alchemy; if you install Alchemy elsewhere you will
have to modify the examples appropriately.
Image Alchemy
27
Change to the directory where you wish to install Alchemy. To
install into the default $HOME/alchemy directory do the
following:
cd $home
mkdir alchemy
cd alchemy
To install the software from diskette insert each diskette, starting
at disk 1, and issue the following command for each diskette:
tar xvf /dev/fd0
For tape installation insert the tape in the appropriate tape drive
and replace /dev/fd0 with the name of the tape device. The
name of the tape device varies between different models and
configurations of systems; ask your system administrator if you
don't know the name of your tape device.
CD-ROM
installation
instructions
See the installation guide packaged with the CD-ROM for
installation instructions appropriate for your platform.
Environment
variable usage
Alchemy uses several different environment variables to
determine its behavior. Among these are controlling where the
PostScript fonts are stored and where to place temporary files.
path
28
Image Alchemy
You must either add $HOME/alchemy to your path, copy the
files alchemy, alchps, and alchfont to a directory which is
already in your path, or be in the $HOME/alchemy directory
when executing Alchemy PS (in which case . must be in your
path).
PostScript fonts
The fonts that ship with Image Alchemy PS are normally found
in the $HOME/alchemy/ps directory, but this may vary
depending on where you installed Alchemy PS.
Alchemy PS can find the $HOME/alchemy/ps directory if the
alchemy directory is in your path, if it is the current directory,
or if Alchemy PS is explicitly executed from the alchemy
directory. Alternatively, you can set the ALCHEMYPS
environment variable to the directory, for example:
setenv ALCHEMYPS=$HOME/alchemy/ps.
Temporary disk files
Alchemy uses the environment variable TMPDIR to determine
where to put its temporary files. This is usually set to /usr/tmp
or /tmp, but if you are converting very large or high-resolution
images there may not be enough space available in the partition
those directories are on (for example, rendering a 8.5" x 11"
PostScript file at 300 dpi in full color will create up to 50
megabytes of temporary files).
If there is not enough space in the usual TMPDIR directory you
will need to set the environment variable TMPDIR to a directory
on a different partition. For example, to set the temporary file
directory to the directory /home/images use setenv TMPDIR
/home/images.
Contact your system administrator if you have problems with
Alchemy running out of disk space while converting images.
Disabling time
estimation
information
When performing a long conversion Alchemy will automatically
display an estimate of the time needed to complete the operation.
To disable the display of this information, set the environment
variable alchemy to p (type setenv alchemy=p at the
prompt).
Image Alchemy
29
Note that during PostScript conversions a completion time
estimate is not displayed. This is because the speed of various
PostScript operations varies widely, and any time estimate would
be inaccurate.
Differences
between UNIX
and MS-DOS
The UNIX and MS-DOS versions of Image Alchemy are very
similar. However, there are several important differences
between the two versions:
Pathnames
Because the MS-DOS and UNIX operating systems use different
conventions for path names, users of UNIX will have to
substitute forward slashes, "/", for the back slashes, "\", found in
the examples in this manual.
Unintentional
wildcard expansion
UNIX users should also be aware that the UNIX shell they are
using may be performing wildcard expansion on certain
characters (generally "*" and "?"). Since these are options which
Alchemy uses, they need to be escaped to prevent the wildcard
substitution. This is done by using a back slash, "\", before the
character (so -? becomes -\?).
Sending output
directly to devices
Several of the examples show output being sent directly to a
device (for example prn:). UNIX users cannot send output
directly to a device using Image Alchemy and should substitute a
file name for the output device name.
Viewing images
30
Image Alchemy
The UNIX command line version of Image Alchemy does not
support image viewing at this time. We have Motif versions of
Image Alchemy for various UNIX workstations. Please contact
us for information if you are interested in upgrading to one of
these versions.
2
Introduction
Introduction
Image Alchemy is a command-line driven program. It is run
from a MS-DOS prompt, Windows 95 or Windows NT console
prompt, or UNIX terminal window.
Basic
instructions
The basic Image Alchemy usage instructions are:
alchemy inputFileName [outputFileName]
[outputExtension] [outputPathName]
-options …
Options
Options are the commands that you give Alchemy so that it
knows what you want it to do. So that Alchemy can distinguish
between options and file names on the command line, options are
preceded by a dash ("-").
The only option that is required is the output file format. Image
Alchemy will make reasonable decisions for all of the other
options.
Some options take parameters. The parameters may immediately
follow the option or be separated by a space. For example, either
-c128 or -c 128 is acceptable.
The options themselves are documented in Chapters 5 through 9.
Image Alchemy
31
Note that options can appear anywhere in the command line and
usually they can be in any order (certain options take parameters;
in those cases the parameters must follow the option). The case
of the options is significant. For example, -d and -D mean
different things.
InputFileName
The inputFileName is the file name of the existing image file that
you are converting from and must be specified.
The inputFileName may include an optional drive and/or path.
OutputFileName
The outputFileName is the name of the file you are converting
the image to. The outputFileName is optional; if it is not
specified Alchemy generates one by substituting an appropriate
extension to the input file name.
If you specify an outputFileName and it does not include an
extension one will be added.
The outputFileName may include an optional drive and/or path.
If you do not supply a path the current directory will be used as
the destination directory.
The inputFileName and the outputFileName cannot be the same
unless you are writing the output file to a different directory.
OutputExtension
If you specify an output extension it will be used instead of the
extension normally used by the output file format. See below for
an example.
Specifying an outputExtension is useful when using the wildcard
option to convert multiple files; see the wildcard command in
chapter 6 for more information.
If you are not using the wildcard option the outputExtension is
usually specified on the command line as part of the
outputFileName.
32
Image Alchemy
Examples
Convert the file test.gif in the directory \images to a TIFF file
called temp.tif in the current directory:
alchemy \images\test.gif temp.tif -t
Do the same thing, calling the new file temp.out:
alchemy \images\test.gif temp.out -t
Convert all of the GIF files in the directory \images to TIFF files,
giving them all the extension .out:
alchemy -- \images\*.gif .out -t
OutputPathName
The outputPathName is the location where you want to put the
output file that Alchemy will create. The outputPathName is
optional; if it is not specified Alchemy places the output in the
current directory or in the directory specified as part of the
outputFileName.
Specifying an outputPathName is useful when using the wildcard
option to convert multiple files; see the wildcard command in
chapter 6 for more information.
If you are not using the wildcard option the outputPathName is
usually specified on the command line as part of the
outputFileName.
Examples
Convert the file test.gif in the directory \images to a TIFF file
called temp.tif in the current directory:
alchemy \images\test.gif temp.tif -t
Do the same thing, placing the output in the directory \new:
alchemy \images\test.gif \new\temp.tif -t
Image Alchemy
33
Convert all of the GIF files in the directory \images to TIFF files,
placing the TIFF files in the \new directory :
alchemy -- \images\*.gif \new -t
Limitations on
filenames
Example
Since Alchemy lets you optionally enter a space between an
option and its parameter it is possible to confuse Alchemy if a
filenames starts with a number. In particular, if you use an
option which has an optional parameter, you choose not to
supply the parameter, and you follow that option immediately
with a filename which starts with a number, Alchemy doesn't
realize that the filename is not the parameter. While it sounds
unlikely that this would ever be a problem it actually happens
quite often.
If you wanted to convert the file 12.gif to a Targa file with the
name output.tga you would have to be careful of the order in
which you specified things.
If you say:
alchemy -a 12.gif output.tga
Alchemy would misinterpret that as:
alchemy -a12 .gif output.tga
and would generate an error.
The easiest way around this problem is to always put the
filenames first, such as:
alchemy 12.gif output.tga -a
34
Image Alchemy
Using response
files
Alchemy can read command line parameters from text files
(called response files). Using response files is equivalent to
typing the options and/or file names on the command line.
Response files are useful when you have commonly used
commands or when you have long commands which would be
hard to remember or exceed the command line limits of your
operating system.
To use a response file you create a text file containing the
options and/or file names that you would ordinarily pass to
Alchemy on the command line. You create this text file using a
text editor. This file can have any name or extension you wish.
To specify this file to Alchemy use the @ operator, followed
immediately by the name of the text file.
For example, if you frequently need to scale images to be no
larger than 640x480, using 'b' quality scaling, and preserving
aspect ratio, you can make a text file which looks like this (called
scale, for purposes of this example):
-Xb640 -Yb480 -+
You would then use this text file with Alchemy by passing its
name along with any other options (including the output file type
option and the file names). For example:
alchemy test.gif new.gif -g @scale
would convert the GIF file test.gif to a GIF file called new.gif,
while performing the desired scaling operation.
Image Alchemy
35
It is also possible to place filenames of images to convert and
other response files in response files. For example, if you want
to convert the files test1.gif, image.tga, scan1.tif, scan2.tif, and
scan3.tif to JPEG files you can create a text which looks like this
(called files):
test1.gif
image.tga
scan1.tif
scan2.tif
scan3.tif
And then use this command line to convert those files to JPEG
files:
alchemy -- @files -j
Note the use of the -- option to indicate to Alchemy that more
than one filename will be specified.
For MS-DOS users it is also possible to place wildcards in
response files. For example, if you want to convert all of the
.gif, .tif, and .tga files to JPEG files you can create a text file
which looks like this (called wild):
*.gif
*.tif
*.tga
And then use this command line to convert those files to JPEG
files:
alchemy -- @wild -j
UNIX users can accomplish the same task by using ls and
redirecting output to a file:
ls *.gif *.tif *.tga >wild
36
Image Alchemy
And then use this command line to convert those files to JPEG
files (note the use of the -- option to indicate to Alchemy that
you are giving it more than one file to convert):
alchemy -- @wild -j
If you wanted to scale the images at the same time, using the
scale text file created earlier, you would add that response file
to the command line. For example:
alchemy -- @files @scale -j
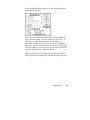
Comments
A line in a response file which begins with a # is treated as a
comment and ignored.
Response files may contain commands and filenames on
multiple lines and may also contain blank lines.
Using output
filename
response files
Sometimes you may need to convert a list of filenames but have
the output filenames have unrelated names. With Alchemy you
can do that in one of two ways. You can give Alchemy a list of
output filenames, this list is similar to a response file that
contains input filename, except that it contains the output
filenames. You can then pass this option to Alchemy with the
-@ operator. For example, you want to convert the following list
of files to JPEG files:
test1.gif
image.tga
scan1.tif
scan2.tif
scan3.tif
You want the output files to have the following names:
image1.jpg
image2.jpg
image3.jpg
Image Alchemy
37
image4.jpg
image5.jpg
Assuming the first list is called files and the second list is called
outnames, the following command can be used:
alchemy -- @files -@outnames -j
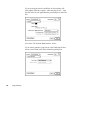
Using paired
filename
response files
If instead of two lists you have one list containing a pair of
filenames the --@ operator can be used. For example, you want
to do the same thing as the previous example, but instead of two
lists, the filenames are in one file like this:
test1.gif
image.tga
scan1.tif
scan2.tif
scan3.tif
image1.jpg
image2.jpg
image3.jpg
image4.jpg
image5.jpg
Assuming the list is called pairs, the following command can be
used:
alchemy -- --@pairs -j
Using sequential
filenames
38
Image Alchemy
Alchemy can process files that contain a sequence number in
various ways. For example, Alchemy can read files with the
names image001.gif, image002.gif, image003.gif, … and write
files with the names file.001, file.002, file.003, …. For
information about this see the Sequential Filenames option in
Chapter 6.
Using multiple
runs of Alchemy
Sometimes you may know what you want to accomplish but not
how to specify the correct combination of options. For example,
you may wish to resize a true color Targa file that you have
scanned and convert it to a 16 color GIF file. Let's say that the
input file name is file.tga and you want to generate a file with
the name file.gif. In this case you could use:
alchemy file.tga -Xb640 -Yb480 -c16 -g
However, there would be no penalty in quality if you did things
in two steps:
alchemy file.tga temp.raw -Xb640 -Yb480 -r
alchemy temp.raw file.gif -c16 -g
In this case you are telling Alchemy to use a temporary raw file
called temp.raw. Except for having to delete the file
temp.raw, this would give you identical results to doing things
in one step.
However, the order of steps is important in many cases. For
example, reversing the order of the two operations in the
previous example:
alchemy file.tga temp.raw -c16 -g
alchemy temp.raw file.gif -Xb640 -Yb480 -g
would give different results. This is because the scaling
operation has to temporarily convert the image to true color, but
the GIF file you are generating has to be paletted, so the second
operation would re-dither the image, lowering the quality.
Image Alchemy
39
Illegal combinations
of options
Sometimes you will have to perform operations using multiple
steps because there are some combinations of options that
Alchemy explicitly does not allow. These combinations of
options are not allowed because the results would not be what
you expect.
For example, using the spiff option, -S, in combination with the
false color option, -F, would spiff the image first and then false
color it, which would give the same results as just using the false
color option.
Since this is not the result you would most likely want, Alchemy
will generate an error if you specify both of those options at the
same time. In this case you could false color the image first,
generating a temporary image, and then spiff that image.
40
Image Alchemy
3
Reading PostScript, EPS, and PDF Files
If you are using Image Alchemy PS you can read PostScript,
EPS, and PDF files. This chapter describes options which effect
how these files are read.
Converting
PostScript files
Image Alchemy PS automatically identifies PostScript,
Encapsulated PostScript, and PDF files and converts them as
other formats. However, unlike the other image file formats
Alchemy reads, many of the of the characteristics of the input
file can be altered depending on what you will be doing with the
resulting file.
For example, a PostScript file needs to be interpreted differently
if it is going to be displayed on a color CRT versus printed on a
1200 dpi black and white typesetter. Since Alchemy does not
know which device will eventually be using the image, various
parameters have to be specified at the conversion time.
These parameters include:
• The resolution of the output device (in dots per inch)
• The size of the PostScript image (in inches, cm, or pixels)
• The desired size of the output image (in inches, cm, or
pixels)
Image Alchemy
41
• Whether the output device is black and white, grayscale, or
color
• Which page(s) of the PostScript file to convert
• Whether or not to clip the border of the image
• Whether or not to rotate the image
Alchemy PS makes reasonable assumptions for default values
for each of these parameters, so in practice it is usually not
necessary to specify all of them.
These parameters are described below.
Identifying
PostScript files
Image Alchemy PS can automatically identify most PostScript
and Encapsulated PostScript files. However, some non-standard
PostScript files may not be recognized by Image Alchemy. If
Alchemy fails to identify a PostScript file correctly, the -=14
option can be used to force Alchemy to recognize the input file
as a PostScript file (see the -= option, in Chapter 7, for more
information).
Disk space
requirements
Note that rendering PostScript files may require a lot of disk
space or virtual memory. For example, rendering an 8.5" x 11"
page at 300 dpi in color generates a temporary file which is up to
25 megabytes in size. In addition, if there isn't enough real RAM
available, Alchemy will use up to another 25 megabytes for swap
space (for a total of 50 megabytes).
If you tell Alchemy to generate a color file when in fact there is
only gray-scale or black and white data in the PostScript file,
Alchemy will fall back to gray-scale or black and white and the
temporary file size will be smaller, but Alchemy will still need a
large amount of real memory or swap space.
42
Image Alchemy
Disk space requirements decrease dramatically for 1 bit black
and white images; for example the same 8.5" x 11" image at
300 dpi would only require a 1 megabyte temporary file (and 1
megabyte of memory).
Rendering large
images
The memory and disk space requirements and processing time
can increase dramatically when rendering PostScript images
directly for use on large format devices. For example, rendering
a full color PostScript image to 34 inches by 44 inches at 300 dpi
(the size of a Novajet plotter) requires up to 800 megabytes of
disk space.
A way to reduce the memory requirement is to render the image
to an intermediate size and then use Alchemy PS's raster scaling
operators (-X and -Y) to increase the image to its final size. This
requires much less disk space since the raster scaling is done on
the fly.
For example, rendering the same image to 17" x 22" and then
raster scaling it to 34" x 44" reduces the disk space requirements
to 200 megabytes; and rendering to 8.5" x 11" and then raster
scaling to 34" x 44" requires only 50 megabytes.
Performing the image scaling in two steps may reduce the
quality of the final image somewhat, but generally the results
will be indistinguishable from rendering the PostScript file
directly to the final size.
See the examples section below for information about the syntax
required for these operations.
Progress
information
While interpreting a PostScript file, Alchemy will display
progress information. It is normal for the rate at which progress
is indicated to vary considerably while interpreting a file. This is
because PostScript is a programming language, and interpreting
some commands can take far longer than others.
Image Alchemy
43
Level 2 Support
Threading
44
Image Alchemy
Image Alchemy PS can convert all Level 1 and Level 2
PostScript files. If you have a PostScript file that Alchemy does
not read correctly please contact us.
Image Alchemy PS is threaded (except for the version of Image
Alchemy PS for MS-DOS). This allows the PostScript data to be
RIPed and immediately passed to the rest of Alchemy, as
opposed to RIPing the entire image and then converting it. Also
if you are using a computer with multiple CPUs Alchemy PS
will use two of them during conversion.
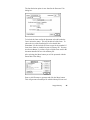
Antialias
-Za
Specify amount of antialiasing to perform.
Syntax
-Za mode
Parameter
mode:
0:No antialias
1:Antialias factor 2.25
2:Antialias factor 4
3:Antialias factor 9
4:Antialias factor 16
The default is No antialias.
Comments
Antialiasing can vastly improve the quality of an image rendered
for use on grayscale or color devices by averaging a number of
pixels together to convert black and white data (such as fonts)
into grayscale data.
Antialiasing will not improve the quality of output black and
white devices like laser printers or 4-bit CMYK devices like
color raster plotters unless you are performing raster scaling on
the image as part of the conversion process.
The antialiasing factor is the number of rendered PostScript
pixels that are averaged to produce each output pixel.
Antialiasing causes the memory requirements and processing
times to increase (the more so the higher the antialias factor).
Example
Convert the file periodic.eps to a grayscale TIFF file called
periodic.tif to be used on a 640x480 display, using antialiasing:
alchemy periodic.eps -t -Zo640p 480p -Z+
-Za2
Image Alchemy
45
Clip
-Zc
Specify whether or not to trim any white space around the edges
of the image.
Syntax
-Zc mode
Parameter
mode:
0:Don't clip
1:Clip
The default is Don't clip.
Comments
This can reduce the size of the output file, although it does not
reduce the memory requirements, as Alchemy still has to render
a full page before it can determine where the edges are.
This option is most useful when converting EPS clip art or other
files for importing into other software. In this case you may also
want to use the Use Bounding Box (-Ze) option, see below for
more information.
Note that clipping occurs after the image is scaled to the final
size; for example, if you specify an output image size of 8.5" x
11", and you specify clipping, the final image will be smaller
than 8.5" x 11".
Example
Convert the file person.eps to a black and white TIFF file called
person.tif to be used on a 600 dpi laser printer and clip the image
to the active image area:
alchemy person.eps -t -Zd600 600 -Zc1
46
Image Alchemy
Color Mode
-Zm
Specify whether to render the image in black and white,
grayscale, or color.
Syntax
-Zm mode
Parameter
mode:
0:Black and White - 1 bit
1:GrayScale - 8 bit
2:RGB Color - 24 bit
3:CMYK Color - 4 bit
4:CMYK Color - 32 bit
The default is Black and White.
Comments
Alchemy defaults to rendering the image in 1 bit black and
white.
If you specify grayscale or RGB color, Alchemy will
automatically fall back to grayscale or black and white if the
image doesn't use any color or grayscale, respectively. However,
the memory, disk space requirements, and processing time all
increase dramatically when telling Alchemy to render in Mode 1
or Mode 2, so don't specify those modes if it is not necessary.
You may want to specify grayscale output even when converting
a PostScript file which will be printed on a black and white
device. This way Alchemy can do a better job raster scaling the
image and you have control over the dithering type used. If you
specify black and white mode the only dither available is the
halftone dither.
Using CMYK - 4 bit mode can significantly speed up conversion
times, since the amount of data written is less than in the RGB
Color or CMYK - 32 bit modes. However the only dither
algorithm available with this mode is a digital halftone.
Image Alchemy
47
Using CMYK - 32 bit mode can be useful if you have color
separations in the PostScript file (for example, CMYK EPS
files). The CMYK - 32 bit option will preserve these separations
so the color representations will be more accurate and has an
advantage over the CMYK - 4 bit mode in allowing any of the
dithering types to be used.
Examples
Convert the file poster.ps to a color RTL file for plotting on a
NovaJet plotter:
alchemy poster.ps -Zm2 --r10
Do the same thing, but go directly to 4-bit CMYK:
alchemy poster.ps -Zm3 --r10
Do the same thing, but generate a 32-bit CMYK file and then
convert it to RTL using dither type 3:
alchemy poster.ps -Zm4 -d3 --r10
48
Image Alchemy
Image Offset
-Z_
Specify image offset.
Syntax
-Z_ xOffset[xUnits] yOffset[yUnits]
Parameter
xOffset:
yOffset:
Distance to offset the image
The default is 0" x 0".
xUnits:
yUnits:
The units the offset parameters are in:
p:pixels
i:inches
c:centimeters
units is optional; the default is inches. The units value
must immediately follow the offset parameter.
Comments
Using the "Use Bounding Box" option (-Ze), described below,
will often automatically accomplish the same thing as using this
option. Many modern PostScript files contain a bounding box
which includes the image offset.
This option shifts the image within the page. Positive numbers
will shift the page right and down (or the image left and up).
This can be useful for PostScript files that have an origin that
isn't 0,0.
If a units parameter is used it must immediately follow the offset
parameter.
Image Alchemy
49
Example
Convert the file contract.eps, which has an origin of 72, 144 (in
units of 1/72 inch), to a PCL file at 300 dpi, with the image
origin at the lower left corner of the output file:
alchemy contract.eps -P -Z_1i -2i
50
Image Alchemy
Input Page Size
-Zi
Specify input image size.
Syntax
-Zi xSize[xUnits] ySize[yUnits]
Parameter
xSize:
ySize:
Size of the image
The default is 8.5" x 11".
xUnits:
yUnits:
The units the size parameter is in:
p:pixels
i:inches
c:centimeters
units is optional; the default is inches. The units value
must immediately follow the size parameter.
Comments
Using the "Use Bounding Box" option (-Ze), described below,
will often automatically accomplish the same thing as using this
option. Many modern PostScript files contain a bounding box
which includes the input page size.
This option is necessary if the PostScript file being read was not
created for a 8.5" x 11" device. Alchemy PS needs this
information, along with the output page size and the output dots
per inch value, to correctly scale the image to the final size.
If a units parameter is used it must immediately follow the size
parameter.
Examples
Convert the file contract.ps, which was originally created to print
on legal size paper (8.5" x 14"), to a PCL file at 300 dpi:
alchemy contract.ps -P -Zi8.5i 14i
Image Alchemy
51
Note that the output image will be 8.5" x 14"; if instead you
wanted to reduce the image to be no larger than 8.5" x 11" you
could add an output page size option (and the preserve aspect
ratio option):
alchemy contract.ps -P -Zi8.5i 14i -Zo
8.5i 11i -Z+
52
Image Alchemy
Margins
-Zb
Specify that the converted PostScript image should have margins
(borders) removed from the edge.
Syntax
-Zb x1[units] y1[units] [x2[units] y2[units]]
Parameter
x1:
Amount to remove from the left side of the image.
The default is 0.
y1:
Amount to remove from the bottom of the image.
The default is 0.
x2:
Amount to remove from the right side of the image.
The default is the same as the left margin.
y2:
Amount to remove from the top of the image.
The default is the same as the bottom margin.
units:
The units the size parameter is in:
p:pixels
i:inches
c:centimeters
units is optional; the default is inches. The units value
must immediately follow the size parameter.
Comments
This option is used to trim any margin the PostScript file may
have (to conform to non-printable areas on a laser printer, for
example).
If a units parameter is used, it must immediately follow the size
parameter.
Image Alchemy
53
Examples
Convert the file house.ps to an HP-PCL file, remove 1/6" from
each of the edges to conform to the non-printable area of HP
LaserJet printers.
alchemy house.ps -P -Zb 0.166i 0.166i
0.166i 0.166i
A simpler way to achieve the same results is to not use the
PostScript conversion margin command but instead use the
reduce margin command on the HP PCL output:
alchemy house.ps -P50
54
Image Alchemy
Output Page Size
-Zo
Specify output image size.
Syntax
-Zo xSize[units] [ySize[units]]
Parameter
xSize:
ySize:
Size of the image
The default is the same size as the input size.
units:
The units the size parameter is in:
p:pixels
i:inches
c:centimeters
x:factor
units is optional; the default is inches. The units value
must immediately follow the size parameter.
Comments
This option is necessary if you want the PostScript file to be a
size other than the size the PostScript image was originally
rendered to. Alchemy PS needs this information, along with the
input page size and the output dots per inch value, to correctly
scale the image to the final size.
If a units parameter is used, it must immediately follow the size
parameter.
If you only specify the X-dimension Alchemy PS will
automatically generate the Y-dimension to preserve the aspect
ratio of the image. This is useful on plotters that take roll paper
and therefore have a very long Y-dimension.
Image Alchemy
55
Specifying a units value of x causes the size parameter to be
treated as a scale factor; e.g. -X 2.5x scales the image by a
factor of 2.5 in the X direction. This is particularly useful when
using the Bound Box command and you want to increase or
decrease the size of the generated image.
Example
Convert an image which was originally rendered to 8.5" x 11"
page to a Targa file which is no larger than 640 pixels x 480
pixels, at the same time preserving the aspect ratio:
alchemy image1.ps -a -Zo 640p 480p -Z+
56
Image Alchemy
Output Page Width
-Zx
Specify output image width.
Syntax
-Zx xSize[units]
Parameter
xSize:
Width of the image
The default is the same width as the input width.
units:
The units the size parameter is in:
p:pixels
i:inches
c:centimeters
x:factor
units is optional; the default is inches. The units value
must immediately follow the size parameter.
Comments
This command can be used instead of the -Zo command if you
only want to specify the output image width and not the height.
Example
Convert an image which was originally rendered to 8.5" x 11"
page to a Targa file which is no larger than 640 pixels wide, at
the same time preserving the aspect ratio:
alchemy image1.ps -a -Zx 640p -Z+
Image Alchemy
57
Output Page Height
-Zy
Specify output image height.
Syntax
-Zy xSize[units]
Parameter
ySize:
Height of the image
The default is the same height as the input height.
units:
The units the size parameter is in:
p:pixels
i:inches
c:centimeters
x:factor
units is optional; the default is inches. The units value
must immediately follow the size parameter.
Comments
This command can be used instead of the -Zo command if you
only want to specify the output image height and not the width.
Example
Convert an image which was originally rendered to 8.5" x 11"
page to a Targa file which is no larger than 600 pixel high, at the
same time preserving the aspect ratio:
alchemy image1.ps -a -Zy 600p -Z+
58
Image Alchemy
Pages
-Zp
Specify which page(s) to render.
Syntax
-Zp
-Zp page
-Zp startPage endPage
Parameter
page:
Specify page number
The default is page 1.
startPage:
Specify beginning page number.
endPage:
Specify ending page number.
Comments
If the -Zp option is used without a following parameter all pages
in the input file(s) will be converted.
If you specify a single parameter after the -Zp option, only that
page will be converted.
If you specify two parameters all pages between those two
numbers will be converted (inclusive, e.g. -Zp 2 3 will convert
pages 2 and 3).
When converting multiple pages, either multiple files will be
written (each containing a single page) or a single multi-page file
will be written, depending on the use of the ---U option. See the
---U option in Chapter 6 for more information and the examples
section below for an example.
Image Alchemy
59
Examples
Convert page 2 of the file test.ps to a GIF file called test.gif:
alchemy test.ps -g -Zp 2
Convert pages 2 through 9 of the file test.ps to multiple GIF
files:
alchemy test.ps -g -Zp 2 9
Convert pages 2 through 9 of the file test.ps to a single multipage GIF file, called pages.gif:
alchemy test.ps -g1 -Zp 2 9 ---U pages.gif
Convert all the pages in the file test.ps to a single multi-page GIF
file, called pages.gif:
alchemy test.ps -g1 -Zp ---U pages.gif
60
Image Alchemy
Pre-load Fonts
-Zf
Specify whether or not to pre-load fonts.
Syntax
-Zf mode
Parameter
mode:
0:Don't pre-load fonts
1:Pre-load fonts
The default is Don't pre-load fonts.
Comments
The command causes Alchemy PS to load all of the PostScript
fonts installed in the fontmap when it starts up, rather than as
needed. This is primarily useful when converting PostScript
files that change their behavior depending on the available fonts
(a font catalogue program, for example).
Example
Convert the file fontlist.ps to a PCL file, preloading all fonts:
alchemy fontlist.ps -P -Zf1
Image Alchemy
61
Preserve Aspect Ratio
-Z+
Preserve aspect ratio when scaling.
Syntax
-Z+ (plus)
Comments
If specified with the -Zo option Alchemy will use the values
specified as a bounding box, reducing one dimension if
necessary to preserve the image aspect ratio.
Example
Convert the file contract.ps, which was originally created to print
on legal size paper (8.5" x 14"), to a PCL file at 300 dpi and fit it
to 8.5" x 11":
alchemy contract.ps -P -Zi 8.5i 14i
-Zo 8.5i 11i -Z+
62
Image Alchemy
Rotate Image
-Zr
Specify the angle to rotate the image in degrees.
Syntax
-Zr angle
Parameter
angle:
Specify rotation angle
The default is 0.
Limitations
Alchemy PS can only rotate images in 90 degree increments.
Comments
The rotation angle is measured the counterclockwise direction
(so specifying a 270 degree rotation achieves a 90 degree
clockwise rotation).
If a 90 or 270 degree rotation is specified, and the input page size
isn't specified, the input size will be changed to 11"x8.5" instead
of 8.5"x11".
Example
Convert the landscape file test.ps to a portrait PCL file called
test.pcl:
alchemy test.ps -P -Zr90
Image Alchemy
63
Specify Image Resolution
-Zd
Purpose
Specify image resolution in dots per inch for the output image.
Syntax
-Zd dotsPerInchX dotsPerInchY
Parameters
dotsPerInchX
The horizontal resolution of the image in dots per inch.
dotsPerInchY
The vertical resolution of the image in dots per inch.
Comments
You must specify both dotsPerInchX and dotsPerInchY, even if
they are the same.
This command, when reading PostScript files, is identical to the
standard Alchemy -D command (see Chapter 9). If both are
specified, the -Zd parameters have precedence.
Example
Convert an AutoCad drawing saved as a PostScript file to a PCX
file for sending with a fax modem. The resolution of fax
machines in fine mode is 200 dpi x 200 dpi:
alchemy drawing.ps -p -Zd 200 200
64
Image Alchemy
Use Bounding Box
-Ze
Specify whether or not to use the bounding box from EPS files.
Syntax
-Ze mode
Parameter
mode:
0:Don't use bounding box
1:Use bounding box
The default is Don't use bounding box.
Comments
The command causes Alchemy PS to look for a bounding box or
a HiRes bounding box in the header of a PostScript or EPS file,
and if present use the image offset and input page size data from
it.
Using this command is equivalent to manually setting those
parameters using the -Z_ and -Zi options. The values from the
bounding box will take precedence over any offset or input size
specified.
This option is useful for reading EPS files which don't have the
origin at 0,0.
The bounding box values are generated by the application
writing the EPS file. As such there may be extra white space
around the edge of the image, or portions of the image cut off
(the bounding box Alchemy PS uses is equivalent to the
boundaries that an importing application displays when reading
an EPS file which does not have a preview).
Example
Convert the file sah.eps to an RTL file for an HP DesignJet
650C, using the bounding box from the file:
alchemy sah.eps --r7 -Ze1
Image Alchemy
65
Complex
Examples
These examples show how to accomplish various common tasks
with Alchemy PS.
See Chapters 5 through 8 for more information on the other
command line options used in these examples.
Some of these examples use too many options to be used directly
with MS-DOS. In these cases you can create a text file which
contains the commands and use the @ response file command
with Alchemy PS (see Using Response Files in Chapter 2).
Also, depending on your system configuration, you may run out
of memory using the standard version of Alchemy PS and may
need to substitute alch386.exe for alchemy.exe in some of
the examples.
Printing a
PostScript file on an
HP LaserJet printer
Send a PostScript file to an HP LaserJet printer; the original
image size is 8.5" x 11" and that is the size of paper the image
will be printed on (this example is directly usable on IBM PC
computers only, UNIX users will have to generate a file and then
send that to their laser printer).
alchemy drawing.ps prn: -P 0
If you have an HP LaserJet 4 and would like to print the file at
600 dpi instead:
alchemy drawing.ps prn: -P 100 -Zd 600 600
You may also want to specify the Expanded Margin option as
part of the PCL output option (-P 50 or -P 150 instead of -P 0 or
-P 100 in the above examples); this is especially true if the
PostScript file was originally generated to be output on a device
which prints all the way to the edge of the paper and the margins
built into the LaserJet are causing portions of your image to be
clipped.
66
Image Alchemy
Preparing an EPS
image for inclusion
in a word processor
Convert an EPS file to a TIFF file so that it can be imported by a
word processor. Keep the image at the original size, using the
bounding box information in the EPS file to only convert the
relevant portion of the image. This examples assumes the TIFF
file will be printed on a 300 dpi laser printer:
alchemy logo.eps logo.tif -t1 -Ze 1
Do the same thing, this time assuming that the TIFF file will be
printed on a 1440 dpi typesetter:
alchemy logo.eps logo.tif -t1 -Zd 1440
1440 -Ze 1
This time convert the EPS file but don't use the bounding box,
instead instruct Alchemy PS to clip to the active image area:
alchemy logo.eps logo.tif -t1 -Zd 1440
1440 -Zc 1
Preparing a
PostScript file for
sending via a fax
modem
Convert an AutoCad drawing saved as a PostScript file to a PCX
file for sending with a fax modem. The resolution of fax
machines in fine mode is 200 dpi x 200 dpi:
alchemy drawing.ps drawing.pcx -p -Zd 200
200
If we were sending in normal mode (200 dpi x 100 dpi) we
would use a -Zd 200 100 instead :
alchemy drawing.ps drawing.pcx -p -Zd 200
100
Image Alchemy
67
Viewing a file on
a VGA screen
(MS-DOS only)
View a color PostScript file on a SVGA screen. The original
image was 8.5 x 11, the final image is being rendered to be
screen sized (640 pixels x 480 pixels):
alchemy drawing.ps -v -Zm 2 -Zo 640p 480p
-Z+
If you have a 24 bit capable SVGA card you can replace the -v
command with the --v command, for better viewing quality:
alchemy drawing.ps --v -Zm 2 -Zo 640p 480p
-Z+
If you have a higher resolution monitor you could change the
viewing command and the PostScript rendering parameters. This
example assumes a 1024x768 viewing mode is available:
alchemy drawing.ps -v1024 -Zm 2 -Zo 1024p
768p -Z+
If you are viewing a PostScript file which contains black and
white data (fonts, for example), you can improve the quality of
the image by using the antialias option, in this example we use
an antialias factor of 4:
alchemy drawing.ps -v -Za 2 -Zo 640p 480p
-Z+
Plotting a
PostScript file on
a large format
plotter
This example series converts and plots a color PostScript image
on an HP DesignJet 2000C plotter.
This example scales the image to the final 34" x 44" size entirely
during the PostScript rendering step and therefore may require
ridiculous amounts of disk space (up to 900 megabytes).
alchemy fish.ps prn: --r 7 -Zm 2 -Zo 34 44
-Z+ -Zd 600 600
68
Image Alchemy
Render the image at 8.5" x 11" and use raster scaling to scale
image to the final size of 34" x 44". This example will require
much less disk space than the previous example (50 megabytes).
For most images the result will be almost the same as the
previous example, although PostScript text will lose a small
amount of quality.
alchemy fish.ps prn: --r 7 -Zm 2 -Xb34i
-Yb44i -+ -Zd 600 600
Render the image at 17" x 22" and use raster scaling to scale the
image to the final size of 34" x 44". This will require more disk
space than the previous example, but will generate a slightly
higher quality plot.
alchemy fish.ps prn: --r 7 -Zm 2 -Zo 17i
22i -Z+ -Xb34i -Yb44i -+ -Zd 600 600
You may of course also want to combine any of the above
examples with a different dithering type (for example -d22 to
use dithering type 22).
alchemy fish.ps prn: --r 7 -Zm 2 -Xb34i
-Yb44i -+ -d 22 -Zd 600 600
Or use a Alchemy Color Correction file (-C dj2500a.acc, to
use the ACC file dj2500a.acc).
alchemy fish.ps prn: --r 7 -Zm 2 -Xb34i
-Yb44i -+ -C dj2500a.acc -Zd 600 600
Image Alchemy
69
Preparing a
PostScript file for
imaging on a Scodl
slide recorder
Render the image to be full size on the slide (which is assumed
to be 36mm x 24mm). This assumes the Scodl file will be
imaged at 2000 by 1366 and that the file was printed in
landscape mode (if the file were in portrait mode it wouldn't fill
much of the slide). We make the image size reasonably large
with the PostScript interpreter, then, after the image is clipped to
the active image area, we scale it, using raster scaling, to fill the
slide. Note that the preserve aspect ratio option is required for
both the PostScript rendering step (the -Z+ option) and the raster
scaling step (the -+ option):
alchemy slide.ps slide.scd --s0 -Zm 2 -Zi
11 8.5 -Zo 2000p 1366p -Z+ -Xb2000 -Yb1366
-+ -Zc 1
Do the same thing, but this time also rotating the image 90
degrees:
alchemy slide.ps slide.scd --s0 -Zm 2 -Zi
11 8.5 -Zo 2000p 1366p -Z+ -Xb2000 -Yb1366
-+ -Zc 1 -Zr 90
70
Image Alchemy
Generating
PostScript files
for use with
Image Alchemy
PS
Most programs have the ability to generate a PostScript file.
Generally you can select a PostScript device as the output device
and then generate a disk file. This file can then be interpreted by
Alchemy PS. Some programs give you a choice of PostScript
printers; usually there is a generic PostScript printer, which
should be used. You may also have to specify if you want black
and white, grayscale, or color output. Because of the increase in
the file size and rendering time you should select the simplest
format which meets your requirements; for example, if you will
be generating a PostScript file which you will be sending via fax,
it is best if you generate a black and white PostScript file.
Generating a
PostScript file
using Microsoft
Windows 95
Generating a PostScript file which can be read by Image
Alchemy PS when running Microsoft Windows 95 requires
setting up a PostScript output device that Windows can print to.
Microsoft Windows 95 includes several different PostScript
device drivers, including drivers for the Apple LaserWriter, HP
LaserJet PostScript, NEC Colormate PS, etc. However most of
these do not include color support, therefore we recommend
selecting the QMS ColorScript 100 as the printer driver.
You accomplish this with the following procedure:
Image Alchemy
71
Setting up
Microsoft
Windows 95
Select Printers from the Start menu under
Settings:
This brings up the Printers window. Double click on the Add
Printer icon:
72
Image Alchemy
This brings up the Add Printer Wizard:
Click Next> to continue with the procedure.
Choose QMS from the Manufacturers: window, then
select QMS ColorScript 100 Model 30 from the
Printers: list.
Image Alchemy
73
Now click on the Next> button to bring up the connect dialog
box:
Select the FILE: item from the Available Ports:
list. This indicates to Windows 95 that the device doesn't
actually exist and that output sent to that driver should be
directed to a file. Click on the Next> button to accept this
choice.
If you want to make this the default printer you can select Yes
to the "Do you want … to use this printer as the default printer?"
question. This isn't recommended, since it will make it more
difficult to use your normal printer with Windows. You may
want to change the name of the printer (perhaps to "Generate
PostScript file") to better reflect what this printer choice is used
for.
74
Image Alchemy
Click Next> to finish the installation procedure:
Image Alchemy
75
You may be prompted to insert one or more of the Windows 95
distribution diskettes at this point.
The printer is now available for use. However, there are a
couple of settings under the Properties sheet that you may want
to change. To bring up the Properties sheet select the printer by
single clicking on it and choosing Properties from the File menu.
Under the Paper tab you can select whether you want
Portrait or Landscape to be the default choice for
printing.
The Paper Size selection is best left at 8.5 x 11 in, since
that is the default size that Alchemy PS expects for PostScript
files. The Paper Source selection is not used by
Alchemy PS.
76
Image Alchemy
Click on the Unprintable Area… button to bring up the
unprintable area dialog:
These can all be set to zero, since Alchemy PS does not have any
unimageable area near the edges. If you will routinely be
sending files that you convert with Alchemy PS to a hard copy
output device, such as a PCL printer, you can set the margins
appropriately for that device. Windows will then warn you if
you are printing too close to the edge.
Now click on the various OK buttons to close the dialog boxes
and accept the choices you have made.
This completes the setup. You are now ready to print a
PostScript file.
Printing to a
PostScript file
To print to a file select Print… from the File menu. This
will bring up a dialog box similar to the one shown; different
programs have different dialogs (this example is from the Paint
program, distributed with Windows 95).
Select the printer QMS ColorScript 100 Model
30 as the printer to print to and click OK. If you setup this
device as the default printer you can skip this step. You can also
change the Orientation choice at this point.
Image Alchemy
77
Selecting OK will bring up the following dialog:
Enter the file name of the PostScript file to be generated. This
file will be created and may be converted with Alchemy PS.
78
Image Alchemy
Generating a
PostScript file
from a
Macintosh
Generating a PostScript file from a Macintosh varies somewhat
with the version of the LaserWriter printer driver you have.
There are three LaserWriter drivers available, version 7, early
version 8.0, and late version 8.x. LaserWriter 8.x drivers have
the advantage that it generates PostScript files that are faster to
convert and it allows you to choose which fonts to include in the
PostScript document (LaserWriter version 7 always includes all
fonts, making the PostScript file larger than necessary).
No matter which LaserWriter version you have, the first step,
selecting the LaserWriter from the Chooser menu, is always the
same.
Image Alchemy
79
Setting up the
Macintosh
Bring up the Chooser from the Apple menu:
Select the LaserWriter printer icon (which may have a different
icon, depending on what version of the Macintosh operating
system you are using and which LaserWriter driver you have). If
the LaserWriter does not appear as one of the choices you will
have to install it off of your system disks. If you have installed
the PS Printer driver from Adobe choose that instead of the
LaserWriter driver.
Note that you don't actually need to have a LaserWriter, since
you will only be using the driver to generate a PostScript file.
If you are changing from a different printer you will be told to
choose “Page Setup” in all open applications.
80
Image Alchemy
Printing to a
PostScript file
To generate a PostScript file with LaserWriter version 7 choose
Print… from the File menu in your application. Then choose
PostScript® File as the Destination: from the print dialog
box:
You may also enable Color/Grayscale to select printing a
color or grayscale file.
After selecting the Save button you will be presented with the
Save Disk File dialog:
Either accept the default filename of PostScript, or enter a new
filename, and click the Save button. This will generate a
PostScript file which Alchemy PS can read.
Image Alchemy
81
If you are using the older LaserWriter 8.0 driver things will look
slightly different. After choosing Print… from the File menu
in your application the print dialog box looks like this:
You select File from the Destination choice.
If you wish to generate a grayscale or color PostScript file that
choice is now found in the Options dialog box.
82
Image Alchemy
After selecting the Save button you will be presented with the
Save Disk File dialog:
To include the fonts used in the document select All under the
Font Inclusion menu. This will include all of the fonts. To
reduce the size of the PostScript file select the All But
Standard 13, this includes all fonts except for the standard 13
fonts; these fonts are included as part of Alchemy PS. You may
also choose None, if you have copies of all the fonts used in the
document installed for use with Alchemy PS.
Enter a valid file name to generate and click the Save button.
This will generate a PostScript file which Alchemy PS can read.
Image Alchemy
83
If you are using the newer LaserWriter 8.0 driver things will
look slightly different yet again. After choosing Print… from
the File menu in your application the print dialog box looks like
this:
You select File from the Destination choice.
If you wish to generate a grayscale or color PostScript file that
choice is now found in the Color Matching dialog box.
84
Image Alchemy
The font Inclusion option is now found in the Save as File
dialog box.
To include the fonts used in the document select All under the
Font Inclusion menu. This will include all of the fonts. To
reduce the size of the PostScript file select the All But
Standard 13, this includes all fonts except for the standard 13
fonts; these fonts are included as part of Alchemy PS. You may
also choose None, if you have copies of all the fonts used in the
document installed for use with Alchemy PS.
After selecting the Save button you will be presented with the
Save Disk File dialog:
Enter a valid file name to generate and click the Save button.
This will generate a PostScript file which Alchemy PS can read.
Image Alchemy
85
86
Image Alchemy
4
PostScript Fonts
alchfont
The program alchfont is used to add PostScript Type 1 fonts to
the fontmap used by Image Alchemy PS.
Alchemy PS comes with the standard PostScript fonts, licensed
from Soft Horizons, installed and ready to use. These fonts are
versions of:, Bookman, Courier, Helvetica, NewCentury
Schoolbook, Palatino, Symbol, Times,, Zapf Chancery, and Zapf
Dingbats in normal, bold, italic, and bold-italic versions (where
applicable).
You can use alchfont to add fonts to those available to Alchemy
PS, remove fonts, list the installed fonts, and add font aliases.
The first step in adding new fonts to Alchemy PS is to copy the
fonts to either the \alchemy\ps directory, the \psfonts
directory, or the directory pointed to by the alchemyps
environment variable. Type 1 fonts generally come with several
files; the only file which Alchemy needs is the .pfb file (the other
files contain various information that programs which generate
PostScript files use).
Image Alchemy
87
Usage
Instructions
Listing installed
fonts
alchfont -list
List fonts in the fontmap
The list of fonts will be quite long; you will probably want to
redirect the output to a file for printing or use the more utility to
page through the list (alchfont -list | more)
Adding fonts
alchfont fontfile
Add the font found in fontfile to the fontmap, thereby making it
available to Alchemy.
For example, alchfont gn______.pfb will add the font
GillSans to the fontmap.
Aliasing a font
alchfont aliasname:fontname
Alias the font fontname with the name aliasname.
Aliasing a font defines an alternate name which may be used to
refer to the font. This is useful for some programs like Microsoft
Word for DOS which creates PostScript files that refer to all
fonts other than the standard 35 fonts as realfontname-F (for
these files use realfontname-F:realfontname; for example, for
Gill Sans use GillSans-F:GillSans).
In this case, alchfont GillSans-F:GillSans, will tell
Alchemy PS to use the font GillSans when the font GillSans-F is
specified.
88
Image Alchemy
This can also be useful when converting a PostScript document
which contains fonts you don't have; you can substitute a similar
font using an alias (Alchemy ordinarily substitutes Courier for
fonts it cannot find).
For example, alchfont Melior:Times will cause Alchemy
PS to substitute the font Times for the font Melior.
Scanning for fonts
alchfont -scan
Scan for fonts in the default directories and add them to the
fontmap. The default directories are the \alchemy\ps
directory, the \psfonts directory, and the directories defined by
the alchemyps environment variable.
Removing fonts
alchfont -remove fontname
Remove specified fonts from the fontmap. This does not delete
the actual font from the disk.
Specifying an
alternate fontmap
Missing fonts
alchfont -fontmap=name
Use specified fontmap; the default is the file named fontmap
found in the path specified by the alchemyps environment
variable (or the file \alchemy\ps\Fontmap, if no alchemyps
environment is set).
Alchemy PS will substitute Courier for any unknown fonts, as
well as fonts that are in the fontmap, but not found on your disk.
Alchemy will display warning messages when it does this. If
Courier is not present, Alchemy will abort with an error message
to that effect.
Image Alchemy
89
If Alchemy cannot find fonts which are used in the PostScript
file you are converting and you do not want Alchemy to
substitute Courier, you can either substitute another font, by
creating an alias, or purchase the font and install it using
alchfont.
Multiple
fontmaps
Image Alchemy will always look for fonts in a file called
fontmap when interpreting a PostScript file. If you need several
fontmaps, perhaps for different users, you can make font
additions and deletions using the -fontmap option to specify
which fontmap to work on. Then, when you want to use a
particular fontmap, copy it to a file called Fontmap.
For example, assume you have three different fontmaps, titled
allan, marcos, and jill. To add Tekton to the marcos fontmap,
you would type:
alchfont -fontmap=marcos tekton.pfb
Then, to make marcos the fontmap that Alchemy will find, copy
marcos to a file called fontmap in the \alchemy\ps directory:
copy marcos \alchemy\ps\Fontmap
It is important to realize that the copy command will overwrite
any other file named Fontmap in the directory.
90
Image Alchemy
5
Conversion Options
Introduction
The one option which is always required when running Image
Alchemy is the output image file type. Even if you are just resizing an image, or changing the number of colors in an image,
Alchemy needs to know what type of image you want to create.
The file types that Image Alchemy supports are listed below. In
addition to the syntax required to generate the file, any known
restrictions or limitations are listed. If you have trouble reading
an image in one of the file formats we claim to support please
contact us (see Appendix D, Customer Support).
The output option consists of a single letter, followed by any
options needed for the file format you are writing. The output
option, like all Alchemy options, is preceded by a dash, "-". The
less common output options consist of a letter preceded by two
dashes, "--".
Output variations
Some of the output formats have several variations; in those
cases you specify which variation you want with an optional
letter and/or number after the output option.
Image Alchemy
91
Example
Further variations
Example
The option to generate a Windows Bitmap file is -w. There are
two types of Bitmap files: uncompressed and Run-LengthEncoded (RLE). To write out an uncompressed Bitmap file use
-w0; to write out an RLE Bitmap file use -w1 (the default
Bitmap file is uncompressed, so a -w without any parameter
following it would also generate an uncompressed Bitmap file).
Note that Alchemy allows spaces between the option and
parameter, so typing -w 1 would be the same as -w1.
Be aware that the other options specified on the command line
may also affect the type of file that is generated.
Within the Windows Bitmap file type there are 1 bit, 4 bit, 8 bit,
and 24 bit files.
Alchemy always generates a file using the best match of the file
type and the output image. So, in the case of Windows Bitmap
files, if the output image is black and white a 1 bit file is
generated. If the output image is paletted with 16 colors or less a
4 bit file is generated. If the output image is paletted with more
than 16 colors an 8 bit file is generated. And if the output image
is true color a 24 bit file is generated.
You can explicitly force any of these file types by using other
Alchemy options. For example, if you wanted a 1 bit Windows
Bitmap file you would specify -c2 -b -w. To force a 4 bit file
use -c16 -w. To force an 8 bit file use -c256 -w. And to
force a true color file use -24 -w.
Identifying
image files
92
Image Alchemy
Image Alchemy identifies the type of file being read by checking
various magic numbers and other information that varies from
format to format. Unfortunately, some formats do not have a
magic number; in those cases Alchemy uses other information to
guess as to the image type. It is possible for Image Alchemy to
incorrectly identify an image; if this happens you can use the -=
option to force Alchemy to recognize the file as a particular
format (see Chapter 6 for more information on the -= option)
Input Options
Some input file formats have optional parameters which affect
how the input file is read. These parameters can specify such
things as the page to read (for multi-page formats, such as PCL),
which bands to read (for multi-band formats, such as Core IDC),
or which resolution to read (for multi-resolution formats, such as
PhotoCD).
The option used to specify input options is -Z. This is followed
by one or more parameters which vary depending on the format
being read. The comments section for each format describes any
input options which apply to that format.
MacBinary
When reading images, Alchemy automatically recognizes and
reads MacBinary II files (MacBinary files are generated when
you accidentally leave MacBinary mode on when transferring a
file from a Macintosh).
Other
information
Alchemy will preserve as much information in each file as
practical; this always includes the height and width of the image
and the number of colors in the image. Some file types include
other data, such as the name of the image, the aspect ratio of the
image, the date the image was created, etc. Since most of these
items are only supported by a few file formats, Alchemy discards
everything but the height, width, number of colors, gamma,
aspect ratio, resolution values, and, optionally, alpha channel
information.
File Formats
The individual file formats supported by Alchemy are described
in alphabetical order on the following pages. The descriptions
follow the template given overleaf.
Image Alchemy
93
Name of format
-option
Overview of file format.
Syntax
Description of syntax. Even though it is shown in this section,
any parameter following the file format output is optional.
Parameters
Brief description of the parameters. Those parameters which
require a detailed explanation are further documented under the
comments section below.
Extensions
The extensions commonly used for this image format. When
multiple extensions are listed Alchemy writes files using the first
one, but will check for files using all extensions (in the order
listed). Some formats use more than one file per image, in that
case the extension for each portion of the image is listed. Four
letter extensions are skipped on MS-DOS systems.
Creator
The company or individual who created this image format.
Please contact them for more information on the format.
Used by
Programs or types of software that use this image format.
Variations
A list of the variations supported by Image Alchemy.
Limitations
Any known limitations that Image Alchemy has when reading or
writing this image format.
Comments
Miscellaneous things of which you should be aware.
Related options
Other Alchemy options that affect the reading or writing of this
image format. Note that -8, -24 (and, for some formats, -15, -16,
and -32), -c, and -b options have an effect for most image
formats and are not listed explicitly.
Examples
Sample conversions involving this image format.
94
Image Alchemy
ADEX
--A
ADEX files are used by the ADEX Corporation ChromaGraph
series of graphics cards.
Syntax
--A compressionType
Parameter
compressionType:
0:None
1:Run Length Coded
The default is None.
Extensions
.img
.rle
Creator
ADEX Corporation
Used by
ADEX ChromaGraph cards.
Variations
4 bit and 8 bit images.
Comments
Some ADEX files don't contain a palette; in those cases there's
usually a second ADEX file which contains the palette to be
used. To read those images that don't have palettes, use the -F
false color option to read the palette from a separate file.
Example
Convert the file test.gif to an uncompressed ADEX file called
test.img:
alchemy test.gif --A
Image Alchemy
95
Adobe Acrobat PDF
--d
Adobe Acrobat PDF (Portable Document Format) files are used
by Adobe Acrobat.
Syntax
--d compressionType
Parameter
compressionType:
0:None
1:Run Length
2:LZW
3:CCITT Group 3 fax
4:CCITT Group 4 fax
5:JPEG Low Quality
6:JPEG Medium Quality
7:JPEG High Quality
0:ASCII Encoding
10:Binary Encoding
The default is no compression and ASCII Encoding. Options are
combined by adding (see below for an example).
Extension
.pdf
Creator
Adobe Systems Incorporated
Used by
Adobe Acrobat
Variations
1 bit black and white, 8 bit grayscale, 8 bit paletted, and 24 bit
color images.
Limitations
CCITT Group 3 fax and Group 4 fax files are always 1 bit, black
and white. Selecting either compression type will cause
Alchemy to automatically convert the input image to black and
white.
96
Image Alchemy
Comments
For more information on reading Adobe Acrobat files see
Chapter 3.
Alchemy can write multi-page PDF files when used with the
---U option. See below for an example.
Examples
Convert the JPEG file sample.jpg to a Run Length compressed
PDF file:
alchemy sample.jpg --d 1
Convert the JPEG file sample.jpg to a high-quality JPEG
compressed PDF file with binary encoding:
alchemy sample.jpg --d 17
Convert all the pages in the TIFF file, doc.tif, to a multi-page
Group 4 compressed PDF file (for more information on the ---U
option see Chapter 6):
alchemy doc.tif --d 4 -U ---U
Image Alchemy
97
Adobe Photoshop
---p
Adobe Photoshop files are used by Adobe Photoshop.
Syntax
---p compressionType
Parameter
compressionType:
0:None
1:Compressed
0:RGB
400:CMYK
The default is None, RGB.
Extension
.psd
Creator
Adobe Systems Incorporated
Used by
Adobe Photoshop
Variations
Writes 1 bit black and white, 8 bit grayscale, 8 bit paletted, 24 bit
color images, and 32 bit CMYK images, with and without alpha
channels.
Limitations
Photoshop 3.x files cannot be read, we are planning an update to
address this issue, check with us to see if it is available.
Comments
Alpha channel data can be read and written by using the -I
option, see Chapter 6 for more information.,
To improve the quality of output may want to use a color
correction file when converting to the CMYK variation of this
format. See the -C option in Chapter 8 for more information.
98
Image Alchemy
Examples
Convert the JPEG file sample.jpg to an uncompressed Photoshop
file:
alchemy sample.jpg ---p
Convert the Targa file alpha.tga to a compressed Photoshop file,
with alpha channel:
alchemy sample.jpg ---p1 -I
Image Alchemy
99
Alias Pix
--I
Alias is a modeling software package for SGI and Macintosh
computers.
Syntax
--I (upper case i)
Extension
.img
.als
Creator
Alias Research, Inc.
Used by
Alias
Vivid Ray Tracer
Variations
24 bit RLE files.
Comments
This is the same format as used by the Vivid ray tracer (see
Vivid, below)
Example
Convert the file spheres.qrt to an Alias Pix file:
alchemy spheres.qrt --I
100
Image Alchemy
Alpha Microsystems BMP
-M
Alpha Microsystems BMP files are used by Alpha
Microsystems.
Syntax
-M compressionType
Parameter
compressionType:
0:None
1:Packed
The default is None.
Extension
.bmp
Creator
Alpha Microsystems
Used by
Alpha Microsystems workstations.
Variations
1, 4, 8, and 24 bit unpacked and packed (run-length encoded)
RGB images.
Limitations
Reading and writing HLS images is not supported.
Comments
When reading an image without a palette Alchemy will assume
the image is gray-scale.
Examples
Convert the GIF file, bigpict.gif, to an uncompressed Alpha
Microsystems BMP file:
alchemy bigpict.gif -M
Do the same thing, but force a 24 bit image, and compress the
image:
alchemy bigpict.gif -M1 -24
Image Alchemy
101
ALPS
---a
Alps files are used by Alps Micro Dry printers.
Syntax
---a
Extensions
.prn
Creator
Alps
Used by
Alps printers.
Variations
1 bit black and white and 4 bit CMYK
Limitations
Write only.
Comments
Alps printers are capable of 300 and 600 dpi in color or black
and white mode. Alps printers also support 1200 x 600 dpi for
black and white mode.
To position the image on the page use the offset image option
("-_") or the center image option ("--_"), see Chapter 8 for
details.
To improve the output quality you may want to use gamma
correction or a color correction file when converting to this
format. See the -G and -C options in Chapter 8 for more
information.
Examples
Convert the JPEG file sample.jpg to an Alps file five inches wide
at 600 dpi.
Alchemy sample.jpg ---a -Xb5i -+ -D600 600
102
Image Alchemy
Autodesk PIC/CEL
---l
Autodesk PIC/CEL files are files developed by Autodesk.
Syntax
---l (lower case L)
Extensions
.pic
.cel
Creator
Autodesk
Used by
Animator and Animator PRO
Variations
15 bit per pixel RGB and 24 bit per pixel RGB with Alpha
channel.
Comments
Alpha channel data can be read and written by using the -I
option, see Chapter 6 for more information.,
Example
Convert the file image.tga to an Autodesk PIC file, preserving
the Alpha channel information:
alchemy input.tga ---l -I
Image Alchemy
103
Autologic
--a
Autologic files are black and white or gray-scale files for use
with Autologic typesetting equipment.
Syntax
--a
Extensions
.gm
.gm2
.gm4
Creator
Autologic, Incorporated
Used by
Autologic typesetting equipment.
Variations
Graphics modes 2 (black/white) and 4 (gray-scale).
Limitations
Only the High Speed Interface inline format is supported.
When reading, images must be preceded by a Graphics
Parameter Block.
Examples
Convert the file input.tif to a GM4 file called output.gm4:
alchemy input.tif output.gm4 --a -b
Convert the file input.tif to a GM2 file called output.gm2:
alchemy input.tif output.gm2 --a -b -c2
104
Image Alchemy
AVHRR
--R
AVHRR files are used for satellite image data.
Syntax
--R outputType
Parameter
outputType
1:IDIDAS Uncompressed
2:IDIDAS Compressed type 1
The default is 1 (IDIDAS Uncompressed).
Extension
.sst
Creators
National Oceanic and Atmospheric Administration (NOAA)
National Environmental Satellite Data Information Service
(NESDIS)
Used by
IDIDAS
SSTMAP
IMGMAP
Variations
Reads 8 and 11 bits per pixel IDIDAS AVHRR files.
Writes 11 bits per pixel IDIDAS AVHRR files.
Limitations
Level 1B AVHRR files will be supported at a later date; please
contact us for more information.
Alchemy discards all but the top 8 bits when reading 11 bit
AVHRR files. When writing, the bottom 3 bits are set to 0.
Any graphics information is discarded when reading the file.
Since AVHRR images are always grayscale, Alchemy assumes
the use of the -b and -8 options when writing an AVHRR file.
Image Alchemy
105
Comments
AVHRR images contain a lot of information which is not part of
the image data. This information includes the time and date the
image was captured, the satellite which captured the image, the
type of instrumentation used, etc. When reading AVHRR
images this information is discarded; when writing AVHRR
images 0 is written for all values for which data is unavailable.
Example
Convert the GOES file, florida.goe, to an uncompressed IDIDAS
AVHRR file:
alchemy florida.goe --R1
106
Image Alchemy
AVS X
---A
AVS X files are image files used by AVS (Application Visual
System)
Syntax
---A
Extensions
.x
Creator
Advanced Visual Systems Inc.
Used by
AVS Software systems
Variations
24 bit true color with alpha channels
Comments
Alpha channel data can be read and written by using the -I
option, see Chapter 6 for more information.,
Example
Convert the file picture.im32 to an AVS file, preserving the
alpha channel:
alchemy picture.im32 ---A -I
Image Alchemy
107
Binary Information Files (BIF)
-B
There are quite a few programs which produce image files which
contain just pixel data. These image files do not have a header
and hence do not include enough information to allow Alchemy
to read them. Using a BIF file Alchemy can read these images.
However, since required information, such as the height and
width of the image, is not present in these files, it must be
supplied by the user.
BIF files can also be created by Image Alchemy for software
which expects images to be just pixels.
See Appendix E, "Binary Information Files", for more
information.
Syntax
-B outputType
Parameter
outputType:
0:Standard
1:3 Files
2:ASCII
3:Group III
4:Group IV
5:Packed, 1 bit per pixel, black and white
The default is Standard. See the comments section below for
more information on the output types.
Extensions
.bif
.raw
Creator
Handmade Software, Inc.
Used by
Image Alchemy
Various image processing software
Variations
24 bit true color, 8 bit gray-scale, and 1 bit black and white.
108
Image Alchemy
For ASCII file describing image.
For actual image data.
Limitations
Paletted files cannot be read in (a work around is to generate a
.PAL file and then false color the gray-scale image using the -F
option).
Comments
BIF files are used to read and write files which consist entirely of
image data. You have to generate a text file which describes the
format of the data you are trying to read in. This file is called a
BIF file. The format of BIF files is documented in Appendix E,
Binary Information Files. You then instruct Alchemy to read the
image data by giving it the name of the .BIF file.
Alchemy can generate a variety of different types of BIF data:
The standard BIF file consists of either gray-scale or byte
interleaved RGB data in binary form. Each pixel is stored as one
or three bytes and there is no padding at the end of lines or at the
end of the image. This is the most common output type.
The three file BIF data has the red, green, and blue data stored in
separate files. The red data will be stored in a file with a .r
extension, the green data has the extension .g, and the blue data
has the extension .b.
The ASCII BIF file is identical to the standard BIF file except
that the data is stored as ASCII instead of binary. Each line of
data in the original image is stored as one line of data in the BIF
file, with a new-line character at the end of the line. There are
commas separating each of the pixel values. This type of BIF
file cannot be read by Image Alchemy.
The Group III BIF files that Alchemy outputs are CCITT Fax
Group III compressed. They have the least-significant bit first,
end-of-line markers before the first line, and after every line
except the last, and are not byte aligned. This is the native order
for a fax machine. This format can be useful if you are
generating data to be sent via a fax modem.
Image Alchemy
109
The Group IV BIF files that Alchemy writes are CCITT Fax
Group IV compressed; they have the least significant bit first.
Packed BIF files are required to be black and white. Packed files
are identical to standard BIF files except that 8 pixels are packed
together into one byte and the data is padded to a multiple of 8
pixels per line.
Examples
Convert the file data to a GIF file:
alchemy data.bif -g
Convert the image helen.pcx to a Binary file (this will create two
files: helen.raw and helen.bif):
alchemy helen.pcx -B
110
Image Alchemy
Calcomp CCRF
--l
Calcomp raster files are used by Calcomp thermal transfer
printers and electrostatic and ink jet plotters.
Syntax
--l type (lower case l)
Parameter
type:
Thermal Transfer Printer:
0:Uncompressed
1:White Space Suppression
2:Run Length Compression
Electrostatic plotter (CCRF):
6:8 bit bytes, 8 bit compression units
7:8 bit bytes, 16 bit compression units
8:8 bit bytes, 32 bit compression units
Ink jet Plotter (Interleaved CCRF):
46:8 bit bytes, 8 bit compression units
47:8 bit bytes, 16 bit compression units
48:8 bit bytes, 32 bit compression units
49:8 bit bytes, Zip compression
The default is Thermal transfer, uncompressed.
Extensions
.crf
.ccrf
.prn
Creator
Calcomp
Used by
Calcomp thermal transfer printers and electrostatic and ink jet
plotters, including the CrystalJet.
Variations
Black and white or 4-bit CMYK.
Comments
If there is only black and white data in the image, a 1 bit file will
be generated.
Image Alchemy
111
To position the image on the page use the offset image option
("-_") or the center image option ("--_"), see Chapter 8 for
details.
To improve the output quality you may want to use gamma
correction or a color correction file when converting to this
format. See the -G and -C options in Chapter 8 for more
information.
Example
Convert the Targa file image1.tga to a CCRF file using 16 bit
compression units:
alchemy page1.tif --l7
112
Image Alchemy
CALS
--c
Computer-aided Acquisition and Logistics Support (CALS) files
are black and white images used by the US Government as part
of their transition to electronic media.
Syntax
--c
Extension
.cal
Creator
Defense Logistics Agency (DLA)
Used by
Department of Defense (DoD)
Variations
Type 1 (Group 4 raster) CALS images.
Limitations
Document labels, such as document ID and figure ID, are
ignored.
Comments
CALS images are Fax Group IV compressed and are therefore a
good way of storing black and white line drawings and scans.
Example
Convert the TIFF file page1.tif to a CALS file:
alchemy page1.tif --c
Image Alchemy
113
Core IDC
--B
Core IDC files are used by Core Software's GIS software.
Syntax
--B
Extension
.idc
Creator
Core Software Technology
Used by
Core Software Technology
Variations
1 and 3 band, 8 bit files.
Limitations
Only 8 bit images can be read.
Alchemy cannot read 2 channel or 4 or more channel images
without using the -Z option (see the comments section below for
more information).
Comments
1 band files are read in as gray-scale images.
3 band files are read in as true color images. The default color
mapping between RGB and bands 1, 2, and 3 is Red=Band 1,
Green=Band 2, and Blue=Band 3, this can be changed by using
the -Z option. See the example section below for details.
Using the -Z option it is possible to select a single channel or 3
channels when reading a multi-channel Core IDC image. To use
the -Z option follow it with a single number to indicate which
channel is to be read as a gray-scale image or three numbers to
indicate which channels are to be read as a 24 bit color image.
See the example section below for details.
Examples
Convert the Core IDC file atlanta.idc to a Sun raster file:
alchemy atlanta.idc -s
114
Image Alchemy
Convert the file satellite.image to a Core IDC file.
alchemy satellite.image satellite.idc --B
The Core IDC file newyork.idc contains 9 bands, the next
examples show various ways to read selected bands out of the
image.
Convert the first band in the image to a grayscale Sun Raster
file.
alchemy newyork.idc -Z 1 -s
Convert the sixth band in the image to a grayscale Sun Raster
file.
alchemy newyork.idc -Z 6 -s
Convert the image to a 24 bit, color Sun Raster file, using band
2 as the red channel, band 7 as the green channel, and band 4 as
the blue channel.
alchemy newyork.idc -Z 2 7 4 -s
Image Alchemy
115
Cubicomp PictureMaker
--P
Cubicomp PictureMaker files are used in broadcast-quality three
dimensional modeling and animation.
Syntax
--P type
Parameter
type:
0:Allow any size image
1:Adjust image size to 512 x 488
The default is 0.
Extension
.r8
.g8
.b8
.a8
Creator
Cubicomp Corp.
Used by
Cubicomp PictureMaker
Variations
24 bit RGB images with an optional alpha channel.
Limitations
8-bit paletted PictureMaker files are unsupported.
Comments
This format is not the same as IBM Picture Maker.
Red channel image data
Green channel image data
Blue channel image data
Alpha channel image data [optional]
The option for adjusting the image size to 512 x 488 is useful
because Cubicomp PictureMaker does not work with images
which are not of this exact size. If either the X or Y dimension is
larger than 512 or 488, respectively, that dimension will be
truncated. If either dimension is smaller than 512 or 488, the
image will be padded on the right-hand side or bottom, as
necessary, with black.
116
Image Alchemy
PictureMaker images have either three or four separate files per
image: a red file, a green file, a blue file, and an optional alpha
channel file. When reading or writing a PictureMaker file
specify the name of the .r8 file, Alchemy automatically generates
the name of the .g8, .b8, and .a8 files
When writing a PictureMaker file Alchemy will overwrite,
without warning, existing .g8, .b8, and .a8 files.
To preserve the alpha channel information when converting to or
from Cubicomp PictureMaker files use the -I option.
Example
Convert the 24-bit JPEG image stones.jpg to PictureMaker files:
alchemy stones.jpg --P
Image Alchemy
117
Dr. Halo CUT
--C
Dr. Halo CUT files are used by various MS-DOS based paint
programs.
Syntax
--C
Extension
.pal
.cut
Creator
Media Cybernetics
Used by
Dr. HALO III Paint Package
HALO Desktop Imager
Variations
8 bits per pixel
Comments
Dr. Halo CUT images are actually two files. You specify the
name of the .cut file and Alchemy automatically generates the
name of the .pal file.
Palette and header data
Pixel data
When writing a Dr. Halo CUT file Alchemy will overwrite,
without warning, existing .pal files.
Examples
Convert the image test.pcx to a Dr. Halo CUT file:
alchemy test.pcx --C
118
Image Alchemy
Encapsulated PostScript (EPS)
-e
EPS files are a subset of PostScript; they may be included by
other PostScript files without requiring that the importing
software be able to interpret the file.
Syntax
-e type
Parameter
type:
0:No preview
1:Device independent preview
2:TIFF preview
0:UNIX newlines
10:Mac newlines
20:MS-DOS newlines
0:Showpage
100:No showpage
0:RGB
400:CMYK
0:Uncompressed
1000:LZW
2000:CCITT Group 4 fax
3000:JPEG Low Quality
4000:JPEG Medium Quality
5000:JPEG High Quality
0:ASCII
10000:Binary
Options are combined by adding. The default is an
uncompressed EPS file with a TIFF preview, UNIX newlines,
and showpage (output type 2).
Image Alchemy
119
Extensions
.epsi
.eps
.epi
Creator
Adobe Systems, Inc.
Used by
PostScript printers
Variations
Black and White, Gray-scale, RGB, and CMYK.
Comments
For information about reading EPS files see Chapter 3.
If the output is black and white or gray-scale and is not
compressed, it will work with any PostScript device. If it's color,
then the CMYK extensions or a level 2 device is required.
If you are writing an EPS file which you intend to send directly
to a PostScript output device, such as a printer, you will want to
write a file with no preview and include the showpage command.
EPS files are normally written using the UNIX newline
convention. To write an EPS file with Macintosh newlines, add
10 to the preview type. To write an EPS file with MS-DOS
newlines, add 20 to the preview type. See below for an example.
To omit the showpage command from the end of the EPS file
add 100 to the preview type. Some software which imports EPS
files does not correctly handle EPS files which contain the
showpage command.
To improve the quality of output may want to use a color
correction file when converting to the CMYK variation of this
format. See the -C option in Chapter 8 for more information.
120
Image Alchemy
Examples
Convert the file input.gif to an uncompressed color EPS file
called input.eps with no preview:
alchemy input.gif -e 0 -24
Do the same thing, but write out MS-DOS newlines:
alchemy input.gif -e 20 -24
Do the same thing, but use LZW compression:
alchemy input.gif -e 1020 -24
Convert the file input.gif to a gray-scale EPS file called gray.eps,
with a device independent preview:
alchemy input.gif gray.eps -e 1 -b
Convert the file test.gif to a black and white EPS file called
test.eps, with no preview and MS-DOS newlines:
alchemy test.gif -e 20 -b -c2
Image Alchemy
121
Epson Stylus
--K
Epson Stylus files are used by Epson Stylus printers.
Syntax
--K outputType
Parameter
outputType:
0:Stylus Color
1:Stylus Color II and IIs
2:Stylus Color 400
3:Stylus Color 600
4:Stylus Color 800
5:Stylus Color 1520
6:Stylus Color 3000
0:Microweave
10:Disable Microweave
0:Uni-directional
20:Bidirectional
The default is Stylus Color 800, Microweave, Uni-directional
(outputType 4). Options are combined by adding.
Extensions
.prn
Creator
Epson
Used by
Epson Stylus printers
Variations
4 bit CMYK.
Limitations
Epson Stylus files can only be 1420x720, 720x720, 360x360, or
180x180 dpi (depending on printer model selected). If you
specify any other dpi value the output file will automatically
switch to one of those.
122
Image Alchemy
Comments
Only Epson Color Stylus 600, 800, 1520, and 3000 support
1440x720 dpi mode. If you specify it for the other models
Alchemy will use 720x720 dpi mode instead.
To improve the output quality you may want to use gamma
correction or a color correction file when converting to this
format. See the -G and -C options in Chapter 8 for more
information.
Examples
Convert the file page1.tif to a 360 dpi Epson Stylus Color 800
file, scaled to 5 inches wide:
alchemy page1.tif --K -D 360 360 -Xb5i -+
Do the same thing, but use a gamma correction value of 2.0:
alchemy page1.tif --K -D 360 360 -Xb5i -+
-Gi1.0 -Go2.0
Do the same thing, but use a dpi value of 1440x720:
alchemy page1.tif --K -D 1440 720 -Xb5i -+
-Gi1.0 -Go2.0
Image Alchemy
123
ER Mapper Raster
--m
ER Mapper files are used by ER Mapper satellite image analysis
software.
Syntax
--m
Extensions
.ers
.
Creator
Earth Resource Mapping
Used by
ER Mapper
Variations
1 channel and 3 channel images.
Limitations
Alchemy cannot read 2 channel or 4 or more channel images
without using the -Z option (see the comments section below for
more information).
Comments
ER Mapper files are actually two files, one with the extension
.ers and the other without any extension. The .ers file contains
header information and the non-extensioned file contains the
actual image data. You specify the name of the .ers file and
Alchemy automatically generates the name of the other file.
Header data
Pixel data
When writing an ER Mapper file Alchemy will overwrite,
without warning, existing ER Mapper image data files.
Using the -Z option it is possible to select a single channel or 3
channels when reading a multi-channel ER Mapper image. To
use the -Z option follow it with a single number to indicate
which channel is to be read as a gray-scale image or three
numbers to indicate which channels are to be read as a 24 bit
color image. See the example section below for details.
124
Image Alchemy
Examples
Convert the Sun Raster file earth.ras to an ER Mapper file:
alchemy earth.ras --m
The ER Mapper file Landsat_TM_year_1991.ers contains 7
bands; the next examples show various ways to read selected
bands out of the image.
Convert the first band in the image to a grayscale Sun Raster
file.
alchemy Landsat_TM_year_1991.ers -Z 1 -s
Convert the fifth band in the image to a grayscale Sun Raster
file.
alchemy Landsat_TM_year_1991.ers -Z 5 -s
Convert the image to a 24 bit, color Sun Raster file, using band 2
as the red channel, band 7 as the green channel, and band 3 as
the blue channel.
alchemy Landsat_TM_year_1991.ers -Z 2 7 3
-s
Image Alchemy
125
Erdas LAN/GIS/IMG
--e
Erdas files are used by Erdas image processing software.
Syntax
--e
Extensions
.lan
.gis.img
Creator
Erdas Inc.
Used by
Erdas remote sensing software.
Variations
1 and 3 band files.
Reads 4, 8, and 16 bit files LAN, GIS, and IMG. Writes 8 bit
LAN and GIS files.
Limitations
When writing Erdas files Alchemy does not change the extension
depending on the number of bands in the image; according to the
specification gray-scale files should have the extension .gis and
true color files should have the extension .lan. Alchemy always
uses .lan.
Alchemy cannot read 2 channel or 4 or more channel images
without using the -Z option (see the comments section below for
more information).
Because of a shortage of test files this feature has not been
extensively tested; if you have Erdas IMG files which Image
Alchemy cannot correctly read please contact us.
We will be adding Erdas IMG output, if you are interested in this
capability please contact us.
126
Image Alchemy
Comments
1 band files are read in as gray-scale images.
3 band files are read in as true color images. The default color
mapping between RGB and bands 1, 2, and 3 is Red=Band 1,
Green=Band 2, and Blue=Band 3; this can be changed by using
the -Z option. See the example section below for details.
Using the -Z option it is possible to select a single channel or 3
channels when reading a multi-channel Erdas image. To use the
-Z option follow it with a single number to indicate which
channel is to be read as a gray-scale image or three numbers to
indicate which channels are to be read as a 24 bit color image.
See the example section below for details.
Examples
Convert the GIS file texas.gis to a Sun raster file:
alchemy texas.gis -s
Convert the file satellite.image to a GIS file.
alchemy satellite.image satellite.gis -b
--e
The Erdas file miami.gis contains 4 bands; the next examples
show various ways to read selected bands out of the image.
Convert the first band in the image to a grayscale Sun Raster file.
alchemy miami.gis -Z 1 -s
Convert the fourth band in the image to a grayscale Sun Raster
file.
alchemy miami.gis -Z 4 -s
Image Alchemy
127
Convert the image to a 24 bit, color Sun Raster file, using band 2
as the red channel, band 1 as the green channel, and band 4 as
the blue channel.
alchemy miami.gis -Z 2 1 4 -s
128
Image Alchemy
Explore TDI
(read only)
TDI is used by the Alias/Wavefront Explore system
Extensions
.tdi
Creator
Nothing Real
Used by
Explore
Shake
Variations
24 bit true-color with alpha channels, read only
Limitations
The TDI file format specification is not published, Alchemy's
support for the format is based on examining customer supplied
files. There are variations of the TDI format, including grayscale
and files without alpha channels, which we do not support
because we have not had such files to examine.
Because of the lack of a published specification Alchemy cannot
write TDI files.
Comments
If you have TDI files which Alchemy cannot read please contact
us. Similarly if you are interested in having Alchemy write TDI
files please contact us.
Alpha channel data can be read by using the -I option, see
Chapter 6 for more information.,
Examples
Convert the sequence of TDI files frame.000 through frame.499
to TIFF files, with the names 0.tif through 499.tif:
alchemy frame.### #.tif -t0 --- 0 499
Image Alchemy
129
Fargo Primera
--k
Fargo Primera files are used by Fargo Primera color printers.
Syntax
--k type
Parameter
type:
0:Thermal 3 Pass Color (CMY)
1:Thermal 4 Pass Color (CMYK)
2:Thermal Black and White (K)
10:Dye Sub 3 Pass Color
11:Dye Sub Black and White
The default is 0.
Extensions
.prn
Creator
Fargo Electronics, Inc.
Used by
Fargo Primera printers
Variations
1, 3, and 4 channel Thermal files.
1 and 3 channel Dye Sub (photo-realistic) files., write only.
Limitations
Reading Dye Sub (photo-realistic) files is not currently
supported.
When writing a dye sub (photo-realistic) file the Fargo supplied
file primera.fzp must be located in the directory the source file is
in. The Primera printer needs the information to print dye sub
images.
Comments
130
Image Alchemy
There seems to be little difference in the quality of Thermal 3
Pass files versus Thermal 4 Pass files.
When printing onto the T-Shirt transfer material you will
probably want to use the mirror image option (--^, see Chapter
8) so that the image will appear correct after it is transferred.
The Primera printer tends to print the left edge of the page off of
the paper. You will probably want to specify a small image
offset to prevent this (see the -_ option, Image Offset, in
Chapter 8).
To improve the output quality you may want to use gamma
correction or a color correction file when converting to this
format. See the -G and -C options in Chapter 8 for more
information.
Examples
Convert the sample JPEG file, sample.jpg, to a Thermal 3 Pass
file:
alchemy sample.jpg --k
Convert the sample JPEG file, sample.jpg, to a Dye Sub 3 Pass
file, scaling the image to be 6 inches wide (and a proportionate
height), offsetting the image 1 inch from the left edge and 3
inches from the top of the page:
alchemy sample.jpg --k10 -Xb6i -+
-D200 200 -_ 1i 3i
Image Alchemy
131
FBM
---F
FBM is the native file format of the Fuzzy pixmap manipulation
package.
Syntax
---F
Extensions
.fbm
Creator
Michael L. Mauldin
Used by
Fuzzy pixmap manipulation package
Variations
8 bit paletted and grayscale and 24 bit true color
Comments
The Fuzzy pixmap manipulation package is freely available from
ftp://nl.cs.cmu.edu/usr/mlm/ftp/fbm.tar.Z.
Example
Convert the file children.rast to a FBM file:
alchemy children.rast ---F
132
Image Alchemy
First Publisher ART
--F
First Publisher ART files are black and white images used as clip
art by First Publisher.
Syntax
--F
Extension
.art
Creator
Software Publishing Corp.
Used by
First Publisher
Variations
Black and white, 1 bit per pixel.
Examples
Convert the image scan.pcx to a First Publisher ART file:
alchemy scan.pcx --F
Image Alchemy
133
FLC
(read only)
FLC files are a simple animated file format.
Extensions
.flc
.fli
Creator
Autodesk
Used by
Various shareware readers
Variations
8 bit, paletted.
Limitations
Read only.
Comments
FLC files are multi-page files, to read all of the pages in a FLC
file use the -U option (see Chapter 6).
Examples
Convert the FLC file, movie.flc, to a multi-page GIF file.
alchemy movie.flc -g1 -U ---U movie.gif
134
Image Alchemy
Freedom of Press
--f
Freedom of Press is a PostScript interpreter from Custom
Applications that converts PostScript files to raster files. The
Freedom of Press format is one of the file types it can create.
Syntax
--f
Extension
.fop
Creator
Custom Applications
Variations
1 bit black and white and 4 bit CMYK.
Comments
Freedom of Press images are actually two files, a data file and an
info file. You specify the name of the data file and Alchemy
automatically generates the name of the info file. The output file
is normally output.001, output.002, etc. Alchemy will strip the
first part of the name and replace it with 'info', so if you specified
an output filename of output.005 there will be another file
created called info.005. If you don't specify an extension,
Alchemy will use .fop, so you'll get two files, named
filename.fop and info.fop. Alchemy will overwrite info files
without warning.
To improve the output quality you may want to use gamma
correction or a color correction file when converting to this
format. See the -G and -C options in Chapter 8.
Example
Convert the file image.tga to a Freedom of Press image called
output.003 and info.003, controlling the undercolor removal
process using sample.ucr, scaling the image to 2500 pixels across
(and scaling proportionately vertically) using nearest neighbor
scaling, and conserving memory:
alchemy --f -Csample.ucr -X2500 -+ -$
image.tga output.003
Image Alchemy
135
GEM VDI Image File
--g
VDI files are files that were developed by Digital Research for
use with GEM.
Syntax
--g
Extension
.img
Creator
Digital Research Inc.
Used by
GEM
Variations
1-8 bit grayscale and 3 and 4 bit color files, reading.
1, 3, and 4 bit grayscale and 3 and 4 bit color files, writing.
Limitations
The support for color and multiple bit grayscale GEM files is not
very universal. Therefore make sure the application you are
using to read the GEM files supports them.
Alchemy defaults to writing out a 1 bit, black and white GEM
file. You can explicitly force a 3 plane color file by use of the
-c8 option and a 4 plane color file by use of the -c16 option (you
may add a -b to write a grayscale file instead of a color file).
Comments
Because color GEM files have only 3 or 4 bits of information
and no palette support the quality is generally not very good for
scanned images. The GEM format seems to have been designed
for line drawings.
Examples
Convert the image scan.pcx to a black and white GEM file:
alchemy scan.pcx --g
136
Image Alchemy
Convert the image bigscan.tga to a 640x480, 8 color GEM file,
using nearest neighbor scaling and type 2 dithering:
alchemy bigscan.tga -c 8 --g -X640
-Y480 -d2
Do the same thing but write an 8 shade grayscale file with no
dithering:
alchemy bigscan.tga -c 8 --g -X640
-Y480 -d -b
Image Alchemy
137
GIF
-g
GIF files were developed by CompuServe as a machineindependent image file format. GIF files are the most popular
way of storing 8 bit, scanned or digitized images. GIF files are
frequently used for storing images on the WWW.
Syntax
-g type [delay [repeatCount] ]
Parameter
type:
0:GIF87A
1:GIF89A
0:non-interleaved
10:interleaved
0:disposal method 0
100:disposal method 1
200:disposal method 2
300:disposal method 3
The default is GIF87A,non-interleaved, and disposal method 0.
Options are combined by adding (see below for examples). See
the comment section below for an explanation of the different
disposal methods).
delay:
Specifies the delay between multiple pages in GIF files,
in hundredths of seconds (a delay of 250 is 2.5 seconds). The
default is 0 (display images with no delay between pages).
repeatCount:
Specifies the number of times the images are to be
repeated. Indicating a repeat count of 0 causes the images to
repeat continuously. The default is 0. This is a Netscape
specific tag.
138
Image Alchemy
Extension
.gif
Creator
CompuServe, Incorporated
Used by
CompuServe
WWW
Everyone
Variations
Reads 1 through 8 bit GIF87A and GIF89A interleaved and noninterleaved files, single and multi-page.
Writes 1 through 8 bit GIF87A and GIF89A interleaved and noninterleaved files. Also writes images with transparency
information and multi-page GIF images.
Limitations
Any text, overlays, pauses, palette changes, etc. are ignored
when reading GIF images.
When writing a multi-page GIF file or one with transparency
information, the GIF89A type must be used. Alchemy will
automatically change to writing a GIF89A file in these cases.
Because GIF files only store the size of the palette to the nearest
power of 2, the exact palette size is lost when converting to and
from GIF files. For example, if you convert a 240 color Sun
Raster file to a GIF file and back to a Sun Raster file, the
resulting Sun Raster file will have 256 colors.
Comments
GIF89A files are a newer variation of GIF files that were
introduced in 1990. They allow the inclusion of transparency
information, text, simple animation, and multiple pages in GIF
files.
Image Alchemy
139
When writing a simple GIF file you will want to use the GIF87A
variation, since the GIF89A extensions aren't necessary to store
single images and some software still can't read GIF89A images.
The advantages of GIF89A are: aspect ratio information is
preserved, transparency information is stored, and multiple pages
are allowed.
The GIF format includes a field for storing the color to be used
for the background when viewing files. Alchemy does not make
use of this value. Alchemy sets the background color to the
darkest color in the palette when viewing files and organizes the
palette such that the first color is the darkest color when writing
GIF files, if the palette is created by Alchemy (you can override
this by using the -z option).
To write a GIF file with transparency information use the ---t
option (see below). When writing a GIF file with transparency
information Alchemy defaults to making the lightest color the
transparency color; you can override this by using the ---t option
(see below for an example).
Multi-page GIF files are used by certain Web browsers (most
notably Netscape Navigator 2.x). See the ---U command below
for more information on writing multi-page files.
When writing a multi-page GIF file you may specify the delay,
in hundredths of seconds, between images. If you do not specify
a delay it defaults to 0 (which will display the images as quickly
as possible). You may also specify a repeat count. This field is
a Netscape specific tag that indicates how many times to display
the sequence. The default is 0, indicating that the sequence is to
repeat indefinitely
140
Image Alchemy
Alchemy will write a multi-page GIF file with a global palette if
you use either the match to palette (-f) or false color (-F) option,
otherwise Alchemy will write local palettes. If you have a series
of images which contain identical palettes you can force
Alchemy to write a global palette by using the -F option and give
the name of the first file (see below for an example). If you have
a series of images which do not contain identical palettes but you
still want to write a global palette you can use Alchemy to
generate a multi-image palette file and then match each of the
images to that palette using the -f option (see below for an
example).
The different disposal methods cause software which is
displaying a multi-page GIF to perform different operations
between images. There are 4 different disposal methods
supported by the GIF specification and using Alchemy it is
possible to write any one of them.
Disposal method 0: Restore to background color
Disposal method 1: Do not dispose, leave image in place
Disposal method 2: Restore area to previous
Disposal method 3: No disposal required
It's difficult to convey what this actually means when an image is
displayed. The easiest thing to do is to write out a multi-page
GIF using each of the disposal methods and use the software
which you will use to display the image to view the results . If
each of the images in the multi-page GIF is the same the disposal
method has little effect, the most obvious differences are noted
when an image is smaller than the previous image.
The LZW compression used in GIF files is patented by Unisys
Corporation and used under license. If you write software to
read or write GIF files you need to contact Unisys to arrange a
license. See Appendix I in the Image Alchemy manual for
contact information.
Image Alchemy
141
Examples
Convert the image test.pcx to a GIF87A image:
alchemy test.pcx -g
Convert the file input.tga to a 16 color GIF89A file:
alchemy input.tga -c16 -g1
Convert the image logo.pcx to a GIF89A image, using white as
the transparent color (white is the default transparent color, so
we do not need to specify 255 255 255 after the ---t):
alchemy logo.pcx -g1 ---t
Do the same thing, with red as the transparent color:
alchemy logo.pcx -g1 ---t 255 0 0
Write out a multi-image GIF file called output.gif, using the files
image00.gif through image99.gif (this example will write out a
local palette for each image):
alchemy image??.gif -g1 ---U output.gif
Do the same thing, but force Alchemy to write out a global
palette (this assumes that all of the input gif images contain an
identical palette):
alchemy image??.gif -g1 ---U output.gif -F
image00.gif
142
Image Alchemy
If the images contained different palettes, but you still wanted a
single, global palette, you could use two runs of Image Alchemy
to do this. First you would use the Multi-Image Palette output
option to generate a .pal file and then run Alchemy again,
matching each of the images to that palette:
alchemy image??.gif -L temp.pal -c256
alchemy image??.gif -g1 ---U output.gif -f
temp.pal
Write out a multi-image GIF file called output.gif, using the files
image00.gif through image99.gif (this example will write out a
local palette for each image), specifying a delay of 1 second
between images, the loop will repeat indefinitely:
alchemy image??.gif -g1 100 ---U
output.gif
Do the same thing, but specify that the loop is to be displayed
exactly twice:
alchemy image??.gif -g1 100 2 ---U
output.gif
Do the same thing, but use disposal method 2:
alchemy image??.gif -g201 100 2 ---U
output.gif
Image Alchemy
143
GOES
--G
GOES files are used for satellite image data.
Syntax
--G type
Parameter
type:
0:GARS format
1:McIDAS format
The default is 0 (GARS format).
Extension
.goe
Creators
The University of Wisconsin
National Oceanic and Atmospheric Administration (NOAA)
National Environmental Satellite Data Information Service
(NESDIS)
Used by
Various satellite image processing software, including the
McIDAS system.
Variations
8 bits per pixel.
16, and 32 bits per pixel, read only.
Limitations
When reading 16 and 32 bit images Alchemy discards all but the
top 8 bits of data.
Alchemy discards any calibration data and level maps when
reading images.
Because of difficulty in getting a sufficient number of test
images in the GOES format (especially the PUT format) reading
GOES images has not been thoroughly tested. If you have any
GOES images which Alchemy does not read correctly please
contact us.
144
Image Alchemy
Comments
The GARS format is a 7680 bytes per block, Motorola byteorder, EBCDIC format; the McIDAS format is a continuous data,
Intel byte-order, ASCII format.
Since GOES images are always grayscale, Alchemy assumes the
use of the -b and -8 options when writing a GOES file.
GOES images contain a lot of information which is not part of
the image data. This information includes the time and date the
image was captured, the satellite which captured the image, the
type of instrumentation used, etc. When reading a GOES image
this information is discarded; when writing a GOES image 0 is
written for all values for which data is unavailable.
Examples
Convert the Erdas file, florida.gis, into a GOES GARS image:
alchemy florida.gis --G0
Do the same thing, but write out a GOES McIDAS image:
alchemy florida.gis --G1
Image Alchemy
145
Histogram
-H
Histogram files are HSI Raw files which contain a histogram.
Syntax
-H options
Parameter
options:
0: Do not ignore any pixels
1: Ignore white
2: Ignore black
3: Ignore sharp peaks
0: Do not generate a cumulative histogram
10: Generate a cumulative histogram
0: Use a black background for the histogram
100: Use a white background for the histogram
See the comments section below for more information. Options
can be combined by adding (see below for an example). The
default is 0.
Extension
.hst
Creator
Handmade Software, Inc.
Used by
Image Alchemy
Variations
Output only (can be read as a raw file).
Histogram files are always paletted with 8 colors.
Comments
146
Image Alchemy
Histogram files are HSI Raw files which contain the frequency
of occurrence of pixel values. The horizontal axis indicates the
intensity (from 0 at the left to 255 at the right). The vertical axis
shows the frequency (the axis is automatically scaled so that
100% corresponds to the most frequently occurring value).
Ignore white and black automatically removes the white and
black values from the histogram. This is useful if the
background color is white or black, which would make the
interesting portion of the histogram too small.
Peak ignore does the same thing, except it automatically decides
what are the most used intensities and ignores them.
The cumulative option generates a cumulative histogram instead
of a discrete histogram.
The white background option makes the background white
(which is nice if you are going to be printing the histogram).
Examples
Generate a histogram for the image sample.jpg:
alchemy sample.jpg -H
Generate a histogram for the image tiger.ras, ignoring the white
background:
alchemy tiger.ras -H 1
Do the same thing, but make it a cumulative histogram:
alchemy tiger.ras -H 11
Image Alchemy
147
Hitachi Raster Format
--h
Hitachi Raster Format (HRF) files are black and white images
used by CADCore.
Syntax
--h
Extension
.hrf
Creator
Hitachi Software Engineering Co., Ltd.
Used by
Information and Graphics Systems, Inc. (IGS)
Variations
Black and white, 1 bit per pixel.
Comments
Alchemy can read and write multi-page HRF files, use the -U
option to read pages other than page 1 and option ---U to write a
multi-page HRF file (see Chapter 6 for more information).
Examples
Convert the TIFF file page1.tif to a HRF file:
alchemy page1.tif --h
Convert the TIFF files page1.tif through page9.tif to a multi-page
HRF file:
alchemy page?.tif ----h ---U output.hrf
148
Image Alchemy
HP Printer Command Language (PCL)
-P
HP PCL files are used by HP LaserJets and compatible printers.
Syntax
-P type[paperSize [inputTray] ]
Parameter
type:
0:Uncompressed
1:RLE compressed
2:TIFF compressed
3:Delta Row compressed
0:Portrait
10:Landscape
0:Standard Margins
50:Expanded Margins
0:PCL3
100:PCL5
200:PCL XL
300:Lexmark PCL
0:Reset printer at start of data
1000:Do not reset printer at start of data
0:Include position information
4000:Do not include position information
See the comments section below for more information. Options
are combined by adding (see below for an example). The default
is 0 (Uncompressed, Portrait, Standard Margins, PCL3, Reset
printer, and include position information).
Image Alchemy
149
paperSize:
0:Printer default setting
1:US Letter
2:US Legal
3:US Ledger
11:A4
13:A3
The default is 0.
inputTray:
0:Printer default tray
1 through 99:Tray varies with printer model
The default is 0
Extension
.pcl
Creator
Hewlett-Packard Company
Used by
HP LaserJet printers
HP compatible laser printers
Variations
1 bit per pixel, black and white, for PCL3, PCL5, and Lexmark
PCL.
Writes 1 bit, 4 bit, and 8 bit grayscale and RGB paletted, for
PCL XL
Reads and writes uncompressed, RLE compressed, TIFF
compressed, and Delta Row Compressed PCL3 and PCL5 files.
Reads and writes portrait and landscape files.
Limitations
150
Image Alchemy
In addition to raster images, PCL files can include text and
vector graphics information. When reading Alchemy only pays
attention to raster images in the file and attempts to skip
everything else. See Appendix A, Answers to Frequently Asked
Questions, for a further discussion of this.
The only resolutions allowed in PCL files are 75 dpi, 100 dpi,
150 dpi, and 300 dpi (and, in the case of PCL5 type files, 200 dpi
and 600 dpi, and, in the case of Lexmark PCL files 1200 dpi) and
the X and Y resolution must be the same.
If you specify a non-allowable resolution Alchemy automatically
uses the next higher resolution. For example, if you specify
250 dpi Alchemy will write a 300 dpi PCL file.
If no resolution is specified either on the command line or in the
input file Alchemy automatically chooses the smallest resolution
which will allow the entire image to fit on an 8.5" x 11" page (or
whatever page size is selected).
PCL XL files are always written as uncompressed, so specifying
-P200 and -P201 will result in the same file being written.
PCL XL files cannot be read.
Comments
To write a color file for the HP Color LaserJet use the HP RTL
output option, --r 9, see below.
PCL3 files are supported by LaserJet 3 and earlier printers, PCL5
is supported by LaserJet 4 and newer printers. PCL XL is
supported by LaserJet 6 and newer printers. Lexmark PCL is
supported by Lexmark printers which are 1200 dpi capable.
The paperSize option will cause the LaserJet to automatically
switch to whatever tray contains the correct size paper. If the
paperSize selected is not available the printer's control panel will
display a message.
The paperTray option varies with different model LaserJets and
with what options are installed. The only way to determine what
your printer
Image Alchemy
151
The Reset printer/Do not reset printer option is useful if you are
generating PCL files which will be sent to the printer by another
application. If you select the Do not reset printer option the
resulting PCL file can be sent as part of a larger PCL stream
The Do not include position information is similarly useful, if
you choose that option the application that sends the generated
PCL data can send a PCL position command before the PCL
data.
When converting color or gray-scale images to PCL3 or PCL5
you will probably want to scale the output so the image will be
larger than the input image. This will allow the dithering to
preserve more detail in the image. This is not necessary with
PCL XL, the printer will do the appropriate conversion,
preserving detail.
PCL XL has advantages of other PCL types in that the printer
will automatically scale the image, perform color/grayscale
density correction, and dither the image. If you use the --X and
--Y options with Alchemy you can set the DPI values such that
the printer will print the image at your desired size, see the
Examples section below for an example.
The best quality dither for PCL output is generally type 3 (Jarvis,
Judice, & Ninke), with a serpentine raster, and some dithering
noise (use -ds3 10, for example).
Not all PCL compatible printers can print all types of
compressed PCL file. Specifically, LaserJet II, IID, and earlier
printers can print only uncompressed PCL files. LaserJet IIp
printers can print only uncompressed and RLE compressed files.
LaserJet III, IIID, IIIp, IIIsi, and 4 printers can print all types of
compressed PCL files.
In general, the higher the compression type, the better the
compression ratio.
152
Image Alchemy
The Landscape option can be used to write a landscape PCL file.
Because of changes in the PCL format, only LaserJet III and
newer printers will correctly print Alchemy produced landscape
PCL files.
PCL files can be used to generate output which can be printed on
HP LaserJet and compatible printers. The easiest method is to
simply generate a .PCL file and then copy it to the printer by
using the copy command (when using the copy command from
MS-DOS you will have to use a /B to make sure the entire file is
copied to the printer; see the example below for more
information).
For MS-DOS users it is possible to write a PCL file directly to a
HP LaserJet or compatible printer. If you use the name of the
device as the output file name Alchemy will redirect output to
that device (for example, use prn: as the output file name if
your LaserJet is attached to the prn: port) .
You may want to adjust the output gamma to compensate for dot
gain when generating a PCL file to print on a laser printer.
Typically specifying an input gamma of 1.0 and an output
gamma of 2.0 produces good results (-Gi 1.0 -Go 2.0). See
Appendix A, Answers to Frequently Asked Questions, for more
information on dot gain.
When converting a PCL file which contains multiple pages you
can specify which page to convert by using the -U option
followed by the page number, see Chapter 6 for more
information.
The expanded margin option adds PCL commands to the output
file to reduce the margin when the page is printed. The upper
left corner of the image will then correspond to the upper left
corner of the paper (note that HP laser printers cannot print all
the way to the edge of the paper, so some information will be
lost).
Image Alchemy
153
To position the image on the page use the offset image option
("-_") or the center image option ("--_"), see Chapter 8 for
details.
Examples
Convert the image image.gif to an HP PCL file, using no
compression:
alchemy image.gif -P
Convert the image small.gif to a HP PCL file called out.pcl with
dimensions of 2000 by 2000 at 300 dpi, performing gamma
correction to compensate for dot gain, and using dithering type 3,
with a serpentine raster, and adding dithering noise :
alchemy small.gif out -P -X2000 -Y2000
-D 300 300 -Gi 1.0 -Go 2.0 -ds3 10
Convert the image small.gif to a HP PCL file called out2.pcl
with dimensions of 2000 by 2000 at 300 dpi, using TIFF
compression:
alchemy small.gif -P2 -X2000 -Y2000
-D 300 300 out2
Print the image madonna.gif directly to your LaserJet 4 at the
largest resolution, using Delta Row compression with dithering
type 22 (printing directly to the printer works only in the MSDOS version of Alchemy):
alchemy madonna.gif prn: -P104 -D600 600
-Xb4800 -YB6600 -+ -d22
Print all the TIFF files in the current directory directly to a HP
LaserJet, while scaling them to fill the page and performing
gamma correction to compensate for dot gain:
alchemy *.tif prn: -P -D 300 300 -Xb2400
-Yb3000 -+ -Gi1.0 -Go2.0
154
Image Alchemy
Convert the page 3 of the HP PCL file, contract.pcl, to a TIFF
file:
alchemy contract.pcl -U 3 -t
Convert all of the pages in the file to TIFF files (the output files
will be called contract.001, contract.002, …):
alchemy contract.pcl -U -t
Convert the file sample.jpg to an HP PCL XL file, setting the
DPI such that the file will print out at 8 inches by 6 inches:
alchemy sample.jpg --X8i --Y6i -P200
Image Alchemy
155
HP PhotoSmart
---S
HP PhotoSmart files are used by PhotoSmart printers.
Syntax
---S paperType[dryTime] ]
Parameter
paperType:
0:Glossy
1:Glossy Reverse Side
2:Matte
3:Deluxe
4:InkJet
5:Plain
6:Project
7:Project Reverse Side
8:Transparency
The default is 0.
dryTime:
0:Short
1:Normal
2:Long
The default is 1.
Extension
.prn
Creator
Hewlett-Packard Company
Used by
HP PhotoSmart printers
Variations
24 bits per pixel, RGB.
Comments
This is a really great printer, buy one and a copy of Image
Alchemy PS to use with it.
The printer is always at 300 dpi, if you want the output to be at
the expected size specify -D300 300 as one of the options.
156
Image Alchemy
The Reserve Side paper types are used if you are printing on the
reverse side of the paper.
Example
Convert the image sample.jpg to a HP PhotoSmart file, 5 inches
wide:
alchemy sample.jpg -D300 300 ---S -Xb5i -+
Image Alchemy
157
HP Raster Transfer Language (RTL)
--r
RTL files are used by HP color raster printers and plotters.
Syntax
--r outputType
Parameter
outputType:
0:PaintJet, DeskJet, and Color LaserJet uncompressed
1:DesignJet and HP7600 uncompressed
2:DesignJet and HP7600 TIFF compressed
3:HP7600 planar, uncompressed
4:HP7600 planar, TIFF compressed
5:HP7600 planar, Group III compressed
6:DesignJet on-the-fly, uncompressed
7:DesignJet on-the-fly, TIFF compressed
9:PaintJet, DeskJet, and Color LaserJet TIFF compressed
10:Encad NovaJet TIFF compressed
11:DesignJet compressed, 4 channel
12:DesignJet on-the-fly, compressed, 4 channel
13:DesignJet compressed, 24 bit
14:DesignJet on-the-fly, compressed, 24 bit
15:DesignJet compressed, 24 bit, old dithering
16:DesignJet on-the-fly, compressed, 24 bit,
0:old dithering
The default is Type 2. See the comments section below for
information on output types 11 through 16.
Extension
.rtl
Creator
Hewlett-Packard Company
Used by
HP raster plotters and printers including PaintJet, DeskJet,
DesignJet, and HP 7600 Series printers and plotters.
NovaJet Plotters.
158
Image Alchemy
Variations
4 bit CMYK
Black and white,
24 bit RGB
Limitations
Output only.
Comments
HP RTL files can be used to produce output which can be
printed on HP color printers and raster plotters. The file can be
printed by sending the file to the plotter.
To improve the quality of output may want to use a color
correction file when converting to the CMYK variation of this
format. See the -C option in Chapter 8 for more information.
Compression type 7 is the best to use on DesignJets. The files
are generally smaller than type 6 files and the on-the-fly mode
allows the plotter to start plotting before the entire file is
received, decreasing the total plot time.
Compression types 6 and 7 are equivalent to types 1 and 2 except
they tell the plotter it may plot the data as received instead of
waiting for the entire image. This is useful on the DesignJet
plotters which have small buffers compared to the imageable
area.
The NovaJet option causes Alchemy to create RTL files which
are compatible with NovaJet plotters.
Type 7 RTL files are compatible with various Mutoh plotters.
These include Falcon CAD (RJ-800), Falcon Graphics (RJ4000), HJ-800, RJ-1300, and RJ-1800. These plotters operate at
either 180, 300, 360, or 720 dpi. Specify the appropriate dpi
value using the -D command.
Image Alchemy
159
Output types 11 through 16 are only available on Revision B HP
650C and newer DesignJets. Types 11 and 12 are the same as
types 2 and 7 respectively, with the difference that types 11 and
12 allow for independent control over the black channel (types 2
and 7 always perform 100% black removal). Types 13 through
16 send 24 bit data to the plotter, allowing it to perform the RGB
to CMYK conversion; types 13 and 14 use a stochastic dither
pattern, types 15 and 16 use a digital halftone dither. Types 13
through 16 can also be used to scale the image, by specifying a
different dpi value than the dpi value the plotter natively uses,
see the examples section below for an example.
Specifying on-the-fly mode instructs the plotter to start plotting
as soon as it receives data (as opposed to buffering the data until
the end of the image). Using on-the-fly mode is a good idea
when plotting large images on the 650c and newer plotters,
otherwise the plotter will buffer the data until it fills its memory,
then it will plot that information, and then revert to on-the-fly
mode. The two different plotting methods produce a slightly
different banding effect, which can be noticeable in the output
image.
Alchemy will generate a color RTL file unless the input file is
black and white or grayscale or the -b option is specified as part
of the conversion.
There is no additional setup required for the PaintJet or
DesignJet plotters. HP7600 series plotters should be in HP-GL/2
mode; best results will generally be achieved with compensation
off. To get color plots from the HP7600 series the plotter must
be in 4 or 5 pass mode.
If the input is black and white, you can do the conversion
without an undercolor removal file and with dithering off. This
will result in a faster conversion.
160
Image Alchemy
If the input is gray-scale, you probably do want to use an
undercolor removal file to perform density correction, but with
100% black removal (the black removal tables should contain 0
through 255, increasing by one each line) so that the output won't
contain cyan, magenta, or yellow. The samples directory on the
distribution diskette has a UCR file called gray.ucr which has
100% black removal.
MS-DOS users can send the RTL file directly to the plotter when
generating an RTL file of type 0, 1, 2, 6, 7, and 9 through 16. To
send the file directly give the name of the output device as the
output file (for example, if your plotter is connected to your
computer via lpt1: specifying lpt1: as the output file will send
output directly to that device).
You may want to use gamma correction or a color correction file
when converting to this format. See the -G and -C options in
Chapter 8 for more information.
The best quality dither for HP RTL output is generally type 3
(Jarvis, Judice, & Ninke), with a serpentine raster, and some
dithering noise (use -ds3 10, for example).
You may want to adjust the output gamma to compensate for dot
gain when generating a HP RTL file. Typically, specifying an
input gamma of 1.0 and an output gamma of 1.8 produces good
results (-Gi 1.0 -Go 1.8). See Appendix A, Answers to
Frequently Asked Questions, for more information on dot gain.
Examples
Convert the black and white image test.wpg to an HP RTL file
for a PaintJet called test.rtl, not using a UCR file and with
dithering off:
alchemy test.wpg --r0 -d0
Image Alchemy
161
Convert the file image.tga to an RTL file for a PaintJet called
image.rtl, using the undercolor removal file sample.ucr:
alchemy image.tga --r0 -Csample.ucr
Do the same thing, but use gamma correction instead of the
undercolor removal file:
alchemy image.tga --r0 -Gi1.0 -Go1.8
Convert the file image.tga to a planar RTL file called image.rtl
using TIFF compression, controlling the undercolor removal
process using sample.ucr, scaling the image to 3000 pixels across
using good quality scaling, preserving the aspect ratio (by
proportionately scaling the image vertically), and conserving
memory:
alchemy image.tga --r4 -Csample.ucr
-Xb3000 -+ -$
Convert the file sample.jpg to an RTL file for a DesignJet
2000C, sending the image directly to the plotter, with gamma
correction, dithering type 3 (with a serpentine raster), and scaling
the image to be 17 inches wide at 600 dpi while preserving the
aspect ratio (the plotter is attached to the lpt1: port of an
IBM PC):
alchemy sample.jpg lpt1: --r7 -Gi 1.0
-Go 1.8 -ds3 -Xb17i -+ -D600 600
Convert the file tiger.ps to a 34" x 44" 600 dpi RTL file,
performing the scaling entirely during the PostScript rendering
step a:
alchemy tiger.ps --r 7 -Zm 2 -Zo 34 44 -Z+
-Ze 1 -Zd 600 600 -Gi 1.0 -Go 1.8
162
Image Alchemy
Do the same thing, but render the PostScript file at 8.5" x 11"
and use raster scaling for the final conversion to 34" x 44". This
uses much less disk space and memory than the previous
example, and most images the result will be almost the same,
although PostScript text will lose a small amount of quality.
alchemy tiger.ps --r 7 -Zm 2 -Zo 8.5 11
-Z+ -Ze 1 -Zd 600 600 -Gi 1.0 -Go 1.8
-Xb34i -Yb44i -+
Convert the 640 x 480 image sample.jpg to a 24 bit RTL image.
Specify the dpi value such that the image will be plotted at 24
inches x 18 inches. The -D 27 27 value is calculated by dividing
the size of the image (in dots) by the desired output size (in
inches), to derive the required dots per inch value
(640/24=26.6667). Note that because the dots per inch value is
required to be an integer this will not produce a plot that is
exactly 24 inches x 18 inches, but instead will be 23.7 inches x
17.78 inches. Also note that the DesignJet 650C uses pixel
replication scaling to increase the size of the images (this is
equivalent to Image Alchemy type 'a' scaling).
alchemy sample.jpg --r14 -D 27 27
The above example has been made simpler by newer Alchemy
commands that perform the calculation for you: --X and --Y
alchemy sample.jpg --r14 --X 24 --Y 18 -+
Image Alchemy
163
HP-48sx Graphic Object (GROB)
--H
Graphic Object files are used by HP-48sx calculators.
Syntax
--H type
Parameter
type:
0:Binary
1:ASCII
The default is Binary.
Extension
.grb
.asc
Creator
Hewlett-Packard Company
Used by
HP-48sx calculators.
Variations
Black and white, 1 bit per pixel.
Comments
Since GROB files are always black and white, Alchemy assumes
the use of the -b, -8, and -c2 options when writing GROB files.
Example
Convert the image madonna.gif to a ASCII HP-48sx GROB file
alchemy madonna.gif --H 1
164
Image Alchemy
HSI JPEG
--j
The HSI JPEG format is a variation of the JPEG format that was
designed by Handmade Software to better compress paletted
images.
Syntax
--j
Extension
.jpg
Creator
Handmade Software, Inc.
Used by
Image Alchemy
GIF2JPG (another Handmade Software product)
Variations
8 bit paletted
Comments
Paletted images often have large areas where the image consists
of 1 or 2 colors; JPEG compression does a poor job on these
sections when compared to LZW compression. HSI JPEG files
are a combination of JPEG and LZW compression.
HSI JPEG files are not compatible with JPEG or JFIF files. If
you intend to transfer files to other systems do not use this
format, use the standard JPEG format instead (using the -j
option).
If you are interested in adding support for HSI JPEG files to your
software please contact us for information on the format.
Example
Convert the file madonna.gif to an HSI JPEG file:
alchemy madonna.gif --j
Image Alchemy
165
HSI Palette
-l
HSI PAL files are palettes which are ASCII files that can be
edited with a text editor.
Syntax
-l (lower case L)
Extension
.pal
Creator
Handmade Software, Inc.
Used by
Image Alchemy
Variations
HSI PAL files are always ASCII files.
Limitations
.PAL files contain only a palette.
Comments
The format of PAL files is described in Appendix H.
Related options
-f
-F
-L
Examples
Extract the palette from the GIF file madonna.gif:
Match image to specified palette
False color with specified palette
Output Multi-Image Palette
alchemy madonna.gif -l
Convert the file image.tga to a GIF file, matching the palette
found in standard.pal:
alchemy image.tga -g -f standard.pal
166
Image Alchemy
HSI Raw
-r
HSI Raw files are used internally by Image Alchemy when
converting between certain combinations of image formats. If
you are interested in converting custom format images to be used
with Image Alchemy we suggest using HSI Raw Files.
Syntax
-r compressionType
Parameter
compressionType:
0:None
1:Packbits
0:RGB
200:4 bit CMYK
400:32 bit CMYK
The default is 0, None, RGB. Options are combined by adding
(see below for an example).
Extension
.raw
Creator
Handmade Software, Inc.
Used by
Image Alchemy
Variations
8 bit paletted, 24 bit true color, 4 bit CMYK, and 32 bit CMYK.
Comments
This format is used internally as temporary files by Alchemy
when doing certain image conversions; it can also be explicitly
read and written. This format is described in Appendix F.
Examples
Convert the file test.lbm to a raw file:
alchemy test.lbm -r
Image Alchemy
167
IBM Picture Maker
--i
IBM Picture Maker files are used by IBM presentation software.
Syntax
--i
Extension
.pic
Creator
IBM Corp.
Used by
IBM Storyboard Live!
Variations
256 color, paletted.
Limitations
16 color Picture Maker files are not supported.
Picture Maker images cannot be larger than 640x480.
Comments
This is not the same format as Cubicomp PictureMaker.
Picture Maker files may be either 320x200 or 640x480. Image
Alchemy will write the smallest variation that will fit the image,
with the image centered and the borders filled with color 0. If
you attempt to write a Picture Maker file which is larger than
640x480 an error is generated.
Example
Convert the PCX file, giraffe.pcx, into an IBM Picture Maker
file:
alchemy giraffe.pcx --i
168
Image Alchemy
IDRISI
---I
The IDRISI project is a not-for-profit project from the Graduate
School of Geography at Clark University. The IDRISI file
format is used by their Windows software.
Syntax
---I type (capital i)
Parameter
type:
0:Binary
1:Packed Binary
2:ASCII
The default is Binary.
Extension
.img
.doc
Creator
Clark University
Used by
IDRISI for Windows
Variations
8 bit grayscale, 16 bit grayscale, 32 bit floating point
Limitations
Alchemy always converts 16 bit and 32 bit images to 8 bit when
reading; you can control whether to use the min. and max. values
that are stored as part of the data by using the -Z option, see
below for more information
Comments
IDRISI images require two files, one with the extension .img and
the other with the extension .doc. The .img file contains the
actual image data and the .doc file contains the header
information. You specify the name of the .doc file and Alchemy
automatically generates the name of the .img file.
For pixel data
For image header information
When writing an IDRISI file Alchemy will overwrite, without
warning, existing .img files.
Image Alchemy
169
Using the -Z option it is possible to choose whether or not to use
the min. and max. values that are stored as part of the header
information when reading a 16-bit IDRISI file. The default is to
not use the values, instead the 16 bit date is scaled to 8 bit by
discarding the lower 8 bits. Using a -Z1 option will cause the 16
bit data to be scaled to 8 bits using the min. and max. values.
See below for an example.
Examples
Convert the PCX file, earth.pcx, into an IDRISI file:
alchemy earth.pcx ---I
Convert the 16 bit IDRISI file earth.doc to a GIF file, using the
min. and max. values to scale the 16 bit data to 8 bit data:
alchemy earth.doc -Z1 -g
170
Image Alchemy
IFF/ILBM
-i
IFF (Interchange File Format) files are used by Amiga computers
for storing a number of types of data, including images, text, and
music; ILBM (InterLeaved BitMap) is a type of IFF file used to
store images.
Syntax
-i
Extensions
.lbm
.iff
.ilbm
Creator
Commodore-Amiga Corp.
Used by
Amiga
Deluxe Paint
Variations
1 through 8 bit, 24 bit, HAM, and PBM images, input.
1 through 8 bit and 24 bit images, output.
Limitations
Dynamic Hi-Res images are not supported.
Does not write images in any of the Amiga-specific display
modes.
Comments
If you're writing an ILBM file for use on an Amiga, you
probably want to write either a paletted file with 32 colors or a
24 bit file. 24 bit ILBM files can then be converted to one of the
Amiga-specific display modes with various third-party utilities.
Example
Convert the file input.pcx to an IFF/ILBM file called output.lbm
with 32 colors:
alchemy input.pcx output.lbm -i -c32
Image Alchemy
171
Imaging Technology
---M
Little is known about this format, it was added at the request of a
customer. If you have any information please contact us.
Syntax
---M
Extensions
.img
Creator
Imaging Technology
Used by
Imaging Technology software.
Variations
8 bits per pixel, grayscale.
Examples
Convert the file sample.jpg to a Imaging Technology file.
alchemy sample.jpg ---M
172
Image Alchemy
Img Software Set
--Q
The Img Software Set is a collection of tools for manipulating
graphic images freely available for various UNIX workstations.
Syntax
--Q
Extensions
.img
.p
.a
Creator
Paul Raveling
Used by
Img Software Set
Variations
8 bit paletted and 24 bit images.
Limitations
Alchemy does not read nor write compressed (.Z) images. Use
the UNIX supplied uncompress program to decompress those
images before reading with Alchemy.
Comments
The Img Software Set is available via anonymous ftp from
ftp://expo.lcs.mit.edu/contrib/img_1.3.tar.Z or
ftp://venera.isi.edu/pub/img_1.3.tar.Z.
Example
Convert the Sun Raster file test.ras to an Img Software Set file:
alchemy test.ras --Q
Image Alchemy
173
Intergraph
---r
The Intergraph file format was developed by Intergraph Corp.
and is used by them.
Syntax
---r compressionType
Parameter
compressionType:
9:Run Length Compressed, black and white
24:Group 4 compressed, black and white
27:Run Length Compressed, RGB
The default is 24.
Extensions
.rgb
Creator
Intergraph Corp.
Used by
Intergraph Corp.
Variations
1 bit black and white and 24 bit RGB images, input and output.
8 bit grayscale, tiled and untiled, input only.
Limitations
If you need to read or write other type Intergraph files please
contact us; we are happy to add support for any of the Intergraph
formats for which documentation is available.
Comments
You can write a scannable type 9 Intergraph file by specifying
109 as the compression type (---r109). Scannable files are
Intergraph files which contain additional information, their usage
is deprecated by the Intergraph documentation, but some
software requires scannable files.
Example
Convert page.tif to an Intergraph file
alchemy page.tif ---r
174
Image Alchemy
Iris CT
---Q
Iris CT is used by Iris printers.
Syntax
---Q
Extensions
.ct
Creator
Iris
Used by
Iris printers.
Variations
32 bit CMYK
Examples
Convert the file sample.jpg to Iris CT format.
alchemy sample.jpg ---Q
Image Alchemy
175
JEDMICS CCITT4
---E
Syntax
---E type
Parameter
type:
0:new format (1997-05-09 draft)
1:old format (1991-04-10 spec.)
0:no preview image
10:preview image
The default type is 0.
Extensions
.c4
Creator
JEDMICS
Used by
JEDMICS
Variations
1 bit per pixel black and white.
Comments
JEDMICS files contain two images, a normal image and a
reduced size preview image. Alchemy treats the normal image
as page 1 and the preview image as page 2 for reading purposes
(therefore you can use -U 2 to read the preview image).
Examples
Convert the file sample.jpg into JEDMICS CCITT4 format.
alchemy sample.jpg ---E
176
Image Alchemy
Jovian VI
--J
Jovian VI files are created by the Jovian Logic video capture
boards.
Syntax
--J
Extensions
.vi
Creator
Jovian Logic Corp.
Used by
Jovian Logic
Variations
8 bit gray-scale images, 4 and 8 bit paletted images, and 16 and
24 bit true color images, input and output.
1, 4, 6, bit gray-scale, input only.
Limitations
Reads files with 6 and 8 bit palettes, always writes 6 bit palettes.
Gray-scale files are always written 8 bit.
Comments
When writing a VI file the palette always starts at 0, but color 0
will not necessarily be black (this is the way that Jovian VI files
are written by Jovian software).
Example
Convert the GIF file, test.gif, to a 16 color VI file:
alchemy test.gif --J -c16
Image Alchemy
177
JPEG/JFIF
-j
JPEG is an image file format that uses a lossy compression
technique to achieve high compression ratios. See Appendix C,
JPEG Compression, for more information on the JPEG file
format.
Syntax
-j[coding] quality [passes]
Parameters
coding:
0none:default Huffman coding
0h:optimum Huffman coding
The default is default Huffman coding.
quality:
1 through 100 (larger is higher quality)
The default quality is 32.
passes:
1:write one pass JPEG files
2 through 10:write n pass JPEG files
The default number of passes is 1.
Extension
.jpg
Creator
Joint Photographic Experts Group (JPEG)
Used by
WWW
Everyone else storing photographic images.
Variations
Baseline JPEG with CCIR-601 YCbCr color space, interleaved
components, Huffman coded.
Gray-scale images are saved as single channel JPEG files; color
images are saved as three channel JPEG files. CMYK JPEG
files can be read.
178
Image Alchemy
Alchemy can read files with any component sub-sampling up to
4x4; it always writes 2h:1v 1h:1v 1h:1v.
Alchemy JPEG files comply with the industry standard 'JFIF'
interchange format.
Limitations
JPEG files are always lossy, which means that the compressed
image is not identical to the original image. At high quality
factors (32 and above) this loss is generally so slight as to be
barely noticeable. There is no quality factor which is guaranteed
to be lossless.
Comments
By default, Image Alchemy uses a fixed set of Huffman tables to
compress an image. If the -j is immediately followed by an 'h',
Alchemy will generate a set of custom tables optimized for the
image and quality factor. This usually produces 5-20% better
compression (depending on the image content and quality factor)
but requires an additional pass over the image data, so it takes
longer to compress (there's no effect on the time it takes to
decompress the image).
Quality may vary between 1 and 100; the default is 32. The
higher the number the higher the quality of the image and the
lower the compression ratio. Quality factors below 10 will
produce images with significant loss of quality.
JPEG files are based on the Joint Photographic Experts Group
(JPEG) CD 10918-1 draft standard.
Since JPEG compression was designed for use with continuous
tone images (such as those produced by a scanner or digitizer),
poor results can be expected when compressing line drawings.
Multi-pass files are useful when generating JPEG files which are
going to be displayed on the WWW. A multi-pass file allows a
rough preview of the image to be displayed quickly when using a
browser which supports multi-pass JPEG files.
Image Alchemy
179
Related options
-q
Examples
Convert the file, photo.tga, to a JPEG file called photo.jpg, using
a high quality setting:
Apply Smoothing when decompressing a JPEG image.
Because JPEG compression works on 8x8 pixel blocks
there may be discontinuities at the edges of these blocks
producing block artifacts. Smoothing attempts to reduce
these artifacts. Smoothing is really only necessary at
very low quality settings (less than 10); even then the
effects of smoothing are not particularly significant.
alchemy photo.tga -j70
Convert the file, photo.tga, to a JPEG file called photo.jpg, using
a low quality setting and generating optimum Huffman tables:
alchemy photo.tga -jh10
Convert the file, photo.tga, to a JPEG file called photo.jpg, using
four pass mode and a low quality setting:
alchemy photo.tga -j10 4
Convert the JPEG file, lores.jpg, to a PCX file using smoothing:
alchemy lores.jpg -p -q
180
Image Alchemy
Lumena CEL
--L
Lumena CEL files are used by Time Arts software.
Syntax
--L
Extension
.cel
Creator
Time Arts
Used by
Lumena
Variations
15 and 32 bit RGB images, including alpha channels (for 32 bit
files).
Comments
Alpha channel data can be read and written by using the -I
option, see Chapter 6 for more information.,
Example
Convert the file test.tga to a Lumena CEL file:
alchemy test.tga --L
Image Alchemy
181
Macintosh PICT/PICT2
-m
PICT files were created by Apple Computer as a common format
for Macintosh applications to use. Virtually every Macintosh
application can use PICT files.
Syntax
-m macBinary
Parameters
macBinary:
0:Do not write a MacBinary file
1:Write a MacBinary file
The default is to not write a MacBinary file.
Extensions
.pict
.pic
Creator
Apple Computer, Inc.
Used by
Macintosh computers
Variations
1, 2, 4, 8, and 32 bit PICT and PICT2 images.
16 bit PICT2 images, input only.
Limitations
Alchemy only pays attention to pixMaps in the image; attempts
to skip everything else.
Comments
Due to the enormous number of options allowed in PICT files,
reading PICTs may not always work. See Appendix A, Answers
to Frequently Asked Questions, for more information.
Adding a MacBinary header to a PICT file is useful if
transferring the file to a Macintosh computer by modem. The
MacBinary header will allow the Macintosh to automatically
recognize the file as a PICT file.
182
Image Alchemy
Alpha channel data can be read and written by using the -I
option, see Chapter 6 for more information.,
Example
Convert the file input1.gif to a Mac PICT file called input1.pic:
alchemy input1.gif -m
Image Alchemy
183
MacPaint
--t
MacPaint files are black and white images used by Macintosh
computers.
Syntax
--t macBinary
Parameter
macBinary:
0:Do not write a MacBinary file
1:Write a MacBinary file
The default is to not write a MacBinary file.
Extensions
.mac
Creator
Apple Computer, Inc.
Used by
Macintosh computers
Variations
1 bit per pixel, black and white.
Limitations
MacPaint images are always 576x720 pixels. If you attempt to
write a MacPaint image which is larger, Alchemy will report this
as an error. If you write an image which is smaller Alchemy will
pad the image with white space along the right-hand side and
bottom.
Comments
Adding a MacBinary header to a MacPaint file is useful if
transferring the file to a Macintosh computer by modem. The
MacBinary header will allow the Macintosh to automatically
recognize the file as a MacPaint file.
Example
Convert the file input1.gif to a MacPaint file called input1.mac:
alchemy input1.gif --t
184
Image Alchemy
MIFF
---i
MIFF files are used by ImageMagick, a freely available UNIX
image utility.
Syntax
---i compressionType
Parameter
compressionType:
0:Uncompressed
1:RunlengthCoded
2:Zip
The default is Uncompressed.
Extensions
.miff
.mif
Creator
John Cristy
Used by
ImageMagick
Variations
8 and 24 bit, with optional alpha channel.
Limitations
JPEG compressed files cannot be read nor written.
Comments
ImageMagick is available on the Internet. See
http://www.wizards.dupont.com/cristy/ImageMagick.html for
more information.
Alpha channel data can be read and written by using the -I
option, see Chapter 6 for more information.,
Example
Convert the file picture.gif to an uncompressed MIFF file:
alchemy picture.gif ---i
Image Alchemy
185
Mimaki MRL-1
---m
Mimaki MRL-1 files are used by Mimaki plotters.
Syntax
---m
Extensions
.mrl
Creator
Mimaki
Used by
Mimaki plotters
Variations
4 bit CMYK
Comments
Mimaki plotters are only capable of printing at a few resolutions
(which resolutions vary between model). Be sure to specify a
valid resolution using the -D option (see Chapter 8 for more
information).
To improve the output quality you may want to use gamma
correction or a color correction file when converting to this
format. See the -G and -C options in Chapter 8 for more
information.
Example
Convert the file flower.tif to a Mimaki MRL-1 file, using gamma
correction of 1.8:
alchemy flower.tif ---m -Gi1.0 -Go1.8
186
Image Alchemy
MTV Ray Tracer
--M
MTV files are used by the MTV RayTracer, a public domain ray
tracer for Suns and other workstations.
Syntax
--M
Extension
.mtv
Creator
Mark T. VandeWettering
Used by
MTV Raytracer
Variations
24 bit true color.
Comments
MTV is a public domain ray-tracer available free of charge via
anonymous ftp from drizzle.cs.uoregon.edu.
Example
Convert the file spheres.img to a MTV file:
alchemy spheres.img --M
Image Alchemy
187
Multi-Image Palette
-L
This option will generate an optimum palette for a number of
images. This is useful for finding a common palette where
multiple images are used (animations, for instance).
Syntax
-L filename
Parameters
filename:
name of the output file to contain the optimized palette
Extension
.pal
Creator
Handmade Software, Inc.
Used by
Image Alchemy
Variations
HSI PAL files are always ASCII files.
Limitations
.PAL files contain only a palette.
Comments
The format of PAL files is described in Appendix H.
This output option is unique in that it will cause Alchemy to
generate only one output file, independent of how many input
files are specified (the other output options generate one output
file per input file). Also the file name of the output file must be
specified immediately after the -L option (ordinarily the output
file name can appear anywhere on the command line).
Related options
188
Image Alchemy
-f
-F
-l
Match image to specified palette
False color with specified palette
Generate a palette file for a single image
Examples
Generate an optimum palette called final.pal for all GIF files in
the current directory:
alchemy -- *.gif -L final.pal
Now map all the GIF files to that palette, putting the results in a
sub-directory call new (the files cannot be placed in the current
directory because the file names would conflict with the original
image file names):
alchemy -- *.gif -f final.pal new\
Image Alchemy
189
OS/2 Bitmap (BMP)
-O
OS/2 BMP files are used by IBM OS/2 2.0.
Syntax
-O compressionType (Uppercase letter o)
Parameter
compressionType:
0:None
1:RLE
2:OS/2 1.1 format
The default is none.
Extension
.bmp
Creator
IBM Corp.
Used by
OS/2 2.0
Variations
1, 4, 8, and 24 bit RGB (raw), RLE4, and RLE8 files.
Comments
OS/2 1.1 files are older version files which are supported
because some OS/2 software cannot read current OS/2 bitmaps.
OS/2 1.1 files seem to be identical to Windows 2.0 bitmap files,
and Alchemy identifies them as such when reading them.
Examples
Convert the image test.jpg to a OS/2 BMP file:
alchemy test.jpg -O
190
Image Alchemy
OS/2 Icon
--O
OS/2 Icon files are used by IBM OS/2.
Syntax
--O outputType (Uppercase letter o)
Parameter
outputType :
0:OS/2 2.0 and Warp
1:OS/2 1.2
The default is OS/2 2.0 and Warp.
Extension
.ico
Creator
IBM Corp.
Used by
OS/2
Variations
1, 4, 8, and 24 bit RGB files.
Comments
OS/2 1.2 Icon files are older version files which are supported
because some OS/2 software cannot read current OS/2 Icons.
OS/2 Icons can contain multiple parts and multiple resolutions.
The default for Image Alchemy is to read the first part of the first
resolution. You can specify which portion and which resolution
to read by use of the -Z option, see below for an example.
One of the parts of an OS/2 icon is often the mask, used by OS/2
to change the appearance of the icon when it is selected. The
mask is often a black rectangle, so if the image resulting from an
OS/2 Icon conversion is a black rectangle you are probably
reading the mask portion.
Examples
Convert the image icon.bmp to an OS/2 Icon file called
program.ico:
alchemy icon.bmp program.ico --O
Image Alchemy
191
Convert the OS/2 Icon program.ico to a Windows BMP file,
reading part 1 of the first icon:
alchemy program.ico -w
Do the same thing, but read part 2 of the first icon:
alchemy program.ico -w -Z 2
Do the same thing, but read part 1 of the second icon:
alchemy program.ico -w -Z 1 2
Do the same thing, but read part 2 of the second icon:
alchemy program.ico -w -Z 2 2
192
Image Alchemy
PCPAINT/Pictor Page Format
-A
The Pictor format was designed by John Bridges. It is optimized
so that an image can be loaded into various IBM PC graphics
adapters very quickly; it does this by almost exactly duplicating
the organization of the graphics adapter memory. This makes
the format hardware dependent.
Syntax
-A type
Parameter
type:
0:320x200x4 CGA*
1:320x200x16 PCjr/Tandy*
2:640x200x2 CGA*
3:640x200x16 EGA
4:640x350x2 EGA
5:640x350x4 EGA
6:640x350x16 EGA
7:720x348x2 Hercules
8:640x350x16 VGA
9:320x200x16 EGA
10:640x400x2 AT&T/Toshiba*
11:320x200x256 VGA/MCGA
12:640x480x16 VGA
13:720x348x16 Hercules InColor*
14:640x480x2 VGA/MCGA
15:800x600x2 EGA/VGA
16:800x600x16 EGA/VGA
17:640x400x256 SVGA
18:640x480x256 SVGA
19:800x600x256 SVGA
20:1024x768x2 SVGA
21:1024x768x16 SVGA
Image Alchemy
193
22:360x480x256 VGA
23:1024x768x256 SVGA
*These modes are not yet supported (if you are
*interested in support for any of these modes please
*contact us).
0:packed
100:not-packed
0:new style palette
200:old style palette
The default is 640x480x256 SVGA, packed, new style palette.
Options are combined by adding, see the Example section below
for an example.
Extension
.pic
.clp
Creator
John Bridges
Used by
PCPAINT
GRASP
Variations
There are variations for most IBM and third party graphics
adapter display modes.
Limitations
Only the EGA and VGA modes are supported at this time.
Text modes are not supported.
Comments
194
Image Alchemy
Some Pictor files do not contain palettes. For those files
Alchemy will default to using a standard palette appropriate to
the display mode the file was saved in. However, the image may
not use the default palette; in that case you can read the palette
from another file with the -F false color option.
Examples
Convert the file image.pcx to a Pictor file called image.pic, for
800x600x256 SVGA mode:
alchemy image.pcx -A19
Do the same thing, but write out an old style palette:
alchemy image.pcx -A219
Image Alchemy
195
PCX
-p
PCX files are used extensively by IBM PC computers.
Originally created by ZSoft for use by their paint software, PCX
files can be read and written by almost all MS-DOS paint
software and desktop publishing software.
A variation of PCX file, DCX, is used by many MS-DOS fax
boards.
Syntax
-p type
Parameter
type:
0:Standard PCX
1:DCX
2:PCJ
The default is standard PCX.
Extension
.pcx.dcx
Creator
ZSoft Corporation
Used by
PC Paint
Publisher's Paintbrush
Most paint and desktop publishing software can read and write
PCX files.
Fax board software uses the DCX variation of PCX.
Variations
1, 4, 8, and 24 bits per pixel for standard PCX files.
1 bit per pixel for DCX files.
8 bits per pixel for PCJ files.
196
Image Alchemy
Limitations
PCX format files are often written out incorrectly; Alchemy
attempts to figure out what is wrong and make intelligent
decisions (things Alchemy can deal with include PCX files
without palettes, files missing the last line of image data, and
files with illegal (and incorrect) combinations of bits per pixel
and planes).
The 24 bit PCX file variation is new and many programs which
support PCX do not support the 24 bit variation. Therefore,
unless you are sure that the software you are using can read a 24
bit PCX file, you probably want to use the -8 option to force
Alchemy to write a paletted file when generating a PCX file.
DCX files are multiple page PCX images which are used by
various manufacturers of fax boards and fax software. Alchemy
always writes single page DCX files.
Comments
Because so many software packages can read and write PCX
files we are especially interested in supporting as many
variations as possible. If you have any PCX files which
Alchemy does not read correctly please contact us.
Since DCX files are always 1 bit, black and white images,
Alchemy assumes the use of -b -c2 -8 when writing the DCX
variation of PCX.
Recently some of the header information in PCX files has been
changed to include image resolution information. Some fax
board software makes use of this information when transmitting
PCX or DCX files as faxes. See the example section below for
an example of how to specify image resolution when writing a
PCX file.
Image Alchemy
197
PCJ files are a variation of 256 color PCX files which have the
palette in a separate file. The palette file has the extension .p13.
Alchemy will automatically look for the palette file in the same
directory as the PCJ file when reading.
When converting a DCX file which contains multiple pages you
can specify which page to convert by using the -Z option
followed by the page number. You can also convert all of the
pages in the file by using the Multi-Page option (-U), see the
examples section below.
Examples
Convert the GIF file, lush.gif, to a PCX file:
alchemy lush.gif -p
Convert the scanned image, page1.tif, to a DCX file:
alchemy page1.tif -p1
Convert the scanned image, page2.tif, to a DCX file, specifying
an image resolution of 200x100 (a common resolution for fax
images):
alchemy page2.tif -p1 -D 200 100
Convert the image, flower.tif, to a PCJ file:
alchemy flower.tif -p2
Convert page 3 of the DCX file, fax.dcx, to a TIFF file:
alchemy fax.dcx -Z 3 -t
Convert all of the pages in the file to TIFF files (the output files
will be called fax.001, fax.002, …):
alchemy fax.dcx -U -t
198
Image Alchemy
PDS
--p
PDS labeled images are used by NASA for planetary images.
Syntax
--p
Extensions
.ibg
.imq
Creator
NASA
Used by
NASA distributes collections of planetary images on CD-ROM
in PDS format.
Variations
8 bit gray-scale uncompressed PDS files.
1, 4, and 8 bit uncompressed and 8 bit first difference Huffman
compressed files, input only.
Limitations
PDS images must begin with either an "SFDU_LABEL" or a
"FILE_TYPE" record for Alchemy to be able to identify it.
Occasionally a PDS labeled image has a palette. There doesn't
seem to be any standard format for the palette; Image Alchemy
handles the palettes we've encountered.
Any portions of the PDS labels not required to extract the image,
such as longitude and latitude, are ignored.
Comments
Some PDS images actually consist of two files, a label file and a
data file. To read that type image you should use the name of the
label file and Alchemy will find the data file.
Examples
Convert the GOES file, phoenix.goe, into a PDS labeled image:
alchemy phoenix.goe --p
Image Alchemy
199
Do the same thing, but name use an .imq extension for the output
filename:
alchemy phoenix.goe .imq --p
200
Image Alchemy
PhotoCD
(read only)
PhotoCD files are multi-resolution images produced by Kodak
Extensions
.pcd
Creator
Eastman Kodak Company
Used by
Eastman Kodak Company
Variations
Reads single channel and three channel images.
Limitations
Read only.
Comments
PhotoCD files contain multi-resolution image data. You may
specify which resolution image you want Alchemy to read by
using the -Z option, followed by the resolution value. Available
resolutions are:
2: 192 x 128
3: 384 x 256
4: 768 x 512
5: 1536 x 1024
6: 3072 x 2084
The default is 3 (384x256).
If you specify a -b as part of the command line Alchemy will
read a grayscale version of the image.
Examples
Convert the first PhotoCD image to a TIFF file, using the default
resolution of 384x256:
alchemy L:\photo_cd\images\img0001.pcd -t
Do the same thing, this time read the 768x512 copy of the image:
alchemy L:\photo_cd\images\img0001.pcd -t
-Z 4
Image Alchemy
201
Pixar PIC
---j
Pixar PIC files are used by Pixar software.
Syntax
---j
Extensions
.pic
Creator
Pixar
Used by
Pixar
Variations
8 bit grayscale and 24 bit RGB, uncompressed with optional
alpha channel.
8 bit grayscale and 24 bit RGB, compressed, with optional alpha
channel, input only.
Limitations
Compressed files cannot be written.
Tiled files cannot be read nor written (if you have any tiled files
please contact us, we'd like to add support for tiled files but
haven't been able to find any for testing).
Comments
Alpha channel data can be read and written by using the -I
option, see Chapter 6 for more information.,
Example
Convert the file traced.qdv to an Pixar file:
alchemy picture.gif ---j
202
Image Alchemy
Pixel Power Collage
---c
Collage files are used by Pixel Power's Collage system.
Syntax
---c
Extensions
Varies with filename
Creator
Pixel Power
Used by
Collage
Variations
8 bit grayscale and 24 bit RGB images with and without alpha
channels.
Comments
Collage files contain a smaller preview image, to read this image
specify that you want to read page to (use option "-U 2"). When
writing files Alchemy always writes a preview image which is
one quarter the height and width of the original image.
Alpha channel data can be read and written by using the -I
option, see Chapter 6 for more information.,
Example
Convert the file sample.jpg to Pixel Power Collage format
alchemy sample.jpg ---c
Image Alchemy
203
PNG (Portable Network Graphics)
---n
PNG files are used by the WWW.
Syntax
---n outputType
Parameter
outputType:
0:None
1:Sub-filtering
2:Up-filtering
3:Averaging
4:Paeth filtering
9:Adaptive filtering
0:Standard
10:Interlaced
The default is Paeth filtering, non-interlaced. Options are
combined by adding.
Extension
.png
Creator
The PNG development group
Used by
WWW
Variations
1 bit black and white, 2, 4, and 8 bit grayscale, 2, 4, and 8 bit
paletted, 16 bit, and 24 bit, and 48 bit color images.
With and without alpha channels.
Transparency information, output only.
Limitations
204
Image Alchemy
Non-image chunks (such as copyright information) are discarded
when reading.
Comments
When writing a PNG file with transparency there are several
different modes that are used depending on whether the file is
paletted, grayscale, or true color. In the case of true-color
images specifying the transparent color using the ---t option (see
below) causes that value to be treated as transparent. When
writing a paletted or grayscale file the nearest match to the color
specified is made transparent.
Alpha channel data can be read and written by using the -I
option, see Chapter 6 for more information.,
Examples
Convert the JPEG file sample.jpg to a PNG file:
alchemy sample.jpg ---n
Convert the JPEG file sample.jpg to a PNG file, using red as the
transparent color:
alchemy sample.jpg ---n ---t 255 0 0
Image Alchemy
205
Portable BitMap (PBM)
-k
The Portable BitMap format was developed by Jef Poskanzer to
allow the transferring of black and white image files between
different workstations. The PBM format has grown to include
black and white, gray-scale, and true color images, a large set of
programs to convert various other image formats to and from
PBM, and a set of image manipulation tools.
Syntax
-k
Extensions
.pnm
.pbm
.pgm
.ppm
Creator
Jef Poskanzer
Used by
Portable BitMap Package
Various workstation graphic programs
Variations
1, 8, and 24 bit RAWBITS (binary) images.
1, 8, and 24 bit ASCII images, input only.
Limitations
When writing a PBM file Alchemy always uses the .pnm
extension (the extension should be changed based on the type of
file being written).
Comments
To write a PBM file use -b -c2.
To write a PGM file use -b -c256.
To write a PPM file use -24.
206
Image Alchemy
By convention the extension of a PBM file changes depending
on the type of image data which it is storing, based on the
following table:
.pnm
Portable aNyMap (Any of those below)
.pbm
Portable BitMap (Black and white)
.pgm
Portable GrayMap (Gray-scale)
.ppm
Portable PixelMap (True color)
Alchemy does not make use of this convention when writing
images, always writing files with the extension .pnm.
The PBM package is a set of image manipulation tools which run
on various workstations. The software is available free of charge
via anonymous ftp: ftp://expo.lcs.mit.edu/contrib/pbmplus.tar.Z
or ftp://ftp.ee.lbl.gov/pbmplus.tar.Z.
Examples
Convert the file sun.im32 to a PBM file:
alchemy sun.im32 -k -b -c2
Convert the file sun.im32 to a PGM file, overwriting any
existing sun.pnm file:
alchemy sun.im32 -k -b -c256 -o
Convert the file sun.im32 to a PPM file called image77:
alchemy sun.im32 image77 -k -24 -.
Image Alchemy
207
Puzzle
--U
The Puzzle format is used by the UNIX supplied Puzzle program
Syntax
--U
Extensions
.pzl
.puzzle
.cm
Creator
Unknown
Used by
The puzzle program.
Variations
8 bits per pixel
Comments
Since puzzle files are always paletted, Alchemy assumes the use
of the -8 option when writing a puzzle file.
Example
Convert the file einstein.im8 to a Puzzle file:
alchemy einstein.im8 --U
208
Image Alchemy
Q0
--q
The Q0 format is apparently commonly used by various Japanese
scanning, painting, and viewing software to store 24 bit images.
Handmade Software has no information other than a basic
description of the format and some sample images; if you have
further information on the Q0 format please contact us.
Syntax
--q
Extensions
.q0
.rgb
.fal
Creator
Unknown
Used by
Various Japanese image processing software.
Variations
24 bits per pixel
Comments
Q0 files are actually two files, one with the extension .rgb or .q0
and the other with the extension .fal. The .rgb or .q0 file
contains the actual image data and the .fal file contains the
header information. You specify the name of the .rgb or .q0 file
and Alchemy automatically generates the name of the .fal file.
For pixel data
For pixel data
For image header information
When writing a Q0 file Alchemy will overwrite, without
warning, existing .fal files.
Since Q0 files are always true color, Alchemy assumes the use of
the -24 option when writing a Q0 file.
Example
Convert the file dogcow.gif to a Q0 file:
alchemy dogcow.gif --q
Image Alchemy
209
QDV
--D
The QDV format is used by Giffer, a Macintosh program which
displays and converts image files.
Syntax
--D
Extension
.qdv
Creator
Steve Blackstock
Used by
Giffer
Variations
8 bits per pixel.
Comments
Giffer is a great shareware (Beerware™, actually) program for
the Macintosh that converts between various image file formats
and allows viewing of graphics files.
Example
Convert the file input.tga to a qdv file:
alchemy input.tga --D
210
Image Alchemy
QRT Raw
--T
QRT files are generated by the QRT Ray Tracer, a public
domain ray-tracer for Amiga, Macintosh, and IBM PC
computers.
Syntax
--T
Extension
.raw
Creator
Steve Korn
Used by
QRT Ray Tracer
Variations
24 bits per pixel
Example
Convert the file spheres.gif to a QRT file called spheres.raw:
alchemy spheres.gif --T
Image Alchemy
211
Raster Graphics
---g
The Raster Graphics format was created by Raster Graphics and
is used by Raster Graphics printers.
Syntax
---g
Extensions
.rg
Creator
Raster Graphics
Used by
Raster Graphics printers.
Variations
1 bit black and white and 4 bit CMYK.
Comments
The result will be either 1 bit black and white if the source image
is grayscale or -b is specified; otherwise it will be 4 bit CMYK.
Examples
Convert the file sample.jpg to Raster Graphics format.
alchemy sample.jpg ---g
212
Image Alchemy
RIX
-R
RIX files were developed by ColoRIX to use with their paint
software.
Syntax
-R
Extension
.scx
.rix
Creator
RIX Softworks, Inc.
Used by
ColoRIX software
Variations
Type 0 (8 bits per pixel) and Type 4 (4 bits per pixel) images.
Limitations
We would like to add support for Type 1 and Type 2 images but
we haven't been able to find any documentation on this variation.
If you have information please contact us.
Comments
A type 0 file will be written if there are more than 16 colors in
the image; otherwise a type 4 file will be written.
Example
Convert the file test.gif to a RIX file:
alchemy test.gif -R
Image Alchemy
213
RLC
---R
Little is known about this format, it was added at the request of a
customer. If you have any information please contact us.
Syntax
---R
Extensions
.rlc
Creator
Unknown
Used by
Unknown
Variations
1 bit black and white.
Comments
There is some confusion about the orientation of RLC files. If
the RLC files you are reading are backwards use the --^ to
mirror them.
Because of a shortage of test files this feature has not been
extensively tested; if you have RLC files which Image Alchemy
cannot correctly read please contact us.
Examples
Convert the file sample.jpg into RLC format
alchemy sample.jpg ---R
214
Image Alchemy
Scitex CT
---X
Iris CT is used by Scitex scanners.
Syntax
---X
Extensions
.ct
Creator
Scitex
Used by
Scitex scanners
Variations
32 bit CMYK
Examples
Convert the file sample.jpg to Scitex CT format.
alchemy sample.jpg ---X
Image Alchemy
215
Scodl
--s
Scodl files are used by Agfa/Matrix slide recorders.
Syntax
--s type
Parameter
type:
0:Non-scalable image (MVP version pre-4.2)
1:Scalable image (MVP version 4.2 or later)
The default is 0 (Non-scalable).
Extension
.scd
Creator
Agfa Corporation / Matrix Instruments Inc.
Used by
Agfa/Matrix slide recorders
Variations
8 and 24 bit run-length coded (RLC) images, output only.
Limitations
Output only.
Comments
Agfa/Matrix made significant changes to the Scodl file format
when they introduced version 4.2 of the MVP and Conductor
software in 1992. Old version Scodl files could not be scaled by
the MVP software; new version Scodl files can be scaled but
only work with the newer version of the MVP and Conductor
software.
Scalable Scodl images have the advantages that they do not have
to be scaled to a specific output resolution and are therefore
generally smaller than pre-scaled Scodl images. They can also
be imaged on a film recorder with any output resolution or
previewed on a monitor.
216
Image Alchemy
The disadvantage of scalable Scodl images is that you must be
using at least Scodl MVP version 4.2 and the Scodl MVP
software does not perform very high-quality scaling. In
particular, the MVP software only does pixel replication scaling
when increasing the size of an image (this corresponds to type 'a'
scaling in Alchemy) and pixel averaging when reducing the size
of an image (corresponding to Alchemy 'b' scaling).
Note that Alchemy pays attention to the aspect ratio or dots per
inch information specified as part of the command line or present
in the original image when converting to a Scodl scalable image.
Therefore you should ensure that this information is correct
when writing a Scodl scalable image.
When writing Non-scalable Scodl files the image should be
scaled up to either 2000x1366 or 4000x2732 to fill the slide.
There are some limitations with the MVP software driver
supplied by Agfa/Matrix:
24 bit Scodl files are not correctly interpreted by the MVP
driver version 4.1 and earlier. 8 bit images are correctly
interpreted.
When sending very large images to the background MVP
driver you must be using version 4.0 or later and have lots
of EMS memory (4 megabytes is recommended). When
using the foreground MVP program turning on disk
caching is necessary.
Examples
Convert the file pict.im32 to a Scodl file using high quality
scaling and preserving the aspect ratio:
alchemy pict.im32 --s -Xc2000 -Yc1366 -+
Do the same thing, but generate a scalable Scodl file:
alchemy pict.im32 --s1
Image Alchemy
217
SGI Image
-n
SGI Image files are used by Silicon Graphics workstations.
Syntax
-n compressionType
Parameter
compressionType:
0:Verbatim (uncompressed)
1:RLE compressed
The default is 0 (Verbatim).
Extension
.sgi
Creator
Silicon Graphics, Inc.
Used by
Silicon Graphics workstations.
Variations
8 bit (gray-scale) and 24 bit RGB verbatim (uncompressed) and
RLE files, with and without alpha channels.
Comments
Only gray-scale images may be 8 bit files. Alchemy will
automatically switch to 24 bit mode when writing a color image.
Alpha channel data can be read and written by using the -I
option, see Chapter 6 for more information.,
Examples
Convert the Sun raster file sun.im8 to a SGI file called sgiout:
alchemy sun.im8 sgiout -n -.
Do the same thing, but write out a RLE compressed SGI file:
alchemy sun.im8 sgiout -n1 -.
218
Image Alchemy
Sharp GPB
---G
Sharp GPB files were developed by Sharp.
Syntax
---G
Extensions
.img
Creator
Sharp
Used by
Sharp
Variations
1 bit black and white, 8 bit grayscale, and 24 bit color images.
Example
Convert the JPEG file image.jpg to a Sharp GPB file:
alchemy image.jpg ---G
Image Alchemy
219
Spaceward Graphics
---s
Spaceward Graphic files were developed and are used by
Spaceward Graphics.
Syntax
---s [compressionType]
Parameter
compressionType:
0:None
1:Compressed
The default is None.
Extensions
.r
.g
.b
.a
Creator
Spaceward Graphics
Used by
Spaceward Graphics
Variations
1 bit black and white, 8 bit grayscale, 8 bit paletted, and 24 bit
color images, with and without alpha channels.
Comments
Alpha channel data can be read and written by using the -I
option, see Chapter 6 for more information.,
Example
Convert the Targa file apple.tga to a Spaceward file, include the
alpha channel information:
Red channel image data
Green channel image data
Blue channel image data
Alpha channel image data [optional]
alchemy apple.tga -I ---s
220
Image Alchemy
SPOT Image
--S
SPOT Image files are high-resolution satellite images produced
by SPOT Image Corporation.
Syntax
--S
Extensions
For GIS (tape) format:
.hdr Header information
.bil Pixel data
.clr Palette data [optional]
For CCT (CD-ROM) format:
.dat
Creator
SPOT Image Corp.
Used by
SPOT Image Corp.
Variations
8 bits per pixel GIS (tape) format files.
8 and 24 bits per pixel CCT (CD-ROM) format files, input only.
Limitations
Only GIS (tape) format images are currently written; contact us
if you are interested in writing CCT SPOT Image files.
Comments
SPOT Image GIS (tape) images are actually three files. You
specify the name of the .hdr file and Alchemy automatically
generates the name of the .bil and .clr files.
If no palette file (.clr file) exists Alchemy will assume the image
is grayscale.
There may also be a statistics file with a .stx extension, but
Alchemy ignores this file.
Image Alchemy
221
When writing a SPOT file Alchemy will overwrite, without
warning, existing .bil and .clr files.
When reading a CCT (CD-ROM) format image specify the
complete path and name of the image file. For example, on an
MS-DOS system: alchemy l:\scene04\imag_04.dat -g
will convert the scene 4 image to a GIF file.
Example
Convert the Erdas file, phoenix.lan, to a SPOT Image file:
alchemy phoenix.lan --S
222
Image Alchemy
Stork
-K
Stork files are CMYK images used by Stork's color proofing
machines.
Syntax
-K compressionType
Parameter
compressionType:
0:None
1:Run length coded
The default is none.
Extensions
.idx
.pre
.tab
Creator
Stork Colorproofing B.V.
Used by
Stork Colorproofing machines
Variations
32 KCMY, 32 KCMY RLC, 16 CLU, and 16 CLU RLC images
(type 100, 101, 300, and 301, respectively).
Limitations
Alchemy can't write paletted files with more than 256 colors.
Header information
Image data
Color lookup table
When reading paletted files with more than 256 colors they are
treated as true color.
Comments
Stork images are stored in two or three files (depending on
whether or not there's a color lookup table associated with the
image). The filename given to Alchemy should be the name of
the data file (normally with a suffix of .pre); Alchemy will
generate the names of the other files by stripping the extension
and appending .idx for the index file and .tab for the color
lookup table (if any).
Image Alchemy
223
Alchemy will overwrite existing .idx and .tab files without
warning when creating Stork files.
To improve the quality of output may want to use a color
correction file when converting to the CMYK variation of this
format. See the -C option in Chapter 8 for more information.
Example
Convert the file image.tga to an uncompressed Stork image
called image.pre and image.idx, using the undercolor removal
file sample.ucr:
alchemy image.tga -K -Csample.ucr
224
Image Alchemy
Sun Icon
--N
Sun Icon files are used by Sun Microsystems workstations to
contain icon information.
Syntax
--N
Extensions
.icon
.ico
Creator
Sun Microsystems, Inc.
Used by
Sun workstations
Variations
1 bit black and white.
Comments
This is not the same format as Sun Raster (see below).
Example
Convert the sun raster file icon.im1 to a sun icon file called
program.ico:
alchemy icon.im1 program.ico --N
Image Alchemy
225
Sun Raster
-s
Sun Raster files are used by Sun Microsystems workstations.
Syntax
-s compressionType
Parameter
compressionType:
0:None
1:Run length compression
The default is None.
Extensions
.rast
.ras
.im
.im1
.im8
.im24
.im32
Creator
Sun Microsystems, Inc.
Used by
Sun workstations
Variations
1, 8, 24, and 32 bit Standard, BGR, RGB, and Byte Encoded
(RLE) files, input.
1, 8, 24, and 32 bit Standard files and 1 and 8 bit Byte Encoded
(RLE) files, output.
Comments
There is no standard extension for Sun Raster files; the
extensions that Alchemy uses are the most common.
Some versions of the PBM toolkit read and write Sun Raster files
which have the wrong RGB order (causing the red and blue
channels to be swapped). You can correct for this problem by
using the swap RGB option (see Chapter 7, for more
information).
226
Image Alchemy
Alpha channel data can be read and written by using the -I
option, see Chapter 6 for more information.,
Examples
Convert the SGI file sgiout to a sun raster file called sun.im8:
alchemy sgiout sun.im8 -s
Do the same thing, writing out a compressed sun raster file:
alchemy sgiout sun.im8 -s1
Do the same thing, preserving the alpha channel information:
alchemy sgiout sun.im8 -s1 -I
Convert the Sun Raster file lena.im24 to an uncompressed TIFF
file, correcting for a wrong RGB order in the Sun Raster:
alchemy lena.im24 --n -t0
Image Alchemy
227
Targa
-a
Targa files were created to support the line of Targa graphics
cards. The Targa format is popular with scanners and high end
paint packages.
Syntax
-a outputType
Parameter
outputType:
0:Uncompressed
1:Run Length Coded
0:Include footer
10:No footer
The default is 0 (Uncompressed, include footer). Options are
combined by adding (see below for an example)
Extension
.tga
Creator
Truevision, Inc.
Used by
Various scanning and paint software.
Variations
8, 15, 16, 24, and 32 bit images (32 bit images include an alpha
channel).
Comments
15 and 16 bit output are actually the same except for one field in
the header.
Targa files allow a footer containing additional information such
as aspect ratio. However some software is unable to read Targa
files which have a footer, so Alchemy allows all valid
combinations to be written. The most common variant for
software to be able to read is 24 bit uncompressed (specify -a0
and -24).
228
Image Alchemy
Alpha channel data can be read and written by using the -I
option, see Chapter 6 for more information.,
Examples
Convert the file input.tif to an uncompressed 24 bit Targa file:
alchemy input.tif -a -24
Convert the file input.tif to an uncompressed 15 bit Targa file
called output.tga with no footer:
alchemy input.tif output.tga -a10 -15
Image Alchemy
229
TIFF (Tagged Interchange File Format)
-t
TIFF is designed to be a universal raster image format. It's very
popular with desktop publishing packages.
Syntax
-t compressionType
Parameter
compressionType:
0:None
1:LZW
2:PackBits
3:Group III Fax
4:Group IV Fax
5:CCITT RLE
7:LZW with Prediction
0:Multi-strip
100:One strip
0:Not bit reversed (applies to fax compressed)
200:Bit reversed (applies to fax compressed)
0:RGB
400:CMYK
The default is LZW Compression, multi-strip, not bit reversed,
and RGB. See the comments section below for more
information. Options are combined by adding (see below for an
example).
Extensions
.tiff
.tif
Creator
Aldus Corp.
Microsoft Corp.
230
Image Alchemy
Used by
Various desktop publishing and scanning software.
Variations
Reads TIFF class B, G, R, and most class P files.
Reads 1 through 8, 12, 24, and 32 bit images.
Input compression types supported are raw, LZW, PackBits,
Group III fax, Group IV fax, CCITT RLE (byte and word
aligned), NeXT, Thunderscan, PICIO, and SGI RLE.
Writes class B, G, P, and R files, depending on the input file and
options specified.
Writes 1, 4, 8, 24, and 32 bit images.
Output compression types supported are raw, LZW, PackBits,
Group III fax, Group IV fax, and CCITT RLE.
CMYK images are always 8 bits per component.
Limitations
Class P TIFF files can only be read if they have 1, 4, or 8 bits per
pixel.
Comments
TIFF files are often written out incorrectly; Alchemy attempts to
figure out what is wrong and make intelligent decisions. If you
have TIFF files which Alchemy cannot read please contact us.
1,4, and 8 bit output files are paletted unless the palette is all
gray, in which case the output is a gray-scale file.
When writing TIFF files using any of the fax compression types
(Group III, Group IV and CCITT RLE), Alchemy uses a
photometric interpretation of minIsWhite.
See Appendix A, Answers to Frequently Asked Questions, for
more information on writing TIFF files which conform to the
various TIFF classes.
Image Alchemy
231
LZW compression is patented by Unisys Corporation and used
under license (for more information see Appendix I,
Acknowledgments).
Specifying a one strip TIFF output option causes Alchemy to
generate a TIFF file which contains the image data in one long
strip (ordinarily you do not want the entire image data be in one
strip, since this increases the memory requirements of software
reading the image; if you do not specify one strip TIFF output
Alchemy will generate a TIFF file which has 8k strips). This
option is useful because some software (primarily fax software)
cannot handle multi-strip TIFF files.
Some Fax decoding software requires the bit order to be
backwards when reading a Fax compressed TIFF file. You can
write such a file by adding 200 to the appropriate output type
when writing a TIFF file.
When converting a TIFF file which contains multiple pages you
can specify which page to convert by using the -Z option
followed by the page number. You can also convert all of the
pages in the file by using the Multi-Page option (-U); see the
examples section below.
Alpha channel data can be read and written by using the -I
option, see Chapter 6 for more information.,
To improve the output quality you may want to use gamma
correction or a color correction file when converting to this
format. See the -G and -C options in Chapter 8 for more
information.
Examples
Convert the file input.gif to an uncompressed gray-scale TIFF
file called output.tif:
alchemy input.gif output.tif -t 0 -b
232
Image Alchemy
Convert the file cover.bmp to a Group III Fax compressed TIFF
file, with the bit order reversed
alchemy cover.bmp -t 203
Convert page 3 of the TIFF file, contract.tif, to a PCX file:
alchemy contract.tif -Z 3 -p
Convert all of the pages in the file to PCX files (the output files
will be called contract.001, contract.002, …):
alchemy contract.tif -U -p
Image Alchemy
233
US Patent Image
---P
Used by the US Patent and Trademark Office to store and
distribute patent data.
Syntax
---P compressionType
Parameter
compressionType:
0:Group 3 compressed
1:Group 4 compressed
The default is Group 4 compressed.
Extensions
.pat
Creator
US Patent and Trademark Office
Used by
US Patent and Trademark Office
Variations
1 bit black and white images.
Comments
Alchemy can write multi-page US Patent files when used with
the ---U option; see below for an example
Examples
Convert the TIFF file page1.tif to a US Patent file:
alchemy page1.tif ---P
Convert all the pages in the TIFF file pages.tif to a multi-page
US Patent file:
alchemy pages.tif ---P -U ---U
234
Image Alchemy
Utah Raster Toolkit (RLE)
--u
The Utah Raster Toolkit is a set of public domain utilities for
manipulating and converting images for various workstations.
Syntax
--u
Extension
.rle
Creator
The University of Utah
The University of Michigan
Used by
Utah RLE toolkit
Variations
1 and 3 channel 8 bits per pixel files, with an optional alpha
channel.
Limitations
While reading, files which are 1 channel and have either no color
map or a single channel color map are assumed to be gray-scale
images. The color map, if present, will be used as a gamma
correction table.
Files which are 1 channel and have a 3 channel color map are
assumed to be paletted color files.
Files which are 3 channel are assumed to be true color.
When writing RLE files Alchemy will generate a 1 channel file
with a 3 channel color map for paletted images and a 3 channel
file with no color map for true color images.
Comments
The Utah Raster Toolkit is available free of charge via
anonymous ftp: ftp://cs.utah.edu/pub/urt-3.0.tar.Z.
Alpha channel data can be read and written by using the -I
option, see Chapter 6 for more information.,
Image Alchemy
235
Example
Convert the PBM file, image.ppm, to a Utah RLE file:
alchemy image.ppm --u
236
Image Alchemy
Verity Image Format (VIF)
--E
VIF is used by the Topic text retrieval software.
Syntax
--E
Extension
.vif
Creator
Verity Corp.
Used by
Topic
Variations
1 bit black and white.
Example
Convert the file fax.tif to a VIF file:
alchemy fax.tif --E
Image Alchemy
237
VIFF
---v
VIFF files are used by Khoros, a visual programming
environment for the X Windowing System.
Syntax
---v
Extensions
.xv
Creator
Khoral Research
Used by
Khoros
Variations
1 bit black and white, 8 bit grayscale, 8 bit paletted, and 24 bit
RGB (with an optional alpha channel) uncompressed.
1 bit black and white, 8 bit grayscale, 8 bit paletted, and 24 bit
RGB (with an optional alpha channel) compressed, read only.
Limitations
Writing compressed files is not yet supported.
Comments
There doesn't seem to be any method for storing an 8 bit
grayscale or paletted image with an alpha channel, when writing
such an image Alchemy will automatically convert the image to
24 bit RGB.
VIFF files may be in either byte order (low byte first or high byte
first). Alchemy will read either byte order and always write
VIFF files with high byte first byte order.
Alpha channel data can be read and written by using the -I
option, see Chapter 6 for more information.,
Example
Convert the file image.rgb to a VIFF file:
alchemy image.rgb ---v
238
Image Alchemy
VITec
-T
VITec files are used by VITec image processing software.
Syntax
-T
Extension
.vit
Creator
VITec
Used by
VITec ELT
Variations
8 bit grayscale and 24 bit color files untiled.
8 bit grayscale and 24 bit color files tiled, input only.
Example
Convert the file map.erm to a VITec file:
alchemy map.erm -T
Image Alchemy
239
Vivid
--I
Vivid is a shareware ray-tracer for MS-DOS computers.
Syntax
--I (upper case i)
Extension
.img.als
Creator
Stephen B. Coy
Used by
Vivid Ray Tracer
Alias
Variations
24 bit RGB.
Comments
The Vivid Ray Tracer is a shareware program for PCs and is
available from:
Stephen Coy
15205 NE 13th Pl., #2904
Bellevue, WA 98007
or from us.
This is the same format as used by Alias (see Alias, above).
Example
Convert the file spheres.qrt to a Vivid file:
alchemy spheres.qrt --I
240
Image Alchemy
Wavefront RLA/RLB
(read only)
RLA and RLB files were developed by Wavefront.
Extensions
.rla
.rlb
Creator
Wavefront
Used by
Wavefront Advanced Visualizer
Variations
24 bit true-color with alpha channels, read only
Limitations
There seem to be many variations of RLA/RLB files. We have
documentation for 3 different variations and the sample files we
have seem to be different from any of those; if we cannot read
the RLA/RLB files that you have please contact us, we'd like to
add support for as many variations as possible.
Comments
If you have Wavefront files which Alchemy cannot read please
contact us. Similarly if you are interested in having Alchemy
write Wavefront files please contact us.
Alpha channel data can be read by using the -I option, see
Chapter 6 for more information.,
Examples
Convert the sequence of Wavefront RLA files frame.000 through
frame.499 to TIFF files, with the names 0.tif through 499.tif,
including the Alpha channel data:
alchemy frame.### #.tif -t0 -I --- 0 499
Image Alchemy
241
Windows BitMap (BMP)
-w
Windows BMP files are used by Microsoft Windows.
Syntax
-w compressionType
Parameter
compressionType:
0:None
1:RLE
10:Write an ICOn file
The default is none.
Extension
.bmp
Creator
Microsoft Corp.
Used by
Microsoft Windows
Variations
1, 4, 8, 15, 16, and 24 bit RGB (raw), RLE4, and RLE8 files.
Limitations
Several of the programs which claim to read and write RLE files
do not do so correctly; we do not recommend writing RLE files
unless you have verified that they work with your intended
application.
Comments
Microsoft supplied Windows utilities cannot read nor write
RLE4 or RLE8 files.
If you are converting an image to use as wallpaper on a 16 color
display you will want to match the palette of the output image to
one of the existing 16 color BMP images supplied with Windows
(chess.bmp, for example). If you do not do this the wallpaper
will not be loaded correctly. See the example section below.
242
Image Alchemy
If you are converting an image to use as wallpaper on a 256 color
Windows 3.1 display you will want to reserve the first 8 colors.
Use the -c 256 8 option to do this (see below for an example).
This will force the first 8 colors of the palette to be the standard
Windows colors.
If you are writing a Windows icon (.ico) file you must scale the
image to a width and a height of 16, 32, or 64 pixels (32 being
the best choice, since Windows displays all icons as 32x32).
Also, Windows seems to remap all icons to the standard 16
colors, so the best results can be obtained if you match the
palette of your icons to an existing icon (see the -f option). If
you don't have any other icons you can also match to one of the
16 color wallpaper files supplied with Windows.
Alchemy can write a BMP file which contains an identity palette
as specified in the Microsoft Multimedia Development Kit.
These images provide for quicker bitmap loading when used
with the Multimedia Extensions. A palette identity file has the
first and last 10 palette entries reserved for 20 system defined
colors. Alchemy will write such an image if you specify -c
246 10 as part of the command line. Note that ordinarily this
would produce a file which has 246 palette entries, but in this
special case the file will have 256 palette entries (20 fixed by the
Windows specifications and 236 chosen by Alchemy). Note that
you can also specify a number smaller than 246, but the palette
will always have 256 colors (since the last 10 have to occupy
positions 246 through 255).
Examples
Convert the image test.gif to a Windows BMP file:
alchemy test.gif -w
Do the same thing, but force the output file to be a 15 bit BMP
file:
alchemy test.gif -w -15
Image Alchemy
243
Convert the image test.gif to a 16 color Windows BMP file to be
used as wallpaper (the file chess.bmp is supplied with Windows
3.0 (substitute leaves.bmp when using Windows 3.1); this
example assumes that it is in the current directory):
alchemy test.gif -f chess.bmp -w
Convert the image test.gif to a 256 color Windows BMP file to
be used as wallpaper with Windows 3.1:
alchemy test.gif -c256 8 -w
Convert the image test.gif to an icon file for use with Windows
3.1:
alchemy test.gif -Xb32 -Yb32 -w 10
-f leaves.bmp
Convert the image test.gif to an identity palette BMP file:
alchemy test.gif -w -c 246 10
244
Image Alchemy
WordPerfect Graphic File
-W
WordPerfect files are images which can be imported into
WordPerfect and various other word processors and desktop
publishing programs.
Syntax
-W
Extension
.wpg
Creator
WordPerfect Corp.
Used by
WordPerfect
Variations
1 through 8 bits per pixel.
Comments
In addition to raster images WordPerfect files may contain
vectors and text information. Such information is lost when
reading WordPerfect files.
Example
Convert the image, newpict.pcx, to a black and white WPG file:
alchemy newpict.pcx -b -c2 -W
Image Alchemy
245
XBM
--b
XBM files are used by the X Windowing System. XBM files are
C source code files which can be read and written by various X
utilities and are designed to be included in C source code for use
as icons and other bit-mapped graphic images.
Syntax
--b
Extensions
.xbm
.bm
Creator
MIT
Used by
The X Windowing system
Variations
1 bit per pixel, black and white.
Limitations
Because .xbm files are actually C source code files there can be
many variations of .xbm files. Since adding a C preprocessor to
Alchemy to handle all the theoretically allowable .xbm files is
impractical we have instead designed Alchemy to interchange
.xbm files with the PBM utilities and the X supplied utilities, and
to read the sample .xbm files from Sun Microsystems. If you run
across any .xbm files which Alchemy cannot read please contact
us.
The hotspot field is ignored when reading .xbm files.
Comments
Most of the X supplied utilities (bitmap, for example) are
designed to edit small .xbm images.
Example
Convert the file picture.im32 to an XBM file using high quality
scaling and preserving the aspect ratio:
alchemy picture.im32 --b -Xb64 -+
246
Image Alchemy
XIM
---x
XIM is yet another file format used by the X Windowing
System.
Syntax
---x
Extensions
.xim
Creator
MIT
Used by
The X Windowing System
Variations
8 bit paletted, 8 bit grayscale, and 24 bit RGB images.
Example
Convert the file screen.xwd to an XIM file:
alchemy screen.xwd ---x
Image Alchemy
247
XPM
--x
XPM files are used by the X Windowing System. XPM files are
C source code files which can be read and written by various X
utilities and are designed to be included in C source code for use
as icons and other bit-mapped graphic images.
Syntax
--x type
Parameter
type:
0:XBM similar style
1:XPM3 style
2:XPM2 style
0:24 bit colors
10:48 bit colors
The default is XBM similar style, 24 bit colors (see the
Comments section below for a discussion of the different XPM
file types). Options are combined by adding (see below for an
example).
Extensions
.xpm
.pm
Creator
MIT
Used by
The X Windowing system
Variations
8 bits per pixel
Limitations
Because .xpm files are actually C source code files there can be
many variations of .xpm files. Since adding a C preprocessor to
Alchemy to handle all the theoretically allowable .xpm files is
impractical we have instead designed Alchemy to interchange
.xpm files with the PBM utilities and the X supplied utilities, and
to read the sample .xpm files from IBM. If you run across any
.xpm files which Alchemy cannot read please contact us.
248
Image Alchemy
Some XPM files contain color names instead of color values for
some of the colors. The conversion information to convert these
names into values is in a file supplied with the X Windowing
system called rgb.txt. When needed, Alchemy will look for
this table in the following directories: the current directory,
/usr/lib/X11, $OPENWINHOME, and /usr/openwin/lib. If
your system has the rgb.txt file in a different location you may
have to copy it to the current directory (its location is system
dependent; ask you system administrator if you need help finding
it).
Comments
The different type XPM files can be identified as follows:
Type 0 (XBM similar style):
#define type0_format 1
…
static char *type0_colors[] = {
"a", "#000000",
"b", "#ff0000",
…
Type 1 (XPM3 style):
/* XPM */
static char * type1[] = {
"32 20 12 1",
"a c #000000",
"b c #ff0000",
…
Type 2 (XPM2 style):
! XPM2
32 20 12 1
a c #000000
b c #ff0000
…
Image Alchemy
249
The 48 bit color XPM files are identical except that the color
values are written as a 48 bit number (instead of a 24 bit
number). Some software expects XPM files that have 48 bit
numbers (Alchemy automatically reads either). For example:
Type 10 (XBM similar style with 48 bit colors):
#define type0_format 1
…
static char *type0_colors[] = {
"a", "#000000000000",
"b", "#ffff00000000",
…
The other formats (11 and 12) are analogous.
When writing an XPM file with less than 27 colors Alchemy
writes 1 character XPM files, otherwise Alchemy writes 2
character XPM files.
XPM files are usually quite small, therefore many utilities (the
PBM toolkit for example) may have trouble reading large XPM
files.
Examples
Convert the file picture.im32 to an XPM file using high quality
scaling and preserving the aspect ratio:
alchemy picture.im32 --x -Xb64 -+
Do the same thing, but write an XPM3 style file with 48 bit
colors:
alchemy picture.im32 --x11 -Xb64 -+
250
Image Alchemy
XWD
--w
XWD is the file format used by xwd, the X window dumping
utility.
Syntax
--w type
Parameter
type:
0:Z type
1:XY type
The default is Z type.
Extension
.xwd
Creator
MIT
Used by
The X Windowing System
Variations
1, 4, 8, and 24 bits per pixel Z format and 1, 4, and 8 bit XY
format, input.
1, 8, and 24 bits per pixel Z format and 1 and 8 bit XY format,
output.
Example
Convert the XBM file, icon.xbm, to an XWD file:
alchemy icon.xbm --w
Image Alchemy
251
252
Image Alchemy
6
General Options
Introduction
General options are options which do not affect the conversion
of the image. They control such things as the overwriting of
existing files and the way that memory is used.
Image Alchemy
253
Control Memory Usage
-$
Purpose
Control the amount of memory uses for temporary storage of
image data.
Syntax
-$
-$ memory
Parameter
memory:
The amount of memory in kilobytes.
Default is 0 (use as much memory as needed).
Comments
Using the -$ without a following parameter causes Alchemy to
use as little memory as possible, both for temporary image
storage and for other internal buffers. On MS-DOS based
systems using the standard version of Alchemy this will usually
allow conversion of larger images than would otherwise be
possible.
Using the -$ option with a parameter causes Alchemy to use no
more than that much memory for temporary image storage, but
use as much memory as necessary for other internal buffers.
Note that a value of 0 following the -$ causes Alchemy to use as
much memory as needed, this is different than -$ without a
parameter. Using this option will limit the amount of virtual
memory that Alchemy will use.
Examples
Convert the image giant.tga to a TIFF file using as little memory
as possible:
alchemy giant.tga -$ -t
Convert the image giant.tga to a TIFF file using no more than 5
megabytes of memory for temporary image storage:
alchemy giant.tga -$ 5000 -t
254
Image Alchemy
Display Image Stats
-x
Purpose
Display image statistics.
Syntax
-x [option]
Parameter
option:
0:Traditional image statistics
1:Verbose image statistics, English Units
2:Verbose image statistics, Metric Units
3:Terse image information
4:Alchemy program information
Default is 0.
Comments
Displays image type, size, number of colors, aspect ratio,
resolution, and compression ratio.
Option 1 and 2 image stats contains more information than
Option 0 and the information is presented in a manner to allow it
to be more easily parsed by other software.
Option 3 image stats produces output in the same format as
options 1 and 2, however only the filename and file type is
returned. The advantage of this option is that PostScript, EPS,
and PDF files are not scanned, so there is no delay in returning
the file type information. This is useful if you are calling
Alchemy from other software; your software might need to know
what file format an image is before calling Alchemy to convert
the image.
Option 4 returns Alchemy's version number and the type of
Alchemy (i.e. PS or non-PS).
Example
Find out about the image called image.tga:
alchemy -x image.tga
Image Alchemy
255
Do Not Alter Output Filename
-.
Purpose
Disable automatic appending of the output image type to the
output file name.
Syntax
-. (period)
Comments
By default, if there's no '.' in the output filename, Alchemy will
add an extension indicating the type of file. If the -. option is
specified no extension will be added.
This is most useful on non-MS-DOS systems where '.' is not a
special character in filenames.
Examples
Convert the file called infile.gif to a PCX file called outfile (if
you did not use the -. option Alchemy would automatically
change the output file name to outfile.pcx):
alchemy infile.gif outfile -p -.
256
Image Alchemy
Do Not Remove Old Extension
---.
Purpose
Allows appending a new extension instead of removing the
existing extension.
Syntax
---.
Comments
Generates filenames such as test.tif.gif
Limitations
Only works on operating systems that support long filenames.
Examples
Convert all the files in the series filename.001, filename.002 into
TIFF format while adding a tiff extension in order to create
filenames such as filename.001.tif, filename.002.tif:
alchemy filename.* ---. -t
Do the same thing on Windows 95 or Windows NT
alchlong filename.* ---. -t
Image Alchemy
257
Help
-h
Purpose
Give you information on how to use Image Alchemy.
Syntax
-h option
Parameter
option:
0:General help
1:General options
2:Output formats A through L
3:Output formats M through Z
4:Color options
5:Scaling and Filtering Options
6:Display options (MS-DOS Only)
7:PostScript input options
Default is 0, general help
Limitations
The help option cannot be combined with any other options.
Comments
The help information given by this command is only a summary.
The numbers in braces after the command name refer to the page
numbers in this manual.
Example
Get help on the color options:
alchemy -h4
258
Image Alchemy
Multi-Page Input
-U
Purpose
Allow the conversion of multiple pages with a single execution
of Alchemy.
Syntax
-U
-U page
-U firstPage lastPage [stepPage]
Parameter
page:
Specify page number
The default is page 1.
startPage:
Specify beginning page number.
endPage:
Specify ending page number.
stepPage:
Specify step between pages.
Comments
The multi-page option allows you to process multiple pages of
an image when reading an image file which contains multiple
pages.
Each page of the image can be written to a separate file or to a
single multiple-page output file (if writing to a format which
supports multiple pages and using the ---U option). If writing
separate files the output file names will be as specified, with the
extension replaced with .001 for first page, .002 for the second,
and so on.
If the -U option is used without a following parameter all pages
in the input file(s) will be converted.
Image Alchemy
259
If you specify a single parameter after the -U option, only that
page will be converted. If you specify two parameters all pages
between those two numbers will be converted (inclusive, e.g.
-U 2 3 will convert pages 2 and 3). If you specify three
parameters the third will be used to indicate the step between
pages (i.e. -U 2 8 2 will convert pages 2, 4, 6, and 8).
Limitations
Image Alchemy reads multi-page: TIFF, DCX (PCX), PCL, US
Patent, FLC, HRF, JEDMICS, Collage, MIFF, and GIF. Image
Alchemy PS has multi-page reading support for these file
formats plus PostScript and PDF.
Examples
Convert all the pages in the PCL file doc.pcl to TIFF files:
alchemy doc.pcl -U -t
Convert all the pages of all the TIFF files to PCX files, placing
the output files into the directory \images\output:
alchemy *.tif -U -p \images\output
Do the same thing, but write a single multi-page DCX variant
PCX file, called doc.pcx:
alchemy *.tif -U -p1 ---U doc.pcx
Do the same thing, but only convert the even pages, starting at
page 4 (9999 is used as the ending page count since we don't
know how many pages the TIFF files contain):
alchemy *.tif -U 4 9999 2 -p1 ---U doc.pcx
260
Image Alchemy
Multi-Page Output
---U
Purpose
Allow the output of image files which contain multiple pages.
Syntax
---U [filename]
Parameter
filename:
Specifies the output filename when writing a single multipage file.
Comments
The multi-page output option allows you to write multiple
images or pages to a single image file.
Because it is possible to write a single multi-page file based on
multiple single page files, a single multi-page file, or multiple
multi-page files and it is also possible to write multiple multipage files based on multiple multi-page input files there are four
permutations to consider.
When writing a single multi-page output file and reading
multiple files, the output filename must appear immediately after
the ---U option.
Limitations
Only certain image file formats allow multiple images in a single
file: Adobe PDF, PCX (the DCX variant), GIF, TIFF, MIFF, US
Patent, and PCL.
Examples
Convert all the pages in the TIFF file doc.tif to a multi-page PDF
file (note that in this case the -U option is needed to cause
Alchemy to read all the pages in the doc.tif file, without it only
the first page would be read):
alchemy doc.tif -U ---U --d
Image Alchemy
261
Convert the TIFF files page1.tif, page2.tif, and page3.tif to a
multi-page PDF file called output.pdf (the -- option is required
to tell Alchemy that there are multiple files being read and the
filename after the ---U option is required to specify the output
file name):
alchemy -- page1.tif page2.tif page3.tif
---U output.pdf --d
Convert the multi-page TIFF files doc1.tif, doc2.tif, and doc3.tif
each to their own multi-page PDF files (this assumes that each
TIFF file is a multi-page file). The -U option is required to tell
Alchemy to treat the input files as multi-page documents. In this
case there is no filename specified after the ---U, because a
single multi-page output file is not being written:
alchemy -- doc1.tif doc2.tif doc3.tif -U
---U --d
Convert the multi-page TIFF files doc1.tif, doc2.tif, and doc3.tif
into a single multi-page PDF file (this assumes that each TIFF
file is a multi-page file). In this case there is a filename specified
after the ---U, because a single multi-page output file is being
written:
alchemy -- doc1.tif doc2.tif doc3.tif -U
---U docs.pdf --d
262
Image Alchemy
Override Input Type
-=
Purpose
Force Alchemy to treat the input file as the specified file type.
Syntax
- = inputType
Parameter
inputTypes:
ADEX .......................................... 24
Adobe PDF .................................. 65
Adobe Photoshop ......................... 74
Alias PIX / Vivid IMG ................ 16
Alpha Microsystems BMP........... 42
Autodesk FLC.............................. 81
Autodesk PIC/CEL ...................... 99
Autologic ..................................... 28
AVHRR ....................................... 43
AVS X ......................................... 91
Binary (BIF) ................................ 31
Calcomp ....................................... 50
CALS ........................................... 41
Core IDC...................................... 66
Cubicomp PictureMaker .............. 44
Dr. Halo CUT .............................. 45
Enc. PostScript............................. 14
ER Mapper Raster ....................... 59
Erdas LAN/GIS/IMG .................. 19
Explore TDI ................................. 93
Fargo Primera .............................. 69
FBM ............................................. 90
First Publisher Art ....................... 46
Freedom of Press ......................... 25
Gem VDI Image .......................... 22
GIF ................................................. 1
GOES ........................................... 40
Hitachi Raster .............................. 63
HP PCL ........................................ 15
HP-48sx Graphic Object .............. 60
HSI JPEG ..................................... 30
HSI Palette ..................................... 3
HSI Raw ........................................ 5
IBM Picture Maker ...................... 48
IDRISI ......................................... 87
IFF/ILBM ...................................... 7
Imaging Technology .................... 80
Img Software Set ......................... 61
Intergraph..................................... 77
Iris CT .......................................... 54
JEDMICS CCITT4 ...................... 79
Jovian VI...................................... 36
JPEG .............................................. 2
Lumena CEL................................ 62
Macintosh PICT ........................... 10
MacPaint ...................................... 49
MIFF ............................................ 88
MTV ............................................ 17
OS/2 BitMaP................................ 55
OS/2 Icon ..................................... 58
PCPaint/Pictor ............................. 29
PCX ............................................... 9
PDS .............................................. 37
PhotoCD ...................................... 56
Pixar ............................................. 98
Pixel Power Collage .................... 82
PNG ............................................. 75
Portable BitMap (PBM)............... 13
Puzzle........................................... 51
Q0 ................................................ 21
QDV............................................. 18
QRT Raw ..................................... 20
RIX .............................................. 38
RLC ............................................. 83
Scitex CT ..................................... 53
SGI Image .................................... 11
Sharp GPB ................................... 78
Spaceward Graphics .................... 76
Spot Image ................................... 39
Stork............................................. 32
Sun Icon ....................................... 52
Sun Raster ...................................... 8
Targa .............................................. 6
TIFF ............................................... 4
US Patent Image .......................... 73
Utah RLE ..................................... 23
Verity Image Format ................... 70
VIFF............................................. 92
VITec ........................................... 64
Wavefront RLA ........................... 94
Windows BitMaP ........................ 12
Word Perfect Graphic .................. 27
X BitMap (XBM) ........................ 35
X PixMap (XPM) ........................ 47
XIM ............................................. 89
XWD ............................................ 33
Image Alchemy
263
Comments
Rarely will Alchemy misidentify a file; the file is usually
damaged in some way when this happens. If the file is damaged,
or if you specify an input type that does not correspond to the
actual type of the image, the results will be unpredictable. If you
have a file which Alchemy misidentifies but is otherwise
undamaged please contact us.
Example
Convert the file unknown.xxx to an OS/2 Bitmap file called
output.bmp, forcing unknown.xxx to be treated as a Sun Raster
image:
alchemy unknown.xxx output.bmp -O -=8
264
Image Alchemy
Overwrite
-o
Purpose
Allow Alchemy to overwrite existing files.
Syntax
-o
Comments
Image Alchemy will not overwrite an existing file unless the -o
option is specified.
Limitations
The input file name and the output file name cannot be the same,
see the --o option to replace the input file with the output file.
Example
Convert the file input.tga to a GIF file called output.gif,
overwriting the existing file called output.gif:
alchemy input.tga output.gif -g -o
Image Alchemy
265
Program Information
-?
Purpose
Give you information on how to get support for Image Alchemy
or inquire about update information.
Syntax
-?
Comments
UNIX users have to escape the question mark with a back-slash
(instead of -? use -\?). This is because the UNIX shell will
attempt to perform wildcard expansion on the question mark.
Limitations
The information option cannot be combined with any other
options.
Example
Get support information:
alchemy -?
266
Image Alchemy
Quiet
-Q
Purpose
Suppress all status messages (but not error messages).
Syntax
-Q
Comments
This is useful when running Alchemy in the background on
UNIX systems or in batch files on MS-DOS systems (and you
don't want the output of Alchemy scrolling important messages
off of the screen).
Limitations
There is no way to suppress error messages.
Example
Convert the file dummy.gif to a PCX file but don't report any
status messages:
alchemy dummy.gif -Q -p
Image Alchemy
267
Response Files
@
Purpose
Response files allow you to place commonly used commands or
lists of input filenames into a text file; the commands or input
filenames in this file will be processed by Alchemy in the same
way as if you had put the parameters on the command line
Syntax
@filename
Parameters
filename:
An ASCII file containing a list of Alchemy options
and/or a list of input filenames.
Comments
Lines beginning with # are treated as comments and ignored.
You must use the -- (Wildcard) option if the response file
contains multiple filenames.
Response files may contain response file commands.
Limitations
Wildcards (* and ?) in response files do not work under UNIX.
Examples
If you have a response file, called resize which contains the
following:
-Xb640 -Yb480
-+
The following command will use this response file to scale a set
of JPEG files to GIF files:
alchemy -- *.jpg -g @resize
If you have a list of files that you want to convert (called files):
test1.jpg
image.tga
268
Image Alchemy
scan1.tif
scan2.tif
scan3.tif
This command will convert them to GIF files:
alchemy -- @files -g
You can use multiple response files, in this case one contains the
list of input filenames and the other the scaling commands:
alchemy -- @files @resize -g
Image Alchemy
269
Response Output Filenames
-@
Purpose
Allows you to specify an arbitrary list of filenames that the
output files are to be called.
Syntax
-@filename
Parameters
filename:
An ASCII file containing a list of output filenames.
Comments
Lines beginning with # are treated as comments and ignored.
You must use the -- (Wildcard) option if the response file
contains multiple filenames.
This command is usually used along with a response file
containing a list of input names.
Limitations
Wildcards (* and ?) are not allowed in a response output file.
Example
You want to convert the following list of files to JPEG files:
test1.gif
image.tga
scan1.tif
scan2.tif
scan3.tif
You want the output files to have the following names:
image1.jpg
image2.jpg
image3.jpg
image4.jpg
image5.jpg
270
Image Alchemy
Assuming the first list is called files and the second list is called
outnames, the following command can be used:
alchemy -- @files -@outnames -j
Image Alchemy
271
Response Paired Filenames
--@
Purpose
Allows you to specify an arbitrary list of input filename and
output filename pairs..
Syntax
--@filename
Parameters
filename:
An ASCII file containing a list of input and output
filename pairs.
Comments
Lines beginning with # are treated as comments and ignored.
You must use the -- (Wildcard) option if the response file
contains multiple filenames.
Limitations
Wildcards (* and ?) are not allowed in a response paired file.
Example
You have a list of paired filenames, containing one input
filename and one output filename per line, like this:
test1.gif
image.tga
scan1.tif
scan2.tif
scan3.tif
image1.jpg
image2.jpg
image3.jpg
image4.jpg
image5.jpg
Assuming the list is called pairs, the following command can be
used:
alchemy ----@pairs -j
272
Image Alchemy
Sequential Filenames
---
Purpose
Allow the conversion of a sequentially numbered series of files
(i.e. image000.tif, image001.tif, image002.tif, …)
Syntax
--- [startInput[-endInput[xincrementInput] ]
--- [startOutput[-endOutput[xincrementOutput] ] ]
Parameters
startInput:
The number of the first input image, defaults to 0.
endInput:
The number of the last input image, defaults to 9999.
incrementInput:
The increment between input values, defaults to 1.
startOutput:
The number of the first output image, defaults to the
startInput value.
endOutput:
The number of the last output image, defaults to the
endInput value.
incrementOutput:
The increment between output values, defaults to the
incrementInput value.
Comments
Insert # characters (pound signs) in the input and output
filenames where the sequence numbers belong, using multiple #
to indicate leading zeros. For example # would be replaced by 1,
2, 3, … 999 and #### would be replaced by 0001, 0002, 0003,
… 0999, assuming the specified range was 1 to 999.
Image Alchemy
273
Alchemy will automatically skip missing files, so if you specify
image.### as the input filename but only image.005 and
image.006 exist only those files will be converted.
If the starting value is greater than the ending value the value
will be decremented (i.e. 50-1 will be treated as 50, 49, 48, …,
1). Specifying a negative decrement is not necessary (nor
possible).
When reading a multi-page document you can use sequential
filename mode to specify the name of the output files. In this
case the startInput, endInput, and incrementInput values are not
specified. See below of an example.
Limitations
You must specify both an input filename and an outputfilename
when using this option.
This option cannot be combined with multiple input filenames
(i.e. alchemy test?.### ----- is not allowed).
Examples
Convert the files image001.gif, image002.gif, image003.gif … to
TIFF files with the names file.001, file.002, file.003, …:
alchemy image###.gif file.### ----t
Do the same thing, but use the filenames image1.gif, image2.gif.,
image3.gif:, through image100.gif as the input files:
alchemy image#.gif file.### --- 1-100 -t
Do the same thing, but skip the even numbered files (image1.gif,
image3.gif, image5.gif, …):
alchemy image#.gif file.### --- 1-100x2 -t
274
Image Alchemy
Do the same thing, but name the output files file.300, file.297,
file.294, …:
alchemy image#.gif file.### --- 1-100x2
300-1x3 -t
Convert all the pages in addendum.pdf to TIFF files, name the
output files addendum.01.tif, addendum.02.tif, addendum.03.tif,
…:
alchemy addendum.tif addendum.##.tiff -t
-U ---
Do the same thing, but starting number the pages at 10 (so page
1 will be page 10, etc.):
alchemy addendum.tif addendum.##.tiff -t
-U --- 10
Do the same thing, but starting number the pages at 100 and
count down:
alchemy addendum.tif addendum.##.tiff -t
-U --- 100-1
Image Alchemy
275
Use Input Directories for Output
--.
Purpose
Place the output files into the same directory as the input files.
Syntax
--. (period)
Comments
By default Alchemy places output files into either the current
directory or a directory specified on the command line. If the --.
option is used the output files will be written to the same
directory as the input files.
Example
Convert all the PCX files in the directories imgs\ and photos\ to
JPEG files, placing the output files in the same directories the
input files were read from:
alchemy -- imgs\*.pcx photos\*.pcx -j --.
276
Image Alchemy
Use Input File Format for Output
-- =
Purpose
Causes Alchemy to write out a file in the same format as the file
being read.
Syntax
-- = [compressionOption]
Parameter
compressionOption:
Sets the output compression or output type based on the
format being written.
Comments
If the output file already has the extension that Alchemy uses for
the file being read and the output file is not being written to a
different directory this command will fail unless the --o
command is used.
Limitations
Only one parameter can be specified (i.e. if writing a multi-page
GIF file the delay between images and the repeat count cannot be
specified when using this option).
Examples
Convert all the files called image.* to files with the same format,
flipping the files and placing the output in a directory called
\flipped:
alchemy image.* --= --^ \flipped
Do the same thing, but replace the existing files with the new
files instead:
alchemy image.* --= --^ --o
Do the same thing, using type 1 compression (what that actually
means depends on the file format being written):
alchemy image.* --= 1 --^ --o
Image Alchemy
277
Use Input Filename for Output
--o
Purpose
Causes Alchemy to write out a file with the same name as the
file being read, replacing the input file.
Syntax
--o (lowercase letter O)
Comments
If the input file is read only this command will fail.
Example
Convert the GIF file, test.gif, to a GIF file, scaling it to 640x480
and keeping the same name:
alchemy test.gif -g -Xb640 -Yb480 --o
278
Image Alchemy
Use 3 Letter Extensions
--3
Purpose
Causes Alchemy to use 3 letter extensions (this is the default
under MS-DOS).
Syntax
--3
Comments
Ordinarily Alchemy will use the extension specified by the
image file format (.GIF, for example), however some file
formats, such as TIFF, specify that on systems which allow it the
extension should be more than 3 letters (.TIFF, in the case of
TIFF). This can be a problem if you are interchanging files with
an MS-DOS system. This option causes Alchemy to always use
no more than 3 letter extensions.
Example
Convert the file large.gif to a TIFF file with a 3 letter extension:
alchemy large.gif -t --3
Image Alchemy
279
Warnings
--W
Purpose
Treat missing input files, unidentifiable input files, and nonoverwriteable output files as a non-fatal errors.
Syntax
--W
Comments
When used in conjunction with the Wildcard option (see below)
the Warnings option allows Alchemy to proceed even when
certain error conditions occur. Specifically, any input files
which are missing or can't be identified as valid image files and
any output files which already exist but are not to be overwritten
are skipped and processing continues with the next file.
At the end of processing Alchemy displays lists of the files
which were not found, which could not be identified, and which
already existed but could not be overwritten.
This option was added at the request of our customers who
routinely convert large numbers of files and don't want Alchemy
to stop if it finds a file missing or finds that an output file already
exists.
Limitations
Any errors which occur during the processing of an image file
are always fatal.
This option can only be used with the Wildcard option.
Example
Convert all the GIF files in the current directory to JPEG files,
skipping any files which can't be identified or already have
existing JPEG files:
alchemy -- *.gif -j --W
280
Image Alchemy
Wildcard
--
Purpose
Allow the conversion of multiple files with a single execution of
Alchemy.
Syntax
-- (dash dash)
Comments
The wildcard option allows you to specify multiple file names
and file names which include wild card characters. Alchemy
will perform the same conversion for each input file name that it
finds.
On MS-DOS systems the use of the wildcard option (--) is not
required if the first file name specified includes a wildcard
character (* or ?); however to reduce confusion it is still
recommended.
Limitations
If you are using the wildcard option you may not specify an
output file name; the file names are automatically generated by
substituting an appropriate extension to the input file names. If
you do specify an output file name it will be misinterpreted as
another input file. An output path name may specified and all
output files will be stored there (see the Examples section below
for an example of this).
Any error will terminate the execution of Alchemy; any images
which appear in the filename list after the one causing the error
will not be processed. This includes attempting to overwrite an
already existing file without specifying the -o option. If you use
the --W option in conjunction with wildcards certain errors will
be treated as warnings and not cause Alchemy to terminate.
These errors are: missing input files, input files which could not
be identified, and output files which already existed but could
not be overwritten (because the -o option was not specified).
Image Alchemy
281
Alchemy does not intelligently retain information between files.
For example, if you are matching a group of files to an existing
palette, the inverse palette generation step only needs to be
performed once, but it is in fact done for each file. This only
affects the speed of conversions, not the quality.
Examples
Convert all the GIF files in the current directory to JPEG files:
alchemy -- *.gif -j
Convert all the TIFF files in the directory \tiff to PCX files in the
directory \images\output:
alchemy -- \tiff\*.tif -p \images\output
Convert all the GIF files in the current directory, in the directory
\images, and in the directory \more to GIF files, scaling them to
be no larger than 640x480 and write them to the directory \small:
alchemy -- *.gif \images\*.gif \more\*.gif
-g -Xb640 -Yb480 -+ \small
Convert the files madonna.gif, bay4.gif, everest.tga, and basil.tif
to JPEG files, overwriting any existing files:
alchemy -- madonna.gif bay4.gif
everest.tga basil.tif -o -j
Convert the files test1.tif, test2.tif, and new*.gif to ILBM files,
matching them to the palette from the file output.pal:
alchemy -- test1.tif test2.tif new*.gif -f
output.pal -i
282
Image Alchemy
7
Color and Palette Options
Introduction
Color and Palette options are options which affect the
appearance of the output image. They control such things as the
number of colors in the output image and the dithering
techniques used.
Image Alchemy
283
Alpha Channel
-I
Purpose
Control the Alpha Channel when converting a file.
Syntax
-I alphaOption (capital i)
Parameter
alphaOption:
1:preserve the alpha channel
2:always write an alpha channel
3:do not write an alpha channel
The default is 1, to preserve the alpha channel.
Comments
Some file formats include alpha channel information. The alpha
channel is often used to store information such as transparency.
By default Image Alchemy writes out an alpha channel if the
input image includes one and the output file format supports
alpha channels.
If you are reading a file which does not have an alpha channel
using the -I 2 option will create an empty alpha channel in the
output file.
If you are writing a file format which does not support alpha
channel data the -I option will be ignored.
Examples
Convert the image giant.tga to a TIFF file, preserving the alpha
channel information:
alchemy giant.tga -t
Do the same thing, removing the alpha channel:
alchemy giant.tga -t -I 3
Do the same thing, but force an alpha channel to be written:
alchemy giant.tga -t -I 2
284
Image Alchemy
Black and White
-b
Purpose
Convert the image to black and white or gray-scale.
Syntax
-b
Comments
The -b option causes an image to be converted to either black
and white or gray-scale. If the -c2 option is specified the output
image will be black and white. Any other number of colors
specified with -c will cause Alchemy to generate a file with that
many shades of gray uniformly distributed from 0 to 255.
If the -c option is not used the default is to write a file with 256
shades of gray when converting from a true color image. When
converting from a paletted image the number of shades of gray
defaults to the number of colors in the original image.
When converting from true color the image will be changed to a
paletted image unless the -24 option is used.
You can use the -b option combined with -c 256 and a scaling
option to perform scale to gray. Scale to gray converts a black
and white image, at high resolution to a grayscale image at lower
resolution, while preserving readability. It is often used when
converting fax received data to a format for displaying on a
monitor. See below for an example.
Related options
-8
-24
-c
Examples
Convert the file sample.jpg into a 256 shades of gray raw file:
Paletted output
True color output
Specify number of colors
alchemy sample.jpg -b -r
Image Alchemy
285
Convert the file madonna.jpg into a 4 shades of gray gif file
called gray.gif:
alchemy madonna.gif gray.gif -b -c4 -g
Perform scale to gray scaling on the file fax.tif, converting the
file to a grayscale GIF file which is no larger than 800 x 600:
alchemy fax.tif -g -c256 -b -Xb800
-Yb600 -+
286
Image Alchemy
Brightness
---y
Purpose
Adjust the brightness of an image.
Syntax
---y brightnessValue
Parameter
brightnessValue:
-1.0 to 1.0, default is 0.
Comments
Changes the brightness of an image by adding or subtracting a
constant value from each pixel. A brightness value of 1.0 will
add 100% to each pixel, making the entire image white. A
brightness value of -1.0 will subtract 100% from each pixel,
making the entire image black.
Related options
---Y Contrast Adjustment
-G
Gamma Correction
Example
To convert the Mac PICT file test.pic to a PCX file, while
slightly increasing the brightness of the image:
alchemy test.pic -p ---y 0.10
Image Alchemy
287
CMYK
---K
Purpose
Convert the image to CMYK.
Syntax
---K
Comments
The ---K option causes an image to be converted to CMYK
data. This option can only be used by those file formats which
support CMYK data.
Example
Convert the file sample.jpg in to an uncompressed CMYK TIFF
file:
alchemy sample.jpg ---K -t0
288
Image Alchemy
Color Correction
-C
Purpose
Apply an Alchemy Color Correction (ACC) file while
performing a conversion. This helps maintain image quality
when converting from RGB to CMYK or CMYK to RGB (for
example from JPEG to RTL or from CMYK EPS to GIF).
Syntax
-C filename
Parameter
filename:
The name of the color correction file.
Comments
More information and various ACC files can be found on our
web site in the acc directory: http://www.handmade.com/acc.
Alchemy continues to support UnderColor Removal (UCR) files.
The undercolor removal portion of UCR files is compatible with
the format used by Stork Colorproofing B.V. The format of this
file is described in Appendix G, Undercolor Removal Files.
Examples
Convert the file image.tga to an HP RTL file called image.rtl
using the ACC file dj2500a.acc:
alchemy image.tga --r7 -Cdj2500a.acc
Convert the file image.tga to an HP RTL file called image.rtl
using the undercolor removal file sample.ucr:
alchemy image.tga --r7 -Csample.ucr
Image Alchemy
289
Colors
-c
Purpose
Specify the number of colors for the output file.
Syntax
-c colors [reserveColors]
Parameters
colors:
Specifies the number of colors in the output image. May
be between 2 and 256.
reserveColors:
Specifies the number of colors to reserve in the output
image. May be between 0 and 255.
Comments
If the input file has a larger number of colors than specified for
the output file, the image will be quantized using Heckbert's
median cut algorithm and dithered. For further information on
Heckbert's median cut algorithm see Appendix B, Color and
Dithering.
The number of colors to reserve is an optional parameter. If it is
present it causes the specified number of colors to be reserved
from the beginning of the palette. The output image will not
contain any of those color indices. This can be useful if you
have menus or other information you wish to display at the same
time as the images and they use colors at the beginning of the
palette. The menu colors will then not interfere with the image.
The first indices are set to black unless 16 is specified, in which
case they are set to the standard VGA color palette.
Limitations
Specifying the number of colors only has an effect if you are
writing a paletted file (using the -8 option) or if the output file
type is always paletted.
Converting an image with a large number of colors to a small
number of colors (less than 8) will usually give poor results.
290
Image Alchemy
The reserved colors will be set to black unless 16 colors are
reserved. In that case they will be set to the standard VGA
colors.
Related options
-8
-d
-u
Examples
Convert the image colors.gif into a 16 color PCX file called
color16.pcx
Convert to paletted image
Specify dither type
Use uniform palette
alchemy colors.gif color16.pcx -p -c16
Convert the image colors.tga into a 256 color GIF file called
output.gif, reserving the first 16 colors.
alchemy colors.tga output.gif -g -c256 16
Image Alchemy
291
Contrast
---Y
Purpose
Adjust the contrast of an image.
Syntax
---Y contrastValue
Parameter
contrastValue:
0.1 to 10.0, default is 1.0.
Comments
Changes the contrast of an image by multiplying each pixel by a
constant. A contrast value of 2.0 will double the value of each
pixel, making the image quite a bit more contrasty.
It is actually possible to specify a negative contrast value, this
has the effect of negating the image while applying the contrast
adjustment (a contrast value of -1.0 has the same effect as using
the -N option).
Related options
---y
-G
Example
To convert the Mac PICT file test.pic to a PCX file, while
slightly decreasing the contrast of the image:
Brightness Adjustment
Gamma Correction
alchemy test.pic -p ---Y 0.90
292
Image Alchemy
Dither
-d
Purpose
Specifies the type of dithering to apply to the image.
Syntax
-d[s] ditherType [perturbation]
Parameters
If the -d is immediately followed by an 's', then a serpentine
raster is used.
ditherType:
0:None
1:Floyd-Steinberg
2:Stucki
3:Jarvis, Judice, & Ninke
4:Stevenson and Arce
5:Sierra Lite
20:Halftone (clustered dot)
21:Bayer (dispersed dot)
22:Halftone 2 (clustered dot)
The default is Floyd-Steinberg.
perturbation:
0 through 127
The default is 0.
Comments
Dithering reduces the color banding in an image caused by the
palette not having a perfect match for every color in the image.
Types 1 through 5 are all error-diffusion dithers. Types 1 and 5
are the fastest of the diffusion dithers, and they usually look the
best on low resolution devices like CRTs. Types 2, 3, and 4 all
tend to cause an image to appear more grainy on low resolution
output devices (such as CRTs). However, they produce better
results than types 1 or 5 on high-resolution, low color output
devices such as laser printers or 1 bit CMYK plotters.
Image Alchemy
293
Type 22 is a digital halftone; this will produce the most accurate
grays on a laser printer, but the image won't be as sharp as one
produced by the error-diffusion dithers. Type 21 is a dispersed
dot ordered dither; it's only advantage over the error-diffusion
algorithms is speed. Type 20 is an additional halftone pattern.
It's similar to type 22, but with a coarser screen.
The -d option only has an effect if the number of colors is being
reduced or the image is being re-mapped to a new palette.
Specifying a perturbation adds noise to the image, which can
help break up visible patterns introduced by dithering. The
parameter specifies the magnitude of the noise. Perturbation has
no effect on dither types 20, 21, and 22.
Using a serpentine raster can also help to reduce visible patterns
introduced by dithering. Using a serpentine raster has no effect
on dither types 20, 21, and 22.
In general we use -d1 when converting 24 bit images to 8 bit
paletted, and -ds3 when converting color images to black and
white and 1 bit CMYK (for sending to a laser printer or plotter).
Examples
Convert the 256 color file image.gif to a 16 color PCX file using
a uniform palette and no dithering:
alchemy image.gif -p -c16 -d0 -u
Convert the true color image sample.jpg into a 256 color GIF file
called sample.gif, using Stucki dithering:
alchemy sample.jpg -g -d2
Convert the 256 color image sample.gif into a one bit black and
white PCL file called sample.pcl, using Jarvis, Judice, and Ninke
dithering, a serpentine raster, and a little noise:
alchemy sample.gif -P -b -c2 -ds3 20
294
Image Alchemy
EGA Palette
-E
Purpose
Optimize the image quality for display on an EGA board and
monitor.
Syntax
-E
Comments
If you are converting images to display on an EGA board and
monitor this option will optimize the image quality.
This option reduces the palette resolution to two bits and
automatically specifies the following: -8 -c16 -z0 2 0.
Limitations
The number of colors in an EGA palette must be less than or
equal to 16; the number of colors defaults to 16 but can be
reduced by using the -c option.
Related options
-c
Example
Convert the image dave1.tga into dave1.pcx, a PCX file with a
palette optimized for EGA use:
specify number of colors
alchemy dave1.tga -E -p
Image Alchemy
295
False Color
-F
Purpose
False color an image using the palette from a file. The input
image will be changed to use the palette found in the specified
filename but no attempt at picking the best match will be done.
Syntax
-F filename
Parameter
filename:
Any valid image file which contains a palette.
Comments
This feature can be used to add false color to monochrome
images.
The output file is not dithered.
False color may only be used with paletted input files.
Limitations
Cannot be combined with the spiff (-S) or match palette (-f)
options.
Related options
-f
Example
False color the file scan.gif using the palette from the file
colorful.pcx, creating the GIF file new.gif:
match palette
alchemy scan.gif new -F colorful.pcx -g
296
Image Alchemy
Gamma Correction
-G
Purpose
Specify the gamma of an input, output, or palette file and/or
perform gamma correction.
Syntax
-G gammaType gammaValue
Parameters
gammaType:
i:Specify input gamma
o:Specify output gamma
p:Specify gamma of palette
gammaValue:
0.1 to 10.0
Comments
Gamma correction can be used to compensate for dot gain when
generating a file that will be printed on an inket or laser printer.
Dot gain occurs because each dot that is placed on the paper is
actually round, and in order to completely fill in a square grid
with round pixels the round pixels have to be larger than the
square. This allows black areas to appear as solid black;
however it also causes gray areas to appear darker than they
should. See Appendix A for a more complete discussion of dot
gain.
A good starting place when using Gamma Correction to correct
for dot gain is to specify an input gamma of 1.0 and an output
gamma of 2.0. If the image appears to light on the page decrease
the output gamma, if it is too dark increase the output gamma.
Image Alchemy
297
To perform gamma correction, Alchemy needs to know both the
input and output gamma. For some file formats the gamma is
known; if you're reading a file with known gamma, such as
JPEG, PICT, PCPAINT, or a Targa file with a gamma field, you
don't need to specify the input gamma. Likewise, if you're
writing a file which has a fixed gamma you don't need to specify
an output gamma. Even if reading or writing a file format which
has a known gamma you may override it by using the -Gi or -Go
option.
Even if both input and output gamma are known based on the
input file and the output format, you must still enable gamma
correction for any correction to take place; you can do this with
just '-G' (if you had specified input, output, or palette gamma,
this would be implied). This is because there are quite a few
images around that have specified or implied gammas that are
wrong, which would cause Alchemy to make matters worse
instead of better if gamma correction was always enabled.
Typical gamma values are 1.0 for images from Macintoshes and
2.2 for images from PCs.
Related options
---y Brightness Adjustment
---Y Contrast Adjustment
Examples
To convert the Mac PICT file test.pic, which has a gamma of
1.0, to a PCX file for use on a PC (which should have a gamma
of 2.2), use:
alchemy test.pic -p -Gi1.0 -Go2.2
To convert the file image.tga, which has a gamma of 2.2, to a
GIF file for use on a Mac, matching the palette test.pal which
was created with a gamma of 1.5:
alchemy image.tga -g -Gi2.2 -Go1.0 -Gp1.5
-ftest.pal
298
Image Alchemy
Match Palette
-f
Purpose
Match the output to a palette read from a file. The input image
will be re-mapped to use the palette found in the specified file.
Syntax
-f filename
Parameter
filename:
Any valid image file which contains a palette
Comments
Using the -f option will cause the output image to be dithered
(unless you specify no dithering by using the -d0 option).
The -f option can be useful if you are combining several images
into a collage or want to match an image to a pre-existing palette.
You can also create a custom palette from scratch by using a text
editor and creating a .PAL file.
Limitations
Cannot be combined with the spiff option (-S) or the false color
option (-F).
The number of colors in the final image will be equal to the
number of colors in the palette being read in.
The specified file must contain a palette (i.e. cannot be true
color).
Related options
-l
-F
-d
Examples
Convert the image bigimage.tif to a pcx file using the palette
from the file standard.pal:
Generate palette file
False color
Dither
alchemy bigimage.tif -p -f standard.pal
Image Alchemy
299
Convert the image color.gif to a gif file called color2.gif using
the palette from the file newpal.gif:
alchemy color.gif color2 -fnewpal.gif -g
300
Image Alchemy
Negate
-N
Purpose
Changes the image to a negative.
Syntax
-N
Comments
This option is equivalent to a photographic negative. When used
on black and white images black is changed to white and white is
changed to black. On color images each of the Red, Green, and
Blue channels are inverted separately (so that bright blue will
become bright yellow).
Example
Negate the file sample.gif, generating a GIF file called
negative.gif:
alchemy sample.gif negative -N -g
Image Alchemy
301
Palette
-8
Purpose
Force the output image to be paletted.
Syntax
-8
Comments
This option is -8 because paletted images are typically 8 bits per
pixel.
Alchemy defaults to the -8 option if the input file is paletted or
gray-scale.
Some file formats require files to be paletted; for those formats
the -8 option is assumed. Some file formats do not have a
paletted variation; in those cases the -8 option will be ignored if
specified. Some file formats only allow gray-scale files to be 8
bit; in those cases Alchemy will ignore the -8 option if the image
being written is not gray-scale.
The actual number of bits per pixel is determined by the -c
option (below).
If the input file is true color the output file will be quantized and
dithered (see the -c and -d options below).
Related options
-15
-16
-24
-32
-c
-d
Examples
Convert the JPEG file bigimage.jpg into a paletted TIFF file with
256 colors:
True color output
True color output
True color output
True color output
specify number of colors in image
dither
alchemy bigimage.jpg -8 -t
302
Image Alchemy
Convert the Targa file madonna.tga to a 16 color PCX file (note
that the -8 option is implied by the use of the -c16 option):
alchemy madonna.tga -c16 -p
Image Alchemy
303
Palette Selection: Heckbert Tuning
-zh
Purpose
Select the specific Heckbert quantization method to use.
Syntax
-zh heckbertType
Parameters
heckbertType:
0:Method 0
1:Method 1
2:Method 2
3:Method 3
The default is Method 0.
Comments
The default Heckbert quantization method produces good results
for most images; however, you may find the results are better
for your images using one of the other methods. This may be
especially true when reducing images to a small number of
colors (in this case method 1 will probably produce better
results).
Image Alchemy v1.7.7 and earlier used Heckbert quantization
method 2. To produce images identical to those versions use
-zh2 on the command line.
Example
Convert the file input.tga to a gif filed called output.gif with 16
colors, using Heckbert Method 1 for the color reduction.
alchemy input.tga output.gif -g -zh 1 -c16
304
Image Alchemy
Palette Selection: Palette Selection
-zp
Purpose
Alter the method which Heckbert quantization uses to select
colors.
Syntax
-zp selectionType
Parameters
selectionType:
0:Mean
1:Median
2:Corner
The default is Mean.
See Appendix B, Color and Dithering, for an explanation of
these choices.
Comments
See Appendix B.
Example
Convert the file sample.jpg to a GIF file, using the corners of the
Heckbert boxes to select the palette entries:
alchemy sample.jpg -zp 2
Image Alchemy
305
Palette Selection: Palette Sorting
-zo
Purpose
Sort the colors in the palette produced by Alchemy
Syntax
-zo sortType
Parameters
sortType:
0:None
1:Popularity
2:Luminance (lightest to darkest)
3:RGB
4:Luminance (darkest to lightest)
The default is None.
Comments
This option only affects palettes that are generated by Image
Alchemy. To sort an existing palette you can save the image as a
true color file (such as HSI Raw), by using the -24 -r options,
and then convert that back to a paletted file, specifying the
desired sort type. In most cases this will not change the image
(other than the palette order); however if the palette had entries
representing colors that are nearly identical then the image may
be slightly modified. See the Example section below for an
example.
Examples
Convert the image sample.jpg to a GIF file, sorting the palette by
Luminance (lightest colors first):
alchemy sample.jpg -g -Zo 2
Sort the colors by Luminance (darkest colors first) in the paletted
image test1.gif:
alchemy test1.gif -r -24
alchemy test1.raw test1.gif -g -zo 4 -o
306
Image Alchemy
Palette Selection: Palette Swapping
-zs
Purpose
Force certain colors to be in certain places when generating a
palette.
Syntax
-zs swapType
Parameters
swapType:
0:None
1:IBM (color 0 is black, 7 is white)
2:Macintosh (color 0 is white, 255 is black)
3:Sun (color 0 is white, 1 is black)
The default is based on the file type being written out (Macintosh
for Mac PICT, Sun for Sun Raster, and None for all others).
Comments
This option forces black and white to be located in certain places
in the palette. This is primarily useful when displaying images
on certain hardware which uses black and white to display
menus and other information.
Example
Generate a GIF file which has black at color 1 and white at
color 0:
alchemy sample.jpg -g -zs 3
Image Alchemy
307
Palette Selection: Palette Weighting
-zw
Purpose
To select between different types of palette weighting.
Syntax
-zw[weightingType]
Parameter
weightingType:
0:NTSC
1:Equal
The default is NTSC weighting.
Comments
NTSC palette weighting places the highest importance on green
and the lowest importance on blue when mapping images to a
palette. Equal palette weighting places equal importance on red,
green and blue when mapping images to a palette.
Examples
Convert sample.jpg into GIF format using equal palette
weighting.
alchemy sample.jpg -zw1
308
Image Alchemy
Preserve Palette While Scaling
---f
Purpose
Keep the original palette when scaling paletted images.
Syntax
---f
Comments
When using type 'b' or better scaling on paletted images
Alchemy has to convert the image to true color as part of the
scaling process and then convert the image back to paletted
before saving. Ordinarily the best results are obtained if
Alchemy is allowed to choose the final palette based on the
scaled image content. However there may be times when you
wish to preserve the original palette instead of generating a new
one. This option does that.
Examples
Scale the gif file flowers.gif to 320 x 200, preserving the original
palette and aspect ratio:
alchemy flowers.gif new.gif -g ---f -Xb320
-Yb200 -+
Scale all the files ending in .gif to 320 x 200, preserving the
original palette and aspect ratio, placing the new files in the
directory new:
alchemy *.gif new -g ---f -Xb320 -Yb200 -+
Image Alchemy
309
Spiff
-S
Purpose
Enhance the image contrast by stretching the pixel color values
to the full 0 to 255 range.
Syntax
-S spiffType
Parameter
spiffType:
a:Histogram stretching
b:Histogram linearization
c:Histogram stretching with black and white ignored
The default is Histogram stretching.
Comments
This command can be used if the image you are converting is
shifted in brightness or squished in contrast. This can happen if
you scan or digitize a very dark or very bright image.
The default type, histogram stretching, simply insures that the
image has pixels which are distributed over the entire output
range (0 to 255).
Histogram linearization insures that the distribution of pixels
over the output range is linear.
Type c spiffing is identical to type a spiffing except that the
colors absolute black and absolute white are ignored in the
image. This is useful when you have images which have black
borders or white captions, since type a spiffing would treat these
as part of the image data and not perform any spiffing.
Histogram linearization can produce significantly better results
than histogram stretching for some images. Generally you will
want to try both types to see which gives better results.
310
Image Alchemy
Limitations
The -S option cannot be used at the same time as the -b option
when converting from a true color image. A work around is to
do the operation in two steps, converting it to black and white
first and then spiffing the resulting image.
Using the spiff option at the same time as the match palette, -f, or
false color, -F, options is not allowed. This is because the spiff
option would be performed before the palette is changed, which
would nullify the effects. A work around is to do the matching
or false coloring first, and then spiff the resultant image.
Related options
-b
-f
-F
-H
Examples
Convert the file gloomy.pcx into a PCX file called better.pcx:
Black and White
Match palette
False color image
Histogram output option
alchemy gloomy.pcx better.pcx -S -p
Do the same thing using histogram linearization instead of
histogram stretching:
alchemy gloomy.pcx better.pcx -Sb -p
Image Alchemy
311
Swap RGB
--n
Purpose
Swap the red channel with the blue channel.
Syntax
--n
Comments
This option is usually only needed if you have an incorrectly
written file or are writing a file which will be read by a broken
file reader.
Example
Convert the Targa file wrong.tga to another Targa file called
right.tga, swapping the red and blue channels:
alchemy wrong.tga right.tga -a --n
312
Image Alchemy
Transparency
---t
Purpose
Specify which color in the output image is considered to be
transparent. Note that transparency is only supported by certain
file formats.
Syntax
---t [red green blue]
Parameters
red green blue:
Specifies the color to use for the transparent color (0 0 0
is black, 255 255 255 is white). The default is 255 255 255
(white).
Comments
Only supported by GIF89A and PNG. See those file formats for
more information. If the source file has a transparent color it is
now preserved during conversion unless a new transparent value
is defined.
Examples
Convert the image logo.tif to a GIF file, specifying white as the
transparent color:
alchemy logo.tif -g1 ---t
Convert the image logo.tif to a GIF file, specifying black as the
transparent color:
alchemy logo.tif -g1 ---t 0 0 0
Do the same thing, this time using red as the transparent color:
alchemy logo.tif -g1 ---t 255 0 0
Check to see if logo.gif has a transparent color.
alchemy logo.gif -x1
Image Alchemy
313
True Color (15 bits)
-15
Purpose
Force the output image to be true color, 15 bits (5 bits per
component).
Syntax
-15
Comments
See the True Color (24 bits) section, below.
Related options
-8
-16
-24
-32
Example
Convert the GIF file test.gif into an uncompressed, true color 15
bit Targa file called test.tga:
Paletted output
True color output (16 bits)
True color output (24 bits)
True color output (32 bits)
alchemy test.gif -a0 -15
314
Image Alchemy
True Color (16 bits)
-16
Purpose
Force the output image to be true color, 16 bits (5 bits each for
red and blue, 6 for green).
Syntax
-16
Comments
See the True Color (24 bits) section, below.
Related options
-8
-15
-24
-32
Example
Convert the GIF file test.gif into an uncompressed, true color 16
bit Targa file called test.tga:
Paletted output
True color output (15 bits)
True color output (24 bits)
True color output (32 bits)
alchemy test.gif -a0 -16
Image Alchemy
315
True Color (24 bits)
-24
Purpose
Force the output image to be true color, 24 bits (8 bits per
component).
Syntax
-24
Comments
This option is -24 because true color images are typically 24 bits
per pixel.
Some file formats require files to be true color; for those formats
the -24 option is assumed. Some file formats only have a
paletted variation; in those cases the -24 option will be ignored if
specified.
The file formats which may be either true color or paletted
default to true color if the input file is true color.
Certain file formats may only be paletted if the images are grayscale, in those cases Alchemy will automatically switch to true
color if the output image is color.
Converting a paletted image to true color will not improve its
quality or change its appearance. The primary use of this option
is to force an image to be true color when converting to a format
which allows either paletted or true color, but where the paletted
variation is not well supported (like the Targa image format).
If the file format you are converting to does not have a 24 bit
mode the closest true color mode available will be chosen, in the
following order: 32 bit, 16 bit, 15 bit.
Related options
316
Image Alchemy
-8
-15
-16
-32
Paletted output
True color output (15 bits)
True color output (16 bits)
True color output (32 bits)
Example
Convert the GIF file test.gif into an uncompressed, true color
Targa file called test.tga:
alchemy test.gif -a0 -24
Image Alchemy
317
True Color (32 bits)
-32
Purpose
Force the output image to be true color, 32 bits (8 bits per
component, 8 bits for the alpha channel).
Syntax
-32
Comments
See the True Color (24 bits) section, above.
Related options
-8
-15
-16
-24
Example
Convert the GIF file test.gif into an uncompressed, true color 32
bit Targa file called test.tga (the alpha channel will be empty):
Paletted output
True color output (15 bits)
True color output (16 bits)
True color output (24 bits)
alchemy test.gif -a0 -32
318
Image Alchemy
Uniform Palette
-u
Purpose
Use a Uniform Palette.
Syntax
-u [paletteType]
Parameter
paletteType:
1:Unevenly weight palette
2:Netscape 216 color (6:6:6) palette
The default is 1.
Comments
Instead of using the Heckbert median cut algorithm to generate a
custom palette for the image, use a palette with entries which are
evenly distributed in the RGB color cube.
The advantage of using a uniform palette is that it's faster than
generating a custom palette. However, this is at the expense of
image quality since the palette isn't generated based on image
content.
Using the Netscape palette will optimize the display of images
on the WWW, both for quality and speed.
When just viewing a true color image on a paletted display a
uniform palette is used.
The -c option can be used in conjunction with -u to specify the
size of the uniform palette; in that case Alchemy will generate a
palette with not more than the specified number of colors (but
not less than 8).
Limitations
The palette size will not necessarily match the specified size for
type 0 uniform palettes, as the actual size must be the product of
three integers. Alchemy picks integers that roughly correspond
to the sensitivity of the human eye to red, green, and blue (30%,
59%, and 11%).
Image Alchemy
319
Related options
-c
-d
Examples
Convert the file many.tga to a gif file using a 256 color uniform
palette:
Specify number of colors
Dither type
alchemy many.tga -g -u
Convert the file many.tga to a gif file with up to 128 colors in a
uniform palette:
alchemy many.tga -g -u -c128
Convert the file many.tga to a gif file using the Netscape palette:
alchemy many.tga -g -u 2
320
Image Alchemy
8
Scaling and Filtering Options
Introduction
These options are all related to image scaling and filtering.
Image Alchemy
321
Center Image
--_
Purpose
The center image option changes the position of the image on the
page. It only affects printer and plotter formats.
Syntax
--_ xSize[units] ySize[units] (underscore)
Parameter
xSize:
The width of the page.
ySize:
The height of the page.
units:
The units each size parameter is in:
p:pixels
i:inches
c:centimeters
units is optional; the default is pixels. The units value
must immediately follow the appropriate size parameter.
Comments
To only center the image in one dimension use 0 for the
dimension that you do not want centered (this is useful when you
have roll paper loaded into your ink jet plotter).
Limitations
Only works for those output options that support centering.
These are Fargo, Epson, Spaceward, Sharp GPB, Imaging
Technology, Pixel Power Collage, Mimaki, Raster Graphics,
Alps, Calcomp, EPS, Fargo, HP PCL, and HP RTL.
If you specify the page size in inches or centimeters you must
also specify a dots per inch value.
Can be used in conjunction with offset image to offset the image
from the center of the page.
Related options
322
Image Alchemy
-_
Offset image
Example
Convert the image temp.gif to an HP PCL file at 300 dpi,
centering it on the page:
alchemy temp.gif -P50 --_ 8.5i 11i -D300
300
Image Alchemy
323
Change Image Resolution
--y
Purpose
Change the image resolution (see the comments section below
for a more detailed explanation).
Syntax
--y[scaleType] dotsPerInchX dotsPerInchY
Parameters
scaleType:
The type of scaling to use:
a:Nearest Neighbor
b:Averaging/Linear Interpolation
c:Lanczos2
d:Lanczos3
scaleType is optional; the default is Nearest Neighbor.
The higher the scale type the higher the quality (and the longer
the processing time).
dotsPerInchX:
The resolution of the image in the X direction, in dots per
inch.
dotsPerInchY:
The resolution of the image in the Y direction, in dots per
inch.
Comments
324
Image Alchemy
Changing the resolution of an image is a combination of
changing the image dpi and the image size (in pixels). For
example, if you print an image which was scanned at 600 dpi on
a 300 dpi laser printer the printed image would ordinarily be
twice the size of the original image. You could use Alchemy to
scale the image a proportional amount (using, in this case,
-X 0.5x -Y 0.5x -D300 300), but this method requires you
to calculate the scale factor (0.5, in this case). Changing the
image resolution does this for you.
Nearest neighbor type scaling is faster than the other types but
introduces aliasing (which reduces image quality). The highest
quality scaling supported is lanczos3, but it takes much longer
than averaging/linear interpolation and usually doesn't produce
significantly better results.
If the dpi information in the input file is missing or incorrect you
can supply a dpi value using the -D option.
Related options
-X
-Y
-D
Examples
Convert a TIFF file that was scanned at 400 dpi to a 300 dpi PCL
file, preserving the size of the image:
Scale in horizontal dimension
Scale in vertical dimension
Specify image resolution
alchemy image.tif -P --y 300 300
Convert a GIF file, which was designed to be viewed on a 72 dpi
monitor to a GIF file which will look the same size on a 100 dpi
monitor, using medium quality scaling (we use the -D 72 72
option because the original GIF file does not contain that
information):
alchemy orig.gif new.gif -g -D 72 72
--yb 100 100
Image Alchemy
325
Convolve Image
-yf
Purpose
Applies any one of a number of convolutions to an image (such
as sharpen or blur).
Syntax
-yf filename
Parameter
filename:
The name of the file which contains the convolution
information
Comments
The various convolutions that ship with Image Alchemy are
found in the samples\ directory. Additional convolutions are
available from our server at http://www.handmade.com/conv.
Examples
Convert the TIFF file image.tif to a TIFF file called new.tif,
sharpening it in the process:
alchemy image.tif new.tif -t -yf
samples\sharpen
Convert the TIFF file image.tif to an HP RTL file for the
NovaJet, scaling it to 2500x2550 and blurring it:
alchemy image.tif --r10 -yf samples\blur
-X2500 -Y2550
326
Image Alchemy
Flip Image
-^
Purpose
Flip image vertically (turn image upside-down).
Syntax
-^ (caret)
Comments
Causes the image to be turned upside-down.
May be combined with the mirror image option (see below) to
cause the image to be rotated 180 degrees.
Related options
--^
Example
Convert the Targa file head.tga to another Targa file called
tail.tga:
Mirror image
alchemy head.tga tail.tga -a -^
Image Alchemy
327
Mirror Image
--^
Purpose
Flip image horizontally (mirror image).
Syntax
--^ (caret)
Comments
Causes the image to be mirrored.
May be combined with the flip image option (see above) to cause
the image to be rotated 180 degrees.
Related options
-^
Example
Convert the Targa file left.tga to another Targa file called
right.tga:
Flip image
alchemy left.tga right.tga -a --^
328
Image Alchemy
Offset Image
-_
Purpose
The offset image option changes the position of the image on the
page. It only effects printer and plotter formats.
Syntax
-_ xOffset[units] yOffset[units] (underscore)
Parameter
xOffset:
The amount to shift the image horizontally.
yOffset:
The amount to shift the image vertically.
units:
The units each size parameter is in:
p:pixels
i:inches
c:centimeters
units is optional; the default is pixels. The units value
must immediately follow the appropriate offset parameter.
Comments
The offset is measured from the upper left corner for Calcomp,
HP PCL, and HP RTL files and from the lower left corner for
EPS files.
Can be used in conjunction with center image to offset the image
from the center of the page.
Limitations
Only works for those output options that support an offset. These
are Fargo, Epson, Spaceward, Sharp GPB, Imaging Technology,
Pixel Power Collage, Mimaki, Raster Graphics, Alps, Calcomp,
EPS, Fargo, HP PCL, and HP RTL.
If you specify the offset in inches or centimeters you must also
specify a dots per inch value.
Related options
--_
Center image
Image Alchemy
329
Example
Convert the image temp.gif to an HP PCL file at 300 dpi,
positioning it on the page 1 inch from the top and 200 pixels
from the left:
alchemy temp.gif -P -_ 200 1i -D300 300
330
Image Alchemy
Only Scale If Too Large
--+
Purpose
Causes Alchemy to only scale images down.
Syntax
-- +
Comments
This command can be useful if you have a variety of images and
want to scale them all to be no larger than a certain size. If this
command is not used all of the images that are smaller will be
scaled up.
Example
Scale all the GIF files in the current directory to be no larger than
640 x 480, preserving aspect ratio and placing the output files in
the directory called new:
alchemy -- *.gif new -Xb640 -Yb480 -+ --+
-g
Image Alchemy
331
Only Scale If Too Small
---+
Purpose
Causes Alchemy to only scale images up.
Syntax
---+
Comments
This command can be useful if you have a variety of images and
want to scale them all to be no smaller than a certain size. If this
command is not used all of the images that are large will be
scaled up.
Example
Scale all the GIF files in the current directory to be no smaller
than 640 x 480, preserving aspect ratio and placing the output
files in the directory called new:
alchemy -- *.gif new -Xb640 -Yb480 -+ ---+
-g
332
Image Alchemy
Preserve Aspect Ratio
-+
Purpose
Preserve aspect ratio when scaling.
Syntax
-+
Comments
If specified with either the -X or -Y option Alchemy will choose
the other dimension to preserve the aspect ratio of the image.
If specified in conjunction with both -X and -Y Alchemy will use
the values specified as a bounding box, reducing one dimension
if necessary to preserve the image aspect ratio.
Limitations
Does not pay attention to the pixel aspect ratio values in the
input image.
Related options
-X
-Y
Examples
Change the size of the image toobig.gif so that the width is 640
and the height is the correct number to preserve the aspect ratio
of the image (the new image will be called new.gif):
Scale image in horizontal dimension
Scale image in vertical dimension
alchemy toobig.gif new -X640 -+ -g
Do the same thing but guarantee that the image will not be larger
than 640 by 480:
alchemy toobig.gif new -X640 -Y480 -+ -g
Do the same thing but use better quality scaling:
alchemy toobig.gif new -Xb640 -Yb480 -+ -g
Image Alchemy
333
Preserve Palette While Scaling
---f
Purpose
Keep the original palette when scaling paletted images.
Syntax
---f
Comments
When using type 'b' or better scaling on paletted images
Alchemy has to convert the image to true color as part of the
scaling process and then convert the image back to paletted
before saving. Ordinarily the best results are obtained if
Alchemy is allowed to choose the final palette based on the
scaled image content. However there may be times when you
wish to preserve the original palette instead of generating a new
one. This option does that.
Examples
Scale the gif file flowers.gif to 320 x 200, preserving the original
palette and aspect ratio:
alchemy flowers.gif new.gif -g ---f -Xb320
-Yb200 -+
Scale all the files ending in .gif to 320 x 200, preserving the
original palette and aspect ratio, placing the new files in the
directory new:
alchemy *.gif new -g ---f -Xb320 -Yb200 -+
334
Image Alchemy
Scale Image in Horizontal Direction
-X
Purpose
Scale the horizontal dimension of the image to the specified size.
Syntax
-X[scaleType] size[units]
Parameters
scaleType:
The type of scaling to use:
a:Nearest Neighbor
b:Averaging/Linear Interpolation
c:Lanczos2
d:Lanczos3
scaleType is optional; the default is Nearest Neighbor.
The higher the scale type the higher the quality (and the longer
the processing time).
size:
The size of the output image in the horizontal dimension.
units:
The units the size parameter is in:
p:pixels
i:inches
c:centimeters
x:factor
units is optional; the default is pixels. The units value
must immediately follow the size parameter.
Comments
Nearest neighbor type scaling is faster than the other types but
introduces aliasing (which reduces image quality). The highest
quality scaling supported is lanczos3, but it takes much longer
than averaging/linear interpolation and usually doesn't produce
significantly better results.
Image Alchemy
335
Specifying a units value of x causes the size parameter to be
treated as a scale factor; e.g. -X 2.5x scales the image by a
factor of 2.5 in the X direction.
If you specify a units for the image size in inches or centimeters
you must specify a dots per inch value for the output image.
Limitations
All of the scale types other than nearest neighbor give much
better results than nearest neighbor scaling, but they are slower
and require a new palette to be generated for paletted output files
(you can force Alchemy to use the original palette by using the -f
option and specifying the original image as the palette file or
using the ---f option).
Related options
-Y
-+
-D
Examples
Scale the input image, test.gif, to 640 by 480 using good quality
scaling, calling the output file test2.gif:
Scale in vertical dimension
Preserve aspect ratio
Specify image resolution
alchemy test.gif test2.gif -Xb640 -Yb480
-g
Scale the input image, big.tga, using fast scaling to an image
which is 320 pixels across and the same aspect ratio as the input
image, calling the output file out.tga:
alchemy big.tga out -X320 -+ -a
Scale the input image, oddsize.gif, using the highest quality
scaling, to an image which is no larger than 640x480, but has the
same aspect ratio as the original image, calling the output image
new.gif:
alchemy oddsize.gif new.gif -Yd480 -Xd640
-+ -g
336
Image Alchemy
Do the same thing as the previous example, but retain the same
palette:
alchemy oddsize.gif new.gif -Yd480 -Xd640
-+ -g -f oddsize.gif
Scale the input image, test.gif, to 2.5 times its original size in
both dimensions using good quality scaling, calling the output
file test2.gif:
alchemy test.gif test2 -Xb2.5x -Yb2.5x -g
Scale the input image, silly.tga, to 1/3 its original size in the X
dimension and 1/4 the original size in the Y dimension, using
low quality scaling in the X dimension and very high quality
scaling in the Y dimension, calling the output file test.tga:
alchemy silly.tga test -a -Xa.33x -Yd0.25x
Scale, using type b scaling, the input image, test.jpg, to 3" x 4.5"
inches writing a 300 dpi HP PCL file:
alchemy test.jpg -P -Xb3i -Yb4.5i
-D300 300
Print all JPEG images in the current directory to an HP LaserJet
at 300 dpi, using dither type 22, scaling the images to fill the
page and preserving aspect ratio (we use 8.16" x 10.66" inches as
the printable area since the printer has a 1/6" border on all four
edges):
alchemy -- *.jpg -P -Xb8.16i -Yb10.66i -+
-D300 300 -d22
Image Alchemy
337
Scale Image in Vertical Direction
-Y
Purpose
Scale the vertical dimension of the image to the specified size.
Syntax
-Y[scaleType] size[units]
Parameters
scaleType:
The type of scaling to use:
a:Nearest Neighbor
b:Averaging/Linear Interpolation
c:Lanczos2
d:Lanczos3
scaleType is optional; the default is Nearest Neighbor.
The higher the scale type the higher the quality (and the longer
the processing time).
size:
The size of the output image in the vertical dimension.
units:
The units the size parameter is in:
p:pixels
i:inches
c:centimeters
x:factor
units is optional; the default is pixels. The units value
must immediately follow the size parameter.
Comments
338
Image Alchemy
Nearest neighbor type scaling is faster than the other types but
introduces aliasing (which reduces image quality). The highest
quality scaling supported is lanczos3, but it takes much longer
than averaging/linear interpolation and usually doesn't produce
significantly better results.
Specifying a units value of x causes the size parameter to be
treated as a scale factor; e.g. -Y 2.5x scales the image by a
factor of 2.5 in the Y direction.
If you specify a units for the image size in inches or centimeters
you must specify a dots per Inch value for the output image.
Limitations
All of the scale types other than nearest neighbor give much
better results than nearest neighbor scaling, but they are slower
and require a new palette to be generated for paletted output files
(you can force Alchemy to use the original palette by using the -f
option and specifying the original file name or using the ---f
option).
Related options
-X
-+
-D
Examples
See the -X option, Scale Image in Horizontal Direction, above,
for examples.
Scale in horizontal dimension
Preserve aspect ratio
Specify image resolution
Image Alchemy
339
Set Horizontal DPI
--X
Purpose
Change the horizontal dpi of an image to a value based on the
specified final image size (e.g. if you have an image which is
100 pixels across and you specify 5 inches this command sets the
horizontal dpi to 20).
Syntax
--X size[units]
Parameters
size:
The size of the output image in the horizontal dimension.
units:
The units the size parameter is in:
i:inches
c:centimeters
units is optional; the default is inches. The units value
must immediately follow the size parameter.
Comments
This command is similar to the -D command, except that the dpi
value is set based on the size specified and the number of pixels
in the image.
To set the vertical dpi use the --Y command (described below).
If you want to preserve the aspect ratio in the image use the -+
command. Using both the --Y and -+ commands will cause the
dimensions given to be treated as a bounding box.
Related options
--Y
-+
Examples
Set the horizontal dpi value so that the image test.tif is converted
to an EPS file that will be 5 inches across when printed:
Set Vertical DPI
Preserve aspect ratio
alchemy test.tif -e --X 5i
340
Image Alchemy
Do the same thing, but preserve the aspect ratio (so the vertical
dpi will be set to the same value as the horizontal dpi):
alchemy test.tif -e --X 5i -+
Do the same thing, but set the vertical size to 6 inches, this will
cause the 5 in x 6 in dimension to be treated as a bounding box:
alchemy test.tif -e --X 5i --Y 6i -+
Image Alchemy
341
Set Vertical DPI
--Y
Purpose
Change the vertical dpi of an image to a value based on the
specified final image size (e.g. if you have an image which is
125 pixels down and you specify 5 inches this command sets the
vertical dpi to 25).
Syntax
--Y size[units]
Parameters
size:
The size of the output image in the vertical dimension.
units:
The units the size parameter is in:
i:inches
c:centimeters
units is optional; the default is inches. The units value
must immediately follow the size parameter.
Comments
This command is similar to the -D command, except that the dpi
value is set based on the size specified and the number of pixels
in the image.
To set the horizontal dpi use the --X command (described
above).
If you want to preserve the aspect ratio in the image use the -+
command. Using both the --Y and -+ commands will cause the
dimensions given to be treated as a bounding box.
Related options
--X
-+
Examples
Set the vertical dpi value so that the image test.tif is converted to
an EPS file that will be 5 inches high when printed:
Set Horizontal DPI
Preserve aspect ratio
alchemy test.tif -e --Y 5i
342
Image Alchemy
Do the same thing, but preserve the aspect ratio (so the
horizontal dpi will be set to the same value as the vertical dpi):
alchemy test.tif -e --Y 5i -+
Do the same thing, but set the horizontal size to 6 inches, this
will cause the 6 in x 5 in dimension to be treated as a bounding
box:
alchemy test.tif -e --X 6i --Y 5i -+
Image Alchemy
343
Specify Image Aspect Ratio
-D
Purpose
Specify aspect ratio for the output image.
Syntax
-D aspectRatio
Parameter
aspectRatio:
The percentage of the width of a pixel to its height.
Comments
This option does not actually change the aspect ratio of the
image, it just adds the aspect ratio value to the output file. This
is important when trying to export the image to software which
expects this information.
The aspect ratio of an image is the ratio of the width of a single
pixel to the height of a single pixel. (So to specify an aspect
ratio of 5:6 use -D 83, since (5/6)*100 is 83).
Alchemy attempts to preserve the aspect ratio value when
converting images whenever one is found in the input image, but
since so few file formats have aspect ratio information this
hardly ever happens.
To write an output image without aspect ratio information
specify an aspect ratio of 0 (zero).
This option also has an effect when using the MS-DOS version
of Image Alchemy and displaying images.
Limitations
It is not possible to specify both an aspect ratio and a dots per
inch value for an image. This is because specifying a dots per
inch value implies an aspect ratio.
Many file types do not have an aspect ratio value; specifying one
when writing such a file type will have no effect.
344
Image Alchemy
Related options
-D
Examples
You are converting a 640x350 IBM EGA PCX image called
ega.pcx (which has an aspect ratio of 35:48) to a TIFF image and
you want the TIFF image to have the correct aspect ratio value
(so that an intelligent TIFF reader will correctly interpret the
image). Note that the value of 73 is (35/48)*100:
Specify resolution
alchemy ega.pcx -D 73 -t
The resulting image will still be 640x350, but the TIFF file now
contains the information that the pixels are not square (and in
fact are 35:48).
If you had instead wanted to convert the image to a 640 by 480
image (with square pixels) you could have used:
alchemy ega.pcx -Y480 -D100 -t
The -D option isn't really needed here, since any software
reading the TIFF file will assume that if there is no aspect ratio
specified the pixels are square.
Image Alchemy
345
Specify Image Resolution
-D
Purpose
Specify image resolution in dots per inch for the output image.
Syntax
-D dotsPerInchX dotsPerInchY
Parameters
dotsPerInchX:
The resolution of the image in the X direction in dots per
inch.
dotsPerInchY:
The resolution of the image in the Y direction in dots per
inch.
Comments
You must specify both dotsPerInchX and dotsPerInchY, even if
they are the same.
When converting from a raster file this command does not
actually change the resolution of the image, it just adds the
resolution fields to the output image. This is important when
trying to import the image into software which expects this
information. For example, Microsoft Word is much more likely
to give the expected results when importing a TIFF image for
printing on a laser printer if the image has a resolution of
300 dpi.
Reasonable values to use for dotsPerInch include 72 (the
resolution of a 13 inch monitor displaying 640x480) and 300 (the
resolution of many laser and inkjet printers).
To write an image without resolution information specify a
resolution of 0 0 (zero zero).
Alchemy will preserve this information when converting files
whenever possible.
346
Image Alchemy
Many file types do not have a resolution value, specifying one
when writing such a file will only effect raster scaling functions
when using the inches or centimeter output option.
This option also effects the MS-DOS version of Alchemy when
displaying images.
Limitations
It is not possible to specify both an aspect ratio and a dots per
inch value for an image. This is because specifying a dots per
inch value automatically implies an aspect ratio.
This option is ignored when writing a file format which does not
have image resolution.
Many file formats that are associated with output devices, such
as HP PCL or ALPS, only support certain resolutions (for
example an HP PCL file cannot have a resolution of 500 DPI).
In these cases writing a file with an unsupported resolution will
give unpredictable results.
Related options
-D
Examples
Convert the Targa file input.tga to a TIFF file called output.tif,
specifying that the resolution of the image in the TIFF file is
300 dpi:
Specify aspect ratio
alchemy input.tga output -t -D 300 300
Convert the file scan.tif to a DCX variation of a PCX file,
scaling the output image to 1500 by 750 (preserving the image's
aspect ratio) and setting the resolution to 200 dpi by 100 dpi (this
is useful if you will be faxing the image using a fax card):
alchemy scan.tif -p1 -X1500 -Y750 -+
-D 200 100
Image Alchemy
347
348
Image Alchemy
9
Viewing Options
MS-DOS Only
Introduction
Image Alchemy is primarily designed as an image file
conversion utility but it can also display images on properly
equipped MS-DOS based computers.
Using wildcards or multiple file names allows you to display a
series of images. After each image is displayed, pressing the
space bar will skip to the next image. After the last image is
displayed pressing the space bar will return to DOS. Pressing
the space bar while an image is being displayed will stop the
display of the image (see the Actions during viewing section
below for other things you can do while displaying images).
Display
hardware
Depending on the hardware you have installed, Alchemy
supports the following display resolutions: 640x480, 800x600,
1024x768, and 1280x1024.
Also depending on the hardware, Alchemy supports the
following display depths: 8 bit, 15 bit, 16 bit, and 24 bit (for
256, 32768, 65536, and 16,777,216 colors, respectively).
Image Alchemy
349
In addition, Alchemy supports the standard VGA mode of
320x200x256, the quasi-standard VGA mode of 360x480x256,
and the common SVGA mode of 640x400x256.
When instructed to display an image, Alchemy automatically
detects which type of display board you have installed. If there
are multiple display boards installed in your computer then
Alchemy will display images on the first board it finds, searching
in the following order:
Western Digital based 8514/A board
AI compatible 8514/A board
XGA board
VESA compatible SVGA board
Other SVGA board
350
Western Digital
8514/A
8514/A boards which are equipped with the Western Digital
chipset are automatically recognized by Alchemy. Depending on
the model board and the amount of memory installed,
640x480x256, 1024x768x256, and 1280x1024x256 modes are
available.
AI 8514/A
Alchemy requires AI to be installed to use 8514/A displays
which aren't based on the Western Digital chipset. In addition to
8514/A boards Alchemy should also be able to display on other
AI compatible boards, such as 340x0 based boards; however this
has not been tested. For AI based boards the only resolution
available is 1024x768x256.
XGA
Alchemy automatically detects the presence of an XGA or
XGA2 board and will use it when displaying images. The
display modes available for XGA boards are 640x480x256,
1024x768x256, and 640x480x65536 (the actual modes available
vary with the model XGA board installed and the amount of
memory available).
Image Alchemy
VESA
The best support for SVGA boards is available for VESA
compatible SVGA boards. VESA is an SVGA standard which
allows application software, such as Image Alchemy, to
interrogate the SVGA board to determine which display modes
are available.
Some SVGA boards have VESA support built directly into the
BIOS found on the board; in this case Alchemy will
automatically detect the VESA driver and use it. Other SVGA
boards require a software driver to be installed; these drivers are
usually found on the floppy disks which came with your SVGA
board (typically the driver is called VESA.EXE).
If you can't find a driver on the diskettes and the documentation
does not explicitly mention that VESA support is built into the
BIOS you might call the manufacturer to see if a VESA driver is
available.
VESA drivers are currently available for SVGA boards using
chipsets from Cirrus Logic, ATI Technologies, Chips and
Technologies, Everex Systems, Genoa Systems, Paradise Logic,
Sigma Designs, STB Systems, Tecmar, Headland Technology
(Video 7), Orchid Technology, Appian Technology, Trident
Microsystems, and Oak Technology.
Other SVGA
If Alchemy cannot find a VESA SVGA board it attempts to
determine what kind of SVGA board is present. If Alchemy can
identify the type of SVGA board installed, either a 640x400x256
or 640x480x256 mode will be available.
SVGA boards which are known to work with Alchemy include
Paradise, Tseng Labs 3000 & 4000, Video 7, Trident, and
Everex chipset based SVGA Boards.
VGA
The 320x200x256 mode is a standard IBM VGA mode and will
work on all VGA boards. The 360x480x256 is a non-standard
VGA mode which should also work on all VGA boards.
Image Alchemy
351
Display
Resolution
Unless you explicitly specify a resolution after the view
command, Alchemy automatically uses the lowest resolution
mode which will display the entire picture.
Alchemy can be told to not use above a particular resolution by
setting the environment variable alchemy to the largest
horizontal resolution to be used.
For example, if your monitor can only display up to 800x600
pixels, but your VESA compatible VGA board can display up to
1024x768 pixels. You would set alchemy=800, to insure that
Alchemy won't try to use the 1024x768 mode. You may want to
add this command to your autoexec.bat file, so that it is
automatically set when your computer is turned on.
When an image is displayed that is smaller than the screen
resolution the image will be centered in the display and the area
around the image will be set to the darkest color in the image
(which is usually black).
Wrong RGB
order
There seem to be a number of SVGA boards that have the
incorrect RGB order information in their VESA driver. You can
correct for this problem while viewing by the using the swap
RGB option (--n), see chapter 8 for more information.
Actions during
viewing
While images are being viewed there are several actions that you
can perform. These include: skipping to the next image (if you
are using wildcards to view multiple images), marking the
current image, and deleting the current image file. These actions
can be useful if you are viewing a large number of images (such
as you might have downloaded from a bulletin board).
352
Image Alchemy
These keys may be pressed either while the image is being
displayed, or afterward, while Alchemy is waiting for a
keystroke to go on to the next image (pressing any other key at
that point will skip to the next image):
Key
q
s
m
alt-d
Action
Quit viewing
Skip to next image
Mark the image
Delete the image
A list of images that were marked is displayed after Alchemy
finishes. If you redirect the output from Alchemy to a file, the
file will contain a list of the images that were marked. This file
can then be used with Alchemy as a response file.
For example, to view all of the GIF files in the current directory,
redirecting the resulting list of any files that are marked to a file
called list:
alchemy *.gif -v >list
If you then what to convert all of the marked files to TIFF files:
alchemy -- @list -t
See Chapter 2 for more information on response files.
Disabling actions
You can disable these keystrokes by setting the Alchemy
environment variable to k (e.g. set alchemy=k at the DOS
prompt).
Image Alchemy
353
Offset View
-_
Purpose
The offset view option changes the position of the image on the
screen during viewing.
Syntax
-_ xOffset yOffset (underscore)
Parameter
xOffset:
Number of pixels to shift the image horizontally.
yOffset:
Number of pixels to shift the image vertically.
Examples
View moving the image up 100 pixels:
alchemy madonna.gif -v -_ 0 -100
View moving the image to the right 200 pixels and down 50
pixels:
alchemy madonna.gif -v -_ 200 50
354
Image Alchemy
Slide Show
-~
Purpose
Automatically change from one image to the next when
displaying images.
Syntax
- ~ [delay]
Parameters
delay:
Delay between images in seconds (for example, 0.5 is 1/2
second). Negative numbers indicate that the slideshow repeats.
The default is 0, no delay between images.
Comments
The slide show mode command does not reset the SVGA card
between images, this has been found to work on most SVGA
cards. Use -- ~ to force a reset between images (robust slide
show mode). Robust slide show mode causes some monitors to
have to resync between images.
Examples
Display the images flower.gif, puppy.gif, and kitten.gif in a
slideshow, repeating the loop and pausing 5 seconds between
images:
alchemy -- flower.gif puppy.gif kitten.gif
-v -~ -5.0
Do the same thing, but use robust slide show mode:
alchemy -- flower.gif puppy.gif kitten.gif
-v --~ -5.0
Do the same thing, but with no screen clear:
alchemy -- flower.gif puppy.gif kitten.gif
-v ---~ -5.0
Image Alchemy
355
View Image
-v
Purpose
View file.
Syntax
-v horizontalResolution
Parameter
horizontalResolution:
320:Use 320x200 mode
360:Use 360x480 mode
640:Use 640x480 mode
800:Use 800x600 mode
1024:Use 1024x768 mode
1280:Use 1280x1024 mode
Comments
If displaying on a Western Digital chipset 8514/A or VESA
compatible VGA board, an optional parameter may follow the -v
command. This parameter specifies horizontal resolution and
may be 320, 360, 640, 800, 1024, or 1280. The default is to use
the lowest resolution which can fit the entire image. You may
set the environment variable alchemy to indicate the highest
horizontal resolution you want Alchemy to use when displaying
images (for example, set alchemy=800 to will cause Alchemy
to use only 640x480 and 800x600 resolutions when displaying
images).
If the image is true color, a uniform palette will be used and the
image will be dithered (dithering may be disabled by use of the
-d option, see above). See Appendix B, Color and Dithering, for
more information.
Related options
-V
Example
View the image madonna.gif:
Reduce image to fit display
alchemy madonna.gif -v
356
Image Alchemy
View Image in True Color Mode
--v
Purpose
View file using 15, 16, or 24 bits/pixel mode. This allows true
color images to be viewed without dithering to a uniform palette.
Syntax
--v horizontalResolution
Parameter
horizontalResolution:
640:Use 640x480 mode
800:Use 800x600 mode
1024:Use 1024x768 mode
1280:Use 1280x1024 mode
Comments
Requires a VESA compatible SVGA board or a Tseng 4000, S3,
ATI, Genoa, Speedstar24, or a Speedstar24X with an appropriate
DAC and at least 1 megabyte of memory on the SVGA board.
Resolutions above 640x480 are only supported by SVGA boards
with a VESA driver. 640x480 mode is supported for various
SVGA boards with sufficient memory and the correct DAC.
Alchemy automatically picks the highest color resolution which
will fit the image you are trying to view. For example, if your
SVGA board supports 800x600x15 bit and 640x480x24 bit,
Alchemy will use the 640x480x24 bit mode when viewing
images which are 640x480 and smaller and the 800x600 mode
when viewing larger images. You can of course override this by
giving Alchemy a resolution parameter after the view command
(for example, --v 640, to view in 640x480x24 bit mode). You
may also set the environment variable alchemy to indicate the
highest horizontal resolution you want Alchemy to use when
displaying images (for example, set alchemy=800 to will
cause Alchemy to use only 640x480 and 800x600 resolutions
when displaying images).
Image Alchemy
357
If the image being displayed is a 24 bits per pixel true color
image, and the display mode is 15 or 16 bits per pixel, the image
will be dithered (dithering may be disabled by use of the -d
option, see above).
Example
View madonna.tga:
alchemy madonna.tga --v
358
Image Alchemy
View Scaled Image
-V
Purpose
View image while scaling image to fit on monitor and correcting
aspect ratio.
Syntax
-V horizontalResolution
Parameter
horizontalResolution:
320:Use 320x200 mode
360:Use 360x480 mode
640:Use 640x480 mode
800:Use 800x600 mode
1024:Use 1024x768 mode
1280:Use 1280x1024 mode
Comments
If displaying on a Western Digital chipset 8514/A or VESA
compatible VGA board, an optional parameter may follow the -v
command. This parameter specifies horizontal resolution and
may be 320, 360, 640, 800, 1024, or 1280. The default is to use
the lowest resolution which can fit the entire image. You may
set the environment variable alchemy to indicate the highest
horizontal resolution you want Alchemy to use when displaying
images (for example, set alchemy=800 to will cause Alchemy
to use only 640x480 and 800x600 resolutions when displaying
images).
This command will scale the image and correct the aspect ratio
of the image by removing rows and/or columns from the image.
Note that this option can also be useful for displaying images
which are not larger than the screen but which have an aspect
ratio different than the display.
Limitations
Alchemy assumes that the aspect ratio of a display pixel is 1:1
when in 640x480, 800x600, 1024x768, and 1280x1024 modes,
5:6 when in 640x400 mode and 320x200 modes, and 16:9 in
360x480 mode.
Image Alchemy
359
If not otherwise specified by using the -D option or in the file,
Alchemy assumes that the aspect ratio of pixels in 640x400
images and 320x200 images is 5:6 and the aspect ratio of pixels
in 640x350 images is 35:48. You can override any of these
assumptions with the -D option.
Don't worry if this is confusing; in practice Alchemy deals with
everything automatically if you use the -V option. However,
there is a problem with displaying 320x400 IFF files; see
Appendix A, Answers to Frequently Asked Questions, for more
information.
Related options
-D
-v
Example
View madonna.gif:
Specify image resolution
View image
alchemy madonna.gif -V
360
Image Alchemy
View Scaled Image in True Color Mode
--V
Purpose
View image in 15 bit mode while scaling image to fit on monitor
and correcting aspect ratio.
Syntax
--V horizontalResolution
Parameter
horizontalResolution:
640:Use 640x480 mode
800:Use 800x600 mode
1024:Use 1024x768 mode
1280:Use 1280x1024 mode
Comments
Requires a Tseng 4000, S3, ATI, Genoa, or Speedstar24 or an
appropriate VESA compatible SVGA board with an appropriate
DAC and 1 megabyte of memory on the SVGA board.
Resolutions above 640x480 are only supported by SVGA boards
with a VESA driver. 640x480 mode is supported for various
SVGA boards with sufficient memory and the correct DAC.
Alchemy automatically picks the highest color resolution which
will fit the image you are trying to view. For example, if your
SVGA board supports 800x600x15 bit and 640x480x24 bit,
Alchemy will use the 640x480x24 bit mode when viewing
images which are 640x480 and smaller and the 800x600 mode
when viewing larger images. You can of course override this by
giving Alchemy a resolution parameter after the view command
(for example, --v 640, to view in 640x480x24 bit mode). You
may also set the environment variable alchemy to indicate the
highest horizontal resolution you want Alchemy to use when
displaying images (for example, set alchemy=800 will cause
Alchemy to use only 640x480 and 800x600 resolutions when
displaying images).
Image Alchemy
361
If the image being displayed is a 24 bits per pixel true color
image, and the display mode is 15 or 16 bits per pixel, the image
will be dithered (dithering may be disabled by use of the -d
option, see above).
This command will scale the image and correct the aspect ratio
of the image by removing rows and/or columns from the image.
Note that this option can also be useful for displaying images
which are not larger than the screen but which have an aspect
ratio different than the display.
Limitations
The same limitations as for scaled 8 bit viewing apply (see
above).
Related options
-D
--v
Example
View big.jpg in true color 640x480 mode, reducing the image to
fit on the screen:
Specify image resolution
View image in True color mode
alchemy big.jpg --V 640
362
Image Alchemy
A
Answers to Frequently Asked Questions
Question
Answer
Question
Answer
How do I perform Scale to Gray?
Scale to Gray is used when the incoming image is black and
white and it is being scaled to a lower resolution. By converting
the black and white data to grayscale while scaling the resulting
image will maintain readability. For example, if you are
displaying a received fax document full size on a monitor. To
perform scale to gray use the following options: -b -c256 in
addition to the scaling options, which must use type b or better
scaling. For example: alchemy fax.tif -b -c256 -Xb800
-Yb600 -+ -g will convert the fax.tif file into a grayscale GIF
file. You might also want to use: alchemy *.tif -b -c256
--yb 72 72 -g, this will convert the .tif files in the current
directory to grayscale GIF files at 72 dpi.
Why can't my paint package read the Targa file I wrote with
Image Alchemy?
Some software which reads Targa files cannot handle
compressed files. In addition, some software can read true color
Targa files, but cannot read paletted or gray-scale files. Image
Alchemy can be forced to write out a true color file by using the
-24 option.
Image Alchemy
363
Question
Answer
I keep getting "Out of Memory trying to …" messages.
Help!
Image Alchemy is running out of memory. If you are running on
an IBM PC you can use alch386 or alchlong instead of
alchemy to do the conversion (if you were running alch386 or
alchlong when you received this error please contact us).
If you are running one of the UNIX versions of Alchemy this
message indicates that you are running out of swap space.
Contact your system administrator to find out how you can
increase the size of your swap space.
Question
Answer
How do I capture screens when running Microsoft Windows
(or MacOS)?
To capture the current screen when running Microsoft Windows
press PRINT SCREEN. This copies a bitmap of the entire
screen onto the clipboard. Then open the Paintbrush program
which comes with Windows and select Paste to copy the image
from the clipboard. The image may now be saved as a BMP file
which Alchemy can convert.
Under MacOS press Command-Shift-3. This will create a file on
your hard disk called Picture n, where n is a number which
starts at 1 and increases by 1 every time you capture another
screen. This file can be converted by Alchemy.
364
Image Alchemy
Question
Answer
Question
Answer
When I view a JPEG compressed image on my VGA board it
looks much worse than when I first convert it to a GIF file
and then view it. Why is this?
To save time Alchemy automatically uses a uniform palette
when you are just viewing a true color image. When converting
to a different file format Alchemy uses Heckbert quantization to
generate a palette. The difference in image quality is the
difference between using a uniform palette and an optimum
palette. See Appendix B, Color and Dithering, for more
information on palette generation.
I'm using Alchemy to print an image. The print out is much
darker than the original image. Why is this?
Many hard copy output devices, including laser printers, ink jet
printers, and ink jet plotters, have a property known as dot gain.
Dot gain causes more toner or ink to be placed on the paper than
is expected. This is caused by the fact that the individual pixels
being output are round, and in order to completely fill in a square
grid with round pixels the round pixels have to be larger than the
square (in fact the circle has π/2 times as much area as the
square). In this example of a single pixel the black area
represents the "extra" toner or ink that is being printed:
You can compensate for dot gain by adjusting the gamma of the
image during the conversion process. The exact gamma value
will depend on the output device, but in general, specifying an
output gamma of 2.0 produces good results (-Gi 1.0 -Go 2.0
on the command line will accomplish this). (If you are using a
UCR file you can also compensate for dot gain by using a UCR
file with a gamma of 2.0.)
Image Alchemy
365
It is not as necessary to compensate for dot gain when printing at
a resolution less than the printer's maximum resolution. This is
because the output device automatically groups individual pixels
together to make the output pixel, which reduces the amount of
extra toner or ink being deposited on the page, as in this example
of printing a 150 dpi pixel on a 300 dpi device:
The same is true if you are using dithering types 20 and 22 (since
those dithering types cluster the dots).
Question
Answer
Why can't my favorite desktop publishing package read the
TIFF file I wrote with Image Alchemy?
TIFF is an extremely versatile standard; it can handle anything
from 1 bit images to full color images with an alpha channel.
Also, TIFF allows many different types of compression.
Unfortunately this versatility means that it's difficult for a single
piece of software to be able to read in every valid TIFF file.
If the software specifies the classes of TIFF it can read, you can
force Alchemy to write out a specific TIFF class by using the
following options:
class B:-8 -b -c2 -t2
class G:-8 -b -t1
class P:-8 -t1
class R:-24 -t1
Class B is black and white, Class G is gray-scale, Class P is
paletted, and Class R is true color.
366
Image Alchemy
If the supported classes are not specified, experiment with
various combinations of -24, -8, -b, and -c. In this case it is
usually best to use no compression (-t0) while experimenting
with the other options, as many TIFF readers have difficulty with
compressed files. When you find a set of options that work, then
you can try various compression modes to save space. Be aware
that using the -b option will force the output file to be gray-scale
and you will lose the color information in the file (most desktop
publishing programs only have support for gray-scale TIFF
files).
You may also have to use the -Dn n option to specify the
resolution of the image (this is especially true when converting
from a file format which does not have a value for image
resolution). You can generally tell if this is necessary because
the program you are using to read in the TIFF file will claim that
the file is unreasonably large or small. Usually, if you are using
a 300 dpi Laser Printer you want to make the TIFF file 300 dpi x
300 dpi (-D 300 300).
If you would like further information specific to using Image
Alchemy with your word processor or desktop publishing
program please contact us; we will be maintaining a list of how
to make Alchemy work with other software packages. Similarly
if you figure out how to import files into a specific package let us
know and we will add your tips to our documentation.
Image Alchemy
367
Question
Answer
When I convert a GIF file to a JPEG file and then back to a
GIF file the final GIF file is twice the size of the original.
Why is this?
There are two things which might cause this to happen:
JPEG compression doesn't really work well for images which
have large areas which are all the same color. The reason for
this is that JPEG is a lossy compression technique. Therefore
you are not going to get back exactly the same values for each
pixel in an area that was one solid color before being JPEG
compressed. But GIF compression works much better on areas
which are one solid color, so, when you GIF compress these
areas, they are quite a bit larger than they were before. The
solution to this problem is to use HSI JPEG compression, which
automatically detects large areas of solid colors and does not
JPEG compress them. The problem with HSI JPEG compression
is that it isn't compatible with JPEG or JFIF.
The other possibility is that the input GIF file didn't have very
many different colors. When you converted it to a JPEG file the
number of colors in the file was lost (JPEG gray-scale files
always use 256 shades, and JPEG color files are always true
color). When the JPEG file was converted back to a GIF file
Alchemy assumed you wanted 256 colors in the file, and a 256
color GIF file is bigger than a 16 color GIF file. To prevent this
you can use a -c32 (or however many colors the original had)
option in the command line; this forces Image Alchemy to use
that many colors for the output file.
368
Image Alchemy
Question
Answer
I am using Alchemy to display a 320x400 IFF image created
by an Amiga. When I use just the -v option the image comes
out tall and skinny. When I use the -V option, which is
supposed to correct the aspect ratio, things get worse instead
of better (the image is even skinnier). What's going on?
As near as we can tell, some Amiga software has a different idea
of what aspect ratio is than the rest of the world.
For displays, aspect ratio is defined as the ratio of the width of a
single pixel to the height of a single pixel. So if you have square
pixels (which you do on a standard monitor in 640x480 mode)
the aspect ratio is 1 to 1 (commonly written as 1:1). When you
change display modes the height and width of the total display
area does not change; what is changing is the width and height of
each pixel, which means that the aspect ratio changes. For
example, a 640x400 display has an aspect ratio of 1:1.2 (that
means each pixel is 1.2 times as tall as it is wide (which makes
sense since 480/400 equals 1.2)). A 640x200 display has an
aspect ratio of 1:2.4.
Now this is where it gets interesting in terms of IFF files. The
aspect ratio number stored in Amiga IFF files for 320x400
images is 1:1.1, meaning pixels are 1.1 times as tall as they are
wide, so therefore the actual image should be the equivalent size
of a 320x440 image with square pixels. And this is what
Alchemy will attempt to display when you use the -V option
(Alchemy never makes any dimension larger, so the actual image
Alchemy displays is 291x400, which is the same ratio as
320x440). However this is obviously wrong, as you can tell
when you examine an image. As near as we can tell the correct
aspect ratio of these images is 5:3 (the math we used to come up
with this number is 640/320:480/400). And if you tell Alchemy
to override the aspect ratio by using a -D 167 option (167
because 5/3*100 is 166.6666) the image displays correctly. Why
Amigas create images which claim they are 1:1.1 remains a
mystery.
Image Alchemy
369
Question
Answer
I told Alchemy to convert a PCX file to an 8 bit GIF file
(using the -8 option). Yet when I get statistics on the file
(using -x) Alchemy reports the file only has 16 colors.
Alchemy will always store the file using the smallest bits-perpixel allowable for the given image (this results in the smallest
possible file). In this case the input file only had 16 colors in it.
Things get more unpredictable with formats such as Sun Raster
(which requires 1 bit files to be black and white) and SGI (which
requires 8 bit files to be gray-scale). In these cases Alchemy will
always do the best it can (giving you a warning message if it
does something which may surprise you later).
Question
Answer
370
Image Alchemy
I've converted a Mac PICT file to a GIF file, but the GIF file
is missing some or all of the information that was in the
PICT file. What happened to it?
PICT files are a combination of drawing commands (such as
lines, rectangles, and circles) and raster areas (called pixMaps).
Alchemy can only read the raster portions of the files. Programs
such as MacDraw and MacDraft write out files with drawing
commands, programs such as MacPaint write out files which are
entirely raster areas (pixMaps), and some programs, such as
SuperPaint can write out files which are either, or a combination
of both. If you are using such a program check the
documentation on how to write out files in "paint" mode.
Question
Answer
Question
Answer
Why can't Image Alchemy read in JPEG files produced by
Kodak's ColorSqueeze (or Sun's VFCtool)?
Some software packages support an obsolete version of JPEG.
Image Alchemy supports the JFIF format and should work with
any other JPEG software which also claims JFIF compatibility.
If other software you are using claims to support the JFIF format
and you are having trouble, please contact us. If the other
software does not support JFIF, contact the manufacturer and tell
them they should send you an update which does (you can tell
them to contact us if they need a copy of the JFIF standard).
I've converted an HP PCL file to a GIF file, but the GIF file
is missing some or all of the information that was in the PCL
file. What happened to it?
PCL files have the same problem as PICT files (see above); they
are a combination of text, fonts, drawing commands (such as
lines and rectangles), and graphics (also called rasters). Alchemy
can only convert the raster areas in PCL files. Unfortunately
there isn't any general way to preserve the rest of the data with
Alchemy.
If you are using Windows and printing using TrueType fonts you
can select the Print TrueType As Graphics check box in the
printer setup dialog box under the Options choice. This will
cause Windows to print all information as graphics which
Alchemy can then successfully convert.
Image Alchemy
371
Question
Answer
372
Image Alchemy
When I convert a 32 bit Targa file to a GIF file and then to a
JPEG file it doesn't look nearly as good as if I convert the
Targa File directly to the JPEG file. What can I do to
maintain high quality in JPEG compressed files?
When the Targa file was converted to the GIF file Image
Alchemy had to reduce the number of colors in the file (the
original Targa File had up to 16 million colors, GIF files are
limited to 256 colors). This step is known as color quantization
(Image Alchemy uses the Heckbert Median Cut method for
quantization; see Appendix B, Color and Dithering, for more
information). The difficulty with color quantization is that it
leaves artifacts known as color banding. To reduce this
phenomenon Image Alchemy dithers the image (you can see the
effect of color banding by turning off dithering by using the -d0
option). Unfortunately a dithered image does not JPEG
compress very well (dithering adds a lot of high-frequency
information to an image; JPEG compression attempts to remove
much of that information). In addition JPEG images are always
continuous color images, so when the JPEG file is decompressed
it has to be color quantized and dithered again. Dithering a
previously dithered image reduces the quality even more. The
solution is to use the best starting quality you can for JPEG
compression, ideally a continuous tone image. The compressed
image size will be smaller than if you had started with a paletted
image and the quality will be better.
Question
Answer
I converted a PCX file with 16 colors to a 16 shades of gray
TIFF file using the -b and -t options. The 16 color PCX file
had some shades of gray in it which were changed in the
TIFF file. How can I prevent this?
The problem is that gray-scale TIFF files have a uniformly
spaced gray palette. If you create a TIFF file with 16 shades of
gray it will have the following shades in it: 0, 17, 34, 51, 68, 85,
102, 119, 136, 153, 170, 187, 204, 221, 238, and 255. However
the 16 color PCX file you started with probably didn't have those
exact colors in it (for example, PCX files written out by
Windows 3.0 Paint have shades of gray which correspond to 0,
128, 192, and 255). So Alchemy did the best it could and
matched the input colors to the output colors (and depending on
the other options that you specified may also have dithered the
image).
The solution is to tell Alchemy to write out a 256 color grayscale TIFF file (which you do by adding a -c256 to the -b and -t
options). This file still has a uniform gray palette; but that
palette now contains every color: 0, 1, 2, 3, …, 255. Therefore
Alchemy can map, for example, the colors 128 and 192 to their
exact match. This does have the disadvantage of making the
resulting 256 color TIFF file twice as large as the 16 color TIFF
file, but this is the only way to guarantee that Alchemy can find
an exact match for all the shades of gray in the input file.
Image Alchemy
373
Question
Answer
How do I get a copy of the JPEG standard?
The JPEG standard is an ISO/IEC standard and you should
contact your local ISO/IEC office to get a copy. The document
number is ISO IS 10918-1.
In the United States you can contact ANSI at:
ANSI
11 West 42nd St.
New York, NY 10036
(212) 642-4900
Question
Answer
374
Image Alchemy
Do you give multiple copy discounts? Do you have site
licenses? Are you interested in licensing the source code?
Yes. Yes. Yes. Contact us for more information.
B
Color and Dithering
Paletted vs.
true color
Color images are usually stored in one of two ways: as an array
of direct color values (usually red, green, and blue) (referred to
as a true color file in this document) or as an array of indices into
a color-map which contains red, green, and blue color values
(referred to as a paletted file in this document).
Paletted images exist because they take less memory, so the
hardware to display them is less expensive. The dominance of
paletted hardware is changing as the price of memory and the
processing power it takes to update large amounts of memory at
a reasonable speed drops.
Until true color graphics devices become the norm, there is a
need to convert images from true color to paletted. This
conversion is done in two steps: the first is to generate a palette
for use by the image; the second is to map the image to the new
palette.
Color cube
The color model generally used by computers is a cube with red,
green, and blue as the axes (this is known as a color cube or
RGB cube). Each point inside the cube is a different color,
depending on the amount of red, green, and blue used. In nature
each of the three axes is nearly continuous, therefore there are a
nearly infinite number of colors available. Computer hardware
and software represent colors in a discrete fashion.
Image Alchemy
375
For true color displays or file formats the number of discrete
positions along each axis of the color cube gives the color
resolution of the output device. For example, a Targa 24 board
for an IBM PC has 8 bits per red, green, and blue channel for a
total of 24 bits (or 256 discrete shades of each color, for a total of
16 million colors (256x256x256)). This is also the color
resolution of most true color file formats.
A 15 bit SVGA boards has 5 bits per channel, for a total of
32x32x32 different colors (32,768). This is the same color
resolution as a Targa 15 file.
A paletted display or image file has the same color resolution
limit as a true color display or image file, but in addition there is
a limit on how many points inside the cube can be used at the
same time. An 8 bit file format, such as GIF, allows 256
different colors out of 16 million. A non-true-color SVGA board
also only allows 256 different colors at one time.
So, converting a true color file to a paletted file involves
reducing the number of occupied points in the color cube. There
are several ways this can be done.
Generating a
palette
Uniform palettes
376
Image Alchemy
Image Alchemy supports two methods of generating a palette:
The simplest and fastest method is to use a palette containing
colors which are uniformly distributed in the RGB cube, this is
referred to as a uniform palette. This has the advantage that it's
fast and the same palette can be used for any image; the primary
disadvantage is that most images don't contain colors from
everywhere in the RGB cube, so palette entries are wasted
representing colors that aren't needed for the particular image
being converted.
Optimal palettes
Assigning colors
To generate a palette which is better for representing a particular
image, Image Alchemy supports Heckbert's median cut
algorithm. This algorithm first builds a three dimensional table
(a histogram cube) indicating how popular any given color in the
RGB cube is in the image being converted. It then proceeds to
subdivide this histogram cube (by dividing boxes in half) until it
has created as many boxes as there are palette entries. The
default Heckbert method bases this decision as to where to
divide a box is based on the distribution of colors within the box.
This will create boxes which have approximately equal
popularity in the image. Using the -zh 1 option changes the
algorithm to instead divide the boxes in half, creating boxes
which are therefore equal in size.
Palette entries are then assigned to represent each box using one
of several different methods. You can change the method used
to select a color to represent each box by using the -zs option
(see chapter 6, for more information).
The default method is to use the mean of all the colors in the
box. However for some images slightly better results can be
obtained by using the center of the box (without regard to where
the pixels are in the box).
For images being reduced to a very small number of colors (less
than 16) better results can be obtained by using a corner of the
box (the boxes tend to be large when reducing an image to a
small number of colors; therefore picking colors near the centers
of the boxes will give you muddy colors, while using corners of
the boxes will give you saturated colors). And having saturated
colors allows the dithering algorithms to generate better looking
images.
There are other methods of generating a palette from an image,
but Heckbert's algorithm is generally regarded as the best
tradeoff between speed and quality.
Image Alchemy
377
Mapping the
image to the
palette
The next step is to map the image to the new palette; this is
where dithering becomes important.
No dithering
The simplest approach is to map every color in the original
image to the palette entry which is closest to it (this is what
Image Alchemy does if you specify no dithering).
However, since the palette entries generally represent several
different colors in the original image, this results in color
banding where areas of smooth color changes in the original
become areas of one solid color in the paletted version.
378
Advantages of
dithering
This can be alleviated by dithering the image data such that any
given pixel might not be mapped to its closest palette entry, but
the average over some area of the image will be closer to the
correct color than it would otherwise be. Image Alchemy uses a
class of algorithms called "error-diffusion" to do dithering.
Error diffusion
dithering
These algorithms work by using the closest palette entry to a
color and then distributing the error (the difference between the
desired color and the chosen palette entry) to the nearby pixels.
This process is repeated for every pixel in the image, using the
color values which have been modified due to the error from
previous pixels. The different dithering algorithms spread the
error over a different area or use a different weighting within the
same area.
Serpentine raster
Error diffusion can be done as a normal raster (left to right, top
to bottom) or as a serpentine raster (alternating left to right and
right to left, top to bottom). A serpentine raster tends to break up
visible patterns introduced by dithering.
Noise
Random noise can also be added to help break up visible patterns
in the resulting image.
Image Alchemy
Further
information
For more information on Heckbert's median cut and dithering see
the appropriate reference listed in the References section below.
Image Alchemy
379
380
Image Alchemy
C
What is JPEG Compression?
Who are those
JPEG guys?
JPEG stands for the "Joint Photographic Experts Group". This is
a group of experts who defined a standard compression scheme
for still images, commonly called JPEG Compression. The
JPEG compression standard is an ISO standard.
Overview
JPEG Compression consists of a series of complex mathematical
operations; including: color space conversion, discrete cosine
transforms, quantization, and entropy coding. After these steps
you end up with an image which takes fewer bits to store than
you started out with.
However, when you decompress a JPEG compressed image you
end up with an image that is not quite the same as the original
(which is why JPEG Compression is referred to as "lossy").
Is lossy
compression
bad?
You might well ask why anyone would want to compress an
image using a lossy technique. Compression ratios for lossy
compression are much better than for lossless compression and
the loss is generally very small. And, in fact, every operation of
converting an image is lossy (the original photographic or
electronic process which captured the image was lossy, scanning
or digitizing the image was lossy, displaying the image on a
monitor is lossy, and printing the image is lossy).
Image Alchemy
381
Details
JPEG compression involves the following steps:
Step 1
The image is converted to a color space with separate luminance
and chrominance channels. This is done because the human eye
is far more sensitive to the luminance information (Y) than it is
to the chrominance information (Cb and Cr); by separating them,
it's possible to compress the chrominance information more than
the luminance before the perceived image quality suffers.
This step isn't specified in the JPEG standard (it doesn't discuss
color space at all), but is standard practice. Image Alchemy uses
CCIR-601 YCbCr, which is the color space specified by the JFIF
standard.
Step 2
The luminance and chrominance information are separately
transformed to the frequency domain using a discrete cosine
transform acting on 8x8 pixel blocks.
To reduce the amount of data which needs to be compressed the
chrominance information may be sub-sampled first. Alchemy
uses 2h:1v:1h:1v:1h:1v sub-sampling when writing JPEG files,
which means that the first component (luminance) has twice as
many samples horizontally as the other two components
(chrominance), and the same number of samples vertically.
Alchemy can read JPEG files with any sub-sampling allowed by
the standard.
Step 3
382
Image Alchemy
The transformed data is quantized (so some information is
thrown away). The samples representing higher frequencies are
generally quantized using larger steps than those representing
low frequencies.
The quality level you specify is used to scale a set of
quantization values which have been found to cause the
quantized data to all have approximately equal importance
visually. A lower quality number will cause larger quantization
steps to be used, and hence increase the compression ratio and
decrease the image quality.
Step 4
The quantized data is compressed using an entropy coder.
Huffman and Arithmetic coding are allowed by the JPEG
standard; only Huffman coding is allowed by the JFIF standard.
Huffman coding can either be done with a set of fixed tables or
custom tables can be generated for an image. Alchemy, by
default, uses a fixed set of tables, but can also generate custom
tables which usually produce 5-20% (depending on the image
and quality setting) better compression. However, producing
custom tables requires an additional pass over the image data and
therefore takes a little longer.
JPEG
Interchange
Format
This data corresponds to the JPEG Interchange Format and is
ready to be stored in a file. Unfortunately the JPEG Interchange
Format does not include enough information to actually be able
to convert the file back to an image. Specifically the color space
used and the aspect ratio or resolution of the image are not
included. Until recently there was no standard way of putting
this information in a JPEG file.
JFIF
On March 1, 1991 representatives of several JPEG hardware and
software developers (including C-Cube, Radius, NeXT, Storm
Tech., the PD JPEG group, Sun, and Handmade Software) met at
C-Cube and established the JPEG File Interchange Format
(JFIF). JFIF allows for the standardization of those pieces of
information missing from the JPEG Interchange Format and
therefore allows various software packages, by different vendors,
to produce compatible JPEG files. If you would like more
information on the JFIF standard please contact us.
Image Alchemy
383
384
Image Alchemy
D
Customer Support
Why might
Alchemy mess
up?
We have made every effort to insure that Image Alchemy can
read all files in its supported formats. However, because of
poorly written standards and non-adherence to standards there
are undoubtedly certain files that Image Alchemy does not read
correctly.
What we need
to help you
If you come across any files which Image Alchemy has trouble
with, please contact us with as much of the following
information as you have: version of Image Alchemy you are
using, type of file, type of computer which generated it, name
and version of software which wrote the file, size of image, and
the number of colors in image. We may ask you to send us the
file so that we can figure out what went wrong. If you send us a
file we will attempt to modify Image Alchemy so that it can read
the file. Once Alchemy is modified, we will send you an
updated copy of it.
Similarly, if any files that Image Alchemy writes cannot be read
by other software please contact us. We may ask you to send us
a copy of a file that can be read by that software package for
comparison.
Please contact us even if you are just using a demo copy of
Alchemy. In addition to helping fix a bug, we feel the best way
to get you to purchase a copy of Alchemy is to demonstrate how
committed we are to customer support.
Image Alchemy
385
How to contact
us
Our address and phone numbers are:
Handmade Software, Inc.
48860 Milmont Drive, Suite 106
Fremont, CA 94538
+1 510 252 0101 (Voice)
+1 510 252 0909 (Fax)
The most efficient way to contact us is by e-mail; this is
especially true if you can send us a sample file which
demonstrates the problem you are having. Please enclose a short
note with your name and phone number so that we may call you
if we need further information. Our e-mail address is:
Internet: [email protected]
386
Image Alchemy
E
Binary Information Files (BIF)
Overview
Binary files are files which are just image data. In other words,
they do not contain any information other than the actual pixels
in the image file. In order to read these files you must create a
file using a text editor which describes to Alchemy the format of
the file you are trying to read. This is called a BIF file (and
typically has the extension .bif).
Required
information
At the minimum a BIF file needs to contain the name of the
image data file and either the height or the width of the image.
Alchemy will make assumptions about the other characteristics
of the image based on the information that it is given and the
total length of the image file.
BIF file format
The first line contains the letters BIF, which identifies the file as
a BIF file.
Each of the rest of the lines in the BIF file consist of an
information tag followed by the information. The spelling of the
tags must be exact or Alchemy will report an unknown tag error.
The usage of many of the tags may not be entirely clear from the
description, please see the examples section if the usage of a tag
needs more explanation.
Data following each tag can be in decimal or hex (0x before the
number indicates hex). See below for a example of using hex
data in BIF file.
Image Alchemy
387
Tags
Tag
filename
Description
The name of the file containing the image data.
To read images that consist of separate files for the red, green,
and blue data, repeat the filename tag three times. The first
filename tag specifies the red data file, the second blue, and the
third green. You must also specify both the height and width and
the number of planes in the image (which must be three) when
using three filename tags (ordinarily Alchemy can calculate one
tag from the others). See below for an example.
width
The width of the image data, in pixels.
height
The height of the image data, in pixels.
planes
The number of planes of image data:
1: gray-scale
2: gray-scale with an alpha channel
3: RGB
4: RGB with an alpha channel.
You can read a black and white image which consists of packed
data (i.e. 8 pixels per byte) by specifying 1 bitspersample (see
below for more information on the bitspersample). In this case
you should not use a planes tag but you must specify both the
height and width of the image (ordinarily Alchemy can calculate
one from the other). See below for an example.
header
388
Image Alchemy
The size of the header, in bytes. This many bytes are skipped
when reading the file.
leftpadding
rightpadding
order
The number of bytes to remove from the beginning of each scan
line.
The number of bytes to remove from the end of each scan line.
The order of the pixels:
For 1 channel g (g=gray).
For 2 channel images either ga or ag (a=alpha).
For 3 channel images, any sequence of r, g, and b: rgb, rbg, grb,
gbr, brg, or bgr (r=red, g=green, b=blue).
For 4 channel images, any sequence of a, r, g, and b (a=alpha).
The defaults are g, ga, rgb, and rgba, depending on the number
of planes.
interleave
The type of interleaving of the pixel data:
0: Byte interleave
RGBRGBRGBRGBRGBRGB…
1: Line interleave
RRR…GGG…BBB…RRR…GGG…BBB…
2: Plane interleave
RRRRRR…GGGGGG…BBBBBB…
The default is 0, Byte interleave.
upsidedown
format
The presence of this tag indicates that the data in the file is
recorded from the bottom of the screen up to the top of the
screen.
The format of the data:
ascii:
read ASCII data
group3: use Group III Fax decompression
group4: use Group IV Fax decompression
ASCII data files can be decimal or hex (0x before each value is
used for hex). See below for an example of reading ASCII data
and an example of reading a Group IV compressed data .
Image Alchemy
389
faxoptions
Options which affect decompressing fax compressed data:
bitreversal: most significant bit first
This tag allows you to specify various fax options when reading
Group IV Fax compressed data. Currently the only faxoptions
tag supported is bitreversal (other options will be added in future
versions of Alchemy).
bitspersample
The size of the data, in bits per sample:
1: 1 bit per sample (8 pixels per byte)
8: 8 bits (one byte) per sample
16: 16 bits (two bytes) per sample
The default is 8 bits per sample.
In the case of 1 bit per sample, it indicates that data is packed,
8 pixels being stored per byte (in which case the bitorder tag
determines whether the data is MSB to LSB or LSB to MSB (see
bitorder, below)).
8 bits per sample is the standard way of storing data, with one
byte storing one pixel.
16 bits per sample is used when reading data which is stored as
two bytes per pixel. In this case Alchemy automatically scans
the data to determine the minimum and maximum values. Then,
when the image is being read, the data is scaled to 8 bits. The
16 bits per sample value can be used for 2-bit to 16-bit data, as
long as the data is padded to 2 bytes. By default, 16-bit data is
presumed to be unsigned and Motorola byte ordered (see signed
and byteorder, respectively, below).
390
Image Alchemy
bitorder
The bit ordering in a 1 bit per sample (packed) image:
msblsb: Most significant byte first
lsbmsb: Least significant bit first
The default is msblsb (most significant byte first).
This option lets you specify the bit ordering when reading 1 bit
per sample data.
byteorder
The byte ordering in a 16 bits per sample image:
motorola:Motorola byte ordered (most significant byte first)
intel:Intel byte ordered (least significant byte first)
The default is Motorola byte ordered.
This option lets you specify the byte ordering when working
with 16 bit per sample data.
signed
The presence of this tag indicates that the data is signed. By
default, it is assumed that 16 bit per sample data is unsigned.
Comments
Lines beginning with a # are treated as comments. Comments
and blank lines are ignored when processing the BIF file.
Palette files
If the binary file has a palette available, you can use that palette
by writing your own software to convert it to a .PAL file and
using the -F option while reading the BIF file.
Examples
Using a BIF file
Assuming the BIF file is called sample.bif, the following
Alchemy command can be used to convert the image to a GIF
file:
alchemy sample.bif -g
A BIF file is treated as an ordinary file, so all the standard
Alchemy commands may be used with it.
Image Alchemy
391
Standard BIF files
This is an example BIF file which can be used to read a 640
pixel wide, true color HSI Raw file. Note that HSI raw files
have a 32 byte header which is being skipped. Also note that the
height tag is not needed. Alchemy will automatically calculate
the height based on the length of the file and the other tags.
Of course you could read the Raw file directly using Alchemy,
but this is after all an example of a BIF file.
BIF
width
640
#skip past header
header
32
filename
planes
sample.raw
3
#the tags below aren't actually needed,
#since rgb and non-interleave are
#the default, but they are included
#here to give an example of what those
#tags look like
order
interleave
rgb
Hex Data
If you have certain values in hex you can put them in a BIF file
directly by preceding them with a 0x:
BIF
filename
width
height
header
392
Image Alchemy
0
sample.raw
640
480
0x020
Plane Interleaved
This example shows how to read an image which is plane
interleaved (i.e. all of the blue pixels are first, followed by the
green, and finally the red).
BIF
filename planar.img
width
1024
height
1024
channels
3
interleave
2
order
bgr
Separate RGB files
This is an example BIF file which would be used to read a
512x512 RGB file which has each of the different color pixels in
a separate file. Note that the width, height, and planes tags must
all be present to read a file of this type:
BIF
filename
filename
filename
width
height
planes
Group IV Fax
compressed
image.red
image.grn
image.blu
512
512
3
This BIF file can be used to read a page of Group IV compressed
patent data as distributed by the United States Patent and
Trademark Office:
BIF
filename 4456956.001
width
2320
height
3408
channels
1
format
group4
faxoptions
bitreversal
Image Alchemy
393
Packed black and
white data
This is an example BIF file which would be used to read a black
and white image which is packed at 8 pixels per byte. Note that
the width, height, and bitspersample tags must all be present to
read a file of this type (the bitorder tag isn't necessary in this
case, since msb-lsb is the default order, but it is included because
we figured you were curious what that tagged looked like):
BIF
filename
scan.img
width
2700
height
3300
bitspersample
1
bitorder
msblsb
16 Bit Data
You can use BIF files to read 16 bit data; only 8 bits of data will
actually be read, but Alchemy will automatically scale the data to
preserve the most information possible. This BIF file can be
used to read a 1024 x 1024 image which is 16 bit, Intel byte
ordered:
BIF
filename
lunar.dat
width
1024
height
1024
channels
1
bitspersample
16
byteorder
intel
ASCII Data
BIF files can read data in hex or decimal ASCII, for example, if
you had a file that looked like this (a small black and white
checkerboard, which changes from hex to decimal halfway
through, for no obvious reason):
0x00 0xff 0x00 0xff
0xff 0x00 0xff 0x00
0 255
0 255
255
0 255
0
394
Image Alchemy
This BIF file could be used to read this data (note that we have to
supply width, height, and channels, Alchemy can't calculate one
from the other in this case):
BIF
filename
width
height
channels
format
checker.txt
4
4
1
ascii
The data file can be much less well organized, Alchemy just
looks for sequences of number separated by whitespace (spaces,
tabs, commas, carriage returns, etc). For example this file is
equivalent:
0x00,0xff,0x00
0xff
0xff
0x00
0xff 0x00 0 255 0 255
255
0 255
0
Image Alchemy
395
396
Image Alchemy
F
HSI Raw Files
History
The HSI Raw format was originally an internal format to Image
Alchemy. Because of user demand the format has been
documented to allow others to read and write HSI Raw files.
Overview
HSI Raw files are very simple image data files, they have the
advantage that they are very easy to read and write and the
location of any pixel in the image may be found by simple
calculations.
If you need to convert custom files to a format that Alchemy can
read we recommend using a Raw file; it is the simplest format to
write and the fastest for Alchemy to read.
This document only describes uncompressed, RGB HSI Raw
files without Alpha channels, if you need to read or write
compressed and/or CMYK files or files which include an Alpha
channel please contact us for a more complete description of the
HSI Raw file format.
Variations
There are two types of HSI Raw Files: paletted and true color.
Paletted images are stored one byte per pixel with a palette at the
beginning of the file. True color files are stored three bytes per
pixel.
Image Alchemy
397
Gray-scale
Black and white
Gray scale files are stored as paletted files with a palette that
contains all gray values. Alchemy automatically recognizes such
files during reading and will treat them appropriately.
Black and White files are stored as paletted files with a palette
that contains two values, black and white. Alchemy
automatically recognizes such files during reading and will treat
them appropriately.
Warning
Note that Handmade Software, Inc. reserves the right to make
changes to this format at any time and without notice. And while
it is unlikely, it is possible that future versions of Image
Alchemy will not support this format.
Old version files
This appendix describes version 4 Raw files. This is the version
that Image Alchemy has written since March 1991. Before this
Alchemy wrote version 2 and 3 raw files (version 2 were 8 bit
files, version 3 were 24 bit files). Those raw files can be read by
current versions of Image Alchemy but are not otherwise
supported. If you run across any of these raw files the easiest
thing to do is to use a current copy of Alchemy to convert them
to a version 4 raw file.
Details
Word size
All values which are not otherwise identified are two byte
integers (16 bits). This is the native integer size of most IBM PC
C-compilers but not Macintosh and UNIX C-compilers.
Byte order
All integers are stored high byte first (big-endian order). This is
the native mode for Macintosh's and Sun's but not the native
mode for IBM PC's.
See below for a CPU independent method to read and write 2byte integers.
398
Image Alchemy
Pixel format
Paletted files are stored one byte per pixel.
True color files are stored as three bytes per pixel in red, green,
blue order.
Padding
Hex
File format
Neither the palette information nor the pixel data is padded to
anything other than a byte boundary. This means that if you
store a file which is 13 by 11 pixels it will occupy 429 bytes if
stored as a true color file (not including the header), or 143 bytes
if stored as a paletted file (not including the header and palette
data).
Numbers including a 0x prefix are hex; all other numbers are
decimal.
The header for a paletted file is 32 bytes plus the size of the
palette. The header for a true color file is exactly 32 bytes (a true
color file contains no palette).
Magic number
Six bytes used to identify the file as an HSI Raw file:
0x6d 0x68 0x77 0x61 0x6e 0x68
Version
An integer used to identify the HSI Raw file version, if you are
reading a file and the version is later than this you won't be able
to read the file because we've made changes to the header
information, in this case contact us for a detailed description of
the HSI Raw file format:
0x0004
Width
An integer indicating the width of the image (in pixels).
Height
An integer indicating the height of the image (in pixels).
Image Alchemy
399
Palette size
Horizontal DPI
An integer indicating the number of entries in the palette. Range
is 2 to 256. A 0 or -24 indicates a true color image (which has
no palette data).
An integer indicating the horizontal resolution of the image, in
dots per inch. A zero indicates that the resolution is unknown.
A negative number is used if only the aspect ratio is known.
Vertical DPI
An integer indicating the vertical resolution of the image, in dots
per inch. A zero indicates that the resolution is unknown. A
negative number is used if only the aspect ratio is known.
Gamma
An integer indicating the gamma of the image, scaled by 100 (a
gamma of 2.2 is stored as 220). A zero indicates that the gamma
is not known.
Compression
An integer indicating the compression mode used to write the
file. This appendix only describes compression mode 0, so you
should check this value when reading a HSI Raw to make sure it
isn't compressed. If you need to be able to read or write
compressed HSI Raw files please contact us.
Alpha Channel
An integer indicating whether or not the file contains an alpha
channel. This appendix only describes files without an alpha
channel, if you need to be able to read or write HSI Raw files
with alpha channels please contact us.
Reserved
Eight bytes reserved for future use. Should be set to zero when
writing.
Palette
The palette data is stored as 3 bytes per palette entry. The bytes
are in red, green, blue order; 0 is black, 0xff is full intensity.
True color raw files have no palette.
Image data
400
Image Alchemy
The image data.
Example files
8 bit paletted,
320 x 200:
6D
00
49
B6
B6
…
68
00
24
B6
FF
77
00
24
92
FF
61
00
24
49
FF
6E
00
00
49
B6
68
00
00
FF
6D
00
00
00
DB
6D
04
00
00
DB
6D
01
00
00
FF
24
40
00
DB
B6
24
00
00
6D
92
DB
C8
00
6D
FF
92
01
00
FF
FF
6D
00
00
92
DB
6D
00
00
92
FF
49
00
00
FF
DB
49
24 bit true color,
320 x 200:
6D
00
49
24
24
…
68
00
24
24
49
77
00
24
49
24
61
00
49
24
24
6E
00
24
24
49
68
00
24
49
24
00
00
49
24
24
04
00
24
24
49
01
00
24
49
24
40
00
49
24
24
00
00
24
24
49
C8
00
24
49
24
00
00
49
24
24
00
00
24
24
49
00
00
24
49
24
00
00
49
24
24
Reading a two
byte integer
int getWord(int i, FILE *stream) {
register int temp;
temp=getc(stream)<<8;
return(getc(stream) | temp);
}
Writing a two
byte integer
int putWord(int i, FILE *stream) {
putc(i>>8, stream);
return(putc(i&0xff, stream));
}
Image Alchemy
401
402
Image Alchemy
G
Undercolor Removal Files
Summary
Undercolor removal files are text files which control the
conversion from RGB to CMYK color space.
This conversion consists of four steps.
The first is to convert an RGB value to an ideal CMY value; this
simply involves negating the RGB values.
The next step is to determine how much black is in that color;
this is done by finding the minimum of the CMY values and
using that as an index into the black removal portion of the
Undercolor Removal tables documented below. These tables
have independent values for how much black to use for that pixel
and how much black to subtract from the CMY values.
Next, a linear transform is optionally applied to the CMY portion
of the CMYK pixel.
Finally the CMYK values are optionally translated,
independently, through the CMYK density correction tables (this
last step is only used if the image is going to be dithered output
on a 1 bit per pixel per component device).
Image Alchemy
403
File format
Black removal tables
The first 256 non-comment lines contain undercolor removal
values corresponding to computed black values of 0 (white) to
255 (black).
Each of these lines has two numbers; the first indicates how
much black to use in place of the computed black value
corresponding to the line, and the second indicates how much
black to subtract from the cyan, magenta, and yellow
components (this value must not be greater than the
corresponding computed black value).
After the black removal block the remaining blocks may appear
in any order.
CMY linear
transform
If there is a line which says only "HSI CMY matrix" then the
next 3 non-comment lines contain a matrix representing a linear
transform which is applied to the cyan, magenta, and yellow
components after black removal and before applying the density
map. The entries are normalized around 256. The first row and
column represent cyan, the second magenta, and the third
yellow. The rows are multiplied by the input cyan, magenta, and
yellow values to create the corrected values. A matrix of
256
0
0
0 256
0
0
0 256
is equivalent to omitting the matrix and causes no correction to
take place. In this case it would be preferable to omit the matrix
as the conversion will run slightly faster without it.
404
Image Alchemy
CMYK density
correction tables
Comments
Example
If there is a line which says only "HSI CMYK density map" then
the next 256 non-comment lines contain density correction
tables, corresponding to cyan, magenta, yellow, and black values
of 0 (white) to 255. Each of these lines has four numbers
representing, in order, the amount of cyan, magenta, yellow, and
black to use in place of the corresponding computed values.
These tables are only applied during dithering; they will not be
used for those CMYK output formats which are continuous tone,
as devices which take continuous tone input data should be doing
their own correction.
Any line beginning with ';' is a comment and is ignored.
The following undercolor removal file has undercolor removal
tables, CMYK density correction tables, and a CMY color
correction matrix.
; Undercolor removal file
;
0
0
1
1
1
1
2
2
3
3
… (256 entries total)
169 169
169 169
170 170
;
Image Alchemy
405
HSI CMY matrix
;the following matrix leaves the
; Cyan and Yellow planes alone, and
; subtracts a bit from the Magenta
; plane when there's Cyan present.
;
256
0
0
-32 256
0
0
0 256
;
HSI CMYK density map
;
0
0
0
0
0
0
0
0
0
0
0
0
… (256 entries total)
248 248 248 248
251 251 251 251
253 253 253 253
255 255 255 255
406
Image Alchemy
H
HSI PAL Files
Overview
HSI PAL files are text files which contain a palette in an ASCII
form. Alchemy can extract palettes from other file formats and
write HSI PAL files. Alchemy can also use HSI PAL files when
converting images.
File format
The first line contains the letters "PAL"; this identifies the file as
a palette file.
The next line contains an integer indicating the number of palette
entries. Valid values are 2 through 256.
The rest of the file consists of lines of 3 numbers, representing
the red, green, and blue values for each of the colors. These
have a range of 0 (black) to 255 (full intensity). Any information
after the 3 numbers is treated as a comment and ignored.
Example
PAL
8
0
0
0
255
0
0
0 128
0
255 255
0
0
0 255
255
0 255
63 63 63
255 255 255
;# colors
;black
;bright red
;dark green
;yellow
;blue
;magenta
;gray
;white
Image Alchemy
407
408
Image Alchemy
I
Acknowledgments
Summary
Almost all the software which comprises Image Alchemy was
written in house. However some of the modules are
modifications of software originally written by other people or
software that we've licensed.
TIFF
Image Alchemy's TIFF I/O is based on libtiff which is copyright
by Sam Leffler and is used with his permission. If you are
interested in reading or writing TIFF files we strongly suggest
that you start with libtiff.
Libtiff is available by anonymous ftp as
ftp://ucbvax.berkeley.edu/pub/tiff/*.tar.Z or
ftp://uunet.uu.net/graphics/tiff.tar.Z.
If you cannot get a copy of libtiff via anonymous ftp please
contact us for a free copy.
VGA display
The MS-DOS version of Image Alchemy's 640x400 SVGA
display routines are based on VGAKIT, written by John Bridges.
VGAKIT is available free of charge from a variety of bulletin
boards
If you cannot find VGAKIT locally please contact us for a free
copy.
Image Alchemy
409
LZW Compression
The LZW compression method is the subject of United States
patent number 4,558,302 and corresponding foreign patents
owned by Unisys Corporation and the use of it for TIFF LZW
compression is licensed from them.
Further information on licensing this patent can be obtained
from:
Unisys Corporation
Welch Licensing Department
Office of the General Counsel
M/S C1SW19
Blue Bell, PA 19424
410
Image Alchemy
J
Other Useful Software
Summary
There are several image processing packages available for free or
as shareware.
Please be aware that we mention these software packages only as
a service to Image Alchemy users. We are not endorsing or
recommending any particular package. Some of the packages
are no longer supported by their authors.
If you have trouble finding any of the listed software please send
us a blank tape or diskette and we will send you a copy free of
charge (please be aware that the software may be quite large;
contact us first if you have any questions).
If you know of any other software which would be appropriate to
add to this list please let us know. If you are the author of any of
these packages and you would rather not be on this list please let
us know that also.
IBM PC
These programs are only available as executable code and can
only be run under MS-DOS.
PicLab
A public-domain image file conversion and printing tool.
Written by Lee Crocker and the Stone Soup Group.
Available via CompuServe.
Image Alchemy
411
Cshow
Vivid
Workstations
Utah Raster
Toolkit (URT)
Fuzzy Bitmap
Manipulation (FBM)
Portable BitMap
(PBMPLUS)
412
Image Alchemy
A shareware image viewing program.
Written by Bob Berry.
Available from:
Canyon State Systems and Software
PO Box 86
Sedona, AZ 86336
A shareware ray-tracing program.
Written by Stephen B. Coy
Available from:
Stephen Coy
15205 NE 13th Pl., #2904
Bellevue, WA 98007
These programs are only available as source code and generally
require a workstation running UNIX or one of its variants.
Written by Spencer W. Thomas, Rod G. Bogart, and James
Painter.
Available from ftp://cs.utah.edu/pub/urt-3.0.tar.Z,
ftp://weedeater.math.yale.edu/pub/urt-3.0.tar.Z, or
ftp://freebie.engin.umich.edu/pub/urt-3.0.tar.Z.
Written by Michael Mauldin
Available from ftp://nl.cs.cmu.edu/usr/mlm/ftp/fbm.tar.Z,
ftp://uunet.uu.net/pub/fbm.tar.Z, or
ftp://ucsd.edu/graphics/fbm.tar.Z.
Written by Jef Poskanzer
Available from ftp://expo.lcs.mit.edu/contrib/pbmplus.tar.Z or
ftp://ftp.ee.lbl.gov/pbmplus.tar.Z.
ImageMagick
Written by John Cristy
See http://www.wizards.dupont.com/cristy/ImageMagick.html
for more information.
Img Software Set
Written by Paul Raveling
Available from ftp://expo.lcs.mit.edu/contrib/img_1.3.tar.Z or
ftp://venera.isi.edu/pub/img_1.3.tar.Z.
XLI
Written by Graeme Gill
(XLI is based on xloadimage, written by Jim Frost)
XLI and XloadImage are available by anonymous ftp from a
variety of ftp sites.
Image Alchemy
413
414
Image Alchemy
K
Configuring DOS/4GW Pro
MS-DOS Only
DOS/4GW Pro is the DOS Extender used by Image
Alchemy/386 and Image Alchemy PS. The DOS Extender is
the software that allows protected mode software to run under
MS-DOS. Only alch386.exe use the DOS Extender. This
chapter explains how to control various operations of the DOS
Extender to optimize use of your computer.
Updating from
previous versions
Virtual Memory
If you have been using earlier versions of Image Alchemy and
have made use of the DOS4GVM environment variable you will
have to make changes to that variable. In particularly the old
style DOS4GVM=1 setting is no longer supported (it isn't
needed, since that is now the default operation) and all '#'
symbols must be changed to ':'.
The Virtual Memory Manager (VMM) uses a swap file on disk
to augment RAM. With VMM you can use more memory than
your machine actually has. When RAM is not sufficient, a
portion of memory is swapped out to disk until it is needed
again. The combination of the swap file and available RAM is
called virtual memory.
Image Alchemy
415
Image Alchemy automatically uses virtual memory if you do not
have enough physical memory available. However, there may be
cases where you wish to change the behavior of virtual memory.
This is done through the DOS4GVM environment variable.
To set the DOS4GVM environment variable, use:
set DOS4GVM=[option [:value]] …
(A ":" is used with options that take values instead of "=" since
the DOS command shell does not allow "=" to appear in
environment variables.)
DOS4GVM
Options
DeleteSwapFile:[On:Off] Default: On
By default the swap file is deleted when Alchemy exits.
Program startup is quicker if the file is not deleted.
PhysMin:n [K|M] bytes Default: 1024K
The minimum amount of RAM managed by VMM.
PhysMax:n [K|M] bytes
Default: 65M
The maximum amount of RAM managed by VMM.
SwapFileName:[path][filename]
The default name is "DOS4GVM.SWP". The default path is the
executable directory.
SwapInc:n [K|M] bytes
Default: 4096K
The size by which the swap file grows.
SwapMin:n [K|M] bytes
Default: 0
The minimum or initial size of the swap file.
VirtualSize:n [K|M] bytes
Default: 16M
The size of the virtual memory space.
416
Image Alchemy
Changing the
Defaults
To change the default values set the DOS4GVM environment
variable. For example:
set DOS4GVM=VirtualSize:64M PhysMax:16M
Sets up a swap file up to 64 megabytes in size after using up to
16 megabytes of RAM.
Image Alchemy
417
418
Image Alchemy
Glossary
Anonymous FTP
An easy way to transfer files via the Internet. If you don't have
Internet access you can't use anonymous FTP; if you do have
Internet access you probably already know about it (if you don't,
ask your system administrator or local network guru).
Black and white
An image which contains just two colors, black and white.
Many file formats, such as TIFF and Sun Raster, have special
variations for black and white images. You can force Alchemy
to write a black and white image by specifying -b -c2 as options.
Dithering
A technique for reducing the amount of color banding in an
image when converting from a large number of different colors
to a small number of different colors. Different dithering
techniques are usually named after the person or persons who
first invented them. Alchemy supports Floyd-Steinberg, Stucki,
and JJN dithering; these are further described in "Digital
Halftoning", by Robert Ulichney, MIT Press.
Gray-scale
An image which contains just shades of gray. Many file formats,
such as TIFF and Silicon Graphics, have special variations for
gray-scale images. You can force Alchemy to write a gray-scale
image by specifying -b -8 as options.
Image Alchemy
419
420
Header
The portion of an image file that is not the actual image data.
The data in a header generally includes the image size (in
pixels), the image depth (in number of bits per pixel or number
of colors), and the palette (if the image has a palette). Some file
formats include quite a bit of additional data in the header, such
as: the name of the image or the date and time the image was
created. Some file formats store information which is usually
found in the header in a separate file.
Heckbert color
quantization
A technique for reducing the number of colors needed by an
image, typically used to convert a true color image to a paletted
image. Named after Paul Heckbert who originally described the
technique in "Color Image Quantization for Frame Buffer
Display", SIGGRAPH '82 Proceedings, p. 297.
Magic Number
A number or sequence of numbers that is found at or near the
start of an image file so that software may determine what type
of format the file is. Most formats have a well defined magic
number; some formats do not, in which case Alchemy examines
various parameters in the header of the file and guesses what
format the image is.
Paletted
An image which isn't true color. Each pixel in the image is an
index into a table of values (typically red, green, and blue) which
describe the color of that pixel. Most paletted images are limited
to 8 bits of information, which allows 256 unique colors. Most
display adapters only allow the display of paletted images
(Alchemy can display true color images on those display
adapters by using a uniform palette).
True color
An image which does not contain a palette. Each pixel in the
image is represented by at least three values, typically red, green,
and blue. True color images are generally produced by scanners
and digitizers and are better quality and much larger than
paletted images. Most display systems cannot display true color
images.
Image Alchemy
References
General
Computer
Graphics
Computer Graphics - Principles and Practice, Second Edition
(Commonly referred to as Foley and van Dam)
J.D. Foley, A. van Dam, S.K. Feiner, and J.F. Hughes
Addison-Wesley
ISBN 0-201-12110-7
Principles of Interactive Computer Graphics
(Commonly referred to as Newman and Sproull)
W.M. Newman and R.F. Sproull
McGraw-Hill
ISBN 0-07-046338-7
Algorithms for Graphics and Image Processing
Theo Pavlidis
Computer Science Press
ISBN 0-914894-65-X
Graphics Gems I through ?
various
Academic Press
various
Image Lab
Tim Wegner
Waite Group Press
ISBN 1-878739-11-5
Image Alchemy
421
Specific Topics
Color
Digital Color Management
Edward J. Giorgianni and Thomas E. Madden
Addison-Wesley
ISBN 0-201-63426-0
The Reproduction of Color in Photography, Printing &
Television
R.W.G. Hunt
Fountain Press
ISBN 0-85242-356-X
Dithering
File Formats
Digital Halftoning
Robert Ulichney
MIT Press.
ISBN 0-262-21009-6
The File Formats Handbook
Günter Born
International Thomson Computer Press
ISBN 1-85032-117-5
Graphics File Formats - Reference and Guide
C. Wayne Brown and Barry J. Shephard
Manning Publications Company
ISBN 1-884777-00-7
Graphics File Formats
David C. Kay and John R. Levine
Windcrest/McGraw-Hill
ISBN 0-8306-3060-0
Programming for Graphics Files in C and C++
John Levine
John Wiley & Sons
ISBN 0-471-59854-2
422
Image Alchemy
Bitmapped Graphics Programming in C++
Marv Luse
Addison-Wesley
ISBN 0-201-63209-8
Graphics File Formats
James D. Murry and William vanRyper
O'Reilly & Associates
ISBN 1-56592-161-5
Bit-Mapped Graphics
Steve Rimmer
Windcrest
ISBN 0-8306-3558-0
The Graphic File Toolkit
Steve Rimmer
Addison-Wesley
ISBN 0-201-60846-4
Supercharged Bit-Mapped Graphics
Steve Rimmer
Windcrest/McGraw-Hill
ISBN 0-8306-3788-5
Heckbert Color
Quantization
"Color Image Quantization for Frame Buffer Display"
Paul S. Heckbert
SIGGRAPH '82 Proceedings
"Median-Cut Color Quantization"
Anton Kruger
Dr. Dobb's Journal, September 1994
Image Scaling
Digital Image Warping
George Wolberg
IEEE Computer Society Press Monograph
ISBN 0-8186-8944-7
Image Alchemy
423
JPEG
PDF (Portable
Document Format)
PostScript
JPEG Still Image Compression Standard
William B. Pennebaker and Joan L. Mitchell
Van Nostrand Reinhold
ISBN 0-442-01272-1
Portable Document Format Reference Manual
Adobe Systems Incorporated
Addison-Wesley
ISBN 0-201-62628-4
PostScript Language Reference Manual, Second Edition
Adobe Systems Incorporated
Addison-Wesley
ISBN 0-201-18127-4
Adobe Type 1 Font Format, Version 1.1
Adobe Systems Incorporated
Addison-Wesley
ISBN 0-201-57044-0
VGA Programming
Michael Abrash's Graphics Programming Black Book
Michael Abrash
Coriolis Group Books
ISBN 1-57610-174-6
Programmer's Guide to the EGA and VGA Cards,
Second Edition
Richard F. Ferraro
Addison-Wesley
ISBN 0-201-57025-4
424
Image Alchemy
Colophon
This manual was created using Microsoft Word 5.1a on a bizarre
collection of computers consisting of a Macintosh Quadra
840AV, Power Macintosh 7100/66, and a PowerBook 5300cs.
The body text is set in Times Roman and the chapter and section
headings are set in Gill Sans. The examples and such are set in
Courier, the Windows references are set in Monaco, and the
Macintosh references are set in Chicago (what else).
The Microsoft Windows screen shots were captured by using
PrintScreen to copy the screen to the clipboard and then
converted to TIFF using Image Alchemy. The Macintosh screen
shots were captured as PICT files, moved to the IBM PC, and
then also converted to TIFF by Image Alchemy.
Camera-ready copy was produced by an HP LaserJet 4MV
printer onto Hammermill Laser Plus ® paper. The manual was
then printed using standard offset printing techniques.
Image Alchemy
425
426
Image Alchemy
Index
Options
-^ 327
- ~ 355
- = 263
-$ 254
-+ 333
-- 281
--^ 328
-- = 277
--+ 331
--- 273
---+ 332
---a 102, 107
---c 203
---e 176
---f 132, 309, 334
---g 212, 219
---i 169, 185
---j 202
---k 288
---l 103
---m 172, 186
---n 204
---p 98, 234
---q 175
---r 174, 214
---s 156, 220
---t 313
---u 261
---v 238
---x 215, 247
---y 287, 292
--. 276
--3 279
--@ 272
--a 95, 104
--b 114, 246
--c 113, 118
--d 96, 210
--e 126, 237
--f 133, 135
--g 136, 144
--h 148, 164
--i 100, 168, 240
--j 165, 177
--k 122, 130
--l 111, 181
--m 124, 187
--n 225, 312
--o 191, 278
--p 116, 199
Image Alchemy
427
--q 173, 209
--r 105, 158
--s 216, 221
--t 184, 211
--u 208, 235
--v 357, 361
--w 251, 280
--x 248, 340
--y 324, 342
--_ 322
-. 256
-15 314
-16 315
-24 316
-32 318
-8 302
-? 266
-@ 270
-a 193, 228
-b 108, 285
-c 289, 290
-d 293, 344, 346
-e 119, 295
-f 296, 299
-fontmap 89, 90
-g 138, 297
-h 146, 258
-i 171, 284
-j 178
-k 206, 223
-l 166, 188
-list 88
-m 101, 182
-n 218, 301
-o 190, 265
-o 149, 196
-q 180, 267
428
Image Alchemy
-r 167, 213
-remove 89
-s 226, 310
-scan 89
-t 230, 239
-u 259, 319
-v 356, 359
-w 242, 245
-x 255, 335
-y 338
-yf 326
-z+ 62
-za 45
-zb 53
-zc 46
-zd 64
-ze 65
-zf 61
-zh 304
-zi 51
-zm 47
-zo 55, 306
-zp 59, 305
-zr 63
-zs 307
-zw 308
-zx 57
-zy 58
-z_ 49
-_ 329, 354
Extensons
.a 173, 220
.a8 116
.als 100, 240
.art 133
.asc 164
.b 220
.b8 116
.bif 108
.bil 221
.bm 246
.bmp 101, 190, 242
.c4 176
.cal 113
.ccrf 111
.cel 103, 181
.clp 194
.clr 221
.cm 208
.crf 111
.ct 175, 215
.cut 118
.dat 221
.dcx 196
.doc 169
.epi 120
.eps 120
.epsi 120
.ers 124
.fal 209
.fbm 132
.flc 134
.fli 134
.fop 135
.g 220
.g8 116
.gif 139
.gis 126
.gm 104
.gm2 104
.gm4 104
.goe 144
.grb 164
.hdr 221
.hrf 148
.hst 146
.ibg 199
.ico 191, 225
.icon 225
.idc 114
.idx 223
.iff 171
.ilbm 171
.im 226
.im1 226
.im24 226
.im32 226
.im8 226
.img 95, 100, 126, 136, 169, 172, 173,
219, 240
.imq 199
.jpg 165, 178
.lan 126
.lbm 171
.mac 184
.mif 185
.miff 185
.mrl 186
.mtv 187
.p 173
.pal 118, 166, 188
.pat 234
.pbm 206, 207
.pcd 201
.pcl 150
.pcx 196
.pdf 96
.pgm 206, 207
.pic 103, 168, 182, 194, 202
.pict 182
Image Alchemy
429
.pm 248
.png 204
.pnm 206, 207
.ppm 206, 207
.pre 223
.prn 111, 130, 156
.psd 98
.puzzle 208
.pzl 208
.q0 209
.qdv 210
.r 220
.r8 116
.ras 226
.rast 226
.raw 108, 167, 211
.rg 212
.rgb 174, 209
.rix 213
.rla 241
.rlb 241
.rlc 214
.rle 95, 235
.rtl 158
.scd 216
.scx 213
.sgi 218
.sst 105
.tab 223
.tdi 129
.tga 228
.tif 230
.tiff 230
.vi 177
.vif 237
.vit 239
.wpg 245
430
Image Alchemy
.x 107
.xbm 246
.xim 247
.xpm 248
.xv 238
.xwd 251
Numbers
1200C 322, 329
15 bits 314
16 Bit 394
16 bits 315
24 bits 316
300XL 158, 322, 329
32 bits 318
386MAX 25
650c 322, 329
7600 322, 329
8 bits 302
8514/A 21, 25, 350
A
Acknowledgments 409
Acrobat 96
Actions during viewing 352
add fonts 87
Adding fonts 88
ADEX 95
ADEX Corporation 95
Adobe Acrobat 96
Adobe Photoshop 98
Adobe Systems 120
Adobe Systems Incorporated 96, 98
Advanced Visual Systems Inc. 107
Advanced Visualizer 241
Agfa Corporation 216
AI 350
alch386 20
alchemy.exe 20
Aldus Corp. 230
Alias 100, 129, 240
Alias Pix 100
Aliasing a font 88
alpha channel 93
Alpha Microsystems 101
Alpha Microsystems BMP 101
ALPS 102
Amiga 171
Anonymous FTP 419
ANSI 374
Antialias 45
Apple Computer, Inc. 182, 184
ASCII 394
aspect ratio 62, 93, 333, 344, 369
Assigning colors 377
AutoCad 67
Autodesk 103
Autodesk PIC/CEL 103
autoexec.bat 23
Autologic 104
Autologic, Incorporated 104
Available Ports 74
Averaging 324, 335, 338
AVHRR 105
AVS X 107
B
back slashes 30
Bayer 293
Berry, Bob 412
BIF 108, 387
Binary Information Files 108, 387
bitorder 391
Black and White 285, 419
Black removal 404
Blackstock, Steve 210
blur 326
BMP 190, 242
Bogart, Rod G. 412
border 42
Bridges, John 194, 409
Brightness 287
Brown, Ralf 410
byteorder 391
C
CADCore 148
Calcomp 322, 329
Calcomp CCRF 111
CALS 113
capture 364
CCIR-601 382
CCITT4 176
CCT 221
CEL 181
Center Image 322
centimeters 49, 51, 53, 55, 57, 58, 322,
329, 335, 338, 340, 342
Change Image Resolution 324
Chicago 425
Chooser 79, 80
ChromaGraph 95
Clark University 169
Clip 46
clustered 293
CMY linear transform 404
CMYK 288, 403
CMYK density correction 405
Collage 203
Colophon 425
Color 375, 422
Image Alchemy
431
Color and Palette Options 283
color banding 378
Color Correction 289
Color cube 375
Color Mode 47
color space 382
ColoRIX 213
Colors 290
Commodore-Amiga Corp. 171
CompuServe 138
Computer 20
config.sys 23
Contrast 292
Conversion Options 91
Convolve Image 326
Core IDC 114
Core Software Technology 114
Courier 89, 90, 425
Coy, Stephen B. 240, 412
Cristy, John 185, 413
Crocker, Lee 411
CrystalJet 111
Cshow 412
CT 175, 215
Cubicomp 116
Cubicomp Corp. 116
Cubicomp PictureMaker 116
Custom Applications 135
Customer Support 385
D
dash 31
DCX 196
Defense Logistics Agency 113
Deluxe Paint 171
Department of Defense 113
DesignJet 68, 158, 159, 322, 329
432
Image Alchemy
DesignJet 2000C 162
DesignJet 650C 163
DeskJet 158, 322, 329
Destination 81
devices 30
Digital Research Inc. 136
discrete cosine transform 382
Disk space 42
dispersed 293
Display hardware 349
Display Resolution 352
disposal method 138, 141
Dither 293
Dithering 375, 378, 419, 422
DLA 113
DoD 113
DOS Extender 415
DOS/4GW 415
dot gain 153, 161, 365
dots per inch 64, 346, 374
Dr. Halo CUT 118
Dye Sub 130
E
Earth Resource Mapping 124
Eastman Kodak Company 201
EGA Palette 295
Eight bits 302
Electrostatic plotter 111, 158
Encad 158
Encapsulated PostScript 41, 119
entropy coder 383
Environment variable 28
Environment variables 23
EPS 67, 119, 322, 329
Epson Stylus 122
ER Mapper 124
Erdas Inc. 126
Erdas LAN/GIS/IMG 126
Error diffusion dithering 378
errors 280
expanded memory 25
Explore TDI 129
extended memory 25
extension 32
F
factor 55, 57, 58, 335, 338
Falcon CAD 160
Falcon Graphics 160
False Color 296
Fargo 130, 322, 329
Fargo Electronics 130
Fargo Primera 130
fax 67, 393
FBM 132, 412
Fifteen bits 314
FILE 74
File Formats 422
filenames 34
filter 326
First Publisher ART 133
FLC 134
Flip 327, 328
Flip Image 327
Floyd-Steinberg 293
font aliases 87
Font Inclusion 83, 85
fonts 23, 29, 61
forward slashes 30
Freedom of Press 135
FTP 419
Fuzzy Bitmap Manipulation 412
G
gamma 93, 297
Gamma Correction 297
GARS 144
GEM VDI Image File 136
General Options 253
GIF 138, 370
Giffer 210
Gill Sans 425
GIS 221
Glossary 419
GOES 144
GPB 219
GRASP 194
gray-scale 373, 419
gray-scale. 285
GROB 164
Group IV 393
H
Halftone 293
Halo 118
Hammermill 425
Handmade Software, Inc. 108, 165, 166,
167, 188
Header 420
Heckbert 420, 423
Heckbert quantization 365
Heckbert's median cut algorithm 377
Help 258
Hewlett-Packard Company 150, 156, 158,
164
HIMEM.SYS 25
Histogram 146
Hitachi Raster Format 148
Image Alchemy
433
Hitachi Software Engineering Co., Ltd.
148
HJ-800 160
HP 158
HP 7600 159, 322, 329
HP LaserJet 66, 149, 322, 329
HP PCL 149, 322, 329
HP PhotoSmart 156
HP Printer Command Language 149, 322,
329
HP Raster Transfer Language 158, 322,
329
HP RTL 158, 159, 161, 162, 322, 329
HP-48sx 164
HP-48sx Graphic Object 164
HP7600 158, 322, 329
HSI JPEG 165
HSI Palette 166
HSI Raw 167
HSI Raw Files 397
Huffman 178
Huffman coding 383
I
IBM Corp. 168, 190, 191
IBM Picture Maker 168
identify 42
Identifying image files 92
IDIDAS 105
IDRISI 169
IEC 374
IFF 171, 369
IGS 148
ILBM 171
Image Alchemy PS 415
Image Alchemy 15, 108, 165, 166, 167,
188
434
Image Alchemy
Image Offset 49
image resolution 64, 346
Image Scaling 423
image statistics 255
ImageMagick 413
Imaging Technology 172
Img Software Set 173, 413
IMGMAP 105
inches 49, 51, 53, 55, 57, 58, 322, 329,
335, 338, 340, 342
Ink jet Plotter 111
input gamma 297
Input Options 93
Input Page Size 51
InputFileName 32
Installing 19
Intergraph 174
Intergraph Corp. 174
Internet 386
Iris CT 175
ISO 374
J
Jarvis, Judice, & Ninke 293
JEDMICS 176
JFIF 178, 179, 371, 382, 383
Joint Photographic Experts Group 178,
381
Jovian Logic Corp. 177
Jovian VI 177
JPEG 178, 365, 368, 371, 372, 374, 381,
424
JPEG Interchange Format 383
K
Khoral Research 238
Khoros 238
Kodak 201
Korn, Steve 211
L
Lanczos2 324, 335, 338
Lanczos3 324, 335, 338
large images 43
LaserJet 66, 150, 322, 329
LaserWriter 79, 80, 81, 82, 84
Leffler, Sam 409
libtiff 409
limiting resolution 352
Linear Interpolation 324, 335, 338
linearization 310
list fonts 87, 88
lossy compression 381
Lumena 181
LZW 410
M
MacBinary 93, 182, 184
Macintosh 79, 182, 184
MacOS 364
MacPaint 184
Magic Number 420
Margins 53
Match Palette 299
Matrix Instruments 216
Mauldin, Michael 412
maximum display resolution 26
McIDAS 144
Media Cybernetics 118
Memory 254, 364
Michael L. Mauldin 132
Micro Dry printers 102
Microsoft 72
Microsoft Corp. 230, 242
Microsoft Windows 71, 242, 364
MIFF 185
Mimaki MRL-1 186
Mirror Image 328
Missing fonts 89
missing input 280
MIT 246, 247, 248, 251
Monaco 425
MRL-1 186
MTV Ray Tracer 187
Multi-Image Palette 188
Multi-Page Input 259
Multi-Page Output 261
multiple files 281
Multiple fontmaps 90
multiple pages 259, 261
Mutoh 160
N
NASA 199
Nearest Neighbor 324, 335, 338
NEC Colormate PS 71
Negate 301
NESDIS 105, 144
Netscape 319
network boards 25
NOAA 105, 144
noise 294, 378
non-overwriteable 280
Nothing Real 129
Novajet 43, 158, 159, 322, 329
number of colors 290
O
Offset Image 329
Offset View 354
Only Scale If Too Large 331
Image Alchemy
435
Only Scale If Too Small 332
Operating system 21
Optimal palettes 377
Options 31
OS/2 Bitmap 190
OS/2 Icon 191
Out of Memory 364
Output Filename 256, 272
output files 270
output gamma 297
Output Page Height 58
Output Page Size 55
Output Page Width 57
OutputExtension 32
OutputFileName 32
OutputPathName 33
Override Input Type 263
Overwrite 265
P
Packed 394
page(s) 42
Pages 59
Painter, James 412
PaintJet 158, 322, 329
PAL files 166, 407
palette 296, 299, 302
Palette Selection
Heckbert Tuning 304
Palette Selection 305
Palette Sorting 306
Palette Swapping 307
Palette Weighting 308
paletted 290, 375, 420
Paper Size 76
Paper Source 76
parameters 31
436
Image Alchemy
path 23, 28
Pathnames 30
PBM 206
PBMPLUS 412
PCL 149, 371
PCPAINT 193, 194
PCX 67, 196, 370
PDF 41, 96, 424
PDS 199
perturbation 293
PGM 207
PhotoCD 201
PhotoSmart 156
PIC 202
PicLab 411
PICT 182, 370
PICT2 182
Pictor Page Format 193
Picture Maker 168
PictureMaker 116
Pixar PIC 202
Pixel Power 203
pixels 49, 51, 53, 55, 57, 58, 322, 329,
335, 338
plotter 68
PNG 204
Portable BitMap 206, 412
Portable Document Format 96, 424
Poskanzer, Jef 206, 412
PostScript 41, 71, 119, 424
PostScript Fonts 87
PPM 207
Pre-load Fonts 61
Preserve Aspect Ratio 62, 333
Preserve Palette While Scaling 309, 334
Primera 130
Print… 77
prn 102
Program Information 266
Progress 43
PS Printer 80
Publisher's Paintbrush 196
PUT 144
Puzzle 208
Q
Q0 209
QDV 210
QEMM 25
QMS ColorScript 100 71
QMS ColorScript 100 Model 30 77
QRT 211
quantization 382
Quiet 267
R
Raster Graphics 212
Raveling, Paul 173, 413
Reading PostScript, EPS, and PDF Files
41
References 421
remove fonts 87
Removing fonts 89
resolution 41, 93, 352
response file 353
response files 35, 37, 38, 268
Response Output Filenames 270
Response Paired Filenames 272
RIX 213
RIX Softworks 213
RJ-1300 160
RJ-1800 160
RJ-4000 160
RJ-800 160
RLC 214
RLE 235
rotate 42
Rotate Image 63
RTL 158, 159, 161, 162
S
Scale Image in Horizontal Direction 335
Scale Image in Vertical Direction 338
scale to gray 285
Scaling and Filtering Options 321
Scan for fonts 89
Scitex CT 215
Scodl 70, 216
screen capture 364
sequential filenames 38, 273
serpentine raster 293, 378
Set Horizontal DPI 340
Set Vertical DPI 342
SGI Image 218
Shake 129
Sharp 219
Sharp GPB 219
sharpen 326
Sierra Lite 293
signed 391
Silicon Graphics, Inc. 218
Sixteen bits 315
slash 30
Slide Show 355
Software Publishing Corp. 133
Spaceward Graphics 220
spawn 410
Specify Image Aspect Ratio 344
Specify Image Resolution 64, 346
Spiff 310
SPOT Image 221
Image Alchemy
437
SPOT Image Corp. 221
SSTMAP 105
status messages 267
Stevenson and Arce 293
Stone Soup Group 411
Stork 223
Stork Colorproofing B.V. 223
Storyboard Live! 168
stretching 310
Stucki 293
Sun Icon 225
Sun Microsystems, Inc. 225, 226
Sun Raster 226
SVGA 21, 350, 351
Swap RGB 312
T
Tagged Interchange File Format 230, 366
tar 27
Targa 228, 363
Temporary disk files 24, 29
temporary files 29
The PNG development group 204
Thermal 130
Thermal Transfer Printer 111
Thirty-two bits 318
Thomas, W. Spencer 412
TIFF 230, 366, 409
Time Arts 181
time estimation 29
Times Roman 425
TMP 24
TMPDIR 29
Topic 237
Transparency 313
True Color 314, 315, 316, 318, 375, 420
Truevision 228
438
Image Alchemy
Tutorial and Examples 362
Twenty-four bits 316
Type 1 fonts 87
U
UCR 403
Undercolor Removal Files 403
unidentifiable input 280
Uniform Palette 319, 365
Uniform palettes 376
Unisys 410
units 55, 57, 58
University of Michigan 235
University of Utah 235
upside-down 327
URT 412
US Patent Image 234
Use 3 Letter Extensions 279
Use Bounding Box 65
Use Input Directories for Output 276
Use Input File Format for Output 277
Use Input Filename for Output 278
Utah Raster 412
Utah Raster Toolkit 235
V
VandeWettering, Mark T. 187
Verity Corp. 237
Verity Image Format (VIF) 237
VESA 21, 26, 351
VGA 350, 351
VGA display 409
VGA Programming 424
VI 177
View Image 356
View Image in True Color Mode 357
View Scaled Image 359
View Scaled Image in True Color Mode
361
Viewing 30, 68
Viewing Options 349
VIF 237
VIFF 238
Virtual memory 24, 415
VITec 239
Vivid 240
Vivid Ray Tracer 100, 240
Z
ZSoft Corporation 196
W
Warnings 280
warranty ii
Wavefront 129, 241
Wavefront RLA/RLB 241
Western Digital 8514/A 350
Wildcard 281
wildcard expansion 30
Windows 72, 364
Windows 95 71
Windows BitMap 242
WordPerfect Corp. 245
WordPerfect Graphic File 245
WWW 204
X
X Windowing system 246, 247, 248, 251
XBM 246
XGA 21, 350
XIM 247
XLI 413
XPM 248
XWD 251
Y
YCbCr 382
Image Alchemy
439
440
Image Alchemy