1
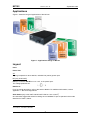
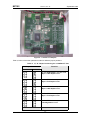
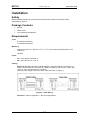
MC102
Media Converters
MC102F, MC102FR, MC102FRC, MC102G, MC102T,
MC102TH, MC102/P
User Manual
MRV Communications, Inc.
URL: http://www.mrv.com
MC102
ML46179, Rev. 08
September 2005
Standards Compliance
This equipment is certified to UL 1950; CSA 22.2 No 950; FCC Part 15 Class B; CE-89/336/EEC,
73/23/EEC.
FCC Notice
WARNING: This equipment has been tested and found to comply with the limits for a Class B digital device,
pursuant to Part 15 of the FCC Rules. These limits are designed to provide reasonable protection against
harmful interference when the equipment is operated in a commercial environment. This equipment
generates, uses, and can radiate radio frequency energy and, if not installed and used in accordance with
the manual, may cause harmful interference to radio communications. Operation of this equipment in a
residential area is likely to cause harmful interference in which case the user will be required to correct for
the interference at his/her own expense.
The user is cautioned that changes and modifications made to the equipment without approval of the
manufacturer could void the user’s authority to operate this equipment.
It is suggested that the user use only shielded and grounded cables when appropriate to ensure compliance
with FCC Rules.
CE Mark
The CE mark symbolizes compliance with the EMC directive of the European Community. Such marking is
indicative that the specified equipment meets or exceeds the following technical standards:
•
EN 55022 – Limits and Methods of Measurement of Radio Interference Characteristics of
Information Technology Equipment
•
EN 50081-1 – Electromagnetic compatibility of Radio Interference Characteristics of Information
Technology Equipment – Generic Emission standard Part 1: Residential commercial and light
industry environment
•
EN 50082-1 – Electromagnetic compatibility – Generic immunity standard Part 1: Residential,
commercial and light industry environment
•
EN61000-4-2 (previously IEC 1000-4-2) – Electromagnetic compatibility for industrial-process
measurement and control equipment – Part 4, Section 2: Electrostatic discharge requirements
•
EN61000-4-3 (previously IEC 1000-4-3) – Electromagnetic compatibility for industrial-process
measurement and control equipment – Part 4, Section 3: Radiated electromagnetic field
requirements
•
EN61000-4-4 (previously IEC 1000-4-4) – Electromagnetic compatibility for industrial-process
measurement and control equipment – Part 4, Section 4: Electrical fast transient/burst requirements
•
EN61000-4-5 – Electromagnetic compatibility for industrial-process measurement and control
equipment – Part 4, Section 5: Surge Immunity requirements
•
EN61000-4-6 – Electromagnetic compatibility for industrial-process measurement and control
equipment – Part 4, Section 6: Immunity to conducted disturbances induced by radio frequency
fields
•
EN61000-4-8 – Electromagnetic compatibility for industrial-process measurement and control
equipment – Part 4, Section 8: Power frequency magnetic field immunity requirements
•
EN61000-4-11 – Electromagnetic compatibility for industrial-process measurement and control
equipment – Part 4, Section 11: Voltage dips short interruptions and voltage variations immunity
requirements
•
EN61000-3-2 – Harmonic standard
•
EN61000-3-3 – Voltage Fluctuation and Flicker standard
•
CISPR 22 – Radiated and Line-conducted Class B
•
EN 60950 – ITE Safety
A ‘Declaration of Conformity’, in accordance with the above standards, has been made and is on file at
MRV ®.
Disclaimer
2
MC102
ML46179, Rev. 08
September 2005
MRV® reserves the right to make changes to any technical specifications in order to improve reliability,
function or design.
MRV reserves the right to modify the equipment at any time and in any way it sees fit in order to improve it.
MRV provides this document without any warranty of any kind, either expressed or implied, including, but
not limited to, the implied warranties of merchantability or fitness for a particular purpose.
The user is advised to exercise due discretion in the use of the contents of this document since the user
bears sole responsibility.
Trademarks
All trademarks are the property of their respective holders.
Copyright © 2002 by MRV
All rights reserved. No part of this document may be reproduced without the prior permission of MRV.
This document and the information contained herein are proprietary to MRV and are furnished to the
recipient solely for use in operating, maintaining and repairing MRV equipment. The information within may
not be utilized for any purpose except as stated herein, and may not be disclosed to third parties without
written permission from MRV.
Document Number: ML46179
Document Revision: Rev. 08
Contact Information
For customer support, you can:
•
Contact your local MRV representative
•
E-mail us at [email protected]
•
Visit our MRV Web site at http://www.mrv.com
3
Release Date: September 2005
MC102
ML46179, Rev. 08
September 2005
Contents
About this Manual .............................................................................6
Safety Requirements.........................................................................6
Before Installing ........................................................................................................................6
Before Powering On ..................................................................................................................6
During Operation .......................................................................................................................6
Servicing.....................................................................................................................................6
Overview ............................................................................................7
General .......................................................................................................................................7
Features......................................................................................................................................7
Models ........................................................................................................................................7
Applications ...............................................................................................................................9
Layout .........................................................................................................................................9
Ports ...................................................................................................................................... 9
Slide Switch (only in MC102F and MC102FI H/W rev. L03 or lower) ................................... 9
Jumpers (only in MC102FI H/W rev. L04 or higher)............................................................ 10
DIP Switch (only in MC102FR, MC102FRC, and MC102/P) .............................................. 13
7-Segment Display (only in MC102/P) ................................................................................ 13
LED Indicators ..................................................................................................................... 13
Installation .......................................................................................14
Safety ........................................................................................................................................14
Package Contents ...................................................................................................................14
Requirements...........................................................................................................................14
Tools.................................................................................................................................... 14
Mounting.............................................................................................................................. 14
Power .................................................................................................................................. 14
Cabling ................................................................................................................................ 14
Procedure .................................................................................................................................15
Operation .........................................................................................17
LEDs..........................................................................................................................................17
MC102F and MC102FI........................................................................................................ 17
MC102FR, MC102FRC, and MC102/P............................................................................... 17
MC102G and MC102T ........................................................................................................ 17
4
MC102
ML46179, Rev. 08
September 2005
7-Segment Display ..................................................................................................................18
MC102/P.............................................................................................................................. 18
Appendix A: Troubleshooting ...................................................... 20
Appendix B: Cleaning Optical Connectors ................................. 21
General .....................................................................................................................................21
Tools and Equipment ..............................................................................................................21
Procedure.................................................................................................................................21
Appendix C: MC102 Configurations............................................. 22
Appendix D: LIN and FEF.............................................................. 23
Link Integrity Notification (LIN)..............................................................................................23
Far-End Fault (FEF) .................................................................................................................23
Appendix E: Product Specification .............................................. 24
Figures
Figure 1: Applications Range of MC102......................................................................................... 9
Figure 2: Location of Jumpers ...................................................................................................... 11
Figure 3: Cable Wiring.................................................................................................................. 14
Figure 4: Fastening a Wall Mount Bracket to the MC102.............................................................. 16
Figure 5: Conversion of Optical Signal Power Reading on MC102/P Front Panel to dBm.......... 18
Figure 6: Air Link Distance vs Expected Received Signal Power ................................................ 19
Figure 7: Data Path ...................................................................................................................... 23
Tables
Table 1: Models of the MC102 ....................................................................................................... 8
Table 2: MC102F and MC102FI Slide Switch Setting .................................................................. 10
Table 3: J1, J2 Jumper Positioning for 10/100Base-T Port.......................................................... 11
Table 4: MC102FR, MC102FRC, and MC102/P DIP Switch Setting ........................................... 13
Table 5: MC102F and MC102FI Front Panel LEDs ..................................................................... 17
Table 6: MC102FR, MC102FRC, and MC102/P Front Panel LEDs ............................................ 17
Table 7: MC102G and MC102T Front Panel LEDs...................................................................... 17
5
MC102
ML46179, Rev. 08
September 2005
About this Manual
This manual is intended for the user who wishes to install, operate, and troubleshoot any of the
MC102 Media Converters.
The latest revision of the user manual can be found at:
ftp.international.mrv.com/support/tech_data
Safety Requirements
Caution!
To reduce risk of electrical shock and fire and to maintain proper operation,
ensure that the safety requirements stated hereunder are met!
Before Installing
Power
Ensure that all power to the MC102 is cut off. Specifically, disconnect the
MC102 power cord from the power line (mains).
Inspection
Ensure by visual inspection that no part of the MC102 is damaged.
Before Powering On
Temperature
Operate the MC102 only at a location where the ambient temperature is in the
range 0 to 40 oC (32 to 104 oF).
Humidity
Operate MC102 only at a location where the ambient humidity is noncondensing and less than 85 %.
Cooling Air
Ensure that the air-flow around the MC102 and through the air vents is not
obstructed. In addition, ensure that there is a clearance of at least 25 mm (1
inch) between the air vents and nearby objects.
Line Power
Ensure that the line (mains) power is as specified on the label on the MC102.
Power Cord
The AC power cord of the OptiSwitch must have either of the following
specifications:
The power cord to be used with a 115 Volt AC configurationmust be a
minimum type SJT (SVT) 18/3, rated 250 Volts AC, 10 Amps with a maximum
length of 15 feet. One end is terminated in an IEC 320 attachment plug, the
other in a NEMA 5-15P plug.
The power cord to be used with a 230 Volt AC configuration must be a
minimum type SJT (SVT) 18/3, rated 250 Volts AC, 10 Amps with a maximum
length of 15 feet. One end is terminated in an IEC 320 attachment plug. The
other end is terminated as required by/ the country where it will be installed.
During Operation
Do not connect or disconnect cables and/or power cords during lightning strikes and
thunderstorms.
Ensure that the MC102 is mounted on a wall or desktop that is flat, stable, non-conductive and
static-free.
Servicing
All servicing must be carried out only by qualified service personnel.
Before servicing, ensure that all power to the MC102 is cut off!
6
MC102
ML46179, Rev. 08
September 2005
Overview
General
The MC102 is a series of media converters, each having the basic function of connecting an
electrical or fiberoptic interface of one device with a fiberoptic interface of another device, and
extending the operating distance between them.
Certain models of the series are based on switching technology and, in addition to the basic
function described above, switch packets, separate the networks connected to their two ports into
separate collision domains, and filter error packets. Others perform, instead, 3R1 repeater
functions so that they can be concatenated to further extend the operating distance without
appreciably compromising signal quality. Still others function as ideal (protocol transparent)
repeaters; capable of transferring data of a wide range of protocols.
Each model is available in a variety of configurations that are characterized by port protocol2,
operating distance, carrier wavelength, fiber/cable type, and port connector. This menu of
configurations enables interconnection of two interfaces that are the same or differ in at most one
or more of these characterizations.
Models MC102FR, MC102FRC, and MC102/P have the Link-Integrity Notification (LIN) and FarEnd Fault (FEF) mechanisms, described in the section Features, page 7.
Using the MC102 to convert an electrical interface into a fiberoptic interface provides the added
benefits of fiberoptic cabling, such as, increased operating distance, EMI/RFI immunity, protection
against intrusion and eavesdropping, safety from electrical shock, etc.
Features
Key features of the MC102 are as follows:
•
•
•
•
•
•
•
•
•
•
Plug-and-play
Regular, VLAN, and jumbo packets support
3R repeater functionality
Protocol transparency
Concatenation to further extend operating distance
Auto-negotiation (auto-sensing) for 10/100Base-TX port
Protective Link Integrity Notification (LIN) mechanism – for details, refer to
Appendix D: LIN and FEF, page 23
Protective Far-End Fault (FEF) mechanism – for details, refer to
Appendix D: LIN and FEF, page 23
Wall mount
Universal (wide-range) internal power supply (except for MC102F)
Models
The MC102 is available in a series of models, each providing one or more unique operation
functions so that a model that tailor-fits an application can be selected. The models and their
description are given in Table 1. Each model is available in various configurations described in
Appendix C: MC102 Configurations.
1
2
3R is Reshape, Retime, Retransmit.
Protocol examples are 10/100Base-TX and 100Base-FX.
7
MC102
ML46179, Rev. 08
September 2005
Table 1: Models of the MC102
Model
MC102F
MC102FI
MC102FR
MC102FRC
MC102G
MC102T
MC102TH
MC102/P
Description
−
−
−
−
−
−
−
−
−
−
−
Switching technology.
10/100Base-TX ÅÆ 100Base-FX protocol conversion.
Packet Length: up to 1522 bytes to support VLANs as well.
3R functionality.
Single-fiber connectivity option.
Collision domain per port.
Data buffering.
Error filtering.
Auto-negotiation or forced speed/duplexity mode.
External DC power supply.
Same as model MC102F except that it has an internal AC power supply.
−
−
Fast Ethernet Repeater technology.
100Base-TX, Full/Half-Duplex ÅÆ 100Base-FX, Full/Half-Duplex protocol
conversion. (The duplexity at both ends of the MC102 must be the same!)
− Multimode ÅÆ Singlemode conversion.
− Packet Length: unlimited to support VLANs and inter-router communication (e.g.,
MPLS, “jumbo” frames, etc.).
− 3R functionality.
− Single-fiber connectivity option.
− Protective Link Integrity Notification (LIN) mechanism.
− Internal AC power supply.
− Fast Ethernet Repeater technology.
− 100Base-TX, Full/Half-Duplex ÅÆ 100Base-FX, Full/Half-Duplex protocol
conversion. (The duplexity at both ends of the MC102 must be the same!)
− Packet Length: unlimited to support VLANs and inter-router communication (e.g.,
MPLS, “jumbo” frames, etc.).
− 3R functionality.
− Single-fiber connectivity option.
− Protective Link Integrity Notification (LIN) mechanism.
− Internal AC power supply.
− Gigabit Ethernet Repeater technology.
− Multimode ÅÆ Singlemode conversion.
− Packet Length: unlimited to support VLANs and inter-router communication (e.g.,
MPLS, “jumbo” frames, etc.).
− 3R functionality.
− 850nm Æ 1550nm wavelength conversion to increase transmission distances.
− Internal AC power supply.
− Protocol transparency technology for protocols of up to 200 Mbps (e.g., T3, E3, DS3,
FE, FDDI, STM-1, ESCON, etc.)
− Multimode ÅÆ Singlemode conversion.
− Packet Length: unlimited to support VLANs and inter-router communication (e.g.
VLAN, MPLS, “jumbo” frames, etc.).
− Wavelength conversion to increase transmission distances.
− Internal AC power supply.
Same as model MC102T except that it is transparent to protocols above 200 Mbps and
up to 1.25 Gbps (e.g., FC, STM-4, GE, etc.)
− Fast Ethernet Repeater technology.
− 100Base-TX, Full/Half-Duplex ÅÆ 100Base-FX, Full/Half-Duplex protocol
conversion. (The duplexity at both ends of the MC102 must be the same!)
− Packet Length: unlimited to support VLANs and inter-router communication (e.g.,
MPLS, “jumbo” frames, etc.).
− 3R functionality.
− Protective Link Integrity Notification (LIN) mechanism.
− Used to connect a TereScope 1 link to a non-MRV switch with special fiberoptic
cables provided by MRV.
− Internal AC power supply.
8
MC102
ML46179, Rev. 08
September 2005
Applications
Figure 1 shows the range of applications of the MC102.
Figure 1: Applications Range of MC102
Layout
Ports
Power Port
AC
3-prong receptacle for 96 to 264Vac, 60/50Hz line (mains) power input.
DC (only in MC102F)
Male pin connector DC IN for 6.5 to 7.5V, 1A dc power input.
The voltage polarities are:
Data Ports
For a functional description, refer to the section Models. For additional information, refer to
Appendix C: MC102 Configurations.
Slide Switch (only in MC102F and MC102FI H/W rev. L03 or lower3)
One internal 6-toggle slide switch for setting the 10/100Base-TX port to operate in the modes
described in Table 2, below.
3
For H/W rev., see label on MC102FI.
9
MC102
ML46179, Rev. 08
September 2005
Table 2: MC102F and MC102FI Slide Switch Setting
Slide Switch
Toggles Position
Function
Set Port ETH10/100 to operate in auto-negotiation mode.
If the toggle is set to the left (ON side), auto-negotiation is
disabled. In such case, the port’s speed and duplexity is
according to the setting of toggles 100M and D-F.
Set Port ETH10/100 to operate at 100 Mbps.
If the toggle is set to the left (ON side), the port operates at
10 Mbps.
Set Port ETH10/100 to operate in full-duplex mode.
If the toggle is set to the left (ON side), the port operates in
half-duplex mode.
Disable half-duplex flow control for ETH10/100 port.
If the toggle is set to the left position (ON side), the port
operates in flow control mode.
Disable full-duplex flow control for ETH10/100 port.
If the toggle is set to the left position (ON side), the port
operates in IEEE 802.3x flow control mode.
means that the toggle position does not affect the function of the toggles shown in specific positions.
Jumpers (only in MC102FI H/W rev. L04 or higher4)
Eight internal 3-pin jumpers for setting the 10/100Base-TX port to operate in the modes described
in Table 3, below.
Figure 2, below, shows the location of jumpers J1 to J8.
4
For H/W rev., see label on MC102FI.
10
MC102
September 2005
ML46179, Rev. 08
Figure 2: Location of Jumpers
Table 3, below, shows the operation modes for different jumper positions.
Table 3: J1, J2 Jumper Positioning for 10/100Base-T Port
Jumper Position
J1
Function
J2
Set Port ETH10/100 to operate at 10
Mbps in Half-Duplex mode.
Set Port ETH10/100 to operate at 10
Mbps in Full-Duplex mode.
Set Port ETH10/100 to operate at 100
Mbps in Half-Duplex mode.
Set Port ETH10/100 to operate at 100
Mbps in Full-Duplex mode.
Set Port ETH10/100 to operate in
Auto-Negotiation mode.
J3
11
MC102
ML46179, Rev. 08
September 2005
Enable Auto-Crossover (AutoMDI/MDIX) – The 10/100Base-T port
can be connected to an Ethernet MDI
or MDIX port with a straight or crossover cable since the port automatically
configures itself to suit the cable type
and co-port interface.
Disable auto-MDI/MDIX.
J4
Enable Half-Duplex (Backpressure)
Flow Control.
Disable Half-Duplex Flow Control.
J5
Enable Full-Duplex Flow Control (IEEE
802.3x).
Disable Full-Duplex Flow Control.
(Future Implementation)
J6
Enable Layer 2 switching functions.
Disable Layer 2 switching functions.
J7
J8
Enable LIN – see Link Integrity
Notification (LIN), page 23.
LIN can function only if AutoNegotiation and Auto-Crossover are
disabled, i.e., jumpers 1 and 2 must be
unconnected and jumper J3 pins 2 and
3 must be connected.
Disable LIN.
12
MC102
ML46179, Rev. 08
September 2005
DIP Switch (only in MC102FR, MC102FRC, and MC102/P)
2-toggle DIP switch for configuring the 100Base-TX port to operate either in auto-negotiation
mode or in forced 100 Mbps/full-duplex mode.
Table 4: MC102FR, MC102FRC, and MC102/P DIP Switch Setting
DIP Switch Toggles
Position
Function
Set ports to operate at 100 Mbps in full-duplex mode without
LIN5 and with FEF6 .
Set ports to operate at 100 Mbps in full-duplex mode with LIN
and without FEF.
Set ports to operate at 100 Mbps in half-duplex mode without
LIN and with FEF.
Set ports to operate at 100 Mbps in half-duplex mode with LIN
and without FEF.
7-Segment Display (only in MC102/P)
Double 7-segment display at the front panel of the MC102/P. It shows the coded reading of the
received optical signal power at the port of the MC102/P. Figure 5 shows how to express the
reading in dBm units.
LED Indicators
Described in Operation.
5
6
LIN (Link-Integrity Notification) is described in the section Features, page 7.
FEF (Far-End Fault) is described in the section, page.
13
MC102
ML46179, Rev. 08
September 2005
Installation
Safety
Before installing the MC102, ensure that the requirements noted in the section Safety
Requirements are met.
Package Contents
•
MC102
•
Power Cord
•
CD containing User Manual
Requirements
Tools
−
6-in flat-tip screwdriver
−
6-in Philips screwdriver
Mounting
−
Wall space (122 mm x 190 mm or 43/4 in x 71/2 in) and wall-mount kit (bracket + two
screws), or
−
Desktop
Power
−
AC: 96 to 264Vac, 60/50Hz, or
−
DC: (MC102F): 6.5 to 7.5V, 1A
Cabling
−
Electrical (MC102F, MC102FI, and MC102FRC): Straight-wired (for connection to a
DTE) or Cross-wired (for connection to a DCE), Category 5, STP or UTP, 2-pair, up to
100 m or 330 ft, RJ45 male 8-pin connector.
The wiring of a straight- and cross-wired cable are shown in Figure 3.
Figure 3: Cable Wiring
−
Fiberoptic: Refer to Appendix C: MC102 Configurations.
14
MC102
ML46179, Rev. 08
September 2005
Procedure
Install the MC102 as follows:
1. Make sure that power to the MC102 is cut off by disconnecting the power cord from the
line (mains).
2. DIP Switch (MC102FR, MC102FRC, and MC102/P): The MC102FR, MC102FRC, and
MC102/P operation mode depends on the position of the toggles of
the DIP switch (external). Determine the required positions for the
toggles using Table 4 and set the toggles accordingly. The factory
setting is as shown on the right.
3. Slide Switch (MC102F and MC102FI H/W rev. L03 or lower7): The
MC102F and MC102FI operation mode depends on the position of the
toggles of the slide switch (internal). The function of each toggle position is
described in Table 2. The factory setting is as shown on the right.
To change the position of a toggle:
1) Undo the eight fastening screws (four on top and two on each side).
2) Remove the cover to expose the slide switch.
3) Set the toggles to the required positions.
4) Refasten the cover with the eight screws.
4. Jumpers (MC102F and MC102FI H/W rev. L04 or higher8): The MC102F and MC102FI
operation mode depends on the position of the jumpers (internal). The function of each
jumper position is described in Table 3, page 11. Jumpers that are not to be used should
be connected to just one pin.
To change the position of a jumper:
1) Undo the seven fastening screws (two on top front, three on top rear, two on left
side, and two on right side).
2) Remove the cover to expose the slide switch.
3) Set the jumpers to the required positions with reference to Figure 2, page 11.
using Table 3, page 11.
4) Refasten the cover with the eight screws.
5. Place the MC102 on a desktop (flat stable non-conductive, static-free surface) or mount it
on a wall after fastening the wall mount bracket with two screws as shown in Figure 4.
6. Connect the MC102 power input port to a power source (dc for MC102F and MC102FI).
7. Connect the MC102 electrical data port.
For MC102F and MC102FI, if the device connected to the ETH 10/100 port does not
have auto-negotiation capability, the MC102F and MC102FI operate in half-duplex mode
and match the speed of the device.
For MC102FR, MC102FRC, and MC102/P, make sure that the device connected to Port
P1 is able to operate at 100 Mbps and in full-duplex mode.
8. Connect the MC102 fiberoptic data ports TX, RX to the device ports, ensuring each fiber
connects TX to RX.
For MC102/P, connect the yellow-sheathed fiber of a special MRV cable to the TX
connector and the blue-sheathed fiber to the RX connector.
9. Power on the MC102 by connecting its power cord to the line (mains).
7
8
For H/W rev., see label on MC102FI.
For H/W rev., see label on MC102FI.
15
MC102
ML46179, Rev. 08
September 2005
10. Verify connectivity by sending data traffic.
Note
If the DIP Switch setting is changed while the MC102 is powered on,
disconnect then reconnect the power cord to enable the MC102 to operate
according to the new setting.
Figure 4: Fastening a Wall Mount Bracket to the MC102
16
MC102
September 2005
ML46179, Rev. 08
Operation
The MC102 becomes fully operational within a few seconds after being powered on. Its operation
can be monitored by interpreting the status of its LEDs with the aid of Table 5 (MC102F and
MC102FI), Table 6 (MC102FR, MC102FRC, and MC102/P), or Table 7 (MC102G and MC102T).
If there is a problem, use the chapter Appendix A: Troubleshooting to resolve it.
LEDs
MC102F and MC102FI
Table 5: MC102F and MC102FI Front Panel LEDs
LED
Status
ON
OFF
ON
OFF
ON
OFF
ON
PWR
SPD
LNK
ACT
OFF
ON
OFF
ON
OFF
FLK
FRX
Significance
Power to MC102 OK.
Power to MC102 faulty.
Port operating at 100 Mbps.
Port operating at 10 Mbps.
Port link OK.
Port link absent or faulty.
Port activity9 present.
Port activity absent.
Fiberoptic port link OK.
Fiberoptic port link faulty.
Fiberoptic port receiving.
Fiberoptic port not receiving.
MC102FR, MC102FRC, and MC102/P
Table 6: MC102FR, MC102FRC, and MC102/P Front Panel LEDs
LED
Status
ON
OFF
ON
OFF
ON
OFF
ON
OFF
ON
OFF
P1 L
P2 L
P1 A
P2 A
LIN (for P1 and
P2)
Significance
Port P 1 link OK.
Port P 1 link absent or faulty.
Port P 2 link OK.
Port P 2 link absent or faulty.
Port P 1 activity present.
Port P 1 activity absent.
Port P 2 activity present.
Port P 2 activity absent.
LIN functionality enabled for ports P1 and P2.
LIN functionality disabled for ports P1 and P2.
MC102G and MC102T
Table 7: MC102G and MC102T Front Panel LEDs
LED
PWR
9
Status
ON
OFF
Significance
Power to MC102 OK.
Power to MC102 faulty.
transmission/reception
17
MC102
September 2005
ML46179, Rev. 08
P1 SD
P2 SD
P1 LCK (only in
MC102G)
P2 LCK (only in
MC102G)
P1 RX (only in
MC102T)
P2 RX (only in
MC102T)
ON
OFF
ON
OFF
ON
OFF
ON
OFF
ON
OFF
ON
OFF
Light signal at port P1 detected.
No light signal at port P1 detected.
Light signal at port P2 detected.
No light signal at port P2 detected.
Data lock-on at port P1 successful.
Data lock-on at port P1 failed.
Data lock-on at port P2 successful.
Data lock-on at port P2 failed.
Data being received at port P1.
Data not being received at port P1.
Data being received at port P2.
Data not being received at port P2.
7-Segment Display
MC102/P
Figure 5 shows how to convert the received optical signal power reading obtained on the double
7-segment display. The vertical axis shows the reading and the horizontal axis shows its value in
dBm. The reading is accurate to + 1 dB.
Optical Signal Power Reading by CLI
14
12
10
8
6
4
2
0
-4 0
-3 5
-3 0
-2 5
-2 0
O p tic a l S ig n a l P o w e r in d B m
Figure 5: Conversion of Optical Signal Power Reading on MC102/P Front Panel to dBm
This dBm value is required to be about equal to the expected dBm value for the link distance
shown in Figure 6.
18
MC102
link distance in m
0.00
received power in dBm
September 2005
ML46179, Rev. 08
-5.00
0
50
100
150
200
250
300
350
400
450
-10.00
-15.00
-20.00
-25.00
-30.00
-35.00
TS1- model C
TS1 - model A
Figure 6: Air Link Distance vs Expected Received Signal Power
19
500
MC102
September 2005
ML46179, Rev. 08
Appendix A: Troubleshooting
No.
1
Problem
Power LED (PWR)
OFF.
Probable Cause
No power.
Corrective Action
1. Check power cord connection.
2. Check source of power.
3. Check power cord.
2
Electrical data port Link
LED (LNK or P1 L)
OFF.
Link between
network and port
absent or faulty.
1. Check electrical cable connections.
2. Check device at other end of electrical cable.
3. Check that the electrical cable is as follows:
cross-wired if connected to a DCE (e.g.,
switch) and straight wired if connected to a
DTE (e.g., PC), Category 5, STP or UTP,
2-pair, up to 100 m or 330 ft, RJ45 male 8-pin
connector.
3
Fiberoptic data port
Link LED (FLK or L).
Link between
network and port
absent or faulty.
1. Check fiberoptic cable connections.
2. Check device at other end of fiberoptic cable.
3. Check fiberoptic cable.
4. Clean connectors as described in Appendix
B: Cleaning Optical Connectors.
4
Data port Activity LED
(ACT, FRX, A, or RX)
OFF.
DTE (e.g., PC) not
transmitting data.
Check DTE.
5
Line Integrity signal
LED LIN ON or SD
OFF.
Fiberoptic link
between the MC102
and device faulty.
MC102FR, MC102FRC, or MC102/P: Check if
the device connected to the MC102 via the
fiberoptic cable is transmitting.
6
Data Signal Detection
LED SD OFF.
Data invalid.
MC102G: Check that the protocol is Gigabit
Ethernet.
MC102T: Check that the protocol speed is in the
range 0-200 Mbps.
MC102TH: Check that the protocol speed is over
200 Mbps and less than 1.25 Gbps.
7
Electrical data port
performance lower than
expected.
Device connected
to this port is not
auto-negotiating.
MC102F or MC102FI: Set DIP switch toggle A.N
to the right position (away from ON). Also, set
DIP switch toggles 100M and D-F so that the
speed and duplexity of the MC102F or MC102FI
match those of the attached device. The factory
setting of the toggles and the procedure for
accessing the DIP switch is given in the section
Procedure.
MC102FR, MC102FRC, or MC102/P: Make sure
that the device attached to the MC102FR,
MC102FRC, or MC102/P is operating at 100
Mbps and in full-duplex mode. Set DIP switch
toggles to the position 100FULL.
8
Fiberoptic data port
performance lower than
expected.
Duplexity mismatch
Insure that the port of the device connected to the
MC102 is set to operate in full-duplex mode.
9
Ethernet network
communication
collapse.
Network
configuration invalid
Insure that the Spanning Tree Protocol is enabled
or that no loops are present in the network.
20
MC102
ML46179, Rev. 08
September 2005
Appendix B: Cleaning Optical Connectors
General
Intrusions (e.g., dust, grease, etc.) at the interface of two optical fibers, such as at a pair of
coupled connectors, attenuate the signal through the fiber. Consequently, optical connectors
must be cleaned before they are coupled with other connectors.
Tools and Equipment
Following are tools and equipment required for cleaning connectors.
•
Dust caps
Caps for protecting the connector from intrusions. A cap is usually made from flexible
plastic. When placing a cap over a connector, avoid pressing it against the fiber ferula
surface in the connector so as to prevent contamination.
•
Isopropyl alcohol
Solvent for contaminants.
•
Tissues
Soft multi-layered fabric made from non-recycled cellulose.
Procedure
The procedure for cleaning connectors is as follows:
1. If no stains are present, using a new clean dry tissue, gently rub, in small circular motions,
the exposed fiber surface and surrounding area in the connector to remove dust.
2. If stains are present,
A.
Moisten a new clean dry tissue with isopropyl alcohol and gently rub, in small
circular motions, the exposed fiber surface and surrounding area in the connector
to remove the stains.
B.
Using a new clean dry tissue, gently rub, in small circular motions, the exposed
fiber surface and surrounding area in the connector to remove the dissolved
stains and excess isopropyl alcohol.
C.
If a connector is not to be coupled with another immediately, cover it with a dust
cap.
21
MC102
September 2005
ML46179, Rev. 08
Appendix C: MC102 Configurations
Models/Configurations
Description
MC102F/x
10/100BaseTX to 100BaseFX converter with external power supply.
MC102F/MT/x
10/100BaseTX to 100BaseFX converter with external power supply and MTRJ
connector
MC102FI/x
10/100BaseTX to 100BaseFX converter
MC102FI/MT/x
10/100BaseTX to 100BaseFX converter with MTRJ connector
MC102FR/x
100BaseFX repeater
MC102FRC/x
100BaseTX to 100BaseFX repeater
MC102FSF13/S1
10/100BaseTX to 100BaseFX single fiber converter with external power supply
(SM; 1310nm transmitter; 0-30 km; SC)
MC102FSF15/S1
10/100BaseTX to 100BaseFX single fiber converter with external power supply
(SM; 1550nm transmitter; 0-30 km; SC)
MC102FSFI13/S1
10/100BaseTX to 100BaseFX single fiber converter (SM; 1310nm transmitter;
0-30 km; SC)
MC102FSFI15/S1
10/100BaseTX to 100BaseFX single fiber converter (SM; 1550nm transmitter;
0-30 km; SC)
MC102FSFR13/M
100BaseFX MM to single fiber repeater (SM; 1310nm transmitter; 0-30 km; SC)
MC102FSFR15/M
100BaseFX MM to single fiber repeater (SM; 1550nm transmitter; 0-30 km; SC)
MC102FSSFR13/S1
100BaseFX SM to single fiber repeater (SM;1310nm transmitter; 0-30 km; SC)
MC102FSSFR15/S1
100BaseFX SM to single fiber repeater (SM; 1550nm transmitter; 0-30 km; SC)
MC102FSFR/S1
100BaseFX single fiber repeater (SM; 1310&1550nm transmitters; 0-30 km; SC)
MC102T/x/x
0-200Mbps Protocol Transparent F/O Repeater
MC102TH/y/y
Above 200-1250Mbps Protocol Transparent F/O Repeater
MC102G/y/y
Gigabit Repeater
MC102/P
Used to interconnect a TereScope 1 link and a non-MRV switch. MC102/P/A is
used with TereScope 1 Model A. MC102/P/C is used with TereScope 1 Model
B.
x and y represent two groups of codes. Below, the left column shows the codes and the right column shows the
meanings.
x=M
MM, 1310nm, 0-2 km, DSC
x = S1
SM, 1310nm, 0-35 km, DSC
x = S2
SM, 1310nm, 25-45 km, DSC
x = S3
SM, 1550nm, 35-90 km, DSC
x = S4
SM, 1550nm, 35-115 km, DSC
x = S5
SM, 1550nm, 35-135 km, DSC
y = SX
MM, 850nm, 0-0.5 km, DSC
y = LX
MM, 1310nm, 0-2 km, DSC
y = S1
SM,1310nm, 0-6 km, DSC
y = S2
SM, 1550nm, 0-32 km, DSC
y = S3
SM, 1550nm, 30-60 km, DSC
y = S4
SM,1550nm, 35-80 km, DSC
y = S5
SM, 1550nm, 35-100 km, DSC
Note
All models have an internal power supply except those specifically mentioned in the above
table as having an external power supply.
22
MC102
ML46179, Rev. 08
September 2005
Appendix D: LIN and FEF
Link Integrity Notification (LIN)
LIN can operate on ports with fiberoptic as well as electrical interfaces.
Following is a description of the operation of the protective LIN mechanism in an MC102 that is
LIN-enabled (FEF-disabled).
Figure 7: Data Path
Referring to Figure 7, if the MC102 does not receive a link integrity signal at RX1, it cuts off
transmission from TX2. Similarly, if it does not receive a link integrity signal at RX2, it cuts off
transmission from TX1. When it receives a link integrity signal, it resumes transmission.
Far-End Fault (FEF)
FEF can operate on ports with fiberoptic interfaces only.
Following is a description of the operation of the protective FEF mechanism in an MC102 that is
FEF-enabled (LIN-disabled).
Referring to Figure 7, if the MC102 does not receive a link integrity signal at RX2, it transmits an
FEF pattern signal from TX2 that notifies Device B about this problem. When RX2 receives the
link-integrity signal, TX2 returns to normal operation. If the MC102 is not configured to operate in
FEF mode, an incoming FEF pattern is ignored.
23
MC102
ML46179, Rev. 08
September 2005
Appendix E: Product Specification
Function
Protocol Conversion:
MC102F, MC102FI
MC102FRC, MC102/P
MC102FR
MC102G
MC102T
MC102TH
Frame size (Max):
MC102F, MC102FI
MC102FRC, MC102/P
MC102FR
MC102G
MC102T
Configurations:
MC102/P/A
MC102/P/C
Others
Fiberoptic Data Port:
MC102/P
Operating Distance
Beam Divergence
Fiber Core/Cladding Diameters
Operating Wavelength
Connector Type
Others
Electrical Data Port (MC102F,
MC102FI, MC102FRC, MC102/P):
Supported Speeds:
MC102F and MC102FI
MC102FR, MC102FRC, MC102/P
MC102G
MC102T
MC102TH
Cable Length (max)
Cable Type
Connector Type
Connector Pinout:
Power Input
AC
DC (MC102F and MC102FI only)
Power Consumption (max)
Media converter
10/100Base-TX ÅÆ 100Base-FX
100Base-TX ÅÆ 100Base-FX
100Base-FX ÅÆ 100Base-FX
Gigabit Ethernet ÅÆ Gigabit Ethernet
Any protocol up to 200Mbps ÅÆ Any protocol up to 200Mbps
Any protocol from above 200 Mbps to 1.25Gbps ÅÆ Any
protocol from above 200 Mbps to 1.25Gbps
1522 bytes
Up to “jumbo” frames (e.g., VLAN, MPLS, etc.)
Up to “jumbo” frames (e.g., VLAN, MPLS, etc.)
Up to “jumbo” frames (e.g., VLAN, MPLS, etc.)
Up to “jumbo” frames (e.g., VLAN, MPLS, etc.)
Used with TereScope 1 Model A.
Used with TereScope 1 Model B.
Refer to Appendix C: MC102 Configurations.
MC102/P/A:
MC102/P/C
240 m (800 ft) at 17 dB/km 470 m (1540 ft) at 17 dB/km
Model A: 6 mrad; Model C: 3.65 mrad
600/630 µm
400/430 µm
850 nm
850 nm
ST
ST
Refer to Appendix C: MC102 Configurations.
10 and 100 Mbps
100 Mbps
1 Gbps
Up to 200 Mbps
Above 200 Mbps to 1.25 Gbps
100 m (330 ft)
Cross-wired (see Figure 3), Category 5 (UTP or STP), 2-pair
RJ45 8-pin shielded female
MDI-X (1ÆRx+; 2ÆRx-; 3ÆTx+; 6ÆTx-)
96 to 264Vac, 60/50Hz
6.5 to 7.5V, 1A
Less than 12 W
Temperature:
Operating
Storage
Humidity (non-condensing)
O
O
0 to 40 C (32 to 104 F)
O
-10 to 50 C (14 to 122 OF)
Less than 85%
Dimensions (W x H x D)
3
1
122 mm x 45 mm x 190 mm (4 /4 in x 1U in x 7 /2 in)
Weight
Less than 500 g (1 lb)
Compliance
Certified to comply with UL 1950; CSA 22.2 No 950; FCC Part 15
Class B; CE-89/336/EEC, 73/23/EEC
1U = 13/4 in.
24