1
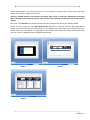
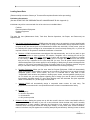
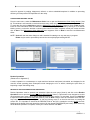
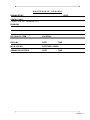
Council Properties
Management System
(CPMS)
User Manual
Author: Engineering Service
Date: 03/25/09
Version: 1.1
CPMS V 1.1
Version History
ID
1.0
1.1
Changes
First Draft
Copy Edit 1
Date Created
12/18/08
03/31/09
Author
T. Harrover
J. Stewart
Edit
J. Stewart
C. Mendez
CPMS V 1.1
TABLE OF CONTENTS
System Overview
Prerequisites
Computer
Instructions
General Order of Startup
Load the Software on Your Computer
Initial Opening of CPMS
Setup
Loading Asset Data
Preliminary Groundwork
Facilities x
Electromechanical Equipment
Program Equipment
Vehicles
Record Maintenance Tasks
Maintenance Orders
Routine Operations
Job Cards
Record Resources and Set Up Hyperlinks
Recording Resources
Setting Up Hyperlinks
Reports
Running Reports
Appendices
Appendix A: Guide for the Preparation of a Maintenance Plan
Appendix B: Maintenance Order System
Appendix C: Routine Operations
Appendix D: Reports
Appendix E: Search Features
Appendix F: Deleting Entries
Appendix G: “Related Tasks” Tabs
Glossary of Terms
CPMS V 1.1
SYSTEM OVERVIEW
The Council Properties Management System is a database system that compiles information on a property’s
assets, its maintenance requirements, and the resources necessary to complete scheduled work. In addition,
it provides a framework for expenditure approvals and controls.
The greatest benefit of this system lies in the potential of the ranger or person responsible for camp
maintenance and management to map out necessary work and resources and to provide a framework upon
which to conduct a constructive dialog of expectations and realities. This will not work if it is seen as a
“ranger’s tool.” While the ranger or person responsible for camp property may perform the majority of data
input, involvement from the entire council’s reporting structure is necessary to make this effective.
The output of this program (the reports) represents a plan of time and resources that must be executed or
adjusted as necessary.
This version of the program is a standalone version. A Web-based upgrade is in the planning stages and will
be released after this version has been introduced to the field and proven. It is intended that the camp ranger
or person charged with camp maintenance print periodic reports from the system and fax or send them to
his/her supervisor for monitoring and controls purposes. We recognize that this may be a bit awkward at first,
but we believe the exigency of completing a first version today outweighs the benefit of publishing a Web
version much later.
Finally, other benefits of the system include budgeting, centralized record keeping, insurance data, and the
ability to hyperlink to plans, specifications, photographs, and procedures.
PREREQUISITES
Computer
1. PC SYSTEM REQUIREMENTS 500 MHz processor; 256 MB RAM; 1024x768 resolution monitor; or
higher. CD-ROM drive. Hard disk: 1.5MB available
2. OPERATING SYSTEM REQUIREMENTS MS Windows XP (upgraded with Service Pack 3); MS Access
2007. CPMS is also compatible with MS Vista.
INSTRUCTIONS
General Order of Startup
1. Load the Software on Your Computer.
2. Set up the camp property by recording the property address, operator, and establishing classifications.
3. Loading Asset Data
a. Facilities
b. Electromechanical Equipment
c. Program Equipment
d. Vehicles
4. Record Maintenance Tasks
a. Maintenance Order
b. Routine Maintenance
c. Job Cards
5. Record Resources and Set up Hyperlinks.
6. Begin Using the System by Printing Reports.
CPMS V 1.1
Load the Software on Your Computer
The disk accompanying this manual contains the Council Properties Maintenance System. There are two MS
ACCESS 2007 files: “CPMS.accdb” and “CPMS_db.accdb.” NOTE: Copy both to your hard drive, but you will only
work directly with the “CPMS.accdb” file. After you have successfully loaded both files, use your mouse and right
click on, “CPMS.accdb”. Select “Send to”, then select “desktop.” This will place the CPMS icon on your desktop.
“If you wish, you may re-label the file simply, “CPMS” by using your mouse and right clicking on the icon. Select
“rename.” The other file (CPMS-db.accdb) is entirely automated and it generates all the reports.
WARNING: All user-accessible functions are contained within “CPMS.accdb” and it is very important to
simply copy the other file (“CPMS_db.accdb”) as instructed and then just leave it alone and let it do its
job. Unless you are a highly competent programmer of MS Access 2007 there is no foreseeable reason for
you to ever open “CPMS_db.accdb.”
When you copy the files to your hard drive, create a separate folder for this and label it with the camp name and
“CPMS”. (e.g., Camp John CPMS) CPMS can accommodate more than one property, but we recommend that
you set up a separate folder for each camp. (See PREREQUISITES)
INITIAL OPENING OF CPMS
Upon opening CPMS, you’ll see the main menu (View A) with a “Security Warning” (View B). Click on Options
and select “Enable this content” button to activate the program and the main menu icons.
To disable Security Warnings in the future, open the Trust Center (bottom of the Security Warning dropdown)
and click on Access Options. Click on Trust Center in the left pane and then select Trust Center Settings.
Select Trusted Locations in the left pane and then Add New Location. Enter the location (directory). Be sure to
select the Subfolders of this location are Also Trusted check box. Enter the description, then click OK.
Set Up
View A
View B
From the main menu, (View A) select Set Up. The information that you enter in Set Up is used for the reports
generated by CPMS. Asterisks (*) indicate required information.
CPMS V 1.1
Set Up always opens in the Council tab (View C). This is where you enter the info for your council and camp
exactly as you wish it to appear in the reports.
Note the “CLOSE” button in the square in the upper right corner of each pane subsequent to the Main
Menu. Clicking on this button at any time will close the current window and take you back to the previous
display.
Next, click on the Operator tab (View D) and enter the info for each person who will be operating CPMS.
Initially, you’ll not need to go to the Drop-down Entries tab (View E). This has some info pre-loaded that will
appear in various drop-downs as choices when you are loading your camp’s data. If you find that these preloaded choices are not adequate or appropriate for your situation, this is where you may come back and enter
your own. There are additional options explained further below.
View C
View D
View E
CPMS V 1.1
Loading Asset Data
(Please carefully review the Glossary of Terms and Prerequisites Section before proceeding)
Preliminary Groundwork
(See also GUIDE FOR THE PREPARATION OF A MAINTENANCE PLAN—Appendix A)
Initial data entry will be concerned with four of the nine icons in the Main Menu:
Facilities
Electromechanical Equipment
Program Equipment
Vehicles
The other five icons (Maintenance Order, Task Alert, Routine Operations, Job Report, and Resources) are
explained later.
1. IDs, Codes, Numbering Systems—CPMS requires that each entry to be tracked is uniquely identified with
its own ID designation. In most cases, CPMS is set up simply to automatically assign sequential numbers
to items as they are entered (such as for Maintenance Orders and Job Alerts). In other cases, (such as
for Facilities) the system is designed to accommodate the council’s already-existing IDs, or you will be
required to devise an ID system for individual identification of each item.
a. Facilities—CPMS accommodates user-assigned IDs alphanumerically, and it will be useful to give
some consideration to how to proceed. For instance, thoughtful care in devising IDs will let you
recognize which camp, which facility, which area of camp, and even what type of facility it is, whether
it is a building, a shed, a gateway, a sign, a utility pole, or a bridge. We recommend for this version
that you set up a separate file for each camp that you own. Your ID system should incorporate
different designations (like a letter prefix) for each category of facility that you want to distinguish from
another. If you have a pre-existing ID system for keeping track of your Facilities, chances are good
that you’ll be able to utilize your existing system without the need to change anything.
b. Program Equipment—When you first enter data for Program Equipment, CPMS will automatically
assign a sequential asset number for each item as it is entered. The system is set up mainly for larger
equipment (make, model, serial number, etc.) but it is intended also to keep track of such
“consumable” items as tents, tent platforms, climbing ropes, arrows, oars and paddles (usually by lot),
etc. For these, use your own judgment regarding how to assign your own ID codes to be tracked.
Incorporating acquisition dates is a good idea. Marking tents with individual IDs (with acquisition
dates or lot numbers, etc.) is also highly recommended.
c.
Vehicles—CPMS will automatically assign a sequential asset number for each entry. The
programmers have also built in a requirement that each vehicle be associated with a facility.
d. Priorities
1—Emergency
2—As soon as possible
3—As scheduled
4—Only as time permits
2. Collection of data—Getting the system set up with the council’s data can involve considerable effort, in
most cases far beyond the ability of just one or two individuals. While the data entry itself is normally
accomplished by a single operator, gathering the information to be entered is a task well-suited to
collective effort, unless good records are being kept already. In most cases, after a short orientation,
teams of volunteers can pull together the necessary data quickly and efficiently. Working in twos or threes
CPMS V 1.1
and using the worksheets provided with this manual, such teams can usually collect the needed info in
just one or two days.
ADDING CHOICES TO DROP-DOWN MENUS
Each dialog box in the following four categories contains drop-downs with pre-loaded choices for some entries. In
the event that you find the pre-loaded choices are not applicable for your purpose, first SAVE your data. Return to
the Main Menu and open Set Up. Select “Classifications” and record your choices for the drop down boxes.
IMPORTANT: Once an entry is saved in Drop-Down Entries, it can never be deleted. Erroneous entries will
require adding a new and correct entry—and care from then on to avoid selecting the erroneous entry.
Facilities
Open the main menu and click on the Facility icon to open the Facility listing window (View F). This window is not
intended to receive direct data entry, rather only to display what has already been entered. To enter data, first
click on Add New to open the Facility dialog box (View G). Click on New to begin. Enter all the information about
the facility. Any entry may be revised by clicking on it so that the blinking cursor is on that line and then reentering the correct info. When complete, review your entries and then click on Save. The Facility dialog box
reappears. Click on New to enter the next facility.
NOTE: Undo will clear the entire dialog box and is intended for starting over on an entry in progress.
Delete will permanently erase an already entered Facility file.
Floor Plan Hyperlink (when enabled) provides instant access to drawing documents of the facility.
(See Appendix)
View F
View G
Electromechanical Equipment
This process is the same as for Facilities, above. You will note that all electromechanical equipment is tied to a
facility. You cannot record the equipment until you have recorded the facility. Open the main menu and click on
the Electromechanical Equipment icon to open the Asset—Electromechanical Equipment Record window (View
H). This window is not designed to receive any direct data entry, rather only to display what has already been
entered. To enter data, click on Add New to open the Asset—Electromechanical Equipment Record dialog box
(View I). Click on New to begin. Enter all the information about the equipment. Any entry may be revised by
clicking on it so that the blinking cursor is on that line and then re-entering the correct info. When complete,
review your entries and then click on Save. The Electromechanical Equipment dialog box reappears. Click on
New to enter info on the next item.
CPMS V 1.1
NOTE: Undo will clear the entire dialog box and is intended to clear an entry in progress.
Delete may be used to permanently remove the currently displayed Electromechanical Equipment
Record file.
View H
View I
Program Equipment
The process is the same as for Facilities above. You will note that all program equipment is tied to a facility. You
cannot record the equipment until you have recorded the facility in which it is stored. Open the main menu and
click on the Program Equipment icon to open the Asset—Program Equipment Record window (View J). This
window is not designed to receive any direct data entry, rather only to display what has already been entered. To
enter data, click on Add New to open the Asset—Program Equipment Record dialog box (View K). Click on New
to begin. Enter all the information about the item(s). Any entry may be revised by clicking on it so that the blinking
cursor is on that line and then re-entering the correct info. When complete, review your entries and then click on
Save. The Program Equipment dialog box reappears. Click on New to enter info on the next item.
NOTE: Undo will clear the entire dialog box and is intended for starting over a new entry in progress.
Delete may be used to permanently remove the currently displayed existing Program Equipment file.
View J
View K
CPMS V 1.1
Vehicles
This process is the same as for Facilities, above. You will note that all vehicles are tied to a facility. You cannot
record the equipment until you have recorded the facility in which it is stored, usually the maintenance yard or a
storage building. Open the main menu and click on the Vehicles icon which will open the Asset—Vehicle Record
window (View L). This window is not designed to receive any direct data entry, only to display what has already
been entered. To enter data, click on Add New to open the Asset—Vehicle Record dialog box (View M). Enter all
the information about the vehicle. Any entry may be revised by clicking on it so that the blinking cursor is on that
line and then re-entering the correct info. When complete, review your entries and then click on Save. The
Vehicles dialog box reappears. Click on New to enter the next item.
NOTE: Undo will clear the entire dialog box and is intended to start over a new entry in progress.
Delete may be used to permanently remove the currently displayed existing Vehicle file.
View L
View M
Record Maintenance Tasks
Maintenance Orders
(Please refer to Appendix B)
A Maintenance Order is an electronic record that contains all of the necessary information about a maintenance
or repair task to be performed. It may be triggered by a maintenance request (MR) or simply entered into the
system by the ranger or other person responsible for facilities maintenance. When work or repairs are needed,
the maintenance order allows the task to be scheduled and resources assigned.
A Maintenance Request is a printed form and can be originated by anyone. Once received, it must be routed to
the designated first line of authority—usually the ranger or camp director. An electronic copy of the MR form (MS
Word 2007 .doc file) is found on the CPMS disk. It is useful to have the MR forms printed and made into small
pads for convenience. A supply of these should always be available from the service center, the camp office, and
the ranger’s office. Additionally, they should be carried by the ranger, the camp director, and anyone else deemed
appropriate.
Every Maintenance Request should be logged for record and follow-up. It is recommended that policy would
require some determination be made regarding the request within 10 days of being originated, and also that
prompt follow-up then occur with the request originator for notification of its status—whether that be approval,
CPMS V 1.1
review for approval is pending, disapproval, deferral, or action scheduled/completed. In addition to promoting
efficiency, this has positive PR implications for the camp.
LOGGING AND TRACKING THE MO
From the main menu, select the Maintenance Order icon to open the Maintenance Order listing window (View
N). This window is not intended to receive direct data entry, rather only to display what has already been entered.
To enter data, first click on Add New to open the Maintenance Order dialog box (View O). Click on New to begin.
Enter all of the information about the Maintenance Order. Any entry may be revised by clicking on it so that the
blinking cursor is on that line and then re-entering the correct info. When complete, review your entries and then
click on Save. The Maintenance Order dialog box then reappears. Click on New to enter the next Maintenance
Order.
NOTE: Undo will clear the entire dialog box and is intended for starting over any new entry in progress.
Delete may be used to permanently remove the currently displayed existing MO file.
View N
View O
Routine Operations
(Please refer to Appendix C)
A routine operation is a maintenance or repair task that has been anticipated, scheduled, and budgeted in the
council’s annual operating plans. Examples include changing the oil in a vehicle, cleaning the pool filters, or
inspecting a septic field during camp.
SETTING UP AND TRACKING ROUTINE OPERATIONS
Routine Operations must be entered and scheduled. Open the main menu (View A) and click on the Routine
Operations icon to open the Routine Operations listing window (View P). This window is not designed to receive
any direct data entry, rather only to display what has already been entered. To enter data, first click on Add New
to open the Routine Operations dialog box (View Q). Click on New to begin. Enter the information about the task.
Any entry may be revised by clicking on it so that the blinking cursor is on that line and then re-entering the
correct info. It is important to note that the DESCRIPTION of the RO is intended to merely identify the task.
Spelling out the details of the task should be reserved for the related PROCEDURE (see below). When data entry
for the Routine Operation is complete, review your entries and then click Save.
CPMS V 1.1
Next, schedule your task. Open the tab “Mass Task Schedule.” Click on, “Find Dates.” CPMS will schedule your
activity based on the start/stop dates and the frequency that you entered on the Routine Maintenance page. You
can change the dates or you can accept the dates by clicking on the “Save Dates” button. Saving the dates will
take you to the “Scheduled Tasks” page, which allows you to modify the details of the individual tasks.
NOTE: Undo will clear the entire dialog box and is intended for starting over an entry in progress.
Delete may be used to permanently remove any currently displayed RO file.
Click on New to add the next task.
View P
View Q
Job Cards
(Please refer to Appendix D)
Use Job Cards to record work that is outside the immediate planning cycle or work that is intended to be
completed by volunteer work crews.
SETTING UP AND TRACKING JOB CARDS
Open the main menu (View A) and click on the Task Alert icon to open the Task Alerts listing window (View R).
This window is not designed to receive any direct data entry, rather only to display what has already been
entered. To enter data, first click on Add New to open the Task Alerts dialog box (View S). Click on New to begin.
Enter all the information about the task. Any entry may be revised by clicking on it so that the blinking cursor is on
that line and then re-entering the correct info. When complete, review your entries and Save. The Task Alerts
dialog box reappears. Click on New to add the next task.
NOTE: Undo will clear the entire dialog box and is intended for starting over an entry in progress.
Delete may be used to permanently remove a currently displayed existing Job Alerts file.
CPMS V 1.1
View R
View S
Record Resources and Set up Hyperlinks
CPMS provides a single point source to record and find contractors, vendors, helpful volunteers, and anything
that can be described as a resource.
Open the main menu (View A) and click on the Resources icon to open the Resources window (View T). This
window is not designed to receive any direct data entry, only to display what has already been entered. To enter
data, click on Add New to open the Resources dialog box (View U). Enter all the information about the resource.
Any entry may be revised by clicking on it so that the blinking cursor is on that line and then re-entering the
correct info. When complete, review your entries and then click on Save. The Resources dialog box reappears.
Click on New to enter the next resource.
NOTE: Undo will clear the entire dialog box and is intended for starting over any new entry in progress.
Delete may be used to permanently remove the currently displayed existing Resources file.
View T
View U
CPMS V 1.1
Setting up Hyperlinks
Hyperlinks can take you to any picture, plan or document that you have saved on your computer. Hyperlinks will
appear on your screen as so: Hyperlink. To set up a hyperlink, copy the document you want to link to on to your
computer. Note the location where you have placed it. Use your mouse to click on the hyperlink “edit” button
located to the right of the hyperlink word. Enter the file and path in the dialog box that pops up.
Reports
The Reports function allows the user to plan for upcoming work and to document work accomplished. Planning for
future work involves discussions about the resources necessary to maintain the camp property. Resources can be
time, money, or materials.
Documentation of completed work forms a baseline from which to project expenses in the next budget cycle.
View V
Running Reports
From the main menu, (View A) select Job Reports. Enter the dates that bracket the time period that you wish to
report on. For example, from 3/1/09 to 3/31/09 would report on the Month of March 2009. Click on the “Find”
button and the information will appear on the screen. All bracketed tasks will be reported and the cost associated
with each. In this version, you can click on the “Action” button to take you to the task to tabulate the remaining
resources (labor, tools, and materials). Subsequent versions will report on materials, tools, and labor as a second
report.
CPMS V 1.1
A P P E N D I C E S
A. GUIDE FOR THE PREPARATION OF A MAINTENANCE PLAN
These steps are essential for effective use of the Council Properties Maintenance System.
ACTION
RESOURCES
1.
Organize maintenance subcommittee
Council organization chart
Subcommittee roster
Subcommittee responsibility chart
2.
Inventory items requiring maintenance
Building records
Structure records
Electromechanical equipment records
Vehicle records
Program equipment records
3.
Establish a Maintenance Order (MO) system
a.
Create MO log
(see Appendix B)
b.
4.
5.
Establish expenditure protocols
Establish Routine Operations
a.
Create Routine Operations Card
for each routine operation
b.
Prepare instruction sheet (Procedure)
for each major routine operation
c.
Create a Maintenance Procedures
Manual
d.
Assign frequency interval to each
operation
e.
Record all work performed in the
appropriate permanent file
Create Task Alerts
a.
Identify and describe projects on
Task Alerts
b.
Schedule the work
c.
Enter into CPMS
d.
Record the completion
Routine operations card(s)
(see Appendix C)
(see Appendix D)
CPMS V 1.1
6.
Conduct Inspections
7.
Prepare budgets
8.
a.
Annual presentation/submittal
for approval
b.
Adjust budgets as required
Inspection checklists for:
Pre-camp
Post-camp
Buildings
Structures
Vehicles
Campsites
Program equipment
Electromechanical equipment
CPMS-generated reports
Implement Maintenance Plan
a.
Train staff / volunteers
9.
Other records / forms
10.
Annual review
a.
Expenditures / accomplishments
b.
Assessment of effectiveness
c.
Adjustments / improvement
Maintenance procedures
CPMS
Purchase orders
Budgets
Expenditures policies and procedures
Contract documents
Maintenance manual
Property records / deeds
Aerial photos / maps
Site development plans
Construction drawings
Manufacturers’ literature
Vehicle use reports
Weekly work report
Long range plan
Conservation plan
Maintenance subcommittee’s
annual report
CPMS V 1.1
B. MAINTENANCE ORDER SYSTEM
The Maintenance Order system is regarded as the heart of CPMS and is the proven best vehicle for the handling
of all incoming maintenance items or requests. CPMS distinguishes between a MAINTENANCE REQUEST (MR)
and a MAINTENANCE ORDER (MO). A Maintenance Request is a printed form and a request can be originated
by anyone. Once received, it must be routed to the designated first line of authority—usually the ranger or camp
director. A recommended form for the Maintenance Request is shown below. An electronic copy of the MR form
(MS Word 2007 .doc file) is on the CPMS disk. It will be useful to have the MR forms printed and made into small
pads for convenience. A supply of these should always be available from the service center, the camp office, and
the ranger’s office. Additionally, they should be carried by the ranger, the camp director, and anyone else
deemed appropriate.
Every Maintenance Request should be logged for record and follow-up. It is recommended that policy would
require some determination be made regarding the request within 10 days of being originated and also that
prompt follow-up then occur with the request originator for notification of its status—whether that be approval,
review for approval is pending, disapproval, deferral, or action scheduled/completed. In addition to promoting
efficiency, this has positive PR implications for the camp.
The Maintenance Order, unlike the Maintenance Request, exists only as an electronic data record. A
Maintenance Order is initiated by the CPMS operator when an MR has been approved. NOTE: In situations when
the action must be immediate, and following the MO procedures is not practical in the emergency, the follow-up
should include documentation with an after-action MO that duly records the actions and approvals.
The MO system is for the daily operation of the property/facility and is the part of CPMS that tracks all nonscheduled repairs and maintenance that have not been specifically budgeted. The recommendation is that the
council’s annual budget allocations for maintenance include a designated percentage for nonscheduled
maintenance, specifically to fund approved MO work items. One of the great values of the MO System is that it
creates a long-term record of actual experience for use as an historic basis for structuring budgets in the future.
CPMS V 1.1
MAINTENANCE
REQUEST
ORIGINATED BY:
DATE:
CONTACT INFO:
(TROOP, CELL NO., ADDRESS, ETC.)
PROBLEM:
RE: FACILITY / ITEM
LOCATION:
REC’D BY:
DATE:
M.O.R. LOG NO.
DATE/TIME LOGGED:
ORIGINATOR NOTIFIED:
DATE:
TIME:
TIME
CPMS V 1.1
C. ROUTINE OPERATIONS
Managing the Routine Operations (RO) is the meat and potatoes of CPMS. These are the ongoing regular
(approved and budgeted) maintenance tasks, operations, and inspections that are performed repetitively—from
daily to annually. CPMS will record and track all items of such work and also provide the scheduling alerts for
upcoming tasks. This program provides for each RO to be hyperlinked to a statement of written Procedures (see
below) that describes in detail the task and what is required.
Critical components of the info in the Routine Operations record are:
• Frequency
• RO Number
• Schedule Start Date
• Schedule End Date
• Procedure Hyperlink
Frequency is how often the task is to be performed. Choose from the drop-down menu.
RO Number is a permanent number for this task automatically assigned when the file is created.
Schedule Start Date must be entered as a calendar date (mm/dd/yyyy). This is the opening date of the time
period during which the task is anticipated to occur. The system is designed with flexibility to accommodate any
time period, whether the task recurs on a continual, seasonal or episodic basis. When you move the cursor to the
data entry box you may enter the date manually, if known. When the cursor is in the data entry box, a calendar
icon appears, displaying the current month. If another month is required, use the forward-backward scroll feature
to display the desired month. Click on the selected date and it will automatically appear in the data.
Schedule End Date also must be entered as a calendar date (mm/dd/yyyy). This is the anticipated date the task
will end. Note that the Schedule Start Date and the Schedule End Date establish the time window during which
the task anticipated is to occur. (See Scheduled Task below.)
Procedure Hyperlink, when enabled, provides instant access to the appropriate written Procedure.
(See Appendix E)
Scheduled Task is provided to allow for setting the actual date for a task to occur or commence. To set the date,
open the RO listing window. Click on the selected RO task record to highlight it, then click on the OPEN SELECT
button to open that task record. Click on the SCHEDULED TASK tab, which will open a special data entry
window. Move the cursor to SELECT DATE and click once to open a calendar display. The current month/year
will display. Use the forward-backward scroll feature to display the desired month/year. Click on the calendar icon
to open a display of that calendar month. Click on the selected date and the corresponding data will enter
automatically. The date can be changed any time, either manually or automatically by following these steps.
Task Scheduling may be used to set future dates for tasks that will recur within the time period between the
Scheduled Start Date and the Scheduled End Date. NOTE: This feature becomes active only after the initial
SCHEDULED TASK date has been set. Click on the TASK SCHEDULING tab. Please refer to Scheduled Task
(above), which will open a special data entry window. Click on the FIND DATES button to display an automatically
calculated schedule of future dates that falls within the time window established by the Schedule Start Date and
the Schedule End Date.
For any calculated date that is not acceptable, click on the ACCEPT checkbox to remove the checkmark. Dates
without an ACCEPT checkmark will not appear in any other display or report. To alter a date, move the cursor to it
and click once. The date is now editable and a calendar icon appears. Type in the desired date or click once on
the calendar icon. The month/year corresponding to the date in the display will appear. Select a new date from
the month that is displayed or use the forward-backward scroll feature to display the desired month/year. Clicking
on the desired date in the calendar display will automatically enter the date in the data entry box.
CPMS V 1.1
Procedures
Procedures are written descriptions that describe, in detail, the task and what is required.
NOTE: There is no provision within CPMS for creating a Procedures document. These must be created
independently. CPMS provides for a hyperlink (Appendix E) between the RO and the Procedure document, which
can be just about any electronic format with text and/or illustrations. Ideally, everything needed for understanding
how to perform the task will be included within the file. Each Procedure should be assigned its own systematic ID
number, which should also be its file name. It is recommended that Procedures be stored in their own folder
within your CPMS folder.
Always include clear step-by-step instructions, with copies of diagrams or illustrations as appropriate.
Example of a simple written Procedure:
SANITIZING WATER SYSTEM PRESSURE TANK
MAINTENANCE PROCEDURE MP-091
****NOTE: THIS PROCEDURE IS RESTRICTED TO ADULTS, 21 OR OLDER****
Property:
Location:
Frequency:
Tools Req’d:
Materials:
Camp Runamok
Well House 2
Annually (April)
Rubber gloves, safety goggles, rubber apron
Hypochlorite, 20% solution, 5 gallons; rubber seal
Procedures:
1. Using a ratchet and ½” socket, remove the 12 bolts from the tank cover plate.
2. Remove from the tank the cover plate and rubber seal.
3. Put on apron, gloves, and goggles; remove cap and seal from hypochlorite container.
4. Slowly pour all of the hypochlorite solution into the tank.
5. Add water to the tank until half full.
6. Let solution set for 30 minutes while replacing cover plate and new seal.
7. Fill tank to overflow with water and install half-inch plug.
8. Account for all tools, lock well house, and complete Routine Operations card.
There is also a provision for assignment of classification of tasks. The report of like classifications is especially
useful when gifts of labor or materials are being considered for donation. This information is also linked to the
Resource files, for matching of needs to available skills. (See Glossary of Terms)
D. REPORTS
Individual item entries—Each of the dialog boxes for entry of information has been provided with a PRINT button.
(This button remains inactive until there is actually data entered.) Once a single item has been saved, the PRINT
button becomes and remains active. Clicking on the PRINT button for an individual item will display a printable
version of the information associated with that item. The QUICK PRINT icon takes you to your printer selection.
CPMS V 1.1
E. SEARCH FEATURES
CPMS has been set up to help you find the information that you want quickly. Each of the Listing Windows (Views
F, H, J, L, N, P, R, and T) has been provided with two search features: SEARCH and SHOW. NOTE: At anytime,
you can go instantly to a desired record by double-clicking on that line in the displayed listing.
SEARCH: Clicking on the SEARCH button in any of the Listing Windows will open the Search Window for that
category. Here you can select any search criteria from the data that has been entered into CPMS. Each different
data type features its own drop-down button to display the choices from the data that has been entered into the
system. Select your criteria by clicking on its drop-down button and then by clicking on your choice, which will
then be displayed on that line. Click on FIND and that will take you to a display that lists all records containing
your selected search criteria. NOTE: you may enter more than one line of search criteria, to narrow your search.
To go instantly to a desired record, simply double-click on that record in the displayed listing.
Below the search results is a side-to-side SCROLL feature. To open the record that you wish to see, scroll to the
far right and click on the OPEN button for that record. This will take you to the selected display.
DELETE button This feature deletes the selected record (as indicated by the pointer in the left-most column of the
record display) and all reference to the record throughout the system. A warning and a YES/NO option will
automatically appear before executing the DELETE command.
CLEAR button This feature will clear the search results from the display with a single stroke. No warnings appear
and nothing permanent happens with this feature.
SHOW button This button is inactive until your data entry has created at least one record for that category. Once
the first record has been saved, the associated SHOW button becomes and remains active.
The SHOW feature allows you to change the display of records only to those containing the criteria that you have
selected. To use the SHOW feature, check the box that corresponds to your selection criteria, then type in the
search word(s) / number(s) and then click on SHOW. The records display will then contain only those records that
contain your selection criteria. To go to a desired record, simply double-click on that record in the display.
The SHOW selection criteria also lets you find records that fall within a range of criteria, such as construction
year, construction cost, square feet, etc. To use this feature, simply enter the low number in the BETWEEN
column and the high number in the AND column and then click on FIND. The display will show all records that are
within the range selected. To go to a desired record, simply double-click on that record in the display.
Search Result Reports
Detail Report This feature displays a printable version of a selected record. To select a record from those
displayed in the search results, move the pointer in the left-most column by clicking on the desired line in that
column. Click on the DETAIL REPORT button to display the printable version. To enter the print process, click on
the QUICK PRINT icon at the top left of your screen.
Summary Report This feature displays a printable version of all records with the selected search criteria. (Ex: All
Program Facilities) The Summary Report also includes an automatic calculation that will summarize total dollar
amounts for the records selected. To enter the print process, click on the QUICK PRINT icon at the top left of your
screen.
A–Z button This feature allows you to reverse the display order of your search results to either ascending or
descending alpha-numeric order. NOTE: This feature uses the column of data that corresponds to the check box
that you chose for your search.
VIEW ALL button This feature will change the display of your search results to again show ALL records.
CPMS V 1.1
F. DELETING ENTRIES (CRITICAL INFORMATION)
Deleting entries in the system is easy, but it involves a few steps. Enter the window for the item category (Facility,
Vehicle, etc.), highlight the desired item and click on Open Select. When the dialog box for the item displays,
Click Delete. An “Are You Sure?” prompt will display.
Also in the SEARCH results display is a DELETE button. ATTENTION: Using this DELETE feature will eliminate
the selected record and all reference to it throughout the system. Before executing the DELETE command, a
warning message will display and ask if you wish to proceed, with YES or NO options.
G. “RELATED TASKS” TABS
The listing windows for each of the four categories of maintenance items to be tracked in CPMS (Facilities,
Electromechanical, Program Equipment, Vehicles) have special navigation tabs to instantly display the tasks in
the system that are related to any record in that category. Highlight the desired record by clicking on it, then click
on the tab that you select to see all tasks (Maintenance Orders, Task Alerts, or Routine Operations) pertaining to
that record.
CPMS V 1.1
GLOSSARY OF TERMS
CLASSIFICATION
Descriptive label for grouping items or tasks to allow for categorizing. CPMS can search
for and report like items of a given “classification”. Examples: kitchen, compressor, pump.
This also applies to skill types, such as carpentry, plumbing, welding, etc. Classification
input tables can be reached through the setup button on the main page.
DETAIL REPORT
A printable version of the data within a single record. A DETAIL REPORT button appears
with each search result.
ELECTROMECHANICAL
EQUIPMENT
Term for tools, devices, and equipment, both powered and manually-operated.
Examples: compressors, generators, fans, pumps, valves, welders, drills, nailers, saws or
anything like this that you want to keep track of for warranty, maintenance, or recordkeeping purposes.
FACILITIES
All-inclusive term for any physical installation that has been “built.” Examples: buildings,
structures, gates, gateways, signs, fences, docks, piers, paving, erosion or drainage
control, fire rings, council rings, C.O.P.E. elements, fixed target lines, etc. CPMS can
keep the records of these in separate categories when individual ID numbers are set up
to distinguish one type of facility from another. (Please refer to PREREQUISITES.)
JOB CARD
(1) A record of a task that is known to be upcoming, but beyond the current budget
period. CPMS provides for these for the purpose of keeping track, for timely bring-up and
for including them in forecasts. Once the task is regarded as timely for scheduling, it can
be entered either as a budgeted Routine Operation for the period or it can be set up for
handling with a Maintenance Order as appropriate, as determined by the operator.
Examples: inspection upon elapse of five years on a paint or stain job; inspection prior to
expiration of a warranty (roof, A/C compressor, pump, water heater, etc.); license or
sticker renewals for vehicles, boats, etc.; inspection of a stand of timber, for maturity, etc.;
expiration of fire extinguisher charges.
(2) A task or item of work that is set aside for volunteers or Scouts to complete. For
example, Job Cards may be pulled and assigned to groups of workers during an Order of
the Arrow work weekend.
JOB PROCEDURE
A written instruction for performing a task. This includes everything that would be
required to instruct someone to accomplish the task: tools, equipment, supplies, labor,
expertise, recommendations, illustrations (if appropriate) and references for aid, or more
information.
MAINTENANCE ORDER SYSTEM
An administrative device for the purpose of control of resource expenditures related to
tasks that were not anticipated or budgeted specifically. The MO system is intended to
ensure that all resource expenditures for unanticipated maintenance or repair have the
documented approvals intended by council management.
MAINTENANCE ORDER
A document form (for CPMS this is an electronic file) that contains/requires all pertinent
information about a maintenance or repair task to be performed; when it is to be
performed; indications of who is to perform the task; by whom the task has been
authorized; time and cost; etc. Information from an MO is tracked and queried by CPMS
for reports, as required. NOTE: The distinction between a Maintenance Order and a
CPMS V 1.1
Routine Operation is that the MO task involves an unanticipated expense, while a
Routine Operation (see below) is an already-authorized task that has been anticipated in
the annual budget and scheduled on the calendar.]
MAINTENANCE REQUEST
A written request for attention to something in need of maintenance or repair. An MR can
be originated by anyone. Ideally, there will be a standard operating procedure in place
that requires the MR originator be notified of the disposition of their request.
PROGRAM EQUIPMENT
Term for all program-related equipment that has a “life,” or that you want to keep track of
for the purpose of warranty, maintenance, condition, etc.
RESOURCES
Time, labor, money, or materials and equipment necessary to complete work and repairs.
Resources are budgeted for forward planning and reconciled for periodic reporting.
ROUTINE OPERATION
A maintenance or repair task that has been anticipated, scheduled, and budgeted in the
council’s annual operating plans. Examples include changing the oil in a vehicle, cleaning
the pool filters, or inspecting a septic field during camp.
SUMMARY
A printable version of a report that includes multiple records. Summaries automatically
will also include a display of the total costs associated with the records included in the
report. A SUMMARY button appears with each search result.
CPMS V 1.1