1
Table of Contents
Table of Contents...........................................................................................................1
Table of Contents...........................................................................................................2
System Configuration ....................................................................................................3
Introduction....................................................................................................................4
SAFETY AND MAINTENANCE INSTRUCTIONS .................................................................... 4
GLOSSARY......................................................................................................................... 4
Basic Operations ............................................................................................................8
ARMING YOUR SYSTEM .................................................................................................... 8
DISARMING ....................................................................................................................... 8
AMBUSH DISARMING ........................................................................................................ 8
ZONE BYPASSING .............................................................................................................. 9
HOW TO BYPASS ZONES ................................................................................................... 9
ARMING CHOICES ............................................................................................................. 9
REMOTE ARMING VIA REMOTE KEY OR DTMF ............................................................. 10
AV-701, AV-702 Keypads (LED type) .......................................................................12
LED INDICATORS ............................................................................................................ 13
SETTING NEW CODE WITH AV-701 LED KEYPAD.......................................................... 13
KEYPAD DISPLAY ............................................................................................................ 14
DELETE A USER CODE .................................................................................................... 15
SETTING THE FOLLOW-ME TELEPHONE NUMBER .......................................................... 15
PROGRAMMING TELEPHONE NUMBERS .......................................................................... 15
SOUNDER......................................................................................................................... 15
AV-707, AV-706, AV-705 Keypads (LCD fits PRO & Dublo panels) ......................16
INTRODUCTION ............................................................................................................... 16
LCD DISPLAY .................................................................................................................. 17
KEY ENTRIES .................................................................................................................. 17
SETTING NEW CODE & GROUP BYPASS WITH AV-706, 707 KEYPADS ........................... 18
SETTING FOLLOW-ME TELEPHONE AT AV-706, 707...................................................... 18
Displaying System Information ...................................................................................19
ALARM MEMORY DISPLAY ............................................................................................. 19
EVENTS DISPLAY ............................................................................................................ 20
TROUBLE CONDITIONS.................................................................................................... 20
Setting System Features...............................................................................................20
CHANGING CODES .......................................................................................................... 20
DELAYS DELETE ............................................................................................................. 21
Testing Your System ...................................................................................................21
SIREN AND BATTERY TEST ............................................................................................. 21
DETECTION DEVICES TEST ............................................................................................. 21
TESTING YOUR CENTRAL STATION (CS) ........................................................................ 22
Troubleshooting ...........................................................................................................22
AV-GAD LIMITED WARRANTY .............................................................................24
Item: 4716 (A4BKE). Rev 6
@ All Rights Reserved to AV-GAD SYSTEMS LTD, Tel Aviv, Israel. POB 49 080 Tel-Aviv 61 104, Israel. / W7/ END_2000_Rev 6 large. May 2011.
2
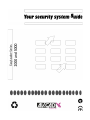
System Configuration
Zone Index
Zone
Description
Type
Zone
1
9
2
10
3
11
4
12
5
13
6
14
7
15
8
16
Description
Type
Installation Data
Installer
Phone:
Mobile:
Installation date:
Zone/s at Home Mode
CS Information
Phone:
Account No.:
Contact Person:
Siren Times
Programmed Telephones
Silent Zones
Notes
---------------------------------------------------------------------------------------------------------------------------------------------------------------------------------------------------------------------------------------------------------------------------------------------------------------------------------------------------------------------------------------------------------------------------------------------------------------------------------------------------------------------------------------------------------------------------------------------------------------------------------------------------------------------------------------------------------------------------------------------------------------------------------------------------------------------------------------------------------
3
EasyLoader t m Series
Alarm Control Panels
End User Operating Manual
(For version 2.18 up to 3.06)
Congratulations for purchasing this state-of-the-art computerized security panel. You
have made a wise investment in the future safety of your home or business premises
with this high-technology security system, however it’s still as EASY as 1,2,3.
If you have one of the new series 3000 alarm refer for details regards the SMS in
the system technical manual.
Introduction
Review this manual carefully before operating your security system.
Your installer should instruct users how to operate the system and about it’s various
features. Complete the System Configuration page and store this manual in a safe
place for future references.
Safety and Maintenance Instructions
Your security system cannot prevent burglaries, emergency cases or damage to your
property. It is only intended to alert emergencies.
To keep your system efficient as intended, it is recommended to test the system daily
upon arming and weekly testing the siren and detection devices. Read the ‘Testing
your System’ section. If your system does not function properly, contact your installer.
Keep the keypad dry; clean the keypad with dry cloth. Never disconnect the main AC
to your system.
Glossary
Your security system has been designed to offer the latest security features with
simple and easy operation. Described here, are some terms that are used throughout
this manual to explain the common terms.
Group Bypass - (In certain countries called Home mode)
‘Group Bypass’ allows bypass of few zones determined by the installer to be bypassed
at once by entering a short keys combination prior to Arming. AV-707B is most
convenient keypad for simple ‘one key press’ for Group Bypass and Arming.
24-hour Zone
A zone programmed for 24-hours protection. Zone is active in both Armed and
Disarmed modes. When a 24-hours zone is troubled, alarm will sound in both Armed
and Disarmed mode.
Battery
Standby rechargeable battery located in the control box, provides emergency backup
power in case of power loss.
4
Bypass (Shunt) a zone
Allows manual removal of one or more protected zones from the system.
Day and Tamper Zone
A zone programmed as a ‘Day’ or ‘Tamper Zone’ enables alarm from keypad's buzzer
during daytime, when system is usually disarmed. The ‘Day’ or ‘Tamper zone’ will trigger
the keypad buzzer and the zone number will flash on keypad display. To reset ‘Day Zone’
alarm, hold-down key 9 (reset key).
During Armed mode, this zone will act as burglary zone and will emit an alarm when
troubled.
Dialer and Communicator
Alarm reports directly to predetermine stations via telephone lines. The dialer reports an
alarm to your telephone, a siren or a recorded message. To report a recorded message the
SVM-40 electronic module is required.
DTMF
Shortening for the most common dialing protocol “Dual Tone Modulated Frequency”. AvGad panels use the DTMF for dialing and in latest alarm panels also used for remote
commands like Arming, Disarming, Zone Bypass, and some more functions.
Digital Display
Keypad enhanced LED 7 segments display. Provides alphanumerical readout of zone status
and messages.
Entry Delay
The Entry Delay is the period allowed for someone to enter the premises and disarm the
system.
Entry-Exit Zone
The entry-exit door or zones are designated by your installer to be used for entering and
leaving the premises when the system is armed.
Exit Delay
The Exit Delay is the period allowed for users to leave the premises after arming the system.
Fire Zone
A zone programmed for connection of fire or smoke detector. Alarm heard in both Armed
and Disarmed modes, and Fire LED is activated.
The siren sound is different from the 24H zone or burglary alarm (it depends on the siren
type used). To reset Fire alarm, hold-down ‘9’ key and your code.
‘Follow-Me’ Programmable Telephone Number
Follow-Me it’s a dialer feature. The desired Follow Me Telephone number is programmed
by the user prior to arming – as necessary (to follow the user destination).
5
Follower Zone (also called conditioned Zone)
Follower Zone reacts instantly upon detection without previous triggering of Delayed zone.
Exit delay applies to Follower zones and Delayed zones.
Hold-down Functions
Holding down keys for about 2 seconds provides additional easy-to-access functions.
Instant Arming
System Instant Arming. Short press on key 5 instantly arms the system.
Instant Zone
Zone feature. The system reacts instantly upon detection at a zone which has been
programmed as ‘Instant.’
Key-switch (optional)
Located on control panel door or remote panel. Used for arming/disarming the system.
Keypad
Your system contains one or more keypads. The keypad is used to operate the system and
display information about the system. Commands are entered on the keypad by pressing one
key at a time.
LCD
Shortening for ‘Liquid Crystal Display’. This type displays full texts, zone locations,
messages, etc. AV-706 and AV-707 are LCD type keypads.
LED
Shortening for ‘Light Emitting Diode’. LED is a modern bulb. LED visually displays the
system status and confirms the functions.
Master Code
The Master Code is a 4 to 6 digits code, is used to arm and disarm the system, to program
your codes and to bypass zones (in certain models). Normally, only one person should know
the Master Code. Your default master code is 1,2,3,4.
Panic Button
Two keys (* and #) on the digital keypad, for alerting the central station in case of
emergency.
Programmable Features
Computerized control panel allows system tailoring to suit individual requirements.
Smoke Detectors
Triggers alarm upon detection of smoke. Smoke detector requires reset after alarm.
6
Sounder
The sounder (in Keypad) simplifies alarm recognition by producing different amounts and
sound patterns to identify various events. The sounder also functions as key-press
confirmation.
Siren
The siren generates noise and light indication (when strobe included) in order to indicate
burglary, fire or other emergency cases. It’s recommended to install a siren indoor and
outdoor of the protected site.
SMS Message (Short Message Service) for series 3000
SMS is the text communication service component of series 3000 alarm panels, in case of
alarm or other selected events the alarm system sends you the same message displayed on
your LCD keypad to your SMS enabled phone. The transmitted events are programmable.
User Codes
One master and seven codes are available to allow users to arm and disarm the system and to
bypass zones. Keep the code confidential to ensure maximum system security.
Zone (also called Area)
An area protected by a security device. For example, a room protected by a motion detector
as Zone number 1, while a door protected by a magnetic contact as Zone number 3. Your
installer will inform you which zones have been set up on your system. The AV-701
contains a zone index list. The AV-707 LCD keypad displays the zone description, like
“Garage”, “Jimmy’s Room”, etc.
7
Basic Operations
Arming Your System
Before arming your system, close all protected doors, windows, and do not move
around areas protected by motion detectors. When all protective zones are closed, the
Green Status LED stops blinking. Exit door and other delayed zone may stay open
upon exit the protected areas.
To arm the system, enter your code. At each digit entry, the keypad sounder will beep.
When the code has been entered, the Armed LED will light. If an incorrect user code
is entered, the keypad will sound a single long tone. To correct the mistake, press ‘9’
and enter the code again.
When the Armed light is on, leave the premises through the designated entry-exit door
before the exit delay expires. At the end of the exit delay, all lights on the keypad will
be shut off, except for the Red Armed light. Your system is now armed.
The factory setting for the exit delay is 30 seconds; your installer may change this
time to suit your needs. Refer to the Arming Options section of this manual for
information on other arming functions.
Disarming
Enter the premises through the designated entry-exit door. The keypad will sound a
constant tone to indicate that the system must be disarmed.
Enter your code at keypad, if an error made while entering the code, press ‘9’ and
enter the code again. After six wrong entries, the keypad locks itself for 30 seconds,
keys do not respond during this period.
When a correct code is entered, the armed light shuts OFF, and the sounder is silent.
Your system is now disarmed.
Enter your code before the entry delay expires (to prevent alarm). The factory setting
for the entry delay is 12 seconds; your installer may change the time to suit your
needs.
If an alarm occurs while the system is armed, the Armed LED blinks. Refer to
‘Display Alarm Memory’ for instructions on displaying the zones in alarm.
Ambush Disarming
If you are forced by an intruder to disarm your system, the Ambush alarm can be
activated. Disarming the system with the Ambush code will cause the system to
disarm and simultaneously send a silent ambush alarm signal to central Station. This
is an optional feature. For details ask your installer.
IMPORTANT: If you return to the premises and find that an alarm
is in progress or there are alarms in memory, do not enter the
premises, as an intruder may be present. Contact local authorities
from your mobile or public phone.
8
Zone Bypassing
A ‘Bypassed’ zone will not cause an alarm. Zones may be bypassed to allow access to
part of the protected area while other zones are armed. For example, you could bypass
the zone protecting your living room. This would allow you to remain in the room,
while the other zones on your system are armed.
With the system disarmed, hold-down ‘2’ key to display bypassed zones. The zone
number displayed represents bypassed zones. Ensure that any zone displayed as
bypassed is intentionally bypassed. Zone bypasses are automatically cancelled when
the panel is disarmed.
How to Bypass Zones
To bypass a zone, press ‘0’ key and the zone number (1 to 8, or 1 to 16 in AV-2016),
the Shunt (Bypass) Yellow light is on in confirmation, enter your arming code, Armed
Red LED goes on.
To remove a bypassed zone, arm then disarm the system, re-enter the bypassed zones.
When you arm your system, the zones you have indicated will now be bypassed.
When arming the system with bypassed zones, it is always recommended to review
the list of bypassed zones before entering your code to arm the system. After
bypassing the desired zones, enter your code to arm the system.
Arming Choices
Group Bypass (Home Mode)
Arming with Home mode, automatically bypasses the zones programmed as Group
Bypass. This feature allows you to arm the system and remain on the premises.
For new systems, version 2.17 and later: To bypass first group, press “0” and holddown “1”, to bypass second group, press ”0” and hold-down “2”, to bypass both
groups, press “0” and hold-down “0”. AV-707B keypads are most convenient for
arming with home mode, one button press for group bypass and arming.
At ‘Home Mode’ another person would still be able to enter the premises through the
entry/exit door without causing an alarm (requires special programming). To disarm
the system when the entry/exit door is opened, enter your user code.
Away Arming
Close all protected doors and windows, you can move in front of the delayed detector.
Enter your code and check if the Armed LED is on. In case of arming with an open
zone, ‘a ≡’ (three lines) sign will be displayed, indicating that the system is disarmed
warning about an open (troubled) zone.
Instant Arming
The Instant Arming feature allows you to press ‘5’ key to arm the system.
This command is designed to allow user to arm the system without needing a full user
code.
9
Note: The instant arming is not recommended. This will allow easy
arming by someone who is not a regular user.
Auto Arming
This feature provides setting of the desired system arming time when the regular user
is away. Auto Arming is useful for shops and sites requiring long exit delay.
Enter to user programming mode; hold-down ‘8’ key then enter your master code,
three led lights will blink.
Hold down '8' ('A' is displayed). Enter the time in 24 hours format.
To display, hold down '8' and wait.
To disable Automatic Arming program, press 0000.
After Automatic Arming is programmed, the system time can be set only via User
Programming Mode: Enter User Programming Mode (hold-down ‘8’ and 1234), hold
down '1' ('t' is displayed) and type hour and minutes. Hold down '1' and wait for the
time to be displayed. Holding down '0'+'1' keys to program the time is possible only if
the Automatic Arming is disabled (otherwise an 'Error’ warning is displayed).
Automatic Arming will not operate if the system time has not been set (blinking 'h').
Automatic Arming will not operate if the control panel is already armed.
Automatic Arming will operate even if the control panel is currently in ALARM.
When the Automatic Arming programmed time arrives, the system starts at a 30seconds countdown. An 'A' is intermittently displayed and beep sounds at keypad.
During the countdown period, the Automatic Arming can be aborted by entering a
valid user code (not code No. 7, if used to ‘open’ a door).
Remote Arming via Remote Key or DTMF
The Remote Arming allows you to use a remote key switch, or wireless (Av-Gad set
AVS22) tiny transmitter to arm the system. This command is designed to arm the
system without a code, or for convenient arming from your car. Remote functions
with DTMF:
“D” suffix (D for DTMF) alarm panels type provides certain remote functions.
The DTMF remote control functions:
Check the control panel status (Armed/Disarm, Alarm in progress)
Inform the zone number that caused alarm, beeping the zone number on the phone
Arm and disarm the control panel
Bypass zones or clear all bypassed zones
Stop the dialer report during alarm
Momentary activate A1 (alarm) output for three seconds
Verify with installer that the system is programmed to answer income calls.
To get on-line, dial to the control panel. The control panel will answer the call after
the number of rings (as programmed). When answering the call, control panel sends a
greeting tune sound, enter your user code within 5 seconds (1234) and confirm
pressing the ‘#’ key (# is the Enter key).
10
When a valid user code is received, followed by # in your phone, the control panel
acknowledges it by a special tune. Otherwise an error tune is sounded. Note: Arming
the “D” control panel by the remote user via DTMF is possible even when zones are
troubled.
Remote DTMF feature requires telephone line (at panel side) without
fax or similar connections.
After control panel acknowledges the user code, it will stay ON-LINE no longer than
3 minutes, providing enough time for the user to perform various operations.
If the panel does not detect activity, it will shorten the ON-LINE time and eventually
will hang up.
When the control panel calls your phone during an alarm, it will first generate the
siren sound for about 30 seconds (to shorten time ask your installer). The siren sound
will stop 10 seconds before the end of the call and a greeting tune will be sounded,
you can now enter your code followed by #. To stop the dialer, enter 6 #, to get panel
status (armed or disarmed) enter 7 #. Reports first zone number to get into alarm,
beeps count for the zone number, enter 7 and 7 #. To arm the panel enter 1 #, to
disarm the panel enter 2 #. To end the processes press 9 #. To Activate a home
appliance (requires hardware and programming) press 3 #.
To learn different tunes call your system and use 8 X then # X is the function
number):
1- Greeting tune. It will be heard only once, after the control panel answers the call
(or calls the user). It indicates that the panel expects a valid user code.
2 - "User code" accepted.
3 - "Error" - Will be sounded in the following cases: Incorrect user code, command
not defined/valid, incorrect input, trying to bypass an undefined zone, command could
be not carried on, on-line time out or call ends.
4 - "Confirmation" - Will confirm that the requested action has been carried out.
5 - "Armed"- Control panel is Armed.
6 - "Disarmed" - Control panel is Disarmed.
7 - "Alarm On" - Control panel is in Alarm position. This warning will be sounded
from time to time during idle periods.
Remote DTMF function example
For example, let’s assume that your kid arrived home and he cannot disarm the alarm
panel.
Call your alarm telephone number (tell the kid not to pick up the phone)
After a few rings, your system answers. A greeting tune is heard
Enter your user code: 1 2 3 4 #.
Confirmation tune is heard. If alarm is on, siren tune is heard
Press 2 # and wait for the confirmation tune
To re-check the system status press 7 # and wait for the system status tune
In case the system is still on, re-enter 2 # or try to enter your user code, then 2 #.
11
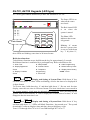
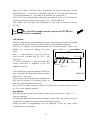
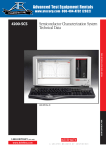
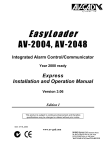
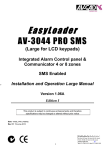
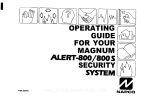
AV-701, AV-702 Keypads (LED type)
AV-702 keypad contains identical keys and LED structure to AV-701.
AV-GAD
ARMED
STATUS
The Status LED is on
when all the zones
are closed.
EASYLOADER AV-701
SHUNT
ZONE
DISPLAY
FIRE
Panic Button
Siren
1
Shunt
Display
2
Delay
Delete
4
Chime
5
Test
7
Program
8
Shunt
0
*
Status
3
Telephone6
Reset
9
#
three LEDs are blinking, enter time in 24 hours format.
The Red Armed LED
is on when the
system is armed.
The Shunt LED
indicates that a zone
is bypassed.
Blinking ‘h’ means
that the system time
is not set; hold-down
key ’1’ key then ’0’,
Hold-down functions
To hold-down function access, hold down the key for approximately 2 seconds.
Hold down function is confirmed by a prolonged beep. Refer to hold-down list:
1 - Siren Test
4 - Delay Delete
8 - Code Programming
2 - Display Bypassed
5 - Activate Chime
9 - Delete Last key Press
Zones
3 - Display Troubled
6 - Telephone
0 – Display Alarm History
Programming
7 - Zone Test
* and # - Panic
Zones
Shunt
0
Shunt
0
1
and Siren
Display and Setting of System Time: Hold down ‘0’ key
and then hold-down ‘1’, three LEDs are blinking, wait for the time to be displayed in
4-digits format.
To set new time, hold down key ‘0’ and then hold down ‘1’. Do not wait for time
display; enter the new time in 24-hours format. The local clock time is not stored in
the system memory; clock must be adjusted after power-up. After powering-up the
system, time is reset to 00:00, ‘h’ will be displayed to remind user to set time; ‘h’ will
disappear after the new time is set.
Shunt
2
and Display
Display and Setting of System Date: Hold down ‘0’ key
and then hold-down ‘2’; 3 LEDs will blink. Enter date: ‘day-month-year.’ The up and
download PC software displays time and date, along with history event.
Years 1978 through 99 as 78 to 99. Years 2000 through 2077 00 to 77
12
The local date and time is not stored in system memory. Adjust date
and time after a long power failure.
LED Indicators
Four led lights provide visual indication of System status as well as confirmation of
various modes.
Red Armed/Alarm Indicator - Lights up when system is armed and blinks after
an alarm is triggered at any zone. Blinking indicates alarm history in memory.
Green status Indicator - Blinks when zone/s is/are troubled, remains lit as long as
zones are not troubled, quick blinking indicates tamper alarm.
Yellow shunt (Bypass) Indicator - Lights up upon zone bypass.
(Note: Yellow shunt may light automatically upon arming if Auto Bypass was
programmed).
The indicator also lights and blinks upon Group Bypass entry (by pressing ‘0’ twice).
Red fire (Trouble) Indicator – Blinks rapidly when a Fire Zone is troubled.
Two led lights Flashing (Left Most LEDs) - In user code programming mode,
quick blinking indicates code or code index to be entered.
In Disarmed mode, the two left-most LEDs are blinking to indicate 24H-alarm mode.
Zone number will also be displayed.
Three led lights Flashing - In Disarmed mode, rapid blinking indicates AC
power failure. AC power failure event is displayed in Events History as three lines .
In Armed mode, rapid blinking indicates system restored after AC Power Failure
mode.
During the programming of the ‘Follow-me’ telephone number, three flashing led
lights indicate that system is expecting a new telephone number.
Four led lights Flashing – Press and hold down key ‘8,’ the system is
waiting for code entry.
System with bypass via code: Same LED indication when code is expected for Bypass
via code.
Setting New Code with AV-701 LED keypad
1. Hold down key Program 8
2. While four led lights are blinking, enter the master code (default 1234)
3. If code is valid, the four led lights will stop blinking, and ‘u’ will be displayed
4. The two Left-Most LEDs blink to indicate that the system is waiting for a new user
code index (user 1 to 8) to be entered
5. Enter the code index (1 for code No. 1; 2 for code No. 2, etc.). User index will be
displayed for 2 seconds, until further digits are entered (eliminate confusing of
index number and code)
6. The two right-most LEDs blink to indicate that the system is waiting for a new
code (1 to 6 digits) to be entered. If user code is not entered, the code is voided.
7. Enter the new code; ‘U’ is displayed for confirmation
8. Wait for ‘u’ (small u). To quit code setting, hold-down ‘9’
13
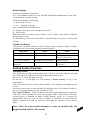
Keypad display
The 7-segments (also called LED keypad) display provides visual readout of the
system status. The display indicates zones in alarm, troubled zones, bypassed zones
and displays the following confirmation letters:
Display
Description
Function
A
Up & Download
C
C
c
c
Communication
Communication
Chime
Closing
d
P
Delay Delete
Dial Delay
E
h
h
Error
Home
Hour
H
o
Hold-Up
Opening
L
P
t
U
u
Low Battery
Program
Tamper
Update
User
Modem ‘Answer Now’ function selected. Confirms holddown ‘6’ key then hold-down ‘1’ key.
‘A’ also displayed upon Auto-Arming programming
Displayed at dialer tests, and upon holding-down ‘6’ key
C flashing in display indicates telephone line trouble
Confirms Chime mode via ‘5’ key
When events log is displayed Indicates Arming followed by
user number
Confirms Delay Delete Upon holding-down ‘4’ key
When programming telephone number that requires an interdigit delay (‘Pause‘) during dialing. (Delay duration is 2
seconds.)
Indicates programming and operation error
Indicates entering of Home Mode (Group Bypass)
Displayed after power-up to remind user to set the system
time: ‘h’ will be removed after time setting (using keys 0
and 1).
Upon Panic triggering from Keypad
Indicates system opening (Disarming). Followed by user
number when events log is displayed
Indicates Low Battery – Call your installer
System is in programming mode
Indicates zone's Tamper alarm
Confirms programming updating
‘u’ (user) followed by user number when events log is
displayed and system is in user code programming mode
Displayed upon Arming attempt with non-delayed
(instant) zones in trouble.
Displayed after AC failure, in history display at the AV701 keypad, indicating the power-fail event
(Three lines)
Arming Denied
or
AC Failure
event
14
Delete a User Code
8
1. Hold down key
2. While four led lights are blinking, enter code No. 1 (default 1234)
3. If code is valid, four led lights will stop blinking, and ‘u’ will be displayed
4. The two left-most LEDs blink to indicate that the system is waiting for a new user
code-index (user 1 to 8) to be entered
5. Enter the code index you want to delete (1 for code No. 1; 2 for code No. 2, etc.)
6. The two right-most led lights blink to indicate that the system is waiting for a new
code
7. Hold-down ‘9’ key to quit code setting
Program
If user code is not entered, the code is voided. A short beep confirms
that the code has been deleted.
Setting the Follow-Me Telephone Number
The ‘Follow-Me’ feature is applicable only with the dialer; in alarm, Follow-Me 1st
number is dialed first if the communicator (communicator dials to central station) is
not selected.
1. Hold down ‘6’ key twice; wait for the blinking of the three led lights
2. Enter Telephone Number (maximum 16 digits and 4 pauses), and wait until all
led lights stop blinking. The ‘Follow-Me’ number is now programmed
3. To delete ‘Follow-Me’ number, access ‘Follow-Me’ programming mode as described
in paragraph 1, but do not enter any number
Programming Telephone Numbers
8
1. Hold down key 8
2. While four led lights are blinking, enter the master code (default 1234)
3. If code is valid, four led lights will stop blinking, and ‘u’ will be displayed
4. The two Left-Most LEDs blink to indicate that the system is waiting, hold down
keys "6"+"1" for first number, "6"+"2", "6"+"4" followed by the telephone number,
‘U’ is displayed for confirmation. If number not entered, the system will display the
telephone number. To erase a number hold down continuity "6", hold down "1", then
hold down “9” to erase the first number, wait for ‘u’, to quit setting, hold-down ‘9’.
Program
Sounder
The Keypad sounder enhances the use of system operation and serves as a local alarm
device (requires programming).
Several programmable features set the sounder functionality. Ask your installer for
more details.
15
With AV-705, 706, 707 (LCD keypad) the user is able to switch the buzzer on and off
at each keypad. Holding down keys "0" and "#" simultaneously turn on and off the
internal buzzer.
The sounder emits sounds in the following instances:
OPERATION
SOUNDER RESPONSE
Pressing of any key
Short confirmation beep
Hold-down functions
Long confirmation beep
Faulty programming input
Long beep (+ ‘E’ display)
Delayed Zone triggering
3 Long beeps
Exit delay starting (if programmed)
Warning beeps until the delay is over
Completion of Arm/Disarm programming
code
Programming Telephone numbers
One long confirmation beep
Completion of address programming
Two confirmation beeps
Pressing ‘Code 7’ for driving door opening
Seven confirmation beeps
System Arming with Instant or 24 hour
troubled zone
Feature programming
Five warning beeps + troubled zone
Follow-Me number programming
Two confirmation beeps
During alarm (requires programming)
Intermittent beep until alarm reset
Two confirmation beeps
Two confirmation beeps
AV-707, AV-706, AV-705 Keypads (LCD fits PRO & Dublo panels)
Introduction
The AV-707 EasyKey™ is the future-generation keypad, with the New Look shape,
fully-customized microprocessor based remote station, multitasking functions with 32
Keypad ID’s. AV-705, 706 provide similar functions. For more details, refer to the
AV-707/706 manual. The AV-705 is an economical keypad, its shape similar to the
AV-707 and supplied without the LCD display. The AV-707B contains three extra
keys used for different emergency alarms, fast and convenience 3 home modes. AV707B is available in Metal Gold or Silver color. The AV-707, 706 and 705 fits only
PRO and Dublo type control panels.
16
After power failure, ‘Set Panel Time’ is displayed. To set time hold-down ‘0’ key
then Hold-down ‘1’, enter time in 24H format and press #. To set the date, hold-down
‘0’ key then hold-down ‘2’, enter date in day-month-year; format and #.
The AV-707 keys and Hold-Down functions are identical to the AV-701 functions,
you can speed up the function by pressing ‘#’ key – the ENTER key.
The sounder and Led lights and indications are the same as described for the
AV-701.
# key in LCD keypads is mostly used as an ENTER key,
The
typed at the end of a command
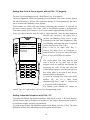
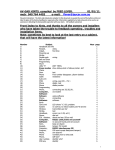
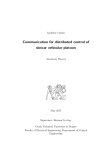
LCD display
The LCD display helps understanding the system status and zone locations by reading
in plain text the system messages, zone description, time and other indications.
The first row displays system announcements, like: System Disarmed, Alarm, Low
Battery, etc., second row displays the zones
System Message
status.
System Disarmed
Each ‘’ sign represents a zone. If a zone is
12:00
3
open, the zone’s number like 123567 will
*
replace the .
armed status shunt fire
If a zone is bypassed a '*' appears instead. The
Bypassed Zone
control panel time is displayed in the five
Close Zone
Open Zone
rightmost positions.
Time
The LCD displays often the installer LOGO (the
A V-7 0 7
logo is editable). For displaying zone description
hold-down ‘3’ key twice.
To save power, the LCD and keys backlight turns
OFF after 60 seconds of no typing activity (it
turns ON again when an alarm occurs).
Most of the accessible functions with the LCD Keypad are similar to those of the
AV-701 (seven segments keypad).
Key Entries
Keys typed at the keypad are concealed (as they are part of the User Code). '* * * *'
signs are displayed.
In Armed and Disarmed mode, after six attempts to enter fault code, the keys will not
respond for 30 seconds, in order to prevent code break exigency.
During all kinds of programming, keys are displayed as they are typed (some
combinations are exceptional).
17
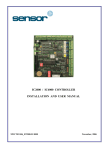
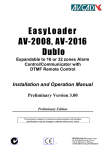
Setting New Code & Group bypass with AV-706, 707 keypads
To enter User Programming mode; ‘Hold Down’ key '8' (program).
The three Rightmost LEDs start blinking; enter the Master User Code (factory default
1 2 3 4) followed by # (Enter). The upper line displays 'User Programming', the lower
line is cleared and a blinking cursor appears.
The Leftmost two LEDs will start blinking indicating that ‘location’ is expected. In
this case, location means ‘User Code’ index to be modified, erased or programmed.
User Index means User Number 1-8, as system contain eight different user codes.
Enter a two digits number from 01 to 08 (2 digits required). After the index had been
entered (the ‘location’), the upper line is
cleared, the blinking cursor moves to the
beginning of the line, three Rightmost LEDs
start blinking indicating that data is expected
SYSTEM DISARMED
(in this case the new User Code).
12345667*
12:00
Enter a one to six digits code. Key '*'
corrects the input press, as backspace or
Hold Down key '9' (reset) to cancel the input.
Press '#' key (as ENTER) for confirm.
ARMED STATUSSHUNT FIRE
The control panel will verify that the new
code is not in use by other user (if that
happens you'll be notified) and respond by
Shunt
Siren 1
Display 2
Status 3
displaying the code. At any time after the
Delay
Telephne6
Chime 5
Delete 4
control panel response, you can start typing a
new index (there is no need to wait for the
Test 7
Program8
Reset 9
announcement to disappear).
* Shunt 0
#
To erase an existing code: Enter user index
number (01, 02, 03....), hold down
simultaneously keys '*' and ' #', followed by
#, E (erased) will be displayed.
The Master (code number 01) cannot be
erased. Type ‘99’ followed by # to exit User Programming mode.
Setting Follow-Me Telephone at AV-706, 707
To display the Follow-Me telephone number; hold down '6' (type '#' for faster display)
and the control panel will display the number (or the 'empty' announcement if there is
no telephone number currently programmed).
To program the Follow Me telephone number Hold Down twice the '6' key. The three
Rightmost LEDs blink, indicating that the keypad waits for input.
18
On the upper display line, a blinking cursor will appear, type the number (digits from
0 to 9), hold down * for '*' digit, hold down '0' key for Pause (a ‘P’ will be displayed)
or press simultaneously '*' & '#' to erase the phone number (a 'E' will be displayed).
To correct the input you can use the '*' as a backspace erasing key.
Group bypass (home mode)
If you want the system to disable few zones during night time for example, ask
installer to define a group bypass zone/s. Bypass is operative only if System is armed
within 60 seconds from the entry of this feature. Yellow LED will flash and ‘h’
(Home) displayed for 1 second in confirmation. Commands to bypass group of zone/s:
0 & hold-down key 1 - Arm with group 1 bypass, or 0+0 - Group 1 Bypass
0 & hold-down key 2 - Arm with group 2 bypass, or 0+0+0 - Group 2 Bypass
0 & hold-down key 0- Arm with group 1+2 bypass, or 0+88 - Group 1+2 Bypass
Each command works as a toggle SET/CLEAR. The AV-707B (with extra 3 keys)
keypad provides arming and group bypass by pressing * than hold down one key;
Button A (most left): Selects Group Bypass No. 1 (if programmed so) and arms the system.
Press * key than hold down key A. For AV-707 (without 3 buttons) press 0 and 1
Button B: Selects Group Bypass No. 2 (if programmed so) and arms the system
For AV-707 (without 3 buttons) press 0 and 2
Button C: Selects both Group 1 and Group 2 and arms the system.
Displaying System Information
Alarm Memory Display
Alarms generated when the system is armed are recorded in the system's memory.
Press key ‘0’ to display the zones in alarm.
0 Concise Alarm History (Events Log): Hold-down ‘0’ to display the last
1.
alarm sequence. New alarm will erase the old events.
Shunt
0 and
0 Detailed Events History (requires programming): Hold
2.
down ‘0’ and again hold-down ‘0’ to display up to 99 events, like: System opening
and closing by user number, opening or closing time, zone-caused alarm and AC
failure. Your PRO panel stores up to 250 events displayed by the EasyLoad program,
the keypad display 99 events only.
By holding-down key Shunt 0 twice, three LEDs start blinking, indicating a special
operation mode. The events are displayed from the most recent events to the oldest
ones.
Shunt
Shunt
5
0 and
3.
Display Last 2 Users: Hold down ‘0’ and then hold down
‘5’ to display user number and System opening or closing time.
‘o’ is displayed for Opening (Disarming); ‘c’ is displayed for Closing (Arming).
Shunt
Chime
19
Events Display
Events are displayed as following:
XX - Event number (from 01 to 99), then HH_MM (Hour and Minutes) Event Time,
Event (alarm or opening/closing).
Translate the display as following:
‘u’ (user number 1 to 8),
‘o’ or ‘c’ - opening or closing
Zone causing alarm will blink twice
X - Tamper alarm from zone causing the alarm (X)
H - Panic Alarm
Note: three lines () indicate power failure. An AC failure event will be displayed
during history events.
For detailed log events ask your installer to download the log events via EasyLoad
software.
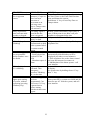
Trouble Conditions
The system constantly monitors itself to ensure proper operation. When a trouble
condition occurs, the system condition will be displayed.
Indication
To do
Cause
‘L’ or Low Battery on
Battery is low
Call for service
Four LEDs are blinking
AC power failure
Check the premises fuse
box. Call for service
‘C’ or ‘Tel. Line Fail’
Telephone line test failed
Call for service
Arming fail and ≡ is Zone is troubled
Bypass the zone and call
displayed
for service
Setting System Features
Changing Codes
The system features eight programmable codes. The first code is the Master Code, and
the remaining seven codes are normal arming and disarming codes.
Do not use ‘0’ as the first digit in a code.
Do not use ‘5’ as first digit in a code number if Instant Arming via key 5 was
programmed.
User code shall not start with the same numbers as the installer programming code
(1994).
Do not use same codes or same first digit for different codes. For example if code No.
one is 1234, programming code No. 2 cannot be 1256.
Key Visual Feedback - Visual ‘feedback’ from the keypad display upon entering of
code. This feature indicates the code entry progress and is most practical when the
keypad buzzer is disabled at Home (Group Bypass) mode, or if selected by
programming. Entry of code by user or installer is confirmed at keypad display.
Display segments will light up clockwise, indicating the sequence of the entered
digits.
Note: After six unsuccessful attempts to enter an invalid code, the
keypad locked itself for 30 seconds
20
Delays Delete
Delay
Delete
4
Chime
5
Shunt
0
Key 4 DELAY DELETE (INSTANT PROTECTION)
Cancels the Entry Delay in zones selected as ‘Delayed’ zones. All zones become
Instant. This feature is optional when Home Mode set and all users are in. Hold-down
‘4’ key, ‘d’ is displayed in confirmation. Instant Protection becomes effective only if
System is armed within 20 seconds following hold-down of ‘4’ key.
Key 5 DOOR CHIME
The Door Chime initiates the keypad to beep whenever a zone is activated. Door
Chime operates on Chime-programmed zones.
Hold-down key 5 enables and disables the function.
Chime mode is confirmed by ‘c’ displayed on keypad.
#
LOCAL BUZZER ON and OFF
Holding down keys "0" and "#" simultaneously turn on and off the buzzer in each
LCD keypad. This function works in disarmed mode.
and
Testing Your System
It is recommended to test your system daily or weekly. Perform
system tests in the off-peak hours, such as early morning or late
evening. Call to inform your monitoring station that you are testing
your system.
Siren and Battery Test
Hold down key ‘1’. This command will generate a siren sound for 2-3 seconds.
Turn off your main AC, verify that LEDs are blinking to indicate power failure; test
siren again to make sure your battery can drive the siren during power failure.
Arm and Disarm the system (main AC is still off) few times, if ‘L’ is displayed, your
battery is faulty, call your installer.
Detection Devices Test
Test
7
Key 7 FAULT FIND
Fault Find enables testing of all detection devices.
Fault Find mode can be entered only during the 15 seconds following system
Disarming.
Fire, 24H, or Panic alarm will stop Fault Find mode.
Hold down ‘7’ key, confirmed by ‘F’ on Keypad display.
Activate each sensor. Detection of zone opening is confirmed by a one-second beep.
Three beeps indicate zone closing.
Arm the system to quit Fault Find mode.
21
Testing your Central Station (CS)
Inform your CS that you perform testing, ask them to report you if an alarm is
received. Arm the system, move in front of a detector or open a protected door, verify
that the siren is activated; to quit testing, disarm the system.
Test your system daily.
Call your installer if any test fails to operate
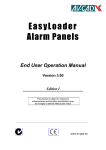
Troubleshooting
PROBLEM
System fails to Arm
when code is entered
at Keypad
INDICATION
Keypad entries are
confirmed by beeps,
but system does not
react
System cannot be
disarmed
Arming/Disarming
code is entered but
Red indicator
remains lit
Yellow indicator is
on (indication that
zones have been
bypassed)
Green indicator
blinks continuously
when you attempt to
arm the system
Yellow (shunt)
indicator constantly
on
Three LEDs
indicators are
blinking, indicating
Power Failure
The system is not
responding; keys do
not respond
Sign is displayed,
and arming denied
(system can not be
Armed with an open
instant or 24H zone)
22
REMEDY
1. Hold down ‘9’ key until you hear a beep,
then enter arming code
2. Program new arming code
3. If you forgot your Arming code, call your
installer
1. Hold down ‘9’ key until you hear the
confirmation beep. Enter arming code
carefully. Do not be confused by Siren
noise.
2. System was armed using the Instant
Arming key (key 5), but code was changed.
(You can ask your installer to cancel this
feature.)
To disable zone/s bypass Arm and disarm
the system; the Yellow indicator light turn
off
Hold down ‘3’ key; the zone/s in trouble
will be displayed. Check the cause: an open
window; movement detected by detector or
else.
1. Press ‘0’ key (Bypass), and then the zone
number where alarm was triggered.
The yellow indicator should light in
confirmation.
2. A delayed zone may be troubled. An open
delayed zone will cause the green indicator
to blink upon exit/entry
You may have a general power failure.
Check your premises fuse box
Warning! If Green indicator is still OFF,
your system is operating on temporary
power supplied by the Battery
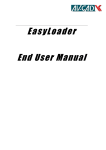
PROBLEM
Buzzer is activated
for no apparent
reason
Entry at protected
zone activates minisounder at keypad
‘L’ is displayed
‘C’ is displayed
(blinking)
Siren was triggered,
but programmed
phone numbers were
not dialed
‘H’ is displayed.
‘h’ is blinking.
Yellow indicator
lights upon arming
of system, without
bypassing (pressing
0 and any key)
INDICATION
Door at delayed zone
(entrance) is open or
there has been
detection of
movement at an
exit/entry zone.
Day or Tamper zone
was activated
A warning signal is
heard before the
siren is triggered
Battery is low,
faulty, or dead
Telephone line
disconnected or dead
or the systems failed
to contact central
station
1. Faulty dialer
2. Faulty phone line
or phone off the
hook
3. Mistaken report of
alarm
A panic alarm was
activated. Take
emergency
measures. Blinking
‘h’; set the time
‘Automatic Bypass’
has been
programmed. Can
also occur if ‘0’ key
is pressed twice
before arming,
which activates zone
bypass
23
REMEDY
Keys ‘5’ or ‘7’ have been pressed, activating
the door Chime or the Fault Find function.
Arm and disarm the system.
Hold-down ‘9’ key to reset Day Zone or
Tamper alarm
Disarm system immediately upon entry at
zone. If delay time is too short, call your
installer to reprogram delay time
Call your installer immediately
Call your installer immediately. Check your
telephone line
1. Hold down ‘6’ key (dialer test);
automatically dialed numbers will be
displayed (test takes several minutes).
2. If the telephone line to the alarm control
has been disconnected, reconnect it.
3. Malfunction of the alarm system - call
your installer
Arm and disarm system to abort alarm and
H display.
Set system time by holding-down ‘0’ key
then ‘1’ key
Before arming, make sure all entry/exit
doors protected by system are closed and all
detectors are off. Arm the system, and call
your installer
AV-GAD LIMITED WARRANTY
Av-Gad
Systems Ltd. (Av-Gad) warrants its products to be free from production
defects in components; materials used and labor, for the period of twelve months
following the date of production. Av-Gad will within the mentioned period, as its
option, repair or replace any product failing to proper operation without charge.
This warranty shall
not apply to any equipment, or any part thereof, which has
been repaired by others, installed not properly, used improperly, abused, altered
damaged, subjected to acts of God or on which the serial and data code altered or
removed.
Av-Gad will not be responsible for any dismantling or reinstallation expenses. In
order to exercise the warranty, the product must be returned by the purchaser,
delivery and transportation costs prepaid and insured to Av-Gad.
After repair or replacement, Av-Gad assumes the cost of returning products under
warranty.
There are no warranties, express or implied, which extend beyond the description
of the face hereof.
There is no express or implied warranty of merchantability or a warranty of fitness
for particular purpose. Additionally, this warranty is in lieu of all other obligations
or liabilities on the part of Av-Gad.
Any action for breach of warranty, including but not limited to any implied
warranty of merchantability, must be brought within three months following the
end of the warranty period. In no case shall Av-Gad be liable to anyone for any
consequential or incidental damages for breach of this or any other warranty,
express or implied, even if the loss or damage is caused by the seller’s own
negligence or fault.
Av-Gad is not an insurer of either the property or safety of the user’s employees,
family, or 3rd part and limits its liability for any loss or damage including
incidental or consequential damages to Av-Gad original selling price of the
product regardless of the cause of such loss or damage.
Av-Gad recommends testing the entire system weekly. Refer to
Testing Your System section for further details.
www.av-gad.com
24