1
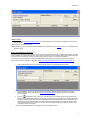
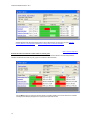
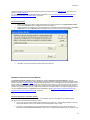
Decision-Support Software for Land Use and
Conservation Planning
User’s Manual
from
Vista On-line Help
4600 N. Fairfax Dr., 7th Floor
Arlington, VA 22203
(703) 908-1800
www.natureserve.org
SECTION FIVE
Site Explorer
SITE ANALYSIS
How to explore sites using a Vista analysis
Related Topics
Glossary
Objectives
Products
Inputs
Methods Summary
Limitations
Back to Top
Objectives
Site Explorer is used to examine sites related to existing Vista analyses, specifically Conservation Value Summaries
(CVS) or Scenario Evaluations. The objectives for Site Explorer differ depending on which analysis is being explored.
The CVS exploration objective is to identify and understand the elements and associated attributes that contribute to the
conservation value of one or more selected site(s).
The Scenario Evaluation exploration objective is twofold:
1.
To reveal the land use(s) and/or policy(ies) operating at one or more specified sites, and the conservation
element(s) occurring on the site(s), including element responses to those land statuses and the
achievement of element conservation goals.
2.
To provide the ability to conduct site-level ”r;what if” inquiries to examine the effects of different land uses
and/or policy types for the designated site(s) on element goal achievement, and/or to facilitate the
development of alternative (e.g., mitigation) scenarios specifying more compatible land uses and/or more
reliable implementation policies.
Back to Top
Products
Because Site Explorer can be used to examine either a CVS or a Scenario Evaluation, the products resulting from the
exploration will differ depending on which analysis is utilized.
CVS exploration produces a detailed Site Selection report that indicates the conservation value of the selected site(s),
along with details for each element on the site(s), including the number and percentage of viable occurrences. For more
detailed information on the data that result from a CVS exploration, see CVS Site Inventory Data.
Scenario Evaluation exploration produces a detailed Site Selection report that indicates the land status(es) of the
selected site(s), along with details for each element on the site(s), including the number and percentage of occurrences
that are compatible and protected (i.e., areas with compatible land uses along with policy types that will reliably ensure
that the actual land uses will be no more intensive than the uses indicated), and the achievement of element
conservation goals. For more detailed information on the data that result from evaluation exploration, see Scenario
Evaluation Site Inventory Data.
In addition to data on the selected site(s) and elements that occur, exploration of Scenario Evaluations provides a
mechanism for the user to develop and save alternative (e.g., mitigation) scenarios specifying more compatible land
uses and reliable policy types on the site(s). Thus, another product that results from the exploration of Scenario
Evaluations can be user-generated alternative scenarios and reports.
Back to Top
Inputs
Required inputs for the Site Explorer are:
•
A site layer imported into Vista, specifically a vector layer that represents land units of interest, such as
ownership parcels, forest stands, management units, watersheds, etc. If multiple types of planning units are
to be used with Site Explorer, it is highly recommended that the various layers be merged into a single layer
to provide the most relevant results for land use/policy implementation.
1
Vista Users Manual October 4, 2011
•
A Vista analysis (either a Conservation Value Summary or a Scenario Evaluation) that was run using the site
layer described above.
Back to Top
Methods Summary
Site Explorer is used to evaluate the conservation properties of one or more specified sites. Output from Site Explorer
includes details on the conservation value and contributing biodiversity elements. It may also include data on land
status(es) of the site, information on the achievement of element conservation goals, and the effects on element goal
achievement if alternative land statuses are used. Select a task below to see a detailed description of the process.
Define Sites
Obtain GIS layers and information on land units of interest
Create, reformat, and merge site layers as needed
Explore a Conservation Value Summary
Create a CVS that specifies a site layer for exploration
Explore sites using the CVS
Explore a Scenario Evaluation
Create a Scenario Evaluation that specifies a site layer for exploration
Explore sites using the Scenario Evaluation
Evaluate and save alternative land statuses, if desired
Back to Top
Limitations
Limitations described for data inputs and dependent Vista analyses, specifically for Conservation Value Summaries and
Scenario Evaluations, are carried forward as limitations of Site Explorer. Additional limitations that are specific to Site
Explorer include:
•
When evaluating alternative land uses and/or policy types for the site selection, the alternative land status(es)
must be applied to the entire selection. This suggests that care be taken to use a planning unit of sufficiently
small size to reflect the scale of most land use patterns.
Steps in the Process of Defining Sites for Exploration
PROCESS OF DEFINING SITES FOR EXPLORATION
Identify/obtain GIS layers and associated information on land units
Identify and obtain one or more geographic information systems (GIS) vector layers that represent land units of interest in the
planning area, such as ownership parcels, forest stands, management units, watersheds, etc.
Overview of site analyses
Go to other steps in the process
Identify/obtain GIS layers and associated information on land units
Create, reformat, and merge layers as needed
Go to steps in a Conservation Value Summary exploration
Create a CVS that specifies a site layer for exploration
Explore sites using the CVS
2
Section Five
Go to steps in a Scenario Evaluation exploration
Create a Scenario Evaluation that specifies a site layer for exploration
Explore sites using the Scenario Evaluation
Evaluate and save alternative land statuses, if desired
PROCESS OF DEFINING SITES FOR EXPLORATION
Create, reformat, and merge site layers as needed
If multiple types of planning units are to be used with Site Explorer, it is highly recommended that the various layers be merged
into a single layer in order to provide the most relevant results for site analyses. More specifically, when exploring a Scenario
Evaluation, using a single site layer will allow a more accurate assessment of policy implementation.
Merging data is a basic GIS task that is performed outside of the Vista application. For guidance on performing this task, see the
help for the Environmental Systems Research Institute (ESRI) application being used to develop the element distribution layers
(e.g., Arc9). To browse or search the contents of the help:
1.
From the Help menu, choose Help Topics.
2.
Choose a tab.
•
The Contents tab shows a list of topics that can be browsed through.
•
The Index tab provides the ability to search an index of help topics.
•
The Find tab provides the ability to search for a particular word in all of the help topics.
When exploring alternative land statuses for a Scenario Evaluation, each status must be applied to the entire site selection.
Thus, the site layer should utilize a planning unit of sufficiently small size to reflect the scale of most land use patterns. For
example, when working in a planning region that contains private land parcels, industry forest stands, and public land
management units, the site layer should contain all of these units. However, in many cases, particularly for large region
conservation assessments, simply combining these different units into a single layer would produce a complex layer containing a
large number of irregular polygons. Thus, it may be more practical to produce a site layer that utilizes equal area units that are of
appropriate size to the region and project objectives, such as 40-acre blocks or 25-hectare hexagons.
Overview of site analyses
Go to other steps in the site definition process
Identify/obtain GIS layers and associated information on land units
Create, reformat, and merge site layers as needed
Go to steps in a Conservation Value Summary exploration
Create a CVS that specifies a site layer for exploration
Explore sites using the CVS
Go to steps in a Scenario Evaluation exploration
Create a Scenario Evaluation that specifies a site layer for exploration
Explore sites using the Scenario Evaluation
Evaluate and save alternative land statuses, if desired
CVS Exploration
ELEMENT INVENTORY DATA FOR A CVS EXPLORATION
The data that result from site exploration of a Conservation Value Summary (CVS) provide details on the conservation value of
the site(s) selected in the exploration, along with information on the contributing biodiversity elements present on that site
selection.
3
Vista Users Manual October 4, 2011
The set of data to be displayed in the Site Explorer window can be defined by selecting desired attributes using the Site Explorer
Options window. A Custom Column Form accessed from the Options window provides users with the ability to select various
metrics that can be used to further customize the exploration. Once metrics have been chosen and site(s) selected in ArcMap,
the metrics will appear as columns in the grid located in the lower portion of the Site Explorer window. Those metrics will
represent values calculated for the elements included in the CVS that occur on the site(s) selected for exploration. Data for the
entire set of element attributes will be included in the Site Selection report resulting from the exploration.
The element attributes available for use in a CVS exploration are grouped according to type of data below, listed by Site Explorer
column label (with Options window entry in parentheses), along with a brief explanation of what each represents. For site data
calculated on the basis of intersections with elements, it is important to note that overlap by even a single pixel will result in
inclusion of that element data in the total. Note also that for data represented by bar charts, combining the values represented by
the dark green and red portions will result in the total contained within the site selection.
General attributes
Name - Name of an element that occurs on the selection.
Total - Number of occurrences intersecting the selection and their area within the entire Conservation Value Summary (CVS).
Selection - Number of occurrences intersecting the selection and their area within the selection.
Conservation Value attributes
Wt (Weight) - Weight assigned to the element in the CVS.
Selection Avg CV (Selection Average CV) - The average conservation value for the element on the selection, calculated by
averaging the different conservation value(s) for that portion of the Element Conservation Value (ECV) raster that
intersects the selection.
Selection Min CV (Selection Minimum CV) - The lowest conservation value for the element on the selection, through
comparison of the different conservation value(s) for that portion of the ECV raster that intersects the selection.
Selection Max CV (Selection Maximum CV) - The highest conservation value for the element on the selection, through
comparison of the different conservation value(s) for that portion of the ECV raster that intersects the selection.
Viability attributes
Viable - Total number of viable element occurrences intersecting the CVS.
% Viable - Percent of viable occurrences intersecting the CVS, and percent of viable area within the CVS.
Selection Viable - Number of viable occurrences intersecting the selection, and their area within the selection.
Selection % Viable - Percent of viable occurrences intersecting the selection, and percent of viable area within the selection.
Viable Occ (Chart: Viable Occurrences) - Chart showing the ratio of viable to non-viable occurrences (dark green vs. red), and
the ratio of occurrences intersecting versus not intersecting the selection (dark color vs. light color), as follows:
Viable occurrences outside the selection; that is, the total number of viable occurrences intersecting the CVS that
do not intersect the selection.
Viable occurrences intersecting the selection.
Non-viable occurrences intersecting the selection.
Non-viable occurrences outside the selection; that is, the total number of non-viable occurrences intersecting the
CVS that do not intersect the selection.
Viable Area (Chart: Viable Area) - Chart showing the ratio of viable to non-viable area (dark green vs. red), and the ratio of area
within versus area external to the selection (dark color vs. light color), as follows:
Viable area outside the selection; that is, the total viable area within the CVS that is external to the selection.
Viable area within the selection.
Non-viable area within the selection.
Non-viable area outside the selection; that is, the total non-viable area within the CVS that is external to the
selection.
Steps in a CVS Exploration
PROCESS OF EXPLORING SITES USING A CVS
Create a Conservation Value Summary that specifies a site layer for exploration
4
Section Five
Using the Vista Summarize Conservation Value window, indicate that the CVS will be used for site analyses by checking the
Perform site-level analysis (for Site Explorer) checkbox, and specifying the site layer that will be used in the exploration in the
Site Layer field.
Overview of site analyses
Go to steps in the site definition process
Identify/obtain GIS layers and associated information on land units
Create, reformat, and merge site layers as needed
Go to other steps in the process
Create a CVS that specifies a site layer for exploration
Explore sites using the CVS
Go to steps in a Scenario Evaluation exploration
Create a Scenario Evaluation that specifies a site layer for exploration
Explore sites using the Scenario Evaluation
Evaluate and save alternative land statuses, if desired
PROCESS OF EXPLORING SITES USING A CVS
Explore sites using the Conservation Value Summary
Right-click on the Conservation Value Summary that you wish to explore and select Site Explorer. Or select Lists Site
Analysis List from the NatureServe Vista menu to open the Site Analysis List window, which will display analyses in the project
that can be used in site exploration. Select the desired Conservation Value Summary from the list and use the resulting Site
Explorer window to evaluate sites.
To start exploring use the
Site Explorer pointer to select a site or select a site from the pull-down window in the upper lefthand portion of the Site Explorer Window. The Site Explorer may take a few minutes to initiate. You may select multiple sites by
holding down the CTRL button on your keyboard while you select. The pointer can also be dragged to define a rectangle to
indicate multiple sites. You may use other tools to navigate around (zoom in, zoom out, pan, etc) while using the Site Explore. To
retrieve the
Site Explorer pointer (the arrow with the circular Vista logo), click on the Vista logo in the menu tool bar.
Overview of site analyses
Go to steps in the site definition process
Identify/obtain GIS layers and associated information on land units
Create, reformat, and merge site layers as needed
Go to other steps in the process
Create a CVS that specifies a site layer for exploration
Explore sites using the CVS
Go to steps in a Scenario Evaluation exploration
Create a Scenario Evaluation that specifies a site layer for exploration
Explore sites using the Scenario Evaluation
5
Vista Users Manual October 4, 2011
Evaluate and save alternative land statuses, if desired
Scenario Evaluation Exploration
ELEMENT INVENTORY DATA FOR A SCENARIO EVALUATION EXPLORATION
The data that result from site exploration of a Scenario Evaluation represent the land uses, with or without policy types, operating
at the site(s) selected, and their impact on elements, including element response to those land statuses and the achievement of
element goals.
The set of data to be displayed in the Site Explorer window can be defined by selecting desired attributes using the Site Explorer
Options window. The attribute values displayed in the grid in the lower portion of the Site Explorer window represent values
calculated for those elements included in the Scenario Evaluation that occur on site(s) selected for exploration. Data for the
entire set of element attributes will be included in the Site Selection report resulting from the exploration.
The full set of element attributes available for use in a Scenario Evaluation exploration are grouped according to type of data
below, listed by Site Explorer column label (with Options window entry in parentheses), along with a brief explanation of what
each represents; for evaluations that include land use compatibility only, the attributes related to protection will not be displayed.
For site data calculated on the basis of intersections with elements, it is important to note that overlap by even a single pixel will
result in inclusion of that element data in the total. Note also that for data represented by bar charts, combining the values
represented by the dark green and red portions will result in the total contained within the site selection.
General attributes
Name - Name of an element that occurs on the selection.
Total - Number of occurrences intersecting the selection and their area within the entire Scenario Evaluation.
Selection - Number of occurrences intersecting the selection and their area within the selection.
Goal - Conservation goal assigned for the element in the Scenario Evaluation, which is to achieve a number of element
occurrences or an amount of area, or a percentage of occurrences or percentage of area. Conservation can be defined
in terms of compatibility, protection, or both.
Response - Response of an element (specifically, compatible, incompatible, or mixed) to land uses in the scenario that was
evaluated. Select a single row in the Scenario Composition portion of the Site Explorer window to view the element’s
specific response to the land use in that row.
Viability attributes
Viable - Total number of viable element occurrences intersecting the Scenario Evaluation.
% Viable - Percent of viable occurrences intersecting the Scenario Evaluation, and percent of viable area within the evaluation.
Selection Viable - Number of viable occurrences intersecting the selection, and their area within the selection.
Selection % Viable - Percent of viable occurrences intersecting the selection, and percent of viable area within the selection.
Viable Occ (Chart: Viable Occurrences) - Chart showing the ratio of viable to non-viable occurrences (dark green vs. red), and
the ratio of occurrences intersecting versus not intersecting the selection (dark color vs. light color), as follows:
Viable occurrences outside the selection; that is, the total number of viable occurrences intersecting the Scenario
Evaluation that do not intersect the selection.
Viable occurrences intersecting the selection.
Non-viable occurrences intersecting the selection.
Non-viable occurrences outside the selection; that is, the total number of non-viable occurrences intersecting the
Scenario Evaluation that do not intersect the selection.
Viable Area (Chart: Viable Area) - Chart showing the ratio of viable to non-viable area (dark green vs. red), and the ratio of area
within versus area external to the selection (dark color vs. light color), as follows:
Viable area outside the selection; that is, the total viable area within the Scenario Evaluation that is external to the
selection.
Viable area within the selection.
Non-viable area within the selection.
Non-viable area outside the selection; that is, the total non-viable area within the Scenario Evaluation that is
external to the selection.
Compatibility attributes
Compatible - Number of compatible occurrences intersecting the Scenario Evaluation, and their area within the evaluation.
% Compatible - Percent of compatible occurrences intersecting the Scenario Evaluation, and percent of compatible area within
the evaluation.
6
Section Five
% of Goal: Compatible - Percent of the Scenario Evaluation goal for the element that is achieved either in compatible
occurrences or area, as defined in the goal itself.
Selection Compatible - Number of compatible occurrences intersecting the selection, and their area within the selection.
Selection % Compatible - Percent of compatible occurrences intersecting the selection, and percent of compatible area within
the selection.
Selection % of Goal, Compatible - Within the selection, percent of the Scenario Evaluation goal for the element that is
achieved either in compatible occurrences or area, as defined in the goal itself.
Compatible Occ (Chart: Compatible Occurrences) - Chart showing the ratio of compatible to incompatible occurrences (dark
green vs. red), and the ratio of occurrences intersecting versus not intersecting the selection (dark color vs. light color),
as follows:
Compatible occurrences outside the selection; that is, the total number of compatible occurrences intersecting the
Scenario Evaluation that do not intersect the selection.
Compatible occurrences intersecting the selection.
Incompatible occurrences intersecting the selection.
Incompatible occurrences outside the selection; that is, the total number of incompatible occurrences intersecting
the Scenario Evaluation that do not intersect the selection.
Compatible Area (Chart: Compatible Area) - Chart showing the ratio of compatible to incompatible area (dark green vs. red),
and the ratio of area within versus area external to the selection (dark color vs. light color), as follows:
Compatible area outside the selection; that is, the total compatible area within the Scenario Evaluation that is
external to the selection.
Compatible area within the selection.
Incompatible area within the selection.
Incompatible area outside the selection; that is, the total incompatible area within the Scenario Evaluation that is
external to the selection.
Protection attributes
Protected - Total number of protected occurrences intersecting the Scenario Evaluation, and their area within the evaluation.
% Protected - Percent of protected occurrences intersecting the Scenario Evaluation, and percent of protected area within the
evaluation.
% of Goal: Protected - Percent of the Scenario Evaluation goal for the element that is achieved either in protected occurrences
or area, as defined in the goal itself.
Selection Protected - Number of protected occurrences intersecting the selection, and their area within the selection.
Selection % Protected - Percent of protected occurrences intersecting the selection, and percent of protected area within the
selection.
Selection % of Goal, Protected - Within the selection, percent of the Scenario Evaluation goal for the element that is achieved
either in protected occurrences or area, as defined in the goal itself.
Protected Occ (Chart: Protected Occurrences) - Chart showing the ratio of protected to unprotected occurrences (dark green
vs. red), and the ratio of occurrences intersecting versus not intersecting the selection (dark color vs. light color), as
follows:
Protected occurrences outside the selection; that is, the total number of protected occurrences intersecting the
Scenario Evaluation that do not intersect the selection.
Protected occurrences intersecting the selection.
Unprotected occurrences intersecting the selection.
Unprotected occurrences outside the selection; that is, the total number of unprotected occurrences intersecting the
Scenario Evaluation that do not intersect the selection.
Protected Area (Chart: Protected Area) - Chart showing the ratio of protected to unprotected area (dark green vs. red), and the
ratio of area within versus area external to the selection (dark color vs. light color), as follows
Protected area outside the selection; that is, the total protected area within the Scenario Evaluation that is external
to the selection.
Protected area within the selection.
Unprotected area within the selection.
Unprotected area outside the selection; that is, the total unprotected area within the Scenario Evaluation that is
external to the selection.
Conservation Value attributes
7
Vista Users Manual October 4, 2011
Selection Avg CV (Selection Average CV) - The average conservation value for the element on the selection, calculated by
averaging the different conservation value(s) for that portion of the Element Conservation Value (ECV) raster that
intersects the selection.
Selection Min CV (Selection Minimum CV) - The lowest conservation value for the element on the selection, through
comparison of the different conservation value(s) for that portion of the ECV raster that intersects the selection.
Selection Max CV (Selection Maximum CV) - The highest conservation value for the element on the selection, through
comparison of the different conservation value(s) for that portion of the ECV raster that intersects the selection.
Steps in a Scenario Evaluation Exploration
PROCESS OF EXPLORING SITES USING A SCENARIO EVALUATION
Create a Scenario Evaluation that specifies a site layer for exploration
Using the Evaluate Scenario window, indicate that the Scenario Evaluation will be used for site analyses by specifying the layer
to be used in the exploration in the Site Layer field.
Overview of site analyses
Go to steps in the site definition process
Identify/obtain GIS layers and associated information on land units
Create, reformat, and merge site layers as needed
Go to steps in a Conservation Value Summary exploration
Create a CVS that specifies a site layer for exploration
Explore sites using the CVS
Go to other steps in the process
Create a Scenario Evaluation that specifies a site layer for exploration
Explore sites using the Scenario Evaluation
Evaluate and save alternative land statuses, if desired
PROCESS OF EXPLORING SITES USING A SCENARIO EVALUATION
Explore sites using the Scenario Evaluation
Right-click on the Conservation Value Summary that you wish to explore and select Site Explorer. Or select Lists Site
Analysis List from the NatureServe Vista menu to open the Site Analysis List window, which will display analyses in the project
that can be used in site exploration. Select the desired Scenario Evaluation from the list and use the resulting Site Explorer
window to evaluate sites.
To start exploring use the
Site Explorer pointer to select a site or select a site from the pull-down window in the upper lefthand portion of the Site Explorer Window. The Site Explorer may take a few minutes to initiate. You may select multiple sites by
holding down the CTRL button on your keyboard while you select. The pointer can also be dragged to define a rectangle to
indicate multiple sites. You may use other tools to navigate around (zoom in, zoom out, pan, etc) while using the Site Explore. To
retrieve the
Site Explorer pointer (the arrow with the circular Vista logo), click on the Vista logo in the menu tool bar.
Overview of site analyses
Go to steps in the site definition process
Identify/obtain GIS layers and associated information on land units
Create, reformat, and merge site layers as needed
8
Section Five
Go to steps in a Conservation Value Summary exploration
Create a CVS that specifies a site layer for exploration
Explore sites using the CVS
Go to other steps in the process
Create a Scenario Evaluation that specifies a site layer for exploration
Explore sites using the Scenario Evaluation
Evaluate and save alternative land statuses, if desired
PROCESS OF EXPLORING SITES USING A SCENARIO EVALUATION
Evaluate and save alternative land statuses, if desired
Detailed process steps for exploring different land uses and/or policy types and their effect on element conservation goals, as
well as saving the results of these explorations, are described in the Evaluate alternative land statuses section of the Site
Explorer window.
Overview of site analyses
Go to steps in the site definition process
Identify/obtain GIS layers and associated information on land units
Create, reformat, and merge site layers as needed
Go to steps in a Conservation Value Summary exploration
Create a CVS that specifies a site layer for exploration
Explore sites using the CVS
Go to other steps in the process
Create a Scenario Evaluation that specifies a site layer for exploration
Explore sites using the Scenario Evaluation
Evaluate and save alternative land statuses, if desired
Windows for Site Explorations
SITE ANALYSIS LIST WINDOW
The Site Analysis List window is displayed by selecting Lists Site Analysis List from the NatureServe Vista menu. This
window lists all of the analyses in the project, specifically Conservation Value Summaries and/or Scenario Evaluations, that can
be examined in detail using the Site Explorer tool. In order to be included in this list, a site layer must be specified for the
analyses. See the Site Analyses section for more detailed information on the use of Site Explorer.
9
Vista Users Manual October 4, 2011
Button functions:
Explore... displays the Site Explorer window with data from the analysis that is selected.
Report displays the report for the selected analysis. See the Reports section for more details on Conservation Value Summary
and Scenario Evaluation reports.
Help opens the on-line documentation.
Close closes the window.
Columns displayed:
Name - name of an analysis that can be evaluated using Site Explorer tool.
TypeName - type of analysis, specifically Conservation Value Summary or Scenario Evaluation.
Def. (Default) - checkbox used to designate an analysis as the default displayed in the Site Explorer window.
SITE EXPLORER WINDOW
The Site Explorer window is used to evaluate the conservation properties of a specified site or set of sites that are of interest,
with functionality and results that differ depending on the type of Vista analysis that is examined, specifically a Conservation
Value Summary (CVS) or Scenario Evaluation). When used for a CVS, the Site Explorer window displays details on the
conservation value for the site selection, along with information on the contributing biodiversity elements present on the
selection. For a Scenario Evaluation, the Site Explorer tool provides data on the land use and/or policy types for the site
selection along with detailed information on elements occurring on the selection in terms of conservation goals achieved, and
enables the user to examine the effects on goal achievement if alternative land statuses are used.
The Site Explorer window can be opened several ways:
•
•
•
•
10
Clicking the Explore... button on the Site Analysis List window will display the Site Explorer window with data from the
analysis (CVS or Scenario Evaluation) that is selected.
Right-clicking on a CVS or Scenario Evaluation displayed on the NatureServe Vista tab of the Table of Contents and
selecting Site Explorer... from the resulting menu will display the Site Explorer window with data for that analysis.
Selecting Explore Sites... from the NatureServe Vista menu will display the Site Explorer window with data for the
analysis marked as the default in the Site Analysis List window.
Clicking the
button on the NatureServe Vista toolbar will open the Site Explorer window with data for the
analysis marked as the default in the Site Analysis List window.
Section Five
Button functions:
Options... displays the Site Explorer Options window to set the attributes (columns of data) to be displayed for elements and
the site selection.
Help opens the on-line documentation.
Report displays the report for the attribute data resulting from the exploration. See the Reports section for more details on Site
Selection reports.
Explore sites related to a Vista analysis:
The basic process for exploring sites related to a CVS and a Scenario Evaluation is the same. Additional functionality is provided
when evaluations are explored, permitting the user to examine the effects on element goals caused by altering land uses and/or
policy types for the site selection, and then save the results as new scenarios for use in Scenario Evaluations.
The process for exploring either a CVS or a Scenario Evaluation is described below. Following the process steps that are
common to both types of analyses is a description of how to evaluate alternative land statuses for a Scenario Evaluation.
1.
Open the Site Explorer window for the desired analysis using one of the methods described above.
2.
Click the Options... button to set the attributes to be displayed for elements and the site selection in the Site
Explorer window for the analysis. See the Site Explorer Options window for details on the process for selecting
element attributes.
3.
Using the
Site Explorer pointer, select one or more land units in the site layer (parcels in this example) to be
examined, or choose the desired site from the Site Layer drop-down menu (populated only if a site attribute has been
specified on the Site Explorer Options window). Holding the button while selecting sites with the pointer will permit
multiple sites to be considered together. The pointer can also be dragged to define a rectangle to indicate multiple
sites to be examined as a set. To deselect units, click outside of the area included in the analysis, or select one or
more different sites to be explored.
Data for the identified site selection will be displayed in the Site Explorer window.
11
Vista Users Manual October 4, 2011
Attribute definitions that will describe briefly what the column data represent can be found in the topics Element
Inventory Data for a CVS Exploration and Element Inventory Data for a Scenario Evaluation.
Back to process steps above
Evaluate alternative land statuses and their effects on element goals:
Once the Site Explorer window has been opened and sites selected for a Scenario Evaluation, the functionality related to
evaluation of alternative land uses and policy types can be utilized, as described below.
Click the More>> button to expand the window to display composition details for the scenario used for the evaluation,
including the land status(es) assigned to the layer(s) that comprise that scenario.
12
Section Five
Button functions for the Scenario Composition portion of the Site Explorer window:
Apply changes land use statuses to those selected in the Override fields.
Undo returns any land statuses changed by "Override" values back to their original statuses.
Review... opens a Site Change List window used to modify statuses for individual layers.
Save opens a Save Changes to Shape File window to capture the modified layers and land statuses as a
shape file.
Response attribute functionality:
Provided the Response attribute is included in the site exploration and displayed as a column, selecting a single row in
the Scenario Composition portion of the Site Explorer window will display each element's specific response to the land
use in that row.
1. Change land use status(es)
Using the Scenario Composition portion of the Site Explorer window, select a different land use and/or policy type to be
applied to scenario layers by selecting value(s) from the appropriate Override drop-down list(s) and clicking Apply.
13
Vista Users Manual October 4, 2011
The land status value(s) selected in the Override field(s) will be applied to the layers that comprise the scenario used
for the Scenario Evaluation. Any resulting changes to the element attribute data for the site exploration will change
accordingly, as shown in the example below (compared with the initial results, above).
2. Review land status changes
Click Report to display the Site Selection report showing the effects of the alternative land status(es) on element
attributes and goal achievement. See the Reports section for more details on Site Selection reports.
If desired, click Review... on the Site Explorer window to display the Site Change List window, which lists all layers that
have modified land status(s) resulting from any override values selected in the Site Explorer window. Modify the change
list if desired using the buttons provided on the window, described below.
14
Section Five
Button functions for the Site Change List window:
OK saves any revisions to the list of land use status changes.
Cancel closes the window without retaining any revisions made to the land status change list.
Remove removes a selected layer (row) with modified land status values from the list. As a result, this layer
will now be displayed in the Scenario Composition part of the Site Explorer window with its original land
status(es); that is, the land status(es) in effect before any override values were specified.
Undo restores a layer removed from the Site Change List window back to the list, again with the land status
modified by override values.
3. Determine optimal land statuses
Repeat the process of selecting new land status(s) for the layers in the site exploration by changing override value(s),
and reviewing and accepting any values (steps 1 and 2, above) that result in desirable changes to element goal
achievement.
4. Save alternative scenario layers
Once a combination of land statuses in the site exploration is deemed to be acceptable/useful, use the Save... button in
the Scenario Composition portion of the window to display the Save Changes to Shape File window. Designate a
folder and file name for the location of the saved data, and click Save.
15
Vista Users Manual October 4, 2011
The saved shape file and associated land status data can then be used to define new scenarios for use in Scenario
Evaluations.
SITE EXPLORER OPTIONS WINDOW
The Site Explorer Options window is displayed by clicking the Options button on the Site Explorer window, and is used to set
attributes related to the element and site information displayed for a particular analysis (i.e., a Conservation Value Summary
(CVS) or Scenario Evaluation).
Set options:
ELEMENT DETAILS TAB INPUT
16
Section Five
1.
Indicate the attributes (i.e., columns) of data to be displayed for elements that occur in the site selection, using the
right arrow button to move one or more highlighted attributes from the Available Columns list to the Selected
Columns list, and the left arrow to remove attribute(s) from the set to be displayed. The up and down arrow buttons
can be used to set the order for the attributes to be displayed in the Site Explorer window. While an attribute is
selected, a brief description for the attribute is displayed near the bottom of the tab. A complete list of attributes and
their definitions can be found in the topics Element Inventory Data for a CVS Exploration and Element Inventory Data
for a Scenario Evaluation Exploration.
SITE ATTRIBUTES TAB INPUT
17
Vista Users Manual October 4, 2011
2.
Select an attribute from the Site selection attribute drop-down list near the top of the window to be used to select
land units for Site Explorer. The values for this attribute will then be displayed in the Site Layer drop-down list on the
Site Explorer window.
3.
Indicate the attribute(s) to be displayed for the site(s) selected in the Selection Attributes box, using the right arrow
button to move one or more highlighted attributes from the Available Attributes list to the Selected Attributes list,
and the left arrow to remove attribute(s) from the set to be displayed. The up and down arrow buttons can be used to
set the order for the attributes to be displayed in the Site Explorer window.
4.
To use the set of attributes specified on both the Element Details and Site Attributes tabs as the default for all site
explorations of Conservation Value Summaries or Scenario Evaluations, indicate so using the checkbox near the
bottom of the window.
5.
To close the window and save any changes made to the attribute lists click OK; otherwise, click Cancel.
Conservation Solutions
CONSERVATION SOLUTIONS
How to generate a conservation solution
How to capture solution results
Objectives
18
Related Topics
Glossary
Section Five
Products
Inputs
Methods Summary
References
Back to Top
Objectives
The major purpose of the Vista Conservation Solution functionality is to facilitate data "exchange" between Vista and
external conservation solution applications, specifically MARXAN and SPOT (the Spatial Portfolio Optimization Tool).
Both MARXAN and SPOT evaluate different units of land according to criteria to determine which sets, when combined
into larger units (i.e., reserve systems or portfolios, respectively) result in optimal conservation solutions in terms of
several factors, including cost and representation of conservation targets.
Different objectives are specified for the two Vista Conservation Solution tool functions:
•
•
The "generate conservation solution" function is designed to prepare the input data needed to generate a
solution using either MARXAN or SPOT, and then effectively walk the user through the process of initiating
solution runs using the designated application.
The "capture solution results" function utilizes solution results generated by MARXAN or SPOT to produce a
shape file that can be used to more easily visualize the results, as well as to define new Vista scenarios,
which can then be utilized in Scenario Evaluations.
For more detailed information on the external conservation solution applications, see
http://www.ecology.uq.edu.au/marxan.htm and http://www.conserveonline.org/workspaces/spot.
Back to Top
Products
The "generate solution" function of the Conservation Solution tool produces a folder containing the input data necessary
for running a solution using either MARXAN and SPOT.
The "capture results" function results in a shape file produced from solution results generated by either MARXAN or
SPOT.
Back to Top
Inputs
The "generate solution" function of the Conservation Solution tool requires the following inputs:
•
An analysis unit layer, which can be associated with an existing Vista site analysis
•
Cost attribute values
•
Selection status attribute values
•
A Vista goal set
•
A penalty factor value OR a Vista weighting system
•
Number of iterations to be performed in a run
•
Number of runs to be performed for a solution
Depending on the parameters needed for the solution, the following inputs for the "generate solution" function are
optional:
•
A Vista filter
•
A value for the boundary length modifier (default is 0)
The "capture results" function of the Conservation Solution tool requires the input of solution results generated by either
MARXAN or SPOT.
Back to Top
Methods Summary
19
Vista Users Manual October 4, 2011
The "generate solution" and "capture results" functions of the Vista Conservation Solution tool require different
processes for their use. Select a task below to see a detailed description of the process.
Generate a Conservation Solution
Identify an analysis unit layer
Determine the parameters to be used for generating the solution
Add cost attributes to the layer
Add the selection status attribute to the layer
Prepare solution input data using Vista
Use input data to generate a solution using MARXAN or SPOT
Capture Solution Results
Determine the location of solution results generated by MARXAN or SPOT
Load results into Vista to create a shape file
Back to Top
References
Game, E. T. and H. S. Grantham. (2008). Marxan User Manual: For Marxan version 1.8.10. University of Queensland,
St. Lucia, Queensland, Australia, and Pacific Marine Analysis and Research Association, Vancouver, British
Columbia, Canada.
Ball, I. R. and H. P. Possingham, (2000) MARXAN (V1.8.2): Marine Reserve Design Using Spatially Explicit Annealing,
a Manual.
Possingham, H. P., I. R. Ball and S. Andelman (2000) Mathematical methods for identifying representative reserve
networks. In: S. Ferson and M. Burgman (eds) Quantitative methods for conservation biology. SpringerVerlag, New York, pp. 291-305.
Steps in the "Generate Solution" Process
PROCESS OF GENERATING A CONSERVATION SOLUTION
Identify an analysis unit layer
Identify and obtain a geographic information systems (GIS) layer that represents land units of interest, such as ownership
parcels, forest stands, management units, watersheds, etc.
Overview of conservation solutions
Go to other steps in the process
Identify an analysis unit layer
Determine the parameters to be used for generating the solution
Add cost attributes to the layer
Add the selection status attribute to the layer
Prepare solution input data using Vista
Use input data to generate a solution using MARXAN or SPOT
Go to steps in the "capture results" process
Determine the location of solution results generated by MARXAN or SPOT
Load results into Vista to create a shape file
PROCESS OF GENERATING A CONSERVATION SOLUTION
20
Section Five
Determine the parameters to be used for generating the solution
Identify values for the various parameters to be used in generating a conservation solution.
Parameters that must be defined for the solution are as follows:
•
External conservation solution generator - MARXAN or SPOT (the Spatial Portfolio Optimization Tool)
•
Analysis unit layer, which can be associated with an existing Vista site analysis
•
Cost attribute(s) and values
•
Selection status attribute and values
•
Vista goal set
•
Penalty factor value OR a Vista weighting system
•
Number of iterations to be performed in a run
•
Number of runs to be performed for a solution
Parameters that are optionally defined for the solution are as follows:
•
Vista filter
•
Value for the boundary length modifier (default is 0)
Overview of conservation solutions
Go to other steps in the process
Identify an analysis unit layer
Determine the parameters to be used for generating the solution
Add cost attributes to the layer
Add the selection status attribute to the layer
Prepare solution input data using Vista
Use input data to generate a solution using MARXAN or SPOT
Go to steps in the "capture results" process
Determine the location of solution results generated by MARXAN or SPOT
Load results into Vista to create a shape file
PROCESS OF GENERATING A CONSERVATION SOLUTION
Add cost attributes to the layer
Add one or more attribute columns to the analysis unit layer in order to represent costs to be considered in generating a
conservation solution. Costs can be broadly described in terms of ecological, social, and economic costs. Examples of costs
include:
•
Base cost of units (dollars)
•
Mitigation costs (dollars)
•
Cost can also be any relative social, economic or ecological measure. For instance, it may reflect the likelihood of
success in different areas based on social willingness, enforceability, or the presence of uncontrollable threats (Game
& Grantham, 2008)
Adding attributes (columns) and values to a layer are basic GIS tasks that are performed outside of the Vista application. For
guidance on performing this task, see the help for the Environmental Systems Research Institute (ESRI) application being used
to develop the element distribution layers (e.g., Arc9). To browse or search the contents of the help:
1.
From the Help menu, choose Help Topics.
2.
Choose a tab.
•
The Contents tab shows a list of topics that can be browsed through.
•
The Index tab provides the ability to search an index of help topics.
21
Vista Users Manual October 4, 2011
•
The Find tab provides the ability to search for a particular word in all of the help topics.
Overview of conservation solutions
Go to other steps in the process
Identify an analysis unit layer
Determine the parameters to be used for generating the solution
Add cost attributes to the layer
Add the selection status attribute to the layer
Prepare solution input data using Vista
Use input data to generate a solution using MARXAN or SPOT
Go to steps in the "capture results" process
Determine the location of solution results generated by MARXAN or SPOT
Load results into Vista to create a shape file
PROCESS OF GENERATING A CONSERVATION SOLUTION
Add the selection status attribute to the layer
Add one attribute column to the analysis unit layer to represent selection status, which indicates whether a unit is to be included
in a solution. Values for this attribute are limited to Locked In, Locked Out, or may be null. Units with an assigned value of
Locked In are to be included in the solution, while those to be excluded have the Locked Out value. Null values for this attribute
will permit the solution generator to choose whether or not to include the unit in the solution.
Adding attributes (columns) and values to a layer are basic GIS tasks that are performed outside of the Vista application. For
guidance on performing this task, see the help for the Environmental Systems Research Institute (ESRI) application being used
to develop the element distribution layers (e.g., Arc9). To browse or search the contents of the help:
1.
From the Help menu, choose Help Topics.
2.
Choose a tab.
•
The Contents tab shows a list of topics that can be browsed through.
•
The Index tab provides the ability to search an index of help topics.
•
The Find tab provides the ability to search for a particular word in all of the help topics.
Overview of conservation solutions
Go to other steps in the process
Identify an analysis unit layer
Determine the parameters to be used for generating the solution
Add cost attributes to the layer
Add the selection status attribute to the layer
Determine the parameters to be used for generating the solution
Prepare solution input data using Vista
Use input data to generate a solution using MARXAN or SPOT
Go to steps in the "capture results" process
Determine the location of solution results generated by MARXAN or SPOT
Load results into Vista to create a shape file
22
Section Five
PROCESS OF GENERATING A CONSERVATION SOLUTION
Prepare solution input data using Vista
Select Generate a Conservation Solution... from the NatureServe Vista menu to open the Generate Conservation Solution
wizard, which will walk through the process of assigning parameters to be used to generate input files for use by the external
MARXAN or SPOT (Spatial Portfolio Optimization Tool) applications.
Overview of conservation solutions
Go to other steps in the process
Identify an analysis unit layer
Determine the parameters to be used for generating the solution
Add cost attributes to the layer
Add the selection status attribute to the layer
Prepare solution input data using Vista
Use input data to generate a solution using MARXAN or SPOT
Go to steps in the "capture results" process
Determine the location of solution results generated by MARXAN or SPOT
Load results into Vista to create a shape file
PROCESS OF GENERATING A CONSERVATION SOLUTION
Use input data to generate a solution using MARXAN or SPOT
Once input data have been generated based on parameters entered in the Generate Conservation Solution wizard, instructions
will be displayed on the last wizard screen which, along with message windows, will step through the process of generating a
conservation solution using either MARXAN or SPOT (the Spatial Portfolio Optimization Tool).
To run Marxan with the generated inputs, drag the marxan.exe file into the Vista generated inputs folder created in the
'Generating a Conservation Solution’ wizard and double-click to run the marxan.exe file. Marxan will automatically use the input
files within the folder.
Overview of conservation solutions
Go to other steps in the process
Identify an analysis unit layer
Determine the parameters to be used for generating the solution
Add cost attributes to the layer
Add the selection status attribute to the layer
Prepare solution input data using Vista
Use input data to generate a solution using MARXAN or SPOT
Go to steps in the "capture results" process
Determine the location of solution results generated by MARXAN or SPOT
Load results into Vista to create a shape file
Steps in the "Capture Results" Process
PROCESS OF CAPTURING SOLUTION RESULTS
23
Vista Users Manual October 4, 2011
Determine the location of solution results generated by MARXAN or SPOT
Determine the location of results that were generated by either MARXAN or SPOT (the Spatial Portfolio Optimization Tool),
external conservation solution generation applications.
Overview of conservation solutions
Go to steps in the "generate solution" process
Identify an analysis unit layer
Determine the parameters to be used for generating the solution
Add cost attributes to the layer
Add the selection status attribute to the layer
Prepare solution input data using Vista
Use input data to generate a solution using MARXAN or SPOT
Go to other steps in the process
Determine the location of solution results generated by MARXAN or SPOT
Load results into Vista to create a shape file
PROCESS OF CAPTURING SOLUTION RESULTS
Load results into Vista to create a shape file
Select Capture Solution Results... from the NatureServe Vista menu to open the Capture Solution Results window, which will
generate a shape file from solution results generated by the external MARXAN or SPOT (the Spatial Portfolio Optimization Tool)
applications.
Overview of conservation solutions
Go to steps in the "generate solution" process
Identify an analysis unit layer
Determine the parameters to be used for generating the solution
Add cost attributes to the layer
Add the selection status attribute to the layer
Prepare solution input data using Vista
Use input data to generate a solution using MARXAN or SPOT
Go to other steps in the process
Determine the location of solution results generated by MARXAN or SPOT
Load results into Vista to create a shape file
Windows for Conservation Solutions
CAPTURE SOLUTION RESULTS WINDOW
The Capture Solution Results window is displayed by selecting Capture Conservation Solution... from the NatureServe Vista
menu. This window is used to load results generated by external conservation solution software, specifically MARXAN and
SPOT (the Spatial Portfolio Optimization Tool). These applications evaluate different units of land according to criteria to
determine which sets, when combined into larger units (e.g., portfolios or reserve systems) result in optimal conservation
solutions in terms of several factors, including cost and representation of conservation targets. The results used in Vista can
consist of separate runs identifying analysis units that were selected for the solution, or can be a summed solution that indicates,
for each unit, the number of runs in which it was selected. In capturing results generated by an external software, Vista produces
24
Section Five
a shape file that can be used to more easily visualize the results, as well as to define new Vista scenarios, which can then be
utilized in Scenario Evaluations.
For more detailed information on the MARXAN and SPOT applications, see http://www.ecology.uq.edu.au/marxan.htm and
http://www.conserveonline.org/workspaces/spot, respectively.
Capture solution results:
1.
Specify the location of the solution results generated from the external application in the Solution Result Location
field, or click the Browse button to navigate to the location and select it.
2.
Specify the location to be used for shape file that will result from conversion of the generated solution in the Solution
shape file field, or click the Browse button to navigate to the location. Enter a file name, and click Save.
3.
Click OK to convert the conservation solution results into a shape file.
GENERATE CONSERVATION SOLUTION WINDOW
The Generate Conservation Solution wizard is displayed by selecting Generate a Conservation Solution... from the
NatureServe Vista menu. This window is used to prepare the necessary input data for analysis by external conservation solution
software, specifically MARXAN and SPOT (the Spatial Portfolio Optimization Tool). These applications evaluate different units of
land according to criteria to determine which sets, when combined into larger units (e.g., portfolios or reserve systems) result in
optimal conservation solutions in terms of several factors, including cost and representation of conservation targets. Once the
input data are generated by Vista, the user is walked through the process of initiating solution runs using the external application.
For more detailed information on the MARXAN and SPOT applications, see http://www.ecology.uq.edu.au/marxan.htm and
http://www.conserveonline.org/workspaces/spot, respectively.
Prepare for generating a conservation solution:
Before beginning the solution generation process, two or more attribute columns must be added to the analysis unit layer
(identified in step 2 below) that will be used in the process.
•
•
One or more columns must be added to represent different types of costs (e.g., effort [in days], mitigation costs), with
values associated with units to be considered in the solution (indicated in step 4, below).
One column must be added to represent the attribute selection status (indicated in step 5, below); values for this
attribute are limited to Locked In, Locked Out, or may be null. The selection status attribute serves to identify units to
25
Vista Users Manual October 4, 2011
be included (Locked In) or excluded (Locked Out) when a solution is generated; null values will permit the solution
generator to choose whether or not to include the unit in the solution.
Note that at any time during the process of generating a solution, the previous step in the process can be revisited (and data
changed, if desired) by clicking the <Back button, or the action can be canceled altogether by clicking the Cancel button.
Generate a conservation solution:
1.
26
Indicate which application should be used as the basis for the solution to be generated by Vista using the appropriate
MARXAN or SPOT radio button. Click Next>.
Section Five
2.
Indicate whether a new or existing site analysis will be used to generate the solution using the appropriate Use
Existing Site Analysis or Create a new Site Analysis radio button. If an existing analysis will be used, select the
analysis from the Site Analysis drop-down list. Click Next>.
27
Vista Users Manual October 4, 2011
3.
If an existing analysis is being used for the solution, select the layer to be used from the drop-down list in the Analysis
Unit Layer field, or by using the
28
ArcCatalog button.
4.
Select the attribute (column) to be used to represent the costs associated with different units in the solution from the
drop-down list in the Cost Attribute field.
5.
Select the attribute (column) to be used to indicate whether units are to be included or excluded in the solution from
the drop-down list in the Selection Status field. Click Next>.
6.
If a new analysis is being created for the solution, select the filter to be used in generating the solution from the dropdown list in the Filter field.
7.
Select the element conservation goals to be used in the solution from the drop-down list in the Goal Set field. Click
Next>.
Section Five
8.
Indicate whether a weighting system that assigns a penalty for each element is to be used in generating the solution,
or a single penalty factor should be utilized for all elements using the appropriate radio button.
•
•
If an element-specific penalty is to be used, select the appropriate system from the Weighting System dropdown list.
If a penalty is to be assigned to all elements in the solution, specify the value to be used in the Single Value
field.
Click Next>.
29
Vista Users Manual October 4, 2011
9.
Specify the value to be used as the boundary length modifier in generating the solution.
10. Specify the number of iterations to be performed per run in the generation process.
11. Specify the number of runs to be performed in generating the solution. Click Next>.
30
Section Five
12. If a solution has already been generated using the same analysis layer as that specified for this solution, the
generation time can be reduced by utilizing the boundary layer that was produced from the previous run. In such an
instance, check the box to indicate that an existing layer will be used, and enter its path in the Boundary layer field, or
click the Browse button to navigate to the layer (found in the ”r;boundary_shapefile” folder) and select it. Click Next>.
13. Specify the location to be used for folders created for the solution generation in the Result location field, or click the
Browse button to navigate to the location. Click Next>.
31
Vista Users Manual October 4, 2011
14. To begin the generation process for the solution, click Next>.
15. A Ready window will open that displays the parameters set for solution generation using the specified external
solution generating application. Review the list of parameters for accuracy and click OK.
32
Section Five
16. A Begin Processing? window will open. If the parameters that were displayed in the previous window are correct for
the solution generation process, click Yes to continue initiating the run. If adjustments need to be made to the
parameters, click No to return to the beginning of the wizard. Click Cancel to exit the solution generation tool.
If Yes was clicked to continue the generation process, Vista will next generate inputs.
17. A final window will then open that says Now run, MARXAN! or Now Run, SPOT! as appropriate. Click OK to begin
generating a solution using the designated external software application.
33
Vista Users Manual October 4, 2011
34