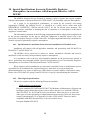
1
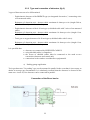
INSTALLATION AND OPERATING MANUAL Réf.: NPM42GB GAS DETECTION We are delighted that you have chosen an INDUSTRIAL SCIENTIFIC instrument and would like to thank you for your choice. We have taken all the necessary measures to ensure that your instrument provides total satisfaction. Now it is important to read this document carefully. EXTENT OF RESPONSIBILITY * INDUSTRIAL SCIENTIFIC declines its responsibility towards any person for material damage, physical injury or death resulting wholly or partly from inappropriate use, installation or storage of its equipment resulting from failure to observe instructions and warnings and/or standards and regulations in force. * INDUSTRIAL SCIENTIFIC neither supports nor authorises any company, physical or moral person to assume responsibility on behalf of INDUSTRIAL SCIENTIFIC , even if it is involved in the sale of INDUSTRIAL SCIENTIFIC products. * INDUSTRIAL SCIENTIFIC cannot be held responsible for direct or indirect damage or be required to pay direct or indirect compensation resulting from the sale or use of any of its products IF THESE PRODUCTS HAVE NOT BEEN DEFINED AND CHOSEN BY INDUSTRIAL SCIENTIFIC FOR THEIR SPECIFIC USE. CLAUSES CONCERNING PROPERTY * Drawings, plans, specifications and information included in this document contain confidential information that is the property of INDUSTRIAL SCIENTIFIC * None of this information may be reproduced, copied, divulged or translated, by physical, electronic or any other means, nor used as the basis for the manufacture or sale of INDUSTRIAL SCIENTIFIC equipment or for any other reasons without prior consent from INDUSTRIAL SCIENTIFIC WARNINGS * This document is not contractually binding. In the interests of its customers, INDUSTRIAL SCIENTIFIC reserves to modify the technical specifications of its equipment without notice, in order to improve its performance. * READ THIS MANUAL CAREFULLY BEFORE FIRST USE OF THE EQUIPMENT: this manual must be read by any person who is or will be responsible for using, maintaining or repairing this equipment. * This equipment will only provide the announced performance levels if it is used, maintained and repaired according to INDUSTRIAL SCIENTIFIC directives, by INDUSTRIAL SCIENTIFIC personnel or by personnel approved by INDUSTRIAL SCIENTIFIC GUARANTEE 2 years guarantee in normal conditions of use on parts and technical labour, return in our workshops, excluding consumables (sensors, filters, etc.) 3 CONTENT 1 DESCRIPTION (fig 1) ..................................................................................................7 2. INSTALLATION AND CONNECTIONS .......................................................................9 2.1. Installation .............................................................................................................9 2.2. Electrical connection of the MX 42A detection unit (fig 2)......................................9 2.3. Connection of the detection unit to the detectors ..................................................9 2.3.1. Physical layout of detectors............................................................................9 2.3.2 Type and connection of detectors (fig 3). .....................................................11 2.4. Connection of the detection unit to external devices ...........................................13 2.4.1. Connection to servocontrols .........................................................................13 2.4.2. 4-20 mA current output.................................................................................13 3. START-UP AND OPERATION...................................................................................15 4. CONFIGURATION OF ALARMS AND SERVOCONTROL .......................................17 4.1. Characteristics of alarm triggering .......................................................................17 4.2. Programming of parameters ................................................................................20 4.3. Servocontrol ........................................................................................................23 4.3.1. Relays ..........................................................................................................23 4.3.2. 4-20 mA current output.................................................................................23 5. PERIODIC SERVICING..............................................................................................25 5.1. 5.2. Adjustment of detectors from the MX 42A detection unit.....................................25 Local adjustment at the detectors........................................................................26 6. TROUBLESHOOTING ...............................................................................................27 7. DETAILED TECHNICAL CHARACTERISTICS .........................................................28 7.1. 7.2. 7.3. 7.4. 7.5. 7.6. 7.7. 7.8. Casing .................................................................................................................28 Display.................................................................................................................28 Power supply .......................................................................................................28 Measurement inputs ............................................................................................29 Alarm ...................................................................................................................29 Control functions..................................................................................................30 Relaying ..............................................................................................................30 Output of measurements .....................................................................................30 8. Scrapping of mx42a..................................................................................................31 9. LIST OF MX42A SPARE PARTS...............................................................................31 9.1. 9.2. Spare parts ..........................................................................................................31 Intrinsic barriers and accessories ........................................................................31 10. Special Specifications for use in Potentially Explosive Atmospheres in accordance with European Directive ATEX 94/9/EC.....................................................32 10.1. 10.2. Specifications for mechanical and electrical installation in Classified Areas. ...32 Metrological Specifications...............................................................................32 4 10.3. Connecting detectors other than INDUSTRIAL SCIENTIFIC detectors to the MX42A device ................................................................................................................33 10.3.1. Device transfer curves in 0% to 100% LEL configuration .........................33 10.3.2. Device transfer curves in 0% to 30.0% OXYGEN configuration ...............34 10.3.3. Power supply and load resistance characteristics ....................................34 10.4. MARKING .......................................................................................................34 5 Figure 1 6 1 DESCRIPTION (fig 1) The MX 42A detection unit is an apparatus for the detection and measurement of various combustible, toxic or oxygen-carrying gases. The MX 42A detection unit has 4 independent measuring channels. Each channel is connected to a gas detector located in places to be monitored. The measurement from the detector is displayed on the MX 42A detection unit and compared to alarm thresholds. Should alarm thresholds be exceeded, the MX 42A detection unit actuates relays which can be used for the control of outside devices (horn, telephone call, exhaust fans, etc.). Note: the detection unit also comes in a 2-measuring channel version. Main characteristics: (cf Figure 1) - Casing for wall mounting made of PVC (length: 340, height: 300, depth: 107) with intern "plating". - AC or DC power supply - 4 measuring inputs for detectors of the explosimetric, toxic or oxygen type (or other type on request) - Visualization of the measurement by LCD - Alarms per channel: 2 increasing or decreasing thresholds, manual or automatic clearance (control logic of exhaust fans on programming) 1 increasing or decreasing threshold, automatic clearance, triggering on basis of time or on averaging - Relaying: a total of 10 relays distributed as follows: 2 relays per channel (NO or NC) for the first two alarm thresholds 1 relay common to the channels for the third alarm threshold (or the remote transmission of the alarm on programming) 1 relay common to the channels for detector faults and anomalies - 4-20 mA output per channel (< 1 mA for fault, 2 mA for maintenance) - Resettable buzzer should alarms or an anomaly appear 7 Figure 2 8 2. INSTALLATION AND CONNECTIONS Please ensure you read the paragraph: Special Specifications for use in Potentially Explosive Atmospheres in Accordance with European Directive ATEX 94/9/EC 2.1. Installation The detection unit can be installed in any place without an explosive atmosphere. It should be put in a well ventilated place where it can be watched (guard house, control room, security service...). It is attached according to Figure 2: 4 attachment points, marked 1, 2, 3 and 4, with centres of 314 x 245 mm, using 5 mm screw. Caution: So that the cover of the detection unit can be completely opened, there must be at least 30 cm of free space above it. Before installation, switch off the MX42A with the switch located on the inside (bottom left corner). 2.2. Electrical connection of the MX 42A detection unit (fig 2). Power supply: connect the power supply wires to the terminal blocks of the detection unit. - Earth, live and neutral terminals, 220 V AC (207 V to 244 V), 50/60 Hz, protected by an F1 630 mA time-delay fuse. - or + DC, - DC terminals, 24 V (19 V to 32 V), DC protected by an F2 4A fuse. On option: - either 115 V AC (103 V to 122 V), 50/60 Hz, protected by an F1 1.25 A time-delay fuse - or 48 V (43 V to 60 V), protected by an F3 2 A time-delay fuse A sticker on the casing gives the power supply voltages. 2.3. Connection of the detection unit to the detectors 2.3.1. Physical layout of detectors Their location depends on three main factors: - Density of gas to be detected: in elevation for gases lighter than air and low down for gases heavier than air - Leak point: determination of the probable source of a leak - In the flow of air in ventilated rooms. 9 Figure 3 Transmitters 4.20 mA / 2 wires. Explosimetric transmitters (catalytic celles) with 3 wires 4.20 mA /3 wires for flammable gas transmitters 4.20 mA / 2 wires / transmitters for parking CO detection 10 2.3.2 Type and connection of detectors (fig 3). 3 types of detectors are to be differentiated: - Explosimetric detectors of the BRIDGE type (no integrated electronics, 3 connecting wires of an armoured cable). Resistance of detection unit - detector cable: maximum 8 ohms per wire (length 500 m, cable 3 x 1.5 mm²), or 16 ohms in a loop. - Explosimetric detectors of the 4-20 mA type (a shielded cable with 3 wires of an armoured cable). Resistance of detection unit - detector cable: maximum 16 ohms per wire (length 1 km, cable 3 x 1.5 mm²), or 32 ohms in a loop. - Toxic gas or oxygen detectors of 4-20 mA type (a shielded cable with 2 wires). Resistance of detection unit - detector cable: maximum 16 ohms per wire (length 1 km, cable 3 x 1.5 mm²), or 32 ohms in loop. It is specified that detectors are connected by SHIELDED CABLES using shielded cables is compulsory the screen of shielded cables must be connected to the earth at two extremities (detectors and control unit) connections to the earth are considered as equipotential. a) Parking garage application Toxic gas detectors "Co-parking" type can be mounted in parallel in the event that it is necessary to obtain an average gas concentration. It is absolutely essential that the detectors be located in the same area. A max of, five detectors can be connected in parallel. Connection of the Zener barrier 11 The Figure 4 describes the connection between the detector and the barrier "i" transmitters "i" transmitters Figure 4 Figure 5 12 b) Special case of intrinsic safety detectors In an area classified as having an explosive atmosphere, the electrical connection between the detection unit and the detector must be of the intrinsic safety type. This requires the use of: - a certified barrier - the conformity of the connecting cable (electrical parameters stipulated in the certificate of conformity of the detector to the legislation in force). Figure 4 shows the connection of the detector and of the barrier according to the type of barrier employed. CAUTION: The conformity of the complete electrical safety system is not the responsibility of INDUSTRIAL SCIENTIFIC. 2.4. Connection of the detection unit to external devices 2.4.1. Connection to servocontrols The MX 42A detection unit has 10 relays which can be used to control external devices: horn, solenoid valve, telephone call, exhaust fans,... The relays are assigned to functions as follows: - for each channel: one relay, «RELAY 1», for triggering of alarm 1 one relay, «RELAY 2», for triggering of alarm 2 (or a total of 8 relays) - for all channels: a common relay, «CR RELAY», for triggering of alarms 3 of the channels one relay, «FAULT RELAY», associated with faults detected on the channels (detector malfunctions, poor electrical connections) An example of a connection is given in Figure 5: a light and buzzer, connected to «RELAY 1» of channel 4 will be actuated when alarm 1 of channel 4 is present. a solenoid valve, connected to «RELAY 2», of channel 4 will be actuated when alarm 2 of channel 4 is present. Note: Considering the low breaking power of the MX 42A relays (2 A with 240 V AC or 30 VDC), external relays must be interposed if the devices to be controlled have high power. 2.4.2. 4-20 mA current output For each channel, the MX 42A detection unit has a 4-20 mA output which can be used for the copy of measurements on a recorder or an external controller. In a loop configuration, the maximum resistance is 600 ohms. The 4-20 mA outputs have common outer earth connections. An example of a connection to a recorder on channel 3 is shown in Figure 5 13 Figure 6 14 3. START-UP AND OPERATION Once the detection unit has been installed and connected, it is started up with the switch located on the inside (bottom left corner). The MX42 goes on test mode checking the proper operation of the LEDS, LCD and the buzzer. All alarms are inhibited during test mode. Then, the MX 42 displays channel 1 during one minute before starting scrutening all channels. 2 cases can happen: a) Channel 1 is off (inter 8) The display indicates « STOP », the green signal lamp « display » is steady on and the green signal lamp « channel in operation » is off. b) Channel 1 is in operation (inter 8) The display indicates « INIT » and then displays the actual measurement value, and the green signal lamp « channel in operation » blinks, the green signal lamp « display » is steady on. During the scrutening of all channels, each channel is scanned by the MX 42 every 9 seconds, and the reading is held during 3 seconds. On the front of the detection unit (Figure 6), the keys 1, 2, 3 and 4 are used to display the measurements of channels 1, 2, 3 and 4 respectively on the common LCD display window. The «TEST» key triggers the lighting of all signal lamps and all segments of the LCD display and the functioning of the buzzer. The «BUZZER» key resets the alarms and clears the buzzer alarm. For each channel, 5 signal lamps indicate the status of the channel. a double signal lamp (Operation/Display): - channel in operation: LED green colour, blinking or steady on (left LED). - channel on display: LED colour green, steady on (right LED) - display signal if channel displayed on LCD window Alarm 1 signal: red when alarm Alarm 2 signal: red when alarm Alarm 3 signal: red when alarm Fault signal: - malfunction on line: LED colour yellow, steady on Calibration signal: - calibration mode: LED colour yellow, blinking In the event of an alarm or fault, the detection unit’s buzzer is actuated until cleared by the key «BUZZER». Note: The buzzer can be inhibited by moving the strap on the display board (top right corner) to the OFF position. 15 Figure 7 16 4. CONFIGURATION OF ALARMS AND SERVOCONTROL Caution: Adjustments described in this section are to be performed by authorized personnel only, as they are likely to jeopardize detection on which safety depends. 4.1. Characteristics of alarm triggering There are three alarm thresholds associated with each channel: - Threshold 1 controls Alarm 1 signal lamp and relay 1. - Threshold 2 controls Alarm 2 signal lamp and relay 2. - Threshold 3 controls Alarm 3 signal lamp and the CR relay (common relay). Note: The CR relay is common to all channels. For each channel, a block of micro switches are located on the display board and are used to program the characteristics of alarm thresholds (Figure 7). Each channel is put into service by micro switch 8 (ON-OFF). * The alarms can be given increasing or decreasing values. Programed by micro switche 4 for alarm 1 and 1 for alarms 2 and 3. * The alarms can be set: - With automatic clearance: (micro switch 3) When a threshold is reached, the associated lamp and relay are activated. When the threshold decreases, the signals are automatically deactivated. - With manual clearance: (micro switch 3) When a threshold is reached, the lamp and relay are activated. When a threshold decreases, the signals are deactivated by the manual reset button being pressed. Note: Threshold alarm 3 has automatic clearance. a) Special case of the 3rd alarm threshold: The 3rd alarm relay, common to the channels are energized: - either after a period of time set by micro switches 9 and 10. The «ALARM 3 DELAY TIME CODING» table gives the position according to the desired lapse time required. - or when the average value reaches the 3rd alarm threshold. The time of averaging is set in the maintenance-adjustment Section 4.2. Microswitch 2 is used to set alarm 3 on either delay time or averaging. 17 Figure 8 18 b) Special case of alarms 1 and 2 in parking garage cycle With micro switch 5, it is possible to select the way in which relays 1 and 2 will be activated, i.e. - according to a special control cycle, used only to start extractor fans, especialy in parking garages. In this case, alarm 1 is generally associated with the low speed (LS) of the extractor fan. Alarm 2 is associated with the high speed (HS) of the fan. The control cycle in the parking garage mode is provided to avoid destruction of the fan due to sudden change over from low speed to high speed. The control logic is shown in Figure 8. Figure 9 19 4.2. Programming of parameters The alarms are adjusted in the factory. However, these adjustments can be changed: For the selected channel, use the following configuration (Figure 9). Switch 8 Switch 7 Switch 6 : on : maintenance : adjustment In this mode, keys 1, 2, 3 and 4 have the following functions: Key 4 = «enter + change over to following parameter» Key 3 = «view the value of the parameter» Key 2 = «key +» increments the parameter Key 1 = «key -» decrements the parameter The following parameters are accessed successively: AL1: alarm 1 threshold AL2: alarm 2 threshold AL3: alarm 3 threshold T1 : averaging time of alarm 3 (0=<val=<1999 minutes) PT : sets the position of the decimal point according to the detector measuring range. SUP : overrange EXAMPLE 1 : positioning alarm 3 at 150 for channel 2: - On the micro switch block of channel 2, position micro switch 7 to MAINTENANCE, 6 to ADJUSTMENT. The LCD displays AL1. - Press the «enter» key. The LCD displays AL2. - Press the « enter» key. The LCD displays AL3. - Press the «view» key. The LCD displays the present value of the alarm 3 threshold. - With the «+» and «-» keys, set the desired threshold. - Press the «enter» key. The threshold is memorized. - Set micro switch 7 to normal. 20 EXAMPLE 2 : How to program the function "overrange " (SUP) Concerning a new function "100 % LEL overrange" (software version : V9) That function can be preprogrammed in operation or not Procedure of programming : Consult chapter 4.2 informations (technical manual) to use the keypad The new list of programmable parameters will be : AL1/AL2/AL3/TI/PT and now SupX (X=preprogrammed channel number) The parameter "SUP" will be inhibited if "OFF" (touche 1) validated (touche 4) The parameter "SUP" will be in operation if "ON" (touche 2) validated If the function "SUP" is validated and if your are detecting a concentration of 100 % LEL or more : the display will show this message "SUP" and you will be blocked If the function "SUP" is triggered, all the alarms "gas and default" will be activated To acknowledge this alarm "SUP" : Either you move the switch 7 (see picture 7) Or you move the switch 8 (see picture 7) Or you move the switch of power supply (see picture 2) Note: The fault lamp blinks to signal the maintenance mode. The maintenance mode lasts for 30 minutes. Beyond that time, the channel automatically changes over to fault. Only one channel can be programmed at a time. When a channel is in the maintenance mode, the 4-20 mA current output is set to 2 mA. 21 Figure 10 22 4.3. Servocontrol 4.3.1. Relays With the position of straps S3 to S12 (Figure 10), the open or closed contacts of the relays can be selected on the output of the terminal blocks. This selection is made by simply moving the corresponding straps. As standard, the relays (except for the fault relay) are in positive safety, which means energized without an alarm. 4.3.2. 4-20 mA current output A 4-20 mA output is available on the terminal block for each channel. It serves to connect the MX 42A detection unit to a chart recorder or to any other data acquisition system (maximum load resistance 600 ohms). In the event of malfunction, the output is set to a current < 1 mA. In the maintenance position, it is set to a current of 2 mA. Note: The 4-20 mA output is preset in the factory: 4 mA corresponds to a display of 0 and 20 mA corresponds to a full-scale value. Potentiometers P5, P6, P7 and P8 (for channels 1, 2, 3 and 4 respectively) adjust the 4 mA. Potentiometers P21, P22, P23 and P24 (for channels 1, 2, 3 and 4 respectively) adjust the 20 mA. 23 Figure 11 24 5. PERIODIC SERVICING Gas detection instruments are potential life-saving devices. Recognizing this fact, Industrial Scientific Corporation recommends that a functional “bump” test be performed on every fixed gas-monitoring instruments as part of a regular maintenance program. A functional test is defined as a brief exposure of the detector to a concentration of gas(es) in excess of the lowest alarm set-point for each sensor for the purpose of verifying sensor and alarm operation and is not intended to be a measure of the accuracy of the instrument. Industrial scientific further recommends that a full instrument calibration be performed using a certified concentration(s) of calibration gas(es) quarterly, every 3 months.* Calibrations may be necessary more or less frequently based, for example, on application, field conditions, exposure to gas, sensor technology, and environmental conditions. The frequency of calibration is best determined by company policy or local regulatory agencies. If an instrument fails to operate properly during any functional “bump” test, a full instrument calibration should be performed successfully prior to use. These recommendations are based on safe work procedures, industry best practises, and regulatory standards to ensure worker safety. Industrial scientific is not responsible for setting safety practices and policies. * For new installations it may be prudent to carry out bump tests frequently at first (perhaps weekly), increasing the time intervals (to, perhaps, monthly or more) as confidence grows with experience in the installation concerned, on the basis of the maintenance record. Caution: The adjustments described in this section are to be carried out by authorized personnel only, since they are likely to jeopardize detection on which safety depends. 5.1. Adjustment of detectors from the MX 42A detection unit Adjustment consists of calibrating the zero of the detector in pure air and the sensitivity of the detector to the reference gas. For each channel, use the following configuration (Figure 7). Switch 8 = on Switch 7 = maintenance Switch 6 = calibration * Adjustment of detector zero Use potentiometer P9 for channel 1, P12 for channel 2, P15 for channel 3 and P18 for channel 4 (Figure 11, «ZERO») to display 0000 on the channel in question. If the ambient air is not pure, inject air from a cylinder containing synthetic air. 25 * Adjustment of the sensitivity of the detector - Inject the reference gas with the calibration tube at the recommended flow rate (30 to 60 l/h, depending upon the detector). - When the reading has stablized, adjust display to the value of the reference gas using potentiometer P11 for channel 1, P14 for channel 2, P17 for channel 3 and P20 for channel 4 (Figure 11, «SENS»). Return to the configuration: Switch 8 = on Switch 7 = normal Switch 6 = calibration In the maintenance mode, the current output is set to 2 mA. Caution: If forgotten, the channel automatically changes over to fault after 1/2 hour. 5.2. Local adjustment at the detectors For some types of detectors, in particular the 4-20 mA detectors, the zero and sensitivity can be adjusted directly on the detector (refer to the detector instruction manual). Note: We are at your disposal to supply you with calibration gas or an annual servicing contract. The work under this contract is performed by our specialists, and this contract will guarantee perfect operation of the installation. Between the dates of the scheduled servicing work performed by INDUSTRIAL SCIENTIFIC, no adjustment is necessary. The maintenance department of the user is thus not burdened by any additional work load. 26 6. TROUBLESHOOTING FAULT-MESSAGE Display off or no signal lamp lighted CAUSES CORRECTIVE ACTION - check power supply voltages and change the fuses if - switch on OFF necessary (cf 22) - set the switch to ON (cf III) «STOP» displayed channel out of service put the channel in service (cf 41) «INIT» displayed channel undergoing initialization message displayed as soon as a channel is put into service (cf III) Fault signal lamp lighted - bad detector electrical connections - check the connections (yellow) - defective detector - change the detector - the type of detector does not - change the type of detector correspond to the factory (Caution: The channel could configuration of the channel have been damaged) - channel very badly adjusted - adjust the channel (cf V) Fault signal lamp lighted channel in maintenance mode reset the channel on and «DEF» displayed for more than 30 minutes «NORMAL» (cf Figure 7) Yellow LED lighting and Explosible channel overrange (> Remove switches 7 or 8 (for display "SUP" 100 % LEL) triggering concerned channel) Fault signal lamp channel in maintenance position reset the channel on blinking «NORMAL» (cf Figure 7) External servocontrol bad choice of relay contact move the strap to use the controlled in opposite common NO contact or the direction, in relation to common NC contact (cf the tripping of the alarm 431) - fuse blown 27 7. DETAILED TECHNICAL CHARACTERISTICS 7.1. Casing Casing Operating temperature Storage temperature Relative humidity Tightness Dimensions Weight Positioning Guarantee Function Capacity Measurement Connection Manufacturer 7.2. Display Display Measuring scale Signal lamps 7.3. : PVC (polyvinyl chloride), completely shielded inside : -10°C to +40°C : -20°C to +55°C : 0 to 95%, non condensing : IP54 : 340 x 300 x 107 mm (length x height x depth) : 4.75 kg : wall-mounted : 1 year : wall-mounted monitoring unit for gas detection : 4 channels (2 on option) : continuous : 1 to 5 gas detectors per channel (depending on type) : INDUSTRIAL SCIENTIFIC : : : Digital LCD 0 to 100 0 to 300 0 to 1000 0 to 2000 24 DELs, see details in Section «ALARM» Power supply Electrical supply accessible in casing * * * * 103 V to 122 V AC, 50/60 Hz (option) 207 V to 244 V AC, 50/60 Hz 19 V to 32 V DC 43 to 60 V DC (option) Fuses: 0.63 A, time-delayed, for 230 V and 110 V 4 A for 24 V 2 A, time-delayed, for 48 V Power consumption: 85 VA or 67 W On/off switch inside casing Earth terminal: yes Cable outlet through 10 metallic cable glands, connected to the earth. Maximum shielded cable diameter: 10 mm 28 7.4. Measurement inputs Line resistances (loop) in ohms between detector and detection unit * Explosimetric detector of the BRIDGE type, 3 wires: 16 ohms (500 m long, cable 3 x 1.5mm²) * Explosimetric detector of 4-20 mA type, 3 wires or 2 wires: 32 ohms (1 km long, cable 3 x 1.5mm²) 7.5. Alarm Visual alarms provided: for each channel * fault signal lamp: - channel in service: green color - channel off or malfunction of microprocessor: off - disturbance on line: steady yellow color - calibration/adjustment mode: blinking yellow color * alarm 1 signal lamp: red color when alarm * alarm 2 signal lamp: red color when alarm * alarm 3 signal lamp: red color when alarm Alarms 1 and 2 - activation after 5 seconds - by increasing or decreasing value - manual or automatic clearance Alarm 3 - activation after elapsed delay time or on basis of average value - automatic clearance - by increasing or decreasing value Disturbance - complete check of short circuit or cut out of at least one wire (with just one detector) - display per channel with yellow signal lamp Buzzer Triggered if: - microprocessor malfunction anomaly of connecting cable or detector alarm threshold level exceeded maintenance time longer than 30 minutes 29 7.6. Control functions Accessible after removal of front panel For each channel: - A set of 10 microswitches Microswitch no. 8: on/off Microswitch no. 7: maintenance/normal Microswitch no. 6: programming/normal Microswitch no. 5: normal/parking garage (alarm 1 and 2) Microswitch no. 4: increase/decrease (alarm 1) Microswitch no. 3: manual/auto (alarm 1 and 2) Microswitch no. 2: time delay/average (alarm 3) Microswitch no. 1: increase/decrease (alarm 2 and 3) Microswitch no. 9: time delay coding (alarm 3) Microswitch no. 10: time delay coding (alarm 3) - Potentiometers for the adjustment of zero and sensitivity of detector - Programming by keys of alarms thresholds, averaging time (alarm 2) 7.7. Relaying Relay contacts * * * * 2 relays per channel for alarm 1 and alarm 2 (positive safety) 1 common relay for alarm 3 (or on option for remote transmission of alarm) (positive safety) 1 common relay for malfunction (negative safety) for each relay, choice of common closed contact or common open contact (by positioning of straps S3 to S12) * characteristics of contact: 2A-250 V AC or 30 VDC 7.8. Output of measurements 4-20 mA current outputs per channel (common earth) Load resistance (loop): maximum 600 ohms In case of fault: output < 1 mA In maintenance position: output = 2 mA 30 8. Scrapping of mx42a Concerning the conservation, of the protection and the improvement of the quality of the environment, as well as for the protection of the health of the persons and the careful and rational use of natural resources, MX42A has to be the object of a selective collection for the electronic equipments and cannot be scrapped with the normal domestic waste. The user thus has the obligation to separate the MX42A of the other waste so as to guarantee that it is recycled in a sure way at the environmental level. For more details of the existing sites of collection, contact the local administration or the distributor of this product. 9. LIST OF MX42A SPARE PARTS 9.1. Spare parts DESIGNATION REFERENCE Analog bus card µp/display card LCD MX42A casing PG 9 cable gland MX42A sticked front panel 5 x 20 : 630 mA fuse 5 x 20 : 4 A fuse tool kit 9.2. 6451403 6451402 6133511 6321280 6143442 6122435 6154627 6154715 6147840 Intrinsic barriers and accessories MODELS OF SI BARRIERS REFERENCE Z787 / EX 6184703 MTL787S+ 6797100 TYPES rail DIN mounted model Obligatory flammeproof casing mounted model 31 INDUSTRIAL SCIENTIFIC CASING for 2 zener barriers 6797192 for 5 zener barriers for 12 zener barriers 6797547 6797101 10. Special Specifications for use in Potentially Explosive Atmospheres in accordance with European Directive ATEX 94/9/EC. The MX42A detection device designed to measure explosive gasses and oxygen complies with the requirements of European Directive ATEX 94/9/EC on potentially explosive atmospheres. As a result of its metrological performance, as tested by the research and testing organisation INERIS, the MX42A device, is classified as a safety device when used with INDUSTRIAL SCIENTIFIC CEX300 and OLC/OLCT 20, 40, 50 and 60 series detectors. The device may therefore contribute to limiting the risk of explosion as a consequence of the data it supplies to external units. The information contained in the following paragraphs should be adopted and complied with by the person responsible for the site on which the equipment is installed. Please refer to the provisions of European Directive ATEX 1999/92/EC on improving health and safety conditions for workers exposed to potentially explosive atmospheres. 10.1. Specifications for mechanical and electrical installation in Classified Areas. Installation will comply with all applicable standards, and particularly with EN 60079-14, EN 60079-17 and EN 50281-1-2. The MX42A device must not be subject to intense mechanical vibration and must be installed in a safe area away from potentially explosive atmospheres. It is essential to refer to the user and installation manuals for the gas detectors referred to above, particularly the paragraph entitled ‘Special Specifications for use in Potentially Explosive Atmospheres in Accordance with European Directive ATEX 94/9/EC’ Where intrinsic safety installations are concerned, it should be borne in mind that the person responsible for IS installation (the “System Designer”) must draw up a system document demonstrating that every aspect of the Power Cable Detector system complies with intrinsic safety. Please refer to EN 50039 for group II and EN 50394-1 for group I when drafting this document. 10.2. Metrological Specifications The device complies with the following European standards: With explosive gas detectors: - European standards EN 50054 and EN 50057 for Methane (calibration gas), Propane and Hydrogen (gasses following response curves) where the device is used with CEX300 and OLC/OLCT 20, 40, 50 and 60 series gas detectors. Where the device is used with other types of sensor producing an output measurement current of 4/20 mA, these must comply with paragraph 1.5 of Appendix II of the ATEX 94/9/EC Directive and be compatible with their characteristics (cf. device transfer curve). - European Standard EN 50271 32 Oxygen detectors: - European Standard EN 50104 where the device is used with OLCT 20, 40, 50 and 60 gas detectors. Where the device is used with other types of sensor producing an output measurement current of 4/20 mA, they must comply with paragraph 1.5 of Appendix II of the ATEX 94/9/EC Directive and be compatible with their characteristics (cf. device transfer curve). - European Standard EN 50271 10.3. Connecting detectors other than INDUSTRIAL SCIENTIFIC detectors to the MX42A device As previously explained, users wishing to connect detectors other than those manufactured by INDUSTRIAL SCIENTIFIC, must ensure their compatibility with the device in order that the resulting combination may be considered as a safety device. 10.3.1. Device transfer curves in 0% to 100% LEL configuration The following curve shows the response of the device in terms of value measured, and fault processing as a function of the input current value supplied by the detector. Where the user connects a brand of detector other than INDUSTRIAL SCIENTIFIC to the MX42A device, he must check carefully that the transfer curve is fully compatible with the device input characteristics, to ensure that the data generated by the detector is correctly interpreted. Equally, the device must supply a suitable power supply voltage, allowing for cable voltage losses. Display in % LEL SUP Fault 100% LEL 0% LEL -17.5% LEL Fault 1.3 4 mA mA 20 mA Signal supplied by the detector in mA Please note: When the value measured is >= 100% LEL, the measuring device memorises the fact that the value has exceeded the scale and the channels switch to alarm and fault mode. Resetting these statuses is a manual operation to be performed by the user, who must follow the safety regulations specific to the site. The reset is checked either by turning the device on and off or by a maintenance inspection. 33 10.3.2. Device transfer curves in 0% to 30.0% OXYGEN configuration The following curve shows the response of the device in terms of value measured, and fault processing as a function of the input current value supplied by the detector. Where the user connects a brand of detector other than INDUSTRIAL SCIENTIFIC to the MX42A device, he must check carefully that the transfer curve is fully compatible with the device input characteristics, to ensure that the data generated by the detector is correctly interpreted. Equally, the device must supply a suitable power supply voltage, allowing for cable voltage losses. Display in % O2 by l Fault 39.4% 30.0% 0.0 -5.0% Fault 1.3 4 mA mA 20 25. mA mA Signal supplied by 10.3.3. Power supply and load resistance characteristics Maximum current available between terminals 2 and 3: 250 mA at 19 V. Maximum no-load voltage between terminals 2 and 3: 30 V Load resistance (outside the IS barrier) between terminals 1 and 2: 47 ohms N.B.: This data applies only where detectors other than INDUSTRIAL SCIENTIFIC are used. Where different types are mixed, please contact INDUSTRIAL SCIENTIFIC to establish the feasibility of the combination. 10.4. MARKING INDUSTRIAL SCIENTIFIC 0080 II 2 (G) INERIS 04ATEX0064 34 35 36