1
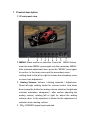
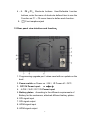
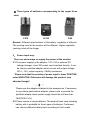
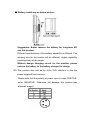
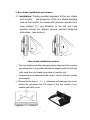
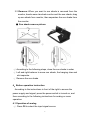
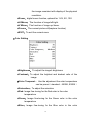
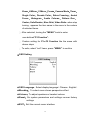
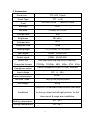
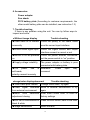
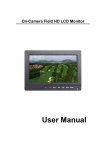
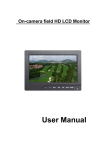
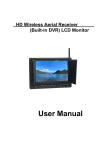
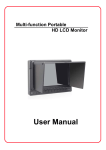
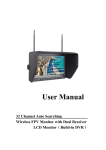
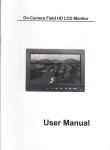
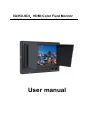
3G/HD-SDI、HDMI Color Field Monitor
7" High Resolution On-Camera Field, Director of Professional Monitor
User manual
Dear users:
Thank you for purchasing our photography, broadcast HD-SDI
LCD Monitor kit. This product employs digital signal processing
circuit and professional TFT LCD screen. The monitor with HDMI,
3G/HD-SDI input & output, to meet different customers' needs.
Its high brightness, low power consumption, stable performance
and emits no radiation advantages, strong compatibility, adjustable
color temperature control. Advanced features include Screen marker,
CAMERA mode, Image magnification, Image flip and change,
Monochrome mode etc. It is an ideal portable light weight frame
supporting the monitor.
Product feature:
◆ Audio Column instructions
◆ HDMI, SDI output port
◆ Peaking focus assist (peaking filter)
◆ CAMERA mode: Canon 5D Mark II mode
◆ Image flip function
◆ False Colors
◆ Exposures
◆ Pattern Gen
◆ Brightness histogram
◆ Screen marker, Screen Center Marker, Nine Grid and
other auxiliary line function
◆ Image zoom
◆ Aspect ratio adjustment
◆ Scan mode: standard, overscan
◆ Image Freeze
◆ Display pixel and the pixel point to point display
◆ Panel of the monitor button User-Definable function
◆ LED backlight, Image display brighter, screen does not
flicker
1
To insure best use of the unit, please read the user's manual
carefully.
CAUTION
1. Please use the adapter attached in the accessory.
2. Do not expose this product to direct sunlight, heat or humid
conditions
3. Keep away from strong light while using this product so as to
obtain the clearest and the most colorful picture.
4. Please avoid heavy impact or drop on the ground.
5. Do not use chemical solutions to clean this unit. Please simply
wipe with a clean soft cloth to keep the brightness of the surface.
6. Without adjustable component in the unit, please do not take
apart or repair the unit by yourself, to avoid damage the product.
CONTENTS
1.Product description --------------------------------------------------- 3
1.1. Front panel view ------------------------------------------------------ 3
1.2. Rear panel view ------------------------------------------------------- 4
1.3. Battery Plates ----------------------------------------------------------5
2. Power input way ----------------------------------------------------------6
2.1 The power supply by the adapter ---------------------------------- 6
2.2 Using batteries -----------------------------------------------------------6
2.3 The power supplied from camera. ----------------------------------7
3. Sun shade installation and remove ------------------------------- 8
4. Operation instruction -------------------------------------------------- 9
4.1 Analog Volume operation --------------------------------------- 9
4.2 Menu operation and F1~F5 Shortcuts buttons setting -10
5. Accessories --------------------------------------------------------------17
6. Parameters----------------------------------------------------------------18
7. Trouble shooting--------------------------------------------------------18
2
1.Product description
1.1.Front panel view
1. MENU: Menu confirm or selection. Press the
MENU button
enter the main MENU, press again into the secondary MENU.
After selected adjustment item, press the "MENU" once again
to confirm. In the main menu and the secondary menu,
rotating knob to the left or right to choose the secondary menu
or menu item adjustment.
2、Analog Volume: Volume / Analog selected / Adjustment.
Direct left-right rotating knobs for volume control. And when
direct press the button for analog volume selection (brightness,
contrast, saturation, sharpness) , after confirm adjusting the
analog volume, rotating left or right for adjust the analog
volume value. In the operation of knobs for the adjustment or
selection menu analog volume.
3、F6:HDMI/SDI signal input selected
3
4 ~ 8 、 F5 ~ F1 : Shortcuts buttons. User-Definable function
buttons, enter the menu of shortcuts defined item to use the
Function on F1 ~ F5 menu items to define each function.
9、
: Front earphone jack
1.2 Rear panel view interface and function:
1. Programming upgrade port(when need with an update on the
host)
2. Power switch.▬ Power on(ON),O Power off(OFF)
3、DC12V Power input:
4.
4-PIN(XLR)DC 12V Power input
5. Battery plates,According to the different requirements of
Battery for the customers, attached different battery plates。
6. SDI signal input
7. SDI signal output
8. HDMI signal input
9. HDMI signal output
4
1.3 Battery plates:
F970
LP-E6
Panasonic Anton Bauer
D28
Sony V-Mount Plate
According to the different requirements of battery for the
customers, attached different battery plate slots. No requirements,
the factory defaults assembly F970 battery plate.。
① Sony F970 battery slot for battery of Sony DV:
Sony F970 F960 F950 T930 F770 T750 F730 F570 F550
F530 QM91D OM91 QM90D QM90 QM71D QM71 QM70D
QM70 QM51D QM51 FM71 FM70 series
② Canon LP-E6 battery slot for battery of Canon DV:
Canon LP-E6
③ Panasonic D28 battery slot for battery of Panasonic DV:
Panasonic D55 D54S D54SE D40 D35 D33 D32 D28 D25
D22 series
④ Sony V-mount camera battery Plate
⑤ Panasonic Anton Bauer battery Plate
5
● Three types of batteries corresponding to the upper three
slots
F970
LP-E6
D28
Remark: Different specifications of the battery, capability is different.
The working time for the monitor will be different. Higher capability
(working time) will be longer.
2、 Power input way:
There are some ways to supply the power of the monitor:
2.1 The power supply by the adapter. 12V/1.2A is optional DC
voltage changer, insert DC power input interface directly. It can
be choose qualified adapter which current with output voltage
DC 6~15V, output capacity >18Wby customers
Please note that the polarity of power input is inner POSITIVE,
outer NEGATIVE. Otherwise will damage the product. (see
attached image)!
Please use the adapter attached in the accessories. If necessary
to use others pacifications adapter, please note to provide the
qualified adapter which power supply should be not less than
18W(DC6V-15V)
2.2 Power source is using batteries: The product back case including
battery slot is available for three types of batteries. Customers
can choose different battery slots according to their needs.
6
● Battery install way as below picture:
Suggestion: Better remove the battery for long-term NO
use this product.
Different specifications of the battery, capability is different. The
working time for the monitor will be different. Higher capability
(working time) will be longer.
Without design charging circuit for the monitor, please
remove the battery to the battery charger for charge.
2.3 This product also can be by 4-Pin XLD interface to use the
power supplied from camera.
Please note that the polarity of power input is inner POSITIVE,
outer NEGATIVE. Otherwise will damage the product.(see
attached image)!
7
3. Sun shade installation and remove
3.1 Installation: Positive parallel alignment of the sun shade
and monitor,
the projection of the sun shade hanging
claw at the monitor sun shade slot (see the monitor front
view marked 17), pay attention to the left and right
position should be aligned around inserted balanced
slide down. (see picture)
①
②
●Sun shade installation picture
① The sun shade protruding hanging claws alignment the monitor
sun shield slot, the position should be aligned with the left and
right send the sun shade hung claw to monitor slot.
② Inserted around balanced slide down, match with sun shade
and monitor.
③ Please follow steps 1、2、3, otherwise will damage the cover,
please do not press the L/R panel of the sun shade, if not,
unable open the cover.
③
8
3.2 Remove: When you want to sun shade is removed from the
monitor, hands were clenched monitor and the sun shade, drag
up sun shade from monitor, then separates the sun shade from
the monitor.
● Sun shade remove picture:
①
②
③
① According to the following steps, close the sun shade in order
② Left and right balance to move sun shade, the hanging claw and
slot separate.
③ Remove the sun shade
4、Button operation instruction
According to the instructions in front of the right to access the
power supply and signal, press the power switch is turned on, and
then according to the following instructions for analog or menu
operation:
4.1 Operation of analog
①. Press F6 to select the input signal source
9
②. Turn directly the rotary knob “Analog Volume” to adjust the
volume
③ Press
“Analog
Volume”
select
“Brightness”
“Contrast”
“ Saturation” “Sharpness”, after selecting the analog item to be
adjusted, turn “Analog Volume” to adjust the analog value.
4.2 Menu operation and F1~F5 shortcut key settings
①、Press the "MENU", enter the Main Menu interface:
②、Revolving around "MENU" button, can choose the secondary
menu items on the MENU, the selected item on the characters
of present a deep color fog
color strips.
③、After selected one of the secondary menu, press "MENU" for
confirm, that is enter into the corresponding secondary menu
options. Such as, select “Auxiliary functions” item. After the
confirmation:
10
④、At this time, you can rotate the “MENU” button, choose the
project need to be adjusted or watch, would be present in the
selected project character deep color strip. When staying in
deep color strip on a certain adjustment of these projects,
rotating “Analog Volume”, can adjust the selected project
parameters or options.
⑤、To exit the current MENU interface with “MENU” select
“EXIT ”item, then press “MENU” again to confirm. If
directly press “Analog Volume”, are out of all the MENU
interface.
⑥、Menu Description:
● Auxiliary functions
11
★ Single Color:To select the image of black and white, red,
green, and blue monochrome display
★ Pseudo Color:The pseudo-color image display
★ Zebra Crossing:“Zebra crossing” function, that is it will
appear " zebra crossing " in that section overexposed pictures
when pictures’ highlights overexposed, can choose the level
of brightness of “70IRE” or “100IRE”.
★ Assist in Focus:To select high, low or close the auxiliary
focus function in order to meet different customers' needs
★ Focus Color :Select auxiliary focus hook edge color (red,
blue, yellow)
★ Histogram: In view of the current image’s distribution for
pixel and brightness.
★ Audio Column:The peak value of left and right sound
channel audio instructions
★ Pattern Gen: The machine itself since the occurrence of
striped and gray scale detection image
★ Camera Mode:Using 5D2 or 550D and other similar camera,
activate “Camera Mode”, the screen image disappears after
about 2-5 seconds, will return to full screen display image,
then watch from framing of the screen image to the recording
when there is no time difference, image NO distortion, NO
black, NO delay, perfect without distortion.
★ EXIT:To exit the current menu interface
12
●Auxiliary Line
★Center: screen center mark (cross mark) display settings
★Safe Border: Picture framing marker selection frame(off,
96%,93%,90%,85%,80%,2.35:1)
★Nine Grid: Auxiliary reference line of Picture frame
★EXIT:Exit the current menu interface
●Picture Setting
★Video Ratio: Image ratio of 16:9, 4:3, automatic model select
★Scan Mode:Special image adaptive processing (standard,
underscan)
★Pixel to Pixe..: The display mode that make the resolution of
13
the image consistent with display of the physical
resolution .
★Zoom:digital zoom function, optional for 1.4X, 5X, 10X.
★H Mirror:The function of image left/right.
★V Mirror:The function of image up/ down.
★Freeze:The current picture still(capture function)
★EXIT:To exit the current menu
●Color Setting
★Brightness:To adjust the image's brightness
★Contrast:To adjust the brightest and darkest ratio of the
image
★Color Temperat..:Use the adjustment the color temperature
can be pre-set(standard,6500K, 9300K)
★Saturation:To adjust the saturation
★Red: Image fine-tuning for the Red color in the color
temperature
★Green:Image fine-tuning for the Green color in the color
temperature
★Blue : Image fine-tuning for the Blue color in the color
14
temperature
★EXIT:To exit the current menu
●Shortcuts(The setting of the front panel F1~F5)
The front panel buttons F1~F5 for custom shortcuts, users can
according to operating habits, selected one of below choice as a
function of the definition of the key, such as Scan Mode、Pixel to
Pixel、Zoom、H Mirror、V Mirror、Freeze、Camera Mode、Timer、
Single Color、Pseudo Color、Zebra Crossing、Assist Focus、
Histogram、Audio Column、Pattern Gen、Center、Safe Border、
Nine Grid、Video Ratio.
★Setting steps(with “F1 Function” as an example):
① Press "MENU" to enter the main MENU interface, rotating
"MENU" button, select"Shortcut", then press "MENU"
again to confirm, namely into the custom shortcuts.
② Selected “F1 Function”, turn the "MENU" button, let the
deep color strips stay in “FI Function”.
③
Rotation ‘Analog Volume” knob, appears in the menu will
rotate item name such as Scan Mode、Pixel to Pixel、
15
Zoom、H Mirror、V Mirror、Freeze、Camera Mode、Timer、
Single Color、Pseudo Color、Zebra Crossing、Assist
Focus 、 Histogram 、 Audio Column 、 Pattern Gen 、
Center、Safe Border、Nine Grid、Video Ratio. when stop
turning , appears the item name in the menu is the custom
of selected items.
④ After selected, turning the "MENU" knob to enter
user-defined“F2 Function”.
⑤ Custom setting for F3~F5 Function like the same with
above steps
⑥ To exits, select "exit" items, press "MENU" to confirm
●OSD Setting
★OSD Language:Select display language(Chinese、English)
★Blending:To select menu shows perspective effect
★Volume:To adjust speakers or headset volume
★Reset:On system parameters and settings recover factory
settings
★EXIT:Exit the current menu interface
16
5. Parameters
TFT LCD 7.0inch
Panel size
Panel Type
TFT LCD
Pixel
1024×600×RGB =1843200 Pixels
Backlight
LED
Dot pitch
0.05(W) x 0.15 (H)
Contrast ratio
16:9
Brightness
250 cd/㎡
Contrast ratio
700:1
Response time
10ms
Viewing angle
75°/75°(L/R) 70°/75°(U/D)
Input signal
HDMI、3G/HD-SDI
Output signal
HDMI、3G/HD-SDI
HDMI/ SDI
1080/24p/24psf/25p/30p/50i/60i/50p/60p;
Supported formats
720/50p,720/60p、480i、480p;576i、576p
Headphone output
Stereo headphone output 3.5 mm interface
Input voltage
DC:6~24V
≤10W
Power consumption
Unit size(Max)
196(L)x156(W)x52(H)mm
Unit weight
540g
There is a 1/4 standard screw bracket fixed hole
Installation
on the up / down and left/right position, for hot
shoe mount & magic arm installation.
Working temperature
-20~50℃
Storage temperature
-30~65℃
17
6. Accessories
Power adapter
Sun shade
F970 battery plate (According to customer requirements, the
other model battery plate can be installed, see instruction 1.3)
7. Trouble shooting
If there is any problem using the unit. You can try follow ways to
inspect and solve.
● Without image display
Trouble shooting
◆Video cable off or connect Check the quality of the cable, make
incorrectly
sure the correct input interface
◆Without video signal input
Check the signal source and output
interface connect is correct or not
◆Monitor is not be powered Check the power whether connected,
on
put the power switch to “on” position
◆Supply voltage instability
The power adapter or battery is poor
connected with battery plate
◆The
power
use
is Reference
self-made,
"Power
input
way"
reconnect
polarity connect inversely
●Image/color display abnormal
◆Video cable poor contact
◆Video
signal
color
Change video cable, try again
interfered Move to another environment to try
from external environment
◆Menu
Trouble shooting
again
saturation Enter menu check color, or reset to
adjustment closing
factory settings
◆B/W set in monochrome or Press the B/W button, back to the color
black & white
◆Image deformation
Reset the ratio
18
●Speaker without sound
◆Volume
adjustment Reset the volume control is adjusted to
was closed
◆HDMI
a proper position
cable
connected
◆Video
output
Trouble shooting
poor Check the quality of cable, or change
cable have a try
without
sound A normal phenomenon. Because in the
recording process, in order to avoid
the
sound field monitor and a voice of
harassing together was also recorded
in,
so
the
camera
itself is no sound output. Only in the
playback when a sound output.
■Remark:
If there are still other problems, please contact with our related
deals.
■ If there are changes without prior notice.
19