1
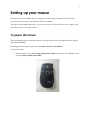
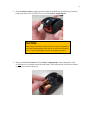
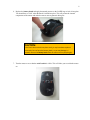
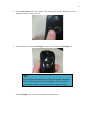
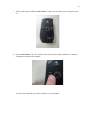
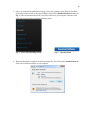
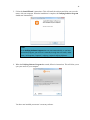
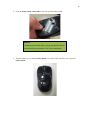
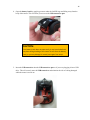
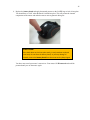
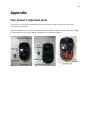
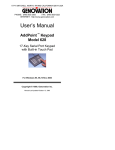
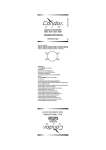
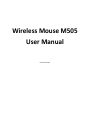
Wireless Mouse M505
User Manual
Chris Stuurman
Table of Contents
Introduction ............................................................................................................................................... 1
Setting up your mouse ............................................................................................................................... 2
To power the mouse ..................................................................................................................... 2
To connect the mouse’s hardware to the computer .................................................................... 7
To install the mouse’s software on the computer ........................................................................ 9
Disconnecting and storing your mouse ..................................................................................................... 12
To disconnect the transceiver from the computer ....................................................................... 12
To store the mouse’s transceiver ................................................................................................. 14
Appendix .................................................................................................................................................... 18
The mouse’s important parts........................................................................................................ 18
Troubleshooting ............................................................................................................................ 19
1
Introduction
Congratulations on your purchase of the Wireless Mouse M505 (hereafter referred to as the “mouse”).
This manual is intended to help you use your mouse and minimize the risk of damaging it. With the help
of this manual’s information, your mouse can last for many years of use.
This manual consists of two major sections: to set up your mouse, which will tell you how to use the
mouse with your computer for the first time; and to disconnect and store your mouse, which will tell you
how to disconnect your mouse from the computer and store it while minimizing risk of damage. In
addition, this manual’s appendix includes a labeled chart detailing the name and position of the mouse’s
important parts, and some troubleshooting tips if you encounter problems with your mouse.
This manual also includes tips, notes, and cautions:
TIP:
Tips include additional information. Tips are not necessary for
any procedure in this manual, but are intended to help users
who have diverged from the steps in this manual for whatever
reason.
NOTE:
Notes include clarifying information. Notes are intended to
help users understand features of the mouse that are not
immediately obvious.
CAUTION:
Cautions include important protective information. Cautions
are intended to prevent the user from damaging the mouse
when there is a significant risk of accidentally doing so.
2
Setting up your mouse
This major section is intended to aid you in using your mouse with your computer for the first time.
Correct set-up is necessary to use the mouse with your computer.
This major section includes three topics: to power the mouse, to connect the mouse to the computer, and
to install the mouse’s necessary software.
To power the mouse
The mouse requires power to function correctly. Each step in the process is accompanied by an image to
aid your understanding.
Powering your mouse requires you to have the mouse and two (2) AA batteries.
To power the mouse:
1. Turn the mouse over so that the battery hatch release slider is accessible. This will allow you to
access the battery hatch release slider.
3
2. Press the battery hatch release slider. This will open the battery hatch.
NOTE:
The battery hatch release slider is spring-operated and will not
hold in place after you release it. This is not a malfunction.
3. Turn the mouse over so that the battery hatch is accessible. This will allow you to open the
battery hatch.
4
4. Open the battery hatch by applying pressure under the LASER logo and lifting away from the
body of the mouse. This will allow you to access the battery compartments.
CAUTION:
If the battery hatch does not open easily, it may have locked back
into place during handling of the mouse. Do not force the battery
hatch, or you may damage it! Instead, start again from step 1.
5. Slide your two (2) AA batteries into the battery compartments. Ensure that positive ends
of both batteries are pointed outward from the mouse. This configuration will allow the batteries
to provide your mouse with power.
5
6. Replace the battery hatch and apply downward pressure to the LASER logo to lock it into place.
You should hear a “click” when the hatch is locked into place. This will protect the internal
components of the mouse and make the mouse more ergonomic during use.
CAUTION:
If the hatch does not lock into place easily, it may have been replaced
incorrectly. Do not force the battery hatch, or you may damage it!
Instead, remove the battery hatch from the mouse and try Step 6 again.
7. Turn the mouse over so that the on/off switch is visible. This will allow you to switch the mouse
on.
6
8. Set the on/off switch to the “ON” position. This will turn on the mouse and allow you to test
whether the mouse is being powered.
9. Turn the mouse over until the on/off light is visible. Confirm that the on/off light is on.
TIP:
The on/off light automatically turns off after ten seconds, although the
mouse is still being powered. If the on/off light is off and you are not
sure whether the mouse is being powered, start again from step 7.
If the on/off light is on, you have successfully powered the mouse.
7
To connect the mouse’s hardware to the computer
This minor section is intended to aid you in connecting your mouse’s hardware to your computer. Your
mouse’s hardware must be connected to your computer to function correctly. Each step of the process is
accompanied by an image to aid comprehension.
Connecting your mouse to your computer requires you to have the mouse, the USB transceiver and the
computer.
To connect the mouse’s hardware to the computer:
1. Insert the USB transceiver into the computer’s USB drive. This will allow the computer to install
the necessary software to use the USB transceiver.
2. Wait for the computer to install the necessary software to use the USB transceiver before
continuing. This will allow the computer to transmit information to and from the mouse.
8
3. Turn over the mouse so that the on/off switch is visible. This will allow you to switch the mouse
on.
4. Set the on/off switch to the “ON” position. This will turn on the mouse and allow it to transmit
information to and from the computer.
You have now connected your mouse’s hardware to your computer.
9
To install the mouse’s software on the computer
The software is necessary for your mouse to function correctly. Each step of the process is accompanied
by an image to aid comprehension.
Installing your mouse’s necessary software requires you to have the mouse, and the computer. In
addition, your computer must have an active internet connection.
To install the mouse’s necessary software:
1. Connect the mouse to the computer (see Connecting your mouse’s hardware to the computer on
page 7). This is required for the computer to apply the installed software to the mouse.
2. Using the computer, go to www.logitech.com/unifying. Scroll to the bottom of the page and
click the Get Unifying software! button. This will load the page where you can download the
appropriate software for your computer.
10
3. Once your computer has loaded the new page, select your operating system from the first dropdown menu on the left side of the page (see Fig. 1) and click the Download Software button (see
Fig. 2). This will download the mouse’s necessary software to your computer’s hard drive and
allow you to use the mouse with your operating system.
Fig. 1 – Select your operating system
Fig. 2 – Click the button
4. When the download is complete, run the downloaded file. This will open the Install Wizard and
allow you to install the software to your computer.
11
5. Follow the Install Wizard’s instructions. This will install the software and allow you to use the
mouse with your computer. When the installation is complete, the Unifying Software Program
should start automatically.
TIP:
If the Unifying Software Program does not start automatically, or you have
closed the program, you can start it manually through the start menu, under
Start / All Programs / Logitech / Unifying / Logitech Unifying Software.
6. When the Unifying Software Program has started, follow its instructions. This will allow you to
sync your mouse to your computer.
You have now installed your mouse’s necessary software.
12
Disconnecting and storing your mouse
This major section is intended to aid you in disconnecting your mouse from your computer. Properly
following these instructions will allow you to disconnect and store your mouse while minimizing the risk
of damaging it. If handled correctly, your mouse can last for many years.
This section includes two topics: to disconnect the transceiver from the computer and to store the mouse’s
transceiver.
To disconnect the transceiver from the computer
Correctly following these instructions can help your mouse last for many years. Each step is accompanied
by an image to aid comprehension.
Disconnecting your transceiver requires the mouse, the USB transceiver and the computer that the
transceiver is currently plugged into.
To disconnect the transceiver from the computer:
1. Turn the mouse over so that the on/off switch is visible. This will allow you to turn off the
mouse.
13
2. Set the on/off switch to the “OFF” position. This will allow the two (2) AA batteries to last
longer before needing to be replaced.
NOTE:
It’s recommended to turn the mouse off whenever you’re not
using it. This will allow the two (2) AA batteries to last longer
before needing to be replaced.
3. Remove the USB transceiver from the computer’s USB drive by gripping it between your thumb
and forefinger, and gently pulling it outward. This will allow you to store the transceiver and
minimize the risk of it being damaged.
You have now safely disconnected your transceiver from your computer.
14
To store the mouse’s transceiver
You can store your mouse’s USB transceiver when you are not using your mouse. Following these
instructions will allow you to store your USB transceiver while minimizing the risk of damage. Each
step is accompanied by an image to aid comprehension.
Storing your transceiver requires the mouse and the USB transceiver.
To store the transceiver:
1. Turn the mouse over so that the battery hatch release slider is accessible. This will allow you to
access the battery hatch release slider.
15
2. Press the battery hatch release slider. This will open the battery hatch.
NOTE:
The battery hatch release slider is spring-operated and will not
hold in place after you release it. This is not a malfunction.
3. Turn the mouse over so that the battery hatch is accessible. This will allow you to open the
battery hatch.
16
4. Open the battery hatch by applying pressure under the LASER logo and lifting away from the
body of the mouse. This will allow you to access the USB transceiver port.
CAUTION:
If the battery hatch does not open easily, it may have locked back
into place during handling of the mouse. Do not force the battery
hatch, or you may damage it! Instead, start again from step 1.
5. Insert the USB transceiver into the USB transceiver port as if you were plugging it into a USB
drive. This will securely store the USB transceiver and minimize the risk of it being damaged
while the mouse is not in use.
17
6. Replace the battery hatch and apply downward pressure to the LASER logo to lock it into place.
You should hear a “click” when the hatch is locked into place. This will protect the internal
components of the mouse and make the mouse more ergonomic during use.
CAUTION:
If the hatch does not lock into place easily, it may have been replaced
incorrectly. Do not force the battery hatch, or you may damage it!
Instead, remove the battery hatch from the mouse and try Step 6 again.
You have now stored your mouse’s transceiver. Your mouse’s USB transceiver should be
protected until you use the mouse again.
18
Appendix
Your mouse’s important parts
This section of the appendix is intended to allow you to correctly identify the parts of your mouse
referenced by this manual.
The important parts of your mouse are labeled in the following three images: the top of your mouse (Fig.
1), the underside of your mouse (Fig. 2), and the inside of your mouse (Fig. 3).
Fig. 1 – The top
Fig. 2 – The underside
Fig. 3 – The inside
19
Troubleshooting
This section is aid you in diagnosing and treating performance problems with your mouse. Check this
section if you are having trouble with your mouse. If the problem persists, or is not covered in this
section, contact Logitech Customer Support at www.logitech.com/support.
Problem
My computer is not
detecting my mouse
My mouse is behaving
erratically
Solution
• Is the mouse powered? During use, your mouse may accidentally be
switched off, or the batteries may be unexpectedly drained. To power
your mouse, see Powering your mouse on page 2.
• Is there metal between the mouse and the transceiver? Metal can
interfere with the signals between your mouse and your computer. Try
to minimize nearby metal to improve performance.
• Are you using it on an appropriate surface? Your mouse’s optical
laser can be confused by non-repeating patterns, such as text or nonabstract images. Try to use your mouse on a visually simple surface,
such as a mousepad, to improve performance.
• Are you using it on a sloped surface? Your mouse’s optical laser can
be confused if used on a sloped surface. Try to use your mouse on as
flat a surface as possible to improve performance.
• Does the mouse need to be reset? Sometimes, your mouse’s
programming may need to be reset. To reset your mouse’s
programming, turn your mouse off and press the left and right buttons
simultaneously for fifteen seconds. This will reset your mouse’s settings
and may improve performance.