1
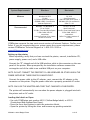
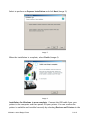
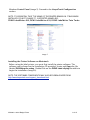
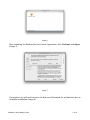
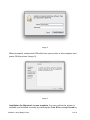
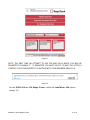
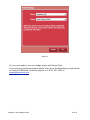
!
KeepnTrack Badge Printer
Installation Guide
!!
!
!
!
!
!
!
1831 Fort Union Blvd, Salt Lake City, Utah 84121 !
800-347-6439 • 801-943-7277!
www.companioncorp.com
Copyright ©2013 Evelyn Manufacturing, All Rights Reserved. Distributed under license by COMPanion Corporation. Under the copyright laws, this document may not be copied, in whole or in part without
written consent of Evelyn Manufacturing. The same proprietary and copyright notices must be affixed to any permitted copies as were affixed to
the original. KeepnTrack™, and the associated logo and icons are registered trademarks of Evelyn Manufacturing. Other trade names are the
property of their respective corporations. Printed in the United States of America.
!
IG0080.8 - v6010 Badge Printer!
1 of 15
System Requirements
Windows
Macintosh
Minimum
Windows XP SP2
(32-bit)
1 GB Free Hard Drive Space, 1
GB RAM, USB 2.0 connection
Internet Explorer 8
OS 10.6
(Intel Processor) 1 GB Free Hard Drive Space, 1
GB RAM, USB 2.0 connection
Safari 5.1.10
Recommended
Windows 7 or Windows 8 (32 or 64 bit)
20 GB+ Free Hard Drive Space,
2 GB+ RAM, USB 2.0
connection
Internet Explorer 10 or Latest
version of FireFox
OS 10.7 or 10.8
(Intel Processor)
20 GB+ Free Hard Drive Space,
2 GB+ RAM, USB 2.0
connection
Safari 6 or Latest version of
FireFox
!
COMPanion supports the two most recent versions of Internet Explorer, FireFox, and
Safari. If you are uncertain that your system meets the current requirements, please
contact COMPanion Technical Support at 1-800-320-5830 or
[email protected]
!
Setting up the printer
When unpacking, verify that you have received the printer, manual, installation CD,
power supply, power cord, and a USB cable.
!
Connect the “D”-shaped end of the USB interface cable to the connector on the rear
panel of the printer. When prompted by the installation software connect the
rectangular end of the cable to an available USB port on your computer.
!
NOTE: DO NOT CONNECT THE PRINTER TO A USB KEYBOARD OR OTHER HUB AS THE
POWER SUPPLIED BY THESE DEVICES IS INSUFFICIENT.
!
Connect the power cable to the AC adapter; next, connect the AC adapter to the
connector on the printer. Plug the power cable into a properly protected AC outlet.
!
NOTE: ONLY USE THE ADAPTER AND CORD THAT CAME WITH YOUR PRINTER.
!
The printer will automatically turn on when the power adapter is plugged into both
the printer and an AC outlet.
!
Loading the Labels or Paper
• Use only COMPanion part number V6101 (Yellow Badge labels) or V6301
(Continuous Wide Student Pass Paper).
• Press the form-feed button to eject the protection labels.
• Open the printer by lifting the cover and remove any packing materials.
!
IG0080.8 - v6010 Badge Printer!
2 of 15
• Following the directions listed on the inside of the printer, load the labels onto the
spool with the labels feeding from below, making sure that the roll is positioned
tightly on the spool with no gap between the roll and the spool.
• Feed the labels into the printer, aligning the labels with the left wall of the printer
and against the label guide, and press the form-feed button on the front of the
printer.
• Gently close the lid.
• An error light will blink if paper nears its end or is incorrectly installed.
Solid Blue - Power is ON and printer is ready
Dimmed Blue - Printer is in power-saving mode
Flashing Blue - Labels are not loaded properly or the label roll is empty
!
NOTE: LABELS ARE HEAT SENSITIVE! DO NOT EXPOSE TO HEAT, DIRECT
SUNLIGHT, OR MOISTURE WHILE STORING.
!
Summary of Installation Steps
In order to use your badge printer with KeepnTrack, you must first properly install
the hardware and device drivers before configuring the printer software:
!
1. On your computer, install the required printer software and then plug in the
printer.
!
NOTE: DO NOT PLUG THE PRINTER INTO THE COMPUTER UNLESS PROMPTED BY THE
SOFTWARE OR THE INSTALLATION PROCESS IS COMPLETE.
!
2. Configure the KeepnTrack Administration Settings to use a badge printer.
!
3. Finally, configure the KeepnTrack Kiosk to use your printer.
!
These steps will be covered comprehensively below.
!
Installing the Printer Software on Windows
!
Before using your badge printer, you must first install the printer software. The
software can be found on the installation CD provided. Locate and Run the file
labeled DLS8Setup.8.x.x.exe (Image 1).
!
NOTE: THE SOFTWARE COMPONENTS MAY ALSO BE DOWNLOADED FROM:
http://www.keepntrack.com/support_downloads.html
!
!
IG0080.8 - v6010 Badge Printer!
!
!
!
3 of 15
!
!
!
Image 1
!
!
!
Image 2
After reviewing the License Agreement, click I Agree to continue (Image 2).
!
IG0080.8 - v6010 Badge Printer!
4 of 15
!
Select to perform an Express Installation and click Next (Image 3). !
Image 3
When the installation is complete, select Finish (Image 4).
!
Image 4
Installation for Windows is now complete. Connect the USB cable from your
printer to the computer and then power ON your printer. You can confirm the
printer is available and installed correctly by selecting Devices and Printers in the
!
IG0080.8 - v6010 Badge Printer!
5 of 15
Windows Control Panel (Image 5). Proceed to the KeepnTrack Configuration
section.
!
NOTE: IT IS ESSENTIAL THAT THE NAME OF THE PRINTER REMAIN AS IT WAS WHEN
INSTALLED. DO NOT CHANGE IT. SUPPORTED NAMES ARE:
DYMO LabelWriter 400, DYMO LabelWriter 450, DYMO LabelWriter Twin Turbo
!
!
Image 5
Installing the Printer Software on Macintosh
Before using the label printer, you must first install the printer software. The
software can be found on the installation CD provided. Locate and Open the file
labeled DLS8Setup.8.x.x.dmg. Double-Click on the DYMO Label v.8.pkg file within to
begin the installation (Image 6).
!
NOTE: THE SOFTWARE COMPONENTS MAY ALSO BE DOWNLOADED FROM:
http://www.keepntrack.com/support_downloads.html
!
!
IG0080.8 - v6010 Badge Printer!
6 of 15
!
Image 6
After reviewing the Readme file and License Agreement, click Continue and Agree
(Image 7).
!
!
Image 7
If prompted, you will need to enter the Name and Password for an Administrator to
complete installation (Image 8).
!
!
!
IG0080.8 - v6010 Badge Printer!
7 of 15
!
!
Image 8
When prompted, connect the USB cable from your printer to the computer and
power ON the printer (Image 9).
!
!
Image 9
Installation for Macintosh is now complete. You can confirm the printer is
available and installed correctly by checking the Print & Fax settings found by
!
IG0080.8 - v6010 Badge Printer!
8 of 15
selecting System Preferences from either the dock icon or from Apple drop down
menu (Image 10). Proceed to the KeepnTrack Configuration section.
!
!
Image 10
NOTE: IN SOME VERSIONS OF OSX IT MAY BE NECESSARY TO SELECT TO ‘ADD A
PRINTER’ FOLLOWING INSTALLATION OF THE SOFTWARE. IF THE PRINTER IS NOT
LISTED IN PRINT AND FAX SETTINGS CLICK THE ‘+’, CHOOSE THE APPROPRIATE
MODEL OF DYMO LABELWRITER FROM THE LIST AND CLICK ‘ADD’.
!
NOTE: IT IS ESSENTIAL THAT THE NAME OF THE PRINTER REMAIN AS IT WAS WHEN
INSTALLED. DO NOT CHANGE IT. SUPPORTED NAMES ARE:
DYMO LabelWriter 400, DYMO LabelWriter 450, DYMO LabelWriter Twin Turbo
!
KeepnTrack Configuration
!
You will need to make a couple of changes in the KeepnTrack software to start
printing badges or student slips. Begin by logging in to KeepnTrack Administration.
!
• To configure settings for the facilities in your account:
Click on Preferences -> Account. In the Classification section you will see options
for Volunteer, Student, Staff, Vendor, and Visitor. For all the types of people that
you wish to print badges for, check the “Show Print Badge checkbox in Kiosk” box
then click Save (Image 11).
!
!
IG0080.8 - v6010 Badge Printer!
9 of 15
Image 11
!
• To configure settings for a single facility in your account:
Click on Preferences ->Facilities and select the desired facility in the list on the
left. In the Classification section you will see options for Volunteer, Student, Staff,
Vendor, and Visitor. For all the types of people that you wish to print badges for,
check the Show Print Badge checkbox in Kiosk box then click Save (Image 12).
!
Image 12
Next, log out of Administration and sign into the Kiosk. Click the blue link at the
bottom of the page that says Printer Settings (Image 13). If the Kiosk is running in
Self-Service mode, you will be prompted for the kiosk operator password in order
to access the printer settings. !
IG0080.8 - v6010 Badge Printer!
10 of 15
!
Image 13
NOTE: THE FIRST TIME AN ATTEMPT TO USE THE ADD-ON IS MADE, YOU MAY BE
PROMPTED TO ENABLE IT. IF PROMPTED YOU MUST SELECT TO RUN THE ACTIVE X
CONTROL FOR YOUR PRINTER TO FUNCTION WITH YOUR BROWSER (IMAGE 14). !
!
!
!
!
!
!
Image 14
For the DYMO 400 or 450 Badge Printer, select the LabelWriter 400 option
(Image 15). !
IG0080.8 - v6010 Badge Printer!
!!
!!
!!
!!
!!
11 of 15
!
!
!
!
Image 15
You are now ready to use your badge printer with KeepnTrack.
If you need any further assistance please refer to the troubleshooting steps below
or contact COMPanion Technical Support at 1-800-320-5830 or
[email protected]
!
IG0080.8 - v6010 Badge Printer!
!
!
!
!
!!
!!
!!
!!
!!
!!
!
12 of 15
Troubleshooting Tips
Clearing Label Jams
1. Tear off any labels that have already fed through the printer. 2. Press the label release lever forward and pull the jammed label out of the label feed slot. 3. Make sure your labels are loaded properly and that the left edge of the label is aligned with the
left edge of the label feed slot. Correcting Poor Print Quality
Poor print quality is most frequently caused by one of the following: • An old roll of labels
• Labels not obtained from COMPanion
• Labels where the thermal coating has been compromised
• A dirty print head
First, make sure you are using COMPanion labels. Do not use third-party labels because the thermal
coating on other labels may have a different sensitivity. Also, the perforated holes between the labels
made by other manufacturers are frequently not detectable by these printers.
If the print quality becomes faint, small dots of white appear scattered through the printed
characters, or light and dark patches of printing appear, you are probably using a faulty roll of
labels. Try using a different roll from a fresh box. If the second roll prints correctly, the problem is
with the first roll of labels.
Another possibility is that the LabelWriter print head needs cleaning. Every LabelWriter printer comes
with a cleaning card. !
You can easily clean your Badge Printer using the following items:
• Lint-free cloth.
• Isopropyl alcohol, diluted dishwashing detergent, or diluted ammonia free glass cleaner.
• Small, soft brush, such as a tooth brush or child’s paint brush.
• LabelWriter cleaning card.
To keep your Badge Printer working properly, you should clean it from time to time. Dusting the
outside of the printer occasionally will help keep foreign matter from getting inside the printer.
However, it is still a good idea to periodically perform some basic interior maintenance, such as
cleaning the label path with the cleaning card.
To clean the exterior of your printer and the label roll compartment 1. Disconnect the power cord. !
IG0080.8 - v6010 Badge Printer!
13 of 15
2. Use the lint-free cloth to wipe the exterior of the printer. 3. Remove dirt and smudges with one of the cleaning solutions mentioned above. 4. Open the top cover. 5 . Use a small, soft brush or cotton swab to whisk away paper dust and other stray particles from
the inside of the printer. 6 . Remove the roll of labels and clean under the roll. 7. If you have a LabelWriter cleaning card, follow the instructions printed on cleaning card packaging. 8. Reconnect the power cord and reload the roll of labels.
Other Common Errors
• DYMO LabelWriter 400 is not set up on this computer or Printer not Recognized
-The printer is not named properly. Supported names are: DYMO LabelWriter 400, DYMO
LabelWriter 450, DYMO LablelWriter Twin Turbo
• ‘undefined’ is not a function
- Completely close and restart your browser. If this does not correct the error condition the browser
version you are running may need to be ran in 32 bit mode.
• Automation Server Can’t Create Object OR To print labels or slips, you must install the most
current DYMO Label Software - Either the current software has not been installed correctly as outlined above, the printer plugin
has not been authorized in the browser, or the printer plugin has been disabled in the browsers
add-on management. When you are prompted by your browser to allow the KeepnTrack Webpage
to run the DYMO plugin (DLS SDK COM Library, DYMO Label Framework IE Plugin, etc.) authorize it
permanently. These messages vary from browser to browser but they will all have a similar
message (Image 16). Image 16
It may be necessary to visit your browsers Add-Ons management to enable the plugin if you
previously disabled or disallowed it (Image 17).
!
!
!
IG0080.8 - v6010 Badge Printer!
14 of 15
Image 17
In some cases the browser settings may be configured in such a way that it is impractical to trace
them all to identify the individual setting causing difficulty. If you are experiencing errors not
mentioned here or if after following the suggested troubleshooting steps you are still experiencing
errors you should reset your browser settings completely. The procedures to perform this step vary
with different browser versions but can generally be located within the browsers Internet Options,
Tools, or Preference settings (Image 18).
Image 18
!
IG0080.8 - v6010 Badge Printer!
15 of 15