1
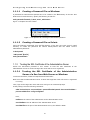
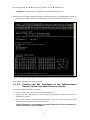
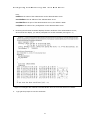
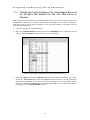
Configuring and Monitoring Sun
Java Web Server
eG Enterprise v5.6
Restricted Rights Legend
The information contained in this document is confidential and subject to change without
notice. No part of this document may be reproduced or disclosed to others without the prior
permission of eG Innovations, Inc. eG Innovations, Inc. makes no warranty of any kind with
regard to the software and documentation, including, but not limited to, the implied warranties
of merchantability and fitness for a particular purpose.
Trademarks
Microsoft Windows, Windows NT, Windows 2000, Windows 2003 and Windows 2008 are either
registered trademarks or trademarks of Microsoft Corporation in United States and/or other
countries.
The names of actual companies and products mentioned herein may be the trademarks of
their respective owners.
Copyright
© 2012 eG Innovations, Inc. All rights reserved.
Table of Contents
CONFIGURING AND MONITORING SUN JAVA WEB SERVER ..................................................................................................1
1.1
1.2
1.3
CONFIGURING THE SUN JAVA WEB SERVER FOR MONITORING BY THE EG AGENT ......................................................................1
1.1.1 Creating a Password File ..................................................................................................................................................1
1.1.1.1 Creating a Password File on Windows ................................................................................................................2
1.1.1.2 Creating a Password File on Solaris ....................................................................................................................2
1.1.2 Trusting the SSL Certificate of the Administration Server................................................................................................2
1.1.2.1 Trusting the SSL Certificate of the Administration Server of a Sun Java Web Server on Windows.................2
1.1.2.2 Trusting the SSL Certificate of the Administration Server of a Sun Java Web Server on Solaris .....................3
1.1.3 Changing the LogOn Privileges of the eGurkhaAgent Service of the eG Agent that Monitors the Sun Java Web Server
on Windows......................................................................................................................................................................................5
1.1.4 Enabling Metrics Collection on the Sun Java Web Server ...............................................................................................6
ADMINISTERING THE EG MANAGER TO MONITOR SUN JAVA WEB SERVER ................................................................................14
MONITORING THE SUN JAVA WEB SERVER ..................................................................................................................................22
CONCLUSION..........................................................................................................................................................................................23
Table of Figures
Figure 1.1: The password file containing the administrator’s password......................................................................................................2
Figure 1.2: Trusting the SSL certificate of the administration server of a Sun Java web server on Windows ...........................................3
Figure 1.3: Trusting the SSL certificate of the administration server of a Sun Java web server on Solaris ...............................................4
Figure 1.4: Selecting the Properties option of the eGurkhaAgent service ...................................................................................................5
Figure 1.5: Specifying the credentials of the user using whose privileges the eGurkhaAgent service should run.....................................6
Figure 1.6: Logging into the administration server ......................................................................................................................................7
Figure 1.7: The administration server console .............................................................................................................................................8
Figure 1.8: The Configurations tab displaying all the configurations on the administration server ...........................................................8
Figure 1.9: The details of the configuration that corresponds to the web server instance to be monitored ................................................9
Figure 1.10: The General tab page..............................................................................................................................................................10
Figure 1.11: The Monitoring Settings tab page ..........................................................................................................................................11
Figure 1.12: The Deployment Pending alert...............................................................................................................................................12
Figure 1.13: Restarting the web server instance.........................................................................................................................................13
Figure 1.14: Finishing the configuration change........................................................................................................................................14
Figure 1.15: Adding the Sun Java Web Server...........................................................................................................................................15
Figure 1.16: List of unconfigured tests for the Sun Java Web Server........................................................................................................15
Figure 1.17: Configuring SWS Conn Queues test......................................................................................................................................16
Figure 1.18: Configuring SWS HTTP test..................................................................................................................................................17
Figure 1.19: Configuring the Hardware Voltage test .................................................................................................................................18
Figure 1.20: Configuring the Application Process test...............................................................................................................................19
1
Configuring
and
Monitoring
Sun
Java
Web
Server
Chapter
1
Configuring and Monitoring Sun
Java Web Server
This chapter deals with the steps involved in the configuring and monitoring the Sun Java Web
Server.
1.1
Configuring the Sun Java
Monitoring by the eG Agent
Web
Server
for
eG Enterprise provides agent-based monitoring support for Sun Java Web Server 7 on
Windows and Solaris platforms. To enable the eG agent to collect statistics of interest from the
Sun Java web server, you need to ensure the following:
The eG agent connects to the administration server to which the target Sun
Java web server is registered to extract the required metrics. To enable the eG
agent to communicate with this administration server, you first need to create
a password file containing the administrator password for accessing the server,
in the bin directory within the install directory of the Sun Java web server.
Then, you need to configure the eG tests with the name of that file;
If this administration server is SSL-enabled, then you need to trust the SSL
certificate of the server to enable the eG agent to communicate with that
server;
While monitoring the Sun Java Web server on Windows, make sure that the
eGurkhaAgent service on the server runs using the privileges of the user who
trusted the SSL certificate of the administration server;
Configure the Sun Java web server to allow metrics collection.
The steps to fulfill each of these pre-requisites have been detailed in the sections that will
follow.
1.1.1
Creating a Password File
This section explains how to create a password file on a web server operating on a Windows
and a Solaris platform.
1
Configuring
1.1.1.1
and
Monitoring
Sun
Java
Web
Server
Creating a Password File on Windows
A password file named admin.passwd has to be created in the bin directory of the Sun Java
Web Server’s install directory. Specify the following in that file:
wadm_password=<Password_of_admin_server’s_administrator>
Figure 1.1 depicts how this is done:
Figure 1.1: The password file containing the administrator’s password
1.1.1.2
Creating a Password File on Solaris
Issue the following commands from the bin directory of the Sun Java web server’s install
directory to create the password file named admin.passwd with the admin server’s
administrator password:
vi admin.passwd
“admin.passwd” [New file]
wadm_password=adm1n
1.1.2
Trusting the SSL Certificate of the Administration Server
Follow the instructions provided in this section to trust the SSL Certificate of the
administration server to which the target Sun Java web server is registered.
1.1.2.1
Trusting the SSL Certificate of the Administration
Server of a Sun Java Web Server on Windows
To achieve the above, follow the steps discussed hereunder:
Make sure that the administration server to which the target Sun Java web server is registered
is running.
Then, login to the target Sun Java web server and go to its command prompt.
At the prompt, issue the following command:
wadm list-virtual-servers --user=<userName> --password-file=admin.passwd --host=<serverHostName> -port=<serverAdminPort> --config=<configName>
Here,
userName is the name of the administrator to the administration server
serverHostName is the IP address of the administration server
serverAdminPort is the port of the administration server; the default is 8989
2
Configuring
and
Monitoring
Sun
Java
Web
Server
configName is the name of any configuration in the administration server
Executing the aforesaid command displays the SSL certificate of the administration server; at
the end of the display, you will be prompted to trust the certificate (see Figure 1.2).
Figure 1.2: Trusting the SSL certificate of the administration server of a Sun Java web server on Windows
Type y at the prompt to trust the certificate.
1.1.2.2
Trusting the SSL Certificate of the Administration
Server of a Sun Java Web Server on Solaris
In this case, follow the steps given below:
1.
Login to the Sun Java web server as the eG install user.
2. Ensure that the administration server to which the target Sun Java web server is
registered is running.
3.
Then, at the prompt, switch to the bin directory of the Sun Java web server’s install
directory, and then issue the following command:
./wadm list-virtual-servers --user=<userName> --password-file=admin.passwd --host=<serverHostName> -port=<serverAdminPort> --config=<configName>
3
Configuring
and
Monitoring
Sun
Java
Web
Server
Here,
userName is the name of the administrator to the administration server
serverHostName is the IP address of the administration server
serverAdminPort is the port of the administration server; the default is 8989
configName is the name of any configuration in the administration server
4.
Executing the aforesaid command displays the SSL certificate of the administration server;
at the end of the display, you will be prompted to trust the certificate (see Figure 1.3).
Figure 1.3: Trusting the SSL certificate of the administration server of a Sun Java web server on Solaris
5.
Type y at the prompt to trust the certificate.
4
Configuring
1.1.3
and
Monitoring
Sun
Java
Web
Server
Changing the LogOn Privileges of the eGurkhaAgent Service of
the eG Agent that Monitors the Sun Java Web Server on
Windows
After trusting the SSL Certificate of the administration server to which a Sun Java web server
on Windows is registered, you need to configure the eGurkhaAgent service of the eG agent on
that web server to run using the privileges of the user who trusted the certificate. For this
purpose, do the following:
1.
Login to the target Sun Java web server.
2.
Open the Component Services window to view the eGurkhaAgent service. Right-click on the
service, and pick Properties from the shortcut menu that appears.
Figure 1.4: Selecting the Properties option of the eGurkhaAgent service
3.
Select the LogOn tab from the Properties dialog box that appears (see Figure 1.5). Then,
choose the This account option from the Log on as section of Figure 1.5, and provide the
Domainname\Username of the user using whose privileges the eGurkhaAgent service
should run. Provide the Password of the domain administrator, and confirm the password
by retyping it in the Confirm Password text box.
5
Configuring
and
Monitoring
Sun
Java
Web
Server
Figure 1.5: Specifying the credentials of the user using whose privileges the eGurkhaAgent service should
run
4.
Finally, click the Apply button in Figure 1.5, and then the OK button to register the
changes.
1.1.4
Enabling Metrics Collection on the Sun Java Web Server
To achieve this, follow the steps given below:
1.
Login to the administration console by first accessing the URL: http://<IP/hostname of the
administration server>:<port of administration server>, and providing a valid user ID and
password (see Figure 1.6).
6
Configuring
and
Monitoring
Sun
Java
Web
Server
Figure 1.6: Logging into the administration server
2.
Figure 1.7 then appears. Click on the Configurations tab page in Figure 1.7. Figure 1.8 then
appears displaying all the server configurations on the administration server. A
Configuration in Web Server is an entire server configuration. It can have many virtual
servers and many HTTP listeners: a declaration of which IP addresses and ports to use. In
Figure 1.8, click on the configuration which the web server instance you want to monitor
uses.
7
Configuring
and
Monitoring
Sun
Java
Web
Server
Figure 1.7: The administration server console
Figure 1.8: The Configurations tab displaying all the configurations on the administration server
8
Configuring
3.
and
Monitoring
Sun
Java
Web
Server
Doing so brings up Figure 1.9 that displays the details of the configuration that is clicked
on.
Figure 1.9: The details of the configuration that corresponds to the web server instance to be monitored
4.
Click on the General tab page in Figure 1.9. Figure 1.10 will then appear. Click on the
Monitor Settings tab page within the General tab page.
9
Configuring
and
Monitoring
Sun
Java
Web
Server
Figure 1.10: The General tab page
5.
This will invoke Figure 1.11. Select the Enabled check box against Statistics collection to
enable metrics collection. Similarly, enable profiling by clicking on the check box against
Profiling. Then, click the Save button in Figure 1.11.
10
Configuring
and
Monitoring
Sun
Java
Web
Server
Figure 1.11: The Monitoring Settings tab page
6.
Once the settings are saved, a Deployment Pending alert appears as depicted by Figure 1.12.
Click on the Deploy button therein to deploy the new configuration setting.
11
Configuring
and
Monitoring
Sun
Java
Web
Server
Figure 1.12: The Deployment Pending alert
7. This will open Figure 1.13, which will prompt you to restart the web server instance that is
affected by the configuration change. With the Now option selected click on the OK button
to restart the web server instance immediately.
12
Configuring
and
Monitoring
Sun
Java
Web
Server
Figure 1.13: Restarting the web server instance
8. Upon successful restart, Figure 1.14 will appear indicating the same. Click on the Close
button to complete the operation.
13
Configuring
and
Monitoring
Sun
Java
Web
Server
Figure 1.14: Finishing the configuration change
1.2
Administering the eG Manager to monitor Sun
Java Web Server
1. Log into the eG administrative interface.
2. eG Enterprise cannot automatically discover Sun Java Web Server. You need to manually
add the server using the Add/Modify Components page (see Figure 1.15) that appears when
the Infrastructure -> Components -> Add/Modify menu sequence is followed. Remember
that components manually added are managed automatically.
14
Configuring
and
Monitoring
Sun
Java
Web
Server
Figure 1.15: Adding the Sun Java Web Server
Figure 1.16: List of unconfigured tests for the Sun Java Web Server
3.
When you attempt to sign out, a list of unconfigured tests appears (see Figure 1.16). Click
on the SWS Conn Queues test in the list to configure it.
15
Configuring
and
Monitoring
Sun
Java
Web
Server
Figure 1.17: Configuring SWS Conn Queues test
4.
To configure the test, specify the following in Figure 1.17.
TEST PERIOD - How often should the test be executed
HOST - The host for which the test is to be configured.
PORT – Refers to the port used by the web server.
USER – Specify the name of the administrator of the administration server to which
the target web server is registered.
PASSWDFILE – The eG agent connects to the administration server to which the target
Sun Java web server is registered to extract the required metrics. To enable the eG
agent to communicate with this administration server, you first need to create a
password file containing the administrator password for accessing the server; this
password file should be created in the install directory of the Sun Java web server.
Specify the name of this file in the PASSWDFILE text box; by default, this is
admin.passwd.
ADMINSERVER – Specify the IP address of the administration server to which the
target web server is registered.
ADMINPORT – Indicate the port at which the administration server listens.
CONFIG – In Web Server 7.0, all configurable elements of a server instance like web
applications, configuration files, and search collection indexes are logically grouped
and termed as a Configuration. To enable the test to locate the web server instance to
be monitored, you need to mention the Configuration that applies to the instance. In the
CONFIG text box therefore, specify the name of the Configuration which the target web
server instance uses.
NODE - Node is a network resource, such as a server or a host. Instance refers to the
environment of a web server daemon on a given node, including its configuration, log
files and other runtime artifacts such as lock databases, caches and temporary files.
To enable the test to identify the exact web server instance to be monitored, you need
to specify the name of the NODE on which the instance executes. The test will thus
monitor only that web server instance that operates on the given NODE and which
uses the specified CONFIG.
16
Configuring
and
Monitoring
Sun
Java
Web
Server
SSL – Set this flag to Yes if the administration server is SSL-enabled; if not, set it to
No.
WEBSERVERDIR – Here, specify the Sun Java web server installation directory
5.
Then, click the Update button in Figure 1.17. Trying to signout now, will once again invoke
the LIST OF UNCONFIGURED TESTS. This time click on the SWS HTTP test to configure it. Figure
1.18 will then appear.
Figure 1.18: Configuring SWS HTTP test
6.
To configure the test, specify the following in Figure 1.18:
TEST PERIOD - How often should the test be executed
HOST - The host for which the test is to be configured.
PORT – Refers to the port used by the web server.
USER – Specify the name of the administrator of the administration server to which
the target web server is registered.
PASSWDFILE – The eG agent connects to the administration server to which the target
Sun Java web server is registered to extract the required metrics. To enable the eG
agent to communicate with this administration server, you first need to create a
password file containing the administrator password for accessing the server; this
password file should be created in the install directory of the Sun Java web server.
Specify the name of this file in the PASSWDFILE text box; by default, this is
admin.passwd.
ADMINSERVER – Specify the IP address of the administration server to which the
target web server is registered.
ADMINPORT – Indicate the port at which the administration server listens.
CONFIG – In Web Server 7.0, all configurable elements of a server instance like web
applications, configuration files, and search collection indexes are logically grouped
and termed as a Configuration. This test will monitor those virtual servers across all
nodes where the configuration specified against CONFIG is deployed. In the CONFIG
text box therefore, specify the name of the Configuration that applies to the virtual
servers of interest to you.
17
Configuring
and
Monitoring
Sun
Java
Web
Server
SSL – Set this flag to Yes if the administration server is SSL-enabled; if not, set it to
No.
WEBSERVERDIR – Here, specify the Sun Java web server installation directory
7.
Then, click the Update button in Figure 1.18. Trying to signout now, will once again invoke
the LIST OF UNCONFIGURED TESTS. This time click on the Hardware - Voltage test to configure
it. Figure 1.19 will then appear.
Figure 1.19: Configuring the Hardware Voltage test
8.
To configure the test, specify the following in Figure 1.19:
TEST PERIOD - How often should the test be executed
HOST - The host for which the test is to be configured. Ensure that the HOST is SNMP-
enabled.
SNMPPORT - The port number through which the UPS exposes its SNMP MIB. The
default value is 161.
SNMPVERSION – By default, the eG agent supports SNMP version 1. Accordingly, the
default selection in the SNMPVERSION list is v1. However, if a different SNMP
framework is in use in your environment, say SNMP v2 or v3, then select the
corresponding option from this list.
SNMPCOMMUNITY – The SNMP community name that the test uses to communicate
with the UPS. This parameter is specific to SNMP v1 and v2 only. Therefore, if the
SNMPVERSION chosen is v3, then this parameter will not appear.
USERNAME – This parameter appears only when v3 is selected as the SNMPVERSION.
SNMP version 3 (SNMPv3) is an extensible SNMP Framework which supplements the
SNMPv2 Framework, by additionally supporting message security, access control, and
remote SNMP configuration capabilities. To extract performance statistics from the MIB
using the highly secure SNMP v3 protocol, the eG agent has to be configured with the
required access privileges – in other words, the eG agent should connect to the MIB
using the credentials of a user with access permissions to be MIB. Therefore, specify
the name of such a user against the USERNAME parameter.
AUTHPASS – Specify the password that corresponds to the above-mentioned
USERNAME. This parameter once again appears only if the SNMPVERSION selected is
v3.
CONFIRM PASSWORD – Confirm the AUTHPASS by retyping it here.
18
Configuring
and
Monitoring
Sun
Java
Web
Server
AUTHTYPE – This parameter too appears only if v3 is selected as the SNMPVERSION.
From the AUTHTYPE list box, choose the authentication algorithm using which SNMP
v3 converts the specified USERNAME and PASSWORD into a 32-bit format to ensure
security of SNMP transactions. You can choose between the following options:
MD5 – Message Digest Algorithm
SHA – Secure Hash Algorithm
ENCRYPTFLAG – This flag appears only when v3 is selected as the SNMPVERSION. By
default, the eG agent does not encrypt SNMP requests. Accordingly, the
ENCRYPTFLAG is set to NO by default. To ensure that SNMP requests sent by the eG
agent are encrypted, select the YES option.
ENCRYPTTYPE – If the ENCRYPTFLAG is set to YES, then you will have to mention the
encryption type by selecting an option from the ENCRYPTTYPE list. SNMP v3 supports
the following encryption types:
DES – Data Encryption Standard
AES – Advanced Encryption Standard
ENCRYPTPASSWORD – Specify the encryption password here.
CONFIRM PASSWORD – Confirm the encryption password by retyping it here.
TIMEOUT - Specify the duration (in seconds) within which the SNMP query executed by
this test should time out in the TIMEOUT text box. The default is 10 seconds.
9.
Finally, click the Update button in Figure 1.19 to save the changes. If you now try to sign
out, you will be prompted to configure the Application Process test.
Figure 1.20: Configuring the Application Process test
10. To configure the test, specify the following in Figure 1.20.
TEST PERIOD - How often should the test be executed
HOST - The host for which the test is to be configured
PORT - The port to which the specified HOST listens
PROCESS - In the PROCESS text box, enter a comma separated list of names:pattern
pairs which identify the process(es) associated with the server being considered.
processName is a string that will be used for display purposes only. processPattern is
an expression of the form - *expr* or expr or *expr or expr* or *expr1*expr2*... or
expr1*expr2, etc. A leading '*' signifies any number of leading characters, while a
19
Configuring
and
Monitoring
Sun
Java
Web
Server
trailing '*' signifies any number of trailing characters. For example, in a Citrix
environment, a process called cmstart.exe is part of the Citrix login process. When
logins are working well, there will be very few cmstart.exe processes running on a
server. However, when users experience slow logins or have difficulty in launching
applications on a Citrix Presentation Server, many cmstart.exe processes are
observed. This process hence requires monitoring. Similarly, users might also want to
be alerted if any instance of the dreaded virus drwatson.exe is executing on the
system. Therefore, the PROCESS configuration in this case will be:
Citrixstartprocess:*cmstart*,Virus:*drwatson*. Other special characters such as
slashes (\) can also be used while defining the process pattern. Typically, slashes (\)
are used when the configured process pattern includes the full directory path to the
process to be monitored.
To determine the process pattern to use for your application, on Windows
environments, look for the process name(s) in the Task Manager -> Processes
selection. To determine the process pattern to use on Unix environments, use the ps
command (e.g., the command "ps -e -o pid,args" can be used to determine the
processes running on the target system; from this, choose the processes of interest to
you).
Also, note that the PROCESS parameter is case-sensitive in Unix environments.
CORRECT - Increased uptime and lower mean time to repair are critical to ensuring
that IT infrastructures deliver a high quality of service to users. Towards this end, the
eG Enterprise suite embeds an optional auto-correction capability that enables eG
agents to automatically correct problems in the environment, as soon as they occur.
With this capability, as and when an abnormal situation is detected, an eG agent can
initiate corrective actions automatically to resolve the problem. Automatic correction
without the need for manual intervention by IT operations staff reduces service
downtime and improves operational efficiency. By default, the auto-correction
capability is available in the eG Enterprise suite for the Number of processes running
measure of Processes test, and the Service availability measure of the
WindowsServices test. You can enable this capability for the ApplicationProcess test, to
correct a problem condition pertaining to a particular measure reported by that test.
To enable the auto-correction capability for the ApplicationProcess test, first, select the
TRUE option against the CORRECT parameter in this page (by default, FALSE will be
selected here).
ALARMTYPE - Upon selecting the true option, three new parameters, namely,
ALARMTYPE, USERPARAMS, and CORRECTIVESCRIPT will appear. You can set the
corrective script to execute when a specific type of alarm is generated, by selecting an
option from the ALARMTYPE list box. For example, if the Critical option is chosen from
the ALARMTYPE list box, then the corrective script will run only when a critical alarm
for the ApplicationProcess test is generated. Similarly, if the Critical/Major option is
chosen, then the corrective script will execute only when the eG Enterprise system
generates critical or major alarms for the ApplicationProcess test. In order to ensure
that the corrective script executes regardless of the alarm type, select the
Critical/Major/Minor option.
USERPARAMS - The user-defined parameters that are to be passed to the corrective
script are specified in the USERPARAMS text box. One of the following formats can be
applied to the USERPARAMS specification:
o
exec@processName:command: In this specification, processName is the display
name of the process pattern specified against the PROCESS parameter, and
20
Configuring
and
Monitoring
Sun
Java
Web
Server
command is the command to be executed by the default script when the there is
a problem condition pertaining to the processName.
o
command: In this specification, command signifies the command to be executed
when there is a problem condition pertaining to any of configured processes.
Such a format best suits situations where only a single process has been
configured for monitoring, or, a single command is capable of starting all the
configured processes.
Note:
1.
The USERPARAMS specification should be placed within double quotes if this
value includes one or more blank spaces.
2. Note that if a processName configured in the PROCESS parameter does not
have a corresponding entry in USERPARAMS (as discussed in format 1), then
the auto-correction capability will not be enabled for these processes.
CORRECTIVESCRIPT - Administrators will have to build the auto-correction capability
for this test to address probable issues with it, by writing their own corrective script.
To know how to create custom auto-correction scripts, refer to the eG User Manual.
The full path to the corrective script should be specified here.
USEPS - This flag is applicable only for AIX LPARs. By default, on AIX LPARs, this test uses
the tprof command to compute CPU usage of the processes on the LPARs. Accordingly,
the USEPS flag is set to No by default. On some AIX LPARs however, the tprof
command may not function properly (this is an AIX issue). While monitoring such AIX
LPARs therefore, you can configure the test to use the ps command instead for metrics
collection. To do so, set the USEPS flag to Yes.
Note:
Alternatively, you can set the AIXusePS flag in the [AGENT_SETTINGS] section of the
eg_tests.ini file (in the <EG_INSTALL_DIR>\manager\config directory) to yes (default: no) to
enable the eG agent to use the ps command for CPU usage computations on AIX
LPARs. If this global flag and the USEPS flag for a specific component are both set to
no, then the test will use the default tprof command to compute CPU usage of
processes executing on AIX LPARs. If either of these flags is set to yes, then the ps
command will perform the CPU usage computations for such processes.
In some high-security environments, the tprof command may require some special
privileges to execute on an AIX LPAR (eg., sudo may need to be used to run tprof). In
such cases, you can prefix the tprof command with another command (like sudo) or the
full path to a script that grants the required privileges to tprof. To achieve this, edit the
eg_tests.ini file (in the <EG_INSTALL_DIR>\manager\config directory), and provide the prefix
of your choice against the AixTprofPrefix parameter in the [AGENT_SETTINGS] section.
Finally, save the file. For instance, if you set the AixTprofPrefix parameter to sudo, then
the eG agent will call the tprof command as sudo tprof.
11. Now, when you try to sign out, it will prompt you to configure the Processes test.
12. Click on the test name in this page to configure it. While configuring, remember to provide
the PROCESSPATTERN.
21
Configuring
and
Monitoring
Sun
Java
Web
Server
Refer to Configuring and Monitoring Web Severs document for details on configuring the
Processes test and specifying the PROCESSPATTERN.
13. After configuring, sign out of the administrative interface.
1.3
Monitoring the Sun Java Web Server
To monitor the Sun Java Web Server, do the following:
1.
Login as a monitor / supermonitor user.
2.
Click on the Components option in the menu bar, and select the Servers option from the
components menu.
3.
From the component list page, click on the Sun Java Web Server for which you wish to
view measurements.
22
Conclusion
Chapter
2
Conclusion
This document has described in detail the steps for configuring and monitoring the Sun Java
Web Server. For details of how to administer and use the eG Enterprise suite of products, refer
to the user manuals.
We will be adding new measurement capabilities into the future versions of the eG Enterprise
suite. If you can identify new capabilities that you would like us to incorporate in the eG
Enterprise suite of products, please contact [email protected]. We look forward to
your support and cooperation. Any feedback regarding this manual or any other aspects of the
eG Enterprise suite can be forwarded to [email protected].
23