1
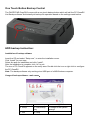
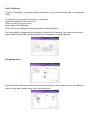
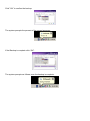
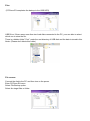
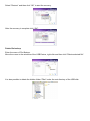
FANTEC MR-CopyDU3
User Manual
2 Bay Docking Station
With One Touch Backup (OTB) and Copy Function
Hardware:
PC and Notebooks, Macintosh
eSATA, USB 1.1, USB 2.0 or USB 3.0 interface
Features:
2,5” or 3,5” SATA I,II,III HDD compatible
HDD copy function (sector by sector)
Backup function with OTB software
USB 3.0 max. 5Gbps, eSATA max. 3Gbps,
power adaptor: 12V 3A
Software:
Windows 2000 / Windows XP / Windows Vista /
Windows 7, Mac OS 10.3 or above, Linux
Package Contents;
Docking Station, Power adaptor, USB cable,
eSATA cable, Manual, CD with backup software
Description:
1. Slot for HDD1 (Source in Copy mode)
2. Slot for HDD2 (Destination in Copy mode)
3. Release button for HDD1. Push to disconnect HDD from SATA port.
4. Release button for HDD2. Push to disconnect HDD from SATA port.
5. Backup button for starting OTB function
6. Status LEDs for data transfer. During Copy mode the copy progress is displayed.
7. Clone button for starting Sector by Sector copy from HDD1 to HDD2
8. Status LEDs for HDD. Steady light for HDD connection.
9. Power LED
10. eSATA port for connection to PC
11. eSATA port for connection to PC
12. DC IN for power adapter
13. Power switch
HDD copy instruction:
1. Do not connect USB interface to PC / MAC
2. Pease insert SOURCE hard disk into Slot 1. Any and every file system or content is
supported.
3. Please insert DESTINATION hard disk into Slot 2. An empty, unformatted hard disk is
recommended.
4. Please power on the unit and wait for about 10 seconds.
5. Press the CLONE button 2 times. The 4 LEDs will start flashing.
6. The copy progress will be displayed by steady shining LEDs at 25%, 50%, 75% and 100%.
The copy process is finished if all 4 LEDs are shining steady. Now you can power of the unit
and remove both hard disks.
NOTE:
The DESTINATION hard disk has to be same or larger size than the SOUCRE hard disk.
If Disk 2 is larger than Disk 1, e.g. Disk 1 has 250GB and Disk 2 has 750GB, after copy process
has finished, there are 500GB unallocated at Disk 2. Please use the partition manager to
allocate and format this part of Disk 2. The copy function allows cloning the SOURCE hard disk
incl. boot sectors, data partitions or unallocated parts.
One Touch Button Backup Control
The FANTEC MR-CopyDU3 comes with a one touch backup button which will call the PC CloneEX
Lite Backup software and instantly do backup file operation based on the settings made before.
HDD backup instruction:
Installation of backup software
Insert the CD and select “Setup.exe”, to enter the installation menu.
Click “Install” for next step.
Select the path for installation and click “install”.
After the installation is complete, click “ok” to exit.
The icon of PC CloneEX appears on the notify area. Double click the icon or right click to configure
the PC CloneEX.
Note: The backup software only working at an USB port of a MS Windows computer.
Usage of backup software - main menu:
1. Fast Backup
4. Setup
2. File backup
5. File backup
key
7. Info
8. Help
3. File management
6. Assign to the system
arrange
Fast File Backup
Click the “File Backup” or use the backup key directly, you only need one step and no complicated
setup.
Connect the product to the PC and turn on the power.
Implement program PCClone EX Lite.
Enter the menu of Quick Launch.
Select option of File Backup.
Click “OK” once a dialogue box appears and the backup will start.
It is also possible to press the backup button to achieve the file backup. One push on the backup
button and the file backup dialogue box appears. Press again to start the backup.
File backup menu
Setup the files for backup and then press the backup button to start (If there were more USB hard
disks, you are able to select which one to store the files).
Click” OK” to confirm the backup:
The system prompts the percent of the current progress.
If the Backup is complete click “OK”.
The system prompts as follows once the backup is complete.
Files
(PCClone EX completes the backup to the USB HDD)
USB Drive: If there were more than two hard disks connected to the PC, your are able to select
which one to store the file.
There is a hidden folder” Fnet” under the root directory of USB disk and the data is stored in this
folder. (Please don‟t delete this folder)
File recover
Connect the disk to the PC and then turn on the power
Enter PCClone EX menu.
Select File Backup option.
Select the target files or folder.
Select "Restore” and then click “OK” to start the recovery.
After the recovery is complete click “„OK”.
Delete file backup
Enter the menu of File Backup.
Move the cursor to the windows of the USB Device, right click and then click "Delete selected file".
It is also possible to delete the hidden folder “FNet” under the root directory of the USB disk.
File management
The function of the File Manager is similar to the file management under Windows. It is possible to
drag the files or folders between the left and right windows. After recovering the files, you are able
to check, move or access the files in a very convenient way.