1
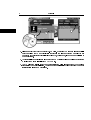
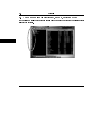
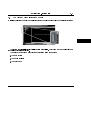
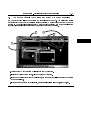
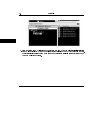
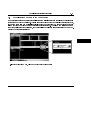
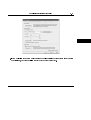
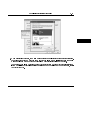
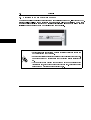
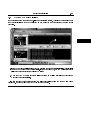
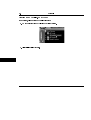
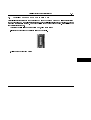
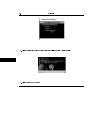
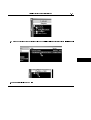
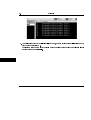
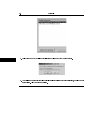
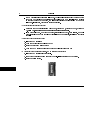
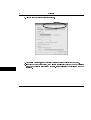
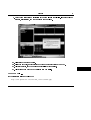
PhatNoise
Music Manager
1
Installing the software . . . . . . . . . . . . . . 3
2
Using the CD Manager . . . . . . . . . . . . . . 9
3
Using the Music Manager . . . . . . . . . . 13
4
Updating Firmware . . . . . . . . . . . . . . . . 39
5
Using content from Audible . . . . . . . 45
6
Support . . . . . . . . . . . . . . . . . . . . . . . . . . . 59
User's Manual
PhatNoise
2
Section 1
Installing the software
•
You must install the PhatNoise Music Manager before you connect the USB
cradle to your computer.
•
The PhatNoise Music Manager requires the Windows Operating System (Windows 98 Second Edition, Windows Millennium, Windows 2000, or Windows
XP).
To congure the software properly, it is very important to follow these steps in order:
1. Exit all running Windows programs.
2. If the DMS Cartridge is inserted into the USB cradle, remove it now.
3. Insert the PhatNoise Music Manager software CD into your computer's CD-ROM drive.
The
PhatNoise Music Manager software installation program will automatically launch.
4. If the PhatNoise Music Manager software installation program does not launch automatically,
follow these steps to run the software manually, otherwise skip to the next step:
(a) Click the "Start" button in the lower left corner of your screen and select "Run...". The Run
dialog box appears.
(b) Type the following text in the drop-down list box:
3
1
PhatNoise
d:\PMM_setup.exe
where "d:" is the letter corresponding to your CD-ROM drive.
(c) Click OK.
5. Follow the on-screen instructions to install the PhatNoise Music Manager software (the PhatNoise
CD Manager software will also be installed at this time).
6. When the installation is nished, the installation program will ask you to restart the computer.
After restarting your computer you will nd two new icons on your desktop: one for PhatNoise
Music Manager and one for PhatNoise CD Manager.
4
Installing the USB Cradle
1.1
1.1
Installing the USB Cradle
1. Once you have installed PhatNoise Music Manager and have restarted your computer, plug the
power connector into the USB cradle. Make sure the other end of the power cable is plugged
into a wall outlet before connecting the USB cradle to your computer.
2. Connect the USB cradle's USB cable to a USB port on your computer.
5
1.1
PhatNoise
3. Insert the DMS cartridge rmly into the USB cradle. Avoid 'slapping' the cartridge into place. The
green and red indicator lights should illuminate. The DMS cartridge will then be detected by the
operating system.
Windows XP: If you have USB 2.0 ports installed on your machine, but the cradle
is plugged into a USB 1.0 port, Windows will display the message below. To take
advantage of the faster transfer speed plug the cradle into a USB 2.0 port.
6
Installing the USB Cradle
1.1
4. After an initialization period, an "Autoplay" dialog box will appear.
5. Let the Autoplay feature nish.
7
1.1
PhatNoise
6. Next, dialog boxes will appear for two new drives, labelled PHTDTA and PHTSYS.
7. For each dialog box, select "Take No Action" and check "Always do the selected Action", then
Click "OK".
8. Your USB Cradle has been successfully installed and your DMS cartridge is ready for use!
8
Section 2
Using the CD Manager
The quickest and easiest way to transfer your CD collection to a DMS cartridge is with the PhatNoise
CD Manager. You can also use the PhatNoise Music Manager to encode CDs and transfer music les to
a DMS cartridge.
This section introduces the core features of the PhatNoise CD Manager software.
To learn about
other features of the software, click on the "Help" button (or press F1) while in PhatNoise CD Manager.
To transfer your CD music collection to a DMS cartridge
1. Double click on the PhatNoise CD Manager icon on your computer's desktop.
2. Insert a DMS cartridge into the USB cradle. PhatNoise CD Manager will detect the DMS cartridge
and after reading its contents will display any music les in the right hand window pane.
9
2
PhatNoise
3. Place an audio CD in your computer's CD-ROM drive. PhatNoise CD Manager will automatically
detect and load the CD and display it's contents in the left hand window pane (If you are
connected to the internet this will include Album Art, Artist Name, Album Name and a listing of
the music tracks).
4. To transfer all the music les and album art to the DMS cartridge click on the large button in the
middle of the window (labelled "ADD CD TO DMS").
5. The CD will automatically eject when the transfer is complete. Insert another CD to continue
transferring your music collection. You can use other applications while PhatNoise CD Manager
is transferring les to a DMS cartridge.
10
2
Using the CD Manager
6. When you are done adding CDs, and you'd like to remove the DMS cartridge, press the Save/Eject
Button.
You must Save/Eject your DMS before removing it from the cradle.
7. Insert the DMS cartridge into your PhatNoise player and enjoy your entire music collection!
PhatNoise CD Manager will store about 300 to 400 CDs on one 20GB DMS cartridge at its default
setting of "Good" quality. (Specically, music is encoded at 128kbps in mp3 format.) To store music
at "Very Good" (256 kbps mp3) or "CD-Exact" (703 kbps FLAC format) quality level, select one of these
options in the "Options" window under the "CD Options" tab.
Click on the "Help" button (or press F1)
while in PhatNoise CD Manager, to learn more about this and other advanced features.
11
2
12
PhatNoise
Section 3
Using the Music Manager
This section introduces the core features of the PhatNoise Music Manager software:
1. Creating MP3 les from an Audio CD
2. Organizing music les and playlists
3. Transferring MP3s and playlists to the DMS cartridge
3.1
Launching the Music Manager and Loading Music Files
1. Launch the PhatNoise Music Manager software. You can do this one of two ways:
•
Double-click the PhatNoise Music Manager icon on your desktop, or
•
Click "Start", select "Program Files", and select the PhatNoise Music Manager icon.
2. The Music Manager splash screen will briey appear, then the "Load Songs to Database" window
will appear. If you already have music les on your computer's hard drive you can load them now
into the Music Manager's database.
\
3. Choose a folder on your computer (for example "C: My Music") that contains songs you want to
load into the PhatNoise Music Manager database and then click "Load Songs".
4. To load songs from additional folders click on the "Load Songs" button on the main window of
Music Manager.
13
3.2
3.2
PhatNoise
The Four Program Views: Library, Encode, Device and Web
The four icons on the left of the program's main window are used to access the four different parts
(views) of the software.
14
The Library View Finding Music
3.3
3.3
The Library View Finding Music
To display the library of music you have loaded into the Music Manager click on the "Library" button:
The Library View initially displays "All Songs" in a single list. At any time you can double click on a
song title and it will start playing.
The main ways of nding music with the PhatNoise Music Manager are:
1. The Browse View
2. The Media Explorer
3. The Search Box
15
3.3
PhatNoise
Browse View: Click the "Browse View" button while in the "Library" (or "Device") View and the
window will display a list of all your Artists and a list of all your Albums just above the list of all your
songs. To display a list of all your Genres click on "View Genres" (or right click on "All Songs" and choose
"Enable Genre Browsing").
•
Clicking on a specic Genre, Artist or Album will cause only those songs in that category to be
displayed below. The Browse View is hierarchical:
•
Clicking on a Genre will display all the Artists, Albums and Songs for that Genre.
•
Clicking on an Artist will display all the Albums and Songs for that Artist.
•
Clicking on an Album will display all the songs on that Album.
You can select up to 15 items by using holding down the SHIFT key or the CTRL key while clicking.
16
The Library View Finding Music
3.3
Media Explorer: The Media Explorer lets you view the les in your database as they are laid out in
the le system. This is helpful if you have already organized your music into Windows folders.
To access the Media Explorer, click on its icon in the left side window pane of the Library View.
The Media Explorer looks and functions just like Windows Explorer.
Note that the rst time you click it, there is a slight delay as the software builds the tree
of folders dynamically.
17
3.3
PhatNoise
Search Box: Type search terms into the search box and the matching songs will be automatically
displayed below as you type. You may search the contents of any playlist, "All Songs", or the results of
a browse view search using the search box. The search function displays all songs for which all or part
of the artist, album, genre, path, or le name matches the search terms.
18
3.4
The Encode View Converting an Audio CD to computer les
3.4
The Encode View Converting an Audio CD to computer les
The CD Encoder View allows you to create computer les from your CDs.
The easiest and fastest
way to transfer CDs to your DMS cartridge is with PhatNoise CD Manager (see
Using the CD Manager
on page 9). The PhatNoise Music Manager CD Encoder View provides much more control over the
encoding process including a wider range of encoding formats and data rates.
1. Switch to the CD Encoder View by clicking the "ENCODE" button.
2. Insert the CD into the computer. Click on the "Load CD" button.
3. If the computer is connected to the Internet, the songs names will appear next to the track
number as follows.
4. If you are not connected to the Internet, the tracks will be listed "Track 01", "Track 02", etc.
19
3.4
PhatNoise
5. Edit the "Artist", "Title", "Genre", and "Year" information if it is missing or incorrect.
6. Choose the tracks to encode using the checkboxes.
7. Choose the le format to encode in.
8. Choose the bitrate of the le to be created.
For the MP3 format, 128kbps will provide good sound quality, 256kbps will provide
very good sound quality but the music les will be twice as large, 192kbps provides a
good combination of sound quality and le size.
9. Press the "Start Encoding" button and encoding will begin. The encoded music les will be saved
to your computer's hard drive. See the Device View section for instructions on transferring les
to the DMS cartridge.
20
3.5
Creating Playlists
3.5
Creating Playlists
A playlist is a collection of songs. It can simply be a collection of songs you choose (static) or a playlist
based on criteria (dynamic).
Creating a Static Playlist and Adding Songs
1. Click the
Create
playlist button. Enter a name for this playlist, choose
Empty Playlist,
then press
Ok
2. Click on the
All Songs playlist.
3. Find the songs you wish to include in the playlist, and then highlight the desired songs.
4. Drag the desired songs into your playlist.
21
3.5
PhatNoise
Creating a Dynamic Playlist
Each time you select a Dynamic Playlist in the PhatNoise Music Manager software, the list of criteria in
that playlist is checked against the MP3 collection on your computer's hard drive. All songs that match
the criteria are automatically added to your dynamic playlist. Dynamic playlists can also be synced
with the playlists on your DMS cartridge.
1. Click the Create playlist button. Enter a name for this playlist, choose Dynamic Playlist, then press
Ok
2. The playlist properties window will automatically appear.
3. To add criteria to a playlist, select the criteria to add. The criteria category selected will determine
what is displayed in the criteria window.
For example, if
22
Artist
is selected, then a list of all Artists is displayed.
3.5
Creating Playlists
If
File Path is selected, an input box appears at the bottom of the criteria window.
Enter the path
and press Add.
If
Most Recent Songs
is selected, then an input box will appear at the bottom of the criteria
window. Enter the number of most recent songs to add and press
Add.
23
3.6
3.6
PhatNoise
The Device View Managing the DMS Cartridge
1. Display the Device view by clicking the "Device" button.
The Device view is organized in two parts:
•
The PhatNoise Music Manager Playlist and Windows Explorer panels on the top
•
The All Supported Devices panels and the contents panel on the bottom
2. Insert the DMS cartridge into the USB cradle. The LED lights on the cradle will icker when the
cartridge has been properly inserted.
24
Adding Music to the DMS Cartridge
3.7
3. Activate the PhatNoise DMS cartridge by clicking PhatNoise DMS in the All Supported Devices
panel. When the DMS cartridge is connected properly, a red GO button appears, click on it to
activate your DMS cartridge.
If a blue Reconnect button appears, click on it to activate your DMS cartridge. If the
DMS cartridge has not been congured properly, a conguration wizard will launch.
For more information, refer to Appendix A: Updating the Firmware.
3.7
Adding Music to the DMS Cartridge
The DMS cartridge stores all music in "Playlists", also called "Discs" or "Virtual Discs". The Home Player
and PhatBox can play these playlists directly, or sort all the music by Album, Artist, or Genre. There are
different ways of placing content on your DMS cartridge, depending on how you like to organize your
music.
CD Based:
If most of your music will come from CDs use PhatNoise CD Manager to encode your music
(see Using the CD Manager on page 9)
and use the Home Player or PhatBox like a large CD player with
browsing capabilities. The Home Player (or PhatBox) automatically organizes your music by Album,
Artist and Genre.
25
3.7
PhatNoise
Alternatively, you can follow these steps using PhatNoise Music Manager to load your music from
CDs to the DMS cartridge:
1. Find the base folder where all your encoded CDs are located using the Media Explorer. In the
example above, it is under 'My Music'.
26
3.7
Adding Music to the DMS Cartridge
2. Drag the Folder onto the bottom left space of the window to create a "virtual" Disc 1. On the
bottom right you can see the music contained in this Disc.
3. No music les are actually transferred at this time. See the section
Ejecting the DMS
on page 36
for instructions on copying your music to the DMS cartridge.
27
3.7
PhatNoise
Playlist Based:
If you like to create custom mixes of music, follow these steps:
1. You can directly drag a playlist you created earlier, listed under
2. Or your can quickly create a static playlist as follows: Select
would like to place on the DMS.
28
All Playlists, onto the DMS.
All Songs, then choose the songs you
Adding Music to the DMS Cartridge
3. Drag the selected songs onto the bottom left space of the window to create a "virtual"
3.7
Disc
(Playlist) of these songs.
29
3.7
PhatNoise
4. Give the Disc a name by clicking on the disc name twice - when you play this Playlist this disc
name will be displayed by your Home Player (or read aloud to you by your PhatBox in the car).
These Virtual Discs (with the same names and numbering) are available via the
your Home Player or PhatBox.
30
Playlist
mode on
Downloading cover art for your music
3.8
3.8
Downloading cover art for your music
The PhatNoise Music Manager features a utility to automatically search and download cover art images
for the songs on your DMS cartridge. These images can be viewed from compatible PhatNoise products,
such as the PhatNoise Home Digital Media Player and the PhatNoise CD Manager desktop software
(album art cannot be viewed on the PhatNoise car audio systems). The album and artist names from
every song will be used for this search, and the resulting downloaded images are stored on your DMS.
Here's how to turn this feature on:
1. In the device view mode, click on the Hardware Options button
31
3.8
2. Click on the
32
PhatNoise
DMS Database / Voice Prompts / Cover Art
tab
Downloading cover art for your music
3.8
3. If you would like to have the music manager download missing cover art every time you eject
the cartridge, check the box titled
Enable Cover Download during Eject.
33
3.8
PhatNoise
4. If you would like the music manager to update your cartridge with cover art now, press the
Cover Art
button.
When the music manger downloads cover art, it may rst ask to regenerate the
database on your DMS cartridge. This is usually a good idea, but may take a few
moments to nish.
34
Fix
Downloading cover art for your music
3.8
5. When generating cover art, the music manager searches an Internet database for the pictures.
Sometimes there can be more than one match for the album name. If this is the case, the music
manager will prompt you to choose which album best describes the songs you have.
Choose one of the album covers and press
Accept Selected Item, or press Cancel to skip this song.
If you would like to cancel the entire operation and not download any more cover art, press
Cancel All Cover Art.
35
3.9
3.9
PhatNoise
Ejecting the DMS (Save/Eject DMS)
When you are nished preparing the contents you want to transfer to your DMS, click
Save/Eject DMS.
This step will copy all new songs, databases, and other system les to the cartridge.
When done
a message will be displayed (and the DMS cartridge drive letters will be removed from Windows)
indicating that you can remove the DMS cartridge from the USB cradle.
•
Wait until the software displays a message indicating it is safe to remove the
DMS cartridge from the USB cradle.
•
Removing the cartridge before this message appears will corrupt the hard drive.
Do not remove the DMS cartridge from the USB cradle while the green light is
on.
•
The Home Player and PhatBox can handle as many as 9999 separate Disc
(Playlist) numbers, with up to 9999 songs per Disc number. The total number of
songs on the DMS Cartridge must not exceed 30,000.
36
Syncing Dynamic Playlists
3.10
3.11
Syncing Dynamic Playlists
The PhatNoise Music Manager has a one-click synchronization feature. This allows you to easily update
the Dynamic Playlists on your DMS cartridge with new music you may have stored on your computer's
hard drive.
1. In the
Device view, a yellow star next to the Disc icon denotes a dynamic playlist.
This playlist is
set to nd songs that match certain criteria. In the example above, the "My Music" Disc reects
all songs that are stored in the folder "My Music":
2. When the
Sync DMS
button is pressed all of the discs with a yellow star will be updated if new
matching content is available.
If a disc has fresh content after syncing, the yellow star will turn blue and the new les will be
highlighted. Be sure to click
Save/Eject DMS to save the changes.
37
3.11
3.11
PhatNoise
Information on ID3 Tags
The PhatNoise Music Manager software allows you to organize, play, and create digital music les.
These music les come in many different formats, but the most popular is the MP3 format. While this
manual usually refers to MP3 les, the same actions apply to any digital music le format.
An MP3 le is a compressed audio le that can be listened to on the computer. An MP3 le is made
of two parts, the audio data and the ID3 tag. The audio data uses high quality music compression
to make storage and movement of music easy. The ID3 tag enables the PhatNoise Music Manager to
organize music les.
The ID3 tag and music data is analogous to a book jacket and the pages inside the book. Whereas
the pages contain the book's story, the book's jacket contains the author's name, the book title, and a
short summary. An ID3 tag contains information about the Artist, Song Title, Album Title, and Genre,
and the rest of the MP3 le is the audio content.
MP3 les possessing an incorrect ID3 tag will be
improperly led, much like a book with the wrong book jacket would be misplaced in a library.
38
Section 4
Updating Firmware
If you have a PhatNoise Car Audio System, this section will explain step-by-step how to update the software
inside of it, or 'rmware', using the PhatNoise Music Manager.
PhatNoise periodically releases updates to the rmware in order to x problems or to provide
feature upgrades. A notice of rmware updates may appear on the PhatNoise website, or you may
be contacted via the email address you registered with PhatNoise when you loaded your PhatNoise
Music Manager Software onto your PC.
In the event of a rmware update, follow these steps:
1. Insert the DMS cartridge into the USB Cradle.
2. Launch the PhatNoise Music Manager by double-clicking the icon on your desktop.
3. Press the Device button.
39
4
PhatNoise
4. Click the text PhatNoise DMS and then press the "GO" button.
5. Press the Hardware Options button.
40
Updating Firmware
4
6. Press the Start Wizard button to begin the update process.
7. The wizard will begin. Press Next to skip the introductory screen.
41
4
PhatNoise
8. Press the Check for Updates from PhatNoise Website button to load the latest set of head unit
rmware available for download. If the Version number of the rmware package is higher than
the version number in your "Current Setup," it is newer rmware.
Left click on the rmware
package you want to download (there may be only one).
9. Press the Next button.
rmware.
42
The window will display information about this particular version of
Updating Firmware
10. Press the Next button one more time.
4
This screen summarizes the options you have chosen.
Press Update PhatNoise DMS when you are done, and the rmware will then be downloaded to
your DMS Cartridge.
Make sure you are choosing the correct options. Reprogramming the PhatBox for an
incorrect head unit may damage your system!
43
4
PhatNoise
11. The wizard will close. Now press the Save/Eject DMS button.
After completing these steps, your DMS cartridge is set to reprogram the PhatBox with the
rmware you just downloaded. Now the PhatBox can be updated using the following steps:
12. While your car radio is off, insert the DMS cartridge into your PhatBox.
13. Turn on the radio and verify that the PhatBox powers on (the green light begins to blink).
14. While the green light is blinking, the PhatBox is reprogramming itself.
This will take about 7
minutes.
Do not pull the cartridge out while the lights are blinking.
15. You may turn off the radio and lock the car - the PhatBox will turn itself off when done.
16. When the PhatBox is done reprogramming, all the PhatBox lights will turn off. Now the PhatBox
is ready for normal operation.
44
Section 5
Using content from Audible
5.1
Introduction
Audible is a huge collection of audio programming delivered digitally over the Internet, anywhere, anytime. At audible.com, you can choose from over 4,500 audiobooks and 14,000 other audio programs.
You can download those programs to your computer and listen immediately, or you can transfer them
to your PhatBox and listen on the go.
5.2
Getting Started with Audible
This guide is a brief introduction to using the PhatNoise Music Manager with Audible content. For a
thorough explanation of the Audible service visit Audible's website at www.audible.com, and view the
PhatNoise Music Manager Help File by pressing F1 while the program is running.
45
5.2
PhatNoise
Creating a new Audible.com account
To get started, please perform the following steps
1. Go to the Library View by clicking the Library Button.
2. Click "All Audible Content".
46
Getting Started with Audible
5.2
3. When you click the "All Audible Content" link for the rst time you will be presented with the
following dialog box:
47
5.2
PhatNoise
The Audible User Name Entry dialog box gives you the following three options:
•
Welcome - Tell Me More! Click the Tell Me More! Button to get more information about
audible.com
•
Existing Users - Click Here! Click the Existing Users Click Here! Button if you already have
an audible.com account.
48
Getting Started with Audible
5.2
Enter your audible.com username and password. Then press the OK button.
A dialog box will appear asking if you would like to synchronize your subscriptions with the
Audible.com servers. We recommend you press the Yes button.
49
5.2
PhatNoise
•
New Users - Click Here! Click the New Users Click Here! Button to create a new audible.com
account and take advantage of our special introductory offer.
You will be taken to the new user signup page at audible.com. Please follow the instructions
on the site.
Once you have registered at the audible.com site, return back to the PhatNoise Music Manager. Go
to the step
Existing Users - Click Here!
above and enter in your new username and password.
You are now ready to download Audible content for use with the PhatNoise Music Manager and
your PhatNoise Car Audio System.
50
Audible Content on the PhatNoise DMS
5.3
5.3
Audible Content on the PhatNoise DMS
Audible les are transferred to the PhatNoise DMS in much the same way as mp3 les are transferred
to the PhatNoise DMS. The only difference is that most Audible les are indexed according to chapter
or section breaks in the content. A new track will be added for each index point. This will allow for
easy navigation in the car.
To transfer Audible les to the PhatNoise DMS, follow these steps:
1. Insert the PhatNoise DMS cartridge into the USB cradle.
2. Click on the Device View button
51
5.3
PhatNoise
3. Click on the "PhatNoise DMS" text under the All Supported Devices panel
4. Click on the red GO button
52
Audible Content on the PhatNoise DMS
5.3
5. On the top portion of the Device view click on the "All Audible Content" text in the Playlist panel
6. Drag an audible le to a DMS disc
53
5.3
PhatNoise
7. You will notice that the Audible le will be added, and each section break will correspond to a
track on the PhatNoise DMS.
Assigning a track to each index point is meant to assist you in nding your place in longer
audiobooks and/or periodicals.
54
Audible Content on the PhatNoise DMS
5.3
Dynamic Audible Subscription Discs
It is possible to create discs that will automatically update with issues of Audible subscriptions.
To
create a dynamic audible subscription disc, follow these steps:
1. Click the Disc Wizard button from the PhatNoise DMS view.
2. Choose "Audible Subscriptions" from the "Create From" drop down list.
55
5.3
PhatNoise
3. Select one or more Audible subscriptions and click one of the Create buttons.
4. You will then be asked if you'd like to include all of the issues of the subscription, or only the most
recent issue. Click yes or no as desired.
56
Audible Content on the PhatNoise DMS
5.3
To update the Audible Subscription Discs
Discs will automatically be updated when you click the Sync DMS button.
Saving Your Changes
When you have nished organizing your Audible content, click the SAVE/EJECT DMS button.
Playing Audible content in your car
A playlist with Audible content on it will auto-resume. The Auto-resume feature allows the PhatBox to
remember where playback stopped in a playlist.
For example, suppose you are listening to an Audible playlist and you switch to a different playlist.
At any point you return to the Audible playlist, the PhatBox will remember where you left off and will
resume at that point.
57
5.3
58
PhatNoise
Section 6
Support
Common Questions
•
I am getting a "Codebase" error
The PhatNoise Music Manager database les have been corrupted.
To x the database, close the PhatNoise Music Manager software and run the Database
Doctor from the PhatNoise Music Manager folder on the Start Menu.
If this does not x the problem, delete the folder "Data" in the PhatNoise Music Manager
installation directory. This is usually
C:\Program Files\PhatNoise Music Manager
Please note that this will erase the entire user's database and playlist les. All the songs will
need to be reloaded and the playlists will need to be redened.
•
When transferring les to the DMS cartridge a message appears "Long Filenames not supported"
The DMS has been mounted incorrectly, or improperly formatted. Cancel the current copy
operation, eject the cartridge, close the PhatNoise Music Manager, restart the PhatNoise
Music Manager, and try the operation again.
•
When a DMS cartridge is inserted into the USB cradle, neither the green nor the red light turn on
The external AC/DC power adapter is not connected. Make sure the connection is rmly
connected, or
59
6
PhatNoise
The DMS cartridge is not inserted all the way. Apply gentle pressure with your hand to the
top of the DMS cartridge to see if this makes the lights come on. If the lights go off right
away after you remove your hand, the lever switch inside the USB cradle may be out of
alignment. In this case, contact the customer service.
•
USB cradle is not recognized properly
Make sure the computer is running Windows 98, Windows ME, Windows 2000, or Windows
XP. WinNT 4.0 and Windows 95 do not have proper USB support.
If you have only USB 1.0 on your computer, try installing a USB 2.0 card instead. Not only
does this resolve many USB problems by installing a modern chipset, it will run much faster
as well!
•
Voice prompts are missing in the car
1. Insert the DMS cartridge
2. Open the Device view and select the DMS
3. Press the Hardware Options button
4. Open the DMS Database/Voice Prompts tab and click Fix Voice Prompts
•
My player says I have a "corrupt track". How do I repair a corrupt track?
1. Insert the DMS cartridge into the cradle.
2. Launch the PhatNoise Music Manager by double-clicking the icon on the desktop.
3. Press the Device button.
60
Support
6
4. Choose "PhatNoise DMS" and then press the "GO" button.
5. Click "Hardware Options".
61
6
PhatNoise
6. Click the "DMS Database/Voice Prompts" tab.
7. Choose "Fix Database", then choose "Fix Voice Prompts" and click "Ok" when done.
8. In order to nd the corrupt track, you will need to select each disc on your DMS cartridge
one by one to see if an error window appears. Start by selecting the rst disc on your DMS
cartridge.
62
Support
6
9. Watch for an error window indicating any broken links in the playlist. If no error window
appears, this disc is ok, and you can skip to step 11 below.
10. Select "Remove Broken Songs".
11. Select the next disc, and repeat steps 9 through 11 for each disc on your DMS.
12. Click "Save/Eject", and the Music Manager will save your settings.
13. Click "Ok" and remove the DMS cartridge from the cradle.
For more help...
For contact information and help go to:
http://www.phatnoise.com/customer_service/index.php
63
6
PhatNoise
PLEASE READ AND UNDERSTAND ALL INSTRUCTIONS
Digital Media Storage Cartridge Precautions
•
Do not remove the DMS Cartridge from the USB Cradle until downloading is complete.
•
Do not leave the DMS Cartridge in locations with high temperatures and high humidity, such as on a car
dashboard or in the rear window where it will be subject to direct sunlight.
Do not subject the DMS
Cartridge to extreme cold temperatures.
•
Do not drop the DMS Cartridge or subject it to a violent shock.
•
Do not spill liquid on the DMS Cartridge or submerge the DMS Cartridge in liquid.
•
The only effective protection for data and other material stored on the DMS Cartridge is the regular backing
up of that data by you, the consumer. PhatNoise Inc. shall not be responsible for the loss of any such data
or other material.
PhatNoise USB Cradle Precautions
•
Never spill liquid of any kind on the cradle.
•
Do not place the cradle on an unstable cart, stand or table. The product may fall, causing serious damage
to the product.
•
Do not use any object to probe the opening of the product and do not put any body parts or other foreign
objects in the opening of the product- this may result in bodily injury and can also damage the product.
•
Avoid severe impact. Do not drop the cradle on a solid surface or drop a heavy object on the cradle.
•
Take care when plugging and unplugging cables.
•
Do not hold the USB cradle by the cables alone.
•
Do not remove the DMS Cartridge from the USB cradle when the green activity light is on.
Do not attempt to service any part of the product yourself. Servicing should only be done by qualied
service personnel.
64
6
Support
Safety and Handling Precautions
•
Do not place this system where it will be subjected to direct sunlight and high temperatures.
•
Do not place this system where it will be subjected to hot air from the heater or any other high-temperature
location.
•
Do not place this system in an area of high humidity or where large amounts of airborne dust/dirt are
present.
Copyright and Patent Notices
Copyright 2004, PhatNoise, Inc.
- All Rights Reserved.
All trademarks, service marks and tradenames, includ-
ing without limitation, PHATNOISE, PHATNOISE CAR AUDIO SYSTEM, PHATNOISE MUSIC MANAGER, PHATBOX,
SSA/VOICE, DPGT, PHATNOISE HOME DIGITAL MEDIA PLAYER, and DMS are proprietary to PhatNoise, Inc.
°
Gracenote is CDDB, Inc. d/b/a "Gracenote." CD and music-related data from Gracenote CDDB c Music Recog-
°
°
nition ServiceSM c 2000, 2001, 2002 Gracenote. Gracenote CDDB Client Software c 2000, 2001, 2002 Gracenote.
U.S. Patents Numbers #5,987,525; #6,061, 680; #6,154,773, and other patents issued or pending.
CDDB is a registered trademark of Gracenote. The logo and logotype, the Gracenote CDDB logo and logotype,
and the "Powered by Gracenote CDDB" logo are registered trademarks of Gracenote. Music Recognition Service
and MRS are service marks of Gracenote.
65