1
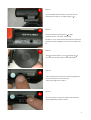
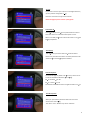
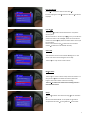
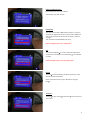
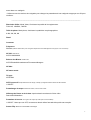
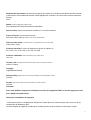
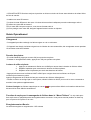
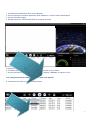
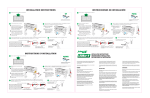
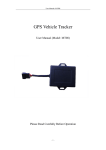
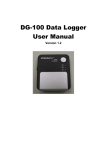
FOR YOUR
SW010
1
GPS
Recording
Speed
Ba ery
indicator
indicator
Loop
Indicator
Mo on
Detec on
Microphone
Digital Camera
Automa c balance
Time & Date
This picture shows the camera is Recording
This picture shows the camera with the recording Paused
2
1
Picture 1
This is the GPS windscreen module, the power must be
inserted into this usb port to enable the gps op on.
2
Picture 2
This is the top of the camera (from le to right)
computer usb port - AV output - Microphone
AV Output - This is used to connect the camera to a television
that does not have the HDMI port, This lead is included in the
kit.
3
Picture 3
The le side of the camera, you can nd a power bu on,
this is used to manually turn the camera ON and OFF
4
Picture 4
This is the external SD card slot, if you wish to upgrade your
memory this expansion slot can be used.
Takes up to a 32gb micro sd class 6
5
Picture 5
This port is used to connect your camera to the television
using the HDMI lead included in the kit.
3
RECORDING
This screen shows your device switched on and recording
The red ball in the top le will pulse to show it is recording.
PAUSED RECORDING
This screen shows your device switched on and the recording
has been PAUSED.
You can PAUSE this device by pressing the OK
When the camera has been PAUSED this will now allow you
to enter the menu.
PRESS and HOLD the UP arrow key, the menu will appear
When in the menu, use the UP and DOWN arrow keys to
highlight the op ons and PRESS OK to enter that op on.
Video Resolu on
Press OK to enter video resolu on , and using the UP and
DOWN arrow keys make your selec on and press OK to
to con rm.
1920x1080 is the highest HD recording quality
VGA is the lowest recording quality
We recommend - 1920 x 1080
Photo Size
This op on allows you to alter the digital camera picture size
From 0.9 Megapixel to 4 Megapixel
We recommend - 4 megapixel
4
Sharpness
This op on Lets you alter the sharpness of the video and
digital Pictures,
We recommend this is set to AUTO
Contrast
This op on lets you change the contrast of the video and
digital pictures.
We recommend this is set to AUTO
Flicker Rate
This op on lets you change the icker rate of the device.
European countries use 60Hz .
If you are unsure please set this op on to AUTO
5
Tv Type
If you want to connect your camera to a analogue television,
you may need to change this se ng.
PAL is the most common type used in the UK
Please see page 3 picture 2 of the “ quick guide”
Auto Power O
This op on lets you set a mer to power down the camera
when the camera is removed from the power source.
When in the OFF posi on the camera will remain on un l the
ba ery is depleted.
Time Set Up
This op on lets you set the date and me of the device.
Please note, that when the GPS is connected, the device will
obtain the me automa cally from satellites.
Time Set Up Cont..
The 1st set of digits in yellow is the me zone, this has to be
correct for the GPS to obtain the me se ngs.
Bri sh standard me +00
Bri sh summer me +01
Use the UP and DOWN arrows to navigate and OK to con rm
Time Set Up Cont…
When you press OK the yellow box will move across the
screen to the next se ng.
Time Zone— Year— Month– Day— Hour— Minutes
6
Date Time Display
This op ons stamps the data into the video le.
So when playing the video le back the date and me will be
displayed
Loop Se ng
The Loop se ng feature allows the device to recycle the
memory card.
We recommend a 5 minute loop se ng, every 5 minutes the
camera will make a new video le, when the card is full the
camera will automa cally delete the oldest video and recycle
the recordings.
Please note in the OFF posi on when the card is full the
camera les will have to be deleted manually
Sensor Flip
This allows the camera to be installed 180 degrees so the
screen and camera are showing the correct way.
This func on is only used in certain installs
Mo on Detect
This func on is used in a CCTV install, where the camera is in
sleep mode un l the lens detects movement, when this
happens the camera wakes and starts recording.
This func on is NOT used if the camera is being used as a
drive accident camera
Stamp
This func on allows more data to be inpu ed into the video
le.
We recommend GPS DATA so the speed and gps data is
stamped into the video le along with the me and date
7
Driver Number
This func on allows a name-vehicle reg to iden fy the
Use the UP and DOWN arrows to choose a Le er or Number
and press OK to con rm, this will then move to the next icon
on the screen.
Power O Screen
When the device is switch on the screen can be set to automa cally switch o and go into screensaver mode.
We recommend 1 minute , a er 1 min the device will switch
o the screen so it does not distract you whilst driving.
If switched to the OFF se ng, the screen will remain on.
Video Record Mode
This func on lets you choose if the camera records
Video and audio or just video
G Sensor Precision
G Sensor is a shock sensor, which ac vates at front/side or
rear accident, it then locks the video le for safe keeping.
This can be set from 2g up to 5g
We recommend this being set at 2g , this can be altered later
if required.
G Sensor Calibra on
This func on needs to be run once installed in your vehicle,
This will calibrate the device, choose YES and keep the camera
and vehicle s ll, while the camera calibrates.
8
G Sensor Calibra on Cont..
Please wait for this screen to calibrate
This will take only a few seconds
Choose Card
This camera comes with a 8GB onboard memory , but if you
would like to upgrade the card you can purchase a 32GB card
class 6 and install into the SD card slot as shown in picture 4
on page 2.
Then choose the OUTTER CARD in the menu.
Please see page 3 picture 4 in “ quick guide”
GPS
To enable the GPS func on on the camera the camera GPS
needs to be set to OPEN, if in the CLOSE posi on the GPS will
not work.
Please see page 3 picture 1 in the “ quick guide”
Format
This func on formats (deletes) all videos and photos on the
internal and external memory
Please remember to back up your data before using this
func on
Firmware
This func on gives informa on about the rmware version on
the camera
9
REVIEWING VIDEO AND PHOTOS
To view videos and photos stored on the device
In PAUSE mode PRESS and HOLD the DOWN arrow bu on
Use the UP and DOWN arrow keys to choose the video
File you wish to play.
PRESS the OK bu on to con rm
To view the photos stored on the device
PRESS and HOLD the DOWN arrow key
To go back to the main screen,
PRESS and HOLD the DOWN arrow key
Then PRESS OK to resume recording
10
HOW TO CONNECT YOUR CAMERA
TO YOUR COMPUTER
AND SOFTWARE
11
Installing the so ware
1.
Plug the usb lead into the camera using the port on page 3 picture 2
2.
Plug the usb lead into your computer and wait for the computer to con gure
3.
“Auto Play” should appear (if not please go to “my computer” to locate the device)
Please Note the drive Le er
4. Click Open folder to view
5. Double Click on the folder called “Player”
6. Now you will see the so ware called “SILENT_WITNESS.exe”
7. Double click on the “SILENT_WITNESS.exe” so ware
All so ware and manuals are available at www.silentwitness.co.uk
12
This will now load the so ware
1
Browse folder will appear on the screen
i
Using the le menu locate the drive Le er and double click
i
Double Click “Removable Disk E”
i
Double Click DCIM folder
i
Double click 100MEDIA Folder
This will now display all the video les within the folder
13
Highlight all the video les and then click OPEN
This will open them into the so ware
14
Please Note internet connec on is needed
For Google mapping
Your Video plays here
Google Maps Shows here
Your video les
Your Speed
G Sensor
Highlight and play
Or double click
Snapshot
File Menu
Skip Back
Rewind
Skip Forward
Play
Delete
Volume
Fast forward
15
User’s Manual
SW010
Please Read This Manual Carefully Before Using
Please keep for future reference
Preface
About the Manual
Thank you for choosing our product!
In order to easily use your product, we attach a detailed user’s manual with the product . Please read it carefully before
operation to get the best from your digital video recorder.
If there is a difference between the manual and recorder, please take the recorder as standard. We reserve the right to
change content or technical rules without prior notice. In addition, the manufacturer reserves the right to change
technical specifications without prior notice.
We are not responsible for any data loss and personal damage caused by misuse of software or hardware,
maintenance, battery replacement or other unforeseen circumstances, we are also not responsible for any indirect loss
caused by this .Besides, we can’t control the misunderstanding of users for this manual, so ,we won’t be responsible for
the accidental loss in the use of manual and the third-party claims
arising from the use of the product .
If the actual accessories in packaging doesn’t match the attachment items , please take the actual accessories as
standard. NOTICE: - Please note that this device is 12-24v with a 5v output, please do not remove any adaptors and
install direct to a 12-24 battery.
About your DVR
This device is designed to capture video whilst you are driving and in the event of an accident to
help protect you and your passengers. With the video footage collected you can prove what really
happened and you do not have to rely on witness statements.
G-Sensor
Your device has a G-Sensor, this is designed to tell the device that a event has just happened,
when the G-Sensor has been activated it will automatically duplicate the current video file and place
it into a un-delectable folder for protection.
In the unfortunate event of an accident, if you believe accident has not activated the G-Sensor
(depends on G-Sensor setting) you can manually lock the file by pressing the down arrow key, just
for your peace of mind.
The G-sensor can be set from 2g up to 5g this setting depends on the vehicle and roads
you drive on.
As default the device is set to 2g but for larger vehicle such as HGV’s and off – road vehicles this
setting may need to be increased.
2
Product Features
«
130 degree ultra wide angle lens .
«
1920x1080P FULL HD high quality resolution.
«
4 mega pixels.
«
4X digital zoom, still image 8X zoom.
«
1.5 inch high resolution LCD, can watch while recording.
«
Advanced H.264 video compression technology.
«
GPS, record the latitude and longitude data automatically.
«
Google map, to review your car tracking, speed and G-sensor info.
«
G-sensor, once device detects collision, the current file would be protected.
«
Seamless continuous recording will not miss any data.
«
Automatically recording (stop recording) after car power on (off).
«
Support AV out/ HDMI
«
Upgraded software to improve recording under dark environments.
«
30/60 frames per second for smooth video flow.
«
Automatic circulating video recording, being able to set the record time for each file.
«
1.5 inch screen to help you to watch video while make video recording in driving.
«
Improve time & date display, no need to reset when re-starting.
«
Screenshots function, can capture the video screen while video recording and reviewing.
«
Easy operation.
«
Built in 8 GB card, upgradable up to 32GB class 6
1. GPS unit : With 3M adhesive a semi-permanent fixture to the vehicles front window.
2. USB port 1: Connect to the charger and computer by USB
3. AV port
4. Menu Button: Press and hold for Menu; short press for UP /Last file; while recording, press for mute.
5. OK Key: Short press for start recording, long time press to take a picture; in menu, press to confirm.
6. Playback Button: Long press for Playback; short press for down /next file. While recording short press
manual locks the video file.
7. Light indicator:
8. Lens
9. USB Port 2 (Support power by charger)
10. Power Button: Short press for power on; long press 2 seconds for power off; press for 8 seconds for
reset.
11. HDMI port
12. SD card expansion slot
3
Display
ICON About the indication of each icon and symbol, see the table below.
Video Mode
V:-------MPH
Start recording
Camera Mode
Take a picture
Supply light(off)
Battery
SD Card
Motion Detection
White Balance (Auto)
Car speed monitor after
GPS is linked to a satellite.
USB connecting
FULL HD /1080P/720P
Resolution
Protected file
2008/01/01
01
loop recording time (1 min)
Date and Time Display
07AM
GPS connected
Light indicator
Red ----charging
Blue -----stand by
Red/Blue--- Recording while charging
Blue flashing-----recording
4
MENU
This DVR is already pre-set, although you can choose your own personal settings
How to configure your device
• Power on the device. if the
is flashing press the OK button to pause recording,
the ball will now change colour, to grey.
• Press and Hold the UP arrow, this will enter the menu list.
• To navigate through the menu use the UP and DOWN arrow keys, and to enter the category press OK.
• To alter setting inside the category’s use the UP and Down arrow keys and OK to confirm.
______________________________________________________________________________
• Video resolution: Video Mode, Choose the video quality setting to record ((recommend FULL HD)
1920x1080p – 1440 x 1080p – 720p60 – 1280 x 720p – wvgap60 – wvgap30 - vga
• Photo size: Photo mode, Choose the quality of still photos ( M = Megapixel)
0.9M, 2M, 3M, 4M
• Sharpness: Alters the sharpness of the camera
• Contrast: alters the contrast of the cameras
• Flicker:
alters the flicker rate PAL=50hz NTSC=60hz
• White Balance: Photo mode
AUTO/Sunny/Incandescent/fluorescent/cloudy
• TV type:
NTSC/PAL
• AUTO power off: The amount of time the camera will stay on after the power has been disconnected (charge depending)
1 min / 3 min / 5 min /OFF
• Time Setup: Set the Time, Time Zone and Date
UK time zone +01 British summer time Standard +00
• Date time display: Imprints the data into the video file (recommend Date and Time)
Date time/off/date&time
• Loop setting: The length of each video clip (recommend 5 min)
1 min / 3 min / 5 min / OFF Please note if you choose the OFF setting, once the recorder has filled the card, the card will need to be
cleared before it continues to record. Please see page 7 loop recording
• Sensor Flip: Lets you turn the camera 180°for different installations
• Motion detect: The camera will only record when it detects movement in front of the lens
(This function is normally use when the
camera is powered from a 24hr power source.)
off/on
• Time Stamp: Will imprint this date into the video file (recommend GPS Data for standard use)
Driver Number/OFF/Date/Time/Date time/Gps Data
• Driver number: Add a 9 digit number or name to the camera
• Power off screen : Screen saver (recommend 1 min)
Off /1 Min /3 Min /5 Min (in the OFF position the screen will remain on)
5
• Video record mode: Choose to record video with audio or just video
Video and audio / video only
• G-sensor precision: The G force needed to activate the G Shock Sensor (see page 2 for details)
2G / 2.5G / 3G / 3.5G / 4G / 4.5G / 5G / CLOSE
• G-sensor calibration: Calibrates the camera for the G Shock Sensor
Yes / No
• Choose card: Choose the internal memory card or External SD slot
Inner / Outer
• GPS
• Language :
English/Russian/Chinese
• Default setting: This function will restore all the settings to the factory defaults.
Yes/No
• Format: This function will delete all data on the SD cards
Yes/no
• Firmware: Information about the firmware installed
To exit the menu, Press and hold the UP arrow key, and Press OK to resume recording.
Notes for Installing the device
• Always find a suitable place on the windscreen which will not obstruct your vision or cause an MOT failure.
The compact size of this camera is ideal to be installed close and tight behind the rear view mirror.
• PLEASE NOTE: Always offer the camera into position and check via the screen before removing the 3M tape
and securing it to the glass
• Installing a External SD card
Insert the SD card in the correct direction , the wrong direction may damage the card .
Please use a Class 6 SD card. (this is identified by the number inside the printed circle)
If the SD card format is not recognized by the dvr, you will need to format the card
(4) To protect your SD card, please turn the camera off before inserting or removing the SD card.
6
Operations Guide
Charging
• This dvr can be charged by the cars power and also can be charged by connecting it to a computer .
• When connected to the cars power source, the dvr will turn on automatically , when turning off the vehicle the dvr
will also turn off after a small delay.
Taking Pictures
• In standby mode, press and hold the OK key to take a photo.
• During video recording, press the OK key to take a photo.
Playback the video and reviewing the pictures.
• Power on the device. if the
is flashing press the OK button to pause recording,
the ball will now change colour to grey.
1. Press and hold the Down arrow key to enter the Video files.
2. Press and hold the Down arrow key again to enter the Photo files.
3. Press and hold the Down arrow key again to Exit the Files.
• Use a short press on the Up and Down arrow keys to navigate through the files and OK to confirm/Play/Pause.
Long press on the Down arrow to go back to video/photo files.
• When a file is highlighted with a Yellow square use the Up arrow to take you into the “ File menu” for further
options.
Protected Files: These files marked with a
unlocked.
can not be over written and have to be manually deleted or
Format:
To format the card, enter the menu , navigate to “FORMAT” press OK , Choose YES and Press OK
Copy function for backup video in the “ File Menu” Video clip can be copied between external and
internal storage, then you can make a back up to pass to the Police or Courts when producing evidence.
Loop Recording:
The camera will record a segments of 1-3-5 minute video, this is called a Loop recording.
This dvr has a built in 8GB for the video.
Example
If the camera is set to a 5 minute loop recording a 8GB card will hold up to 28 five minute videos files,
7
And when it reaches the end of the sd card (it’s 28th video file) I will automatically delete video file number 1 and
then number 2, and cycles through the sd card, deleting and writing video files.
If the camera Loop setting is set to the OFF position then the camera will record 1 continuous video file until the
card is full. The camera will then display “CARD FULL” and will stop recording, this file will then have to be taken
off the card to the computer or the card formatted to enable it to record again. Please see page 6 Format
Stamp: Time /Date/ Date time/GPS data /driver number/off
1. After you choose a stamp, when you start recording, the stamp will be written into your video file automatically.
When you playback the video, you can see the stamp (video footage 1).
Video Footage 1
GPS
1).Power on your DVR, the satellite search start automatically. When GPS signal is located, this icon
will be
showed on the display. When GPS signal is located, the DVR will auto record your GPS entry the SD card.
If the satellite is not found the icon will have a red “no action” symbol around it.
8
SOFTWARE
1. Connect the camera / SD card to the computer.
2. Open the disk from “my computer” or “auto play”
3. Open the “player” folder
4. Double click “GPSPLAYER.exe” and the software will now open
5.Click the
symbol
6. Locate your Camera / SD card and double click to open the file
7. Open DCIM folder and then single click on the 100Media folder and click OK
This will now load all the data and video into the software ready for you to view
8. Choose a
video file by
double clicking
the file
9
Specification
Image Sensor
1/2.7 CMOS 2.0 Mega-pixel sensor
Display
1.5 TFT 650× 240 pixels
Chip
Ambarella
GPS Module
GPS Logger
Memory
SD card up to 32 G
Lens
4X fixed focus
ISO
Auto
Still images
Format JPEG EXIF2.2 DCF
Image resolution 0.9M 2M 3M Software
Videos
Format H.264 (MOV)
Resolution 1920× 1080 30fps >>>
Zoom
Video 4X Digital Zooming(1440*1080P)
Playback still image Digital Zoom 8X (Maximum)
Audio
Built-in microphone/ speaker(AAC)
Exposure
compensation
-2.0EV~+2.0EV
Loop Recording
OFF, 1 mins,3 mins,5mins
Auto Power Off
4M Software
OFF, 1 min, 3 mins, 5mins
Auto Screen off
OFF, 1 min, 3 mins, 5mins
PC Interface
USB2.0 High-speed
Output
HDMI , Audio-Video output
AV Output Format
NTSC/PAL
Battery
Built-in polymer battery 3.7V, 350mAh.
RESOLUTION
1440 x 1080
720P60
1280 X 720
WVAP60
WVAP30
VGA
8 GB CARD Min
90
90
126
126
210
270
32 GB CARD Min
360
360
504
504
840
1080
10
Troubleshooting
If you run into problems , please refer to the following solutions.
• Can’t record a video or takes pictures
Please check and make sure the card has enough storage space. Please see page 7 for formatting your SD
card
• Stopped automatically while recording
Because the data is high-definition video, please use a high-speed SD card - High-speed card will be signed
with “C6”.
• If prompted “ File Error” while playback the video or image
This is because the SD card has the wrong data format, resulting in the file error, use "Format" in Menu, to
format the SD card..please see page 7
• Image is blurred
Please check the lens, for fingerprints or dirt.
• Image has horizontal stripes interference on TV play back
This is due to the wrong setting of “Flicker” .Please check the local power supply frequency, reset the Flicker:
50 Hz/60 Hz. If your tv is Pal please set the device to 50hz Ntsc systems require 60hz.
• It does not start automatically recording when powering on the vehicle
Please make sure the loop recording is set 1/3/5 mins, and not OFF, it won’t auto start recording when loop
recording is OFF, please also check you have not paused recording, Press OK button to see the red ball in the top
right of the screen, please also check the “motion detection” is also off.
• The machine keeps automatically recording
Please check the motion Detection, check for this icon
on the screen. When the Motion Detect is ON, it will
auto start recording when a moving object appears within the range of the camera; please see page 7 Motion
Detect
• Auto power off setting does not work
Please ensure that motion detection is turned off, if the motion detection is turned on, the machine will always
be in standby mode, the machine will not automatically shut down until the power goes (when connected to a
permanent power source.)
• The camera is unresponsive
Press and hold the power button for 10 seconds or more, release the button and the camera will restart.
• If prompted “ Card Full”
Please check your SD card, if the card is full please transfer the date to a device or format the sd card.
Also check the “loop setting” in the file menu if this is switched to OFF the card will have to be manually
deleted each time, if a time option is chosen the camera will re-write over the video files.
11
Manuel d'Utilisateur
SW010
Lisez Attentivement Ce Manuel Avant Utilisation
Conservez pour de futures références
Préface
À propos de ce manuel
Merci d'avoir choisi notre produit!
Afin d'en rendre l'utilisation facile, nous y avons attaché un manuel d'utilisateur détaillé. Lisez-le attentivement avant
d'opérer l'appareil afin d'en retirer la meilleure expérience.
S'il y a une quelconque différence entre le manuel et l'appareil, prenez l'appareil comme standard. Nous nous
réservons le droit de changer le contenu ou les règles techniques sans préavis. De plus, le constructeur se réserve le
droit de changer des spécifications techniques sans préavis.
Nous ne sommes responsables d'aucune perte de données ou de dommage personnel produite par une mauvaise
manipulation du logiciel, de l'appareil, de maintenance, de remplacement de batterie ou d'autres circonstances
imprévues. Nous ne sommes également pas responsables des pertes indirectes en découlant. De plus, nous ne
pouvons contrôler la mauvaise interprétation de ce manuel par les utilisateurs, donc, nous ne serons pas responsables
pour les dommages accidentels par l'utilisation du présent manuel, et les réclamations des tierces-parties.
Si les accessoires présents dans votre commande ne correspondent pas ceux décrits ici, prenez les premiers en
considération.
Accessoires :
Nom
Enregistreur
Adaptateur de voiture (5V)
Câble USB
Autocollant 3M
Unité GPS Fixe
Manuel d'utilisateur
Quantité (pièces)
1
1
1
1
1
1
Contenu du Produit
2
u
Lentille ultra-large à 130 degrés d'ouverture.
u
1920x1080P FULL HD, résolution haute qualité
u
4 mega pixels.
u
4X zoom digital, image fixe 8X zoom.
u
Écran LCD haute résolution de 1.5”
u
Technologie avancée de compression vidéo (H.264)
u
GPS avec enregistrement automatique des données de latitude et longitude.
u
Google map, pour vos informations enregistrées de déplacement, vitesse et capteur-G
u
Capteur-G pour la protection de vos fichiers lors d'une collision.
u
Enregistrement continu
u
Démarrage et arrêt automatique de l'enregistrement avec le contact de l'automobile.
u
Sortie AV HDMI
u
Logiciel amélioré pour la captation à faible luminosité
u
30/60 images par seconde pour un enregistrement fluide
u
Enregistrement cyclique automatique, avec une durée spécifique pour la boucle
u
Affichage d'heure et de date amélioré.
u
Fonction de “Capture d'écran” pour prendre une photo pendant un enregistrement vidéo.
u
Carte mémoire TF jusqu'à 32GB Class 6 – Ce DVR possède une mémoire interne de 8GB
1. Unité GPS : Avec un adhésif 3M et une fixation semi-permanente conçue pour votre pare-brise.
2. USB port 1: Pour connecter le chargeur de batterie ou votre ordinateur.
3. Port auxiliaire (AV)
4. Menu: Appuyer longuement pour ouvrir le Menu; appuyer rapidement pour la navigation HAUT /dernier
fichier; pendant un enregistrement, appuyer pour désactiver l'audio
5. Touche OK: Court appui pour démarrage de l'enregistrement, long appui pour prendre un photo; dans
le Menu, appuyer pour confirmer.
6. Touche Lecture: Long appui pour la Lecture; court appui pour BAS/Fichier Suivant
7. Indicateur lumineux
8. Lentille
9. Port USB 2 (également pour recharger la batterie)
10. Bouton Power: Court appui pour allumer, long appui de 2 secondes pour éteindre, long appui de 8
Display
secondes pour une remise à zéro.
11. Port HDMI
12. Embase TF
ICÔNES Voir tableau ci-dessous pour la signification des icônes et symboles.
3
Mode Video
Démarrer
l'enregistrement
Prendre une photo
Mode Photo
Flash (off)
Batterie
Carte TF
V:-------MPH
Détecteur de
mouvement
Balance des blancs
(Automatique)
Vitesse de la voiture
détectée par GPS
Connexion USB
FULL HD /1080P/720P
Résolution
Temps de la boucle
d'enregistrement (1min)
Fichier protégé
2008/01/01
01:07AM
Affichage de Date et
Heure
GPS connecté
Indicateur lumineux
Rouge ----en charge
Bleu -----stand by
Rouge/Bleu--- Enregistrement pendant la recharge
Bleu clignotant-----Enregistrement
MENU
Comment configurer votre appareil
• Allumer l'appareil. Si le
clignote, appuyer sur OK pour arrêter l'enregistrement.
Le symbole passera de rouge à gris.
• Appuyer et maintenez la touche HAUT, vous entrerez dans le Menu.
• Pour naviguer à travers le menu, utilisez les flèches directionnelles HAUT et BAS, et appuyer sur OK pour
4
entrer dans une catégorie.
• Utilisez encore les touches de navigation pour changer les paramètres d'une catégorie et appuyez sur OK pour
confirmer.
______________________________________________________________________________
Résolution Vidéo: Mode Video, Choisissez la qualité de l'enregistrement.
FULL HD, 1080P30, 720P30
Taille de photo: Mode photo, choisissez la qualité de vos photographies.
0.9M, 2M, 3M, 4M
Détail
Contraste
Fréquence:
50/60Hz (Utilisez cette fonction pour changer la fréquence de votre affichage selon les pays où vous vous situez).
AE ISO: Mode Photo
AUTO/100/200/400
Balance des Blancs: Mode Photo
AUTO/Ensoleillé/Incandescent/Fluorescent/Nuageux
AE bias:
AE meter mode:
TV type:
NTSC/PAL
AUTO power off: Dépendamment de la charge, le temps que l'appareil restera inactif avant de s'éteindre.
1/3/5/OFF
Paramétrage de temps: Paramétrez l'heure, votre zone et la date
Affichage de l'heure et de la date: Imprime date heure dans le fichier vidéo
Date time/off/date/time
Paramètre de boucle: La longueur de chaque clip vidéo (5min recommandées)
1/3/5/OFF Notez que sur OFF, la carte aura besoin d'être formatée dès qu'elle sera remplie.
Sensor Flip: Retourne votre lentille à 180 degré
5
Détecteur de mouvement: La caméra n'enregistre que quand un mouvement est détecté devant la lentille
(cette fonction est normalement activée quand l'appareil est connecté à une source de courant continuelle
24h/24).
off/on
Stamp: Imprime la date dans le fichier vidéo.
Driver Number/OFF/Date/Time/Date time/Gps Data
Driver number: Ajoute un nombre à 9 chiffres ou un nom à la caméra.
Power off screen : Économiseur d'écran
Off/1 Min /3 Min /5 Min (En position OFF, l'écran restera allumé)
Video recorder mode: Choisissez entre un
Video audio / video
enregistrement avec ou sans audio.
G-sensor precision: La force G requise pour activer le Capteur G
2G / 2.5G / 3G / 3.5G / 4G / 4.5G / 5G / CLOSE
G-sensor calibration: Calibre la caméra pour le capteur de G
Yes / No
Choose card: Choisissez entre la carte mémoire interne ou l'embase TF externe.
Interne / Externe
Langage :
Anglais/Russe/Chinois
Default setting: Cette fonction remet tous les paramètres à zéro (paramètres d'usine)
Oui/Non
Format: Cette fonction efface toutes les données sur la carte mémoire.
Oui/Non
Firmware:
Pour sortir du Menu, Appuyez et maintenez la touche de navigation HAUT, et ensuite appuyez sur OK
pour rétablir l'enregistrement.
Notes pour l'installation de l'appareil
• Choisissez toujours un emplacement adéquat sur le pare-brise qui n'obstruera pas votre vision ou qui ne
causera pas de défaillance MOT.
La taille compact de l'appareil est idéal pour l'installer proche et serrée derrière le rétroviseur central.
6
• VEUILLEZ NOTEZ: Sécurisez toujours la position et révisez sa visée via l'écran avant d'enlever le collant 3M et
de fixer la caméra.
• Installer une carte SD externe.
Insérez la carte SD dans le bon sens. L'insérez d'une manière inadéquate pourrait endommager celle-ci.
⑵ Utilisez une carte SD de classe 6
⑶ Si la carte SD n'est pas reconnue, vous devrez formater celle-ci
(4) Pour protéger votre carte SD, éteignez l'appareil avant insertion ou éjection.
⑴
Guide Opérationnel
Chargement
• Cet appareil peut-être rechargé via l'allume-cigare ou via un ordinateur.
• Si l'appareil est chargé via l'allume-cigare lors de l'éteinte de votre automobile, elle enregistrera encore pendant
10 secondes avant de s'éteindre.
Prendre des photos.
• En mode Stand-By, appuyez et tenez OK pour prendre une photo
• Pendant un enregistrement vidéo, appuyez sur OK pour prendre une photo.
Lecture de vidéo et photo
1. Appuyez et maintenez la flèche vers le BAS pour entrer dans le dossier de fichiers vidéos.
2. Répétez l'opération pour entrer dans le dossier de fichiers photos.
3. Répétez encore l'opération pour sortir des dossiers de fichiers.
• Appuyez brièvement sur les flèches HAUT et BAS pour naviguer à travers les fichiers et OK pour
confirmer/jouer/mettre en pause.
Appuyez longuement sir la flèche du bas pour retourner aux fichiers vidéos/photos
• Quand un fichier est surligné par un carré jaune, utilisiez la flèche du HAUT pour ouvrir le menu contextuel et
accéder à des options supplémentaires.
Fichiers Protégés: les fichiers marqués par un verrou (
déverrouillé ou bien effacé manuellement.
) ne peuvent être effacés ou écrasés et doivent être
Fonction de copie pour la sauvegarde de fichiers dans le “Menu Fichiers” Un clip vidéo peut
être copié entre un périphérique de sauvegarde interne et externe. Vous pouvez ensuite produire un back-up
pour vos preuve à la police ou en cour.
Enregistrement en Boucle:
La caméra enregistre en segments de 1/3/5 minutes
7
Ci-dessous se trouve une description du procédé d'enregistrement en boucle sur un segment de 5 minutes.
5
A
H
H
H
10
B
B
I
I
15
C
C
C
J
20
D
D
D
D
25
E
E
E
E
30
F
F
F
F
35
G
G
G
G
40
H
H
H
H
>>>>>>
I
I
I
I
Fin de la carte
Z
Z
Z
Z
La vidéo commence à remplir la carte avec des fichiers de 5 minutes. En atteignant la fin de capacité de la
carte(Z), elle commencera par écraser le fichiers le plus ancien (A) pour continuer son enregistrement. Ce
procédé recommence à chaque fin de carte.
Si le paramétrage d'enregistrement en boucle de la caméra est sur OFF, la caméra enregistrera UN fichier
continu jusqu'à ce que la carte soit pleine. Ensuite la caméra affichera “CARTE PLEINE” et arrêtera son
enregistrement. Il vous faudra ensuite soit déplacer le fichier sur un périphérique externe, soit formater la carte
pour lui permettre d'enregistrer encore.
Stamp: Heure /Date/Heure et Date/Données GPS/Numéro de Pilote/off
1. Après avoir choisi une étampe, au début de l'enregistrement, celui-ci sera automatiquement intégré sur le
fichier vidéo. En jouant la vidéo, vous pourrez y revoir l'étampe choisie (Image 1)
Image 1.
GPS
1).Allumez votre DVR. Le scan satellite commence automatiquement. Lorsque le signal GPS est identifié et
localisé, cette icône(
) s'affiche. Le DVR enregistrera ces données dans votre carte SD automatiquement. Si le
satellite n'est pas trouvé, une icône rouge “no action” s'affichera.
Logiciel
8
1. Connectez la caméra/carte SD è votre ordinateur.
2. Ouvrez le disque dur externe à partir de “Mon ordinateur” ou de l'ouverture automatique.
3. Ouvrez le dossier “player”
4. Double-cliquez sur “GPSPLAYER.EXE” et le logiciel s'ouvrira.
5.Cliquez sur le symbole
6. Localisez votre Caméra / carte SD et double-cliquez pour ouvrir le fichier.
7. Ouvrez le dossier “DCIM” et cliquez une fois sur le dossier “100Media” et cliquez ur “OK”
Ceci chargera toutes les données et vidéos dans votre logiciel
8. Choisissez une vidéo en double cliquant dessus
9
Spécifications
Capteur d'image
Affichage
Chip
Module GPS
Mémoire
Lentille
ISO
Images fixes
Vidéos
Zoom
Audio
Compensation
d'exposition
Enregistrement
en boucle
Auto Power Off
Auto Screen off
Interface PC
Sortie
Format de sortie
AV
Batterie
1/2.7 CMOS 2.0 Méga-pixel
1.5″TFT(650×240 pixels)
Ambarella solution, 1080 P 30FPS
GPS Logger
Carte TF jusqu'à 32GB (certains modèles possèdent la fonction
“dual-card)
4X focus fixe
Auto
Format:JPEG(EXIF2.2)、DCF
Résolution:0.9M、2M、3M(Software)、4M(Software)
Format:H.264 (MOV)
Résolution: 1920×1080 30fps、1440×1080 30fps、1280×720
30fps et plus bas
Video:4X Zoom Digital(1440*1080P)
Lecture de photos: Zoom digital 8X (Maximum)
Microphone/ Haut-Parleur Intégrés (AAC)
-2.0EV~+2.0EV
OFF, 1 mins,3 mins,5mins
OFF, 1 min, 3 mins, 5mins
OFF, 1 min, 3 mins, 5mins
USB2.0(High-speed)
HDMI , Audio-Video
NTSC/PAL
Batterie polymère 3.7V, 350mAh intégrée
1
0
Résolution de problèmes
Encas de problèmes avec le produit, veuillez vous référez aux outils de diagnostics suivants et leurs solutions.
Ne peux enregistrer de vidéos ou de photos.
Vérifiez que la carte SD ne soit pas verrouillée et qu'elle ait suffisamment d'espace de stockage.
• S'arrête automatiquement pendant l'enregistrement.
Utilisez une carte SD C6 (Classe 6) de haute-vitesse à cause du débit d'information causé par l'enregistrement
haute définition.
• L'appareil affiche“File Error” pendant la lecture.
Formatez votre carte. Ceci est du à un mauvais formatage de fichier de votre carte.
• L,image est floue
Vérifiez les traces de doigts ou poussières sur la lentille.
• L'image à des interférences sous forme de lignes horizontales
Changez vos paramètres de ”Flicker”. Vérifiez le type de courant dans votre zone géographique et changezle (50 ou 60Hz).
• Elle ne démarre pas l'enregistrement automatiquement à l'allumage du véhicule.
Vérifiez que le paramètre d'enregistrement en boucle ne soit pas sur OFF. Vérifiez également que
l'enregistrement n'ait pas été mis en pause. (appuyez sur OK afin de voir le rond rouge en haut à droite dans
l'écran).
• L'appareil continue d'enregistrer automatiquement.
Avec l'appareil en détection de mouvement, cela se peut. Vérifiez si vous voyez l'icône . Si oui, la caméra
enregistre au moindre mouvement détecté devant sa lentille.
• L'éteinte automatique ne fonctionne pas.
Vérifiez que le détecteur de mouvement soit OFF. La détection de mouvement permet à l'appareil
d'enregistrez même si éteint, sauf si elle manque de courant.
• La caméra ne répond pas.
Appuyez et maintenez le bouton POWER pour 10 secondes ou plus, relâchez le bouton et la caméra
redémarrera.
1
1