1
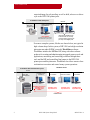
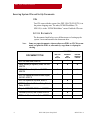
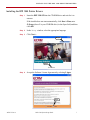
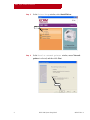
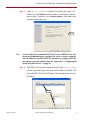
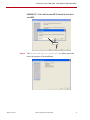
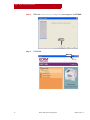
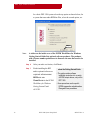
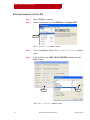
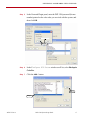
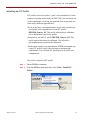
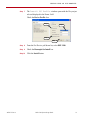
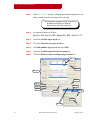
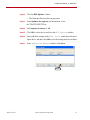
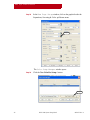
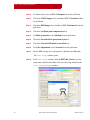
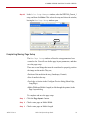
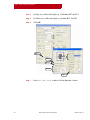
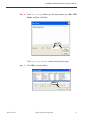
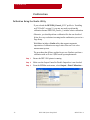
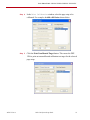
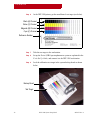
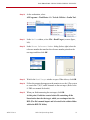
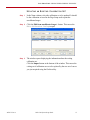
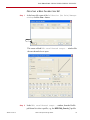
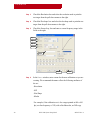
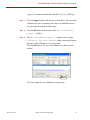
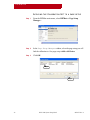
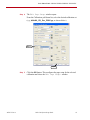
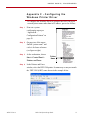
DPP 1200
System Setup Guide
AO12333
Rev. 19
AO50727
Revision 4
This guide reflects the software as of December 2012.
Additional copies of this manual may be obtained by writing or calling:
ECRM Order Processing
554 Clark Road
Tewksbury, MA 01876
Phone No. (US) - +1 978-851-0207 — Fax (US) - +1 978-851-7016
Phone No. (UK) - +44 1923-218255 — Fax (UK) +44 1923-218256
Phone No. (Hong Kong) - +852 2-564-8989— Fax (Hong Kong) +852 2-564-8821
Visit our Internet Web Site: www.ecrm.com
Proprietary Notice
The information contained within this guide is the property of ECRM. No transmission,
reproduction, transcription, storage in a retrieval system, translation into any language or
other use is permitted in whole or in part in any form without first obtaining written
permission of ECRM.
ECRM® is a registered trademark of ECRM Incorporated. Other brand or product names are
the registered trademarks or trademarks of their respective holders.
© copyright ECRM Incorporated 2012
ii
DPP 1200 System Setup Guide
AG50727 Rev. 4
.....
Table of Contents
Introduction 1
System Configurations 1
System Specifications 3
System Set Up: An Overview 4
Set Up Instructions 5
Setting Up the DPP 1200 Printer 5
Setting Up the System Workstation 5
Securing System CDs and Set Up Documents 6
Installing the DPP 1200 Printer Drivers 7
Installing RIPMate and optional ECRM Software Products 13
Installing the DPP 1200 Printer Plugin 15
Entering Passwords into the RIP 16
Installing an ICC Profile 19
Configuring a Device 22
Completing/Saving Page Setup 29
Calibration 32
Calibration Using the Genlin Utility
32
Troubleshooting 44
Printer Menus 44
Front/Back Alignment Procedure 45
Front/back Alignment Procedure 46
Adjust Page X, Y Positioning 47
Thick Media Adjustment 48
Appendix A - Network Summary Printout 49
AG50727 Rev. 4
DPP 1200 System Set Up Guide
iii
Appendix B - Configuration Printout 50
Appendix C - Configuring the Windows Printer Driver 51
iv
DPP 1200 System Set Up Guide
AG50727 Rev. 4
Introduction
This document will help you set up your DPP 1200 system. The scope
of your task will depend on the complexity of your system.
System Configurations
The simplest DPP 1200 system includes:
• an ECRM DPP 1200 printer/digital press, and
• an ECRM RIPMate RIP, running on a networked PC System
Workstation.
Basic DPP 1200 System
DPP 1200
Printer/Press
Ethernet
DPP 1200 System
Workstation*
RIPMate
* Customer-supplied or ordered
from ECRM as a system option.
However, a typical system is usually more complex, like the one
shown on the next page. It runs under ECRM RIPMate Plus
software, which includes the RIPMate RIP, plus additional software
that enables remote workstations to control the RIPing process and
job output. With this configuration, any networked workstation can
be used to view, roam, and zoom (in or out) on any part of the
AG50727 Rev. 4
DPP 1200 System Setup Guide
1
Introduction
rasterized image for soft proofing, as well as hold, release or re-direct
a job to the DPP 1200 printer/press.
A RIPMate Plus DPP 1200 System
DPP 1200
Printer/Press
Ethernet
DPP 1200 System
Workstation*
RIPMate
Plus software
Networked workstations with
a Web browser can remotely
control the RIPing process and
job output to the digital press.
* Customer supplied or ordered
from ECRM as a system option.
Even more complex systems, like the one shown below, are typical in
high-volume shops. In this system, a DPP 1200 and a high-resolution
platesetter run under ECRM’s powerful WorkMates software.
WorkMates includes the RIPMate RIP, along with other software
products for creating and administrating integrated prepress tools and
applications, monitoring and controlling workflow through those
tools and the RIP, and controlling final output to the DPP 1200
printer/press and the platesetter. WorkMates also allows remote client
workstations to monitor and control many system operations.
WorkMates Clients
A WorkMates DPP 1200/Platesetter System
Ethernet
DPP 1200/
WorkMates Server
Workstation*
DPP 1200
Printer/Press
PC workstation
Macintosh workstation
PC workstation
WorkMates Client
ImposeMate Client
WorkMates Client
ImposeMate Client
USB
WorkMates Administrator
WorkMates Client
ImposeMate Client
RIPMate
ECRM Platesetter
2
WorkMates Client
ImposeMate Client
ECRM Software
DPP 1200 System Setup Guide
AG50727 Rev. 4
SYSTEM SPECIFICATIONS
System Specifications
DPP 1200 PRINTER
Refer to DPP 1200 User Guide, AG50724.
SYSTEM WORKSTATION
Refer to ECRM WorkMates Getting Guide AG12333.
AG50727 Rev. 4
DPP 1200 System Setup Guide
3
System Set Up: An Overview
System Set Up: An Overview
Here’s an overview of what you’ll do to set up the DPP 1200 system.
Step 1
Unpack the DPP 1200 printer (details on page 5).
Step 2
Unpack workstation(s), if ordered (page 5).
Step 3
Secure CD’s and set up documentation (page 6).
Step 4
Install the DPP 1200 printer drivers (page 7).
Step 5
Install RIPMate and optional software products, if ordered (page 13).
Step 6
Install the DPP 1200 Printer plugin (page 15)
Step 7
Enter passwords for the DPP 1200, ColorPro, and optional software, if
ordered (page 16).
4
Step 8
Install an ICC profile (page 19).
Step 9
Configure the DPP 1200 device (page 22).
Step 10
Complete and save a page setup (page 29).
DPP 1200 System Setup Guide
AG50727 Rev. 4
SETTING UP THE DPP 1200 PRINTER
Set Up Instructions
To set up the system, perform the procedures below in sequential
order.
Setting Up the DPP 1200 Printer
Step 1
Remove the printer shipping carton walls per the instructions on the
box.
Step 2
Locate the 12'' x 18'' Printer Set-up poster.
Step 3
Unpack the printer per the poster instructions.
Setting Up the System Workstation
AG50727 Rev. 4
Step 1
If the system includes a new ECRM workstation (an optional item), set
it up per the instructions that came with it.
Step 2
Ensure the workstation (new or old) is connected to the LAN.
Step 3
Power up the workstation.
DPP 1200 System Setup Guide
5
Set Up Instructions
Securing System CDs and Set Up Documents
CDS
Two CDs come with the system. One, DPP 1200 CD P/N 50728, is in
the printer shipping crate. The other, ECRM WorkMates CD
SP50154, is in the “ECRM WorkMates” carton. Find both CDs now.
SET UP DOCUMENTS
The documents listed below cover different aspect of setting up the
system. Locate and assemble the documents now.
Note:
Some are paper documents, whereas others are PDFs on CD. We recommend you print the PDFs or, alternatively, copy them to a laptop for
viewing.
LOCATION
DOCUMENT TITLE
6
DPP 1200
CD
SP50578
WorkMates
DVD
SP50154
DPP 1200 User Guide, AG50724
X
X
Safety, Warranty & Regulatory Guide, 59410801
AG50725
X
X
X
DPP 1200 Printer Set Up Poster, 58407701
AG50726
X
X
X
DPP 1200 Supplies and Service Sheet, English,
59410901 AG50733
X
X
X
DPP 1200 System Set Up Guide, AG50727
X
ECRM WorkMates for Windows Getting Started
Guide, AG12333
X
Plugin for ECRM DPP 1200 Printer, AG50729
X
ColorMate (ColorPro) User’s Guide, AG45129
X
RIPMate for Windows User’s Guide, AG12325
X
DPP 1200 System Setup Guide
PRINTER
SHIPPING
CARTON
AG50727 Rev. 4
INSTALLING THE DPP 1200 PRINTER DRIVERS
Installing the DPP 1200 Printer Drivers
Step 1
Insert the DPP 1200 CD into the CD-ROM drive and wait for it to
autorun.
If the installer does not start automatically, click Start > Run, enter
E:\Setup (where E is your CD-ROM drive) in the Open field, and then
click OK.
Step 2
In the Setup window, select the appropriate language
Step 3
Click Next >.
Step 2
Step 3
Step 4
Accept the Software License Agreement by selecting I Agree.
Step 4
AG50727 Rev. 4
DPP 1200 System Setup Guide
7
Set Up Instructions
Step 5
In the Driver Setup window, select Install Driver.
Step 5
Step 6
In the Local or network printer window, ensure Network
printer is selected, and then click Next.
Step 6
8
DPP 1200 System Setup Guide
AG50727 Rev. 4
INSTALLING THE DPP 1200 PRINTER DRIVERS
Step 7
In the TCP/IP connection window, if you know the printer’s IP
address, select IP address, enter the address, click Next >, and then
jump to Step 9. Otherwise, select Search address:, click Next > and
continue with the next step.
Step 7
Note:
A static address is recommended. If the LAN uses a DHCP server, ask
the network administrator to configure the server to always assign the
same IP address to the DPP 1200. Or, alternatively, configure the Windows Driver to use the printer name. See “Appendix C - Configuring the
Windows Printer Driver" on page 51.
Step 8
If the DPP 1200 is up and running on the LAN, the Printer search
window opens and displays the name and IP address of the DPP 1200.
Select the DPP 1200 and Click Next >. This automatically enters the
IP address.
Step 8
AG50727 Rev. 4
DPP 1200 System Setup Guide
9
Set Up Instructions
Step 9
In the Printer model and emulation window, ensure PCL is
selected and click Next >.
Step 9
Step 10
In the Printer name window, click the Customization button.
Step 10
Step 11
In the Printer Settings window, enter a name like DPP 1200, as shown
below, click OK, and then click Next >.
10
DPP 1200 System Setup Guide
AG50727 Rev. 4
INSTALLING THE DPP 1200 PRINTER DRIVERS
IMPORTANT - To be valid, the name MUST include the three-letter
word DPP.
Step 11
Step 12
The Driver and utility installation window opens and
traces the progress of the installation.
AG50727 Rev. 4
DPP 1200 System Setup Guide
11
Set Up Instructions
Step 13
When the Installation complete screen appears, click Finish.
Step 13
Step 14
Click Exit.
Step 14
12
DPP 1200 System Setup Guide
AG50727 Rev. 4
INSTALLING RIPMATE AND OPTIONAL ECRM SOFTWARE PRODUCTS
Installing RIPMate and optional ECRM Software Products
Note:
If you are merely adding the DPP 1200 printer to an existing ECRM system running the latest RIP and you are not adding any optional WorkMates software, skip this section and continue with “Installing the DPP
1200 Printer Plugin" on page 15.
Step 1
Keep the ECRM WorkMates for Windows Getting Started Guide
AG12333 handy for reference.
Step 2
Locate ECRM WorkMates DVD SP50154, load it into the system
workstation, and launch the setup.exe program.
Step 3
When the splash screen opens, click on Install Optional WorkMates
Modules.
Step 3
Step 4
Respond to prompts that are displayed. For details, refer to the ECRM
WorkMates for Windows Getting Started Guide.
Step 5
When the Select WorkMates component(s) to install
window opens, select the appropriate installation option. For example,
AG50727 Rev. 4
DPP 1200 System Setup Guide
13
Set Up Instructions
for a basic DPP 1200 system select the top option as shown below; for
a system that runs under RIPMate Plus, select the second option, etc.
Step 6
Note:
A sticker on the inside cover of the ECRM WorkMates for Windows
Getting Started Guide lists optional software products. The products
with a license number printed next to them are the ones that need to be
installed.
Step 6
After you make a selection, click Next >.
Step 7
Finish installing the RIP
and/or optional software as
explained in INSTALLING
RIPMATE AND
WORKMATES in the ECRM
WorkMates for Windows
Getting Started Guide
AG12333.
14
about the Getting Started Guide
• The guide provides software
installation instructions for a variety
of ECRM output devices, not just the
DPP 1200.
• Some procedures are for specific
ECRM imagesetter and platesetters.
Disregard those procedures.
DPP 1200 System Setup Guide
AG50727 Rev. 4
INSTALLING THE DPP 1200 PRINTER PLUGIN
Installing the DPP 1200 Printer Plugin
Step 1
Keep the ECRM WorkMates for Windows Getting Started Guide
AG12333 handy for reference.
Step 2
Locate ECRM WorkMates CD SP50154, load it into the system
workstation, and launch the setup.exe program.
Step 3
When the splash screen opens, click on Install ECRM WorkMates
Components
Step 3
Step 4
When the Select Components window opens, select ECRM DPP
1200 Plugin.
Step 4
Step 5
Step 5
Click Next > and finish installing the software as explained in the
ECRM WorkMates for Windows Getting Started Guide AG12333.
AG50727 Rev. 4
DPP 1200 System Setup Guide
15
Set Up Instructions
Entering Passwords into the RIP
Step 1
Ensure RIPMate is running.
Step 2
From the main menu bar, select RIPMate > Configure RIP...
Step 2
The Configure RIP window opens.
Step 3
Click on the Extras... button. The Configure RIP Extras window
opens.
Step 4
In the scroll list, select DPP 1200, ECRM DPP, and then click the
Add... button.
Step 3
Step 4
The Enable Feature window opens.
16
DPP 1200 System Setup Guide
AG50727 Rev. 4
ENTERING PASSWORDS INTO THE RIP
Step 5
In the Protected Plugin panel, enter the DPP 1200 password (license
number) printed on the sales order you received with the system, and
then click OK.
Step 5
Step 6
In the Configure RIP Extras window scroll list, select Harlequin
ColorPro.
Step 7
Click the Add... button.
Step 7
Step 6
AG50727 Rev. 4
DPP 1200 System Setup Guide
17
Set Up Instructions
Step 8
When the Enable Feature window opens, enter the Harlequin
ColorPro password printed on the sales order and then click OK.
Then, click OK and OK to close the two other windows that are still
open.
Step 8
18
DPP 1200 System Setup Guide
AG50727 Rev. 4
INSTALLING AN ICC PROFILE
Installing an ICC Profile
ICC profiles are used to achieve “good” color reproduction. For the
purposes of getting started with your DPP 1200, you can choose one
of three approaches. Choosing one approach does not preclude you
from using a different approach later.
•If you do not have a spectrophotometer or you want to quickly get
good quality color reproduction, use the ICC profile
DPP1200_Generic_1r2. This profile includes basic calibration
curves and produces good color quality.
•Alternatively, use the ICC profile DPP1200_Generic_2r2. This
profile requires the printer be calibrated. You will need a
spectrophotometer to perform the calibration.
•For the most accurate color reproduction, ECRM recommends you
create ICC profiles for all your resolution/screening/media
combinations. You will need ICC profiling tools to profile your
configurations.
Here’s how to install an ICC profile.
Step 1
Ensure RIPMate is running.
Step 2
From the RIPMate main menu bar, select Color > Install ICC
Profile...
Step 2
AG50727 Rev. 4
DPP 1200 System Setup Guide
19
Set Up Instructions
Step 3
In the Install ICC Profile window, double click on the folder
named ICC.
Note:
The ICC folder is in the RIP install folder.
Step 3
The Look in: field at the top on the window is updated as shown in the
next figure.
Step 4
Double click on the DPP 1200 folder shown below,
Step 4
Step 5
In the DPP 1200 folder window that opens, select a profile file; for
example, DPP1200_Generic_1r2.icc.
Step 6
20
Click Select.
DPP 1200 System Setup Guide
AG50727 Rev. 4
INSTALLING AN ICC PROFILE
Step 7
The Install ICC Profile window opens with the file you just
selected displayed in the Name: field.
Check the Device Profile: box.
Step 7
Step 8
Step 9
Step
AG50727 Rev. 4
Step 8
From the For Device: pull down list, select DPP 1200.
Step 9
Check the Resample On Install box.
Step 10
Click the Install button.
DPP 1200 System Setup Guide
21
Set Up Instructions
Configuring a Device
Step 1
From RIPMate’s main menu, select RIPMate > Page Setup Manager.
Step 2
Click New...
Step 3
In the New Page Setup window Device: pull down,
select DPP 1200.
Step 4
Click on the Configure Device button. The Configure Device
window opens.
Step 5
From the Output to: pull-down list, select SPL:DPP 1200. This is the
name we gave the printer earlier, when we installed the driver.
Note:
If “File” is the only option listed in the pull-down list, the software can’t
find the DPP 1200 printer on the network.
Step 3
Step 4
Step 5
Step 8
Step 6
Step 7
Step 9
Step 6
For Media size: select Media size & Feed edge from Page Layout
Step 7
For Media tray: select Paper tray 1.
Step 8
Under Output, in the Feed edge pull-down, select (Auto).
Note:
22
Refer to Plugin for ECRM DPP 1200 Printer, AG50729 for more about
these device parameters.
DPP 1200 System Setup Guide
AG50727 Rev. 4
CONFIGURING A DEVICE
Step 9
Click OK. This configures the device and closes the Configure
Device window.
Step 10
In the Resolution pull-down, select 600 x 1200.
Step 11
Click on the graphic beside the Separations, Screening & Color Style:
pull-down menu. The Separations Manager window opens.
Step 12
In the Separations Manager window, select CMYK Composite
and then click on the Copy... button.
Step 13
In the New Style for device... window, enter a descriptive
style name, like CMYK Composite DPP, for example.
Step 14
Click the Create button. The New Style for device... window
closes and the Edit Style window opens.
Step 10
Step 11
Step 12
Step 13
Step 14
AG50727 Rev. 4
DPP 1200 System Setup Guide
23
Set Up Instructions
Step 15
In the Edit Style window, configure the separation parameters, dot
shape, resolution and screen frequencies you want.
The following are suggested setting combinations:
* The following are suggested setting combinations:
Euclidean
dot at 200 lpi for either dpi.
Euclidean dot at 130 lpi for 600 x 600 dpi.
Euclideandot
dotat
at200
180lpi
lpifor
foreither
600 xdpi.
1200 dpi.
Rhomboid
Rhomboid dot at 200 lpi for either dpi.
Step 16
Set separation angles as follows:
Black (K) = 37.5,. Cyan (C) = 22.5, ..Magenta (M) = 67.5, ..Yellow (Y) = 7.5
Step 17
Check the Overide angles in job box.
Step 18
Check the Generate extra gray levels box.
Step 19
For Limit number of gray levels to: select 2048.
Step 20
Check the Use Harlequin Precision Screening box.
Step 21
Check the Rotate screens according to page rotation box.
Step 16
Step 17
Step 15
Step 19
Step 18
Step 23
Step 20
Step 21
Step 24
Step 22
Step 25
Step 26
24
DPP 1200 System Setup Guide
AG50727 Rev. 4
CONFIGURING A DEVICE
Step 22
Click the HPS Options... button.
• The Harlequin Precision Screen pops open.
Step 23
In the Optimize for angle set pull down menu, select
the 7.5, 67.5. 22.5, 37.5 set.
Step 24
Set Frequency Accuracy to 1.0.
Step 25
Click OK to select the set and close the HPS Options window.
Step 26
Ensure ALL the settings in the Edit Style match those shown in
figure above, and then click OK to save the settings and close window.
Step 27
In the Separations Manager window, click Select.
Step 27
AG50727 Rev. 4
DPP 1200 System Setup Guide
25
Set Up Instructions
Step 28
In the New Page Setup window, click on the graphic beside the
Separations, Screening & Color: pull-down menu.
Step 28
The Color Setup Manager window opens.
Step 29
Click the New ColorPro Setup... button.
Step 29
26
DPP 1200 System Setup Guide
AG50727 Rev. 4
CONFIGURING A DEVICE
The New Color Setup: window opens.
Step 30
Note:
For CMY< data select GRACol_2006_Coated1v2 from the pull-down.
If you print using other standards such as SWOP or FOGRA, select these
in this popup.
Step 31
Check the Override color management in job box.
Step 32
Check the Overprint 100% black box.
Step 33
Check the Use late color management box.
Step 34
For Output Profile, select V3.icc from the pull-down. (This is the
DPP1200_Generic_1r2.icc we set on page 21. You may have selected a
diffrenet name.)
Step 30
Step 34
Step 35
Step 36
Step 31
Step 37
Step 38
Step 39
Step 40
Step 32
Step 41
Step 33
Step 42
Step 43
AG50727 Rev. 4
DPP 1200 System Setup Guide
27
Set Up Instructions
Step 35
For Main intent: select (->ICC Colorimeter) from the pull-down.
Step 36
Check the CMYK images: box, and then (->ICC Colorimeter) from
the pull-down.
Step 37
Check the RGB images: box, and then (->ICC Colorimeter) from the
pull-down.
Step 38
Check the Use black point compensation box.
Step 39
For Black generation: select Medium from the pull-down.
Step 40
Check the Override black generation in job box.
Step 41
Check the Convert RGB black to true black box.
Step 42
For Color adjustments: select Accurate from the pull-down.
Step 43
Ensure ALL settings are as shown above, and then click Save As...
The Save Setup window opens.
Step 44
In the Save Setup window, enter the DPP1200_Generic_1 as the
setup name, and then click Save. This saves the setup and opens the
Color Setup Manager window.
Step 44
28
DPP 1200 System Setup Guide
AG50727 Rev. 4
COMPLETING/SAVING PAGE SETUP
Step 45
In the Color Setup Manager window, select the DPP1200_Generic_1
setup, and then click Select. This selects the setup and closes the window,
leaving the New Page Setup window open.
Step 45
Completing/Saving Page Setup
The New Page Setup window reflects the setup parameters have
created so far. You will now define page layout parameters, and then
save the page setup.
There are several things that must be considered to properly position
the image on the media. They are,
•Position of the media in the tray (Landscape, Portrait)
•Size of media in the tray
•Feed edge: selection in the Configure Device dialog (Short Edge,
Long Edge)
•Media Width and Media Length (as fed through the printer) in the
Page Layout dialog
To complete and save the page setup:
AG50727 Rev. 4
Step 1
Click the Page layout... button.
Step 2
Check center page on Media Width.
Step 3
Check center page on Media Length.
DPP 1200 System Setup Guide
29
Set Up Instructions
Step 4
Set Page size, width, and height (e.g., US Letter, 8.5'' and 11'').
Step 5
Set Media size, width, and height (e.g., Letter, 8.5'' and 11'').
Step 6
Click OK.
Step 1
Step 5
Step 2
Step 3
Step 4
Step 6
Step 7
30
In the New Page Setup window click the Save As... button.
DPP 1200 System Setup Guide
AG50727 Rev. 4
COMPLETING/SAVING PAGE SETUP
Step 8
In the Save Setup window, give the setup a name (e.g., 600 x 1200
Letter), and then click Save.
Step 8
The Page Setup Manager window shown below opens.
Step 9
Click OK to close the dialog.
Step 9
AG50727 Rev. 4
DPP 1200 System Setup Guide
31
Calibration
Calibration
Calibration Using the Genlin Utility
If you selected the DPP1200_Generic_1 ICC profile in “Installing
an ICC Profile" on page 19, you may not need to perform this
calibration because DPP1200_Generic_1 includes a basic calibration.
Otherwise, you should perform a calibration like the one described
below for every resolution/screening/media combination you use in a
Page Setup.
WorkMates includes a Genlin utility that supports automatic
importation of calibration test target values from an X-rite color
measurement system.
The procedure that follows explains how to use Genlin to perform a
calibration with an X-rite i1|PRO model spectrophotometer.
32
Step 1
Ensure the DPP 1200 printer is running.
Step 2
Make sure the Output Controller Disable Output box is not checked.
Step 3
From the RIPMate main menu, select Output > Print Calibration...
DPP 1200 System Setup Guide
AG50727 Rev. 4
CALIBRATION USING THE GENLIN UTILITY
Step 4
In the Print Calibration window, select the page setup to be
calibrated. For example, the 600 x 600 Letter shown below.
Step 5
Click the Print Uncalibrated Target button. This causes the DPP
1200 to print out an uncalibrated calibration test target for the selected
page setup.
AG50727 Rev. 4
DPP 1200 System Setup Guide
33
Calibration
Step 6
At the DPP 1200 printer, get the uncalibrated test target (see below).
Black (K) Channel
Yellow (Y) Channel
Magenta (M) Channel
Cyan (C) Channel
Reference Number
Step 7
Take the test target to the workstation.
Step 8
Set up the X-rite i1|PRO spectrophotometer system as explained in the
X-rite Set Up Guide, and connect it to the DPP 1200 workstation.
Step 9
Lock the calibration test target in the system backup board as shown
below.
Backup Board
Test Target
34
DPP 1200 System Setup Guide
AG50727 Rev. 4
CALIBRATION USING THE GENLIN UTILITY
Step 10
At the workstation, select:
All Programs > WorkMates 4.1 > Tools & Utilities > Genlin Tool.
Step 11
In the Genlin window, select: File > Read Target (see next figure,
left).
Step 12
In the Choose Reference Number dialog (below, right) select the
reference number that matches the reference number printed on the
test target and then click OK.
Step 13
Step 14
Wait for the Read Target window to open. When it does, click OK.
Follow the prompts that appear on the monitor to use the i1 Pro system
to scan in the C, M, Y, and K channels on the test target. (Refer to the
i1 PRO user manual for details).
Step 15
When you finish measuring the test target, click OK.
At this point, Genlin has created a data file containing all the
linearization data for the target, which you can import into the
RIP. (The file is named import and is located in the caldata folder
within the RIP SW folder.)
AG50727 Rev. 4
DPP 1200 System Setup Guide
35
Calibration
Step 16
From the RIPMate main menu, select Output > Calibration
Manager...
Step 17
In the Calibration (Dot Gain) Manager window,
•from the Device: menu, select OKI PCL Halftone,
•from the Color Space: menu: select CMYK.
The next action depends on whether you are updating an existing
calibration set or creating a new one.
•If you are updating an existing calibration set, continue with
“Updating an Existing Calibration Set” below.
•If you are creating a new calibration set, continue with “Creating a
New Calibration Set" on page 39.
36
DPP 1200 System Setup Guide
AG50727 Rev. 4
CALIBRATION USING THE GENLIN UTILITY
UPDATING
AN
EXISTING CALIBRATION SET
Step 1
In the Name column, select the calibration set to be updated. It should
be the calibration set used in the Page Setup used to print the
uncalibrated target.
Step 2
Click the Edit from uncalibrated target... button. This causes the
Edit Calibration Dialog to open.
Step 3
The window opens displaying the information about the exiting
calibration set.
Click the Import button at the bottom of the window. This causes the
exiting set of calibration curves to be replaced by the new set of curves
you just acquired using the Genlin utility.
AG50727 Rev. 4
DPP 1200 System Setup Guide
37
Calibration
Step 4
Click the OK button to save the updated calibration set.
Step 5
Continue with “Applying the Calibration Set to a page setup" on page
42.
38
DPP 1200 System Setup Guide
AG50727 Rev. 4
CALIBRATION USING THE GENLIN UTILITY
CREATING
Step 1
A
NEW CALIBRATION SET
At the lower left corner of the Calibration (Dot Gain) Manager
window, click the New... button.
Step 1
This causes a blank Edit uncalibrated target... window like
the one shown below to open.
Step 2
In the Edit uncalibrated target...window, from the Profile:
pull-down list select a profile, e.g., the DPP1200_Generic_2 profile.
AG50727 Rev. 4
DPP 1200 System Setup Guide
39
Calibration
Step 3
Check the Resolution box and select the resolution used to print the
test target from the pull-down menus to the right.
Step 4
Check the Dot shape: box and select the dot shape used to print the test
target from the pull-down menus to the right.
Step 5
Check the Screen freq: box and enter a screen frequency range in the
fields to the right.
Step 2
Step 3
Step 4
Step 5
Step 6
Step 7
Step 6
Step 8
In the Name: window, enter a name for the new calibration set you are
creating. We recommend the name reflect the following attributes of
the set:
•Resolution
•LPI
•Dot Shape
•Media
For example, if the calibration set is for a target printed at 600 x 600
dpi, at a line frequency of 120, with a Euclidean dot, on 20lb copy
40
DPP 1200 System Setup Guide
AG50727 Rev. 4
CALIBRATION USING THE GENLIN UTILITY
paper, we recommend a name like 600x600_120_ Euc_20lbCopy.
Step 7
Click the Import button at the bottom of the window. This causes the
calibration set you are creating to have the set of calibration curves
you just acquired using the Genlin utility.
Step 8
Click the OK button at the bottom of the Edit uncalibrated
target... window.
Step 9
The Edit uncalibrated target... window closes, and the
Calibration (Dot Gain) Manager window opens and displays
the name of the calibration set you just created.
Click the OK button. This saves the calibration set and closes the
window.
Step 9
We’ll now apply the new calibration to a page setup.
AG50727 Rev. 4
DPP 1200 System Setup Guide
41
Calibration
APPLYING
THE
CALIBRATION SET
TO A PAGE SETUP
Step 1
From the RIPMate main menu, select RIPMate > Page Setup
Manager...
Step 2
In the Page Setup Manager window, select the page setup you will
link the calibration to. Our page setup is 600 x 600 Letter.
Step 3
Click OK.
Step 2
Step 3
42
DPP 1200 System Setup Guide
AG50727 Rev. 4
CALIBRATION USING THE GENLIN UTILITY
Step 4
The Edit Page Setup: window opens.
From the Calibration: pull-down list, select the desired calibration set
(e.g., 600x600_120_ Euc_20lbCopy, as shown below.)
Step 4
Step 5
Step 5
Click the OK button. This configures the page setup for the selected
calibration and closes the Edit Page Setup: window.
AG50727 Rev. 4
DPP 1200 System Setup Guide
43
Troubleshooting
Troubleshooting
Refer to the last chapter of the DPP 1200 User Guide, AG50274. It
has over 30 pages of troubleshooting information.
Printer Menus
Refer to the last 10 pages DPP 1200 User Guide, AG50274 for the
printer menus and examples of how to use them.
44
DPP 1200 System Setup Guide
AG50727 Rev. 4
CALIBRATION USING THE GENLIN UTILITY
Front/Back Alignment Procedure
The procedure that follows is for correcting front-to-back registration
problems that can occur when a job is printed duplex. In some cases,
when the printer turns the sheet over to be printed on the other side,
slight skewing occurs causing the image that is then printed on the
second side to be slightly misaligned with the image on the other side,
as shown in this example.
0.076”
BORDER ON THE BACK SIDE
BORDER ON THE FRONT SIDE
0.044”
FRONT SIDE OF AN 11'' X 17'' SHEET OF PAPER.
THE SAME BORDER IS PRINTED ON THE FRONT
AND BACK. THE PAPER IS BEING HELD IN FRONT
OF A BRIGHT LIGHT TO SEE HOW THE BORDERS
LINE UP.
AG50727 Rev. 4
DPP 1200 System Setup Guide
45
Front/Back Alignment Procedure
Front/back Alignment Procedure
Use file …/Documentation/DPP 1200/Test
Jobs/Box_11x17_2Page.pdf or Box_8.5x11_2Page.pdf, depending on
the size media you have. The 11x17 page has a 10x16 inch box on it.
ADJUST PAGE X, Y POSITIONING
Step 1
Load 11x17” copier paper in the MPT Tray (as square as possible).
Step 2
Open Box_11x17_2Page.pdf in a runlist.
Step 3
Select a DPP Page Setup that will output a 11x17” page to the MPT
Tray.
Step 4
Hold the Output.
Step 5
Print the job.
Step 6
In the RIP Mate View right click and select output.
Step 7
Uncheck Page 2 (only output Page 1)
Step 8
Output the page.
Step 9
Reload the printed sheet of paper in the MPT Tray printed side down,
using the same lead edge (as square as possible).
Step 10
Output only Page 2.
Step 11
Now hold the paper to the light (Page 1 facing you) and look at the
distance between the position of the top left corners (looking through
the paper to see the back side).
Step 12
Enter ½ the distance for X and for Y in the X,Y offset in the printer
control panel.
Menus-System Adjust-Print Position Adjust-X Adjust, and Y Adjust
46
Step 13
Rerun and look at results.
Step 14
Adjust as necessary to optimize the placement.
DPP 1200 System Setup Guide
AG50727 Rev. 4
ADJUST PAGE X, Y POSITIONING
Adjust Page X, Y Positioning
Step 1
Perform the Adjust Page X, Y Positioning procudure above.
Step 2
In the RIPMate View, Right Click and Select Output.
Step 3
Select Duplex.
Step 4
Output both Pages duplexed.
Step 5
Hold the sheet to the light Page 2 on top, and look at the distance
between the position of the top left corners.
Step 6
Enter the distances for X and for Y in the Duplex X,Y offset in the
printer control panel (moving Page 2).
Menus-System Adjust-Print Position Adjust-Duplex X Adjust, and
Duplex Y Adjust.
AG50727 Rev. 4
Step 7
Rerun and look at the results.
Step 8
Adjust as necessary to optimize the placement.
DPP 1200 System Setup Guide
47
Thick Media Adjustment
Thick Media Adjustment
This procedure adjusts the printer to handle and image on thick media.
If you are using relatively thick media and you are seeing misregistration toward the end of the media, you may be able to improve
registration by using the Heavy Media Adjust selection in the DPP
1200 control panel.
Select Calibration > Heavy Media Adjust.
The selection range is as follows:
Off, -5, -4, -3, -2, -1, 0, +1, +2, +3, +4, +5
The settings adjust the fusing speed for printing on heavy media.
Off automatically adjusts the speed.
A value other than Off adjusts the speed based on the adjustment
value that has been set. The speed can be adjusted from -0.5% to
+0.5% in 0.1% increments.
48
DPP 1200 System Setup Guide
AG50727 Rev. 4
ADJUST PAGE X, Y POSITIONING
Appendix A - Network Summary
Printout
To print out a network summary report, proceed as follows.
Step 1
Power up the printer
Step 2
Press the control
Scroll Up
Menu
panel MENU button.
Step 3
In the Functions
Scroll Down
Enter
menu, scroll down to
Print Information, and then press the ENTER button.
Step 4
In the Print Information menu, scroll down to Network and press the
ENTER button.
Step 5
When Execute appears on the display, press the ENTER button.
A few seconds later, the DPP 1200 will print a 2-page “Network
Information” report that includes:
•Printer Information
•General Information
•TCP/IP Configuration
•NetWare Configuration
•EtherTalk Configuration
•NetBEUI Configuration
•Email Configuration
•SNMP Trap Configuration
•IPP Configuration
•Time/SNTP Configuration
•IEEE802.1X Configuration
•Security
•Maintenance
AG50727 Rev. 4
DPP 1200 System Setup Guide
49
Appendix B - Configuration Printout
Appendix B - Configuration Printout
To print out a system configuration report, proceed as follows.
Step 1
Power up the printer
Step 2
Press the control
Scroll Up
Menu
panel MENU button.
Step 3
In the Functions
Scroll Down
Enter
menu, scroll down to
Print Information, and then press the ENTER button.
Step 4
In the Print Information menu, select Configuration and press the
ENTER button.
Step 5
When Execute appears on the display, press the ENTER button.
A few seconds later, the DPP 1200 will print a 2-page “Configuration”
report.
Page 2
Page 1
50
DPP 1200 System Setup Guide
AG50727 Rev. 4
ADJUST PAGE X, Y POSITIONING
Appendix C - Configuring the
Windows Printer Driver
To configure the Windows Driver to reference the DPP 1200 by its
network printer name rather than its IP address, proceed as follows.
Step 1
Print out a system
configuration report per
“Appendix B Configuration Printout" on
page 50.
Step 2
On page two of the report,
find the “printer name” and
circle it for future reference
(see figure at right).
Step 3
At the workstation, choose
Start > Control Panel >
Printer
Name
Printers and Faxes.
Step 4
In the Printers and Faxes
window, select the DPP 1200 printer. Its name may or may not match
the “DPP 1200 (OKI)” name shown in the example below.
AG50727 Rev. 4
DPP 1200 System Setup Guide
51
Appendix C - Configuring the Windows
Step 5
In the Printer window, from the Printer pull-down menu select
Properties, as shown below.
Step 6
In the printer Properties window, select the ports tab for the DPP
1200 printer, and then click the Configure Port... button.
52
DPP 1200 System Setup Guide
AG50727 Rev. 4
ADJUST PAGE X, Y POSITIONING
Step 7
In the Configure Standard TCP/IP Port Monitor window,
clear the IP address from the Printer Name or IP Address: window.
Clear the
IP Address
Step 8
In the Printer Name or IP Address window: enter the printer name you
circled in the Configuration report. For us, it was the DPP1200023614 shown below.
Step 9
Click OK. This configures the DPP 1200 Windows printer driver to
“see” the DPP 1200 printer by its name, rather than its IP address.
Enter the
Short Printer
Name
Step 8
Step 9
Step 10
AG50727 Rev. 4
Close other windows that are still open.
DPP 1200 System Setup Guide
53
Appendix C - Configuring the Windows
54
DPP 1200 System Setup Guide
AG50727 Rev. 4