1
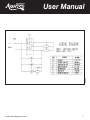
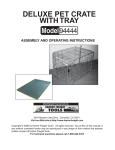
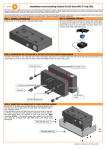
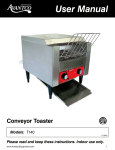
User Manual Conveyor Toaster Models: T140 11/2010 Please read and keep these instructions. Indoor use only. www.AvantcoEquipment.com1 User Manual Installation, Operation and Care Unpacking Great care has been taken during the packing and shipment of your Avantco conveyor toaster. However, if you notice any signs of damage when unpacking the unit, please call the manufacturer. • Do not remove any tags or labels until unit is installed and working properly. General Installation and Operation Instructions ! IT IS ESSENTIAL TO MAKE SURE THAT THE INCOMING VOLTAGE IS THE SAME AS THE RATED VOLTAGE OF THE UNIT AS FOUND ON THE SERIAL PLATE. THE SERIAL PLATE IS LOCATED AT THE REAR OF THE UNIT ADJACENT TO THE INCOMING CORD ENTRY. 1. T his conveyor toaster has been designed to continuously produce toasted bread or buns. The desired toasted color of the product can be adjusted by changing the belt speed of the conveyor. Depending on installation position, the toasted product can be discharged to the front or rear of the unit. 2. Before operating this unit, thoroughly clean as described in the cleaning section of this manual (page 5). ! ENSURE THE SUPPORT FEET ARE ASSEMBLED TO THE UNIT BEFORE COMMENCING OPERATION. (Operation Instructions) 3. A s detailed in the diagrams to the right, the unit can either be assembled with front or rear discharge depending on installation position and preference. i. Front Chute a. Pull metal plate up to the closed position and latch. 1) This will direct food to the bottom of the toaster. b. Pick up the longer of the two chutes. c. Slide the flanged end of the chute up underneath the toaster. d. Rest the flanged end of the chute onto the interior ledge. 2www.AvantcoEquipment.com User Manual ii. Rear Chute a. Push the metal plate down to the open position. 1) This will direct food to the back of the toaster. Page 2 3. As detailed in the diagrams below the unit can either be Page 2Page 2 assembled with front or rear discharge depending on 3.PickAs 3.detailed detailed inthe the in diagrams the diagrams below below the unit thecan uniteither can either be be c. up theAs smaller of two chutes. installation position and preference. assembled assembled with front with or front rear or discharge rear discharge depending depending on on Page 2 d. Slide the two keyholes on the chute behind the loosened screws. installation position position and preference. and loosen preference. i.3.chute FRONT 1) Ifinstallation the not fit DISCHARGE all waydiagrams down, the screws Asdoes detailed inthethe below themore. unit can either be REAR PLATE MUST assembled with front or rear discharge depending on BE FITTED e. the screws to secure the chute to the toaster. i. Tighten i. FRONT FRONT DISCHARGE DISCHARGE TO PREVENT HEAT LOSS installation position and preference. b. Loosen the two rear screws. FEEDER DISCHARGE i.FIT WIREFRONT FIT WIRE FITFEEDER WIRE FEEDER REAR PLATE REAR MUST PLATEBE MUST FITTED BE FITTED TO PREVENT TO PREVENT HEAT LOSS HEAT LOSS REAR PLATE MUST BE FITTED TO PREVENT HEAT LOSS FIT WIRE FEEDER 3. As detailed in the diagrams below the unit can either be assembled with front or rear discharge depending on installation position and preference. ii REAR DISCHARGE Page 2 FRONT DISCHARGE iii. REAR ii REAR DISCHARGE DISCHARGE ii REAR DISCHARGE REAR PLATE MUST BE FITTED TO PREVENT HEAT LOSS FIT WIRE FEEDER FIT WIRE FEEDER FIT WIRE FITFEEDER WIRE FEEDER FIT WIRE FEEDER ii REAR DISCHARGE www.AvantcoEquipment.com3 User Manual 4. The unit has two controls. i. Speed or color control determines the length of time the toast or product is in the heating chamber. The slower the speed, the longer the exposure and the darker the product. ii. The heat control switch has 4 settings. a. "OFF" - In this position, the unit is off. b. "STANDBY" - In this position, the conveyor belt will run and both top and bottom elements will operate at 25% capacity. This mode is designed to keep the unit warm in quiet periods to reduce start-up time and conserve energy. c. "BREAD" - In this position, both top and bottom elements operate at full capacity. This is the ideal mode for toasting bread. d. "BUNS" - In this position, only the top element operates at full capacity. This is the ideal setting for toasting one side only of a bun. 5. F or best results, allow the unit to preheat for 20-25 minutes before use so that the correct operating temperature can be reached. As described above, product appearance or color is dependent on conveyor speed and type of product. These other factors may also affect the toasting color: i. Moisture content of the product. ii. Sugar content of the product. iii. Initial product temperature. 4www.AvantcoEquipment.com User Manual Cleaning 1. Always ensure that the unit is disconnected from the main power supply. ! THIS APPLIANCE SHOULD NOT BE IMMERSED IN WATER. USE ONLY A DAMP CLOTH OR SPONGE DIPPED IN SOAPY WATER. DO NOT USE STEEL-WOOL AS IT WILL DAMAGE THE BRIGHT STAINLESS STEEL FINISH. 2. Wipe off the unit with a dry cloth and wait at least half an hour before reconnecting to the power outlet. 3. R emove the crumb tray from the unit by pulling forward. Dispose of the crumbs and clean the tray as described above, refit the tray before reusing the appliance. Specific Cleaning Instructions The following applies to cleaning of the conveyor belt only. 1. Turn off the toaster and allow the unit to cool down. 2. Switch on the unit to standby mode and adjust the belt to slow speed. 3. Using an abrasive pad, wipe the conveyor belt in a back and forth motion (ie: side to side) to remove baked on product. 4. Finally, clean the belt with a damp cloth in the same manner as described in number 3. www.AvantcoEquipment.com5 User Manual Safety 1. W hen this unit is to be positioned in close proximity to a wall, partitions, kitchen furniture, decorative finishes, etc, it is recommended that they be made of non-combustible material. If not, they shall be clad with a suitable non-combustable heat insulating material, and the closest attention be paid to fire prevention regulations. 2. U se the unit on an individual 15A power outlet only. DO NOT OVERLOAD THE CIRCUIT. 3. Ensure that the power cord does not come into contact with hot surfaces. 4. Do not touch moving parts while operating the unit. 5. Close supervision is necessary when the appliance is used in close proximity to children. 6. Do not operate the unit if the power cord becomes damaged or frayed. Contact your local service agent. Electrical Connection Information MODEL DESCRIPTION VOLTS (V/HZ) POWER (WATTS) PLUG TYPE T140 CONVEYOR TOASTER 120/60 1750 NEMA 5-15P 6www.AvantcoEquipment.com S ) 1750 Page 6 www.AvantcoEquipment.com7 Page 5 POWER PLUG (WATTS) TYPE NEMA 15-5P e replaced with a new er’s agent. e appliance is used in ng the unit. me into contact with outlet only. se proximity to a wall, finishes, etc. it is n-combustible suitable al, and the closest ations. User Manual 120V 60Hz T140 7001 User Manual INCH SIZES IN BRACKETS Page 7 CLEANING : THIS APPLIANCE SHOULD NO WATER JET OR IMMERSED IN CLOTH OR SPONGE DIPPED I DO NOT USE STEEL-WOOL W BRIGHT STAINLESS STEEL FI 4. 3. 2. 1. Finally clean the belt with a damp c as described in point 3. Using a plastic abrasive pad, wipe back and forth motion (ie; side to s product. Switch on the unit to standby mode slow speed. Turn off the toaster and allow the u The following applies to cleaning of the SPECIFIC CLEANING INSTRUCTIONS 4. Remove the crumb tray from the un Dispose of the crumbs and clean th refit the tray before reusing the appl 3. Wipe off the unit with a dry cloth and before re – connecting to the mains 2. This toaster should not be cleaned w immersed in water. Use only a damp in soapy water. ! 1. Always ensure that the unit is disco power supply 8www.AvantcoEquipment.com