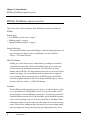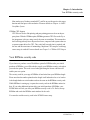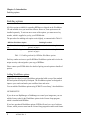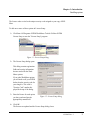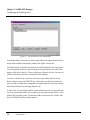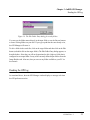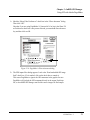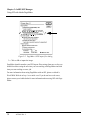
1
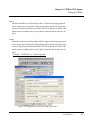
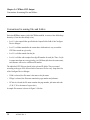
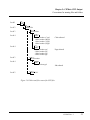
RIPMate
Extensions
User Manual
AG50603 Revision 2
©October 2008 ECRM Imaging Systems. All rights reserved.
No part of this publication may be copied or in any other way reproduced, nor may it be stored in a retrieval system, without the prior written permission of ECRM Imaging Systems.
The information in this manual is subject to change without notice.
ECRM Imaging Systems assumes no responsibility or liability for any
errors or inaccuracies that may appear in this book.
WorkMates, RIPMate, DotMate, DPX, InRIP OPI Manager, RipManager, DotManager, ImposeMate, PDFMate, CIPMate, RipSpool and
ProofMate are trademarks of ECRM Imaging Systems. Other manufacturers’ trademarks are used in an editorial fashion, with no intention of
infringement.
The imagesetters mentioned in this manual have been tested and found
to comply with the limits for a Class A digital device, pursuant to part
15 of the FCC Rules. These limits are designed to provide reasonable
protection against harmful interference when the equipment is operated
in a commercial environment.
The equipment is supplied with a shielded cable. It must be operated with a shielded cable in order to meet FCC Class A emission limits.
The equipment generates and can radiate radio frequency energy
and, if not installed and used in accordance with the instruction manual, may cause harmful interference to radio communications. Operation of the equipment in a residential area is likely to cause harmful
interference, in which case the user will be required to correct the interference at his or her own expense.
AG50603 Rev. 2
2
AG50603 Rev. 2
CONTENTS
CHAPTER 1 • INTRODUCTION . . . . . . . . . . . . . . . . . . . . . . . . . . . . . . . . . . . . . . 5
RIPMate WorkMates options overview . . . . . . . . . . . . . . . . . . . . . . . . . . . . . . 6
Your RIPMate security code . . . . . . . . . . . . . . . . . . . . . . . . . . . . . . . . . . . . . . 7
Enabling options . . . . . . . . . . . . . . . . . . . . . . . . . . . . . . . . . . . . . . . . . . . . . . . . 8
CHAPTER 2 • EXTENDED WORKFLOW . . . . . . . . . . . . . . . . . . . . . . . . . . . . . 11
Enabling the Extended Workflow Option . . . . . . . . . . . . . . . . . . . . . . . . . . . 12
RipSpool . . . . . . . . . . . . . . . . . . . . . . . . . . . . . . . . . . . . . . . . . . . . . . . . . . . . . 12
CHAPTER 3 • INRIP OPI MANAGER . . . . . . . . . . . . . . . . . . . . . . . . . . . . . . . . . 15
Overview . . . . . . . . . . . . . . . . . . . . . . . . . . . . . . . . . . . . . . . . . . . . . . . . . . . .
The OPI folder structure . . . . . . . . . . . . . . . . . . . . . . . . . . . . . . . . . . . . . . . . .
Enabling InRIP OPI Manager . . . . . . . . . . . . . . . . . . . . . . . . . . . . . . . . . . . .
Configuring InRIP OPI Manager . . . . . . . . . . . . . . . . . . . . . . . . . . . . . . . . . .
Configuring input folders . . . . . . . . . . . . . . . . . . . . . . . . . . . . . . . . . . . . . . . .
Configuring the PostScript filter . . . . . . . . . . . . . . . . . . . . . . . . . . . . . . . . . .
Reading the OPI log . . . . . . . . . . . . . . . . . . . . . . . . . . . . . . . . . . . . . . . . . . . .
Entering images into the OPI system . . . . . . . . . . . . . . . . . . . . . . . . . . . . . . .
Using OPI images in layout . . . . . . . . . . . . . . . . . . . . . . . . . . . . . . . . . . . . . .
Printing jobs with OPI images . . . . . . . . . . . . . . . . . . . . . . . . . . . . . . . . . . . .
Using OPI with Adobe PageMaker . . . . . . . . . . . . . . . . . . . . . . . . . . . . . . . .
15
16
18
19
21
23
25
26
27
27
28
CHAPTER 4 • INRIP PROOFMATE SYSTEM . . . . . . . . . . . . . . . . . . . . . . . . . . 31
ICC color management . . . . . . . . . . . . . . . . . . . . . . . . . . . . . . . . . . . . . . . . .
Creating ICC profiles for Windows . . . . . . . . . . . . . . . . . . . . . . . . . . . . . . . .
Setting up ProofMate . . . . . . . . . . . . . . . . . . . . . . . . . . . . . . . . . . . . . . . . . . .
Simple proofing using color management . . . . . . . . . . . . . . . . . . . . . . . . . . .
Proofing using the Optional Job Profile . . . . . . . . . . . . . . . . . . . . . . . . . . . . .
Sending output to a proof printer . . . . . . . . . . . . . . . . . . . . . . . . . . . . . . . . . .
Sending output to a TIFF file . . . . . . . . . . . . . . . . . . . . . . . . . . . . . . . . . . . . .
Troubleshooting . . . . . . . . . . . . . . . . . . . . . . . . . . . . . . . . . . . . . . . . . . . . . . .
32
32
33
38
39
40
41
43
AG50603 Rev. 2
3
Contents
CHAPTER 5 • CIPMATE CIP3 OUTPUT . . . . . . . . . . . . . . . . . . . . . . . . . . . . . . .45
CIP3 and PPF . . . . . . . . . . . . . . . . . . . . . . . . . . . . . . . . . . . . . . . . . . . . . . . . . .45
CIP3 support in RIPMate . . . . . . . . . . . . . . . . . . . . . . . . . . . . . . . . . . . . . . . . .46
Using CIPMate in your workflow . . . . . . . . . . . . . . . . . . . . . . . . . . . . . . . . . .46
Setting up CIPMate . . . . . . . . . . . . . . . . . . . . . . . . . . . . . . . . . . . . . . . . . . . . .46
Conventions for naming files and folders . . . . . . . . . . . . . . . . . . . . . . . . . . . .50
INDEX . . . . . . . . . . . . . . . . . . . . . . . . . . . . . . . . . . . . . . . . . . . . . . . . . . . . . . . . . . .53
4
AG50603 Rev. 2
Chapter 1
1
Introduction
Several WorkMates extensions (add-on options) are available for RIPMate. Each of
them adds special functions that will improve the quality of your prints and/or make
your work easier and more efficient. This chapter provides an overview of the
options that are available and explains how to activate the various options.
Note: This manual deals with the WorkMates extensions available for RIPMate.
Refer to the ECRM RIPMate User Guide for information on the Harlequin add-on
options.
AG50603 Rev. 2
5
Chapter 1 • Introduction
RIPMate WorkMates options overview
RIPMate WorkMates options overview
This section offers a brief description of the WorkMates extensions available for
RIPMate.
Related topics:
• “Your RIPMate security code” on page 7
• “Enabling options” on page 8
• “Adding WorkMates options” on page 8.
Extended Workflow
The Extended Workflow option adds RipSpool, a dedicated input plug-in providing extra support for larger, multi-user installations. For more details see
Chapter 2 • Extended Workflow.
InRIP OPI Manager
Enables you to work faster on your workstations by providing low-resolution
versions of large image files, which would otherwise take up extra disk space
and slow down your workstation and network. The OPI utilizes an image
shrinker and an OPI filter. The image shrinker creates low-res versions of incoming high-res images. You can then design layouts using the low-res images at
your workstation. When you send the job to the RIP for output, the OPI filter
locates the originals and replaces the low-res images with their high-res versions.
For more details see Chapter 3 • InRIP OPI Manager.
ProofMate
The ProofMate proofing option lets you use any low- or high-end printer or plotter as a proofing device with RIPMate in front. You can even connect several
proofers/printers to the same RIPMate on one license. The only thing you need is
a standard Windows printer driver. With ProofMate, any of thousands of printers
can be used for proofing at the cost of just one printer driver. ProofMate allows
simultaneous output to a proofer and to any other output device, such as an imagesetter. While you are sending one job to the proofer, you can be sending another
job to the imagesetter, thus greatly improving your output productivity. Proof-
6
AG50603 Rev. 2
Chapter 1 • Introduction
Your RIPMate security code
Mate makes use of industry-standard ICC profiles to provide precise color reproduction and final press color emulation. For more details see Chapter 4 • InRIP
ProofMate System.
CIPMate CIP3 Support
CIP3 files are used to link printing and post-printing processes closer to the prepress phase. With the CIPMate option, RIPMate generates CIP3 files on the fly as
the imagesetter is driven, using exactly the same screened data. This means that
the PostScript job only has to be processed once, compared with systems that use
a separate output driver for CIP3. Thus, only half as much time is required, and
the cost and inconvenience of maintaining a duplicate CIP3 setup for each imagesetter setup is avoided. For more details see Chapter 5 • CIPMate CIP3 Output.
Your RIPMate security code
If you choose to purchase a new WorkMates option for RIPMate after your initial
purchase of RIPMate, you will be asked to supply your RIPMate security code when
you order the option. This code is used when generating the license code that will
enable your new option.
The security code for your copy of RIPMate is hard-wired into your RIPMate dongle.
Please note that the number printed on the dongle itself and marked as serial number
is the dongle hardware serial number and not the same as the RIPMate security code.
While RIPMate is starting up, it reports the security code in the RIPMate main window. If you order additional options after your initial purchase of RIPMate, your
ECRM dealer will ask you what your RIPMate security code is. To find it, start up
RIPMate and watch the RIPMate main window for the code.
You can also read the security code in the ECRM License setup.
AG50603 Rev. 2
7
Chapter 1 • Introduction
Enabling options
Enabling options
All of the options available for extending RIPMate are shipped on the WorkMates
CD and installed when you install the software. However, some options must be
installed separately. To activate one or more of the options, you must enter a key
number, which is supplied to you by your ECRM dealer.
The procedure for enabling each option varies slightly, as summarized in Table 1.1.
RIPMate WorkMates Option
Enabling Procedure
ProofMate Color Proofing System
Enter the key number as described in “Adding WorkMates
options” on page 8.
CIPMate CIP3 File Support
Enter the key number as described in “Adding WorkMates
options” on page 8.
Table 1.1 Enabling methods for RIPMate WorkMates options
Each key number activates a specific RIPMate WorkMates option and is tied to the
unique security code assigned to your copy of RIPMate.
Please contact your ECRM dealer for details of pricing on each option or bundle of
options.
Adding WorkMates options
ECRM has developed several WorkMates options that build on top of the standard
RIP and options developed by Harlequin. The WorkMates options are designed to
improve your results and make your workflow faster and easier.
You can add the WorkMates options using ECRM "License Setup," described below.
LICENSE SETUP
If you do not use RipManager or DotManager to control your imagesetter you can
add the license codes for the WorkMates options in the License Setup program,
which is installed with RIPMate.
If you have purchased WorkMates options, ECRM will send you a set of software
licenses, which you must enter into the License Setup program to enable each feature.
8
AG50603 Rev. 2
Chapter 1 • Introduction
Enabling options
The license codes are tied to the unique security code assigned to your copy of RIPMate.
To add one or more of these options in License Setup:
1 • Click Start>All Programs>ECRM WorkMates>Tools & Utilities>ECRM
License Setup to start the "License Setup" program.
Figure 1.1 License Setup dialog
2 • The License Setup dialog opens.
This dialog contains registration
fields and security information
that are needed for the WorkMates options.
If you order WorkMates options,
you will need to tell your ECRM
dealer what the security code for
your dongle is. This code is
"Security Code" number displayed at the top of the dialog.
3 • Enter the license for each option
you have purchased into the
appropriately named field.
Figure 1.2 License Setup dialog
4 • Click OK.
The licenses are updated and the License Setup dialog closes.
AG50603 Rev. 2
9
Chapter 1 • Introduction
Enabling options
10
AG50603 Rev. 2
Chapter 2
Extended Workflow
2
The Extended Workflow option provides extra support for larger, multi-user installations. It adds RipSpool, a dedicated input plug-in. It can be used with any DotMate/
DPX imagesetter but must be run under Windows 2000, Windows XP, or Windows
Server 2003.
AG50603 Rev. 2
11
Chapter 2 • Extended Workflow
Enabling the Extended Workflow Option
Enabling the Extended Workflow Option
The Extended Workflow Option is included in ECRM RIPMate free of charge and no
code is needed to activate the option.
RipSpool
RipSpool is an input plugin for RIPMate. It enables you to create a virtual printer on
the network for each page setup you create in RIPMate. It has four major advantages
over the other kinds of input plugins:
•
It can communicate with both Mac and PC workstations.
•
It can communicate with more than one workstation at a time.
•
It stores jobs in a queue, thereby freeing the network and workstations more
quickly.
•
It is very easy to configure.
For these reasons, you should always use RipSpool for your input if you have the
Extended Workflow option.
Setting up RipSpool input
For Windows 2000, or XP most of the considerations for setting up RipSpool with
RIPMate are included in the RIPMate User Guide, with the exception of setting up
the Configure RipSpool dialog (explained below.)
For Windows Server 2003, the following additional procedure applies that you need
to perform before setting up a RipSpool printer:
1 • Choose Run from Windows’ Start menu.
2 • In the dialog that opens, enter:
gpedit.msc
12
AG50603 Rev. 2
Chapter 2 • Extended Workflow
RipSpool
3 • Press Enter.
4 • In Computer Configuration > Administrative Templates > Printers, disable the
“Disallow installation of printers using kernel-mode drivers“ option.
5 • Close the window. (It is not necessary to reboot.) Continue with setting up
RipSpool.
The RipSpool Configuration dialog
Each type of input channel used by RIPMate is set up in the same way. The only visible difference between them appears when you click on the Configure button in the
Input Channel Edit dialogs.
Figure 2.1 The Input Controller window
AG50603 Rev. 2
13
Chapter 2 • Extended Workflow
RipSpool
The Configure RipSpool dialog enables you to assign a DOS share name for the input
and to enable other RIPMate options to use RipSpool.
Figure 2.2 The Configure RipSpool dialog
The settings available in this window are explained below.
Dos Share Name
This name will appear on some PC workstations to identify the RipSpool input
channel over the network. The setting is optional. To assign a DOS share name,
simply enter a unique and valid 8.3 character share name in the space provided.
If you leave the space blank, a default share name will be used.
Enable OPI Filter
If you are using the InRIP OPI Manager, the Configure RipSpool dialog will also
have a check box for activating the OPI filter. See “InRIP OPI Manager” on
page 15 for more information.
Allow ProofMate to create...
If you are using ProofMate, the Configure RipSpool dialog will also have a
check box for allowing ProofMate to create an output device for the current input
channel. See “InRIP ProofMate System” on page 31 for more information.
14
AG50603 Rev. 2
Chapter 3
3
InRIP OPI Manager
This chapter contains information about setting up and using the InRIP OPI Manager.
Overview
An OPI is a program that creates low-resolution versions of all supported images and
other artwork and stores the high-resolution versions on a disk available to the RIP
PC. (As a known limitation, network operation is not currently supported.) When the
RIP receives a print job with low-res OPI images embedded in it, InRIP OPI Manager replaces the low-res image with the associated high-res image and then RIPs the
job.
The OPI utilizes an image shrinker and an PostScript filter. The image shrinker creates low-res versions of incoming high-res images. When you send the job to the RIP
for output, the PostScript filter locates the originals and replaces the low-res images
with their high-res versions.
AG50603 Rev. 2
15
Chapter 3 • InRIP OPI Manager
The OPI folder structure
The advantage of this system is that the low-res versions take up less disk space on
the workstation and are faster to work with in layout programs (especially on slower
machines). Moreover, the low-res versions are faster to send across the network to
the RIP.
Note that for InRip OPI Manager to work correctly, you must use an RipSpool input
channel, as described in “RipSpool” on page 12. RipSpool is part of the RIPMate
Extended Workflow option, which means that you must be using RIPMate Extended
Workflow before you can add InRIP OPI Manager.
Once InRIP OPI Manager is installed, the image shrinker will always be running
while the RIP PC is turned on, even when RIPMate is not running.
The image shrinker can operate on the following types of files:
•
TIFF (6.0)
•
EPS
•
DCS (1 & 2)
The OPI folder structure
InRip OPI Manager is configured to watch a specific set of folders. These are called
the input folders. The OPI maintains an output folder with two sets of folders: one for
high-resolution images, the other for the low-resolution versions created by the OPI.
Since each of these sets of folders (input, output, high-res, and low-res) can contain
many sub-folders, each set is called a tree.
Each time a new subfolder is added under the input tree, it is automatically also created under the output trees for the high-resolution and low-resolution images. Each
time you add an image into any subfolder in the input tree, that image is automatically moved into the corresponding subfolder in the output tree. Then a low-resolution version of the image is created and placed in the corresponding subfolder in the
output tree. A simplified illustration of this process is given in Figures 3.1 to 3.3.
16
AG50603 Rev. 2
Chapter 3 • InRIP OPI Manager
The OPI folder structure
Output
Input
A
Hi
Lo
B
A
A
C
D
B
B
C
C
E
D
D
No images
E
E
Original versions
Low-res versions
Figure 3.1 OPI is awaiting input
Input
Output
A
Lo
Hi
B
A
C
D
A
B
B
C
C
E
N
New folder with
scanned images
D
D
E
E
Figure 3.2 User creates a new folder and scans some images
AG50603 Rev. 2
17
Chapter 3 • InRIP OPI Manager
Enabling InRIP OPI Manager
Output
Input
A
Lo
Hi
A
A
B
B
B
C
C
C
D
D
D
E
E
E
N
N
N
Images are moved
from here to
high-res tree.
Image in matching
high-res folder.
Low-res version is
created and saved to
a matching folder
Figure 3.3 OPI mirrors the folder and creates low-res versions
Enabling InRIP OPI Manager
OPIMate is enabled in the ECRM RIP free of charge.
To begin you must configure RIPMate to use the OPI Manager. This configuration
consists of two steps:
1 • Configure RipSpool to use the OPI filter by marking the Enable OPI Filter
check box in the Configure RipSpool dialog. See “RipSpool” on page 12 for
details.
For more information about selecting input plugins for page setups, see the
ECRM RIPMate User Guide.
18
AG50603 Rev. 2
Chapter 3 • InRIP OPI Manager
Configuring InRIP OPI Manager
2 • Open the Page Setup window for the appropriate setup(s) and choose Enable
OPI Filter from the drop-down list under the Enable Features check box (you
must also mark this check box).
For more information about using the Page Setup window, see the ECRM RIPMate User Guide.
Note that the image shrinker is always running in the background. This means that
you do not need to run RIPMate or have the Enable OPI Filter check box or page feature selected to use the image shrinker.
Configuring InRIP OPI Manager
To use the OPI, you must configure InRip OPI Manager to monitor a specific folder,
or set of folders, for incoming high-resolution images and define output folders in
which to save high-res and low-res images from each input. The InRip OPI Manager
program is used for configuring these folders. While it is running, the OPI Manager
window is visible on your screen.
AG50603 Rev. 2
19
Chapter 3 • InRIP OPI Manager
Configuring InRIP OPI Manager
Figure 3.4 The OPI Manager window
The OPI Manager window shows a status report for the OPI. A log of all actions is
kept by the OPI and displayed here.
If problems arise with the image shrinker, a log of OPI-related issues can be displayed using the Event Viewer of Windows:
1 • Choose the Event Viewer from the Start menu at Start > Programs > Administrative Tools > Event Viewer.
2 • Check for events related to FDLowResGen.
To configure the input and output folders, select Setup from the OPI Manager menu.
The Setup dialog appears.
20
AG50603 Rev. 2
Chapter 3 • InRIP OPI Manager
Configuring input folders
The Setup dialog has two tabs:
•
Image Shrinker, which controls the behavior of the “shrinker”, which creates the
low-res images. The dialog shows each of the watched input folders, and the destination folders for both high- and low-res images.
•
PostScript Filter, which controls where the OPI will search for hi-res versions of
images referenced in incoming print jobs. The dialog shows a list of folders in
which the OPI will search.
Configuring input folders
Use the Image Shrinker tab of the Setup dialog to view and edit your input folders.
InRip OPI manager will watch all listed folders, and all sub-folders of those listed,
for incoming files and folders.
Figure 3.5 The Image Shrinker Setup dialog
AG50603 Rev. 2
21
Chapter 3 • InRIP OPI Manager
Configuring input folders
Defining input and output folders
To add new folders to the list, click on the Add button. The Edit Folder Entry dialog
appears. Use it to define a folder to watch for input, and to define where the OPI will
place the high- and low-res images when it is done. You can type the folder names
directly in the fields, or use the Browse buttons to locate existing folders on your
disk. If you type a path that does not already exist, the OPI Manager will create it.
Figure 3.6 The Edit Folder Entry dialog for input folders
Note that the output folders must not be contained inside any of the watched folders,
or a redundant loop will be created. The program will refuse your entry if you try to
do this.
When you define a new input folder, you must always also define the output folder,
which contains a high-res folder and a low-res folder. The high-res output folder that
you specify is automatically added to the list of folders searched by the PostScript
Filter when a print job with OPI references arrives at the RIP.
Several input folders can be configured to output to the same set of output folders.
To edit an input folder, click on the target folder and then click on the Edit button (or
double-click on the target folder). The Edit Folder Entry dialog will appear, just as
described above.
To remove an input folder, click on the target folder and then click the Remove button (or press the DELETE key.)
If you would like to rearrange the order of the list, click on a target input folder and
use the Move Up and Move Down buttons. This will not affect the function of the
OPI.
22
AG50603 Rev. 2
Chapter 3 • InRIP OPI Manager
Configuring the PostScript filter
Output Preferences
The sizes of output files are controlled from the Edit Folder Entry dialog’s Resolution
field. Provided that the image will not violate the other output preferences settings,
the image shrinker will create a low-res output image using the resolution specified in
this field.
If a file name already exists
To adjust what happens if the OPI Manager encounters an identically named file in
an output folder after processing an input image, use the Overwrite existing files
check box in the Edit Folder Entry dialog. If checked existing files in the output folders will always be replaced by incoming images of the same name.
Configuring the PostScript filter
When a print job that includes OPI references arrives at the RIP, InRip OPI Manager
searches for the high-res versions and replaces the low-res images. The OPI must be
told where to look for the high-res images. To define the search folders, use the PostScript Filter tab of the OPI Manager Setup dialog. It is called a PostScript filter
because it filters each incoming PostScript job looking for OPI images.
AG50603 Rev. 2
23
Chapter 3 • InRIP OPI Manager
Configuring the PostScript filter
Figure 3.7 The PostScript Filter setup dialog
As mentioned above, each time you add an input folder in the Image Shrinker tab, the
output folder defined for that input is added to the High-res Search list.
The folders will be searched in the order shown in the PostScript Filter Setup dialog.
You can therefore increase the speed of the process by placing the most often used
high-res folder first in the list. To move a folder up or down in the list, click once on
a folder name and use the Move Up and Move Down buttons.
To remove a folder for the search list, click on the target folder and click on the
Remove button (or press the DELETE key.) Note that you will not be permitted to
remove a high-res folder that is configured as an output folder for any of the currently
defined input folders from the Image Shrinker tab.
In some cases, you will want the OPI to search in folders that are not associated with
any of the current input folders. For example, you may keep an image archive, or use
another OPI from time to time. To add a new folder to the search list, click the Add
button. The Edit Folder Entry dialog appears.
24
AG50603 Rev. 2
Chapter 3 • InRIP OPI Manager
Reading the OPI log
Figure 3.8 The Edit Folder Entry dialog for search folders
You can type the folder names directly in the input fields, or use the Browse buttons
to locate existing folders on your disk. If you type a path that does not already exist,
the OPI Manager will create it.
To edit a folder in the search list, click on the target folder and then click on the Edit
button (or double-click on the target folder). The Edit Folder Entry dialog appears, as
described above. Note that you will not be permitted to edit a high-res folder that is
configured as an output folder for any of the currently defined input folders from the
Image Shrinker tab. Also note, that you can use any folder available to your PC via
the network.
Reading the OPI log
As mentioned above, the main OPI Manager window displays a message each time
the OPI performs an action.
AG50603 Rev. 2
25
Chapter 3 • InRIP OPI Manager
Entering images into the OPI system
Figure 3.9 The OPI Manager window
All actions are stored in a log file on your hard disk—the OPI Manger window displays this file.
After some time, most of the information in the log file will become out of date. You
can erase all of the old entries by selecting Edit Ô Clear Log.
Entering images into the OPI system
1 • Create a new image—for example by scanning.
2 • Inspect and edit the image until it is ready for print.
26
AG50603 Rev. 2
Chapter 3 • InRIP OPI Manager
Using OPI images in layout
3 • If a suitable folder for the image does not exist, create one in one of the input
directories monitored by InRip OPI Manager.
For example, each publication should have its own folder, so that the designers
can find the image easily. Use the following techniques to make sure the OPI
will be able to locate the original high-res image at print time:
• Use unique names for each image file.
• Use several sub-folders, so that the path to each image will be unique.
4 • Save the image in an appropriate folder.
InRip OPI Manager will find the image and move it to an identically named
folder in the configured hi-res tree. It also creates a low-res version and saves it
in an identically named folder in the low-res tree.
IMAGE FILE ERRORS
If the file contains an error, it will be moved to the high-res folder and remain there.
In the low-res folder, a text file with an error message will be created.
Using OPI images in layout
When creating layouts that use images from the OPI system, designers should always
import images from the low-res tree. For best results, do not move the low-res images
out of their folders in the low-res tree. This will help make sure that:
•
You are always using the low res images for highest performance during layout
•
InRip OPI Manager can quickly and easily find the correct high-res images when
it is time to print.
Printing jobs with OPI images
Most layout programs are prepared to create OPI output. They include an option
somewhere in their Print dialog that allows you to “exclude images” or “omit
AG50603 Rev. 2
27
Chapter 3 • InRIP OPI Manager
Using OPI with Adobe PageMaker
images”. Sometimes, the setting is listed under a heading that mentions OPI. When
you send a job containing low-res OPI images to print, be sure to use the exclude
images setting. See the documentation for your layout software for complete instructions. It is not strictly necessary to omit images in order for the OPI to work, but performance will improve, and problems will be avoided if you do.
When you choose to exclude images in a print, your layout application adds a comment in its PostScript output that notes that an OPI image belongs there, and includes
the file name of that image. When the PostScript Filter in InRip OPI Manager sees
such a comment, it locates the high-res image and inserts it into the PostScript job.
As noted above, in order for InRip OPI Manager to search for your high-res images,
you must use an RipSpool input channel, as described in “RipSpool” on page 12.
Using OPI with Adobe PageMaker
The default settings in Adobe PageMaker assume that you are printing to a local laser
printer and that all OPI images contained in your document will be present on your
machine. However, this is not the situation if you are working in a print house using
an imagesetter and InRIP OPI Manager. Therefore, you must change the settings
when you import EPS or DCS images, both of which contain comments that identify
the OPI source. If you do not, your job may produce an unexpected end of file error
when you try to print.
The first time you import a low-res OPI EPS graphic (as from Adobe Illustrator or
Macromedia Freehand) or DCS (Desktop Color Separation) image into a job, use the
following procedure:
28
AG50603 Rev. 2
Chapter 3 • InRIP OPI Manager
Using OPI with Adobe PageMaker
1 • Mark the “Show Filter Preferences” check box in the “Place document” dialog.
Then click “OK”.
Note that if you are using PageMaker 5.0 (instead of 6.0 or later), the Show Filter Preferences check box is not present. Instead, you must hold down the SHIFT
key and then click on OK.
Figure 3.10 PageMaker’s Place document dialog
2 • The EPS import filter dialog appears. Look at the “Read embedded OPI image
links” check box. If it is marked, click on the check box to unmark it.
This causes PageMaker to ignore the OPI comments in the graphic for now.
PageMaker will include the OPI comments directly in the output PostScript
file, so that InRIP OPI Manager can find the correct images for final output.
AG50603 Rev. 2
29
Chapter 3 • InRIP OPI Manager
Using OPI with Adobe PageMaker
Figure 3.11 PageMaker’s EPS import filter dialog
3 • Click on OK to import the image.
PageMaker should remember your EPS import filter settings from now on, but you
should check the setting the next time you start working with PageMaker and each
time you start working on a new job.
For more information about using PageMaker with an OPI, please see Adobe’s
World Wide Web site at http://www.adobe.com. If you do not have web access,
please contact your Adobe dealer for more information about using OPI with PageMaker.
30
AG50603 Rev. 2
Chapter 4
InRIP ProofMate System
4
The ProofMate color proofing option lets you use any low- or high-end printer or
plotter as a proofing device with RIPMate in front. You can even connect several
proofers/printers to the same RIPMate on one license. The only thing you need is a
standard Windows printer driver. With ProofMate, any of thousands of printers can
be used for proofing for the cost of just one printer driver.
ProofMate allows simultaneous output to a proofer and to any other RIPMate output
device, such as a DPX 4 imagesetter. While you are sending one job to the proofer,
you can be sending another job to the imagesetter, thus greatly improving your output
productivity.
AG50603 Rev. 2
31
Chapter 4 • InRIP ProofMate System
ICC color management
ICC color management
ProofMate makes use of ICC color management profiles for precise color reproduction.The International Color Consortium, or ICC, has defined standards for describing the color characteristics, or color space, of color devices. ICC standards are used
by the printing industry to describe printers, printing presses, plotters, scanners and
inks. Other industries, such as the film and video industries, also use ICC color profiles for color management.
To use ProofMate’s color management features, all you need is the ICC color profiles
for the proofing device and for the press or printer that you want to emulate. You can
get the profile for your printer from the manufacturer, or you can create the profile
yourself using third-party software, printing a test page and measuring its colors.
Using ProofMate, you can define the color space of the PostScript job, the proofing
device, the printing press, and any other device that you want to emulate. Precise
color matching can be done on any color proofer with any desired result. For example, a proofer can be configured to show the colors that would result from printing a
job on a specific printer, or to show the colors that would result from printing a proof
on another well-known proofer or proof system.
It is possible to use Harlequin ColorPro with ProofMate to obtain ICC color management. See the ColorMate User Guide.
RIPMate is shipped with several default ICC profiles. These profiles are located in
the ICC folder in the RIPMate root folder.
Creating ICC profiles for Windows
Most color printers are supplied with ICC profiles for different types of paper (matte,
glossy and so on). These “standard” ICC profiles vary greatly in quality. For best
results, ECRM recommends that you create your own profile for each type of paper
that you will use with your proofer.
32
AG50603 Rev. 2
Chapter 4 • InRIP ProofMate System
Setting up ProofMate
ProofMate works with standard Windows printer drivers, which work best with RGB
ICC profiles. Therefore, when choosing third party products for creating ICC profiles, make sure the product can create an RGB profile.
Setting up ProofMate
Before setting up ProofMate, make sure that your proofing printer has been correctly
installed. Starting with the printer itself, check any switches or settings that may affect
the output. Next, from the Control Panel in Windows, open the Printers item and install a
driver for the printer. Finally, check the properties and settings for the printer again to
make sure they are correct.
Once the printer has been set up correctly, avoid changing any of its settings. RIPMate uses the settings in the Windows Control Panel, so if you change these, you
may also have to change existing page setups.
Once you have activated the ProofMate option, you can set up color profiles for each
of your printers. From the RIPMate menu, select Page Setup Manager. Click on New
to create a new page setup, or select the page setup you want to edit and click on Edit.
In the Edit Page Setup window, make sure that the output device is a printer, and
click on Configure Device. For a color device, the window shown in Figure 4.1 will
appear. For a monochrome (black and white) device, the window shown in Figure 4.2
will appear.
Proofing on a color device
The settings in the Configure ProofMate Color Device window are explained below.
AG50603 Rev. 2
33
Chapter 4 • InRIP ProofMate System
Setting up ProofMate
Figure 4.1 The Configure ProofMate Color Device window
Color Mode
This sets the color mode of the raw color data that the PostScript interpreter will
generate from the incoming PostScript job.
If you are using ICC Color Management, this field must be set to the color mode
of the ICC profile of the Device to Emulate or Color-Match, or to the color mode
of the ICC profile of the incoming print job, if that is being used.
If you are not using ICC Color Management, it is relatively unimportant which
color space is selected. Selecting RGB will produce slightly faster output.
Anti-Aliasing
Anti-aliasing is used to smooth the edges of graphic elements when printing on
low-resolution printers. The larger the kernel size chosen (None, 2x2, 3x3, 4x4,
5x5 or 6x6), the greater the effect will be.
Print Separation
The check boxes under Print Separation let you create proofs with any desired
combination of process colors—for example, progressive proofs for a one- or
two-color press.
34
AG50603 Rev. 2
Chapter 4 • InRIP ProofMate System
Setting up ProofMate
The colors selected can be modified in the Output Controller window after RIPing the job. This means that more than one type of proof can be produced without
changing the page setup.
For example, to produce a cyan+magenta proof for the first pass on a two-color
press, and then a four-color proof for the second pass, you could configure the
page setup for the two-color proof, output it, and then manually select the
remaining colors via the Output Controller window and output the proof again.
Print single separation in black
If only one process color is selected for the proof, this check box lets you print
out a cyan, magenta or yellow separation in black, rather than colored, ink, which
emulates the film output rather than the printed result.
ICC Color Management Setup
To use color management, you must specify a color profile both for your proofing printer and for the device you want to emulate (usually a printing press). It is
also possible to specify a color profile for the incoming job, if the job was
intended for another press or output system than the one you are using.
Enable ICC Color Management
This setting turns ICC color management on or off.
This proofer
In this field, you specify the ICC color profile of the proofing device you are
going to use. Typically, this will be the profile of the proofing printer, but it can
also, for example, be the profile of a monitor.
Device to emulate or color-match
In this field, you specify the ICC color profile of the press or device you want to
emulate (typically, a printing press). This makes the proofing printer show you
what the job will look like when you print it on the press. Alternatively, you can
enter the ICC color profile of another, well-known proofing system. This will
show you on your current proofing printer what the job would have looked like if
you had printed it on the other proofing system.
AG50603 Rev. 2
35
Chapter 4 • InRIP ProofMate System
Setting up ProofMate
Optional job profile
This field is intended for expert users. If you are in doubt about it, set it to None.
Optional Job Profile lets you specify the ICC color profile of the incoming job
being sent to the RIP. This is only relevant if the job’s profile is different from
that of the emulated device—in other words, if the job was originally intended
for another printing press or was created using a color space different from that
of the current press—and if you use color management in your workflow for the
press and normally require the job colors to be changed to the press colors.
Rendering intents
The rendering intents drop-down lists enable you to decide how colors will be
changed when they are converted from one color space to another space that has
a different gamut. The following options are available:
Absolute colorimetric
This style provides the closest possible simulation of a final print. Use this
style to obtain the most accurate possible image of what your printing press
can produce. With this style, all colors that are contained within the gamut of
both the proofer and the printer are reproduced exactly. Colors outside the
device gamut are mapped onto the closest point available in the gamut. This
style also simulates the “white” paper color used by the press. Typically, the
paper used by proofers is more white than that used on the final press, so
when you use the absolute colorimetric style, ink will be applied to the white
areas of the image (areas having all CMYK values equal to zero) to reproduce the paper color of the final press.
Relative colorimetric
Like the absolute colorimetric style, this style provides an accurate simulation of the press colors, mapping in-gamut colors directly when possible and
choosing the closest in-gamut color for image colors that can not be reproduced on the press. However, this style does not simulate the “white” paper
color used by the press. Areas where no ink will be applied by the press (the
white areas) will also receive no ink on the proofer. The brightnesses (but
not the hues) of all of the other colors in the image will be scaled to fit the
slightly expanded gamut that results. This creates a more clean/brilliant
proof, but will not be as accurate. You might choose to use this style if you
36
AG50603 Rev. 2
Chapter 4 • InRIP ProofMate System
Setting up ProofMate
or your clients are bothered by the scattered colored dots that appear in the
white areas when you use the absolute colorimetric style.
Perceptual
This style maps the entire device-independent color space onto the gamut of
the printer by compressing the range of in-gamut colors to make room for
out-of-gamut colors. This avoids the “clipping” of colors that results with the
colorimetric styles because two colors that are different in the original will
also provide a similar contrast in the output. However, this style will not
generate an accurate proof print that reflects results attainable by an actual
press. Use this style if you are creating a final print using the proofer (for
example, a one-off poster print).
Saturation
This style is very similar to the perceptual style, except that the mapping
used to match the original colors to the output colors is weighted to favor
more color saturation. Your choice of using perception or saturation will
depend on your preferences, your proofer and the types of prints you are
making. As with the perceptual style use this style if you are creating a final
print using the proofer (for example, a one-off poster print).
Proofing on a monochrome printer
Monochrome (black and white) printers are often used for imposition proofing, i.e.,
for checking that all the pages of the job are placed correctly. They are also useful for
making sure that all fonts and images are present.
Figure 4.2 The Configure Monochrome Device window
Mode
Monochrome printers, such as standard black-and-white laser printers, can only
print 1-bit color. This means that 8-bit gray scale data must be converted to 1-bit.
AG50603 Rev. 2
37
Chapter 4 • InRIP ProofMate System
Simple proofing using color management
The Mode setting determines whether the data is converted by the RIP or by the
printer itself. Monochrome (1-bit) means that conversion takes place in the RIP.
Gray (8-bit) means that conversion takes place in the printer.
Anti-Aliasing
Anti-aliasing is used to smooth the edges of graphic elements when printing on
low resolution printers. The larger the kernel size chosen (None, 2x2, 3x3, 4x4,
5x5 or 6x6), the greater the effect will be.
The Anti-Aliasing setting has no effect if Mode is set to Monochrome.
Simple proofing using color management
Printer profile (the
proofing printer)
Emulation profile (the press the
job will be printed on)
CMYK
PostScript
file
RIP
Windows
printer driver
CMYKRGB
RGB
Color
transformation
Proofer
Figure 4.3 Using ICC Profiles for Proofing
Figure 4.3 shows how ICC profiles can be used to set up a printer for proofing. In the
example, the job is a PostScript file. The emulation profile is the profile of the printing press, and the printer profile is the profile of the proofing printer.
Since the emulation profile uses CMYK colors, the RIP must be set to output
CMYK. This is done with the Color Mode setting. The data are passed from the RIP
through the emulation profile to the printer profile, where the color information is
38
AG50603 Rev. 2
Chapter 4 • InRIP ProofMate System
Proofing using the Optional Job Profile
changed from CMYK to RGB, and finally sent to the Windows printer driver for
printing on the proofing printer.
In this example, the PostScript job was originally intended for the press specified in
the emulation profile. In other words, the color space of the job was the same as that
of the press, and it was therefore not necessary to specify a profile for the incoming
job.
Proofing using the Optional Job Profile
In Figure 4.4, the incoming job was intended for another press or device than the current one, requiring that the color space of the incoming data be adjusted. This is done
by specifying an Incoming Job Profile.
The data is first passed from the incoming job profile to the emulation profile, where
the color data is adjusted so that the job will print correctly on the current press.
Then, the data is passed from the emulation profile to the printer profile, where the
color data is adjusted again so that the proofer prints what will be printed on the current press or device.
RIP
CMYK
or
RGB
Color
transformation
CMYK
or
RGB
From To
Incoming job
profile
Color
transformation
RGB
From To
Emulation
profile
Printer
profile
Windows
printer driver
Figure 4.4 Adjusting color using the Incoming Job profile
AG50603 Rev. 2
39
Chapter 4 • InRIP ProofMate System
Sending output to a proof printer
Sending output to a proof printer
ProofMate makes all of the printers configured for Windows available through RIPMate . You can then use all of the standard RIPMate tools to configure the output to
your proof printer and make the printer available over your network.
1 • Set up your proof printer using the standard Windows printer tools.
See “Setting up ProofMate” on page 33 for details.
2 • Create a page setup that uses your proof printer as its output device.
ProofMate creates a RIPMate output device for each printer configured using
the standard Windows printer settings. Create a new page setup and select your
proofer in the Device drop-down list in the Edit Page Setup dialog box. Make
other page setup settings as required.
For complete instructions on how to create a page setup, see the ECRM RIPMate User Guide.
3 • Configure the ProofMate settings.
Click on the Configure Device button in the Edit Page Setup dialog box. See
“Setting up ProofMate” on page 33 for more information about the available
ProofMate settings.
4 • Create an input channel that uses the new page setup.
Create an input channel as usual, as described in the ECRM RIPMate User
Guide. Note that if you are using RipSpool, which is included with the
Extended Workflow option, then you must enable ProofMate in the Configure
RipSpool dialog. See “RipSpool” on page 12 for instructions.
5 • To use the proofer, send a job to RIPMate as usual, choosing an input channel
that you created using ProofMate.
You can create as many ProofMate inputs channels as you like, each using a
different page setup.
40
AG50603 Rev. 2
Chapter 4 • InRIP ProofMate System
Sending output to a TIFF file
Sending output to a TIFF file
In addition to creating physical proof prints, you can also use ProofMate to create
color-calibrated TIFF files, which can be opened in any TIFF-reading application.
As with physical proofers, you can apply an ICC profile when you use the ProofMate
TIFF output device. The profile you choose will be embedded in the TIFF file, which
means that if you open it using an ICC-aware application, such as Adobe Photoshop,
the colors shown on your screen will simulate those that will appear from the final
press (or any other device you choose).
Unlike the standard TIFF output channel included with RIPMate , ProofMate automatically creates a new folder for each job sent to the ProofMate TIFF output device.
This makes it much easier for users to locate their proofs on the server. When a user
sends a job to ProofMate TIFF, ProofMate reads the PostScript header on the job and
creates a new folder based on the file name of the job. This folder is placed inside a
ProofMate folder, which is available to all users over the network. The properties of
the image created depend on the settings for the page setup associated with the ProofMate TIFF output channel.
Setting up and using ProofMate TIFF output is just like using a physical proofer or an
imagesetter. The only difference is that the Configure ProofMate Color Device window includes an extra field for choosing the folder in which to save the resulting
TIFF file, as shown in Figure 4.5.
AG50603 Rev. 2
41
Chapter 4 • InRIP ProofMate System
Sending output to a TIFF file
Figure 4.5 The Configure ProofMate Color Device window
To use ProofMate to create a TIFF file:
1 • Create a page setup that uses “Tiff ProofMate Device” as its output device.
ProofMate creates a new type of output device called ProofMate TIFF. To use
it, create a new page setup and select it in the Device drop-down list in the Edit
Page Setup dialog box. Make other page setup settings as required.
For complete instructions on how to create a page setup, see the ECRM RIPMate User Guide.
2 • Configure the ProofMate TIFF output device.
As with other kinds of output devices, you make settings for ProofMate TIFF
by clicking on the Configure Device button in the Edit Page Setup dialog box.
See “Setting up ProofMate” on page 33 for more information about the available ProofMate settings. Note that you must also specify an output folder in the
Output Path field, which appears only when you are configuring a Tiff ProofMate Device, as shown in Figure 4.5.
3 • Create an input channel that uses the ProofMate TIFF page setup.
For complete instructions on how to set up an input channel, see the ECRM
RIPMate User Guide.
42
AG50603 Rev. 2
Chapter 4 • InRIP ProofMate System
Troubleshooting
4 • To use the proofer, send a job to RIPMate as usual, choosing an input channel
that you created using the ProofMate TIFF output device.
You can create as many ProofMate TIFF inputs channels as you like, each using
a different page setup.
5 • Once output is completed, open the TIFF file using any standard TIFF-reading
application.
After the job has been through the RIP, a TIFF image, or a set of TIFF images,
will be available in a folder stored inside the ProofMate folder on the RIP PC.
The folder will be named after the file that was sent to ProofMate. Inside the
job folder will be a TIFF image (or set of images) for each page in the job. If
you are using ICC profiles for color management, then be sure to open the TIFF
file with a program that can interpret the embedded profile, such as Adobe Photoshop.
Troubleshooting
PROBLEM: The error message No Printer ICC profile specified appears in the RIPMate window.
SOLUTION: An ICC profile must be specified in the This Proofer field and at least
one of the other fields.
PROBLEM: The error message Incorrect Color-Match ICC profile. Color-Match
profile is RGB, selected color space is CMYK appears in the RIPMate window.
SOLUTION: The Color Mode setting does not match the ICC profile selected in the
Device to Emulate or Color-Match field.
PROBLEM: The output is clipped.
SOLUTION: If the output looks correct in RIPMate’s Roam function but is clipped
in the printer output, check that Paper Size is correctly set in the printer’s Document
Defaults dialogue.
AG50603 Rev. 2
43
Chapter 4 • InRIP ProofMate System
Troubleshooting
44
AG50603 Rev. 2
Chapter 5
5
CIPMate CIP3 Output
CIP3 and PPF
CIP3 is an international standards body that has defined the PPF (Print Production
Format) file format. Files using this format are often called simply “CIP3 files.” They
are used to link printing and post-printing processes closer to the prepress phase by
combining standard PostScript with additional information, such as:
•
Administrative data
•
Image data for creating ink consumption profiles for the printing process
•
Cutting and binding data for the post-printing process
AG50603 Rev. 2
45
Chapter 5 • CIPMate CIP3 Output
CIP3 support in RIPMate
CIP3 support in RIPMate
The WorkMates RIPMate option CIPMate is able to generate CIP3 files on the fly
during output using exactly the same, screened data that it sends to the imagesetter.
This means that the PostScript job only has to be processed once, thereby saving the
time, cost and inconvenience of processing CIP3 separately, as many other systems
require.
Using CIPMate in your workflow
The CIP3 files generated by RIPMate’s CIPMate option contain image data and
transfer curves that can be used by compatible press systems to calculate an ink consumption profile. The resulting files can be used by third-party software that either
generates settings for the printing press or controls the printing press directly.
The CIPMate option cannot integrate CIP3 files generated by other systems into the
output files. Such files must be transferred separately to the CIP3 software at the
press.
Setting up CIPMate
To activate the CIPMate option, you must enter a key code as described in “Adding
WorkMates options” in ECRM License Setup.
Once you have activated CIPMate, you can set CIP3 options for each DotMate/DPX
output device driver or ECRM Tiff to Folder output.
1 • From the “RIPMate” menu, select “Page Setup Manager”.
NOTE: You must stop inputs before you can display the Page Setup Manager;
if necessary, choose the RIPMate
Start Inputs menu option or click the tool bar button that shows a red arrow and
traffic lights.
46
AG50603 Rev. 2
Chapter 5 • CIPMate CIP3 Output
Setting up CIPMate
Figure 5.1 Page Setup Manager dialog box
2 • Select the page setup you want to edit and click on “Edit”.
3 • In the “Edit Page Setup” window, click on “Configure Device.” A configure
device window will open.
The appearance of the window and the CIP3 configuration choices it offers will
depend on the page setup. Here are two examples.
Example 1 - Page Setup for a DPX platesetter
Figure 5.2 Configure Device window for DotMates
AG50603 Rev. 2
47
Chapter 5 • CIPMate CIP3 Output
Setting up CIPMate
4 • Mark the “Enable CIP3 File Generation” check box and make settings in the
“CIP3 Settings” area as described below. (If you want to generate CIP3 files
but not output them to media, mark the "Suppress Output to Media" check box.)
5 • Mark the "Place CIP3 Files At Root-level" check box if you want to place CIP3
files at level 1 (root level) only.
If you do not mark this option CIP3 files are placed as described in “Conventions for naming files and folders” on page 50 and illustrated in Figure 5.4 on
page 51.
Output Folder
Use the Output Folder field to specify a name for the folder into which RIPMate
will place the CIP3 files that it generates. The folder will be created automatically by RIPMate when needed if it does not already exist. If you like, you can
use the Browse button to use a standard browse window to navigate and select a
folder. See also “Conventions for naming files and folders” on page 50.
Generate a file for every:
Use the Generate a file for every drop-down list to choose what type of CIP3
files to generate. You have three options, which are described below and illustrated in Figure 5.4 on page 51.
• Select Color to create a separate file for each color on each page
• Select Page to create one file for each page, each of which will contain information on all the colors in that page
• Select Job to create a single file that contains color information for each
color on each page
Rotate
Use this drop-down list to specify the rotation at which you plan to position the
final film or plate on the press relative to its position as output by the imagesetter. Note that this setting does not affect the rotation of the job on the imagesetter; it only affects the data stored in the CIP3 file so that ink use will be computed
correctly according to the way you plan to position the film or plate on your
press.
48
AG50603 Rev. 2
Chapter 5 • CIPMate CIP3 Output
Setting up CIPMate
Mirror
Mark this checkbox if your final image will be a mirror of the image generated
by the image setter. Note that this setting does not affect the job sent to the imagesetter; it only affects the data stored in the CIP3 file so that ink use will be computed correctly according to the way you plan to create the film or plate on your
press.
Negate
Mark this checkbox if your final image will be a negative of the image generated
by the image setter. Note that this setting does not affect the job sent to the imagesetter; it only affects the data stored in the CIP3 file so that ink use will be computed correctly according to the way you plan to create the film or plate on your
press.
Example 2 - ECRM Tiff - to - Folder Page Setup
Figure 5.3 Configuration window for ECRM Tiff-to Folder
AG50603 Rev. 2
49
Chapter 5 • CIPMate CIP3 Output
Conventions for naming files and folders
Conventions for naming files and folders
Each time RIPMate outputs a job with CIPMate enabled, it creates a four-folder-deep
hierarchy (if one does not already exist):
•
Level 1 is the output folder specified in the Output Folder field of the Configure
Device dialogue.
•
Level 2 is a folder named after the current date, which makes it easy to track the
CIP3 files created on a given day.
•
Level 3 is a folder named after the job.
•
Level 4 is a folder with a unique four-digit ID number for each job. Thus, if a job
is output more than once on a given day (or if different jobs have the same name),
each instance will receive a different ID number.
The individual CIP3 files are placed in the relevant ID folder. They are named
according to the type of file selected in the Generate a file for every: drop-down list
of the Configure Device dialogue:
•
If Job is selected, the file name is the same as the job name.
•
If Page is selected, the file name contains the page number and job name.
•
If Color is selected, the file name contains the page number, job name and color
(C, M, Y, K or the name of a spot color).
A sample file structure is shown in Figure 5.4, below.
50
AG50603 Rev. 2
Chapter 5 • CIPMate CIP3 Output
Conventions for naming files and folders
Level 1
Level 2
Level 3
Level 4
Level 4
Level 3
Level 4
Level 2
CIP3
1998AUG14
Sales brochure
0000
1.Sales brochure (C).ppf
1.Sales brochure (M).ppf
1.Sales brochure (Y).ppf
1.Sales brochure (K).ppf
0002
1.Sales brochure.ppf
2.Sales brochure.ppf
3.Sales brochure.ppf
4.Sales brochure.ppf
Color selected
Page selected
Travel brochure
0001
Travel brochure.ppf
Job selected
1998AUG15
Figure 5.4 Folders and files created for CIP3 files
AG50603 Rev. 2
51
Chapter 5 • CIPMate CIP3 Output
Conventions for naming files and folders
52
AG50603 Rev. 2
Index
AG50603 Rev. 2
53
Index
A
absolute colorimetric
description of 36
adding options 8
Adobe PageMaker 28
B
business graphics
See saturation
C
CIP3 files 45
CIP3, files and folders 50
CIPMate 45
CIPMate, setting up 46
colorimetric
See absolute colorimetric
Configure Device window for DotMates 47, 49
description of 37
image shrinker. See InRIP OPI Manager
InRIP OPI Manager
compatible file types 16
configuring 19
Configuring input folders 21
configuring the PostScript filter 23
directory structure 16
enabling 18
enabling OPI filter 14
entering images 26
Image Shrinker 21
log 25
OPI images in layout 27
output preferences 23
overview 6
printing jobs 27
using PageMaker with 28
L
D
License Setup 8
adding WorkMates options 8
DOS share name 14
DotManager
adding WorkMates options 8
M
E
Extended Workflow option 6, 11
H
High-res Search list 24
O
OPI. See InRIP OPI Manager
I
ICC absolute colorimetric
description of 36
ICC perceptual
description of
ICC profiles
creating 32
in ProofMate 32
ProofMate 32
setting up 35
ICC relative colorimetric
description of 36
ICC saturation
54
mapping styles
absolute colorimetric 36
business graphics 37
perceptual 37
photorealistic 37
saturation 37
AG50603 Rev. 2
P
perceptual
description of 37
photorealistic
See perceptual
PostScript filter 15, 23
PostScript filter. See InRIP OPI Manager
PPF 45
Print Production Format 45
printing jobs with OPI images 27
ProofMate 31–43
Index
anti-aliasing 34
color mode 34
ICC profiles 32
ICC setup 35
print separation 34, 37
rendering intents 36
setting up 33
TIFF output 41
using 31
With a color device 33
R
relative colorimetric
description of 36
rendering intents 36
RipManager
adding WorkMates options 8
RipMate Extended
features 11
RipMate WorkMates options 5
RipSpool
configuration 13
setting up 12
using 12
S
saturation
description of 37
security code 7
security code of RipMate 7
W
WorkMates options
adding 8
AG50603 Rev. 2
55
Index
56
AG50603 Rev. 2