1
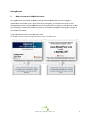
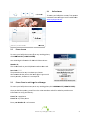
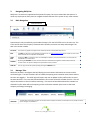
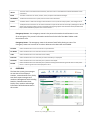
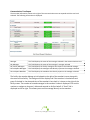
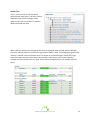
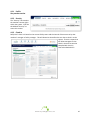
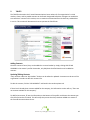
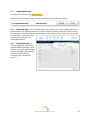
 User Manual: Manager
www.myrallypoint.com
0
1. RallyPoint User Types Members Members comprise of any cardholder that belongs to an organization. Members may include but are not limited to employees, clients, vendors, Board of Directors; investors’ even immediate family if requested. In general, members have a much smaller role than any other user type with regard to the amount of complexity required to run the system. Members have the following capabilities: • Check‐in • Manage Member Profile • Send, Receive and Reply to Corporate Messaging • Receive Corporate Data, such as Documents, Pictures and Video Departmental Managers Departmental managers are basic members that also manage a group or several groups of people. Generally you can define departmental managers directly from your organization chart. Every member is directly linked to his/her departmental manager. Departmental managers have the following capabilities: • Check‐in • Manage Member Profile • Manage Employee Profiles • Upload/Store/Share Documents, Pictures & Video • Create & Manage Events • Send & Receive Corporate Messaging • Setup & Maintain Trusted Communication with Clients, Vendors and Media • Manage Facilities • View Reports Facility Mangers Facility managers are basic members that manage a physical facility/location. Facility managers are tasked with the responsibility to evacuate members located in their facility. Every member should be assigned to a facility manager. Facility managers have the following capabilities: • Check‐in • Manage Member Profile • Manage Employee Profiles • Upload/Store/Share Documents, Pictures & Video • Create & Manage Events www.myrallypoint.com
1
•
•
•
•
Send & Receive Corporate Messaging Setup & Maintain Trusted Communication with Clients, Vendors and Media Manage Facilities View Reports System Administrators System administrators are basic members that also have complete system access. Facility managers are often the people in an organization responsible for setting up and maintaining the RallyPoint system. System administrators have the following capabilities. • Create Communications Tree • Create Facility Tree • Manage Skills • Manage Members • Manage Company Information • Manage employee profiles • Upload/Store/Share Documents, Pictures & Video • Create & Manage Events • Send & Receive Corporate Messaging (requires rights) • Setup & Maintain Trusted Communication with Clients, Vendors and Media • Manage Facilities www.myrallypoint.com
2
Getting SStarted 2. H
How to Acces
ss your RallyyPoint Account Your orgaanization care
es about its peeople and hass implementeed RallyPoint into its emerrgency preparedn
ness and reco
overy plan. In
n the event off an emergen
ncy, you will rreceive an aleert via text message aand/or email. Using your R
RallyPoint Crisis Communication Card, yyou are able tto check in w
with your manager(s), receiive vital recovvery informattion, and delivver messagess informing yo
our manager of your statu
us and locatio
on. Using you
ur RallyPoint C
Crisis Commu
unication Card
d Your RallyPo
oint member carrd contains login
n information forr Online and Pho
one Access: www.myrallypoint.com
3
2.1
Online Acccess To acccess your RalllyPoint accou
unt, first open
n an Intern
net browser aand type into the address b
bar www..myrallypointt.com. 2.2 Phone Accesss To access your RallyPo
oint account, ffrom any worrking phone, dial 1‐888
8‐RALLYPT (1‐‐888‐725‐597
78). Your initiaal login inform
mation for On
nline & Phonee Access: Member Id: This can b
be found on yyour RallyPoin
nt issued mem
mber card. Pass Code
e: **** The pass ccode can be aany 4 numberrs you choosee. We recom
mmend that yyou use the laast 4 digits in yyour social security n
number, howe
ever it is not rrequired. 2.3 Phone Checkk In and Usagge for a Man
nager To access your RallyPo
oint account, ffrom any worrking phone, dial 1‐888‐RA
ALLYPT (1‐888
8‐725‐5978). Once you dial the num
mber, you will hear the voicce attendant and will be assked to provide some informatio
on to verify yyour identity. Press 1 fo
or a payphone
e Press 2 fo
or any other p
phone Enter you
ur Member Id: xxx*xxxxxxxx www.myrallypoint.com
4
This can be found on your RallyPoint issued member card. Pass Code: **** The pass code can be any 4 numbers you choose. We recommend that you use the last 4 digits in your social security number, however it is not required. Once verified you will then hear the Company message as well as your Manager message. Press 1 to leave a check‐in message for your manager Press 2 to leave an announcement message for your direct reports Press 3 to hear your check in messages from your members Press 7 to leave a global company message 2.4 Record a check‐in message for your manager Press 1 to record your 60 second check‐in message Press 9 to disconnect To record a check‐in message you will be prompted to enter your current location 5 digit zip code. RallyPoint can geo‐code your current location on a map for your management team to view. Enter the zip code and then press #. RallyPoint will then prompt you to decide if you can return to work. Press 1 if Yes Press 2 if No After this, you will be asked if you would like to record a voice message for your check in. You will have 60 seconds to record this message, press # when you are finished. Press 1 to review your message Press 2 to re‐record your message Press 3 to deliver the message Once you deliver your check‐in message, you will be asked what other messages you would like to leave. Press 1 for your direct reports Press 2 to leave a Global Company Message Press 7 to disconnect www.myrallypoint.com
5
2.5 Leave an announcement for your members RallyPoint will give you 60 seconds to record this message. Press # when you are finished. Press 1 to review your message Press 2 to re record your message Press 3 to deliver the message to your direct reports 2.6 Listen to your members check‐in messages Remember that only new check in messages will be heard from this option. You will hear the first message on the IVR. After listening to your message, you can: Press 1 to repeat the message Press 2 for the next message Press 3 to return to main menu 2.7 Leave a global company message You will have 60 seconds to record a company‐wide message, press pound when you are finished. Press 1 to review your message Press 2 to re record your message Press 3 to deliver a global company message if you have rights As a manager, you can also hear all of your member check in messages via the website at www.myrallypoint.com www.myrallypoint.com
6
3. Navigating RallyPoint RallyPoint is an extremely sophisticated and powerful system, but it was created with the end user in mind. Any employee can easily learn to navigate the basic features of the system in only a few minutes. 3.1 Main Navigation MAIN NAVIGATION
System Setup is only accessible by system administrators. Click the SYS SETUP icon in the main nav. This is the section where the company’s communication & facility structures are setup and managed. The tabs in this section include: SYS SETUP This option only appears for System Users and allows access to the System Setup menus. INFO The INFO icon will open a new window, bringing the user to www.myrallypoint.net where he/she can learn more about the features and capabilities of RallyPoint. LOCAL INFO Clicking the INFO icon allows the users to view RallyPoint features, unique characteristics, current threats via news feeds and a contact form. SUPPORT By clicking the SUPPORT icon, the user has access to a contact form along with a comment box. A toll‐free contact number to speak to a RallyPoint representative is also provided. SIGN OUT The user signs out of the system by simply clicking the SIGN OUT icon. 3.1 Manager Tabs RallyPoint has built in intelligence that will display the most relevant information to the user and his associated rights. The basic members will see a different opening screen based on event status and last time the user logged in. The initial login will require the user to update his/her profile unless an event has been declared. If an event has been declared the first screen will be the member Check‐In. This will require the member to check in before continuing. If an event has been declared and the member has checked in his/her Inbox will be the opening screen to allow the member quick access to the latest company and manger messaging. OVERVIEW The Overview screen gives managers an overview of the company’s statistics, communications tree, facility tree direct report managers and members. www.myrallypoint.com
7
TRUSTS The Trusts screen is the Online Business Directory. Here the “trusts” are established and maintained between clients and vendors. INBOX The Inbox is where the user sends, receives, stores, composes and broadcasts messages. DOCUMENTS The Documents allows users to upload, store and share critical documents. STATUS The Status section is where the manager checks members in and out, sets the company status, and manages events. REPORTS The Reports Screen allows the user to view real time status reports of the status of the company. Messages can be sent directly from the graphs. Several reports are available including the graphical view of available assets, Member Roster Report, Outbound Efficiency Report and an Interval Check‐in. Emergency Contact – the emergency contact is the person the member should contact in case of an emergency. This person’s information can be found in the left of the Main Toolbar under the welcome note. Emergency Status – The emergency status is the status of each facility during an event. The Emergency Status can have one of six values. Below are the values that are available. NO EVENT Status used when there is not a current event or possible event. NO THREAT Status used when there is an event but a threat is not imminent. ALERT Status used when there is an event and a threat is likely. EVACUATE Status used when there is an event and you need to evacuate your employees. RECOVERY Status used when there is an event and you are past the initial impact. RETURN Status used when there is an event and you are past the recovery phase and entering into the return to work phase. Return is used as a general call to all employees to return. 4. OVERVIEW The Overview screen gives managers an overview of the company’s statistics, communications tree, facility tree direct report managers and members. Management tools including Statistics, Communication View, Facility View, member and manager information will be demonstrated in this section. www.myrallypoint.com
8
Statistics There are 2 line graphs at the top left of the screen. These graphs represent the current check‐in status of all the members that directly and indirectly report to this manager. Direct Report – Report of those members who directly report to you. Overall Report – Report of those members who directly and indirectly report to you. Communications Tree The “Company Tree” on the left will display your current organizational structure. Organizational structures are built during the initial implementation and are unlimited in their flexibility. The department level is displayed in grey text and the manager of that department is displayed in blue. Click through the tree to view the details associated with each level. www.myrallypoint.com
9
Communication Tree Report The overview information shown to the right of the communication tree corresponds with the tree level selected. The following information is displayed: Manager My Manager My Facility Managers Direct Report Managers Direct Report Members This field displays the name of the manager selected in the communications tree. This field displays the name of the manager’s manager selected This field displays the facility managers who report to the selected manager This field displays the managers who directly report to the manager selected This filed displays the members who directly report to the manager selected The facility the member belongs to is displayed to the right of the member’s name along with the status of that facility. The background color displays red if the member is checked out and green if checked in. the date and time of the member’s last check in is shown to the right of the facility status. The number of unread messages in the member’s inbox is displayed. Click on this number to navigate to that user’s inbox and respond on his/her behalf. A “Send” link is displayed to the far right. This allows you to send a message directly to that member. www.myrallypoint.com
10
Facility Tree Click on “Facility View” to view the details associated with each facility. The facility name is displayed in grey and the manager of that facility in blue. Click on the facility to view the details associated with each. When a facility is selected, the manager of that facility is displayed under the field marked “Manager”. The facility name and status is shown to the right of the member’s name. The background is green if that member is checked in and red if checked out. The number of unread messages is shown to the right. Select the number and you will be taken to that member’s inbox where you can now respond to messages on his/her behalf. Click the “Send” link to send a message directly to the member from this report. www.myrallypoint.com
11
4.1 PROFILE The Member Profile is the section in the applicattion that conttains each meember’s criticcal contact, location aand dependen
nt data. The p
profile of a manager can be found by clicking “PROFILE” next to the username in th
he welcome n
note. M
Member profi
les can be uploaded in bu
ulk in the systtem seetup for easyy implementation. B
Be sure to add
d your primarry “C
Contact Inforrmation”. Thiss is th
he place to ad
dd your primaary phone and em
mail address.
4.1.1 A
Adding/Updating Person
nal Informattion Adding/U
Updating pe
ersonal inforrmation – Yoou may noticee your profile has pre‐loaded informaation in it. Th
his is the informatio
on that was likely pre‐load
ded from a daata import from yourr organization
n’s human ressources progrram. Be suree to updatee your information in the m
member profiile. Click to save
e any changes. Adding/U
Updating cu
urrent locatio
on – within the “Personal Informatio
on” section m
members can change their current location b
by simply clickking on the Cu
urrent Locatio
on dropdown
n and clickin
ng to savee the changess. The “Current LLocation” is u
used to definee the exact lo
ocation of an eemployee. If you move fro
om one placee to another b
be sure to upd
date your “Cu
urrent Locatio
on”, this inforrmation is useed by RallyPoint to map yo
our location ggraphically on
n our interactive mapping ttool. Uploadin
ng a photo – To upload a –
photo click o
on the button locatted in the perrsonal information section off the memberr profile. Wheen the Choosee File dialogue b
box pops up b
browse throu
ugh your files and choose th
he image that you would like to upload and click Open. Bee sure to use an image thaat is around 100 x130 www.myrallypoint.com
12
pixels in ssize. Larger im
mages can be used but will only displayy 100x130. Deleting a photo – To delete a phhoto select the Delete Photto checkbox aand click tto remove th
he image. Adding/U
Updating Skkills To updatee member skiills click and the Skills and Craafts selection box will appeear. Select the appropriaate skills and ccrafts or add a new skill orr craft and click
. Note: N
Not all memb
bers will have tthe rights to add a new skkill or craft. Seee your systeem administraator if you need these righ
hts added to your member profile. 4.1.2 A
Adding/Updating Depen
ndents Addin
ng Depende
ents Addin
ng dependentts will give your manager insight about additiional responssibilities you m
may have to m
manage durin
ng a crisis. To add a dep
pendent, go tto the “Depen
ndents” form on your p
profile, enter a name in th
he name field,, then select tthe appro
opriate type from the drop
p down. Oncee the form is complete, click
. to add depen
ndents to thee list. dents Updaating Depend
To up
pdate dependents click and the in
nformation fo
or the dependen
nt will load into the Add a Dependent fo
orm. Update the information in the forrm and click
. If you w
would like to delete the deependent sim
mply click the inform
mation will be
e removed fro
om your RallyyPoint. next to his/her namee and 4.1.3 A
Adding/Updating Contact Informatiion The contaact informatio
on should be up to date att all times. Dissasters are dyynamic, and sso are preparedn
ness and reco
overy plans. M
Managers bro
oadcast missio
on critical info
ormation to tthe communication device
es you providee. You will no
otice a “Prioritty” setting for the Email and Text Messsaging fields. Maanagers will decipher which device(s) th
he alerts are ssent to based
d on the priority setting. Generallyy, during an em
mergency thee broadcast w
will be sent to
o every devicee available to ensure a successful delivery. Adding/U
Updating Te
ext Messagin
ng Adding aa Cell Phone Number To add a ccell phone nu
umber, enter the cell phone number includin
ng the area code in the “Number”” field. Choosse a Carrier frrom the drop down menu. To receive text messagges to the www.myrallypoint.com
13
entered n
number, selecct the “Enablee” check‐box and click to add a cell phone number to and RallyPoint will seend a test texxt message to the the list. To
o test the num
mbers you en
nter click number selected. Updatingg a Cell Phon
ne Number To updatee cell phone n
numbers clickk and tthe information for the cell phone num
mber will load into . If you the “Add a Cell Phone #” form. Upd
date the information in thee form and cliick
would likee to delete th
he cell phone number, clickk and the informaation will be rremoved from
m your RallyyPoint. 4.1.4 A
Adding/Updating Email Addresses
Adding aan Email Add
dress To add an
n email address, locate thee “Email Addresses” form. Enter an emaail address in the “Email Address” field. Enter th
he required in
nformation in
n the Add an Email d an Email Address and clicck
form. Add
. Updatingg an Email A
Address To updatee an email address click and thee information will load into tthe “Add an EEmail” form. Update the in
nformation in
n the f
form and clic
k
uld like to dellete the email . If you wou
aaddress, clickk nexxt to the address and the i
information w
will be removved from yourr RallyPoint.
4.1.5 A
Adding/Updating Locations Adding aa Location To add a llocation, ente
er the requireed informatio
on in the “Add
d a Location” form. Once the form is complete, click . The iinformation w
will be added to your profiile. S
Setting Locat
tion as Curre
ent The “Current LLocation” is yyour on when checcking present locatio
in
n. There are two ways to set your current lo
ocation. www.myrallypoint.com
14
1) If your current location is a previously added existing location: locate the desired location from the list and click
. A pop‐up window will appear reminding you to click “Update/Save”. Click “OK” then click
. 2) If your current location is a location added on the fly, complete the “Add a Location” form, and select the “This is my current location” check‐box. Click added to your profile and set as your current location. and the location will be Updating a Location To update a location, find your desired location from the list, click
and the information will appear in the form to the left. Update the information in the form and click
. Deleting a Location If you would like to delete the location, simply click next to the address. A pop‐up window will appear confirming your selection. If you would like to delete the location selected, click “OK”, if you would like to cancel your request, click . Setting a Default Home Location There are two ways to set your default home location. 1) If your default location is an existing location: locate the desired location from the list and click . The information will appear in the form to the left. Click the “Default Home Location” check‐box and click . 2) If your default location is a location added on the fly, complete the “Add a Location” form, and select the “Default Home Location” check‐box. Click added to your profile and set as your default home location. and the location will be 4.2 Manager Sub‐Tabs The manager sub‐tabs are located in the profile by clicking “PROFILE” next to the displayed name in the welcome note. The three tabs are: Profile Click the Profile tab to access the profile. Security The Security tab contains the user’s access rights within the system Check In The Check In section allows the user to access check in forms www.myrallypoint.com
15
4.2.1 Profile See previous section 4.2.2 Security The “Security” Tab contains the member’s access rights within the system. Click the tab labeled “Security” to access this section. 4.2.3 Check In RallyPoint’s check in is based on the current facility status and the interval of that event set by that member’s manager or facility manager. This will determine how often the user has to check in to the system. There is a report that will allow managers to view check in intervals to see who complied with check in intervals and who didn’t. www.myrallypoint.com
16
How to C
Check In By Intern
net – If you are required too check‐in, thhe first page tthat will load is thee check‐in page. If the check in page do
oesn’t load firrst, you are not reequired to che
eck in. To check in to RallyPoint click the CHECK‐IN tab in the navigattion bar and fill ou
ut the Check‐IIn Forms. Check In Form Return Datte: Enter the date you ccan return to w
work Current Location: From the drop down
n menu, selectt your current location dded location o
or select “Add New from aa previously ad
Locatiion” to enter aa new location on the fly. Working Phone: Enterr in your curren
ntly working ph
hone numberss. (Limited to 3 numbeers) Email Address: Enter your currentlyy working emaiil address. Address: Commentss: Enter the address att which you aree currently located. Type aa message for your manager in the commeent box. Check‐In Field Descrriptions: Every time yyou check in to R
RallyPoint it is stored in your Sen
nt Items section o
of your Inbox. Things Yo
ou Need In this secction, check aany of the boxxes that applyy to you. Filling out this secction will geneerate a reporrt for your manager to view and form a p
plan that accommo
odates the needs of his meembers. Things Yo
ou Can Provvide Check anyy of the boxess that apply to you. Filling out this sectio
on will generaate a report fo
or your manaager. Once the Check‐In, Thiings You Need
d and Things You Can Provide forms are complete, click
mation you provided will b
be sent to you
ur The inform
manager. . www.myrallypoint.com
17
5. TRUSTS The TRUSTS tab contains the Trusted Communications Server where all of an organization’s critical vendors, clients, and key media contacts can be found. Designated RallyPoint managers can establish a trust with their contacts in this section, so as to maintain communications with these key stakeholders in a crisis. This section will demonstrate how to operate the TRUSTS tab. Adding Contacts Once the contact is found, they can be added as a trusted vendor by simply clicking ADD TO MY VENDORS in the contact’s profile. Remember, only RallyPoint Certified Vendors can be added as contacts. Updating/Editing Contacts *Only contacts under the “My Vendors” Section can be edited or updated. A contact must be one of the organization’s vendors to edit their contact info. To edit the contact, Click the “VIEW PROFILE” tab listed in the vendor options tab. If there hasn’t already been contacts added for the company, the information section will say “There are no contacts available for this company” To add/invite contacts, fill out the information at the bottom of the profile and choose the contact type. Click Save/Invite when finished. This will notify that person that they have been added as a contact in the Trusted Communications Server. www.myrallypoint.com
18
6. INBOX RallyPoint’s Inbox is the messaging component. This is where all messages are composed and This allows the user to keep track of all messages as well as keeping track of all messages ever sent. To view all messages click the All Messages link in the messaging navigation bar. To return to the original view simply click the inbox link and the current event messages will reload into the window. Types of Messages: Company Message Manager Message Member Check In Message Direct Message Facility Message Messages sent on behalf of the company to the entire company. These messages are general in nature and come from the highest levels of the company or your corporate communications department. Messages sent on behalf of your direct manager. These messages come directly from your manager and should be more specific in nature giving everyone in his group specific instructions.
Messages sent to managers when a member checks in. Messages sent from a single individual to another single individual. Messages sent from a facility manager to everyone in a facility. Generally these messages will convey information on building closures and/or maintenance issues as well as facility evacuations.
www.myrallypoint.com
19
6.1 Composing Messages To compose any message, click . Select the type of message you want to send at the top of the folder and click continue. 6.1.1 Filtered Message – the “Filtered Message” option allows you to send a message and filter by Communication Tree: Managers, Members or both in each level, Facilities: select facility and or facility plus subs (subs is the sub branches associated with the main branch), Check In Status: All, Not Checked In or Checked In, and by Skills (skills entered into the system by your system administrator). 6.1.2 Company Message The “Company Message” option allows you to broadcast a message to every member in the organization. Sending company messages is only available to those who have company messaging rights set within the system. www.myrallypoint.com
20
Once the message type has been selected, click appear. Compose the message in the main text box section and then decide whether to send the message as an email or text message in addition to sending it as a RallyPoint Message To send it as an email, click the email box in the top right corner of the screen. To send it as a text message, type an abbreviated version of the message in the text box at the bottom of the screen. 6.2 and the compose message screen will Message Drafts Rather than compose a new message every time it is necessary, drafts can be composed and saved for future use within the system. To create a draft, click the drafts button at the left hand side of the screen at the main message window. Any drafts previously composed and saved will appear here. To edit and send the draft, click edit. 6.3 Sent Messages Anytime a message is sent from the current account the message is save in the sent items folder. To view these items, click the sent items folder at the left hand side of the screen. Contained in this folder are any messages sent from the user’s message center. Click any of these messages to review their content. Click print in any of these messages to print them. www.myrallypoint.com
21
7. DOCUMENTS The documents tab allows managers to upload critical documents and share them with other managers and members in an emergency. Managers can each have up to one gigabyte of memory stored. Uploading Documents To upload a document: Enter the file name in the file name box, and select the file to upload by either typing in the name or browsing for it on the computer. Once the desired file has been selected, click upload. The file should now appear in the files folder with its file size, sharing designation and date/time of upload displayed. Deleting Documents To delete a file: Simply click the delete button on the right hand side of that file. Sharing Documents Once a file is uploaded, a manager can share that file with other managers or members. To share an uploaded file, Click the button labeled “Share this file” under the sharing tab on the document. Select the group you would like to share this file with. Not Shared, Shared with all, Shared with Managers. Click continue once finished. If sharing with select managers was selected, a drop down menu with the names of all employees with manager rights will appear. Simply select the people the document will be shared with and click continue when finished. www.myrallypoint.com
22
8. STATUS In this tab, a member with rights can create events, set check in intervals, and update facility statuses. 8.1 Checking Out Members By clicking on the appropriate check boxes the Facility Manager can “Check Out” all members that belong to that facility. 8.2 Check In Members By clicking on the appropriate check boxes the Facility Manger can “Check In” all members that belong to that facility. 8.3 Set Facility Status By clicking on the appropriate radio button the Facility Manger can set the current “Facility Status” that is visible by all management and members for that facility. Manage Events Once in the events tab, it is extremely easy to create an event in RallyPoint. To initiate the event: Choose Event Source‐ select either natural or custom event. Selecting a Natural event will create another dropdown menu for event type. Select event type if this occurs Select the Start date and start time, but it is not required to select an end date or time. www.myrallypoint.com
23
There is also a box to designate this event as a drill. To make the event a drill, check the box. Fill in the description with text describing the event details. Click Save/Add to create the event. Clicking reset will erase all the info for that event. Updating Events ‐ Once an event has been created, it will appear in the main events screen on top of any other events. To edit or change the event, click the edit button. This will bring up the Event information in the left hand side of the screen and allow a manager to edit and change this info Click Save/add when finished. Closing Events ‐ To close the event, Click close event. The event information will then show on the left hand side of the screen. Click Save/Add to end the event. Once the event has been closed, it will no longer appear in the events list, however the information from this event can be reviewed in the reports section. Set Check In Intervals Updating the check in interval designates how often a manager would like their people to check into the system during an event. To update the check in interval, click the Check in interval tab at the top right of the event. Select the desired interval. 1 hour, 5 hours, 5 weeks etc. A reminder should pop up as a reminder to click the save/add button. Click ok, and then click the save/add button to update and save the check in interval. www.myrallypoint.com
24
9. Reports RallyPoint’s Flex reporting system provides managers with a dash‐board for your company status. Each bar represents the number of checked in against the total, as well as percentages on who hasn’t checked in and what the current critical needs of the community at large are. The Reports drop down menu offers several reporting options: Company Overview Interval Check In Map Member Roster Outbound Efficiency The manager’s communication tree is displaying only his direct reports. View individual status reports by clicking the individual tree levels. Check in status reports of the selected level is displayed to the right of the communication tree. By rolling over the graph, a light box will appear displaying the check in status. Send a message directly from the graphs by holding down shift and left click your desired report. A light box will appear with the option to send a message. Once you opt to send a message, another box will appear with several options: Check In Status Search – the drop down menu gives you the option to message either those members checked in or those not checked. Once the status is chosen, click search and your desired list will appear. Recipient Selection ‐ Every member of the selected status appears in this list. The “Check All” button allows you to check each member in the list. The “Uncheck All” button clears the selected. By clicking the “Inverse All” button, the selected members will be cleared and those not selected will become selected. Continue – clicking the “Continue” button, brings you to the message component. Compose the message as a RallyPoint message in the main message box, as a text message in the text messaging box and/or as an email by selecting the “Send as Email” option, then click “Send”. Filter Once you are in the mapping section of RallyPoint, you can filter employees by skill set. The filter button is located at the top right of the screen, under the toggle option. After clicking the filter button, you will be prompted to choose the desired skill(s) to be mapped. Click continue to view your selection. To remove the filter, simply select the filter option, deselect the boxes chosen, then click continue. This will give you a refreshed view of the map. www.myrallypoint.com
25
9.1 Company Overview The main menu of the reports tab is the company overview. This main page shows the company tree, and allows graphical viewing of the number of employees checked in and in what location or department. By drilling down into the graphs, it is possible to see who is checked in and message those that aren’t. 9.2 Interval Check In By clicking the interval Check in option, it is possible to review archived information about check‐ins from current and past events. This report will show a manager who met the check in times and who didn’t for a specific period of time. This information can also easily be printed. 9.3 Map By Clicking the Map option, a manager can graphically view their checked in employees and facilities. This interactive reporting system allows the manager to graphically see where his employees, facility status, vendor locations are located as well as search for specific skill sets you may need in an emergency. The members are displayed on the map in groups. To obtain a more granular view, click the zoom button until the desired magnification is reached. This will break the members up into individual components. Select a group of people on the map by clicking the selection option then click the starting point and click again on your end point. The selected members will appear in red. Message the selected members by clicking the “Message Selected” button. Clear the selection by clicking the “Clear Selected” button. Toggle the members off the map by clicking the people icon next to the “Toggle” option. Toggle them back on by clicking the people icon again. Toggle the facilities off the map by clicking the facility icon next to the “Toggle” option. Toggle them back on by clicking the facility icon again. 9.4 Member Roster The member roster report option displays a list of all members that the manager is responsible for, and information about that individual. This is an easy way find out exactly what number all the members want to be contacted at. This information is also useful in creating distribution lists before and after an event. 9.5 Outbound Efficiency The outbound efficiency report is a very useful tool to determine whether or not your members have logged into the system and updated their profiles. This report gives the number of members with cell phone numbers and email address in the system against those who do not. www.myrallypoint.com
26