1
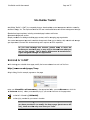
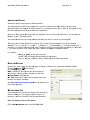
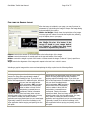
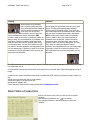
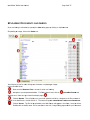
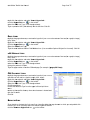
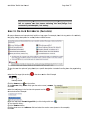
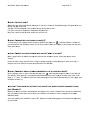
Version 2008.02.01
Site Builder Toolkit Basics
This document covers the basic elements of Site Builder Toolkit (SBT). Some areas covered are templates,
layout, creating and editing pages, and navigation. Please take some time to become acquainted with the
information contained here-in.
SITE BUILDER TOOLKIT ..................................................................................................................................................... 1 LOGGING IN TO SBT ............................................................................................................................................................. 1 SBT TOOLKIT ICONS ............................................................................................................................................................ 2 NAVIGATE TO YOUR PAGE(S) ........................................................................................................................................... 2 CREATE A CONTAINER PAGE ........................................................................................................................................... 3 MODIFY AN EXISTING PAGE TO BE A CONTAINER PAGE ........................................................................................................... 3 CREATE A NEW PAGE .......................................................................................................................................................... 4 PAGE CONTROL ..................................................................................................................................................................... 5 TEMPLATES............................................................................................................................................................................. 5 SCHOOL / DEPARTMENT TEMPLATES ............................................................................................................................ 5 SCHOOL / DEPARTMENT FACULTY AND STAFF LISTING PAGE ........................................................................................... 8 META DATA ........................................................................................................................................................................... 10 PAGE TITLE ............................................................................................................................................................................ 10 KEYWORDS............................................................................................................................................................................. 10 CLONE A PAGE ..................................................................................................................................................................... 11 EDITING PAGE CONTENT ................................................................................................................................................. 12 GET ACQUAINTED WITH THE EDIT SCREEN ............................................................................................................................ 12 FORMATTING TEXT CONTENT ....................................................................................................................................... 15 FORMAT WITH STYLE ....................................................................................................................................................... 15 CREATING TABLES ............................................................................................................................................................. 15 ORGANIZE TABULAR INFORMATION ....................................................................................................................................... 15 ADD A TABLE ......................................................................................................................................................................... 16 EDIT A TABLE ....................................................................................................................................................................... 17 MANIPULATE CELLS ............................................................................................................................................................... 17 To split a cell into two cells: .............................................................................................................................................. 17 To merge two or more horizontally adjacent cells into one cell: ....................................................................................... 17 To set cell attributes explicitly: .......................................................................................................................................... 18 INSERTING IMAGES ............................................................................................................................................................ 19 PREPARE THE GRAPHIC .......................................................................................................................................................... 20 START THE PROCESS ............................................................................................................................................................... 20 GET THE IMAGE FILE .............................................................................................................................................................. 20 If the File Already Exists on Web Server ........................................................................................................................... 20 To Upload an Image .......................................................................................................................................................... 21 FINE-TUNE THE GRAPHIC LAYOUT ......................................................................................................................................... 22 INSERT SPECIAL CHARACTERS ..................................................................................................................................... 24 UPLOADING DOCUMENTS AND IMAGES ..................................................................................................................... 25 CREATING AND "BREAKING" HYPERLINKS .............................................................................................................. 26 CREATE THE LINK .................................................................................................................................................................. 26 WEBSITE LINKS ...................................................................................................................................................................... 26 EMAIL LINKS .......................................................................................................................................................................... 27 CSN WEBPAGE LINKS ............................................................................................................................................................ 27 CSN DOCUMENT LINKS ......................................................................................................................................................... 27 BREAK THE LINK .................................................................................................................................................................... 27 LINK TO ON-PAGE REFERENCES (ANCHORS) ............................................................................................................ 28 CLEAN UP CONTENT FROM OTHER SOURCES .......................................................................................................... 29 USE NOTEPAD ........................................................................................................................................................................ 29 RELOCATE A PAGE ............................................................................................................................................................. 30 DELETE A PAGE ................................................................................................................................................................... 30 SITE BUILDER TOOLKIT - FAQS ..................................................................................................................................... 31 WHAT'S MY USER ID? ............................................................................................................................................................ 31 CAN I WORK ON MY WEB PAGES FROM HOME? ....................................................................................................................... 31 HOW DO I EDIT PAGES? ........................................................................................................................................................... 31 HOW DO I MAKE A PAGE A CONTAINER PAGE (MEANING I CAN ADD PAGES TO IT)? ................................................................. 31 HOW DO I ADD A PAGE? .......................................................................................................................................................... 31 WHY CAN'T I ADD A PAGE? ..................................................................................................................................................... 31 HOW DO I TITLE MY PAGE? ..................................................................................................................................................... 32 HOW DO I CHANGE THE LOCATION OF MY PAGE(S)? ............................................................................................................... 32 HOW DO I MAKE A PAGE INACTIVE AND WHY WOULD I WANT TO DO THAT? ........................................................................... 32 HOW DO I ORDER MY PAGES, EITHER ALPHABETICALLY OR IN A SPECIFIC ORDER? ................................................................. 32 WHY CAN'T I CUSTOMIZE MY TEXT WITH THAT FONT I LOVE, MAKE IT PURPLE AND MAKE IT HUGE, LIKE 48 POINTS? ............ 32 WHAT'S THE DIFFERENCE BETWEEN DELETE AND PURGE? ...................................................................................................... 33 WHAT ARE NAVIGATIONAL AND HYPERTEXT LINKS AND HOW DO I ADD THEM? ..................................................................... 33 WHEN COPYING/PASTING PAGES FOR MIGRATION, HOW DO I 'CLEAN UP' MY PAGES? .............................................................. 33 HOW DO I USE SPELL CHECK? ................................................................................................................................................. 33 HOW DO I INSERT A PICTURE OR GRAPHIC ON MY PAGE? ........................................................................................................ 33 HOW DO I ADD ALT TEXT TO MAKE MY PICTURES AND IMAGES ADA COMPLIANT? ................................................................ 34 I WANT TO PUT A TABLE ON MY PAGE. WHAT'S THE BEST WAY TO DO THAT? ......................................................................... 34 I ADDED CONTENT AND WENT BACK TO THE WEB SITE, BUT MY CONTENT WAS NOT THERE. WHAT HAPPENED? .................... 34 HOW DO I ENTER A SOFT RETURN? (ONE-LINE) ....................................................................................................................... 34 Site Builder Toolkit User Manual
Page 1 of 27
Site Bu
uilder To
oolkit
Site Builder To
S
oolkit 2.1 (SB
BT) is a complletely browser-based webssite content management
m
s
solution
creatted by
S
SunGard
Colle
egis, Inc. The simple and in
ntuitive SBT user
u
interface
e facilitates we
eb content management th
hrough:
Standardized page templattes, including automated page headers and footers
S
A
Automated
na
avigational content
S
Simple
proced
dures for addiing and editin
ng page conte
ent, and for managing page organization
The content management
T
m
approach
a
to website
w
devellopment allow
ws you to devvelop, edit, ma
aintain and manage
y
your
departme
ent’s content with minimall training and it requires no
o HTML experience.
As you read thro
ough this manual, please
p
kee
ep in mind
d the
screens you see he
ere may orr may not be the sam
me as whatt you
see on your
y
screen
n. This is due to diffferences in
n permissio
ons /
rights as
ssigned thrrough the application
a
n
LOGGING
G IN TO SBT
S
W
While
viewing
g your website
e’s home page
e, modify the
e browser add
dress box so itt is of the form
h
http://ww
ww.csn.edu/pages/3.asp
A login dialog,, like this example, appearrs on the page
e.
Enter your USERID and
E
d PASSWO
ORD in the appropriate
a
fie
elds; press <E
< NTER> or click the
< OGIN> button). When
<L
W
you succcessfully log in,
i you see tw
wo new icons in the page footer:
f
on the
e left followe
ed by [USERN
NAME]
on the
e right, prece
eded by your name
n
in brackets
These ic
cons are ex
xplained in
n Site Builder Toolkit Icons. Unless
you have
e permission to mod
dify the hom
me page (m
most users
s will
not), the
ese are the
e only new icons you’’ll see.
Site Builder To
S
oolkit User Ma
anual
Page 2 of 27
S
SBT
TOO
OLKIT ICO
ONS
T
This
is a list of Icons that you will see based on the
e permission
ns/rights of your SBT use
er account.
O
Open
the full toolkit
LLogout of Site
e Builder Toolkit. Note your user
n
name
appearss to the left of
o this icon.
E this page
Edit
e
C
Copy
this page
Prresent when you
y are logge
ed into Site Bu
uilder
To
oolkit.
h
the apprropriate perm
missions to
Present if you have
erform the fun
nction represe
ented by the icon.
pe
D
Delete
this pa
age
A a page to
Add
o this containe
er page
t page is a container (pa
arent)
Prresent only if the
pa
age—one thatt may have su
ubordinate (child)
pa
ages connecte
ed to it.
NAVIGAT
TE TO YOUR
O
PAGEE(S)
There are num
T
merous ways to navigate to
o a given pag
ge for editing::
L
Login
and navvigate to the page
p
using th
he links provid
ded within the
e site just as you would to view the pag
ge
n
normally.
L
Login
and navvigate to the toolkit
t
using the
t toolkit ico
on
he page number.
and type in th
and type in th
L
Login
and navvigate to the toolkit
t
using the
t toolkit ico
on
he title of the
e page.
There may
m
actually be more
e ways than this to navigate
n
to
o any
given pa
age for editing, howe
ever, to ke
eep things simple, we
e will
stick witth these..
S Builder To
Site
oolkit User Ma
anual
Page 3 of 27
CREATE A CONTA
AINER PAGE
MODIFY AN EXISTING PAGE TO BE A CONTAINEER PAGE
While viewing
W
g the page you
u wish
t be a container page, clicck the
to
Page Edit Icon.
b
IIn the Manag
ger’s Toolkitt
w
window,
click the Page Co
ontrol
t
tab.
For the option
F
n Will this pa
age
c
contain
othe
er pages?, cllick Yes.
C
Click
the Publish button.
This step is esssential; if you
T
u forget
itt, the change
e will not be saved
a the page will not be a
and
c
container
page.
(
(see
Get Acqu
uainted with the
t Edit
S
Screen
for a discussion
d
of the
S
Save
button).
Wait for confirrmation of the
W
e
p
publishing
acttion. If you go
o to the
n
next
step too quickly, you may
c
cancel
the pub
blishing action
n.
Click the Bac
C
ck To Home
e Page
b
button.
With the
W
ADD PAG
GE ICON in
i the middle group at the bottom of th
he page, you’rre ready to ad
dd a new
c
child
page to this
t
parent pa
age.
IIf the
ADD PAGE
E ICON doe
esn’t appear, you may nott have permisssion to add pages. Check with your
lo
ocal site administrator to remedy
r
this.
Site Builder To
S
oolkit User Ma
anual
Page 4 of 27
CREATE A NEW PAGE
New pages must be added as subordina
N
ates (children) of a contain
ner (parent) page.
p
If the pa
age you’re vie
ewing is a
c
container
page, you’ll see the
t
ADD NEW PAG
GE ICON in th
he middle grou
up of the pag
ge footer or header. If
t
this
icon isn’t present, you must make it a container page befo
ore you can add
a a child page.
While viewing the page that will be the
e parent off the new page,
p
click the
e ADD PAGE ICON (
in the midd
dle of the page footter or
footer).
If you don’t
d
see the DELETE
permissiion to dele
ete pages.
ICON
(
) , you
y
don’t have
P
Page
Navig
gation
Replace
e New Untittled Page with
w the name
e by which yo
ou want the page
p
to be kno
own.
y create a child
c
page, SB
BT assumes you
y want the new page inccluded in
Generally, leave this as is. When you
the navigation panel of the parentt page.
A such navigation links are included in alphabetical order—unlesss you change this value.
All
A positive valu
ue less than 99
9 identifies the
t page as one in a group
p that will be sequenced
s
ab
bove those with the 99
v
value.
Thus, iff you give one
e group of pa
ages the value
e 50 and anotther group a value of 70, the
t links are
s
sequenced
in the navigatio
on panel with all the 50-numbered page
es in alphabettical order, folllowed by the
e 70n
numbered
pag
ges in alphabetical order, followed
f
by th
he 99-numbered pages in alphabetical order.
o
• Any negative
e value indica
ates the page
e’s link should not appear in
n the navigattion panel, ma
aking the pag
ge
a
available
only by an explicit link in anoth
her page. This typically is appropriate
a
fo
or detail page
es linked from
m a main
p
page
that you
u omit from th
he navigation panel to minimize clutter.
Site Builder To
S
oolkit User Ma
anual
Page 5 of 27
PAGE CONTROL
Active generally is the co
orrect option. Selecting Ina
active allowss you to creatte and publish
h the page
b keeps it hidden from ussers. Selecting
g Deleted marks the page
e for
(save it to the website), but
m the system—it’s just hidden from view
w and flagged
d for later deletion.
deletion; it’s not gone from
You may be allowed
a
to select a differen
nt page temp
plate (this typiically is restriccted to site
administratorrs and webma
asters)
Click Yes on
nly if this pagee will be a paarent to otherr child pages. It’s more efficcient to leavee No
selected if yo
ou’re not sure
e. You may alw
ways change this as described in Modif
dify an Existin
ing Page
to be a Conttainer
No generally
y is a good ch
hoice. Opening
g too many browser
b
windo
ows can confu
use users
You can set a date for the
e page to starrt appearing and
a another date
d
when the
e page should
d expire;
the latter isn’t required.
Click the Con
C
ntinue button. SBT return
ns you edit mo
ode.
C
Click
Publish
h to save the new page on
n the website.
T
TEMPLA
ATES
Web page te
W
emplates will be provided
d to help the
e users creatte an attracttive page for their deparrtment or
o
organization.
S
SCHOOL
/ DEPARTM
MENT TEMPLATES
The Interim Vice
T
V
President of Academic Affairs has developed the content guid
delines for a School
S
or Dep
partment
W page. We
Web
eb page temp
plates are pro
ovided through SBT to assist Page Owne
ers in creating
g complete an
nd
c
consistent
We
eb pages for schools,
s
departments and faculty/staff
f
listing pages.
To create a Scchool or Depa
T
artment temp
plate, select th
he Template icon
i
on the to
ool bar (highliighted in red)) and the
c
choose
the Te
ext and Link Boxes-Departm
B
ment Homepa
age layout ass highlighted.
Site Builder Toolkit User Manual
Page 6 of 27
The page will appear as the following layout. Replace the placeholder text with actual text describing the School
or Departments programs. Complete as much other information and links as provided on the page. Delete any
unnecessary content.
Site Builder Toolkit User Manual
Page 7 of 27
Site Builder Toolkit User Manual
Page 8 of 27
SCHOOL / DEPARTMENT FACULTY AND STAFF LISTING PAGE
To create a Faculty and Staff Listing template, select the Template icon on the tool bar (highlighted in red) and
the choose the Image and Information layout at the bottom as highlighted.
The page will appear as the following layout. Replace the placeholder text with actual text listing the Faculty/Staff
information. Delete any unnecessary content.
Site Builder Toolkit User Manual
Page 9 of 27
Site Builder Toolkit User Manual
Page 10 of 27
META DATA
The metadata of an HTML lets authors specify meta data -- information about a document rather than document
content -- in a variety of ways. For the purposes of the CSN website, the following Metadata tags can be included
through SBT; Page title and Keywords. This metadata is used as descriptors for search engines to locate the page
on the web.
PAGE TITLE
The webpage title is a required element of your webpage. Replace New Untitled Page with the name by which
you want the page to be known. The title is used by the major search engines as the most important piece of
information available in order to help them determine the topic of your page, and thus to determine the ranking
of your page in their search results. The title is displayed in the search results as the most prominent piece of
information available to searchers. The title is displayed by the visitor's browser in the border of the viewable
screen as the visitor is viewing your website and used as the name for a favorite or bookmark.
KEYWORDS
Keywords tag is supposed to be a brief and concise list of the most important themes of your page. Pick the 10 or
15 terms that most accurately describe the content of the page. Meta keywords tags should adhere to the
following guidelines: (1) keep your list of keywords or keyword phrases down to 10 - 15 unique words or
phrases; (2) separate the words or phrases using a comma (you do not need to leave a space between words
separated by commas); (3) do not repeat words or phrases; (4) put your most important word or phrases at the
beginning of your list. Click the Search Engine link on the toolbar and type a few keywords in the keywords box.
Site Builder Toolkit User Manual
Page 11 of 27
CLONE A PAGE
It may be expedient to create a new page based on an existing page, instead of creating it from scratch. This
applies if you've invested significant effort in the layout of a page and you want to create a new page with all or
most of the same formatting—where content is the main difference.
While viewing the existing page you want to clone,
click the COPY BUTTON
In the Manager's. SBT returns you edit mode.
Click PUBLISH to save the new page on the website.
At this point, you have created an exact copy of the original page—with the following exceptions:
It will not be a container page, even if the original page was—therefore, it also will not have any subordinate
(child) pages.
Two names likely are not as you want them:
The navigation panel link for the cloned page is identical to the original page link.
The Title Bar name is “Copy of xxxx”, where xxxx is the original page's name.
To correct these issues and while viewing the page in edit mode (where SBT returns you after you made the
copy), click the NAVIGATION tab and change:
To the name you want to appear in the page's Title Bar;
To the name you want in the navigation panel for this page;
Site Builder Toolkit User Manual
Page 12 of 27
To the pop up hint you want to give the user when the mouse pointer is hovered over the link.
Click Publish to save the changes
If you navigate to a different page without clicking Publish, your
changes are lost
EDITING PAGE CONTENT
Editing the content of pages with SBT is similar in many ways to editing with MS Word and many other document
editors. SBT also does well accepting material copied from other sources and pasted in its editing window. You
may not achieve exactly the results you want by pasting from another source if the formatting is complex. Keep
this in mind if you chose to create your content in another application (Word, WordPerfect, FrontPage, etc.) then
copy it into the SBT editing window: don't use overly complex formatting. Plain text, such as you'd copy from
Notepad, is a safe source.
Editing page content typically involves navigating to the page and clicking the Edit this page icon in the page
footer or header, which opens the Edit screen with the Pages tab and Main Content option selected.
GET ACQUAINTED WITH THE EDIT SCREEN
Two occurrences of disposition buttons (top and bottom):
Site Builder Toolkit User Manual
Save & Lock
Page 13 of 27
Saves the content to the web server, but does not publish it (changes are not
visible to users navigating to the page). Useful when content is in process, but not
complete. You should click Save at any point in your editing where you don't want
to risk losing what you've done.
Appears after page is SAVED. Will not appear if you do not have publishing
permissions.
Publish
Saves the content and publishes it, replacing what users see.
If you fail to click either Save or Publish before leaving a viewing mode—even
within the Pages tab—you lose all unsaved edits.
Site Builder Toolkit User Manual
Page 14 of 27
Preview
OR
Returns to the website, displaying the page you were editing. You lose all
unsaved edits if you click this button without first clicking SAVE or PUBLISH .
Published Version
Button shows up only after page is saved.
Revert
List
This is the major “oops” button—it restores the content of the page being
edited to what most recently was saved or published. All unsaved edits are
lost. Useful when you decide your edits are so badly compromised you want to
revert to your last saved version.
Closes the edit window and reverts to the “picklist”—the screen that allows you
to select a page to manage. You lose all unsaved edits if you click this button
without first clicking SAVE or PUBLISH .
Content options:
In the database —the default setting that defines a page whose content is stored in the SBT database and edited
using SBT tools.
At a URL —defines a pass-through page that redirects the user to a different web page
In an include file —content from a file is presented to the user as if it were on this page. This is a special-use
option whose use is beyond the scope of this document.
This is the content area for the page as it appears when a page is newly created—it's your empty canvas for
creating your page.
The scroll bar for the content editing area (not to be confused with the scroll bar for the full browser
window).
Site Builder To
S
oolkit User Ma
anual
Page 15
5 of 27
FORMATT
TING TEX
XT CONT
TENT
To maintain a standard loo
T
ok and feel on
n the website,, much of the
e formatting iss determined by the style sheet(s)
s
a
associated
witth the templa
ate on which your
y
page is based.
b
This in
ncludes the tyypeface and fo
ont size availa
able on
y
your
page. SB
BT provides to
oolbar icons fo
or bolding, un
nderlining, fon
nt color, etc.,, that are similar in function to what
y use in typ
you
pical documen
nt editing app
plications (succh as Word). If
I you have le
egitimate nee
eds outside these
o
options
you sh
hould discuss them with th
he Web Overssight Committtee or the We
ebmaster.
See Clean Up
S
p Content frrom Other Sources for tips on dealing
g with copying text from another source
e.
IIt's easier to apply
a
text formatting attrib
butes after the
e fact, as follo
ows:
T
Type
the full paragraph
p
(prressing Enter to end the pa
aragraph).
S
Select
the texxt (all or part of
o the paragra
aph) you wish
h to format.
C
Click
the apprropriate forma
atting icon.
S provides a few text forrmatting toolb
SBT
bar options not directly analogous to Word:
Superscrip
pt—creates a smaller font size
s
above the standard ba
aseline.
Subscript—
—creates a sm
maller font sizze below the standard
s
base
eline.
FORMAT WITH STYLE
T
The template on which you
T
ur page is bassed likely inclu
udes defined styles. To see
e the availablle styles for
p
page,
click the
e down-arrow
w on the style box on the le
eft side of the
e toolbar. CCS
SN defined styyles are as
f
follows:
Normal Body Text
N
T
— used for most textt on the page.
H
Heading
1 — a main heading (comparab
ble to Heading 1 in Word),, used by SBT
T as the page heading. Using this
h
heading
elsew
where on the page should signify
s
importtance equal to
o the page he
eading.
H
Heading
2 — a heading sub
bordinate to the
t page head
ding (comparrable to Heading 2 in Word
d).
H
Heading
3 thrrough 6 — eacch a subordin
nate of the He
eading previous to it
Without going
W
g into great de
etail, there arre many good
d reasons for using styles appropriately
a
pplying
instead of ap
e
explicit
formattting to text. If you think you
y have a va
alid requireme
ent for additio
onal styles, discuss it with the Web
O
Oversight
Com
mmittee or the
e Webmasterr.
CREATING TABLEES
ORGANIZE TABULAR INFORMATION
N
N
SBT provides a table functiion that is con
S
nceptually sim
milar to tabless in Word, butt the manipullation is some
ewhat
m
more
constrained. Tabular information copied
c
from Word,
W
Excel and many othe
er sources ge
enerally paste nicely
in
nto the SBT editing
e
area. You
Y may find it easier to create your tables in anothe
er application
n and copy/pa
aste them
Site Builder To
S
oolkit User Ma
anual
Page 16
6 of 27
nto your SBT--based page. It generally is
i easier to do
o all the formatting in the other application before co
opying
in
a pasting in
and
nto the SBT edit space. Ma
aking other th
han simple cha
anges in SBT is more difficcult and may require
e
editing
HTML tags.
ADD A TABLLE
T add a table
To
e using SBT's table functio
on:
Position your cursor where you want the
P
e table.
C
Click
the Insert Table icon
in the toolbar.
C
Change
valuess in the Tablle dialog as follows…
f
R
Rows:
and Columns:
C
determine the table structu
ure.
P
Padding:
co
ontrols the sp
pace between text and the cell
b
borders.
The default
d
is 1 pixel.
S
Spacing:
va
alue controls the
t space bettween cell borrders.
T default is 1 pixel.
The
B Color: allows
BG
a
you to select
s
a backg
ground color for the
t
table.
B
Border:
dete
ermines the weight
w
of the table's outsid
de
b
border
—higher numbers give
g
heavier borders:
b
use 0 for no
b
border
and 9 for
f the heavie
est border. Ch
hanging border color
r
requires
HTMLL coding.
W
Width:
determines width of the table in
i pixels (an absolute
a
n
number,
such as 780) or percentage
p
(ssuch as 100%
%).
P
Percentage
ge
enerally is the
e better way to
t specify wid
dth.
H
Height:
dete
ermines the overall
o
minimu
um height of the
t
table
in pixelss. Table conte
ent determines the actual height,
h
overrid
ding a too-sm
mall specification.
A
Align:
determ
mines how th
he table will be placed on the
t page if the
e width is less than 100%. Options are Left,
C
Center
or Right.
R
S
Style:
is beyyond the scop
pe of this discu
ussion. It allo
ows you to incclude HTML ta
able parameters.
C
Click
OK.
All optio
ons exceptt Rows: an
nd Columns
s: may be modified after
you crea
ate the tab
ble. Rows and
a
colum
mns may be
e added an
nd/or
deleted using the table icons
s in the too
olbar, as described
d
in the
following topic, Ed
dit a Table .
SBT crea
ates the ta
able with columns
c
of equal wiidth. When
n you
start typ
ping conte
ent in the first cell you
y
may be
b surprise
ed at
what ha
appens: SB
BT increases the collumn to a width gre
eater
than you
u expect. Don't be concerned
c
; as you type
t
conte
ent in
remainin
ng cells, SBT dynamically bala
ances the column
c
widths.
The folllowing top
pic explains how you
y
may override SBT's
S
actions.
Site Builder To
S
oolkit User Ma
anual
Page 17
7 of 27
EDIT A TABLE
Editing table content
E
c
is a WYSIWYG fun
nction… just tyype away. Ed
diting table atttributes involvves use of SB
BT table
t
tools.
If you sp
pecified Bord
der: 0 the border
b
will be
b invisible when publiished.
It may, however,
h
b helpful to
be
o have bord
ders visible For the follo
owing
actions or while adding and editting content.
Start by hoverring your mou
S
use pointer ovver any table border.
W
When
the poin
nter changes to
…
T modify the
To
e table creatio
on attributes:
R
Right-click
to open the dialog.
M
Modify
parameters as desccribed in Add a Table on page 11.
T manually stretch/shrink
To
s
k the table:
L
Left-click
to se
elect the table
e.
C
Click
a sizing handle
h
(side, top, bottom or corner) an
nd drag to ressize.
T specify horrizontal alignm
To
ment:
L
Left-click
to se
elect the table
e.
C
Click
an alignm
ment icon in the
t toolbar
for left, center or right alignm
ment.
T add a row or column, put your curso
To
or in the last row
r
or column
n and right click to reach the shortcut menu.
F
From
there, cllick on your choice.
c
Fortunattely, Ctrl+Z
Z (or clicking Undo
) reverses
s an action
n you
try.
Occasion
nally it may
m
take more tha
an one undo actio
on to
complete
ely undo a table cha
ange — it seems SB
BT makes some
s
changes
s in a series
s of steps, each requ
uiring an un
ndo action..
MANIPULATE CELLS
T split a cell into two ce
To
ells:
Position your cursor in the cell.
P
R
Right
click for shortcut men
nu
L click on CELL
Left
C
C
Click
on the SPLIT CELL ico
on
T merge two
To
o or more ho
orizontally ad
djacent cells into one celll:
Position your cursor in the cell.
P
R
Right
click for shortcut men
nu
L click on CELL
Left
C
Site Builder To
S
oolkit User Ma
anual
Page 18
8 of 27
Click on the MERGE CELL iccon
You will achieve more pred
dictable re
esults if the
t
cells to
t be
merged contain att least one
e characterr. Note tha
at SBT does not
allow me
erging cells vertically
y.
T set cell atttributes explicitly:
To
Position your cursor anywh
P
here in the cell.
R
Right
click for the shortcut menu
L click on Cell
Left
C Propertiess
M
Modify
cell atttributes…
S
Selecting
Do not wrap contents
c
fo
orces the cell content to be
e on one line. This attribute
e overrides ta
able and
c width attrributes.
cell
A long te
ext string, with Do no
ot wrap con
ntents specified, can make
a table extend
e
bey
yond a scre
een's width
h.
Width: and Height:
W
H
speciifies the minim
mum width/height of the cell.
c
The value
es may be specified in pixe
els (an
a
absolute
number such as 20
2 ) or percentage (such as
a 20% ). In
n either case, cell content may override your
w
width/height
s
settings.
When sp
pecifying width/heig
w
ght values
s, considerr including
g the
column width only
y in the to
op cell of the colum
mn and the
e row
height only
o
in the leftmost cell
c
of the row. This way, you have
just one
e cell to modify
m
for each colum
mn/row iff you decid
de to
resize th
he columns
s/rows.
BG Color: applies
B
a
a back
kground color to the cell, overriding
o
the table backgro
ound for the cell.
B
Border
colo
or: applies a color to the one-pixel
o
bord
der around th
he cell.
Site Builder To
S
oolkit User Ma
anual
Page 19
9 of 27
Align: contro
A
ols horizontal text alignment. You may achieve
a
the same
s
results without opening this dialog
g, using
toolbar
t alignmentt icons in the
the
.
V
Vert
Align: controls the vertical text alignment.
a
C
Click
OK.
Many ce
ell attribute
es are not absolute—
—they interact with other
o
cell and
d table atttributes. The best way to determine
e the
outcome
e is through experime
entation.
Without going into
o great de
etail, there
e are many
y good rea
asons
for usin
ng styles appropria
ately inste
ead of ap
pplying ex
xplicit
formattiing to textt. If you th
hink you have
h
a vallid requirem
ment
for add
ditional styles,
s
dis
scuss it with yo
our local site
administtrator and/
/or webma
aster. SBT provides a table fun
nction
that is conceptu
ually simillar to tab
bles in Word,
W
butt the
manipula
lation
is
somewh
hat
more
constrained.
Tab
bular
informattion copied
d from Wo
ord, Excel and many
y other sou
urces
generallly paste nicely into the editin
ng area. You
Y
may fiind it
easier to
t
create your tab
bles in another
a
ap
pplication and
copy/pa
aste them into
i
your based
b
page
e. It genera
ally is easiier to
do all th
he formattting in the
e other ap
pplication before
b
cop
pying
and pastting into th
he edit spa
ace.
INSERTIN
NG IMAGE
ES
The adage “A picture is wo
T
orth a thousan
nd words” is true
t
only whe
en the picture
e, or graphic image, is relevvant and
c
concise.
Using
g images merrely as decora
ation can distrract readers of
o your web page.
p
And, sin
nce graphic im
mages
r
require
relativvely large file sizes, they may
m contribute
e to longer loa
ad time for yo
our page. In this
t
sense, a large
p
picture
literallyy may be cosst more than a thousand words—an
w
unn
necessary pictture being eq
quivalent to exxtended,
o
off-subject,
ve
erbal ranting.
Consider using
C
g thumbnail or
o text links to
o non-essential graphics. Users
U
are mucch more accepting of page
e load
t
time
when the
ey specifically
y request an image by clickking a link tha
an they are off graphics the
ey are forced to view
e
every
time a page
p
loads.
K
Keep
your ima
ages as small as possible by
b optimizing them before including the
em in the SBT
T image libraryy.
There are two
T
o componentss to this guide
eline...
T image file
The
e should be siized as closelyy as possible to the space allocated for it on the pag
ge. Dynamicallly sizing
a image in th
an
he SBT editorr, by clicking and
a dragging a sizing hand
dle, does not change the im
mage file size
e nor does
itt affect the pa
age load time
e.
T image sho
The
ould be in a compressed
c
fiile type (such
h as .jpg or .g
gif). Bitmap im
mages (.bmp file type) are
e
extremely
larg
ge.
Site Builder To
S
oolkit User Ma
anual
Page 20 of 27
PREPARE TH
HE GRAPHIC
IIncluding a grraphic image requires a litttle preparation.
The image sho
T
ould be sized and/or cropp
ped to fit as-iss in the space
e on your pag
ge. While it's true
t
you mayy
d
dynamically
re
esize the imag
ge once you'vve included it in your page
e, the sizing has no effect on
o the graphic file size.
D
Dynamic
resizzing also may adversely afffect the image
e quality.
Be sure you have
B
h
appropria
ate rights to use
u the image
e. Be sure to include prope
er attribution if you don't own the
im
mage or it isn
n't in the publlic domain.
The image file
T
e must be on a storage me
edium accessiible from the PC on which you are using
g SBT.
There must be
T
e no special characters
c
or spaces in the
e file name. Liimit the chara
acters in yourr file names to
o
a
alphabetic
[ a - z ], numeriic [ 0 - 9 ], da
ash [ - ], unde
erscore [ _ ], left parenthe
esis [ ( ] and right parenthesis [ ) ]
c
characters.
A file name inco
orporating an
ny other chara
acters, including the ever popular
p
ampe
ersand [ & ] and
a space
[ ], will cause problems—even though th
he name is pe
erfectly accep
ptable to Wind
dows Explore
er.
For example:
F
_proper)-file--name
this_is_a_good_(and_
e problems [b
because of the
e spaces]
this file name will cause
bad_file_nam
me&will_cause
e_problems [b
because of the
e ampersand]]
this_is_a_b
START THE PROCESS
Position your cursor where you want the
P
e image to ap
ppear; a table
e cell is an appropriate can
ndidate locatio
on.
C
Click
the Ima
age icon
in
n the toolbar..
I the Image
In
e dialog…
U
URL:
is where
e you may typ
pe the path to
o the image file.
f
A
Alternatively,
and less pron
ne to mistakess, you may click
BROWSE SERV
VER, discussed
d next.
A Text: allo
Alt.
ows you to sp
pecify text to display if the user's
b
browser
can't display the im
mage.
See Fine-tun
S
ne the Graphic Layou
ut for the disccussion of
t remaining
the
g options.
GET THE IMA
AGE FILE
IIf the image file
f you intend
d to use already exists with
hin SBT's
c
control,
includ
ding it in yourr page is relattively simple. The
p
process
is a litttle more invo
olved if the fille exists elsew
where.
Iff the File Alrready Exists on Web Serv
ver
C
Click
on BROW
WSE SERVER to
o the right off the URL field
d.
Site Builder Toolkit User Manual
Page 21 of 27
In the Open Image dialog, you will see the files are stored in directories associated with individual departments
and groups.
Navigate to your department or groups directory, if the file you intend to use is listed in the right panel, doubleclick the file name.
If the Image dialog appears again, click OK
To Upload an Image
Please see the section on Uploading Documents and Images
NOTE: Files larger than 1mb cannot be uploaded in the manner
described. You must either change the resolution to 72dpi if an
image, or break up the file into 1 or more documents if a word
or word-type document. If neither is an option, contact your
Webmaster.
Site Builder Toolkit User Manual
Page 22 of 27
FINE-TUNE THE GRAPHIC LAYOUT
After the image is included in your page, you may fine-tune its
placement by right-clicking the image to reopen the Image dialog
and manipulating the options.
Width: and Height: initially show the implicit size of an image.
You may type new values to override the implicit size, affecting
only the display size on your page.
Changing the values does not affect
the image file size. It's better if the
image is sized to your usage before
you include it, rather than use these
controls to dynamically resize it
HSpace: controls the amount of horizontal space to the left and right of the image.
VSpace: controls the amount of vertical space at the top and bottom of the image.
Border: controls the weight in pixels of the border or frame around the image. A value of 0 (zero) specifies no
border.
Align: controls the alignment of the image with respect to the text line in which it occurs.
Including a graphic image at the cursor and manipulating the Align: option has the following effects:
Left
Right
Without going into great detail, there are many good
reasons for using styles appropriately instead of
applying explicit formatting to text. If you think you
have a valid requirement for additional styles, discuss it
with your local site administrator
and/or webmaster. SBT provides a
table function that is conceptually
similar to tables in Word, but the
manipulation is somewhat more
constrained. Tabular information
copied from Word, Excel and many other sources
generally paste nicely into the editing area. You may
find it easier to create your tables in another
application and copy/paste them into your based page.
It generally is easier to do all the formatting in the
other application before copying and pasting into the
edit space.
Site Builder Toolkit User Manual
Top
Without going into great detail, there are many good
reasons for using styles appropriately instead of
applying explicit formatting to text. If you think you
have a valid requirement for additional styles, discuss it
with your local site administrator and/or webmaster.
SBT provides a table function that is conceptually
similar to tables in Word, but the manipulation is
somewhat more constrained. Tabular information
copied from Word, Excel and many other sources
generally paste nicely into the editing area. You may
find it easier to create your tables in another
application and copy/paste them into your based page.
It generally is easier to do all the formatting in the
other application before copying and pasting into the
edit space.
Page 23 of 27
Middle
Without going into great detail, there are many good
reasons for using styles appropriately instead of
applying explicit formatting to text. If you think you
have a valid
requirement for
additional
styles, discuss it
with your
local site
administrator
and/or webmaster.
SBT provides
a table function that
is
conceptually similar
to tables in Word, but the manipulation is somewhat
more constrained. Tabular information copied from
Word, Excel and many other sources generally paste
nicely into the editing area. You may find it easier to
create your tables in another application and
copy/paste them into your based page. It generally is
easier to do all the formatting in the other application
before copying and pasting into the edit space.
Bottom
Absmiddle
Without going into great detail, there are many good
reasons for using styles appropriately instead of
applying explicit formatting to text. If you think you
have a valid requirement for additional styles, discuss it
with your local site administrator and/or webmaster.
SBT provides a table function that is conceptually
similar to tables in Word, but the manipulation is
somewhat more constrained. Tabular information
copied from Word, Excel and many other sources
generally paste nicely into the editing area. You may
find it easier to create your tables in another
application and copy/paste them into your based page.
It generally is easier to do all the formatting in the
other application before copying and pasting into the
edit space.
Without going into great detail, there are many good
reasons for using styles appropriately instead of
applying explicit formatting to text. If you think you
have a valid requirement for additional styles, discuss it
with your local site administrator and/or webmaster.
SBT provides a table function that is conceptually
similar to tables
in Word, but the
manipulation is
somewhat more
constrained.
Tabular
information
copied from
Word, Excel and
many other
sources
generally paste
nicely into the editing area. You may find it easier to
create your tables in another application and
copy/paste them into your based page. It generally is
easier to do all the formatting in the other application
before copying and pasting into the edit space.
Site Builder Toolkit User Manual
Page 24 of 27
Texttop
Baseline
Without going into great detail,
there are many good reasons for
using styles appropriately instead of
applying explicit formatting to text.
If you think you have a valid
requirement for additional styles, discuss it with your
local site administrator and/or webmaster. SBT
provides a table function that is conceptually similar to
tables in Word, but the manipulation is somewhat more
constrained. Tabular information copied from Word,
Excel and many other sources generally paste nicely
into the editing area. You may find it easier to create
your tables in another application and copy/paste them
into your based page. It generally is easier to do all the
formatting in the other application before copying and
pasting into the edit space.
Without going into great detail, there are many good
reasons for using styles appropriately instead of
applying explicit formatting to text. If you think you
have a valid requirement for additional styles, discuss it
with your local site administrator and/or webmaster.
SBT provides a table function that is conceptually
similar to tables in Word, but the manipulation is
somewhat more constrained. Tabular information
copied from Word, Excel and many other sources
generally paste nicely into the editing area. You may
find it easier to create your tables in another
application and copy/paste them into your based page.
It generally is easier to do all the formatting in the
other application before copying and pasting into the
edit space.
The differences among some options aren't obvious. The best way to see how the Align: option affects your page
is to experiment with it.
It requires HTML markup beyond the scope of this document to have other than simple text-wrapping around an
image.
A table can be a simple and effective alternative to complicated HTML markup for placing an image in relation to
text.
Include a one-row table with two or three columns.
Include the graphic in the appropriate cell.
Include text in adjacent cells.
Control the layout using the table functions discussed in Manipulate Cells.
INSERT SPECIAL CHARACTERS
Position your cursor at the point you want to insert a special
character.
on the toolbar.
Click the Special Characters icon
Click a special character in the dialog window to insert the
character.
Site Builder To
S
oolkit User Ma
anual
Page 25
5 of 27
UPLOADIING DOC
CUMENTS AND IMA
AGES
I you are linkking to a docu
If
ument, open up the LINK Dialog
D
page by clicking on the LINK icon
n.
I uploading an
If
a image, click on the IMAG
GE icon.
The following is true for eitther linking to
T
o a documentt or uploading
g an image:
C
Click
on Browsse Server
Make sure the RES
SOURCE TYPE is correct for what you’re doing.
d
f
If a fo
older doesn’t exist, click on
n
Navigate to your departmental folder.
g
generate
one.. Make sure you
y check forr multiple pag
ges
CREATEE NEW FOLDER
R and
.
Click on
o BROWSE. This will take
e you to your local system’’s hard drive. Navigate to the file you want
w
to
u
upload
to the Web Server. Double clickk on it. The name
n
will appe
ear UNDER UPLOAD
P
A NEW FILE IN THIS FOLDER
F
.
Click on
o UPLOAD. The file will b
be uploaded to the Web Se
erver and app
pear in the follder / area yo
ou chose.
Doublle-click on the
e file name. It
I now transfe
ers to the Link / Image Dia
alog page and
d into your do
ocument.
Site Builder To
S
oolkit User Ma
anual
Page 26
6 of 27
NOTE
E: If you wan
nt to delete old content fro
om your depa
artmental folder, click the
icon.
tto rename a file,
f
click the
icon. If you want
CREATING AND "BREAKIN
NG" HYPE
ERLINKS
Pages you cre
P
eate automatically are inclu
uded in the na
avigation pan
nel, unless you
u specify othe
erwise. You also
a
may,
in
n the page co
ontent, make specific referrence to otherr pages—with
hin your webssite and in outtside sites—b
by
in
ncluding a hyyperlink in you
ur page.
CREATE THE LINK
Highlight the page
H
p
elementt you want ass the hyperlink (one or
m
more
characte
ers of text and
d/or a graphic image), the
en, either…
R
Right-click
the
e selection an
nd select Inse
ert Hyperliink…
C
Click
the Hyp
perlink icon
in the toolbar.
S
Select
the UR
RL button, if not
n already se
elected.
I the URL: field…
In
f
I the referencce is to anoth
If
her page in yo
our website, type
t
n
nnn.asp
, where
w
nnn is the SBT-assigned page num
mber (for
e
example
/pag
ges/687.as
sp ).
I the referencce is to an ou
If
utside page, in
nclude the fulll URL. You
m type it orr open anothe
may
er browser insstance, go to the page,
c
copy
the URL from the add
dress field and
d paste it in this field.
I the Targe
In
et: field, type new if you want the refe
erenced
p
page
to open in a separate
e browser win
ndow.
C
Click
OK.
PLEASE NOTE !!!
When linking
g to anothe
er page on
n the “core
e” CSN we
ebsite,
change th
he PROTOCO
OL to OTHER
R; and do no
ot include www.csn.e
w
edu in
the URL; i.e.: /page
es/486.asp
/admin
nistration/fa
aculty/resou
urces.asp
The ADVA
ANCED tab is
i beyond the
t
scope of
o this tuto
orial.
SBT assigns a font size and
S
d color to the hyperlink as defined by th
he template's style sheet(ss). It generallyy is not a
g
good
idea to impose your own
o
explicit fo
ormatting to the hyperlinkk. Consistent appearance
a
helps users kn
now what
t expect.
to
WEBSITE LINKS
I
Highlight the page
H
p
elementt you want ass the hyperlink (one or more characterss of text and/o
or a graphic image),
t
then,
either…
Site Builder To
S
oolkit User Ma
anual
Page 27 of 27
Right-click the
e selection an
nd select Inse
ert Hyperliink…
C
Click
the Hyp
perlink icon
in the toolbar.
S
Select
the UR
RL Link Type, if not alreadyy selected.
T
Type
or paste
e the URL (we
eb address) in
nto the URL box. Click OK.
EMAIL LINK
KS
Highlight the page
H
p
elementt you want ass the hyperlink (one or more characterss of text and/o
or a graphic image),
t
then,
either…
R
Right-click
the
e selection an
nd select Inse
ert Hyperliink…
C
Click
the Hyp
perlink icon
in the toolbar.
S
Select
the E-M
Mail Link Typ
pe
T
Type
the ema
ail address into
o the E-Mail Address
A
box. (You can add
d an Optional Subject for the email). Click OK.
C
CSN
WEBPA
AGE LINKS
Highlight the page
H
p
elementt you want ass the hyperlink (one or more characterss of text and/o
or a graphic image),
t
then,
either…
R
Right-click
the
e selection an
nd select Inse
ert Hyperliink…
C
Click
the Hyp
perlink icon
in the toolbar.
S
Select
the UR
RL Link Type, if not alreadyy selected.
C
Change
the prrotocol to Oth
her.
T
Type
the page
e number of another
a
CSN webpage
w
(For example: /p
pages/687..asp).
C
CSN
DOCUM
MENT LINKS
S
Highlight the page
H
p
elementt you want ass the hyperlink (one or more
c
characters
of text and/or a graphic imag
ge), then, eith
her…
R
Right-click
the
e selection an
nd select Inse
ert Hyperliink…
C
Click
the Hyp
perlink icon
in the toolbar.
S
Select
the UR
RL Link Type, if not alreadyy selected.
C
Click
Browse Server.
S
C
Choose
the Re
esource Type from the upp
per left hand pull down
m
menu.
B
Browse
to the
e specific direcctory where the
t documentt is located an
nd
c
click
the file name.
n
C
Click
OK.
BREAK THE LINK
IIf you decide to eliminate the
t link, even
n if you intend
d to delete the
e page eleme
ent to which you assigned the link…
P
Position
your cursor anywh
here within the defined hyp
perlink element.
C
Click
the Rem
move Hyperlink icon
on the toolbar.
Site Builder To
S
oolkit User Ma
anual
Page 28
8 of 27
You risk
k leaving extraneous
e
s HTML ma
arkup in yo
our page iff you
fail to remove
r
th
he link beffore deletting the te
ext/image—not
necessarily catastrrophic, butt messy.
LINK TO ON-PAGEE REFEREENCES (A
ANCHORSS)
On-page referrences can be
O
e particularly helpful on lon
ng pages. Forr example, he
ere's the top portion
p
of a re
elatively
lo
ong page, listting descriptio
ons for severa
al product-related courses:
To give the usser the option
T
n of going dire
ectly to a spe
ecific descriptiion—instead of
o scrolling do
own the page
e looking
f it…
for
S
Select
the first target (the anchor)
i the above Anchor
in
A
Point Example
Click the ANC
C
CHOR icon
on the toolbar.
I the ANCHO
In
OR dialog NAME: field, typ
pe the anchor name ( acce
ess , for example).
C
Click
OK.
Select the texxt/image in the list that willl represent th
S
he link
a
above
Anchorr Point Examp
ple
in the
Right-click and
R
d select Inse
ert Hyperlink (or click the
t Hyperlink icon
).
I the Hyperlink dialog…
In
C
Click
the Anc
chor button.
C
Click
the down
n arrow in the
e Name: field and select the anchor name (access in this examp
ple).
C
Click
OK.
Site Builder To
S
oolkit User Ma
anual
Page 29
9 of 27
Repeat the ste
R
eps above forr the rest of the target ancchors and linkks on the page
e.
Consider inclu
C
uding anotherr set of ancho
or links to assiist users returrning to the top
t of the pag
ge (not everyo
one
k
knows
about Ctrl+Home
C
e ). In this exxample, the ph
hrase Back to
t top of page occurs following
f
each
h course
d
description
(se
ee the red bo
ox in the samp
ple—the box is not part of the page).
A occurrence
All
es of this anch
hor link refer to an anchor established on the page header.
CLEAN UP CONTEENT FROM
M OTHER
R SOURC
CES
When you passte content frrom other sou
W
urces, you often get bagga
age—markup from the source applicatio
on—that
y don't need and that may complicate
you
e your editing
g activity in SB
BT. These opttions for cleaning source te
ext
in
nvolve Notepad and editing HTML tags..
USE NOTEPA
AD
The safest approach is to use
T
u Notepad as
a an interme
ediate step.
O
Open
Notepad
d ( Start ’ Programs ’ Accesssories ’ Note
epad ).
S
Select
and cop
py the source
e text in its na
ative application (Word, FrontPage, brow
wser page, ettc.).
P
Paste
the copied text into the
t Notepad document.
d
Th
his removes all
a tags, leavin
ng you with plain text.
S
Select
and cop
py the text in the Notepad document.
P
Paste
the copied text in the
e SBT page.
F
Format
the text using SBT's tools.
A few sweep
ping generalizations:
IIt's generally a good idea to
t save the pa
age before yo
ou paste conte
ent from anotther source. If,
I after you paste
p
the
c
content
and th
he code swee
ep causes pro
oblems, you merely
m
click Reset
R
to return to the prevviously saved content.
Y may need
You
d to run two sweeps—
s
Mic
crosoft Wo
ord mark-u
up and Font Tags —to achieve the de
esired
r
results.
C
Consider
All HTML
H
Tags
s a sweep of last resort; th
he resulting co
ontent has no
o markup. All headings and
d other
le
egitimate markup are lost..
T last resorrt is to toggle to the HTML editing mode
The
e using the HT
TML editing iccon
and clean
c
it up you
urself,
w
which
can be daunting if yo
ou are unfam
miliar with HTM
ML markup.
Site Builder To
S
oolkit User Ma
anual
Page 30
0 of 27
RELOCAT
TE A PAG
GE
You may find after you add
Y
d a page you really would prefer it to be
e associated with
w a different container (parent)
p
page.
SBT pro
ovides a simple way to relo
ocate the pag
ge with minimum effort.
While viewing
W
g the page forr editing
c
click
the Locattion option.
S displays where
SBT
w
the pag
ge currently is located (as a child of Pro
ofessional Devvelopment & Training in th
his
e
example).
To relocate the page, click th
he down arrow
w.
C
Click
the new parent locatio
on (any page
e in black is a candidate).
C
Click
Publish
h (or at least Save).
NOTE:
In this example:
e
Children
n of the page
located aren't
a
in th
he list.
to
o
be
Items in
n red are not candid
dates
because
you
don't
have
appropriiate permis
ssion for th
hem.
DELETE A PAGE
You may delette a page any
Y
ywhere you see the Delete
e icon
. This includes wh
hile viewing the page on th
he
w
website
(afterr logging in to
o Site Builder Tools) and frrom any of the find page fu
unctions availlable in SBT.
Site Builder To
S
oolkit User Ma
anual
Page 31 of 27
SITE BUILLDER TOOLKIT - FAQS
WHAT'S MY USER ID?
Usually, it’s th
U
he first initial of your first name and you
ur entire last name.
CAN I WORK
K ON MY WEB
E PAGES FR
ROM HOME?
Yes, the softw
Y
ware is browse
er based, whiich means you can work on your pages from any com
mputer that has
h
I
Internet
Explo
orer or a like application.
a
H
However,
you
u will need a CSN
C
“VPN” acccount (virtua
al private netw
work)
a
account;
conta
act the Held Desk
D
to obtain one.
HOW DO I EDIT PAGES?
The in-line editor icons are
T
e located at th
he bottom of each page yo
ou have accesss to. To:
E a page—cchoose the pa
Edit
age with penccil icon
C
Copy
a page—
—choose the two
t
pages ico
on
D
Delete
a page
e— choose the
e X icon
A a page—cchoose the do
Add
og-eared page (only visible
e if you said yes to a speciific question when creating
g the
p
page;
see belo
ow for more information)
i
HOW DO I MAKE
M
A PAGE
E A CONTAIN
NER PAGE (MEANING I CAN
C
ADD PAG
GES TO IT)?
?
When creating
W
g or editing th
he page, choo
ose the page control sub-m
menu and ansswer yes to th
he question, ‘Will this
p
page
contain other
o
pages?'
HOW DO I ADD
A
A PAGE?
Once you are logged in, se
O
elect the page
e you want to add a page to
t and click on the add a page icon on the in-line
e
editor.
WHY CAN'T I ADD A PAG
GE?
IIf you do not see the
icon, you did
d not make th
his page a con
ntainer page and you are unable
u
to add
d a page.
T rectify thiss, choose the edit page icon
To
and ch
hoose the pag
ge control sub
b-menu. For the
t question, ‘Will this
p
page
contain other
o
pages?' choose the yes
y radio buttton. (The deffault answer iss no.) Go bacck to the page
e you
w
want
to add a page to and add a page icon
i
should now be visible.
Site Builder To
S
oolkit User Ma
anual
Page 32
2 of 27
HOW DO I TITLE MY PAG
G E?
Always title yo
A
our page whe
en adding new
w pages. If yo
ou don't, the words
w
‘New Untitled Page' will appear when you
p
publish
the pa
age to the site
e.
T
Title
Bar—the text displaye
ed in the brow
wser title bar of
o the Web browser.
L
Link
Text—how text is disp
played in auto
omated naviga
ation links.
H
Help
Text—texxt that pops up
u when userrs hover over the link.
HOW DO I CHANGE
C
THE LOCATION OF
O MY PAGE(S)?
To move one of your pagess to another location,
T
l
selecct the edit pa
age icon
, and select lo
ocation. Choo
ose the
n
new
location from
f
the drop
p-down menu
u. You will be only able to move
m
your pa
ages to other pages that yo
ou have
b
been
given acccess.
HOW DO I MAKE
M
A PAGE
E INACTIVE AND
A
WHY WOULD
W
I WAN
NT TO DO TH
HAT?
Make a page inactive
M
i
by ed
diting the pag
ge and selecting the naviga
ation control. Under page status, select
‘iinactive'.
Choose to make a page ‘inactive' when it needs to be
C
e approved byy a content manager
m
or when it's a worrk in
p
progress
and is not ready to
t be active and
a published to the Web site.
s
HOW DO I ORDER
O
MY PA
AGES, EITHE
ER ALPHABET
TICALLY OR IN A SPECIF
FIC ORDER?
On the page you
O
y want to order,
o
select the
t edit page icon
an
nd select the navigation
n
me
enu. In the bo
ox with
t question, ‘What positio
the
on in a navigation sequence
e should this link be?' type
e the number of the order of the
p
page
(1, 2, 3, etc.). The de
efault is 99 which means th
hat pages will be ordered alphabeticallyy. To hide a page,
p
type
a negative number (-1).
WHY CAN'T I CUSTOMIZZE MY TEXT WITH
W
THAT FONT I LOVE, MAKE IT PURPLE
P
AND
D MAKE IT HU
UGE,
L
LIKE
48 POIINTS?
Because we want
B
w
to presen
nt a consisten
nt look and im
mage to our viewers, there
e are fewer ch
hoices for custtomizing
y
your
test than
n you have be
een used to in
n the past. We
e want your content
c
to be the message
e not the page
e's
in
ndividual design.
There are sevveral styles av
T
vailable for yo
ou in SBT. Sele
ect one of the
e Heading styyles or the No
ormal font dep
pending
o your needss.
on
Site Builder Toolkit User Manual
Page 33 of 27
WHAT'S THE DIFFERENCE BETWEEN DELETE AND PURGE?
Deleting a page means that you can still go back and find the page on the page listing. (Make searching for your
deleted pages easier by filtering only on deleted pages.) Deleting a page is recommended if you think you might
want to reactivate the page or use the content again.
Purging a page means that it's gone forever. Any copy or images on the page will have to be recreated if you
want it again.
The majority of the SBT Users will NOT have permissions to
Purge.
WHAT ARE NAVIGATIONAL AND HYPERTEXT LINKS AND HOW DO I ADD THEM?
A navigational link connects to information within the CCSN website. Creating navigational links is recommended
rather than recreating content on your page. Consult the site map, A to Z index, or the search function if you are
looking for particular information and want to know if it already exists on the site.
Add a navigational link by creating the link information (text) within your main content. Highlight the text and
select the ‘link' (chain) icon in the editor. On the URL line, type the page number of the page you want to link
followed by .asp.
A hypertext link connects to an external Web site or an original document created in Acrobat, Word, or Excel.
Follow the same directions for adding a navigational link. However, to link to an external Web site, you must type
the entire Web site address. Also, in the target line, type the word ‘new'. This will open the site or document in a
new browser window and is required for all hypertext links.
WHEN COPYING/PASTING PAGES FOR MIGRATION, HOW DO I 'CLEAN UP' MY PAGES?
Cleaning up pages means removing any font or tab markups from the original document. It will make it much
easier for you to apply the style sheets in SBT to your copy. Removing all HTML tags is not recommended. First,
sweep out the Microsoft Word mark ups; then the font tags; and finally, the span tags.
HOW DO I USE SPELL CHECK?
In the editor (main content) menu, highlight the text you want to check and select the ABC icon.
HOW DO I INSERT A PICTURE OR GRAPHIC ON MY PAGE?
Be sure the name of the picture contains no special characters or blank spaces. (A file named “Dog Splashing &
Tub/yesterday.jpg” won't work). Dashes, underscores, upper and lower case letters are acceptable. (Files named
like this: DoginTub.jpg or dog_in_tub.jpg will work).
Before placing the picture or image on your page, manipulate the size, file format and resolution in image-editing
software such as Photoshop Elements or Microsoft's Photo Editor. If the picture is from a digital camera, use the
editing software that came with the camera.
Site Builder Toolkit User Manual
Page 34 of 27
The image size should be no larger than 150 K. (Subject to change; use this until further notice).
Required file formats are GIF for line art and JPEG for pictures. Required resolution for Web images is no more
than 72 dpi.
To place a photo or image on your page, select the picture frame icon and browse to where the picture is stored
on the web server.
HOW DO I ADD ALT TEXT TO MAKE MY PICTURES AND IMAGES ADA COMPLIANT?
When adding an image, complete the alt text box with the appropriate text.
If the image is already part of your content, simply right click on the image and complete the alt text box that
appears.
I WANT TO PUT A TABLE ON MY PAGE. WHAT'S THE BEST WAY TO DO THAT?
Either use one of the pre-defined tables or create the table in Microsoft Word or Front Page and then place it on
your page.
I ADDED CONTENT AND WENT BACK TO THE WEB SITE, BUT MY CONTENT WAS NOT THERE. WHAT
HAPPENED?
More than likely you saved the page, but didn't publish it to the Web site. Select the hammer and screwdriver
icon and find your page and select it. Publish the page to the site to drive the information to the site.
HOW DO I ENTER A SOFT RETURN? (ONE-LINE)
To create a paragraph break or hard return (two-lines), Hit the enter key. To create a one line return or soft
return hit shift + enter at the same time.