1
ModelRight 4.0 Help
ModelRight, Inc © 2006 - 2014, all rights reserved
ModelRight 4.0
Data Modeling Done Right
Whether you are a beginner or an expert data modeler,
ModelRight is the database design tool of choice.
It is the answer when you need a database modeling tool that
surpasses the “least common denominator” approach tak en
by others.
ModelRight 4.0 Help
ModelRight, Inc © 2006 - 2014, all rights reserved
All rights reserved. No parts of this work may be reproduced in any form or by any means - graphic, electronic, or
mechanical, including photocopying, recording, taping, or information storage and retrieval systems - without the
written permission of the publisher.
Products that are referred to in this document may be either trademarks and/or registered trademarks of the
respective owners. The publisher and the author make no claim to these trademarks.
While every precaution has been taken in the preparation of this document, the publisher and the author assume no
responsibility for errors or omissions, or for damages resulting from the use of information contained in this
document or from the use of programs and source code that may accompany it. In no event shall the publisher and
the author be liable for any loss of profit or any other commercial damage caused or alleged to have been caused
directly or indirectly by this document.
4
ModelRight 4.0 Help
Table of Contents
Foreword
Part I Welcome to ModelRight 4.0
7
9
Part II Whats New
11
Part III User Interface
24
1 Explorers
................................................................................................................................... 24
2 Property
...................................................................................................................................
Browser
33
3 Windowing
...................................................................................................................................
Features
37
4 Diagrams
................................................................................................................................... 44
Content Display
..........................................................................................................................................................
Options
47
Model Subsets
.......................................................................................................................................................... 53
Relation Display
..........................................................................................................................................................
Options
60
Child Graphics.......................................................................................................................................................... 61
Them es
.......................................................................................................................................................... 61
5 Shortcuts
...................................................................................................................................
toolbar
64
6 Modeless
...................................................................................................................................
Database Compare
65
7 Diagram
...................................................................................................................................
Navigator
66
8 Transaction
...................................................................................................................................
History
67
9 Model...................................................................................................................................
Validation
67
10 Diagram
...................................................................................................................................
Tooltips
69
11 Diagram_Zoom
................................................................................................................................... 71
12 Keyboard
...................................................................................................................................
Shortcuts
71
Part IV Concepts
74
1 Basics
................................................................................................................................... 74
2 Templates
................................................................................................................................... 75
3 Scripting
................................................................................................................................... 78
VB Scripts
.......................................................................................................................................................... 79
Script Language
..........................................................................................................................................................
API Reference
82
4 Migration,
...................................................................................................................................
Unification, and Rolenaming
86
5 Naming
................................................................................................................................... 86
6 User Defined
...................................................................................................................................
Properties
88
7 Relations
................................................................................................................................... 90
Table Relations
.......................................................................................................................................................... 90
View Relations
.......................................................................................................................................................... 90
Select From Relations
.......................................................................................................................................................... 91
REF Relations .......................................................................................................................................................... 92
Part V Basic Working Procedures
94
ModelRight, Inc © 2006 - 2014, all rights reserved
Contents
5
1 Creating
...................................................................................................................................
new objects
94
2 Copy/Paste
...................................................................................................................................
and Drag/Drop
96
3 On-Diagram
...................................................................................................................................
Editing
97
4 Reporting
................................................................................................................................... 98
5 Search
...................................................................................................................................
and Find
101
Part VI Database Support
105
1 Compare
...................................................................................................................................
with another Model
105
2 Supported
...................................................................................................................................
Databases
108
SQL Server Support
.......................................................................................................................................................... 108
Oracle Support
.......................................................................................................................................................... 109
PostgreSQL ..........................................................................................................................................................
Support
110
DB2 Support .......................................................................................................................................................... 111
MySQL Support
.......................................................................................................................................................... 112
ODBC
.......................................................................................................................................................... 112
3 Generate
...................................................................................................................................
to Database/Forward Engineer
113
4 Generate
...................................................................................................................................
Change Script
118
5 Reverse
...................................................................................................................................
Engineering
122
6 Reverse
...................................................................................................................................
Engineer into Model
127
7 Compare
...................................................................................................................................
with Database
128
8 Converting
...................................................................................................................................
Between Databases
134
Datatype Conversion
.......................................................................................................................................................... 135
Part VII Property Pages
137
1 Common
...................................................................................................................................
Property Pages
137
Notation
.......................................................................................................................................................... 137
Com m ent & ..........................................................................................................................................................
Definition Property Page
139
Notes Property
..........................................................................................................................................................
Page
139
Category Property
..........................................................................................................................................................
Page
140
Reset Property
..........................................................................................................................................................
Page
142
Used By Property
..........................................................................................................................................................
Page
142
Links Property
..........................................................................................................................................................
Page
143
Physical Property
..........................................................................................................................................................
Page
145
SQL Property..........................................................................................................................................................
Page
146
Graphics Property
..........................................................................................................................................................
Page
149
Type Property
..........................................................................................................................................................
Page
151
Independent..........................................................................................................................................................
Defaults
151
Revision History
.......................................................................................................................................................... 152
2 Diagram
...................................................................................................................................
Property Pages
152
Diagram Property
..........................................................................................................................................................
Page
153
Relation Display
..........................................................................................................................................................
Options
153
Header
.......................................................................................................................................................... 155
3 Table
...................................................................................................................................
Property Pages
156
Table Property
..........................................................................................................................................................
Page
157
Physical Property
..........................................................................................................................................................
Page
158
Partition Property
..........................................................................................................................................................
Page
160
Table Graphic
..........................................................................................................................................................
Options
161
ModelRight, Inc © 2006 - 2014, all rights reserved
5
6
ModelRight 4.0 Help
4 View...................................................................................................................................
Property Pages
163
View Property
..........................................................................................................................................................
Page
163
Select Property
..........................................................................................................................................................
Pages
164
5 Relation
...................................................................................................................................
Property Pages
165
Relation Property
..........................................................................................................................................................
Page
166
Integrity Property
..........................................................................................................................................................
Page
167
Migrate Property
..........................................................................................................................................................
Page
169
Relation Graphics
..........................................................................................................................................................
Property Page
170
6 Trigger
...................................................................................................................................
Property Pages
172
Trigger Property
..........................................................................................................................................................
Page
172
Trigger Body..........................................................................................................................................................
Property Page
173
7 Schema
...................................................................................................................................
Gen Option Set
174
8 Check
...................................................................................................................................
Constraints
176
9 Model
...................................................................................................................................
Source
178
Part VIII Dialogs
181
1 Options
................................................................................................................................... 181
2 Model
...................................................................................................................................
Browser
182
3 Meta...................................................................................................................................
Model Browser
183
4 Find................................................................................................................................... 184
5 Model
...................................................................................................................................
Validation
185
6 Print...................................................................................................................................
Dialog
187
7 Export
...................................................................................................................................
JPG or Bitmap
188
Part IX How to buy ModelRight
Index
190
191
ModelRight, Inc © 2006 - 2014, all rights reserved
Foreword
Foreword
ModelRight, Inc © 2006 - 2014, all rights reserved
7
Part
I
Welcome to ModelRight 4.0
1
9
Welcome to ModelRight 4.0
Welcome to the Next Generation in Database Design
ModelRight radically simplifies the development of your database design. It will help you to
visualize and manage the complexity of your database and create a solid database design.
ModelRight can also help you enforce complex constraints, manage database views, validate
design decisions, and create complete CREATE and ALTER scripts. It has been developed
from the start to support many of your database's most advanced features, without sacrificing
intuitive ease of use.
It combines all the standard features like drag/drop, undo/redo, reporting, printing, on-diagram
editing, etc... with powerful and advanced design features like Templates, in-depth databasespecific support, scripting, and comparisons with your database or another Model. We are
convinced that it is the best database modeling product available today at any price. It is the
answer when you need a database modeling tool that surpasses the “least common
denominator” approach taken by others.
ModelRight, Inc © 2006 - 2014, all rights reserved
Part
II
Whats New
2
11
Whats New
Whats New
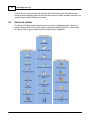
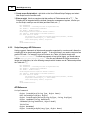
LOGICAL AND CONCEPTUAL MODELING
MODEL SOURCES
DERIVE AND COMPARE MODELS
AUTO SAVE/RESTORE
SAVE MODEL CHANGE HISTORY
DEFAULT OBJECT GRAPHICS
USER_DEFINED ICONS
MODEL TEMPLATE
Logical and Conceptual M odeling
ModelRight 4.0 introduces Logical and Conceptual Model types:
The Model/Type property page
When Logical or Conceptual is selected, your Model is then defined in terms of Entities,
Attributes, Relations, Key Constraints, Check Constraints and Logical Datatypes.
ModelRight also allows you to create supertype/subtype and many-to-many relations in a
Logical Model.
ModelRight, Inc © 2006 - 2014, all rights reserved
12
ModelRight 4.0 Help
Supertype/subtype symbols in the various notations that ModelRight supports.
When a supertype/subtype symbol is selected, the property page of the Property Browser
contains the following controls:
Category Transform - specify how to convert the supertype/subtype structure when
converting to a physical model:
M odel Sources
ModelRight 4.0 introduces the concept of a Model Source. A Model Source stores information
about Model to Model compares so that previously matched objects are matched even if their
name changes. A Model Source also allows you to see what has changed in either of the
compared Models since the last time they were compared. It also allows you to update your
Model automatically with any changes made in the Model Source since the last Sync/Refresh
(see Refresh).
ModelRight, Inc © 2006 - 2014, all rights reserved
Whats New
13
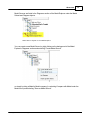
Model Sources are listed in the Diagrams section of the Model Explorer under the Model
Subset and Diagram objects.
Model Source objects in the Model Explorer
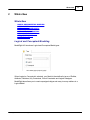
You can create a new Model Source by right clicking on the background of the Model
Explorer's Diagrams section and selecting "Create Model Source"
:
or simply by doing a Model to Model compare (i.e.selecting Compare with Model under the
Model menu) and selecting "Save as Model Source".
ModelRight, Inc © 2006 - 2014, all rights reserved
14
ModelRight 4.0 Help
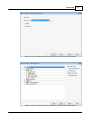
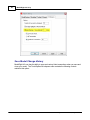
The following page is displayed in the Property Browser when a Model Source object is
selected:
Model Source property page
Model File - the last known location of the Model Source file. Browse to select a new
location.
Store Smart Compare Info - controls whether or not information about which Model
changed objects and properties is maintained.
Refresh - if the Model Source Model saves its Change History (see Save Model Change
History), then this button will be enabled and allow you to update your Model with any changes
that have been made to the Model Source Model since the last Sync or Refresh.
ModelRight, Inc © 2006 - 2014, all rights reserved
Whats New
15
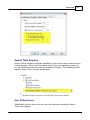
Sync - shortcut button to start a Model to Model Compare using the selected Model
Source
Open - shortcut button to open the Model Source's linked Model.
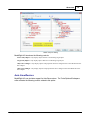
Model Compare Filter
A Model Source can have any number of Model Compare Filters. A Model Compare Filter
controls what objects from the other Model are included in the compare. Having multiple
Model Compare Filters allows one to quickly and easily compare different parts of the other
Model. When a Model Compare Filter is selected, the following property pages are displayed
in the Property Browser:
Select the types of objects and properties that
you would like to compare.
ModelRight, Inc © 2006 - 2014, all rights reserved
16
ModelRight 4.0 Help
Select specific instances of objects in the
other Model to compare.
Derive and Compare Models
To quickly create a new Model from an existing Model, ModelRight 4.0 provides a Derive
Model feature:
Derive Model creates a new Model based on the existing Model. The new/derived Model can
be a different type of Model (i.e. Logical vs Physical) or a different Physical database type (i.e.
Oracle vs SQL Server). The derived Model will contain a Model Source that links the objects
in the derived Model back to the objects in the original Model.
Selecting the menu item Model/Derive Model Wizard will bring up a wizard with the following
pages:
ModelRight, Inc © 2006 - 2014, all rights reserved
Whats New
Select the type of Model that you would like to create from the existing Model.
Select the type of objects that you would like to include in the derived model.
ModelRight, Inc © 2006 - 2014, all rights reserved
17
18
ModelRight 4.0 Help
Derive Object Types - select the type of objects to display for selection. This also
effects the objects that will be included in the derived Model.
Select specific instances of objects to include or exclude in the derived Model.
When doing a Model Compare, the Select Object Types and Objects wizard pages are also
displayed to let you narrow down your compare. With Model Compare the following page is
also displayed to show and resolve the differences between the Models being compared:
ModelRight, Inc © 2006 - 2014, all rights reserved
Whats New
19
Model Compare dialog
ModelRight 4.0 introduces the following controls:
Source Only Objects - only display objects that have no matching target object
Target Only Objects - only display objects that have no matching target object
Only Source Changes - only display objects and properties that have changed in the source Model since the
last compare
Only Target Changes - only display objects and properties that have changed in the other Model since the
last compare
Auto Save/Restore
ModelRight 4.0 now includes support for Auto/Save restore. The Tools/Options/Workspace
editor contains the following controls related to this option:
ModelRight, Inc © 2006 - 2014, all rights reserved
20
ModelRight 4.0 Help
Save M odel Change History
ModelRight 4.0 now has the ability to save and restore Undo transactions when you save and
close your model. The Tools/Options/Workspace editor contains the following controls
related to this option:
ModelRight, Inc © 2006 - 2014, all rights reserved
Whats New
21
Default Table Graphics
When a Table is included in a Diagram, ModelRight 4.0 will use this setting to determine how
it will be displayed. This is useful if you always want a Table to be displayed a certain way
(i.e. with certain fonts and colors) when it is included in a Diagram. This capability has been
added for Tables, Views, Columns, and Relations.
The Default Graphics control on the Table page of the Property Browser.
User Defined Icons
ModelRight 4.0 lets you import your own icons to be used when drawing the Table (or
Column) in a Diagram.
ModelRight, Inc © 2006 - 2014, all rights reserved
22
ModelRight 4.0 Help
M odel Templates
You can use this control in the File/New and Database/Reverse Engineer dialogs to let you
create a new Model based on an existing Model. Use the Browse button to select the
Template Model that you want to use.
ModelRight, Inc © 2006 - 2014, all rights reserved
Part
III
24
3
ModelRight 4.0 Help
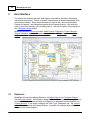
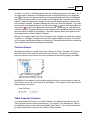
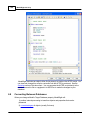
User Interface
The various User Interface elements work together to provide an innovative, intuitive and
natural work environment. There's no need to constantly pop up different dialogs and hit Ok
just to make a change. Simply select the object you want to edit - either from the Model
Explorer or Diagram - and change its properties in the Property Browser. With unlimited
Undo, if you make a mistake, you can always undo it. View the full impact of any changes in
the Transaction History window.
ModelRight provides a Shortcuts toolbar, Model Explorer, Diagram(s), Property Browser,
Diagram Navigator, Modeless Database Compare window, Transactions window, Find
Results window, and a Validation Results window.
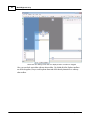
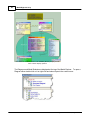
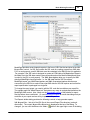
This screenshot illustrates the various elements of the ModelRight User Interface.
3.1
Explorers
ModelRight 4.0 has three different Explorers - the Model Explorer, the Templates Explorer,
and the Scripts Explorer. Each Explorer displays different different types of Model objects in a
tree format. When you select an object in an Explorer, its properties will be displayed in the
Property Browser. If you select a category, like Table, Type, Tablespace, etc... the category
editor will be displayed in the Property Browser. If possible, the selected object will also be
selected in the current Diagram.
ModelRight, Inc © 2006 - 2014, all rights reserved
User Interface
25
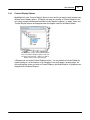
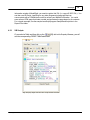
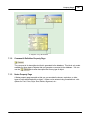
The Explorers can be docked together (as illustrated below) or separately. To dock an
Explorer (or any toolbar) separately, turn Auto-Hide off and then drag the tab.
The Model Explorer
The Model Explorer displays most of the ModelRight types of objects. It is divided into two
sections - Diagrams and Model Objects. The Diagrams section is provided primarily to
display and edit the graphical portions of the model. It contains entries for the Diagrams,
Model Subsets, and the Model itself. The Model Objects section displays the basic types of
modeling and Oracle objects. i.e. Tables, Views, Columns, etc...
The Model Explorer is a fundamental component of the design environment. It gives you a
tree/folder oriented perspective into your Model that is compact and complete. Explorer
Folders are similar to the common notion of a file directory. They act as containers for either
other Explorer Folders or leaf-level items - in this case "Explorer Lists". An Explorer List
allows you to view a list of objects of some type. ModelRight automatically creates Explorer
Lists for all of your top-level database objects like Tables, Views, etc... Now with ModelRight
4.0 you can create your own Folders and Lists. A list can be of a top-level object type like
Tables or of a secondary-level (or tertiary, etc) type of object like Key Constraint (secondary
because its always owned by a Table). At each level, you can either include all objects or
restrict the included objects by specifying a "Filter" - some condition/criteria that needs to be
satisfied for inclusion. ModelRight 4.0 will then automatically add/remove objects from the list
depending on whether or not they satisfy the Filter condition.
ModelRight, Inc © 2006 - 2014, all rights reserved
26
ModelRight 4.0 Help
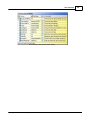
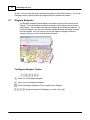
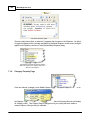
ModelRight 4.0 provides the capability to create and organize your "Explorer Folders" any way
you want. We provide a default organization as shown below, but you can move "Explorer
Folders" and "Explorer Lists" around by drag/dropping or using the Move Up/Down toolbar
buttons to create the Folder organization that you want.
Example of default Folder and List
organization (for SQL Server)
Just as Explorer Folders are similar the notion of a directory folder, "Explorer Lists" are similar
to a file. An Explorer List allows you to view a list of some type of object. ModelRight
automatically creates Explorer Lists for your basic database objects like Table, View, etc...
Now with ModelRight 4.0 you can create your own. The list can be of a top-level object like
Tables or of a secondary-level (tertiary, etc) type of object like Key Constraints (secondary
because its always owned by a Table). At each level, you can include all objects or restrict
the included objects by specifying a "Filter" (some condition/criteria) that needs to be
satisfied. ModelRight 4.0 will then automatically add/remove objects from the list depending
on whether or not they satisfy the Filter condition. ModelRight 4.0 provides a Explorer List
Wizard to help you create and edit basic Explorer Lists. You can also use the Property
Browser page to create and edit them more manually.
ModelRight, Inc © 2006 - 2014, all rights reserved
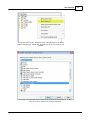
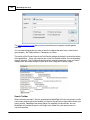
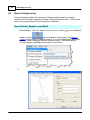
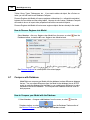
User Interface
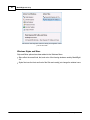
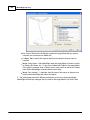
The context menu that is displayed when you right click on the Model
Explorer background. Select New Explorer List to run the Explorer List
Wizard.
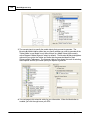
First step is to select the type of object that you want to make a list of. In this
case, we chose to make a list of Key Constraints.
ModelRight, Inc © 2006 - 2014, all rights reserved
27
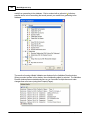
28
ModelRight 4.0 Help
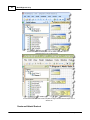
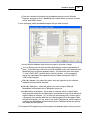
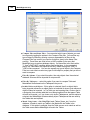
Then optionally specify a filter for each level. In this case, no filter is specified at the
Table level (so all Tables are used) and a Filter to only display Primary Key
Constraints is specified at the Key Constraint level.
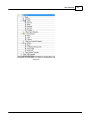
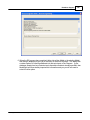
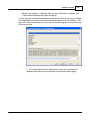
Example of what the Model Explorer looks like after the new Explorer List
was created.
ModelRight, Inc © 2006 - 2014, all rights reserved
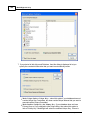
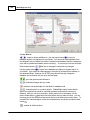
User Interface
The Property Browser page that is displayed
when the Explorer List is selected. You can edit
the Explorer List using this as well. You can also
re-run the Explorer List Wizard to edit the
Explorer List.
ModelRight, Inc © 2006 - 2014, all rights reserved
29
30
ModelRight 4.0 Help
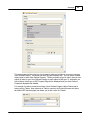
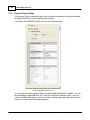
The components of the Explorer List Property Page.
1) the type of object
2) any filters on the object type
3) a list of object instances
4) repeat
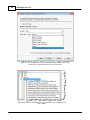
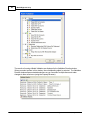
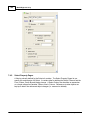
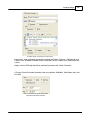
If you right click on an object in the Model Explorer you will get a context menu with various
actions you can take on that object or tree item:
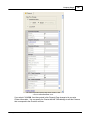
If you right click on the background of the upper section of Model Explorer you will get a
different context menu. This option is also available in the Tools->Options dialog. This menu
contains a Display Graphic Objects option. This option toggles the display of the Graphic
Objects that are contained in the Diagram(s). A Graphic Object is created for each object
that is displayed in the Diagram. The purpose of the Graphic Object is to hold options for how
the object is displayed in the Diagram - i.e. its font, color, position, etc..
The context menu that is
displayed when the
background of the Diagrams
tree is right-clicked.
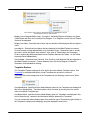
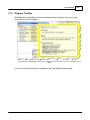
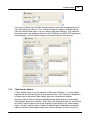
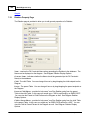
If you right click on the background of the lower section of Model Explorer you will get a
different context menu.
ModelRight, Inc © 2006 - 2014, all rights reserved
User Interface
31
The context menu that is displayed when the background of the
Model Objects tree is right-clicked.
Display Active Diagram Tables Only - if turned on, the Model Explorer will display only those
Tables/Views that are in the currently active Diagram. If no Diagram is active, then all Tables/
Views will be displayed.
Display Note Hint - If an object has a Note, then an asterisk will be displayed after the object's
name.
Sort Objects - Determines how objects that are displayed in the Model Explorer are sorted.
Choose between sorting Alphabetically or by Generation Order. Generation Order is usually
the order in which the objects were created. In the case of Tables/Views, the Generation
Order is dynamically determined based on the Relations between the Tables - so the Tables
are always listed Alphabetically.
Sort Columns - determines how Columns, View Columns, and Attributes that are displayed in
the Model Explorer are sorted. Choose between Sync with Active Diagram, Pk/Non-Pk,
Generation, and Alphabetical ordering.
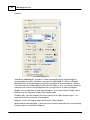
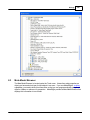
Templates Explorer
The Templates Explorer displays all of the built-in and user-defined Template objects. See
Templates for a detailed description of what Templates are and how to use them.
If you right-click on the background of the Templates tab, the following context menu will be
displayed:
Sort Alphabetical - specifies that the default display option for how Templates are displayed in
this tree is Alphabetically. The default option can be overriden by chosing from the context
menu of a specific Template type.
Sort Hierarchical - specifies that the default display option for Templates are displayed in this
tree is Hierarchically - based on the inheritance relations between the Templates.
You can override the default display option for a particular type of Template by right-clicking on
the Template's category and changing it using the displayed context menu.
ModelRight, Inc © 2006 - 2014, all rights reserved
32
ModelRight 4.0 Help
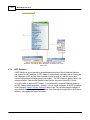
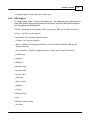
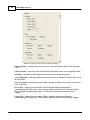
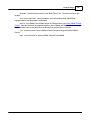
Scripts Explorer
The Scripts Explorer contains all of the built-in and user-defined Script objects. Scripts are
primarily used for generating DDL from your model objects, but they can be used for other
purposes as well. See the Scripts section for more details.
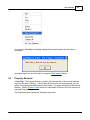
Incomplete Objects
If an item is displayed in red, then it is somehow incomplete and can not be generated to the
database. For example, if you plop down a new Table, it will initially be incomplete because it
does not yet have any Columns:
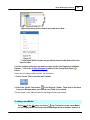
If you right click on the Table and select the Why Incomplete menu item
ModelRight, Inc © 2006 - 2014, all rights reserved
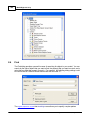
User Interface
33
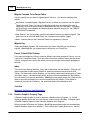
If you select it, ModelRight will display a dialog with information about why the object is
incomplete:
Incomplete object can also be found by running the Model Validate feature.
3.2
Property Browser
In ModelRight, The Property Browser is used to edit the properties of the currently selected
object (in this case a Column). If the Property Browser is not currently displayed, you can
display it by selecting the Edit/Properties menu option. F4 toggles the display of the Property
Browser. See the Property Pages section for a description of some of the more common or
important Property Pages.
The Property Browser contains the following components:
ModelRight, Inc © 2006 - 2014, all rights reserved
34
ModelRight 4.0 Help
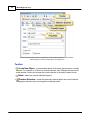
This screenshot illustrates the elements of the Property Browser - the Toolbar,
Path Navigator, Property Pages/Tabs, and Properties.
Toolbar
Create New Object - creates another object of the same type as what is currently
selected. For example, if a Column is currently selected, then clicking this button would
create another Column and change the current selection to the newly created column.
Delete - delete the currently selected object(s)
Previous Selection - makes the previously selected object the current selection.
Changing the selection does not change the underlying model.
ModelRight, Inc © 2006 - 2014, all rights reserved
User Interface
35
Next Selection - if Previous Selection is clicked, then this button becomes enabled
to allow you to navigate forward from your previous selection(s).
Select Next Sibling - makes the next sibling object the current selection.
Select Previous Sibling - makes the previous sibling object the current selection.
Undo - undo your last action. This action might not be related to the currently selected
object, but its provided here for your convenience.
Redo - if you Undo any actions, then this button becomes enabled to allow you to re-do
your undone actions.
Move Object Up In Order - if the currently selected object's order can be changed,
then this button is enabled to allow you to move the object up in its sibling order. For
example, if a column is selected, then clicking this button will move the column up in the
logical or physical/generation order (depending on what the Model Explorer's Sort Columns
option is set to). Tables and Views are always displayed in alphabetical order since their
generation order is dynamically determined based on their relations. Hence, their order can
not be changed with this button.
Move Object Down In Order - same as above button, except it moves the object
down in the order.
Commit - becomes enabled when you change text in an edit control. It just provides a
place for you to click so that the edit control loses focus and commits your changes.
Selection Explorer
The Selection Explorer lets you quickly view and navigate to objects that are related to the
current selection. It displays the name of the currently selected object and all of its owners.
You can click any owner to navigate to it - i.e. make it the currently selected object. You can
also click on the drop-down control next to each name to display a menu of that object's child
types and children. Selecting an item from this menu will cause ModelRight to navigate to
that object. Ctrl+Clicking on a child type will cause ModelRight to create a new object of that
type and navigate to it.
In the screenshot below, clicking on PRODUCT_INFORMATION will make that table the
currently selected object and show its properties.
ModelRight, Inc © 2006 - 2014, all rights reserved
36
ModelRight 4.0 Help
Illustration of the menu that is displayed when a drop-down control
is clicked.
Tabs
Standard tab controls are used to separate the different types of properties.
Properties
Each tab contains various types of controls to allow you to change the selected object's
properties.
Create and Attach Shortcut
ModelRight has always allowed easy navigation to related objects via its unique hyperlinked
User Interface. Now you can create, attach, and navigate all in one click. For example, if you
are editing a Table and want to assign it to a new Tablespace, all you have to to is hold the
ModelRight, Inc © 2006 - 2014, all rights reserved
User Interface
37
Control key down and click on the Tablespace Hyperlink - as illustrated below. When you Ctrl
+Click on a hyperlink in the Property Browser, ModelRight will create a new object of the type
of the hyperlink, attach it to the currently selected object, and change the selection to the
newly created object.
3.3
Windowing Features
Toolbar Docking
ModelRight 4.0 has improved window and toolbar handling.
When you drag the top of a toolbar (like the Explorers, Property Browser and Output Window),
docking hints will be displayed to show you where the toolbar will be placed when the drag
ends. You can specify subtle changes in the toolbar placement by dragging it over the docking
hints.
ModelRight, Inc © 2006 - 2014, all rights reserved
38
ModelRight 4.0 Help
Illustrates the docking hints that are displayed when a toolbar is dragged.
Also, you can dock any toolbar with any other toolbar. By default all of the Explorer toolbars
are docked together, but you could separate them and dock them by themselves or with any
other toolbar:
ModelRight, Inc © 2006 - 2014, all rights reserved
User Interface
39
Illustrates a different docking configuration in which the Model, Domain,
and Script Explorers are docked separately. And the Shortcut Taskbar
and Script Explorer are Auto-Hidden.
Auto-Hide
The toolbars now have an Auto-Hide option to keep them from taking up screen space till they
are needed. When they are not needed the are hidden on the side of the application and a tab is
displayed instead. When you want to use the Toolbar, simply move the cursor over it and it will
re-appear.
.
The Auto-Hide option is
located in the upper-left
corner of th toolbars.
Diagram Selection Dialog
A helper dialog is displayed when you hit Ctrl+Tab to help you select a Diagram or toolbar to
display. You can either tab through the selections or click on the one you want.
ModelRight, Inc © 2006 - 2014, all rights reserved
40
ModelRight 4.0 Help
Illustrates the Diagram selection dialog that appears when
you hit Ctrl+Tab
Windows Styles and Skins
Style and Skins options have been added to the Windows Menu.
Skins effect the overall look, feel, and color of the framing windows used by ModelRight
4.0.
Styles fine-tune the fonts and look of the Skin and usually just change the window icons.
ModelRight, Inc © 2006 - 2014, all rights reserved
User Interface
41
Play around with these options to find the combinations of Window Style and Skin that you
like most.
ModelRight, Inc © 2006 - 2014, all rights reserved
42
ModelRight 4.0 Help
Screenshot with Windows/Skin set to Office 2007/Blue and
Windows/Style set to Office 2003
Screenshot with Skin set to XP Luna/Extra Large Homestead and Style set to
Native XP
Create and Attach Shortcut
ModelRight, Inc © 2006 - 2014, all rights reserved
User Interface
43
ModelRight has always allowed easy navigation to related objects via its unique
hyperlinked User Interface. Now you can create, attach, and navigate all in one click. For
example, if you are editing a Table and want to assign it to a new Tablespace, all you have
to to is hold the Control key down and click on the Tablespace Hyperlink - as illustrated
below. When you Ctrl+Click on a hyperlink in the Property Browser, ModelRight will
create a new object of the type of the hyperlink, attach it to the currently selected object,
and change the selection to the newly created object.
Property Grid
The Property Grid has options for displaying by Category or Alphabetically
The new property grid displaying categorized
properties
The property grid the properties sorted
alphabetically
Multiple Selection
ModelRight now supports the selection and editing of multiple Tables at the same time.
This is useful when you want to change a property of the selected Tables all at once. The
ModelRight, Inc © 2006 - 2014, all rights reserved
44
ModelRight 4.0 Help
Table, Physical, SQL, Reset, and Graphics pages have been this enhanced with this
capability.
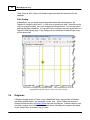
Print Scaling
In ModelRight, you can simply drag the page boundaries that are displayed on the
Diagram to change the print scale. i.e. how much is printed on a page. When the mouse
rolls over a page boundary, the cursor changes as illustrated below. You can then select
and drag the page boundaries. You can also set the scaling by entering a scale factor in a
Diagram's Grid property page. Page Setting such as Landscape mode and Page sizing
info are also saved.
Illustration of dragging the page boundaries. The highlighted lines show the
dragged/new page boundaries. Notice the cursor change.
3.4
Diagrams
A Diagram displays a view of Tables, Views, Materialized Views, various kinds of Relations
and simple graphic objects - like rectangles, circles, lines.. Which Tables and Views are
displayed is determined by the Model Subset that owns the Diagram. A Model Subset is used
to specify a subset of all of a Model's Tables and Views - allowing you to organize the display
of your Tables/Views in whatever way you want.
ModelRight, Inc © 2006 - 2014, all rights reserved
User Interface
45
ModelRight provides an amazing variety of ways to display your Model. The following two
Diagrams illustrate this variety. Both Diagram are contained in the same Model Subset (so
they have the same Tables/Views) and use the same Notation (Barker), but they have very
different display options: Themes allow you to change the look of a Diagram with a single
click.
A Diagram with its Diagram Display and Table Graphic options set to plain
black and white options.
ModelRight, Inc © 2006 - 2014, all rights reserved
46
ModelRight 4.0 Help
The same set of Tables/Views and notation (Barker) displayed with
more colorful display options.
The Diagrams and Model Subsets are displayed at the top of the Model Explorer. To open a
Diagram either double-click on it or right click and select Open in the context menu.
ModelRight, Inc © 2006 - 2014, all rights reserved
User Interface
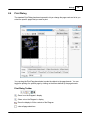
3.4.1
47
Content Display Options
ModelRight 4.0 uses "Content Display" objects to store and let you easily switch between your
different sets of display options. A Diagram can have any number of Content Displays to let
you quickly change the displayed information of the Diagram's objects (i.e. tables, views, etc).
Content Display objects are displayed under the Diagram object in the Model Explorer.
The Diagrams section of the Model Explore
lists the Content Display options that you
currently have defined. Select it to edit or
double click to select and activate.
A Diagram has one active Content Display at a time. You can activate a Content Display by
double clicking on it in the Explorer or by changing it from the Diagram's property page. As
with anything else, when you select a Content Display in the Model Explorer, its properties are
displayed in the Property Browser:
ModelRight, Inc © 2006 - 2014, all rights reserved
48
ModelRight 4.0 Help
The Content Display edit controls in the Property Browser.
Click around on the tree items to see the options that are available for the selected item.
ModelRight 4.0 provides unprecedented levels of control and flexibility when it comes to your
Diagram's display. With a wealth of new and useful display options, you can display and edit
any kind of object and any property on the Diagram. You simply select the properties, the
types of objects that you want to included in your diagram - and order them any way you want.
ModelRight, Inc © 2006 - 2014, all rights reserved
User Interface
An example of the default Table display
ModelRight, Inc © 2006 - 2014, all rights reserved
49
50
ModelRight 4.0 Help
Example 1
Example of display option settings to show only the Table
Comment and Create Script
And the resulting Table display
Example 2
ModelRight, Inc © 2006 - 2014, all rights reserved
User Interface
Table with Columns (using checkboxes for Not Null), Key
Contraints and properties (no header), and Relations and
properties
ModelRight, Inc © 2006 - 2014, all rights reserved
51
52
ModelRight 4.0 Help
...and the resulting display
Notable Display Options
Table.Column.Index Designators
P - Primary Key Index
Un - Unique Key Index (where n is the generation order)
Fn - Foreign Key Index
C - Clustered Index
Qn - Unique Index
In - Non-Unique Index
Index Designator and Key Designator
same codes as above
ModelRight, Inc © 2006 - 2014, all rights reserved
User Interface
3.4.2
53
Model Subsets
Model Subsets provide a basic organizational framework for your Model. They let you break
your model into more manageable pieces of related tables and views - in whichever way you
want. Its similar to a music playlist. And like a music playlist, sometimes you want to
automatically add items based on some criteria. ModelRight 4.0 adds this capability. In
previous versions, you could manually select the individual objects that you want in the
subset. In ModelRight 4.0, you can either manually specify the subset objects or you can
specify some criteria that is used to add and remove objects automatically. The criteria can
be defined in terms of some property having some value - or no value, or an inherited value,
etc... You can have multiple criteria that are combined to give you the result set that you
want.
A Model Subset defines a subset of Model objects. A Model can own any number of Model
Subsets and a Model Subset can own any number of Diagrams. i.e. the Model Subset
defines the Model objects (i.e. Tables and Views) that will be in the Diagram and the Diagram
defines how those objects are displayed. This allows you to organize and view a given set of
Tables and Views in many different ways. Relations are automatically included in the
Diagram if both the parent and child Tables/Views are in the Model Subset.
New in ModelRight 4.0
Like a music playlist, you may sometimes want to have items automatically added based on
some criteria. ModelRight 4.0 provides this capability for Model Subsets. You can specify a
filtering condition and ModelRight 4.0 will automatically add and remove objects based on that
condition - saving you the trouble of having to manually add and remove them. ModelRight
4.0 provides a Model Subset Wizard to help you create and edit Model Subsets:
Simply right click on the background of the Diagrams portion of the Model Explorer to get the
context menu:
ModelRight, Inc © 2006 - 2014, all rights reserved
54
ModelRight 4.0 Help
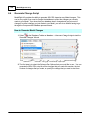
First step is to select the type of object that you want to include in your Diagrams.
Uncheck the "Only Display Tables option if you want to include other types of
objects besides Tables and Views.
ModelRight, Inc © 2006 - 2014, all rights reserved
User Interface
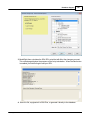
Then specify how you want to add/remove objects of that type. Select Manual if
you want to manually select them or Automatically if you want to specify a
condition that determines their membership.
ModelRight, Inc © 2006 - 2014, all rights reserved
55
56
ModelRight 4.0 Help
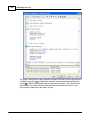
The Manual option. Just check the ones you want in your Model Subset's
Diagram(s). The controls below the list let you control what is displayed in the
selection list.
ModelRight, Inc © 2006 - 2014, all rights reserved
User Interface
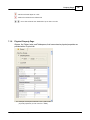
With the Automatic option, you can specify a Filter condition. In this example, we
specified that we only want to display Tables that are in the HumanResources
schema.
ModelRight, Inc © 2006 - 2014, all rights reserved
57
58
ModelRight 4.0 Help
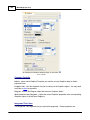
or you can select the special value "Create One for Each Value" to have ModelRight
create a Model Subset for each Schema.
You can also edit a Model Subset like any other object - select it and then change its
properties in the Property Browser. When you select a Model Subset, the following page will
be displayed in the Property Browser to let you edit the Model Subset:.
ModelRight, Inc © 2006 - 2014, all rights reserved
User Interface
59
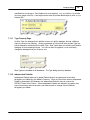
If the "Content is Defined By Filter" option is not selected, then the Filter can still be used in
conjunction with the Only Filter Contents option to display only instances that satisfy the
filtering condition.
Auto Attach New Tables - allows you to indicate that you would like any newly created
Tables/Views to be automatically added to this Model Subset.
Include Child Tables - if this option is selected when you add a table(s), then along with the
selected table(s), ModelRight 4.0 will add any tables that references the selected table(s).
Since the added table(s) will be selected after the add, you can continue to hit the add button
to add additional levels of related child tables.
Include Parent Tables - if this option is selected when you add a table(s), then along with the
selected table(s), ModelRight 4.0 will add any tables that the selected table(s) references.
ModelRight, Inc © 2006 - 2014, all rights reserved
60
ModelRight 4.0 Help
Since the added table(s) will be selected after the add, you can continue to hit the add button
to add additional levels of related parent tables.
After Reverse Engineering from the database, ModelRight 4.0 gives you the option to create a
Model Subset for any of your Schema or Storage objects.
3.4.3
Relation Display Options
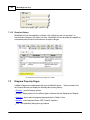
Relation display options that are applied to all Relations in a Diagram are surfaced as
Diagram options. Relation display options that can vary on a per-Relation basis are surfaced
as Relation Graphics options. For example, the Line Style option (Diagonal vs Orthogonal) is
a Diagram Display option, since you would most likely want to have all Relations in a Diagram
drawn one way or the other. Whereas the Line Color option is a Relation Graphic option,
since you may want to give different Relations different colors.
You can view the Diagram Display options by selecting a Diagram in the Model Explorer and
then selecting the
tab in the Property Browser and then selecting Relation in the
Display Type control. Or you can right click on the background of a Diagram and select
Display Relation->Properties from the context menu. Since a Diagram can inherit its
properties from a Diagram Template, you can use the <default> Diagram Template to change
display options for all Diagrams (that inherit from the <default> Template and haven't
overridden the property - see Templates).
ModelRight, Inc © 2006 - 2014, all rights reserved
User Interface
61
You can view the Relation Graphics options by selecting a Relation in the Diagram and then
selecting the
tab in the Property Browser. Since a Relation Graphic object inherits
from Relation Graphics Template, you can edit the Default Relation Graphics Object to affect
the display of all Relations in all Diagrams (if the property hasn't been overridden).
3.4.4
Child Graphics
A Child Graphic refers to the Graphic object that is used to hold display information for nonColumn children of a Table that are displayed inside a Table in a Diagram. See Diagram
Display Options for more details. For example, you could choose to display Key Constraints
inside a Diagram Table. If you do so, a Child Graphic object will be created for each
displayed key. Each of these Child Graphic Objects will inherit from a Child Graphics
Template. Which Child Graphics Template it will initially inherit from depends on the type of
object it is. You can specify that a Child Graphics Template is the default for different object
types in the Child Graphics Template property tab:
This screenshot shows that I have a Child Graphics Template called "Child Graphics
Template for Keys" and made it the default for Key Constraints. Now if I chose to display Key
Constraints inside a Diagram Table, they will automatically be set to inherit from this
Template, and hence be displayed red and bold.
3.4.5
Themes
Themes allow you to quickly and easily change the look of a Diagram. Maybe you would like
to use one set of colors to print your Diagram and another to view it. Themes let you do that
and much more in a single click. Any of the visual characteristics of the Diagram can be
changed by the Theme. Themes do not effect the content of the Model, just its display.
ModelRight, Inc © 2006 - 2014, all rights reserved
62
ModelRight 4.0 Help
A Diagram using the default Theme
A Diagram using the Printer Friendly Theme
Just select a Diagram object and set its Theme on the Diagram Property Page.
ModelRight, Inc © 2006 - 2014, all rights reserved
User Interface
63
To change a Diagram's Theme, simply select the Diagram
and then select the new Theme.
A Theme is simply a collection of Templates that should be applied to a Diagram's displayed
objects. i.e. when a Theme is applied to a Diagram, it will change the Templates that the
Graphic Objects and the Diagram inherit their properties from. It sounds complicated, but its
very easy to use.
The Theme Property Page
By default, a Diagram only has a Default Theme and a Printer Friendly Theme, but you can
easily add others or copy/paste them from another Model. Keep an eye on the ModelRight
Downloads page for sample Models with Themes that have been contributed by other users.
ModelRight, Inc © 2006 - 2014, all rights reserved
64
ModelRight 4.0 Help
Themes are not to be confused with Windows Skins and Styles under the Window menu.
Windows Skins and Styles effect how the Windows frames, borders and titles are drawn, but
not how objects inside a Diagram are drawn.
3.5
Shortcuts toolbar
The Shortcut Taskbar provides quick access to common or highlighted tasks. Select the
section headers at the bottom of the toolbar to display the different sections. Click through
the various icons to get acquainted with the product and its capabilities.
ModelRight, Inc © 2006 - 2014, all rights reserved
User Interface
3.6
65
Modeless Database Compare
The Database Compare Window allows you to see the differences between your Model and
the Database at all times. It contains the same pages as the Database Compare Wizard but
is "modeless". i.e. you can work on your Model while its displayed.
If you want to export a difference to the database, select the compare item and click on the
solid blue arrow that points to the right. To make the corresponding change in the database,
click on the navigate forward button at the top of the page til you get to the Generate Script
page. This page allows you to execute or "Save to File" the database commands that will
effect your changes in the database.
To create these commands, ModelRight 4.0 keeps an internal list of the changes that you
have made. Once you have executed or saved these commands, you should select the
"Commit and Return" toolbar button
, to return to the Compare page and to indicate to
ModelRight 4.0 that it can reset this internal list of changes - so it won't continue to create
these same commands.
As with any other ModelRight 4.0 window, you can dock or undock this window (by dragging
ModelRight, Inc © 2006 - 2014, all rights reserved
66
ModelRight 4.0 Help
the tab). You can Auto-Hide it (by selecting the pushpin on the window's border). Or you can
change the order in which its listed (by dragging the tab to another tab position).
3.7
Diagram Navigator
The Diagram Navigator window displays a zoomed out view of the currently active
Diagram. The red rectangle represents the portion of the Diagram that is currently
being viewed. You can select and drag the rectangle to pan around the Diagram. To
zoom you Diagram, you can move the zoom slider thats under the toolbar or resize
the red rectangle. Also, you can just click on the Diagram Navigator window to
instantly center your view around the clicked location.
The Diagram Navigator Toolbar
- Zoom In on the Diagram Navigator
- Zoom out on the Diagram Navigator
- Zoom the Diagram Navigator to fit the contents of the Diagram
- Nudge the display of the Diagram up, down, left or right
ModelRight, Inc © 2006 - 2014, all rights reserved
User Interface
67
The Diagram Navigator Zoom Slider
The Zoom slider at the top of the Diagram Navigator window can be used to quickly and easily zoom
the Diagram.
3.8
Transaction History
Whenever you make a change, ModelRight uses an internal "transaction" to contain the full
impact of your change. When the transaction completes, it evaluates all of these changes
and inserts an entry to this tab. Any entry can be expanded so that to see the full impact of
your changes.
You can specify the number of transactions to view in the dialog in the Tools->Options dialog.
If you right click on any of the transactions, a context menu will be displayed. If you select the
Undo option, ModelRight will roll-back all the transactions up to and including the one you
selected.
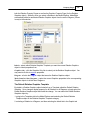
3.9
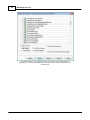
Model Validation
Selecting the menu item Model -> Validate, or the Shortcut Task
brings up the
Model Validation dialog. This dialog allows you to check your model for commonly occurring
problems and issues. Entries marked with a red dot indicate an issue that will prevent the
model from generating to the database. Entries marked with a yellow dot indicate a
possible issue, but not something that would prevent your model from generating to the
database.
ModelRight, Inc © 2006 - 2014, all rights reserved
68
ModelRight 4.0 Help
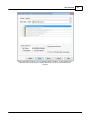
The results of running a Model Validation are displayed in the Validation Results window.
When you select an item in this window, the corresponding object is selected. The Validation
Results window allows extended selections so you can select multiple items and make
changes to them all at once (using the Property Browser).
ModelRight, Inc © 2006 - 2014, all rights reserved
User Interface
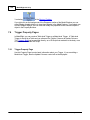
3.10
69
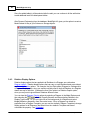
Diagram Tooltips
ModelRight 4.0 has the ability to show informational tips about objects when your mouse
hovers over them in the Diagram:
An example of a ModelRight tooltip that is displayed when the mouse cursor is hovering over a
Table
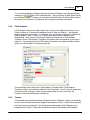
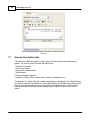
You can control what information is displayed in the Tools/Options/Tooltips dialog:
ModelRight, Inc © 2006 - 2014, all rights reserved
70
ModelRight 4.0 Help
You can display this dialog by either selecting the Tool/Options menu item and then selecting
the Tooltips tab or by right clicking on the Diagram's background and selecting the Tooltip
Options menu item:
ModelRight, Inc © 2006 - 2014, all rights reserved
User Interface
71
The Tooltip options are application-wide - meaning they are set for the application and will be
the same regardless of the Model or Diagram in use.
3.11
Diagram_Zoom
Slider controls have been added to the main toolbar and the Diagram Navigator window to let you
quickly and easily zoom your Diagram. Just like any other toolbar, you can drag the Zoom Diagram
slider that's on the main toolbar to anywhere on the main toolbar - or elsewhere.
3.12
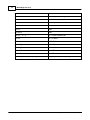
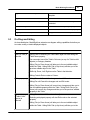
Keyboard Shortcuts
You can use the following keyboard shortcuts in ModelRight 4.0:
Key
Action
F1
Help
F3
Toggle Model Explorer Display
F4
Toggle Property Browser Display
Alt+Enter
Toggle Property Browser Display
Del
Delete Selected Objects
Ctrl+A
Select All
Ctrl+C
Copy Selected Objects to Clipboard
Ctrl+F
Toggle Full Screen Display
Ctrl+G
Go To in Diagram
Ctrl+Shift+L
Toggle Reverse Engineer Logging
Ctrl+N
New Model
Ctrl+O
Open File
Ctrl+P
Print
ModelRight, Inc © 2006 - 2014, all rights reserved
72
ModelRight 4.0 Help
Ctrl+S
Save to File
Ctrl+T
Go To Selection in Diagram
Ctrl+X
Delete Selected Objects
Ctrl+V
Paste Clipboard Contents
Ctrl+Y
Redo
Ctrl+Z
Undo
Alt+Back
Undo
Ctrl+1, 2...5
Go To User-Defined Link
Ctrl+9
Go To Parent
Ctrl+0
Go To Child
Ctrl+Right Arrow
Select Next
Alt+Right
Select Next
Ctrl+Left
Select Previous
Alt+Left
Select Previous
Shift+Up, Down, Left, Right
Nudge Up, Down, Left, Right
ModelRight, Inc © 2006 - 2014, all rights reserved
Part
IV
74
4
ModelRight 4.0 Help
Concepts
This section describes basic concepts that are central to the operation of ModelRight.
4.1
Basics
Objects
In ModelRight everything is either an object or a property. Things like Tables, Columns,
Models, Templates, etc... are all examples of objects. Objects can own other "child" objects.
For example, a Table can own Columns. The Model Explorer shows the objects in the
Model. The Model Browser provides an unfiltered, read-only view of a Model's objects and
properties.
Model
A Model is the root object. It owns either directly or indirectly all other objects. For example,
a Model owns Table objects directly and Column object indirectly (since they are owned by
Table objects).
Properties
Objects hold values for properties. Examples of properties are Name, Comment, Datatype,
etc... An object's properties are displayed in the Property Browser when the object is selected
(in either the Model Explorer or the Diagram). When you click a checkbox or change text in
an edit control on the Property Browser, you are creating or changing the value of a "local"
property - a property that is defined on the object itself. You can delete a local property using
the Reset tab of the Property Browser. Properties can also be "inherited" from a Template.
ModelRight also supports "calculated" properties. Calculated properties are not local or
inherited, but are determined dynamically - usually based on the value of other properties.
Therefore as those other properties change the calculated property automatically changes
based on the new values. The Name of Graphics objects is an example of a calculated
property - the Name is based on the name of the object that the Graphic object represents.
Meta Model
The Meta Model provides a map of how different types of objects and properties are
connected. For example. it describes what properties an object can have and what type of
child objects it can own. If you use ModelRight's scripting capabilities, you need to know this
information so that you can programmatically navigate an object's children and properties.
ModelRight provides a Meta Model Browser that displays the entire ModelRight meta-model in
tree format.
Diagrams
A Diagram is an object that is used to display a set of Table, Views, Relations, etc... Which
Tables and Views are displayed is defined by the Model Subset that owns the Diagram. A
Graphics Object is created (and owned by the Diagram) for each Table, View, Column, etc.
that is displayed in the Diagram to represent the object and store graphical properties. A
Model can any number of Model Subsets and a Model Subset can own any number of
Diagrams. When you Open a Diagram a window is created to graphically display the
contents of the Diagram. Opening and Closing a Diagram has no affect on the underlying
ModelRight, Inc © 2006 - 2014, all rights reserved
Concepts
75
Model.
Files
In ModelRight, a file contains one and only one Model. When you save a file, the Model is
saved in a file with a .WER extension. The "workspace" is saved in a file with the same
name, but with a ".WWS" extension. The workspace contains information about what
Diagrams are open and other user interface information.
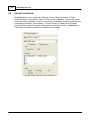
4.2
Templates
A Template (formerly called Domain) is simply an object that can be reused to define other
objects. It defines the properties and objects that other objects can "inherit" - in effect
allowing you to organize any type of object into classes with share properties. If an object
doesn't have value for a property, ModelRight will look to see if the it's Template has a value
for the property. You can think of Templates as a way to classify your objects based on the
properties they have in common and then define those properties in one place - the Template.
For example, you might have lots of Columns in your Model that are some type of ID
(Customer ID, Employee ID, etc...). Instead of having to assign common properties to them
individually (a datatype of INTEGER, NOT NULL, etc..), you could create a Template named
ID, assign to it the common properties and then assign it to all of your ID Columns. That way
you are assured consistency of those properties across all of your ID Columns and you can
easily change their properties simply by changing the ID Template. So Templates effectively
provide a way to classify your objects, organize their properties, enforce consistency of
property values, and easily make changes across the class of objects. Of couse, you can
add arbitrary level of Templates to suit your desired meta-data organization.e
ModelRight always provides a "default" Template for any object that uses Templates. Thus
give you a way to set Model-wide defaults for any property - JUST by setting it on the default
Template.
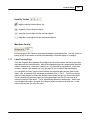
To see all the different types of Templates that ModelRight supports, click the
tab at the bottom of the Model Explorer. A red exclamation point is used
throughout ModelRight 4.0 as a symbol for a Template. We provided a Template for any type
of object for which we thought it would be helpful ( Table Templates for Tables, Column
Templates for Columns, etc...), but let us know if we you would like any others!
ModelRight, Inc © 2006 - 2014, all rights reserved
76
ModelRight 4.0 Help
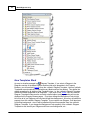
How Templates Work
An easy to visualize example is a
Diagram Template. If you select a Diagram in the
Diagrams section of the Model Explorer and then look at its properties in the Property
Browser, you will see that it Inherits from the <default> Diagram Template. Various <default>
Templates are automatically created with every Model and can't be deleted. They define the
default properties for all objects of the Template's type. i.e. the <default> Diagram Template
defines the default properties for all Diagrams. If you click on the "Inherit" link, the <default>
Diagram Template will become the currently selected object, and its properties will now be
displayed in the Property Browse pages. If you then change the Background Color to light
blue, then all of you Diagrams will now have a light blue background - since they all inherit this
property from the <default> Diagram Template. If you create a new Diagram, it will also have
a light blue background - since it will be initialized to inherit its properties from the <default>
Diagram Template. If you change the Background Color property of the <default> Diagram
Template to red, then all your Diagrams will have a red background, etc...
ModelRight, Inc © 2006 - 2014, all rights reserved
Concepts
77
An object "overrides" an inherited property when you modify that property on the object. So, if
you again select a Diagram in the Diagrams section of the Model Explorer (or by navigating
back
to the one you had just selected) and change the Background Color of the Diagram
to grey, you will have created a "local" property on the Diagram that "overrides" the inherited
property. Now this Diagram will no longer use the inherited property and any changes made
to the <default> Diagram Template's Background Color won't effect this Diagram. If you want
to remove this local property/override, you can select the
tab in the Property Browser
and click the icon next to the Background Color property. By the way, you can't delete the
<default> Diagram Template's Background Color property since ModelRight enforces the fact
that some value is needed for this property - hence this property doesn't even appear on the
Reset page for the <default> Diagram Template.
Not only can a regular object inherit from a Template, but a Template can inherit from another
Template. i.e. a Diagram Template can inherit from another Diagram Template. This allows
you to create a classification scheme as a hierarchy of Templates with each level contributing
more properties and effectively adding more specificity.
Column Groups
ModelRight 4.0 allows you to add Columns as children of a Column Template. Any Column
that then "inherits" from it will also inherit these sub-Columns. This allows you to define a
group of commonly used Column once and consistently reuse them throughout your Model.
Column Domain Address is used to
define sub-columns Street, City, Zip.
ModelRight 4.0 also added a Column display option that lets you choose whether to view the
Sub-Columns or the Top-Level Columns on the Diagram. This option is found under Content
Display options for Columns.
Table Template Columns
You can also add child Columns to a Table Template. Any table that then inherits from the
Table Template will also contain those columns. For example, if you wanted every Table in
your Model to contain a Create_Date and a Modify_Date Column. You could accomplish this
by simply adding these Columns to the <default> Table Template.
ModelRight, Inc © 2006 - 2014, all rights reserved
78
ModelRight 4.0 Help
The <default> Table Domain
with create_date and
modiy_date sub-Columns.
Table Inheritance
A Table can now inherit from another Table as well as a Table Template. Inheritence
relations are displayed on Diagram with an arrow Relation. All Columns and Table Check
Constraints are inherited by the Table.
ModelRight 4.0 also adds a corresponding Column display option that allows you to specify
whether inherited Columns are displayed on the Diagram or not. This option is found under
Content Display Options for Columns.
4.3
Scripting
ModelRight implements a COM/ActiveX interface for accessing and manipulating a model's
objects and properties programmatically. It uses this interface internally from VB Scripts to
generate DDL. You can write your own VB Scripts that use this within ModelRight to generate
DDL, create reports, perform custom validation, do batch processing, etc...
The scripting engine resides in a DLL named SCF.DLL. If you want to access your Model's
ModelRight, Inc © 2006 - 2014, all rights reserved
Concepts
79
information outside of ModelRight, you need to register this DLL (i.e. regsvr32 SCF.DLL). You
can then use VB Script, JavaScript or any other programming language that can
communicate with a COM/ActiveX control to access your Model's information. You could
even write an HTML page that loads a model and generates the page based on its contents.
For a simple example, see the sample JavaScript program SampleJavaScript.htm in the
Report Files folder.
4.3.1
VB Scripts
If you select a Table and then click on the
SQL tab in the Property Browser, you will
see the corresponding CREATE TABLE statement.
SQL Property Page with the Run Script button selected
ModelRight, Inc © 2006 - 2014, all rights reserved
80
ModelRight 4.0 Help
SQL Property Page with the Edit Script selected
ModelRight generates the CREATE TABLE statement, and any other DDL statement, by
evaluating a VB Script in the context of the given object (in this case the Table you selected).
This section describes how this is accomplished and the many ways you can customize it.
Any object that generates DDL for has a SQL Property Page. If you select the object and
then select the SQL Property Page (i.e. the
SQL tab in the Property Browser) you will
see the DDL that resulted from evaluating a VB Script. If you then select the
Edit Script
button in the page's toolbar, you will see the VB script that was evaluated.
When ModelRight needs to generate DDL, it first needs to determine what VB Script to
evaluate. It attempts to find a VB Script by performing the following steps:
1. if the object being evaluated has a value for the script, use it.
2. if the Template that the object inherits from has a value for the script, then use that.
3. use the corresponding Script object in the Script Explorer. When ModelRight starts up, it
looks for VB Scripts that have been stored in files under the "Scripts" sub-directory
(beneath the executable's directory). If it finds any, then it stores this internally as the
default script value. This way all models will use the given script as the default. If it doesn't
find a script file, then ModelRight will load the script from an internal resource.
ModelRight, Inc © 2006 - 2014, all rights reserved
Concepts
81
Hence, changing a VB Script in different areas of the product will affect the DDL that different
objects produce:
Individual Object - If you want to change the VB Script for just one object, then select the
object, go to the SQL Property Page, click the
Edit Script button in the page's toolbar,
and make changes to the VB Script in the edit control provided. This creates a local value
for the given script property. If you then decide that you want to use this VB Script for all
objects (of the given type in the model), click the "Apply To All" button. This will removed the
local value and set it on the corresponding Script object in the Script Explorer.
Template Level - if you want the change the VB Script for all objects that inherit from a
given Template, change the script in the SQL Property Page of the Template.
Script Objects - Select the Scripts tab at the bottom of the Model Explorer bar. Navigate
down the Database tree to the type of object and type of script that you want to change.
Script values entered here will be used as the default script for all objects of the given type.
File - If you enter a value for a Script object as described above, then you can right click on
it in the Script Explorer to bring up a context menu. Select "Save To Disk" to save the script
to file, it will then be used as the default across models.
Script Explorer
The Script Explorer is located under the Scripts tab of the Model Explorer. It contains the
Script Categories and Script objects that are used for schema generation and other
purposes. Script objects under the database category provide a place to view and change
the model-wide default VB Script values. If you modify the text of a Script object, it will effect
the DDL generated for all objects of the given object type (like Table) for the given property
(like Create Statement). If you would like to apply that change to all models, bring up the
context menu (by right clicking on the Script in the Script Explorer) and select Save To Disk.
GlobalNamespace Script
ModelRight appends the contents of the built-in Script named GlobalNamespace to any other
script that it executes. i.e. this is the place where you can add a scripting function that can
be re-used by all of the other scripts.
Pre and Post Scripts
These scripts will be evaluated before and after the Create Statement.
Ad Hoc Scripts
While VB Scripts are used primarily for DDL generation, you can write scripts to do anything produce reports, make batch modifications, perform custom validations, etc...
1. Bring up the the Script Explorer - select the Scripts tab at the bottom of the Model
Explorer
ModelRight, Inc © 2006 - 2014, all rights reserved
82
ModelRight 4.0 Help
2. Create a new Script object - right click on the User Defined Script Category and select
New Script from the context menu
3. Enter a script. Here's a sample script that prefixes all Table names with a "T_". The
Scripting API is integrated with the internal transaction management system, so after you
run the script, make you can hit Undo (and then Redo, etc...).
Dim Framework
Set Framework = CreateObject("SCF.ScriptFramework")
Set Models = Framework.ActiveModels
Set Model = Models.Item(1)
Model.BeginTransaction("Batch Rename Tables")
Set Tables = Model.AsObject.Children("Table")
For Each Table In Tables
Set PropValue = Framework.CreatePropertyValue("Table", "Name")
PropValue.FromString("T_" + Table.Name)
Table.SetProperty "Name", PropValue
Next
Model.EndTransaction
4.3.2
Script Language API Reference
Having a generic framework of objects and properties organized by a meta-model, allows the
scripting API to be simple and generic as well. To do most things, you need to use just a few
generic API calls. For example, to get all Columns in a Table, you would simply write
"Table.Children("Column")". To check any property of any type of object, you would make a
call like Object.Property("Property Name"). You can use standard VB Script constructs to
iterate over collections, as in the following example which iterates over all Tables and prefixes
the Table with "T_".
Dim Framework
Set Framework = CreateObject("SCF.ScriptFramework")
Set Models = Framework.ActiveModels
Set Model = Models.Item(1)
Model.BeginTransaction("Batch Rename Tables")
Set Tables = Model.AsObject.Children("Table")
For Each Table In Tables
Set PropValue = Framework.CreatePropertyValue("Table", "Name")
PropValue.FromString("T_" + Table.Name)
Table.SetProperty "Name", PropValue
Next
Model.EndTransaction
API Reference
ScriptFramework
Object CreateObject(String Type, Object Owner)
Bool DeleteObject(Object Object)
Object CreatePropertyValue(String ObjType, String PropType)
Object LoadModel(String ModelPath)
SaveModel(String ModelPath, Object Model)
Initialize
Object MetaModel
Object CreateObjectById(Long Type, Object Owner)
ModelRight, Inc © 2006 - 2014, all rights reserved
Concepts
Object CreatePropertyValueById(Long ObjType, Long PropType)
Object Model(String ModelId)
ModelCollection ActiveModels
Object CreateModel
String Evaluate(String Property)
Object CurrentModel
Object CurrentSelection
Object CurrentDrawableSelection
ScriptContext
ScriptDocument ScriptDocument
Object Object
Object Options
ScriptDocument
Write(String Val)
Object
String Name
Object Property(String Type)
Collection Children(String Type)
String CreateStatement
Bool HasProperty(String PropType)
String AlterStatement
Object Owner
Long Id
Long Type
String TypeName
Bool IsValid
Bool SetProperty(String Type, Object Prop)
Bool DeleteProperty(String Type)
String DropStatement
Collection Properties
Property PropertyById(Long PropType)
Collection ChildrenById(Long ObjType)
Bool SetPropertyById(Long Type, Object Prop)
Bool DeletePropertyById(Long PropType)
Bool HasPropertyById(Long PropType)
Model Model
Collection AllChildren
String Evaluate(String Property)
Bool Equals(Object Obj)
Collection ModifiedProperties
Collection ModifiedChildrenPosition
Property OriginalProperty(String Type)
Collection OriginalChildren(String Type)
Bool HasLocalProperty(String PropType)
ModelRight, Inc © 2006 - 2014, all rights reserved
83
84
ModelRight 4.0 Help
Bool HasLocalPropertyById(Long PropType)
Object OldOwner
ObjectCollection
Object Item(Long Index)
Long Count
Property
Long Type
String Name
Object Value
PropertyCollection
Property Item(Long Index)
Long Count
PropertyValue
String AsString
Bool AsBoolean
Long AsInteger
Double AsDouble
Object AsObject
Collection AsVector
Bool IsStringProperty
Bool IsBooleanProperty
Bool IsIntegerProperty
Bool IsDoubleProperty
Bool IsObjectProperty
Bool IsVectorProperty
Bool IsNull
FromString(String Val)
FromBoolean(Bool Val)
FromInteger(Long Val)
FromDouble(Double Val)
FromObject(Object Val)
VectorPropertyValue
Object Item(Long Index)
Long Count
AddValue(Object Val)
ChildOrderItem
Object Child
Long NewPosition
Long OldPosition
ChildOrderItemCollection
Object Item(Long Index)
ModelRight, Inc © 2006 - 2014, all rights reserved
Concepts
Long Count
Model
String Name
Object AsObject
Object MetaModel
String Id
BeginTransaction(String pVal)
EndTransaction
RollbackTransaction
Undo
Redo
ModelCollection
Model Item(Long Index)
Long Count
MetaModel
Collection MetaObjects
MetaObject MetaObjectById(Long type)
MetaObject MetaObject(String Type)
MetaObject
Long Type
String Name
Collection MetaObjects
Collection MetaProperties
MetaObject MetaObjectById(Long type)
MetaObject MetaObject(String Type)
MetaProperty MetaPropertyById(Long type)
MetaProperty MetaProperty(String Type)
MetaObjectCollection
MetaObject Item(Long Index)
Long Count
MetaProperty
Long Type
String Name
MetaPropertyCollection
MetaProperty Item(Long Index)
Long Count
ModelRight, Inc © 2006 - 2014, all rights reserved
85
86
4.4
ModelRight 4.0 Help
Migration, Unification, and Rolenaming
ModelRight automatically creates Columns in a Relation's child Table for certain Columns in
the parent Table. This is referred to as Migration. By default, ModelRight migrates the
Columns in the parent Table's primary key (you can also migrate a unique key) to be "foreign
key" Columns in the child Table. This ensures that you can use a foreign key constraint (i.e.
the CREATE FOREIGN KEY statement) to enforce referential integrity declaratively (vs
programmatically with a Trigger).
Even after a foreign key column is created, ModelRight will automatically update it when
certain changes are made to the parent Column - like name and datatype changes. If you
want to give the migrated Column in the child Table a different name, you can "rolename" it.
Once rolenamed, name changes made to the parent Column's name will no longer effect the
name of the child Column.
If two relations contribute child Columns with the same name, ModelRight will automatically
"unify" them into a single Column in the child Table.
See the Relation Migrate Property Page for more details.
4.5
Naming
Naming options are a property of the Model. So if you select the Model object at the top of the
Model Explorer or select Edit Naming Options
in the Shortcut Taskbar you
will see the Naming tab in the Property Browser.
Select the current Model to get
to the Naming page
The Naming page allows you to specify various constraints on the names used in your Model.
ModelRight, Inc © 2006 - 2014, all rights reserved
Concepts
87
Auto Naming Options - use these options to auto-generate more meaningful default names
for FK Columns, PK , UK , FK, Check constraints and Indexes. You can use the "macros"
listed to form a name based on related object's name. For instance, to name relationships as
ParentTableOfRelation_ChildTableOfRelation you can enter “%ParentTable_%ChildTable” in
the Auto Name column for Relation. The Auto Names option is applied only to names that you
have not explicitly named (for instance, names given to new objects). If an object already has
a user-defined name then it needs to be Reset before the Auto Name value will be applied.
Auto generated names will be kept up to date if any related object names change. Also, if the
ModelRight, Inc © 2006 - 2014, all rights reserved
88
ModelRight 4.0 Help
Auto Name is changed to some different macro combination then all the generated names will
be re-generated according to the new auto name definition.
Unique Naming Options - specify what ModelRight should do if there is a unique name
conflict. The Owner option specifies whether ModelRight should take the object's Owner/
Schema into consideration when determining whether a name is unique.
Case - lets you specify that Names should have a Mixed, lower or UPPER case. lower and
UPPER will change your existing names and enforce the case. Mixed has no effect on the
names.
Allow Special Chars - if checked, special characters (non alpha-numeric) in names will be
replaced with an underscore
Naming Options by Type - Option and Owner are unique naming options and are provided on
a type by type basis. For each different type of database object, you can specify what
happens when there are name conflicts (two names with the same value): Allow, Disallow,
Ask, Auto Rename. The Owner option is provided for types of objects that have an owner. A
value of Yes means the Owner of the object will be used to determine whether the name are
unique or not. i.e. OWNER1.TABLE1 and OWNER2.TABLE1 would be considered unique.
4.6
User Defined Properties
ModelRight lets you add your own properties to any kind of object. You can then specify a
value for each object that uses your property.
You first need to create a new User Defined Property object. The Property Browser will then
display the following edit page:
ModelRight, Inc © 2006 - 2014, all rights reserved
Concepts
89
The main purpose of this page is to let you specify what type of objects you want to use your
User Defined Property. You would use the Type grid to specify this. You can select multiple
object types for each User Defined Property. When you select a type of object, then you can
specify a value for your User Defined Property for each object of that type. i.e. whenever you
edit an object of that type, a UDP Property Page will be displayed with your User Defined
Properties displayed and editable.
For example, the above screenshot shows a User Defined Property called Creator that is
being used by Tables. Now whenever a Table is selected, the Property Browser will add a
tab called UDP which displays and allows you to edit a value for Creator:
ModelRight, Inc © 2006 - 2014, all rights reserved
90
ModelRight 4.0 Help
You can specify a default value for your User Defined Property. If you specify Choices List,
then when you edit an object's UDP values, a combo box will display all the choices that you
entered. Otherwise, an edit control is used.
4.7
Relations
ModelRight lets you create several different kinds of Relations:
Table Relations
View Relations
Select From Relations
REF Relations
4.7.1
Table Relations
The most common type of a Relation is a Table Relation (or just Relation). It is a Relation
between two Tables. It is usually used to enforce referential integrity between the Parent
Table and the Child Table. Referential integrity is enforced by the database and means that
certain child Columns must form a reference to a row in the Parent Table.
Relations are represented in a Diagram with a Relation Graphic object. A Relation Graphic
Template is provided so that you can categorize your Relations and easily change the
appearance of all of them.
You can toggle the display of all Table Relations in the Diagram's Relation Display Options
Property Page. You can also toggle the display of any individual Relation by selecting the
Relation, then selecting the Graphic tab in the Property Browser, and toggling the Display
checkbox.
See Also
Migration, Unification, and Rolenaming
Relation Property Pages
Diagram Relation Graphics
Oracle Manual - Referential Integrity
4.7.2
View Relations
A View Relation is very similar to a Table Relation, except the Child of the Relation is a View.
A View Relation has the same properties as a Table Relation, however the database does not
enforce the referential integrity of a View Relation. i.e. in Oracle it must always be created as
DISABLE NOVALIDATE. Hence, View Relations are primarily used just for documentation
purposes.
ModelRight, Inc © 2006 - 2014, all rights reserved
Concepts
91
View Relations are represented in a Diagram with a View Relation Graphic object. A View
Relation Graphic Template is provided so that you can easily change the appearance of all
View Relations.
You can toggle the display of all View Relations in the Diagram's Relation Display Options
Property Page. You can also toggle the display of any individual Relation by selecting the
Relation, then selecting the Graphic tab in the Property Browser, and toggling the Display
checkbox.
4.7.3
Select From Relations
A Select From Relation (From Relation for short) is used to specify the name of a Table or
View in the FROM clause of a Select statement. A Select From Relation is a Relation in
which the child is a Select object (which is owned by a View) and the parent is a Table or
View. In ModelRight, a View can be composed of several Selects (combined using some
operator, like UNION).
Select From Relations are represented in a Diagram with a Select From Graphic object. A
Select From Graphic Template is provided so that you can easily change the appearance of
all Select From Relations.
You can toggle the display of all Select From Relations in the Diagram's Relation Display
Options Property Page. You can also toggle the display of any individual Relation by selecting
the Relation, then selecting the Graphic tab in the Property Browser, and toggling the Display
checkbox.
ModelRight, Inc © 2006 - 2014, all rights reserved
92
ModelRight 4.0 Help
This screenshot shows a view with a number of From
Relations. By default, From Relations are drawn with a red
dotted line.
4.7.4
REF Relations
A REF Relation is only supported for those databases that have Object-Relational features
and support the REF datatype. A REF relation is automatically associated with a Column that
has a datatype of REF and has been constrained to be scoped to a specific object table
(similar to a traditional referential integrity constraint). The REF Relation's parent Table is the
referenced object Table and the Relation's child Table is the owner of the REF Column.
You can't create or delete a REF Relation. It is automatically created and deleted based on
the REF Column and its properties. However, you can toggle the display of all REF Relations
in the Diagram's Relation Display Options Property Page. You can also toggle the display of
any individual Relation by selecting the Relation, then selecting the Graphic tab in the Property
Browser, and toggling the Display checkbox.
ModelRight, Inc © 2006 - 2014, all rights reserved
Part
V
94
5
ModelRight 4.0 Help
Basic Working Procedures
This section describes the most common basic tasks you will use when working with
ModelRight. It is designed as a "How-To" guide. You can use the table of contents as an
index. Although it is organized roughly in the order that you would perform the tasks you don't
need to begin at the beginning and work your way through. Every topic contains
comprehensive links to background information and other relevant subjects so you can just
pick out the task you need to perform and begin.
The topics in this section are intentionally kept as brief as possible. The focus is on how to do
what you need to do. More detailed background information on many subjects is provided in
other areas.
5.1
Creating new objects
Creating a new object:
Choose from the following ways to create a new object:
1. Select the object's category in the Model Explorer (in this case the Table
category)...
...and then enter the name of the new object in the Category editor of the
Property Browser.
2. Select the object's category or any existing object in the Model Explorer...
ModelRight, Inc © 2006 - 2014, all rights reserved
Basic Working Procedures
95
...right click to bring up the context menu and select New...
... a new object will be created and you will be placed in edit mode of the new
object's name.
3. select an object of the type you want to create in either the Diagram or the Model
Explorer. Then in the Property Browser's toolbar hit the Create New Object
button.
In the case of creating a table (or view), you could also:
1. Select Create Table in the Shortcut Taskbar:
2. Select the Create Table button
in the Objects Toolbar. Then click on the place
in an open Diagram where you want the new Table to be located.
This will create a new Table and add it to the Diagram where you clicked.
Creating a new Model:
Select New in the File menu (or click on in the Toolbar) to create a new Model.
If a non-empty Model is already loaded, ModelRight will start another instance of
ModelRight, Inc © 2006 - 2014, all rights reserved
96
ModelRight 4.0 Help
itself with an empty Model.
5.2
Copy/Paste and Drag/Drop
ModelRight supports Copy/Paste and Drag/Drop within Model or between Models. Also
ModelRight supports these operations within or between the Diagram and the Model Explorer.
Generally, if you have Ctrl pressed while you move a selection, it is considered a copy
gesture.
These operations are used to support the following scenarios:
Action
Result
re-ordering - move an object within its parent change the order of the selected object within
object
its parent object. In the case of Columns, the
order that is affected is whatever order is
being displayed (Generation or Pk/Non-Pk). If
displaying in Pk/non-Pk order, dragging a
Column from the non-Pk part of a table to the
Pk part will make add the Column to the Pk an vice versa. For most other objects, the
Generation order is affected. Tables and
Views can not be re-ordered since their order
is determined dynamically based on their
relations.
copy any object that is owned by the Model to creates a copy of the selected object(s)
the same or another Model
copy a simple graphic (rectangles, text, lines, creates a copy of the Graphic
etc...) to a Diagram
copy or move Table/View or MView to the
same or different Model
creates new object(s)
move Table/View or MView to a Diagram or
Model Subset
adds the object to the Model Subset
ModelRight, Inc © 2006 - 2014, all rights reserved
Basic Working Procedures
97
copy or move a Column Template to a Table creates a new Column based on the Column
Template
copy or move a Column to a Table
copies or moves the Column to the Table
move a Column to an Index or Key Constraint adds the Column to the Index or Key
Constraint
5.3
move a Tablespace to a Table/View
sets the Table's Tablespace property
move a User to to a Table/View
sets the Table's Database Owner property
drag/drop a relation endpoint
changes the Relation's child or parent Table
On-Diagram Editing
As described below, ModelRight has extensive on-diagram editing capabilities that allow you
to create, modify, or delete displayed objects:
Current State
Table (or View) is
selected
Action
Hitting Enter or Selecting the Table Name again will start editing the
Table Name property.
You can select one of the Table's Columns (or any of a Table's child
objects) or Category Headers
Hitting Tab (or Down Arrow) will take you to the next editable object
within the Table. Hitting Shift+Tab (or Up Arrow) will take you to the
previous editable object in the Table.
Shift+Up, Down, Left, Right move the Table in that direction
Hitting Control+Enter creates a Column
Editing a property
Hitting Enter will Commit the changes and end Edit mode.
Hitting Esc will Cancel the changes and end Edit mode.
Hitting Tab (or Down Arrow) will commit any changes and take you to
the next editable property within the Table. Hitting Shift+Tab (or Up
Arrow) will commit any changes and take you to the previous editable
property in the Table.
Column (or any of
a Table's child
objects) is
selected
Hitting Enter will start Edit mode on the object
Selecting a displayed property will start Edit mode on the selected
property
Hitting Tab (or Down Arrow) will take you to the next editable object
within the Table. Hitting Shift+Tab (or Up Arrow) will take you to the
ModelRight, Inc © 2006 - 2014, all rights reserved
98
ModelRight 4.0 Help
previous editable object in the Table.
Hitting Ctrl+Up/Down will move the Column up/down in its sibling order.
If you are displaying the Table's Columns in PK/non-PK Order and this
causes the Column to cross the PK/non-PK separator, then the
Columns will be added/removed from the PK.
Hitting Ctrl+Enter will append a new Column. Hitting Shift+Ctrl+Enter
will insert a new Column.
Editing with a
combo box
Hitting Alt+Down Arrow will cause the combo box to drop (i.e. display its
selections). You can then use the Down/Up arrows to navigate the
combo box entries.
Category is
selected
Hitting Ctrl+Enter will create a new object.
Expand/Collapse
Icon is selected
The corresponding Category or Table will collapse or expand.
Any object is
selected
Hitting the Delete button will delete the selected object(s)
Hitting Enter will expand or collapse the category, if the Diagram's
Expand/Collapse Icon option is turned on.
mouse wheel scrolls Diagram, middle mouse click starts dynamically
panning diagram based on current mouse position, Ctrl+middle mouse,
then mouse wheel zooms in or out
nothing selected
5.4
arrow navigation keys - up, down, right, and left arrows scroll the Diagram
Reporting
ModelRight can be thought of as the source of data for a report. It contains all of the Model
objects and properties that you may want to include in your report. ModelRight generates
reports by first generating XML data containing whatever model information you want. That
XML is then transformed using XSL into whatever report format you like - HTML or RTF, etc...
XML and XSL are W3C standards.
ModelRight, Inc © 2006 - 2014, all rights reserved
Basic Working Procedures
99
ModelRight provides several sample reports in the form of XSL files that are listed in the XSL
Report Files control. An XSL file contains the XSL code for creating a report from XML data.
For it to work properly, specific XML data must be contained in the XML file that it is applied to.
For example, if the XSL code is designed to create an HTML table of all Materialized Views in
the Model, then the XML data needs to have information about the Model's Materialized Views
in order for the XSL to work properly. The XML Data Options allow you to specify the XML
data that ModelRight should generate - i.e. the XML data that the XSL file requires.
ModelRight saves your XML Data Options and XML Generation Options selections as
comments in the XSL file to make it clear what XML data the XSL file requires and so that the
report specification is packaged in a single file.
To change the report output, you need to edit the XSL code that constitutes your report file.
The sample report file "Model Report.xsl" illustrates many ways to navigate and transform the
ModelRight XML content. Also, check out the Downloads section of the website for report
files that others have contributed. Or send ModelRight support an email describing what you
would like in your report and we will try to provide it for you.
The Reports builder dialog provides the following controls to help generate reports:
XSL Report Files - lists all of the XSL files in the current Report Files directory (and subdirectories). The current Report Files Directory is displayed at the top of the dialog. To
change it, you can click the Browse for Folder
button in the upper right corner of the dialog
ModelRight, Inc © 2006 - 2014, all rights reserved
100
ModelRight 4.0 Help
and browse to another directory. When you select a folder, ModelRight will scan that
directory and any sub-directories looking for XSL files and display the results in the XSL
Report Files control.
XML Data Options - a tree of all of the different types of objects and properties used in the
product. Select the items that you want to be included in your report. When you run a report,
ModelRight will create an XML file that contains data for the options that you selected.
XML Generation Options - options that qualify the XML data that is generated
Local Properties Only - generate data only if the property is locally defined on an object (vs.
being inherited or calculated).
Current Model Subset Tables/Views Only - generate Table/View information only for the
currently active Diagram
Filter XML Data Options - The list of XML Data Options is extensive and can be a little hard
to wade through. These options are provided to filter the listed objects and properties from
display and from generation to the XML data file.
Run - when a report is run, ModelRight will generate an XML file containing the data that has
been selected in the XML Data Options control. It prefixes that XML data in the file with a
processing instruction:
<?xml-stylesheet type="text/xsl" href="YourReportFile.xsl"?>
where YourReportFile.xsl is the name of the XSL report file that you are running. This will
cause a browser that opens the XML file to use your XSL report file to view the XML data.
ModelRight then launches your web browser and passes the name of the XML data file as a
parameter - so the browser will open the file. You could generate an HTML file by using a
command-line prompt and an XSL processor, like msxsl:
msxsl MyReport.XML MyReport.XSL -o MyReport.HTM
...and then open that file in your browser.
Execute Shell Command(s) - Enter an XSL processing application's command line that
ModelRight should execute when you run a report. The command should process the XML
file into an HTML file (or whatever). You should quote the command and/or arguments if they
contains spaces. You can specify multiple commands on separate lines. You can use the
placeholders %XmlFile %XslFile %FileName %InstallDir to refer to those items in the
command. An example of such a command(s) using msxsl is:
"c:\bin\msxsl.exe" "%XmlFile" "%XslFile" -o "%FileName..htm"
"%FileName.htm"
Generating Diagrams and Table/View Images
ModelRight supports embedding images of your Diagrams and various other graphics in your
HTML reports. See the sample report file Model Report.xsl to see examples of each of the
following features:
If you select Model/Current Diagram As JPEG in the XML Data Options control, ModelRight
will create a file called current_diagram.jpg in a sub-directory called images under the current
Report File Output directory. The file will contain a JPEG image of whatever the current
ModelRight, Inc © 2006 - 2014, all rights reserved
Basic Working Procedures
101
Diagram is.
If you select Model/Model Subset/Diagram/As JPEG, ModelRight will generate a JPEG file for
each Diagram in each Model Subset that the Model contains. The file will be located in a
sub-directory called images under the current Report File Output directory and will be called
<diagramid>.jpg - where <diagramid> is the internal object identifier of the Diagram object.
The XML data value of this property will be the file name that was generated.
If you select Model/Model Subset/Diagram/Table Graphics/As JPEG, ModelRight will
generate a JPEG file containing an image of each Table in each Diagram. The file will be
located in a sub-directory called images under the current Report File Output directory and will
be called <graphicid>.jpg - where <graphicid> is the internal object identifier of the Table
Graphic object. The XML data value of this property will be the file name that was generated.
A similar property is provided Views and Materialized Views.
If you select Model/Model Subset/Diagram/Table Graphics/Dimensions, ModelRight will
generate the position and dimensions of each Table as it appears in each Diagram. This
information can then be used by XSL code to generate an HTML image map for the diagram.
A similar property is provided Views and Materialized Views.
Note:
the XSL report file usually contains references to images in an images sub-directory.
To make sure those references are valid, you need to generate your report to a directory that
has the images sub-directory - or create a new images subdirectory under your new report
output directory and copy whatever images you are using to it.
5.5
Search and Find
The Find dialog provides a powerful means of searching for objects in your model. You can
search by the type of object that you want to find, the property that you want to match, and a
value that you want that property to match. For example, the following dialog settings could
be used to find all Columns whose Name starts with the letter "S":
ModelRight, Inc © 2006 - 2014, all rights reserved
102
ModelRight 4.0 Help
The regular expression syntax that ModelRight uses allows you to specify complex pattern
matches.
You can select Property has no value to search for objects that don't have a value for the
given property - like Tables without a Tablespace or Owner.
The results of the Find are listed in the Find Results window (by default in a tab at the bottom
of the application). When you select an item in the Find Results window, the corresponding
object is selected. The Find Results window allows extended selections so you can select
multiple items and make changes to them all at once (using their Property Pages).
Search Toolbar
What could be more basic? But it is surprising that ModelRight 4.0 is the only product to offer
such a basic feature with all the flexibility you need to find any kind of object that matches your
search criteria. ModelRight has always had a Find capability to help with this, but now
ModelRight 4.0 provides a search control right in the toolbar for even easier access to
common searches.
ModelRight, Inc © 2006 - 2014, all rights reserved
Basic Working Procedures
Search control in main toolbar
ModelRight, Inc © 2006 - 2014, all rights reserved
103
Part
VI
Database Support
6
105
Database Support
ModelRight supports full-cycle development of your database with the following capabilities:
Forwards Engineer
Generate Change Script
Reverse Engineer
Compare with Database
6.1
Compare with another Model
ModelRight can compare your Model with another Model to show and resolve
differences between the two. You can export differences from the current/source
Model to the target Model to make the target Model more like the source Model, or you
could import differences to make the source Model more like the target Model. The
Compare with Model wizard is used for both purposes:
How to Compare your Model with another Model:
1. Select Model > Compare with Model from the menu
, or select
from the Modeling Tasks
section of the Shortcut Toolbar to start the Compare with Model wizard.
2. In the first wizard page you can specify the target File/Model that you want to compare
with. You can also define the type of objects and properties that you want to compare:
ModelRight, Inc © 2006 - 2014, all rights reserved
106
ModelRight 4.0 Help
File: enter or Browse for the file that contains the target Model that you want to
compare your current/source Model with
Compare Filter: specify the types of objects and properties that you want to
compare.
Match Using Owner - after ModelRight loads the target Model, it needs to match
up Tables (and Views, etc...) in the source Model with Tables in the target Model.
If this option is selected, then a Table's owner must match as well as the Table's
name before ModelRight will automatically match them.
Match Case Sensitive - if selected, then the case of the names of objects must
match before ModelRight will match the objects.
5. This wizard page shows the differences between your source and target Models.
ModelRight will save any changes that you make to the target Model if you click Finish.
ModelRight, Inc © 2006 - 2014, all rights reserved
Database Support
107
Toolbar Buttons
- export or import a difference. Use the import button
to import an
object(s) or property into your current Model. When you import an object/property, the
action is performed immediately and the comparison trees will be updated
immediately with the result(s). Of course you can use the Undo/Redo toolbar
buttons
that are on the page to undo/redo any changes.
Use the export button
to export any source Model object or property to the target
Model. If you export an object/property, the action is performed immediately on the
target Model and the comparison tree updated to reflect the result.
- go to the previous/next difference
- undo/redo changes that you made
- delete an unmatched object on the Model or database side
- manually match or un-match objects. If ModelRight doesn't automatically
match two objects that should be matched (probably because their differences in their
names), then you can do so manually. Simply select one of the objects, hit the match
toolbar button
and select the other object that you want to match. To un-match
tow matched objects, select the matched items and hit the un-match toolbar button
.
Only Show Differences - if selected, then items that match and are equal are not
displayed.
ModelRight, Inc © 2006 - 2014, all rights reserved
108
ModelRight 4.0 Help
Show Dependencies - shows all the referenced objects that an object depends on. In
some cases, importing/exporting an object's differences will not fully resolve a
difference unless its referenced objects are first imported/exported. Selecting this
option will cause unresolved dependencies to be displayed under objects in the tree
so that you have a visual cue to help you determine what needs to be imported/
exported to resolve differences.
6.2
Supported Databases
ModelRight supports many popular Databases: Oracle, SQL Server, DB2 (zOS and UDB),
PostgreSQL, MySQL, Access, and any database via generic ODBC support. ModelRight 4.0
always goes beyond the "least common denominator" approach that most other data
modeling tools take to provide extensive and full support for you database.
6.2.1
SQL Server Support
ModelRight 4.0 supports SQL Server 2000, 2005, 2008, 2012 and 2014.
Here is a partial list of the SQL Server objects and properties that are supported in ModelRight
4.0. ModelRight 4.0 can Reverse Engineer, Forward Engineer (Generate SQL DDL), and
Compare these objects and properties with an existing database or other Model.
Tables - SQL Server-specific properties like Filegroups, Text Image Filegroups, Partition
Schemes, etc...
Columns - Computed Columns, SQL Server-specific properties like IDENTITY, Not for
Replication, Collation, ROWGUIDCOL, FILESTREAM, Collation
Views - SQL Server-specific properties like WITH CHECK, ENCRYPTION, etc...
Indexes - SQL Server-specific properties like Clustered, FILLFACTOR, FILEGROUP,
ALLOW_ROW_LOCKS, etc..
Fulltext Indexes and Fulltext Catalogs
Key Constraints
Check Constraints - Table and Column level
Triggers - DDL and DML
Types - Alias, External, and Inline
Defaults - generated as DEFAULTS or inline
Rules - generates as RULES or Check Constraints
Partition Schemes and Partition Functions
ModelRight, Inc © 2006 - 2014, all rights reserved
Database Support
109
Procedures and Functions
Assembly
Synonym
Schemas
Template support for many of the above object types lets you categorize and re-use
Note: To connect to SQL Server either select an ODBC data source from the drop down list,
enter the name of a server (or server/database or server,port/database, or machine/server/
database), or enter a connection string (http://msdn.microsoft.com/en-us/library/
ms130822.aspx). If you enter a connection string, then you need to fully specify all the
parameters (the server, user, password..)
To create an ODBC data source, bring up the Control Panel, select Administrative Tools, and
then select Data Sources (ODBC). Click on the Add button and then the SQL Server driver.
Proceed with the rest of the wizard.
Windows Authentication to a remote server is not supported.
6.2.2
Oracle Support
Of course Tables, Views, Columns, and Indexes, etc... are supported, but we add support for
many Oracle-specific objects and properties as well.Here is a list of the Oracle-specific
features that are supported in ModelRight 4.0.
Tables - Index-Organized, Partitioning, Sub-Partitioning, Object-Relational, LOB storage options,
Oracle-specific Physical Properties
Views - Object-Relational, any Oracle-specific properties
Materialized Views, Materialized View Logs, and their Physical Properties
Columns - Virtual (Oracle 11g)
Indexes - Bitmap, and Function-based indexes, Local and Global Partitioning, Oracle-specific
Physical Properties
Key Constraints - Unique Key Migration (Primary, Unique, and Foreign Key/Relations)
Cluster, Cluster Columns and Cluster Indexes
LOB Storage - Oracle-specific Physical Properties
Sequence
Package
Procedure
ModelRight, Inc © 2006 - 2014, all rights reserved
110
ModelRight 4.0 Help
Function
Trigger
Synonym
Rollback Segment
Schema
Object-Relational features: Types, Attributes, Object Tables, Object Views, REF Relations
Tablespaces, Tablespace Templates, and Datafiles, and their Oracle-specific properties
Template support for many of the above object types
6.2.3
PostgreSQL Support
Of course Tables, Views, Columns, and Indexes, etc... are supported, but we add support for
many Postgre-specific objects and properties as well.Here is a list of the Postgre-specific
features that are supported in ModelRight 4.0.
Tables - Table Inheritence and any Postgre-specific Physical Properties
Views any Postgre-specific properties
Columns any Postgre-specific properties
Indexes
Key Constraints
Check Constraints
Sequence
Language
Type - Enum
Database
Tablespace
Function
Trigger
Schema and Users
ModelRight, Inc © 2006 - 2014, all rights reserved
Database Support
111
Template support for many of the above object types
6.2.4
DB2 Support
Of course Tables, Views, Columns, and Indexes, etc... are supported, but we add support for
many DB2-specific objects and properties as well.Here is a list of the DB2-specific features
that are supported in ModelRight 4.0.
Tables - Partitioning, Sub-Partitioning, LOB storage options, DB2-specific Physical Properties
Views - any DB2-specific properties
Materialized Views and their Physical Properties
Columns - DB2-specific properties
Indexes - Bitmap, and Function-based indexes, Local and Global Partitioning, DB2-specific
Physical Properties
Key Constraints - Unique Key Migration (Primary, Unique, and Foreign Key/Relations)
LOB Storage
Sequence
Bufferpool
Partition Group
Security Policy
Security Label
Dimension
Key Sequence
Database
Catalog
Storage Group
Alias
Database Partition Group
Procedure
ModelRight, Inc © 2006 - 2014, all rights reserved
112
ModelRight 4.0 Help
Function
Trigger
Synonym
Schema
Tablespaces and their DB2-specific properties
Template support for many of the above types
6.2.5
MySQL Support
Here is a partial list of the MySQL-specific objects and properties that are supported in
ModelRight 4.0. ModelRight 4.0 can Reverse Engineer, Forward Engineer (Generate SQL
DDL), and Compare these objects and properties with an existing database or other Model.
Tables - Partitioning, Sub-Partitioning, MySQL-specific Physical Properties - like Engine,
Row Format, Auto Increment, Key Block Size, etc...
Columns - IDENTITY, Not for Replication, Enum and Set
Views - MySQL-specific properties like: Security Type, Algorithm, Definer, etc...
Indexes -MySQL-specific Physical Properties - like Full Text
Key Constraints
Collation
Character Sets
Engines
Logfile Groups
Database
Tablespaces, Datafiles, and their MySQL-specific properties
Template support for many of the above object types
Partition Functions and S
6.2.6
ODBC
If you need to connect to a database that ModelRight does not explicitly support, then you can
use ODBC to import it into ModelRight. ModelRight 4.0 will be able to reverse engineer,
ModelRight, Inc © 2006 - 2014, all rights reserved
Database Support
113
forward engineer, and synchronize with any ODBC compliant database. While ODBC does
not have the deep support for physical details of a database, tables, columns, indexes,
primary and foreign constraints will be supported (ODBC-driver dependent).
Of course Tables, Views, Columns, and Indexes, etc... are supported, but we add support for
many Oracle-specific objects and properties as well.Here is a list of the Oracle-specific
features that are supported in ModelRight 4.0.
Tables
Views - Forward Engineer only
Columns
Indexes
Key Constraints (Primary, Unique, and Foreign Key/Relations)
Check Constraints
Template support for many of the above object types
6.3
Generate to Database/Forward Engineer
After you have created all of your tables, views, columns and other database objects and
specified their properties, you are ready to create your database design in the database itself.
ModelRight make this easy with its Generate to Database Wizard:
How to Generate (Forward Engineer) you database design to the database
1. Select
in the Database Toolbar or Database > Generate to Database to start the
Generate to Database Wizard.
2. The first step is to select the Schema Gen Options that you would like to use. Do you
want to create or drop Tables? Views? Tablespaces, etc... Do you want to generate
Comments? Quote Names? Constraint Names? All of these options and more are
specified by a Schema Gen Option Set object. In this wizard page, you can select a
pre-defined one and change its properties/options. Outside of this page, you can
create and edit one simply by going to the Oracle Schema Gen Option Set section of
the Model Explorer and create, edit, or delete one as you would any other object.
ModelRight, Inc © 2006 - 2014, all rights reserved
114
ModelRight 4.0 Help
3. The second step is to specify the model objects that you want to generate. The
Restrict By Model Subset option lets you specify whether you want to generate all the
Tables/Views in your Model or only those that are in a Model Subset (the currently
active Diagram's Model Subset is select by default). The Restrict By Physical Options
options let you restrict the Tables and Views that are generated based on their
Schema and/or Tablespace. The Generate Objects tree shows the result of selecting
these options and lets you further specify the objects to generate.
4. The next page in this wizard is solely for your information. When the Next button is
enabled, just click through to see your DDL.
ModelRight, Inc © 2006 - 2014, all rights reserved
Database Support
115
5. ModelRight orders the Tables and Views based on their dependencies and the
selected Schema Gen Options and then evaluates the appropriate scripts to produce
the SQL DDL - as illustrated below. Save it to file, copy/paste it to SQL/Plus, or
generate it directly to the database.
ModelRight, Inc © 2006 - 2014, all rights reserved
116
ModelRight 4.0 Help
The "gutter" along the left of the script editor displays the status of the script execution.
It displays a green dot to indicate the statement has executed successfully and a
red dot to indicate the statement did not execute successfully. The results control
at the bottom of the editor lists the statements that executed and the result. If you
right-click on a statement in the editor, you can
ModelRight, Inc © 2006 - 2014, all rights reserved
Database Support
117
Toolbar
Run Script - evaluates the specified script type and displays the results.
Edit Script - lets you view and edit the VB script source code that is evaluated
Gutter Numbers
Cut, Copy, Paste
Find, Replace
Undo, Redo
Run - execute the SQL commands. If there isn't an active database connection,
ModelRight will prompt you to login first.
Pause - pause the execution of the SQL commands.
Step Next - execute the next SQL command only.
Restart - restart executing the SQL commands - starting at the top.
Set Execution Line - set the execution point to the line where the caret is currently
placed in the edit control. The
symbol is displayed in the gutter to the left of the
SQL edit control to show the next command that will be executed. You can set the
execution line to any line in the control simply by first clicking on the text of the line,
and then selecting this button.
Set Breakpoint - Click in the edit control on the line that you want to set a
breakpoint on and click this button. A breakpoint will cause execution to pause when it
gets to that line. The
symbol is displayed in the gutter to show where breakpoints
are currently set.
- scroll to the next breakpoint
- scroll to the previous breakpoint
- remove all breakpoints
ModelRight, Inc © 2006 - 2014, all rights reserved
118
6.4
ModelRight 4.0 Help
Generate Change Script
ModelRight 4.0 provides the ability to generate SQL DDL based on any Model changes. This
can be very useful if you want to change the database to reflect the changes you recently
made to your Model. If you know that your database hasn't changed and you just want to
change it to reflect changes you just made in your Model, you can do so without having to go
through the Compare with Database process/wizard.
How to Generate Model Changes
1. Select
in the Database Toolbar or Database > Generate Change Script to start the
Generate Changes Wizard.
2. The first step is to select the Schema Gen Options that you would like to use. You can
generate the SQL DDL script for all the changes that you made this session, the last
number of changes that you made, or specify the change that you want to start from.
ModelRight, Inc © 2006 - 2014, all rights reserved
Database Support
119
3. ModelRight then calculates the SQL DDL script that will effect the changes you want.
This wizard page displays the progress of the script calculation. When the Next button
is enabled, just click through to see your DDL.
4. Save it to file, copy/paste it to SQL/Plus, or generate it directly to the database.
ModelRight, Inc © 2006 - 2014, all rights reserved
120
ModelRight 4.0 Help
The "gutter" along the left of the script editor displays the status of the script execution.
It displays a green dot to indicate the statement has executed successfully and a
red dot to indicate the statement did not execute successfully. The results control
at the bottom of the editor lists the statements that executed and the result. If you
right-click on a statement in the editor, you can
ModelRight, Inc © 2006 - 2014, all rights reserved
Database Support
121
Toolbar
Run Script - evaluates the specified script type and displays the results.
Edit Script - lets you view and edit the VB script source code that is evaluated
Gutter Numbers
Cut, Copy, Paste
Find, Replace
Undo, Redo
Run - execute the SQL commands. If there isn't an active database connection,
ModelRight will prompt you to login first.
Pause - pause the execution of the SQL commands.
Step Next - execute the next SQL command only.
Restart - restart executing the SQL commands - starting at the top.
Set Execution Line - set the execution point to the line where the caret is currently
placed in the edit control. The
symbol is displayed in the gutter to the left of the
SQL edit control to show the next command that will be executed. You can set the
execution line to any line in the control simply by first clicking on the text of the line,
and then selecting this button.
Set Breakpoint - Click in the edit control on the line that you want to set a
breakpoint on and click this button. A breakpoint will cause execution to pause when it
gets to that line. The
symbol is displayed in the gutter to show where breakpoints
are currently set.
- scroll to the next breakpoint
- scroll to the previous breakpoint
- remove all breakpoints
ModelRight, Inc © 2006 - 2014, all rights reserved
122
6.5
ModelRight 4.0 Help
Reverse Engineering
Reverse Engineering refers to the process of reading information about your existing
database from the system catalog and creating a new Model based on them. This is a good
place to start using the product if you already have a database.
How to Reverse Engineer a new Model:
1. Select Database > Reverse Engineer from the menu, or select
from the Database
toolbar, or select
from the Database Tasks section of the Shortcut
Toolbar to start the Reverse Engineer wizard. If you have a Model open, ModelRight
will close it before starting the Reverse Engineer process. If the Model has any
unsaved changes, ModelRight will prompt you to save them.
2.
ModelRight, Inc © 2006 - 2014, all rights reserved
Database Support
123
Enter the connection information for the database that you want to Reverse
Engineer, and click on Next. ModelRight uses native drivers so there is no need
to fuss with ODBC drivers.
3. In the next page, define the database objects that you want to import.
You can filter the database objects that you import in a number of ways:
You can filter any type of object by Name by entering a comma separated list of
filters. These filters are used to form a LIKE conditions in the query statement that
ModelRight uses to retrieve database objects. If a Name filter term starts with a
"!", then a "NOT LIKE" condition will be used for that term. In the screenshot
above, the Table Name filter specifies that only Tables starting with "EMP" or
"JOB" will be imported.
Filter By Schema: if you select this option, then only objects from the selected
database Schemas will be imported.
Filter By Tablespace: select this option if you want to import Table and
Materialized Views based on the Tablespace they are in.
Include Referenced Objects: if this option is selected, then if an object that is
being imported references an object that is not selected for import, that referenced
object will also be imported. i.e. if a Table you are importing has a Column that is
a foreign key from another table that is not being imported, then that parent Table
will also be imported - or if you chose not to import Tablespaces, and this option is
selected, then ModelRight will automatically import Tablespaces that are used by
the Tables that are imported.
4. The Instance Filter page lets you further specify the database objects that you want to
ModelRight, Inc © 2006 - 2014, all rights reserved
124
ModelRight 4.0 Help
RE or Compare. The database objects that are displayed here are based on the filters
that were specified on the previous wizard page:
If you Reverse Engineer into an existing Model, then a Show Objects Already in
Model option is displayed to let you show or hide existing objects. This makes it
easier for you to see what exists in the Database, but not in your Model.
5. The next screen displays just for your information - and to let you cancel the RE if you
want. If you do hit Cancel, keep in mind that the first Cancel stops the RE, and the
second Cancel will Cancel the dialog. Hitting Finish will Commit the RE process.
ModelRight, Inc © 2006 - 2014, all rights reserved
Database Support
125
6. When the RE process has completed (either into a New Model or the existing Model),
this dialog is displayed to give you a summary of what was imported. This dialog also
contains options for inferring additional info and auto-layout of the Diagram. If your
database already has key constraint and referential constraints already specified, then
ModelRight will have already imported this information and you you will not need to
select the infer option.
ModelRight, Inc © 2006 - 2014, all rights reserved
126
ModelRight 4.0 Help
7. If you elected to Infer Keys and Relations, then this dialog is displayed to let you
specify the constraint information that you want to automatically create.
Make Unique Indexes Unique Keys - select this option if your database does not
contain Unique Key Constraints, but does contain Unique Indexes that you want to
associate with a Unique Constraint.
Make Smallest Unique Key the Primary Key - if your database does not have
Primary Keys or if you selected to infer Unique Keys, then select this option to
infer a Primary Key. ModelRight will select the smallest Unique Key. If there is
ModelRight, Inc © 2006 - 2014, all rights reserved
Database Support
127
more than one, ModelRight 4.0 will select the one that who's first column has the
most similarity to the Table name.
From Indexes and Column Names - If an Index in a Child Table has Columns that
match the names and datatypes of a Key Constraint in the Parent Table, then a
relation is created.
From Column Names and Datatypes - If a Child Table has Columns that match the
names and datatypes of a Key Constraint in the Parent Table, then a relation is
created.
If you Reverse Engineer into an the existing Model, then Infer will only be applied to the
newly added Tables.
8. If you elected to Auto-Layout Imported Tables, then this dialog is displayed to let you
specify the relative distance between Tables. The Compaction Factor must be a
number between 1 and 100. The time that Auto-Layout and Diagram display of your
new Model takes depends on how large your new Model is and how many relations it
contains.
If you Reverse Engineer into an existing Model, then only the newly imported Tables
will be used. At the end of the layout they will be auto-selected so that you can move
them as a group.
6.6
Reverse Engineer into Model
"Reverse Engineering" refers to the process of reading information about your existing
database from the system catalog and creating a new Model based on them.
"Reverse Engineer into Model" allows you to add objects from the database to an existing
model. You can also do this with the Database Compare feature, however, in some cases it
is easier and quicker to use this feature: i.e. if you know that you want to add all tables from a
certain Schema or Tablespace en masse. This feature works for "top-level" objects like
ModelRight, Inc © 2006 - 2014, all rights reserved
128
ModelRight 4.0 Help
Tables, Views, Types, Tablespaces, etc.. If you want to add a sub-object, like a Column or
Index, you will still need to use Database Compare.
Reverse Engineer into Model will reverse engineer relationships (i.e., referential constraints)
between the new tables and the exiting tables. However in some cases, Database Compare
still needs to be run to import other properties that link the new and old objects.
Reverse Engineer into Model will not reverse engineer objects that are already in the model.
How to Reverse Engineer into Model:
Select Database > Reverse Engineer into Model from the menu, or select
Database toolbar, to start the Reverse Engineer into Model wizard.
from the
See Reverse Engineer for a description of the wizard pages.
6.7
Compare with Database
ModelRight can compare your Model with the database to show differences between
the two. You can export differences from the Model to the database (via an ALTER
script) to make the database like the Model, or you could import differences to make
the Model more like the database. The Compare with Database wizard is used for
both purposes:
How to Compare your Model with the Database:
1. Select Database > Compare with Database from the menu, or select
from the
Database toolbar, or select
from the Database Tasks section of
the Shortcut Toolbar to start the Compare with Database wizard.
ModelRight, Inc © 2006 - 2014, all rights reserved
Database Support
129
2. Connect to the database that you want to compare with:
Enter the connection information for the database that you want to compare with,
and click on Next. ModelRight uses native drivers so there is no need to fuss with
ODBC drivers.
3. In the next screen you define the database objects that you want to compare your
Model with:
ModelRight, Inc © 2006 - 2014, all rights reserved
130
ModelRight 4.0 Help
Compare Filter and Name Filter - You can select which type of objects you want
to compare by toggling the options in the Compare Filter tree. You can filter any
type of object by Name by entering a comma separated list of filters in the
Compare Filter tree control (you need to click twice, slowly in the Name Filter
section). These filters are used to form a LIKE condition in the query that
ModelRight uses to retrieve database objects. If a Name filter term starts with a
"!", then a "NOT LIKE" condition will be used for that term. In the screenshot
above, the Table Name filter specifies that only Tables starting with "EMP" or
"JOB" will be compared. You can also expand any type of object in the Compare
Filter tree control and un-select any type of child object or property that you do not
want to compare.
Filter By Schema - if you select this option, then only objects from the selected
database Schemas will be imported to compare with.
Filter By Tablespace - select this option if you want to compare Table and
Materialized Views based on the Tablespace they are in.
Include Referenced Objects: if this option is selected, then if an object that is
being imported references an object that is not selected for import, that referenced
object will also be imported. i.e. if a Table you are importing has a Column that is
a foreign key from another table that is not being imported, then that parent Table
will also be imported - or if you chose not to import Tablespaces, and this option is
selected, then ModelRight will automatically import Tablespaces that are used by
the Tables that are imported.
Match Using Owner - after ModelRight loads Tables (Views, etc.) from the
database, it needs to match up Tables in the Model with the Tables in the
database. If this option is selected, then the Table owners must match as well as
the Table names before ModelRight will match the Tables.
ModelRight, Inc © 2006 - 2014, all rights reserved
Database Support
131
Match Case Sensitive - if selected, then the case of the Names of objects must
match before ModelRight will match the objects.
4. Once you have specified what database objects that you want to compare your Model
with, ModelRight must retrieve information about those objects from the database. This
page of the wizard is displayed just so you can monitor the progress of this process and
Cancel at any time.
5. This wizard page shows the differences between your Model and the
database objects that you have specified in the previous wizard pages.
ModelRight, Inc © 2006 - 2014, all rights reserved
132
ModelRight 4.0 Help
Toolbar Buttons
- export or import a difference. Use the import button
to import a
database object(s) or property into your Model. If you import an object/property from
the database into your Model, the action is performed immediately and the comparison
trees will be updated immediately with the result(s). Of course you can use the Undo/
Redo toolbar buttons
that are on the page to undo/redo any changes.
Use the export button
to export to the database any object or property that is in
your Model. If you export an object/property, the action is performed immediately on
the database Model. However, the ALTER script that will actually change the
database isn't produced until you go to the Next page.
- go to the previous/next difference
- undo/redo changes that you made
- delete an unmatched object on the Model or database side
- manually match or unmatch objects. If ModelRight doesn't automatically
match two objects that should be matched (probably because their names are
different), then you can do so manually. Simply select one of the objects, hit the
match toolbar button
and select the other object that you want to match. You can
also drag one of the unmatched items and drop it on the other one to match them. To
unmatch two matched objects, select the matched items and hit the unmatch toolbar
button .
- expand all child tree items
ModelRight, Inc © 2006 - 2014, all rights reserved
Database Support
133
- save
current compare tree to file as XML data and then display. When this
button is selected, a dialog will appear to let you optionally enter a command to
process the XML.
- show detailed differences of the currently selected items. Useful when the
currently selected item is a multi-line property. When this button is selected, a dialog
will appear to let you enter a shell command to run to show the differences between
the selected items in detail. Enter the name of differencing application like WinDiff,
Beyond Compare's application, etc...
Only Show Differences - if selected, then items that match and are equal on the
database and model sides are not displayed.
Show Dependencies - shows all the referenced objects that an object depends on. In
some cases, importing/exporting an object's differences will not fully resolve the a
difference unless its referenced objects are first imported/exported. Selecting this
option will cause unresolved dependencies to be displayed under objects in the tree
so that you have a visual cue to help you determine what needs to be imported/
exported to resolve differences.
6. If you exported any changes in the previous step, then this page will be displayed next
to let you specify Schema Gen options that might effect the ALTER script that will be
produced in the next step.
Notice that the built-in Alter Script Schema Gen Options object has been automatically
selected in the Option Set combo box.
7. This page displays the ALTER script that will implement the changes to the database
that you previously specified.
ModelRight, Inc © 2006 - 2014, all rights reserved
134
ModelRight 4.0 Help
ModelRight evaluates an object's Alter Script property to produce the ALTER script. You
can view and change this script to customize how the ALTER is produced. See the
Scripting section of this document. You can generate the ALTER script directly to the
database, save it to file or copy/paste it to SQL/Plus to make the changes to your
database.
6.8
Converting Between Databases
When you change a Model's Target Database property, ModelRight will:
1) perform internal processing to transform objects and properties that can be
preserved
2) convert datatypes of objects (usually Columns)
ModelRight, Inc © 2006 - 2014, all rights reserved
Database Support
135
3) delete any objects that are not represented in the new target database
4) swap in new Scripts to do Forward Engineering in the new target database
6.8.1
Datatype Conversion
When a new target database is selected, one of the steps that ModelRight takes is to convert
the datatypes (if needed). The Convert Datatype Script is used to accomplish this. Its
code looks something like:
Select Case PrevDatabase ' what was the previous database type
Case "MySQL 5.0", "MySQL 5.1"
Select Case CurDatatypeName ' what was the name of the previous
datatype
Case "TINYINT", "BOOL", "BOOLEAN", "SMALLINT"
NewDatatype = "SMALLINT" ' specify the new datatype
name
.
.
.
Case Else
' dont change it - let the datatype get deleted while
still being used.
' the app will let you know by issueing a warning and inherit a default value
NewDatatype = ""
End Select
Case Else
Document.Write("Unknown Previous Database")
Exit Sub
End Select
If NewDatatype <> "" Then
Obj.SetDatatype(NewDatatype) ' call SetDatatype to change the
current objects datatype
End If
Document.Write("Ok") ' return Ok, or something else to flag an error
The advantage of this approach is that the Script could contain any sort of coding logic that
you might want to use to determine the new datatype. You could look at what the current
object is that is having its datatype changed. You could look at the length of the datatype and
use that to determine the new datatype. etc...
If you are converting from Oracle to another type of database, any Tables or Columns that
use an Object Type will be converted to have the Object Type's Attributes represented as
ordinary Columns.
As with any ModelRight Script, you can use the existing one, or change it for an individual
object, the entire model, or all models. See Scripting for more details.
ModelRight, Inc © 2006 - 2014, all rights reserved
Part
VII
Property Pages
7
137
Property Pages
Property Pages are the tabs that appear in the Property Browser when an object is selected.
Some of the more important, common, or non-trivial Property Pages are described in this
section.
7.1
Common Property Pages
Some of the more common property pages are described in this section:
7.1.1
Notation
The Model/Notation tab lets you select which data modeling notation you want to use in your
Model.
The Model Notation page
The following screenshots illustrate each of the Notation options:
ModelRight, Inc © 2006 - 2014, all rights reserved
138
ModelRight 4.0 Help
A Diagram using Barker Notation
A Diagram using IDEF1X Notation
ModelRight, Inc © 2006 - 2014, all rights reserved
Property Pages
139
A Diagram using IE Notation
7.1.2
Comment & Definition Property Page
The comment is for descriptive text that is generated to the database. This tab is only made
available for those types of objects that can generate a comment to the database. You can
use the
tab to enter descriptive text for any type of object.
7.1.3
Notes Property Page
A Notes property page was add so that you can annotate the issues, reminders, or other
types of notes associated with an object. A Note can be entered using formatted text - with
options for Font, Color, Style, Size, Bullets, Alignment, etc...
ModelRight, Inc © 2006 - 2014, all rights reserved
140
ModelRight 4.0 Help
The Notes property page
When an object has a Note, an asterisk (*) appears after its name in the Explorers. An option
to toggle the display of this reminder was added to the Model Explorer context menu (though it
applies to all Explorers) and in the Tools/Options/Model Explorer dialog.
Illustrates the asterisk that is placed
after the name of an object that has a
Note in the Explorer.
7.1.4
Category Property Page
If the user selects a category in the Model Explorer
or on
the Diagram
, then the Property Browser will display
its Category editor. This Property Page is designed to let you quickly add new, delete or
rename objects of the type that you selected.
ModelRight, Inc © 2006 - 2014, all rights reserved
Property Pages
141
The Category editor. In this case the Table category
was selected. The last line of its control is always
reserved for quickly adding new objects.
The Column Category editor has more controls to let
you enter commonly used properties of Columns.
You can always go to the last line in the category editor (highlighted in the screenshot above),
enter the name of a new object and hit Enter to create a new object. Selecting a part of a
name will start editing of the name.
You can also use the following keys to navigate the Category editor's grid control:
Delete - deletes the object that currently has the focus - if its allowed
Up Arrow - moves the current focus up - wraps when it gets to the top
Down Arrow - move the current focus down - wraps to the top when it gets to the bottom
Tab - moves the focus to the next field. Shift+Tab moves the focus to the previous field.
Enter - if editing a name, then it will commit the edit changes, if not editing the name, then it
will cause the current selection to go to the selected object if the properties icon
currently selected.
Esc - if editing a name, then it will cancel the edit changes
ModelRight, Inc © 2006 - 2014, all rights reserved
is
142
7.1.5
ModelRight 4.0 Help
Reset Property Page
The Reset Property Page is made available for all objects and it allows you to delete a
property that has been defined on an object. It only lists those properties that have been
defined "locally" and can be deleted.
You delete the property by clicking on the
7.1.6
.
Used By Property Page
Reusable objects like storage objects (Tablespaces, Filegroups), Schemas, Types, Userdefined Properties, Templates, etc... have a Used By Property Page. This page displays and
lets you edit which other Model objects use the selected object. To have a Model object use
the selected object, simply check it. You can also jump to the displayed items by doubleclicking on them.
This page shows all the objects (Tables,
Synonyms, etc...) that are using the currently
selected object (in this case a Schema). You
can check and uncheck
any of the entries to have them use (or not)
the selected Schema.
ModelRight, Inc © 2006 - 2014, all rights reserved
Property Pages
143
Used By Toolbar
- toggle to display selected items only
- expand the tree to show all objects
- make the current object use the selected objects
- make the current object not use the selected objects
Max Items Control
Some categories, like Columns, might have thousands of potential entries. Use this control to
specify a limit to the number of entries that ModelRight 4.0 should display in a category.
7.1.7
Links Property Page
The Links Property tab is displayed for all objects and lists other objects that are in some way
associated with the selected object. Most of the displayed objects are automatically linked via
child of, referenced by, references, inherits from, or is inherited by associations. In the case
of tables, columns, and relations you may also see FK (a.k.a. parent/child) associations.
You can define your own "shortcut links" between the selected object and any other model
object, a file, or a website URL. Keyboard accelerators (Ctrl+1, Ctrl+2, ...Ctrl+8) can then be
used to quickly navigate to these user-defined shortcut links and take you to the link's target.
Ctrl+9 is reserved as a shortcut link to the first parent object and Ctrl+0 is reserved as a
shortcut to the first Child object. This is automatically defined for relationships - which have
only one parent and child - and table and columns (which may have more than one - so the
shortcut link will take you to the first one).
ModelRight, Inc © 2006 - 2014, all rights reserved
144
ModelRight 4.0 Help
To create a link to an object in another Diagram, link to the Model/Model Subset/Diagram/
Graphic object in that Diagram.
A link can also be specified as a property of an Image and Text Graphic. If a link is specified
on an Image or Text Graphic, then it acts as a hyperlink - and when you click on it, it will take
you to the target of the link.
The Links Toolbar
- create a new link
ModelRight, Inc © 2006 - 2014, all rights reserved
Property Pages
145
- add the selected object as a link
- delete the selected user-defined link
- move the selected user-defined link up or down in order
7.1.8
Physical Property Page
Objects, like Tables, Index, and Tablespaces, that have extensive physical properties are
provided with a Physical tab.
An example of a Physical tab that uses a grid to edit
physical properties (in this case for a Table).
ModelRight, Inc © 2006 - 2014, all rights reserved
146
ModelRight 4.0 Help
This tab uses a property/value grid to display and edit physical properties. The values in this
grid are colored to indicate how the value of a property was derived:
Black - the property's value has been defined "locally". i.e. the value has been set directly on
the object and is not inherited from a Template
Blue - the value for the property is inherited from a Template (like MAXEXTENTS above)
Grey - the value is calculated or based on a built-in default value
7.1.9
SQL Property Page
The SQL Property Page is used to display the SQL that will be generated to the database.
The SQL is created by evaluating a VB Script. See VB Scripts for more details.
SQL Property Page with the Run Script button selected
ModelRight, Inc © 2006 - 2014, all rights reserved
Property Pages
147
SQL Property Page with the Edit Script selected
Script Type
An object can have many different kinds of Scripts. i.e. a Create Script, a Drop Script, and
Alter Script, a Pre Script (to be evaluated and generated before the Create Script), a Post
Script (to be evaluated and generated after the Create Script), etc... This control allows you
to select which script property you want to view or edit.
ModelRight, Inc © 2006 - 2014, all rights reserved
148
ModelRight 4.0 Help
Toolbar
Run Script - evaluates the specified script type and displays the results.
Edit Script - lets you view and edit the VB script source code that is evaluated
Gutter Numbers
Cut, Copy, Paste
Find, Replace
Undo, Redo
SQL Execution Toolbar
Run - execute the SQL commands. If there isn't an active database connection,
ModelRight will prompt you to login first.
Pause - pause the execution of the SQL commands.
Step Next - execute the next SQL command only.
Restart - restart executing the SQL commands - starting at the top.
Set Execution Line - set the execution point to the line where the caret is currently placed
in the edit control. The
symbol is displayed in the gutter to the left of the SQL edit control
to show the next command that will be executed. You can set the execution line to any line in
the control simply by first clicking on the text of the line, and then selecting this button.
Toggle Breakpoint - Click in the edit control on the line that you want to set a breakpoint
on and then click this button. A breakpoint will cause execution to pause when it gets to that
line. The
symbol is displayed in the gutter to show where breakpoints are currently set.
- scroll to the next breakpoint
- scroll to the previous breakpoint
- remove all breakpoints
ModelRight, Inc © 2006 - 2014, all rights reserved
Property Pages
149
If you right-click in the SQL commands editor, the following menu will appear. You can
Toggle Breakpoints, Set Execution Start, and Start Execution on the line you clicked on:
Apply To All
If you make changes to the VB Script, ModelRight creates a local value for the given script
property. If you then decide that you want to use this VB Script for all objects (of the given
type in the model), click the "Apply To All" button. This will removed the local value and set it
on the corresponding Script object in the Script Explorer.This button becomes enabled only if
you have changed the selected script property.
Default Schema Gen Options
The schema generation options affect the SQL that is generated. Click this link to go to the
Default Schema Gen Options object to change the selected options. Just click the Navigate
Back toolbar button
to get back to this property page to see the results.
See also:
Scripting
7.1.10 Graphics Property Page
Any object that is displayed in a Diagram will have a Graphics Property Page when that object
is selected and the Diagram is active. A Graphics object is used to represent the object
within the Diagram. i.e. it holds display properties like font and color that are used to draw
the object. Each object that is displayed in a Diagram has an associated Graphic object.
When the Diagram is active and you select the object, ModelRight automatically adds the
corresponding Graphics object to the selection. That is why in the Property Browser you see
the both the object's Property Pages as well as the Graphics Property Page (for the Graphics
object). Similarly, when you select an object in the Model Explorer, ModelRight automatically
adds its associated Graphics object from the active Diagram (if there is one) to the selection.
ModelRight, Inc © 2006 - 2014, all rights reserved
150
ModelRight 4.0 Help
An example of a Graphics Property Page. In this case, its
for a Column.
Common Controls
Inherit - select which Graphics Template you want the current Graphics object to inherit
properties from.
Graphics Only - click the Graphics Only link to select just the Graphics object. You may need
to do this to reset its properties.
Diagram - a link to the Diagram object that owns the Graphics object.
Make Same In Other Diagrams - copies the current Graphics properties to the corresponding
Graphics objects in all the other Diagrams.
Image and Text Links
The Image and Text Pages also let you specify link properties. If these properties are
ModelRight, Inc © 2006 - 2014, all rights reserved
Property Pages
151
specified then, the Image or Text Graphic acts as a hyperlink. i.e. if you click on it, it will take
you to the target of the link. A link target can be either a) another Model object b) a file, or c) a
website URL.
7.1.11 Type Property Page
An Alias Type is a datatype that is defined in terms of a built-in datatype, but has a different
name to convey more meaning. When you generate a Column that uses an Alias Type, the
built-in datatype is substituted for the Alias Type. Alias Types allow you to define your Model's
datatypes in more meaningful terms. You can use them to organize, re-use, and easily
change the datatypes that your Columns use.
Alias Types are available for all databases. The Type dialog varies by database.
7.1.12 Independent Defaults
Independent Defaults allow you to define Default values in one place and re-use them
throughout your Model (by your Model's Columns). When a Column that uses an Independent
Default is generated to the database, the Independent Default's value is used as the
DEFAULT value of the Column. Since Independent Defaults are defined in one place, they
ensure consistency and correctness and make it easier to change Column Defaults
throughout your Model.
ModelRight, Inc © 2006 - 2014, all rights reserved
152
ModelRight 4.0 Help
7.1.13 Revision History
ModelRight 4.0 has the capability to maintain a list of Revision notes on any object - to
document the changes to the object over time. ModelRight 4.0 also provides the capability to
automatically add a revision note whenever an object changes.
An example of the Revision page for a Table
7.2
Diagram Property Pages
A Model's Diagrams are displayed at the top of the Model Explorer. When you select one,
the Property Browser will display the following tabs (among others):
Diagram - general Diagram options
Display - display options for the different types of objects that are displayed in a Diagram
Category - how to delimit categories displayed within a Table or View
Notation - select between Barker, IDEF1X and IE notations
Grid - self-explanatory background grid options
ModelRight, Inc © 2006 - 2014, all rights reserved
Property Pages
7.2.1
153
Diagram Property Page
The Diagram tab lets you edit some general properties of a Diagram. As usual, you can
change the Name and Template of the selected object.
7.2.2
Relation Display Options
The Display Property Page shows the Relation Display Options when you select Relation in
the Display Type control.
ModelRight, Inc © 2006 - 2014, all rights reserved
154
ModelRight 4.0 Help
Display Type - the contents of this tab is based on the type of object that is selected in the
Display Type control. You can switch between editing Table, View, Materialized View, and
Relation display options.
Display Relation - lets you toggle the on-diagram display of various text items
Line Style - draw Relation lines either diagonally or orthogonally. If you change the Diagram's
Notation this option is also updated to the default value for the Notation.
Auto Position Endpoints - determines where the default location of the Relation endpoints
should be placed. A value of center will result in the Relations being clustered around the
center of a Table's sides. A value of straighten will result in endpoints being placed in such a
manner that a Relation line will be drawn as a straight horizontal or vertical line whenever
possible.
Display Verb Phrases - display the Parent to Child and Child to Parent verb phrases either in
the center of the Relation line or at the endpoints. If middle is selected then the Parent to
Child Verb Phrase will be displayed above the Child to Parent in the middle of the Relation. If
endpoints is selected, then the Parent to Child Verb Phrase will be displayed at the Relation's
parent table endpoint and the Child to Parent Verb Phrase at the relation's child table.
Display Relations - lets you toggle the display of all Relations of a particular type within the
Diagram. You can also toggle the display of a Relation on an individual basis using the
ModelRight, Inc © 2006 - 2014, all rights reserved
Property Pages
155
Relation Graphics Property Page.
Default Relation Graphics - Some properties of the a Relation are controlled by the Diagram.
Others are controlled by the Relation Graphics objects - as described under Relation Display
Options. This hyperlink is provided so that you can conveniently jump to the default Relation
Graphics object - which can be used to set properties that affect the display of all Relations in
all Diagrams,
7.2.3
Header
When viewing a Table (or View) in a Diagram, ModelRight lets you display not just Columns,
but any type of object that a Table can own.
The options in this tab let you define how the delimiter between the different types of child
objects (i.e. Categories) should be displayed. The options in this tab are self-explanatory and
demonstrate themselves when clicked.
A Diagram's Category tab in the Property Browser
With the Category Header and Category Separator options, you can either have a "thick"
Header with the name of the child object type or a narrow line Separator.
ModelRight, Inc © 2006 - 2014, all rights reserved
156
7.3
ModelRight 4.0 Help
Table Property Pages
When you select a Table, the following Property Pages will appear in the Property Browser:
Table/General
Physical
Partition
Graphic
ModelRight, Inc © 2006 - 2014, all rights reserved
Property Pages
7.3.1
157
Table Property Page
The Table Property Page lets you edit the basic properties of a Table.
Name - change the Name of the selected Table
Owner - specify the Owner of the selected Table. Click on the
selected Owner.
link to jump to the
Inherit - specify the Table Template that the selected Table should inherit property values
from. Use the
link to jump to the selected Template.
Generate - specify whether the selected Table should be generated to the database or not.
Sync Column Orders - ModelRight tracks a Table's Column's Physical/Generation order and
the PK/non-PK order (i.e. the order that is used when you display Columns in PK/non-PK
order). Select this option if you want to keep the two orders in sync. If you want to allow them
to diverge, then don't select this option. i.e. when you make a change to the PK/non-PK order
the Generation order won't change and vice-versa.
Type - specify whether the current Table is a Relational or Object table. If its an object table
then further specify its Type. For further information, see Oracle's Documentation on OR
Tables.
ModelRight, Inc © 2006 - 2014, all rights reserved
158
7.3.2
ModelRight 4.0 Help
Physical Property Page
This Property Page corresponds closely to the Oracle documentation on Physical Properties
for Segment Attributes, Physical Attributes and Storage.
If you select ORGANIZATION HEAP, then you will see the following
The Table Physical Property Page when Heap is the
selected ORGANIZATION value.
You can create an index organized Table by selecting ORGANIZATION->INDEX. If you do,
then ModelRight will add additional "IOT" rows to the Physical Properties control. And if you
select the OVERFLOW option, a link to an Overflow Storage object will appear at the bottom.
Click on it to enter Overflow Storage properties.
ModelRight, Inc © 2006 - 2014, all rights reserved
Property Pages
159
The Table Physical Property Page when Index is the
selected ORGANIZATION value.
If you select CLUSTER, then the controls in this Property Page change to let you enter
Cluster information. You can specify the Cluster that this Table belongs to and the Columns
that correspond to the Cluster's columns.
ModelRight, Inc © 2006 - 2014, all rights reserved
160
ModelRight 4.0 Help
See Also
Physical Property Page.
7.3.3
Partition Property Page
If you select a Partition Type of RANGE, then the following controls will be displayed to let you
enter a value for the Partition Key Columns. Plus, a Partition category is added to the Model
Explorer, under the selected Table object, to let you create and edit Range Partitions.
If you select a Partition Type of LIST, then the following controls will be displayed to let you
enter the List Key Column. Plus, a Partition category is added to the Model Explorer, under
the selected Table object, to let you create and edit List Partitions:
ModelRight, Inc © 2006 - 2014, all rights reserved
Property Pages
161
If you select a Partition Type of HASH, then the following controls will be displayed to let you
enter the Partition Key Columns. Plus, a Partition category is added to the Model Explorer,
under the selected Table object, to let you create and edit Hash Partitions. If you select the
By Quantity option, then additional controls for the STORE IN and OVERFLOW Tablespaces
will be displayed - and the Partition category in the Model Explorer will be removed.
7.3.4
Table Graphic Options
A Table Graphics object is used to represent a Table within a Diagram. i.e. it holds display
properties like font and color that are used to draw the Table. Each Table that is displayed in
a Diagram has an associated Table Graphic object that is owned by the Diagram.
When you select a Table in a Diagram, ModelRight automatically adds the corresponding
Table Graphics object to the selection. That is why in the Property Browser you see the both
the Table's Property Pages as well as the Graphics Property Page (for the Table Graphics
object). Similarly, when you select a Table in the Model Explorer, ModelRight automatically
adds its associated Table Graphics object from the active Diagram (if there is one) to the
ModelRight, Inc © 2006 - 2014, all rights reserved
162
ModelRight 4.0 Help
selection.
The Table Graphics tab
Auto-Resize Width/Height - by default, a Table automatically adjusts its width/height to
accommodate its content. If however, you resize the width/height of a Table in a Diagram,
ModelRight will use the width/height you specified regardless of how wide/high its content is.
This control lets you tell ModelRight to auto-resize the Table (or not). You can also select this
option from the context menu that appears when you right click on a Table in a Diagram.
Display - lets you hide/show a Table within a Diagram. If you want to hide all Tables within a
Diagram, use the Diagram's Display Table Display option.
Graphics Only - click the Graphics Only link to select just the Table Graphics object. You
may need to do this to reset any of its properties.
Diagram - a link to the Diagram object that owns the Table Graphics.
Make Same In Other Diagrams - copies the current Graphics properties to the corresponding
Graphics objects in all the other Diagrams.
ModelRight, Inc © 2006 - 2014, all rights reserved
Property Pages
163
The Default Table Graphics Template
By default, a Table Graphics object inherits from a Template called the Default Table
Graphics. So to change a display property for all Tables in all Diagrams, simply select the
Default Table Graphics object and make the change. You can select the Default Table
Graphics object by:
1. going to the Templates tab in the Model Explorer and selecting the Default Table Graphics
object in the Table Graphics Template category
2. selecting a Table in a Diagram, and then selecting the Inherit link in the Graphic tab
3. selecting
in the Shortcut Taskbar
If you right click on the background of the Diagrams section of the Model Explorer you can
select Display Graphic Objects to view these objects in the Model Explorer. If you select one
of these Graphic objects, you can view and modify the properties of the selected Graphics
object in the Property Browser - including what Template the Graphic object inherits from.
Note: Printing blended colors isn't supported by Windows. So when printing a Diagram, the
Solid option is used for Name Background, Background Color and Category Color - even if its
not select for displaying the diagram on screen. This allows you to have some control over
the color that is used for printing without having to change how the diagram is displayed.
7.4
View Property Pages
When you select a View, the following Property Pages will appear in the Property Browser:
View/General
Select
7.4.1
View Property Page
In ModelRight, a View is primarily defined by the Selects it contains. It can contain (own) one
or more Selects that are combined with an operator (like UNION). A View's Columns are
based on the first Select, unless it is an Object View - in which case its Columns are based
on the selected Object Type. Since Selects are such a prominent part of defining a View,
they are listed at the bottom of this page in the Select control. To jump to a Select object,
simply click the button in the control.
ModelRight, Inc © 2006 - 2014, all rights reserved
164
7.4.2
ModelRight 4.0 Help
Select Property Pages
A View is primarily defined by the Selects it contains. The Select Property Pages let you
specify the various parts of a Select. It contains tabs for defining the Select Columns and the
From, Where, Group By and Having clauses. A Select Column can be either an expression
or a simple reference to another Table or View's Column. References to other objects are
kept up to date if the referenced object changes (i.e. renamed or deleted).
ModelRight, Inc © 2006 - 2014, all rights reserved
Property Pages
165
Include Table - When an Available Column is added to create a Select Column, this option is
used to determine whether the Column will be prefixed with the name of the Table that owns
it.
Include Owner - - When an Available Column is added to create a Select Column, this option
is used to determine whether the Column will be prefixed with the owner of the Table that
owns it.
Star Select - select this option if you want to generate "SELECT *". All of the Available
Columns will be added as Select Columns and ModelRight will keep the Select Columns in
sync with the underlying Tables/Views. However, ModelRight will always generate just
"SELECT *" to create the Select statement.
7.5
Relation Property Pages
When you select a Relation, the following Property Pages will appear in the Property Browser:
Relation/General
Integrity
Migrate
ModelRight, Inc © 2006 - 2014, all rights reserved
166
ModelRight 4.0 Help
Graphic
7.5.1
Relation Property Page
The Relation page is provided to allow you to edit general properties of a Relation:
Name - used as the FK Constraint Name when generating the Relation to the database. The
Name can be displayed on the diagram. See Diagram Relation Display Options.
Generate Name - indicates whether the Name should be generated (as the FK Constraint
Name) to the database.
Child - The child Table. You can change it here or by drag/dropping the child endpoint on the
Diagram.
Parent - The parent Table. You can change it here or by drag/dropping the parent endpoint on
the Diagram.
Parent to Child Phrase - provided to help users "read" the Relation going from the parent
Table to the child Table. In this case you would say a "JOB is performed by an EMPLOYEE".
You can view the Parent to Child Phrase on the Diagram as well. See Diagram Relation
Display Options.
Child to Parent Phrase - provided to help users "read" the Relation going from the child Table
to the parent Table. In this case you would say "an EMPLOYEE performs a JOB". You can
view the Child to Parent Phrase on the Diagram as well. See Diagram Relation Display
Options.
ModelRight, Inc © 2006 - 2014, all rights reserved
Property Pages
167
Status - The state of the Oracle constraint.
Generate - indicates whether or not the Relation should be generated to the database.
7.5.2
Integrity Property Page
The Integrity Page is provided to let you specify various aspects of how the Relation's
Referential Integrity should be enforced. The database provides explicit support for enforcing
some of these options (Delete Rule, Identifying). In the other cases (Optionality, Cardinality,
Update Rule), you can specify values for documentation purposes or you could write a
Trigger to read and enforce the option.
Relation Integrity Property Page for Barker Notation
ModelRight, Inc © 2006 - 2014, all rights reserved
168
ModelRight 4.0 Help
Relation Integrity Property Page for IDEF1X Notation
Child Optionality - whether there must be a row in the child Table for each row in the parent
Table.
Child Cardinality - how many rows can be in the child Table for each row in the parent Table
Identifying - indicates whether the parent key is part of the child's primary key
Parent Optionality - indicates whether there must be a row in the parent Table for each row in
the child Table
Parent Cardinality - indicates how many rows in the parent Table there must be for each row
in the child Table
Delete Rule - when a row in the parent Table is deleted, what should happen to
corresponding child Table rows. Some of these options (like No Action, Cascade and Set
Null) are explicitly supported by Oracle. The others would need to be enforced using
Triggers.
Update Rule - when a row in the parent Table is updated, what should happen to
corresponding child Table rows. These options would need to be enforced using Triggers.
ModelRight, Inc © 2006 - 2014, all rights reserved
Property Pages
7.5.3
169
Migrate Property Page
The Migrate Property Page allows you to specify what Columns in the parent Table you want
to "migrate" to be "foreign key" Columns in the child Table. ModelRight automatically creates
foreign key Columns in a Relation's child Table for certain Columns in the parent Table. This
is referred to as Migration. By default, ModelRight migrates the Columns in the parent
Table's primary key to be foreign key Columns in the child Table. This ensures that you can
use a foreign key constraint (i.e. the CREATE FOREIGN KEY statement) to enforce
referential integrity declaratively (vs programmatically with a Trigger).
The Migrate Property Page of a Relation when
Key-Based migration is selected
The Migrate Property Page of a Relation when the
User-Defined migration option is selection
ModelRight, Inc © 2006 - 2014, all rights reserved
170
ModelRight 4.0 Help
Migrate Columns From Parent Table
Lets you specify how you want to migrate parent Columns. You have the following three
options:
Key-Based - the default option. Migrates Primary or Unique Key columns from the parent
Table to the child Table. If a Column is added/removed from the migrated Key, then a
foreign key Column will automatically be added/removed from the Child table. This option
will be enforced in the database by using declarative referential integrity (i.e. the CREATE
FOREIGN KEY statement).
User-Defined - lets you manually specify which parent Columns you want to migrate. This
option can not be enforced declaratively, but could be enforced with a Trigger.
None - indicates that you don't want the Relation to migrate any Columns.
Migrate Key
If doing Key-Based migration, this control will let you select which key you would like to
migrate. ModelRight lets you migrate either a Unique key or a Primary key.
Parent Column/Child Column
If you want the foreign key Column to have a different name than the parent Column, you can
"rolename" it using this control. Once the child Column has a different name than the parent
column, changes to the name of the parent column will no longer automatically propagate to
the child.
Index
This combo box displays the index, if any, that is associated with the Relation. Often you will
want to associate an Index with a Relation to speed joins between the parent and child
Tables. If no Index exists for the Relation, you can easily create one by selecting the <Create
Join Index> option. If an Index already exists, but has not been associated with the Relation,
you can select it to make the association. ModelRight automatically keeps the Columns in the
Index in sync with the foreign key Columns contributed by the Relation. If the relation is
deleted (or the Index set to <None>), the associated Index will be deleted as well.
See Also
Migration, Unification, and Rolenaming
7.5.4
Relation Graphics Property Page
A Relation Graphics object is used to represent a Relation within a Diagram. i.e. it holds
display properties like for font and color that are used to draw the Relation. A Diagram owns
a Relation Graphics object for each Relation displayed in the Diagram.
When you select a Relation in a Diagram, ModelRight automatically adds the corresponding
Relation Graphics object to the selection. That is why in the Property Browser you see the
ModelRight, Inc © 2006 - 2014, all rights reserved
Property Pages
171
both the Relation Property Pages as well as the Graphics Property Page (for the Relation
Graphics object). Similarly, when you select a Relation in the Model Explorer, ModelRight
automatically adds its associated Relation Graphics object from the active Diagram (if there
is one) to the selection.
Inherit - select which Relation Graphics Template you want the current Relation Graphics
object to inherit properties from.
Graphics Only - click the Graphics Only link to select just the Relation Graphics object. You
may need to do this to reset its properties.
Diagram - a link to the Diagram object that owns the Relation Graphics object.
Make Same In Other Diagrams - copies the current Graphics properties to the corresponding
Graphics objects in all the other Diagrams.
The Default Relation Graphics Template
By default, a Relation Graphics object inherits from a Template called the Default Relation
Graphics. So to change a display property for all Relations in all Diagrams, simply select the
Default Relation Graphics object and make the change. You can select the Default Relation
Graphics object by:
1. going to the Templates tab in the Model Explorer and selecting the Default Relation
Graphics object in the Relation Graphics Template category
2. selecting a Relation in a Diagram, and then selecting the Inherit link in the Graphic tab
ModelRight, Inc © 2006 - 2014, all rights reserved
172
ModelRight 4.0 Help
3. selecting
in the Shortcut Taskbar
If you right click on the background of the Diagrams section of the Model Explorer you can
select Display Graphic Objects to view these objects in the Model Explorer. If you select one
of these Graphic objects, you can view and modify the properties of the selected Graphics
object in the Property Browser.
7.6
Trigger Property Pages
In ModelRight, you can create a Table-level Trigger or a Model-level Trigger. A Table-level
Trigger is owned by a Table and can reference the Table's Columns as Update Columns.
The Trigger's Bodycan be specified directly, as a VB Script that evaluates to the body, or as
a reference to a reusable VB Script.
7.6.1
Trigger Property Page
Use this Property Page to enter basic information about your Trigger. If you are editing a
Model-level Trigger, then the Update Columns control will not be displayed.
ModelRight, Inc © 2006 - 2014, all rights reserved
Property Pages
173
A Table-level Trigger Property Page with the Update Columns
control
7.6.2
Trigger Body Property Page
The Trigger's body can be defined in three different ways:
1. You can enter the SQL directly. If you just want to enter the Trigger body's SQL directly, hit
the Run Script toolbar button
and type it in.
2. You can enter a VB Script that when evaluated will produce the Trigger Body's SQL. Hit
the Edit Script toolbar button
and type it in. If you are writing a Table Trigger, the VB
Script can evaluate the Table's Relations to enforce referential constraints that are not
implemented declaratively by the database.
3. Use the Script Type control to select a reusable Trigger Body VB Script that has been
entered in the Script Explorer under Scripts->"database name"->Trigger Body. A shortcut
to this location has been provided on the Edit Script page.
ModelRight, Inc © 2006 - 2014, all rights reserved
174
ModelRight 4.0 Help
The Trigger Body Property Page when the run button has been
selected.
7.7
Schema Gen Option Set
A Schema Gen Option Set object is used to specify Schema Gen/Forward Engineering
options. It is used to specify Schema Gen options like:
Generate Comments
Use Owner Names
Generate Constraint Names
Quote Names
Physical Storage Properties
whether to Create or Drop Tables, Views, Indexes, Foreign Keys, etc...
Two Schema Gen Option Sets are created automatically by ModelRight: The Default Schema
Gen Options serves as the default for Forward Engineering, and the Alter Script Schema Gen
Options is the default Option Set that is used when creating Alter Scripts. Click the Make
Current checkbox at the bottom of the Property Page to make it the one that is used by
default.
ModelRight, Inc © 2006 - 2014, all rights reserved
Property Pages
ModelRight, Inc © 2006 - 2014, all rights reserved
175
176
7.8
ModelRight 4.0 Help
Check Constraints
ModelRight allows you to create both Table and Column Check Constraints. A Check
Constraint object is owned by the Table or Column that it is applied to. You can also create
Check Constraint Templates so that you can specify a constraint in one place and then reuse
it throughout your Model - via inheritance. To have a Column or Table Check Constraint
reuse a Check Constraint Template, simply select it in the Inherit control. In ModelRight, a
Table Check Constraint can either be an Expression or a Script:
An Table Check Constraint of type Expression
ModelRight, Inc © 2006 - 2014, all rights reserved
Property Pages
177
A Table Check Constraint of type Script
Expression - enter a Boolean expression involving the Table's Columns. Double-click on a
Column in the Available Columns control to add the Column's name to the Expression edit
control.
Script - enter a VB Script that will be evaluated to produce the Check Constraint.
A Column Check Constraint contains a few more options: Min/Max, Valid Values List, and
Not Null:
Part of the Column Check Constraint
Page with Min/Max selected.
ModelRight, Inc © 2006 - 2014, all rights reserved
178
ModelRight 4.0 Help
Part of the Column Check Constraint Page with Valid
Values List selected
Part of the Column Check Constraint
Page when the Not Null option is
selected.
Min/Max - specify a min condition and value and/or a max condition and value
Valid Values - Valid Value Lists are defined as independent objects (children of the Model) and
just referenced/attached here. To quickly create and attach a new Valid Values List object,
click the Create New... button.
Not Null - a Not Null Column Check Constraint is automatically created and deleted by
ModelRight based on the NOT NULL checkbox control in the Column Property Page.
7.9
Model Source
A Model Source stores information about Model to Model compares so that previously
matched objects are matched even if their name changes. A Model Source allows you to see
what has changed on either side since the last time they were compared. It also allows you
to update your Model automatically with changes made in the Model Source (see Refresh).
The following page is displayed in the Property Browser when a Model Source object is
selected:
Model Source property page
ModelRight, Inc © 2006 - 2014, all rights reserved
Property Pages
179
Model File - the last known location of the Model Source file. Browse to select a new
location.
Store Smart Compare Info - controls whether or not information about which Model
changed objects and properties is maintained.
Refresh - if the Model Source Model saves its Change History (see Save Model Change
History), then this button will be enabled and allow you to update your Model with any changes
that have been made to the Model Source Model since the last Sync or Refresh.
Sync - shortcut button to start a Model to Model Compare using the selected Model
Source
Open - shortcut button to open the Model Source's linked Model.
ModelRight, Inc © 2006 - 2014, all rights reserved
Part
VIII
Dialogs
8
181
Dialogs
This section describes some of the Windows that ModelRight uses.
8.1
Options
The Tools->Options dialog is provided to let you view and edit application-wide preferences.
These values are used across Models and are stored in the Windows system registry.
These options are also displayed in the context menu that is displayed when you right-click on
the background of the Model Explorer.
This page lets you turn back on prompts that you previously turned off and indicated not to
ask you about again.
ModelRight, Inc © 2006 - 2014, all rights reserved
182
ModelRight 4.0 Help
This page lets you specify the number of transactions to be displayed in the Transaction
History Window.
8.2
Model Browser
The Model Browser is located under the Tools menu. It displays all of a Model's objects and
properties in a tree format. It provides a "raw", unfiltered, read-only view of the Model's
objects and properties.
ModelRight, Inc © 2006 - 2014, all rights reserved
Dialogs
8.3
183
Meta Model Browser
The Meta Model Browser is located under the Tools menu. It describes what properties an
object can have and what type of child objects it can own.. If you use ModelRight's scripting
capabilities, you need to know this information so that you can programmatically navigate an
object's children or reference it's properties. ModelRight provides a Meta Model Browser that
displays this information in tree format
ModelRight, Inc © 2006 - 2014, all rights reserved
184
8.4
ModelRight 4.0 Help
Find
The Find dialog provides a powerful means of searching for objects in your model. You can
search by the type of object that you want to find, the property that you want to match, and a
value that you want that property to match. For example, the following dialog settings could
be used to find all Columns whose Name starts with the letter "S":
The regular expression syntax that ModelRight uses allows you to specify complex pattern
ModelRight, Inc © 2006 - 2014, all rights reserved
Dialogs
185
matches.
You can select Property has no value to search for objects that don't have a value for the
given property - like Tables without a Tablespace or Owner.
The results of the Find are listed in the Find Results window (by default in a tab at the bottom
of the application). When you select an item in the Find Results window, the corresponding
object is selected. The Find Results window allows extended selections so you can select
multiple items and make changes them all at once (using their Property Pages).
Search Toolbar
What could be more basic? But it is surprising that ModelRight 4.0 is the only product to offer
such a basic feature with all the flexibility you need to find any kind of object that matches your
search criteria. ModelRight has always had a Find capability to help with this, but now
ModelRight 4.0 provides a search control right in the toolbar for even easier access to
common searches.
Search control in main toolbar
8.5
Model Validation
Selecting the menu item Model -> Validate, or the Shortcut Task
brings up the
Model Validation dialog. This dialog allows you to check your model for commonly occurring
problems and issues. Entries marked with a red dot indicate an issue that will prevent the
ModelRight, Inc © 2006 - 2014, all rights reserved
186
ModelRight 4.0 Help
model from generating to the database. Entries marked with a yellow dot indicate a
possible issue, but not something that would prevent your model from generating to the
database.
The results of running a Model Validation are displayed in the Validation Results window.
When you select an item in this window, the corresponding object is selected. The Validation
Results window allows extended selections so you can select multiple items and make
changes them all at once (using their Property Pages).
ModelRight, Inc © 2006 - 2014, all rights reserved
Dialogs
8.6
187
Print Dialog
The standard Print Dialog has been improved to let you change the page scale and to let you
select the specific pages that you want to print:
You can drag the Print Page boundaries to scale the objects to the page bounds. You can
toggle the printing of a specific page by clicking on the boxes defined by the page bounds.
Print Dialog Toolbar
- Zoom In on the Diagram's display
- Zoom out on the Diagram's display
- Zoom the display to fit the contents of the Diagram
- clear all page selections
ModelRight, Inc © 2006 - 2014, all rights reserved
188
ModelRight 4.0 Help
- select only pages that have something on them
- select all pages
Fit to page - scales the page boundaries to include all diagram objects. You can manually
scale the page bounds simply by drag/dropping them.
Header/Footer: - enter the text or macros that you want to have printed in the header/footer
margin. ModelRight will expand the macros when each page is printed. The macros are
evaluated using ModelRight's sripting API.ModelRight prefixes the macros with the following
script:
Sub Evaluate_OnLoad()
Set Context = CreateObject("SCF.ScriptContext")
Set Document = Context.ScriptDocument
Set Options = Context.Options
Set CurrentObject = Context.Object
User-define macros starting (text that starts with <% and ends with %>) are preprocessed by
making the following replacements:
<%
<%=
<%-
Document.Write(Context.
Document.Write(
text evaluated "as-is"
In addition to the usual Context values like CurrentTime and CurrentDate, CurrentPage and
TotalPages are also available when printing. The Context.Object is set to the Diagram object.
Escape character \l, \c, and \r can be entered to indicate whether to print left, center, or right
justified. The default is center.
8.7
Export JPG or Bitmap
ModelRight 4.0 provides the Export to JPG and Export to DIB/Bitmap features so that you can
view your Diagram outside of ModelRight.
Note: The size of the Diagram that can be exported in this manner is inherently limited by
memory constraints.
ModelRight, Inc © 2006 - 2014, all rights reserved
Part
IX
190
9
ModelRight 4.0 Help
How to buy ModelRight
You can buy ModelRight directly online worldwide with all three major credit cards. As soon as
your transaction is completed you will be able to download and install the program and start
working right away.
Direct order link:
Online Store
M odelRight Software home page:
http://www.modelright.com
Email support:
[email protected]
Tech support phone :
(609) 423 9296
Fax: (866) 812-3742
Snail mail:
ModelRight, Inc.
66 Witherspoon Street
Suite 138
Princeton, NJ 08542
USA
ModelRight, Inc © 2006 - 2014, all rights reserved
Index
Index
-DDefault Relation Graphics
Delete Rule
167
Dependencies
143
Diagram
24, 153
Diagram Display Options
Diagram Domain
60
Diagram options
60
Display
90
Display Graphic Objects
Domain
24, 75
Domains
9, 24
Drag
96
Drop
96
-AAllow Special Chars
86
ALTER
128
Auto Attach New Tables
53
Auto Position
153
-BBarker
137
By Quantity
160
-Ccalculated
74
Cardinality
167
Case
86
Case Sensitive
128
Category
24, 140
category editor
24
Category Header
155
Category Separator
155
Check Constraint
176
Check Constraints
176
Child Column
169
Child Graphic Objects
24
Child Graphics
24
Child to Parent
166
CLUSTER
158
Cluster's
158
Column Check
176
Column Check Constraints
Column Domains
75
Columns
24
comment
139
Compare
105
Copy
96
Create New Object
33
Ctrl+Enter
97
-EEndpoints
153
Enter
97
Esc
97
-FFiles
74
Filter
122
Find Results
101, 184
foreign key
86
Forward Engineer
113
-G176
ModelRight, Inc © 2006 - 2014, all rights reserved
Generate
113
Generate Name
166
GlobalNamespace
79
Graphic Object
24
Group By
164
-HHASH
Having
160
164
60, 153
24
24
191
192
ModelRight 4.0 Help
Model Validate
24
Model Validation
67, 185
Multiple Values
88
-IIDEF1X 137
IE
137
Include Owner
164
Include Referenced Objects
Include Table
164
Incomplete
24
Incomplete Objects
24
Index
169
Individual Object
79
inherit
75
inherited
74
Integrity
167
-N122
-OObjects
74
On-Diagram
97
On-Diagram Editing
97
Only Show Differences
105
Optionality
167
Options
67, 181
Oracle Manual
90
ORGANIZATION
158
OR-support
9
Output Window
24
overrides
75
Owner
157
-JJPEG
98
-KKey Constraints
24
Key-Based
169
-LLine Style
153
Links
143
LIST 160
local
74
Local Properties
locally
142
Naming
86
new objects
94
Not Null
176
Notation
137
-P98
-MMake Same In Other Diagrams
Meta Model
74
Migrate
86, 169
Migrate Key
169
migration
86, 169
Min/Max
176
Model
74
Model Explorer
24
Model Objects
24
Model Subset
24, 44
161
Parent Table
169
Parent to Child
166
Partition
160
Partition Key
160
Paste
96
Physical Attributes
158
Physical Properties
158
Physical Property
145
PK/non-PK
157
Post Scripts
79
Previous Selection
33
Primary key
169
Properties
74
Property Browser
24
Property Pages
33
-QQuote Names
113
ModelRight, Inc © 2006 - 2014, all rights reserved
Index
-RRANGE
160
RE
122
Redo
33
REF
90
REF Relations
90
Referenced
122
Referenced Objects
128
referential integrity
90
regular expression
101, 184
Relation
60, 86
Relation Display
90
Relation Graphics
60
report
98
Report Files
78
Reporting
98
Reset
142
Restrict By Model Subset
113
Restrict By Physical Options
113
Reverse Engineer
122
rolename
86
-SSchema
128
Schema Gen
113
Schema Gen Option Set
174
Script
24, 146
Script Explorer
79
Scripts
24, 79
Segment Attributes
158
Select
163
Select Column
164
Select Columns
164
Select From
90
Select From Relations
90
Separator
155
Shortcut Taskbar
24
Show Dependencies
105, 128
Show Differences
128
Sort Alphabetical
24
Sort Hierarchical
24
Special Chars
86
SQL
79, 146
SQL Property Page
79
ModelRight, Inc © 2006 - 2014, all rights reserved
Star Select
164
Storage
158
support
190
Sync Column
157
-TTable
24
Table Check Constraint
176
Table Relations
90
Tablespace
24
transaction
67
Transaction History
24, 181
Trigger
167
Type
24
-UUDP
88
undo
33
unify
86
UNION
163
Unique key
169
User Defined
88
User Defined Property
User-Defined
169
Using Owner
128
88
-VValid Values
176
Validate
24
Validation
67, 185
Validation Results
67, 185
VB
79
VB Scripts
78
Verb Phrases
153
View
163
View Relations
90
Views
44
-XXML
98
XML Data
98
XML Data Options
XSL
98
98
193
194
ModelRight 4.0 Help
XSL Report Files
98
ModelRight, Inc © 2006 - 2014, all rights reserved
195
Endnotes 2... (after index)
ModelRight, Inc © 2006 - 2014, all rights reserved
Back Cover