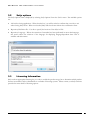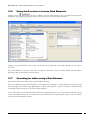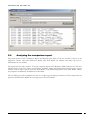
1
SILWOOD TECHNOLOGY LTD Safyr Metadata Explorer User Guide SILWOOD TECHNOLOGY LIMITED User Guide – Safyr 6.0 This product is subject to the license agreement and limited warranty accompanying the product. The product software may be used or copied only in accordance with the terms of this agreement. Information in this document is subject to change without notice. No part of this manual may be reproduced, or transmitted in any form or by any means, electronic or mechanical, including photocopying and recording, for any purpose without the express written permission of Silwood Technology Ltd, or Authorised Silwood Technology Distributor. © Copyright 2005-12 Silwood Technology Ltd. All rights reserved. Table of Contents 1 Introduction............................................................................................................................ 4 1.1 Where do I find what I need? ............................................................................................................ 4 1.1.1 Installing and configuring .................................................................................................. 4 1.1.2 Extracting metadata from the Enterprise Application .................................................. 4 1.1.3 Exploring the contents of the Safyr repository .............................................................. 4 1.1.4 Exporting metadata from Safyr into other environments............................................. 4 1.2 Safyr manual set ................................................................................................................................... 4 2 The Repository Manager........................................................................................................ 5 2.1 Repository Manager toolbar .............................................................................................................. 6 2.2 Editing repository settings or creating a new repository ............................................................... 6 2.3 Copying an existing repository definition ........................................................................................ 6 2.4 Deleting a Repository ......................................................................................................................... 6 2.5 Import/export Repository ................................................................................................................. 6 2.5.1 Import Repository ............................................................................................................... 6 2.5.2 Export Repository ............................................................................................................... 7 2.6 Repository maintenance ..................................................................................................................... 7 2.7 The Repository .ini file ...................................................................................................................... 8 2.8 Safyr Licensing ..................................................................................................................................... 8 2.9 Managing Multiple Repositories ........................................................................................................ 8 3 Browsing the metadata in Safyr ............................................................................................10 3.1 The Safyr workspace ......................................................................................................................... 10 3.1.1 Elements of the Safyr workspace.................................................................................... 10 3.1.2 The Safyr menus ................................................................................................................ 11 3.1.3 The Safyr toolbar ............................................................................................................... 12 3.2 Safyr options ...................................................................................................................................... 13 3.3 Licensing Information ...................................................................................................................... 13 3.4 Browsing the metadata ..................................................................................................................... 14 3.5 The Model Overview ........................................................................................................................ 14 3.6 How Safyr determines the Row Count .......................................................................................... 15 3.6.1 Special Considerations for SAP and Siebel Systems .................................................... 15 3.7 Opening additional Model Overview windows ............................................................................ 16 3.8 Seeing View, Data Element and Domain information ................................................................ 16 3.9 Selecting tables in the Model Overview ......................................................................................... 17 3.9.1 To select tables .................................................................................................................. 18 3.10 Using Advanced Search .................................................................................................................... 18 3.11 Sorting columns in data mode ......................................................................................................... 22 3.12 Clearing Search Criteria in the Model Overview .......................................................................... 23 3.13 Viewing table details ......................................................................................................................... 23 3.13.1 Table details ....................................................................................................................... 25 3.13.2 Index details ....................................................................................................................... 26 3.13.3 Relationship details ........................................................................................................... 27 3.14 Viewing parent/child relationships................................................................................................. 28 3.15 Using the Overview to browse Views ............................................................................................ 29 3.15.1 Showing the View fields ................................................................................................... 30 3.15.2 View Elements Information ............................................................................................ 31 3.16 Using the Overview to browse Data Elements ............................................................................ 32 3.17 3.18 3.19 3.20 3.21 3.22 3.23 3.24 3.25 3.26 3.27 3.28 3.29 3.30 3.31 3.32 3.33 3.34 3.35 3.36 3.37 3.38 3.39 3.40 Searching for tables using a Data Element .................................................................................... 32 Using the Overview to browse Domains ...................................................................................... 33 Searching for tables using a Domain .............................................................................................. 34 The Model Overview context pop-up menu ................................................................................ 34 3.20.1 Finding a table in the Application Hierarchy ................................................................ 35 The Application Hierarchy .............................................................................................................. 36 Available actions from the Hierarchy ............................................................................................. 37 Searching for tables and views in the Application Hierarchy ..................................................... 38 Searching Tree Nodes in the Application Hierarchy .................................................................. 40 What does the Application Hierarchy show for each ERP? ....................................................... 41 3.25.1 Application Hierarchies for SAP .................................................................................... 41 3.25.2 Application Hierarchies for Siebel .................................................................................. 41 3.25.3 Application Hierarchies for PeopleSoft Enterprise ..................................................... 41 3.25.4 Application Hierarchies for PeopleSoft EnterpriseOne (JDEdwards) ..................... 41 3.25.5 Application Hierarchies for Oracle Enterprise Business Suite ................................... 41 Drilling into data................................................................................................................................ 42 Using QBE (Query by Example) to interrogate data................................................................... 43 Exporting data to flat files ............................................................................................................... 45 3.28.1 Exporting data from a single table.................................................................................. 45 3.28.2 Export of a number of tables .......................................................................................... 47 Creating SQL scripts for table access ............................................................................................. 48 3.29.1 To generate Views or Select Statements ........................................................................ 48 Creating a report of table attributes ................................................................................................ 50 Exporting a list of tables .................................................................................................................. 51 Viewing Model Statistics .................................................................................................................. 52 The ERP Extract Log ....................................................................................................................... 53 Subject Areas...................................................................................................................................... 54 Managing Subject Areas ................................................................................................................... 55 Adding tables to a Subject Area ...................................................................................................... 56 3.36.1 Populating a Subject Area from the Model Overview ................................................. 56 3.36.2 Populating a Subject Area from the Related Tabled pop-up menu ........................... 57 3.36.3 Populating a Subject Area from the Application Hierarchy ....................................... 59 Expanding a Subject Area with related Parent or Child tables ................................................... 60 Creating additional Relationships not extracted from the source Application ........................ 63 Creating additional Relationships.................................................................................................... 64 Reviewing generated Relationships................................................................................................. 64 3.40.1 To delete a Rules Based or Extended Relationship ..................................................... 65 4 Exporting metadata from Safyr ............................................................................................ 66 4.1 Getting ready to export .................................................................................................................... 66 4.2 The CSV export format .................................................................................................................... 70 4.3 Exporting to the Safyr ER Diagrammer ........................................................................................ 71 4.3.1 The ER Diagrammer toolbar .......................................................................................... 72 4.3.2 The ER Diagrammer Right Mouse Click Menu ........................................................... 72 5 Comparing metadata ............................................................................................................ 75 5.1 Creating a Comparison File ............................................................................................................. 75 5.2 Performing the Subject Area comparison ..................................................................................... 77 5.3 5.4 6 Results of a comparison ................................................................................................................... 77 Analyzing the comparison report.................................................................................................... 78 Special Product Features for SAP BW ................................................................................. 79 6.1 How Safyr represents InfoCubes .................................................................................................... 79 6.2 The Model Overview and BW ........................................................................................................ 80 6.2.1 Using Advanced Search to select BW Table types ....................................................... 81 6.3 The Application Hierarchy and BW ............................................................................................... 81 6.3.1 Choosing which Hierarchy to Use .................................................................................. 82 6.4 Right Mouse Click Options for BW Repositories ........................................................................ 82 6.4.1 RMC Options from the Model Overview ..................................................................... 82 6.4.2 RMC Options from the Application Hierarchy............................................................ 83 Appendix A. The Safyr Meta Model........................................................................................ 84 Appendix B. Adding Additional Relationships ........................................................................91 B.1 Understanding the PeopleSoft and JDEdwards rules sheets ...................................................... 92 B.2 Special Considerations for PeopleSoft Relationships .................................................................. 93 B.3 Defining a Rule .................................................................................................................................. 93 B.4 Examples of using the rules ............................................................................................................. 93 B.5 Adding rules to the spreadsheet ...................................................................................................... 94 B.6 Running an update to process new rules ....................................................................................... 95 B.7 What happens if a spreadsheet rule conflicts with an Existing Relationship?.......................... 96 B.8 Method for Generating Extended Relationships.......................................................................... 96 B.8.1 Pass 1: identifying relationships ...................................................................................... 97 B.8.2 Pass 2: identifying relationships (PeopleSoft & J.D. Edwards EnterpriseOne only) ........................................................................................................................................ 98 B.8.3 Pass 3: identifying relationships (PeopleSoft & J.D. Edwards EnterpriseOne only) ........................................................................................................................................ 98 B.8.4 Pass 4: ‘Dimension’ search (J.D. Edwards EnterpriseOne only) ............................... 98 B.8.5 Pass 5: ‘Dimension’ search (J.D. Edwards EnterpriseOne only) ............................... 98 B.8.6 Pass 6: ‘Dimension’ search (J.D. Edwards EnterpriseOneOnly) ............................... 98 B.8.7 Influencing the Extended Relationship generation process for PeopleSoft and JDEdwards relationships ............................................................................................ 99 Index ............................................................................................................................................. 100 I N T R O D U C T I O N 1 Introduction Describes how to use this manual W elcome to the Safyr User Guide. This manual describes the various features of Safyr in detail and in particular the powerful features for exploring the metadata extracted from your chosen environment. 1.1 Where do I find what I need? 1.1.1 Installing and configuring We recommend that you refer to the Safyr ‘Getting Started Guide’ for details of how to install and configure the product. For information on installing and configuring Safyr, refer to Chapter 2 of the Safyr ‘Getting Started Guide’. Safyr will need to be fully installed before you can attempt an extraction of metadata from your ‘source’ system. 1.1.2 Extracting metadata from the Enterprise Application Once Safyr is installed and configured, an extraction of metadata need to be carried out by connecting to the Enterprise Application you require (e.g. SAP, PeopleSoft…). The detailed steps for achieving this are described in Chapter 3 of the Safyr ‘Getting Started Guide’. 1.1.3 Exploring the contents of the Safyr repository Safyr’s main purpose is to allow exploration of the data structures extracted from your environment and stored in the Safyr Repository. To understand the features available, refer to Chapter 3 of this manual. 1.1.4 Exporting metadata from Safyr into other environments Having located particular data structures with the Safyr browsing interface, users may wish to export these data structures into other tools and formats. See Chapter 4 of this manual for more details. 1.2 Safyr manual set There are two Safyr manuals supplied in Adobe Acrobat format (.pdf files) with the Safyr software. Getting Started Guide: Use this manual for details of product installation and an overview of Safyr features User Guide (this manual): Describes all of the Safyr functions in detail USER GUIDE 4 T H E R E P O S I T O R Y M A N A G E R 2 The Repository Manager Describes the features for creating and managing multiple sets of metadata in Safyr T he Safyr Repository Manager centralises all the features and functions related to creating, maintaining and managing one or more Safyr repositories. On starting Safyr, the Repository Manager form is displayed. The Repository Manager form To open an existing Repository, select the appropriate entry from the list of repositories and click the ‘Open’ button. USER GUIDE 5 T H E R E P O S I T O R Y 2.1 M A N A G E R Repository Manager toolbar The options for managing and maintaining repositories are accessed from the toolbar. Tool Button 2.2 Tool Button Name For more details see... Edit repository settings Editing repository settings or creating a new repository Create a new repository Editing repository settings or creating a new repository Copy a repository Copying an existing repository definition Delete selected repository Deleting a Repository Import repository Import/Export Repository Export repository Import/Export Repository Repository Maintenance Repository Maintenance Repository Inifile The Repository .ini file Start License Dialog Safyr Licensing Editing repository settings or creating a new repository Clicking the ‘Edit Repository Settings’ or ‘Create New Repository’ button displays a series of forms for configuring the Safyr repository and the connection to the ‘source’ system. See the Safyr ‘Getting Started’ guide, Chapter 2 – Installation for details on how to complete the required information. 2.3 Copying an existing repository definition Clicking the ‘Copy a repository’ button will copy the currently selected repository definition and automatically create a new set of definitions with ‘Copy of’ in front of the name. 2.4 Deleting a Repository Clicking the ‘Delete selected repository’ button will remove the entry from the available list of repositories. Please note that this only removes the entry from the list. The Safyr repository database and its contents will still exist. 2.5 Import/export Repository The contents of a Safyr repository can be moved from one instance of Safyr to another using the repository import/export feature. 2.5.1 Import Repository Clicking this button will display a form for selecting the import/export file. This is in the form of a ‘zip’ file and must have been produced from the Safyr Repository export process (see ‘Export Repository’ below). Locate the file and select it to begin the import process. Importing a repository will overwrite the previous contents of that repository. Note: Do not unzip the repository import file. Safyr reads the file in its zipped format. USER GUIDE 6 T H E R E P O S I T O R Y 2.5.2 M A N A G E R Export Repository Clicking this button will display a form for specifying the location of the export file. Enter an appropriate name and location and press the ‘Save’ button to proceed with the export process. 2.6 Repository maintenance Clicking the Repository Maintenance button displays a form that controls the tasks involved in maintaining the structure of the tables in the Safyr Repository. Repository Maintenance form The Repository Maintenance form deals with the Creation, Deletion and Modification of the tables and other RDBMS objects in a Safyr repository. The process will appear automatically when configuring a new repository, or when upgrading from an older version of Safyr. There are three buttons on the form: Repository Maintenance: Click this button to check the structure of the Safyr repository against the latest standard. This will typically be used when upgrading from an earlier Safyr release Create Repository: Click this button to create the tables, views and triggers that form the structure of the Safyr repository. Drop Repository: Click this button to drop all the tables, views and triggers in an existing Safyr repository. Please note that this will delete the entire contents of the repository! In each case, Safyr executes a set of SQL scripts to perform the required database tasks. USER GUIDE 7 T H E 2.7 R E P O S I T O R Y M A N A G E R The Repository .ini file Safyr uses an .ini file to record details of each Repository created. In addition to this, a Microsoft Excel file is used to store a set of options used by Safyr. Appendix B of the Safyr ‘Getting Started Guide’ gives details on the structure and purpose of this Excel file. The Repository Inifile button on the Repository Manager allows the location and name of the .ini file to be specified. By default the file is called safyr.ini and is located in the Safyr root folder (typically Program Files\Silwood\Safyr 6\safyr.ini). On clicking the button, a form is displayed which allows you to specify the name and location of the file. 2.8 Safyr Licensing The licensing screen shows details of any existing product license, and enables the user to apply for a product license. The actual options shown will vary depending on how the product was purchased. 2.9 Managing Multiple Repositories Most Safyr customers will use the product to extract and store multiple sets of metadata from their chosen ERP environment(s). This section describes how to achieve this. Safyr needs a separate database or schema for each set of metadata to be stored. Each database will require a database user to be specified and this user must be the Table Owner for the database. Each and every Safyr user wishing to share the metadata in a Safyr repository must specify the same database (or schema) and database user when defining a new Safyr repository within their local Safyr environment. The following example shows a typical scenario; 4 Safyr users wanting to connect to a mixture of SAP and PeopleSoft systems. There are 3 databases (or schemas). Database A stores metadata from a SAP system, Database B metadata from a PeopleSoft system and Database C from another SAP system. USER GUIDE 8 T H E R E P O S I T O R Y M A N A G E R Safyr Client 1 has 3 Repositories defined: SAP1 pointing to Database A using Table Owner A as the database user PSoft1 pointing to Database B using Table Owner B as the database user SAP2 pointing to Database C using Table Owner C as the database user Safyr Client 2 has the same 3 Repositories defined Safyr Client 3 is only interested in the PeopleSoft system: PSoft1 pointing to Database B using Table Owner B as the database user Safyr Client 4 is only interested in the SAP systems: SAP1 pointing to Database A using Table Owner A as the database user SAP2 pointing to Database C using Table Owner C as the database user USER GUIDE 9 B R O W S I N G T H E M E T A D A T A I N S A F Y R 3 Browsing the metadata in Safyr A detailed description of the features for browsing the extracted metadata S aphir’s main purpose it to make the exploration of the extracted application metadata easy to explore. This chapter describes the various features for exploration in detail. 3.1 The Safyr workspace When the Safyr application is started, a list of available Repositories is displayed and after selecting the appropriate one, the Safyr toolbar and menu options provide the means to explore the metadata. The following sections describe the characteristics of the Safyr workspace. 3.1.1 Elements of the Safyr workspace At the top of the Safyr window is the Menu system and the Toolbar. The options available from these are described below. At the bottom of the window is the status bar. Safyr Status Bar The status bar is divided into 4 areas which are (from left to right) as follows: Micro Help – displays a short description as the mouse is positioned over menu items and buttons Repository Identifier – shows the name of the currently selected Safyr repository Repository Type – identifies the type of the Safyr repository (e.g. SAP) Selected Language – shows the language code that is being used for ‘descriptive’ fields like field names and table names. USER GUIDE 10 B R O W S I N G 3.1.2 T H E M E T A D A T A I N S A F Y R The Safyr menus The Safyr menu options are summarized in the following table. See the referenced section to find out more on each menu option. Menu Menu Item For more details see... File Repository Manager Chapter 2 – The Repository Manager ERP Extract Safyr Getting Started Guide, chapter 3 Export Data Model as… Chapter 4 – Exporting metadata from Safyr Exit Edit Subject Areas ‘Subject Areas’ in this chapter View Model Overview ‘The Model Overview’ in this chapter Application Hierarchy ‘The Application Hierarchy’ in this chapter Table Details ‘Viewing Table Details’ in this chapter Table Relationships ‘Viewing parent/child relationships’ in this chapter View Details ‘Using the Overview to browse views’ in this chapter Source Data ‘Drilling into data’ in this chapter Statistics ‘Viewing Model Statistics’ in this chapter Safyr Options ‘Safyr Options’ in this chapter Compare Subject Areas Chapter 5 – Comparing metadata Tools Show ERP Extract Log… ‘The ERP Extract Log’ in this chapter Window Open ER Diagrammer See Chapter 4 for details of ER Diagrammer Licensing ‘Licensing Information’ in this chapter Cascade Tile Horizontally Tile Vertically Minimize All Close All Help User Guide About USER GUIDE 11 B R O W S I N G 3.1.3 T H E M E T A D A T A I N S A F Y R The Safyr toolbar The Safyr Toolbar options are summarized in the following table. See the referenced section to find out more on each option. Tool Button Tool Button Name For more details see... Repository Manager Chapter 2 – The Repository Manager Show Model Overview ‘The Model Overview’ in this chapter Show Application Hierarchy ‘The Application Hierarchy’ in this chapter Edit Subject Areas ‘Subject Areas’ in this chapter Show Table Details ‘Viewing Table Details’ below Show Table Relationships ‘Viewing parent/child relationships’ in this chapter Show View Details ‘Using the Overview to browse views’ in this chapter Drill into Source Data ‘Drilling into data’ in this chapter Start Export Wizard Chapter 4 – Exporting metadata from Safyr USER GUIDE 12 B R O W S I N G 3.2 T H E M E T A D A T A I N S A F Y R Safyr options The Safyr Options form is displayed by selecting ‘Safyr Options’ from the ‘Tools’ menu. The available options are: Ask before closing application – When checked ‘on’, you will be asked to confirm that you wish to exit when closing Safyr down. When not checked, Safyr will close down without the confirmation form. Repository Definition file – Use this to specify the location of the Safyr ‘ini’ file. Repository Language – Where the extraction of metadata has been performed in more than language, this option allows the selection of the language for displaying language-dependent data such as attribute and table names. Safyr Option form 3.3 Licensing Information Safyr needs an appropriate licensing key, not only to enable the product usage, but to determine which product features are enabled. Safyr is distributed via a number of licensing systems. Please contact your Safyr software provider for more details of licensing options. USER GUIDE 13 B R O W S I N G 3.4 T H E M E T A D A T A I N S A F Y R Browsing the metadata There are two main ‘entry points’ for Browsing the metadata: The Model Overview – this displays a list of tables, views or domains in the repository. You can use search facilities to refine the list. For more details see ‘The Model Overview’ below. The Application Hierarchy – this shows the tables and views organised by Application Module. For more details see ‘The Application Hierarchy’ later in this chapter. 3.5 The Model Overview The Model Overview form is displayed by clicking from the ‘View’ menu. Clicking the on the Safyr toolbar or selecting ‘Model Overview’ button will return a list of all the tables in the Safyr repository. The Model Overview form For each table, the following fields are displayed: Table Name: The ‘physical’ table name. Short Desc: The ‘logical’ name. Tbl Type: Possible values are TRANSP (Transparent), POOL or CLUSTER. POOL and CLUSTER are only applicable to SAP systems. No. of Child Tbls: The number of related ‘child’ tables. No. of Parent Tbls: The number of related ‘parent’ tables. USER GUIDE 14 B R O W S I N G T H E Row Count: M E T A D A T A I N S A F Y R The number of rows in the table. See ‘How Safyr determines the Row Count’ below Below the grid are a set of controls for moving through the result set. From left to right these will: Move to the first record in the result set Move to the previous record in the result set Move to the next record in the result set Move to the last record in the result set The total number of rows in the result set is displayed next to ‘No of Records’. By default, there is a limit to the number of records that are retrieved of 2,500. This limit can be changed by clicking the ‘Change No of Rec Limit’. Setting this to zero means there is no limit to the number of returned records. If the actual number of rows available is higher than the Record Limit set, the words ‘Limit Exceeded!’ are displayed beside the ‘No of Records’. 3.6 How Safyr determines the Row Count The Safyr Row Count shows the number of rows in each table. The row count is obtained from the database statistics and can only be evaluated correctly if: the database user specified in the connection properties to the source ERP system (see Chapter 3 of the Getting Started Guide for details of connecting to the source ERP) has access to the DBMS statistics (note: for a SAP system, access to statistics is via ABAP) the database statistics are processed (normally such a process is scheduled on the DBMS system) Safyr only provides the row count feature for ERPS based on Oracle, SQL Server or DB2. Other platforms will result in the Row Count being set to ‘-1’. If the statistics are unavailable or the Table does not exist in the physical database, the Row Count for the table will be set to ‘-1’. For a SAP system, the row count is only available for Transparent Tables. For Pool and Cluster tables the Row Count will show only that there is data or not in the table. Those tables with data will have the Row Count set to 1 and those without data to zero. 3.6.1 Special Considerations for SAP and Siebel Systems The row count capability of Safyr takes no account of multiple systems that may exist in the same ‘source’ ERP system. SAP (via the MANDT – Client approach) and Siebel (via the Repository approach) permit USER GUIDE 15 B R O W S I N G T H E M E T A D A T A I N S A F Y R several parallel systems to be stored within the same database. For example, within one Siebel system there might be a ‘Standard’ repository and a ‘Custom’ repository. Because the row count capability of Safyr is based upon the physical row count in the system catalog, the resulting row count for a given table will reflect all rows, regardless of which of the rows belongs to which Repository. 3.7 Opening additional Model Overview windows Multiple ‘Model Overview’ forms can be opened. Each window functions separately allowing a number of different object lists to be displayed concurrently. 3.8 Seeing View, Data Element and Domain information The Model Overview can be switched between Table, View, Data Element and Domain display using the tabs above the form. See ‘Using the Overview to browse Views’, ‘Using the Overview to browse Data Elements’ and ‘‘Using the Overview to browse Domains’ later in this chapter for more details. USER GUIDE 16 B R O W S I N G 3.9 T H E M E T A D A T A I N S A F Y R Selecting tables in the Model Overview The three fields above the table list can be used for selecting tables from the full list. Search Criteria The Start Select button uses the entered selection criteria to search for a matching table set. Each of the three fields is preceded by a specified. button which allows the type of search criteria to be Clicking this button reveals a set of searching options. The meaning of each of these buttons is described in the table below. Button What Does it Do? Wild Card Search - find rows starting with or containing the specified string Negated Wild Card Search - find all rows not containing the specified string Exact Match - find rows exactly matching the specified string Negated Match - any rows exactly matching the specified string are excluded Greater than - finds all rows greater than the specified string in the collating sequence Greater than or equal to - find all rows greater than or equal to the specified string in the collating sequence Less than - finds all rows less than the specified string in the collating sequence Less than or equal to - finds all rows less than or equal to the specified string in the collating sequence Null search - finds all rows containing Null value Not Null search - finds all rows containing a Not Null value Safyr search types The default search type is ~ - Wild Card Search. This will probably satisfy most of the normal searching requirements. The three search fields are: Table Name: The physical name of the table Short Description: The descriptive name for the table USER GUIDE 17 B R O W S I N G 3.9.1 T H E M E T A D A T A Subject Area ID: I N S A F Y R The id of the Subject Area (see ‘Subject Areas’ later in this chapter for more details of subject areas) To select tables Enter the selection criteria for the desired tables Click the ‘Search’ button. The set of tables satisfying the criteria will then be displayed. 3.10 Using Advanced Search The selection criteria described in the previous section cover most of the day-to-to-day queries. The Advanced Search button displays a form allowing for more flexible search capabilities. This is particularly useful when searching for a given field occurrence. The form consists of three tabs: ‘Standard Filter’, ‘Search for Field Patterns’ and ‘Extended Filter’. Advanced Search form The Standard Sections tab includes a range of search fields, including Field Name, Short Description and Long Description. These are described below. USER GUIDE 18 B R O W S I N G T H E M E T A D A T A I N S A F Y R The search options are grouped into 3 different areas: Table related search criteria: Table Name: Enter a Table Name or partial Table Name Short Description: Enter a Short Description or partial Short Description Table Type: use the drop down list to choose Transparent, SAP Pool or SAP Cluster. The latter two are only relevant to an SAP system Physical Table Name: Enter a Table Name or partial Table Name. This is the name of the actual Table in the underlying ERP database No of Parent Tables: Enter the desired number of ‘Parent’ tables No of Child Tables: Enter the desired number of ‘Child’ tables Row Count: Enter the desired number of rows in the table Long Description: Enter a string to be located within the Table Long Description Field (or Column) related search criteria: Field Name: Enter a Field Name or partial Field Name Short Description: Enter a Short Description or partial Short Description Data Element Name: Enter a Data Element Name or Partial Name Domain Name: Enter a Domain Name or Partial Name Long Description: Enter a string to be located within the Field Long Description Subject Area related search criteria: in: Enter the Subject Area name containing the tables to be searched not in: Enter the Subject Area name containing the tables not to be included in the search Having entered the appropriate search conditions, click ‘OK’ to perform the actual search. USER GUIDE 19 B R O W S I N G T H E M E T A D A T A I N S A F Y R Advanced Search - Search for Field Patterns The ‘Search for Field Patterns’ form allows for combinations of fields and field characteristics to be used as search criteria. The available options are: Field Name: Enter a Field Name or Partial Field Name Position: Use the scroll bar to select the actual numeric position of the field in the table Key Flag: toggle between Key Field( ‘X’), Not Key Field (‘empty’) or Wild Card (‘?’) Data Element Name: Enter a Data Element Name or Partial Name Having entered the appropriate search conditions, click ‘OK’ to perform the actual search. USER GUIDE 20 B R O W S I N G T H E M E T A D A T A I N S A F Y R The ‘Extended Filter’ form has features for entering multiple selection criteria in one query. Extended Filter This form can then be used to enter search criteria, similar to those described for the ‘Standard Filter’ form. However, multiple search criteria can be entered by adding additional lines to the search. Lines are added by using the ‘Down Arrow Key’. The following example shows a query that looks for tables starting with an ‘A’ or a ‘T’ and having Parent relationships between 1 and 10 ‘child’ tables. Example with multiple selection lines USER GUIDE 21 B R O W S I N G 3.11 T H E M E T A D A T A I N S A F Y R Sorting columns in data mode The data can be sorted on any of the available columns by clicking on the field heading. The current sort field is denoted by a sort icon An inverted sort icon next to the name of the sorted column. denotes a column sorted in descending order. More complex sort criteria can be specified in the Define Field Sort-Order form. This is opened by a Right Mouse Click on the field heading. Defining Field Sort Order Specify the sort order by dragging the appropriate fields from the ‘Available Fields’ window into the ‘Sort Fields’ window. The sequence of fields in the ‘Sort Fields’ window determines the sort order. The Descending check box can be checked to specify descending sort sequence for that field. Click the ‘Show SQL’ button to see the order by clause of the SQL Query representing the requested sort. Displaying the Query SQL Click the OK button to perform the sort. USER GUIDE 22 B R O W S I N G 3.12 T H E M E T A D A T A I N S A F Y R Clearing Search Criteria in the Model Overview When search criteria have been entered, either in the Model Overview screen, or using the Advance Search, a Clear Search Criteria button - appears next to the ‘Search’ button. This indicates that there are search criteria active, and by clicking this button, all search criteria will be cleared. The button is only visible when search criteria are present. The Clear Search Criteria button 3.13 Viewing table details Full details of a given table can be displayed by double clicking on the row for that table in the Table list. This opens the Table Details window. Alternatively, Right Click on the highlighted table and select ‘Table Details’ from the pop-up menu. Note: It is possible to open a number of separate table details windows. When the Table Details form is opened a list of fields is displayed for that table. Other table information can be displayed from this form using the Buttons on the left-hand side of the form. The default display format shows details of each field in the table. To the left of each field icon be an additional icon. This can be: - there may The Field is part of the Table’s Primary Key The Field is part of the Primary Key and also a Foreign Key The Field is a Foreign Key field As each field is selected, further information about that field is shown in the tabbed display to the right. There are three levels of information about each field: The Field Details, the Data Element for that field and the Domain to which the Data Element belongs. The three levels can be displayed by clicking on the appropriate tab. USER GUIDE 23 B R O W S I N G T H E M E T A D A T A I N S A F Y R Displaying Field Details USER GUIDE 24 B R O W S I N G 3.13.1 T H E M E T A D A T A I N S A F Y R Table details The Table Information tab and any Views based on the table. will show details including the Business name of the Table, its Class Table Information Details of a given view can be displayed by double-clicking the view name. This will display the View details form. See ‘Showing the View fields’ later in this chapter for more details. USER GUIDE 25 B R O W S I N G 3.13.2 T H E M E T A D A T A I N S A F Y R Index details Clicking on the index tab displays a list of indexes for the currently selected table. Viewing Index Information Clicking on an index in the list displays the field components of that index in the box to the right. USER GUIDE 26 B R O W S I N G 3.13.3 T H E M E T A D A T A I N S A F Y R Relationship details Clicking on the Relations tab any ‘parent’ tables. reveals a list of all the relationships between the current table and Note: This will only find relationships where the current table in the Tables Details is a ‘child’. To find both parent and child relationships see ‘Viewing parent/child relationships’ later in this chapter. Relationship details Clicking on a particular relationship will show the fields participating in the relationship at bottom right for both the ‘child’ and ‘parent’ table, along with more information about the relationship at top right. The ‘Parent Table’ field in the top right panel shows the Parent table for the selected relationship. Clicking on the icon to the right of this field can be used to display details of the ‘parent’ table in the relationship. USER GUIDE 27 B R O W S I N G 3.14 T H E M E T A D A T A I N S A F Y R Viewing parent/child relationships From the Model Overview with a table selected, clicking on the tool from the toolbar, or selecting the ‘Table Relationships’ option from the View menu will display the Table Relationships context pop-up form. Table Relationships form This form is split into two sections: The top section shows a list of tables that have a ‘parent’ relationship to the currently selected table in the model overview. This means that each of the parent tables contributes a foreign key to that table. The bottom section shows a list of tables that have a ‘child’ relationship to the currently selected table in the model overview. This means that each of the child tables receives a foreign key from that table. The total number of tables is shown in brackets at the top of each section. The ‘only with data’ checkbox can be used to reduce the ‘parent’ and ‘child’ table lists to only those with a ‘Row Count’ greater than zero. The list of ‘parent’ and ‘child’ tables displayed can also be refined using the drop down lists for each section. The available choices are shown in the table below. USER GUIDE 28 B R O W S I N G T H E M E T A D A T A I N S A F Y R All relationships All relationships are displayed Identifying relationships Only relationships where the migrated primary key is part of the receiving table’s primary key are displayed Non-identifying mandatory relationships Only relationships where the migrated primary key is not part of the receiving table’s primary key, and the parent is mandatory, are displayed Non-identifying optional relationships Only relationships where the migrated primary key is not part of the receiving table’s primary key, and the parent is optional, are displayed Full details of any of the tables shown in the ‘parent’ or child’ area can be displayed by double-clicking on the table. This uses the Table Details form to show the structure of the selected table (see ‘Viewing table details’ earlier in this chapter.) 3.15 Using the Overview to browse Views Safyr can display details of application Views in a similar manner to the way it shows base tables in the Model Overview. (Note: There are no Views available in Safyr for PeopleSoft Enterprise applications). To display a list of views in the Model Overview, click on the button. tab and then click the Search Model Overview: Views USER GUIDE 29 B R O W S I N G T H E M E T A D A T A I N S A F Y R The View list is similar in usage and appearance to the base table list in the Model Overview. Available fields in the View List include: View Name The internal Name for the View Short Desc. The Business Name for the View 3.15.1 Showing the View fields Double clicking on the view will show full details of the selected view. View Details This is very similar in content and purpose to the base table details form (see ‘Viewing Table Details’ earlier in this chapter). USER GUIDE 30 B R O W S I N G 3.15.2 T H E M E T A D A T A I N S A F Y R View Elements Information Clicking on the view info button which the view is based. reveals more details of the view and a list of the Base tables on View Info Double clicking on one of the ‘component’ Table Names will open the Table Details Window for that base table (see ‘Viewing table details’ earlier in this chapter). USER GUIDE 31 B R O W S I N G 3.16 T H E M E T A D A T A I N S A F Y R Using the Overview to browse Data Elements Clicking on the tab on the Model Overview form displays a list of available Data Elements. Initially the list is empty; pressing the ‘Search’ button retrieves a full list of Data Elements. Model Overview: Data Elements Clicking on a Data Element in the list box on the left reveals full details of that Data Element on the right of the form. The search facilities at the top of the form are similar in function to those for Base Tables and described in Selecting Tables in the Model Overview above. 3.17 Searching for tables using a Data Element This feature finds all the tables using a specified Data Element. From the ‘Model Overview Data Element’ form, right mouse clicking on a Data Element reveals a pop-up menu showing ‘Find Tables using DataElement’. When selecting this, a search is initiated to find all Tables containing Fields that belong to the chosen Data Element. Note: This feature sets the ‘Data Element’ field in the Search parameters (see ‘Using Advanced Search’ above) to the selected Data Element. It is advisable to clear this field after completing the search to prevent further searches from including this setting. USER GUIDE 32 B R O W S I N G 3.18 T H E M E T A D A T A I N S A F Y R Using the Overview to browse Domains Clicking on the tab on the Model Overview form displays a list of available Domains. Initially the list is empty; pressing the ‘Search’ button retrieves a full list of Domains. Model Overview: Domains Clicking on a Domain in the list box on the left reveals full details of that domain on the right of the form. The search facilities at the top of the form are similar in function to those for Base Tables and described in Selecting Tables in the Model Overview above. Where a Domain has associated ‘fixed’ values, these are shown in the panel at bottom right as Domain values. USER GUIDE 33 B R O W S I N G 3.19 T H E M E T A D A T A I N S A F Y R Searching for tables using a Domain This feature finds all the tables using a specified Domain. From the ‘Model Overview Domains’ form, right mouse clicking on a Domain reveals a pop-up menu showing ‘Find Tables using Domain’. When selecting this, a search is initiated to find all Tables containing Fields that belong to the chosen Domain type. Note: This feature sets the ‘Domain’ field in the Search parameters (see ‘Using Advanced Search’ above) to the selected Domain. It is advisable to clear this field after completing the search to prevent further searches from including this setting. 3.20 The Model Overview context pop-up menu Right-Clicking on a row in the Model Overview will display the Model Overview context pop-up menu. Pop-up menu on right mouse click The available options are summarized in the following table: Menu Usage or For more details see... Table Details ‘Viewing Table Details’ in this chapter Table Relationships ‘Viewing parent/child relationships’ in this chapter Add Table <name> to Subject Adds the currently selected Table to the currently Area <name> open Subject Area Select All Selects all the tables in the current list Find Table in… See ‘Finding a table in Application Hierarchy’ below Drill into Source Data ‘Drilling into data’ in this chapter Export Source Data ‘Exporting data from a single table’ in this chapter USER GUIDE 34 B R O W S I N G T H E M E T A D A T A I N S A F Y R Export Source Data (Full Selection) ‘Export of a number of tables’ in this chapter Export table Properties ‘Creating a report of table attributes’ in this chapter Export table List… ‘Exporting a list of tables’ in this chapter Create SQL Scripts ‘Creating SQL scripts for table access’ in this chapter 3.20.1 Finding a table in the Application Hierarchy This option, when selected from the Model Overview context menu, will show a list of one or more available Hierarchies in which to search for the table or view. Once the desired Hierarchy has been selected, the Hierarchy is opened at the appropriate table or view. This allows the selected object to be seen in context to its position in the hierarchy. For more details of Application Hierarchy see ‘The Application Hierarchy’ later in this chapter. USER GUIDE 35 B R O W S I N G 3.21 T H E M E T A D A T A I N S A F Y R The Application Hierarchy The Application Hierarchy is an alternative way of looking at the contents of the Safyr repository. The same set of Tables and/or Views seen in the Model Overview are organised in a ‘tree’ structure. Depending on the Enterprise Application being viewed, there may be more than one ‘Tree’ to choose between. Click the icon on the Safyr toolbar or click ‘Application Hierarchy’ from the ‘View’ menu to display the Application Hierarchy screen. If there is more than one type of Hierarchy available for the currently selected Enterprise Application, the ‘Tree’ drop down list box will show the possible choices. The Application Hierarchy The Application Hierarchy is presented as a tree structure. Click the ‘+’ and ‘-‘ icons to open and close successive tree nodes. The set of highest level tree nodes correspond to the various modules within the Enterprise Application. USER GUIDE 36 B R O W S I N G T H E M E T A D A T A I N S A F Y R Various icons are used in the hierarchy as follows: indicates a module or a sub-module indicates a Table indicates a View 3.22 Available actions from the Hierarchy Right Mouse Clicking on a node in the application hierarchy presents a pop-up menu. The available options on this menu are context-dependant. Context menu from Application Hierarchy The available actions are: Search in Hierarchy: - This displays a form for searching the entire hierarchy. See ‘Searching for tables and views’ and ‘Searching Tree Nodes’ below. Search in Branch <branch name>: - This displays a form for searching within the currently selected hierarchy branch. See ‘Searching for tables and views’ and ‘Searching Tree Nodes’ below. Show Table/View Info - This option is only available if the current selected node is a table or view. It shows the details of the selected table or view. See ‘Viewing Table Details’ and ‘Showing the View fields’ earlier in this chapter for more details. Show Table Relationships – This option is only available if the current selected node is a table. The related ‘parent’ and ‘child’ tables form will be displayed. See ‘Viewing parent/child relationships’ earlier in this chapter for details. USER GUIDE 37 B R O W S I N G T H E M E T A D A T A I N S A F Y R Add all Tables and Views of <node> to subject area <subject area name> - This option is only available if the ‘Subject Area’ form is open. (See ‘Subject Areas’ later in this chapter). All the tables and/or views belonging to the node are added to the current subject area. Add all Tables of <node> to subject area <subject area name> - This option is only available if the ‘Subject Area’ form is open. (See ‘Subject Areas’ later in this chapter). All the tables and/or views belonging to the node are added to the current subject area. Add all Views of <node> to subject area <subject area name> - This option is only available if the ‘Subject Area’ form is open. (See ‘Subject Areas’ later in this chapter). All the tables and/or views belonging to the node are added to the current subject area. Expand Sub Tree – opens the currently selected node. 3.23 Searching for tables and views in the Application Hierarchy Clicking the ‘Search in Hierarchy’ or ‘Search in Branch’ options in the Application Hierarchy pop-up menu displays the ‘Search’ form. This has three tabs, the first two are for searching for Tables and Views respectively. Both features work in the same way and the ‘Search for a Table’ option will be used here to describe the functionality. Search Tables feature To find the location of a table in the application hierarchy, or currently selected node, enter the ‘physical’ Table Name or ‘logical’ Short Description string and click the ‘Search’ button. A list of matching tables will then be displayed. USER GUIDE 38 B R O W S I N G T H E M E T A D A T A I N S A F Y R Note that the Table Name and Text search fields have the same searching options as described above for the Model Overview (see ‘Selecting Tables in the Model Overview’). Table Search –result Once the search is complete, double-clicking on an item in the search results will position the Application Hierarchy at that point. Using the Search Tables result to locate a table in the Hierarchy USER GUIDE 39 B R O W S I N G 3.24 T H E M E T A D A T A I N S A F Y R Searching Tree Nodes in the Application Hierarchy Clicking the ‘Search in Hierarchy’ or ‘Search in Branch’ options in the Application Hierarchy pop-up menu displays the ‘Search’ form. This has three tabs, the first two are for searching for Tables and Views, and the third tab for searching Tree Nodes. Clicking the ‘Search for Tree Node’ tab displays the ‘Search for a Tree Node’ form. Search Tree Node form To find node in the application hierarchy, enter a search string in the ‘Short Description’, and optionally select a Tree node class from the drop down list. The Treenode classes available in the list are dependent on the Enterprise Application selected. Clicking the ‘Search’ button will display a list of matching nodes. Having arrived at a list of items for the search performed, double clicking on an item in the list will locate that item in the Hierarchy. USER GUIDE 40 B R O W S I N G 3.25 T H E M E T A D A T A I N S A F Y R What does the Application Hierarchy show for each ERP? As mentioned above, the actual structure of the Application Hierarchy is dependent on which ERP is shown within Safyr. This section describes the ERP-specific ‘objects’ available. 3.25.1 Application Hierarchies for SAP There are two Application Hierarchies created in Safyr for SAP. These are: SAP Application/Development Class Tree This tree shows Table and Views grouped by Application Component and SAP Development Class. An important point to understand is that the location of a Table or View in a tree node is related to which component the table was originally allocated when it was created. That is, a table will only belong to one node in the tree. SAP Program Tree This tree shows Table and Views grouped by Application Component, Program , Function Group and/or Transaction. A SAP transaction is associated with a Program or Function Group. The Tables and Views are shown in the hierarchy associated with the Program or Function group that uses them. So searching for a given Transaction will locate the Program/Function Group associated with that Transaction, and then the Table/Views used by that Program/Function Group are grouped below that Program/Function Group. Note: For a SAP BW system, see Chapter 6, Special Product Features for SAP BW. 3.25.2 Application Hierarchies for Siebel There are two Application Hierarchies created in Safyr for Siebel. These are: Siebel Application and Business Objects This tree shows Siebel Applications, and for each Application the Business Objects associated with that Application. Each Business Object is associated with a set of Business Components which form the next level of the hierarchy. Siebel Application, Screens and Views This tree shows Siebel Applications at the top level, and for each Application the associated Screens, then Views and for each View the Business Components associated with that View. 3.25.3 Application Hierarchies for PeopleSoft Enterprise PeopleSoft Application Tree This tree shows PeopleSoft Applications, and for each Application the Tables associated with that Application. The Application is based upon the Object Owner Id of each Table. 3.25.4 Application Hierarchies for PeopleSoft EnterpriseOne (JDEdwards) JDEdwards System Code Tree This tree shows JDEdwards tables grouped by System Code. The System Code comes from the JDEdwards Table definition. 3.25.5 Application Hierarchies for Oracle Enterprise Business Suite EBS Application Treee This tree shows Oracle EBS tables grouped by Application. The Application Id comes from the EBS Table definition. USER GUIDE 41 B R O W S I N G 3.26 T H E M E T A D A T A I N S A F Y R Drilling into data In addition to looking at the metadata for tables, Safyr allows the actual data itself to be displayed, subject to the appropriate data access authorities. This is achieved by selecting the table from the Model Overview, and then clicking on the toolbar, , or by Right-Mouse-Clicking on the table in the list and selecting ‘Drill into Source Data’. Safyr then performs a query to retrieve the data from the table. Drilling into Data Safyr displays the result data set in tabular form. Additionally there are one or more Detail Tabs to the right of the screen, which allow the user to examine all the fields of one row. The columns in the data set can be re-arranged by dragging and dropping a column to a new position using the column title. The data set can be sorted by clicking on the title for the required sort column. A second click will sort that column in descending order. USER GUIDE 42 B R O W S I N G T H E M E T A D A T A I N S A F Y R For more complex sorting, Right Click on the column title to access the Define Field Order form. Changing the Sort Order Use drag-and-drop to select the fields for sorting. Use the ‘Descending’ check box to change the sort between Ascending/Descending. 3.27 Using QBE (Query by Example) to interrogate data To restrict the data retrieved, click on the QBE Button . Queries can be built up by adding selection criteria to one or more fields. Search Criteria can be added to the tabular display area or to the detail tabs. Setting QBE Selection Criteria USER GUIDE 43 B R O W S I N G T H E M E T A D A T A Click the Execute Button I N S A F Y R to run the query. Query Results USER GUIDE 44 B R O W S I N G T H E M E T A D A T A I N S A F Y R 3.28 Exporting data to flat files 3.28.1 Exporting data from a single table Having selected the required data, click on the Button. The data can be exported with or without column headings, using logical or physical names. A comma, tab or other character can be specified to delimit the export file. Export Form The Export form options are as follows: File Name: Enter the name of the file to export to. Use the button to browse for a file or folder. If this file does not exist, Safyr will create it. Write File Header:: Checking this option enables the additional options in the panel of ‘Record Counter and ‘Column Names’. Record Counter: Select this option to include a row count at the beginning of the export file. Column Names: Click the appropriate radio button to include either Logical or Physical names as column headers. Field Separator: Choose the appropriate character to act as a field separator in the exported file. Boolean ‘True’ or ‘False’: allows the user to specify suitable text values by which to represent Boolean values in the file. USER GUIDE 45 B R O W S I N G T H E M E T A D A T A I N S A F Y R Field Delimiter: Choose the appropriate character to act as a field delimiter in the exported file Record Separator: Choose the appropriate character to act as a record separator in the exported file The button toggles the ‘Field’ selector portion of the form on and off. In the field selector you can select fields for inclusion in the exported file. Once the export options have been set, click OK to start the export. The following progress form shows the export running. Export Progress Form USER GUIDE 46 B R O W S I N G 3.28.2 T H E M E T A D A T A I N S A F Y R Export of a number of tables This facility must be used with care as it will export all the data from any number of tables. Firstly select the tables to be exported either using the various Safyr search facilities or by putting selected tables into a subject area and loading the subject area into the model browser. All tables selected into the Model Browser can be exported by Right-clicking on the model browser and selecting from the pop-up menu. The ‘Batch Export Properties’ form is then displayed. Set export properties For the export, each table will be exported into a separate file in the chosen export directory. Specify a Path for the location of the exported text files. Select a prefix and extension for the export files. On clicking OK Safyr displays the same Data Export form used for a single table data export (but without the ‘Field’ selection feature). After selecting the appropriate setting and clicking the ‘OK’ button, each table in the Model Overview selection is exported to flat file. USER GUIDE 47 B R O W S I N G 3.29 T H E M E T A D A T A I N S A F Y R Creating SQL scripts for table access This feature of Safyr is an aid to making direct access to the source application (e.g. PeopleSoft) easier for any tool that uses SQL to interrogate the data. By selecting a base table, a database view can be generated, or a select statement that uses the ‘business names’ as an alias. The example below shows a view generated from SAP table A008. The Table Description from SAP becomes the View name and the Field Description for each field becomes an alias. CREATE VIEW V_Plant_Additional_selling_plant AS SELECT MANDT AS Client, KAPPL AS Application, KSCHL AS Condition_type, WERKS AS Plant, WERKV AS Resale_plant, DATBI AS Valid_to, DATAB AS Valid_from, KNUMH AS Cond_record_no FROM A008; 3.29.1 To generate Views or Select Statements Right Mouse Click on the appropriate table in the Safyr Model Overview and choose ‘Create SQL Scripts’. This displays the script creation form shown on the next page. USER GUIDE 48 B R O W S I N G T H E M E T A D A T A I N S A F Y R Script generation form The options on the left of the form dictate how the view or select statement is generated. To create a view – check this box to create a view, leave unchecked to create a select statement. With readable field names – check this box to use the field name as an alias. Uppercase Statement – check to have the generated text in upper case characters. Table Owner – specify the database table owner to be used as a prefix to the Table Name in the generated text. Prefix for created views –specify a string to be used as a prefix for the View name. Add Client where clause – allows specification of a SAP ‘Client’ (MANDT) for inclusion in the generated text ‘where’ clause. Add ‘;’ at the end – tail the generated statement with an ‘;’. Having made the appropriate selections, click the ‘Create SQL’ button to generate the required statement. The ‘Select All’ and ‘Copy to Clipboard’ buttons can now be used to select and copy the generated text for transfer to another application, if required. USER GUIDE 49 B R O W S I N G 3.30 T H E M E T A D A T A I N S A F Y R Creating a report of table attributes This feature of Safyr can be used to create simple reports of table attributes. Right Mouse Click on the appropriate table in the Safyr Model Overview and choose ‘Export Table Properties’ to display the following form. The Export Table Properties form The check boxes at top left lists the reportable properties. Check each property to be included in the report. Add Column Headers – check this box to see the property names as header on the list. Delimiter – chose ‘Tab’ or ‘Comma’ as the delimiter to separate the report columns. The buttons at the bottom of the form are as follows: Create List – This produces the Report text, based upon the options specified above. The ‘Select All’ and ‘Copy to Clipboard’ buttons can now be used to select and copy the generated text for transfer to another application, if required. . USER GUIDE 50 B R O W S I N G 3.31 T H E M E T A D A T A I N S A F Y R Exporting a list of tables This feature of Safyr can be used to create simple list of tables from the Model Overview. Right Mouse Click on the Safyr Model Overview and choose ‘Export Table List to File or Clipboard’ The following screen is then displayed. Export table List screen The Export form options are as follows: To File or to Clipboard Choose the appropriate option to export to a file or to the Clipboard File Name: Enter the name of the file to export to. Use the button to browse for a file or folder. If this file does not exist, Safyr will create it Output Encoding: Choose the output encoding required. This can be ANSI, UTF16 or UTF8 Write Header: Checking this option enables the additional options in the panel of ‘Record Counter and ‘Column Names’. Record Counter: Select this option to include a row count at the beginning of the export file. Column Names: Click the appropriate radio button to include either Logical or Physical names as column headers. Field Separator: Choose the appropriate character to act as a field separator in the exported file. USER GUIDE 51 B R O W S I N G T H E M E T A D A T A I N S A F Y R Boolean ‘True’ or ‘False’: allows the user to specify suitable text values by which to represent Boolean values in the file. Field Delimiter: Choose the appropriate character to act as a field delimiter in the exported file Record Separator: Choose the appropriate character to act as a record separator in the exported file The button toggles the ‘Field’ selector portion of the form on and off. In the field selector you can select fields for inclusion in the exported file. After making the appropriate selections, click ‘OK’ to generate the export to the specified File or the Clipboard. 3.32 Viewing Model Statistics The ‘Statistics’ option on the Safyr View menu will display a form showing a summary of the ‘objects’ extracted and stored in the Safyr repository. Model Statistics USER GUIDE 52 B R O W S I N G 3.33 T H E M E T A D A T A I N S A F Y R The ERP Extract Log During the extraction of metadata from the chosen Enterprise Application, Safyr records a log of the extraction steps in the form of an XML file. This log file can be viewed by selecting ‘Show ERP Extract Log…’ from the Safyr ‘Tools’ menu. Viewing the Extract Log At the completion of each extract the log file is written to the ExtractLog folder. This folder is located within the Safyr folder. The default location for this is \ProgramFiles\Silwood\Safyr 6\ExtractLog\. During the extract process, the Log can be saved at any stage by Right Mouse Clicking on the background and selecting ‘Export Log…’ USER GUIDE 53 B R O W S I N G 3.34 T H E M E T A D A T A I N S A F Y R Subject Areas Subject Areas allow tables and views in Safyr to be divided into manageable ‘chunks’. Subject Areas allow you to: Create subsets of the full set of tables in the Safyr repository – a Safyr subject area is like a folder where you can group together tables of interest. Qualify Searches – A subject area can be used in combination with the other Safyr search capabilities to limit the scope of the search being performed. E.g. “Find me all the tables that have a field with the text “order date” in the field description that are in the ‘Warehouse’ subject area” Export into other tools – The subject area is the vehicle for exporting data definitions into any of the Safyr tool interfaces. All the tables of the subject area will be exported to the chosen tool. The members of a subject area are simply references to the tables and views grouped in that subject area. Deleting a subject area member only deletes the reference to that table or view and not the table or view itself. The contents of a subject area can be moved from one subject area to another using the subject area import/export feature described below. USER GUIDE 54 B R O W S I N G 3.35 T H E M E T A D A T A I N S A F Y R Managing Subject Areas To create, delete or change a Subject Area, click the icon on the Safyr toolbar, or select ‘Subject Areas’ from the ‘Edit’ menu. This will display the Edit Subject Areas form which has features for creating and populating subject areas. The Subject Area form The controls on the form are as follows: Select Subject Area: Use this dropdown list to select an existing Subject Area. The contents of the subject area will be displayed in the window below the dropdown list. Click this icon to change the name of the current Subject Area. Click to create a new Subject Area. Click to delete the currently selected Subject Area. You will be asked to confirm this deletion and then the Subject Area and its contents will be deleted. Expand the Subject Area by creating a list of related parent and/or child tables. See ‘Expanding a Subject Area with related Parent or Child Tables’ below. Import Subject Area members. A subject area and its contents, previously exported, may be loaded into a separate subject area. On clicking this option, you will be prompted for the file name of the subject area to be imported. On accepting this, the current subject area will be updated with the contents of the export file. USER GUIDE 55 B R O W S I N G T H E M E T A D A T A I N S A F Y R Export Subject Area members. This option exports the currently selected subject area into an export file. This file can be used to populate another subject area in the same or a different Safyr repository. On clicking this option you will be prompted for the file name of the subject area to be exported. On accepting this, the current subject area and its members will be written to the export file. Delete. This option will delete the currently selected item in the subject area. Delete All. This will delete all the items in the subject area. A form will be displayed, asking for confirmation of the delete action before the items are removed. 3.36 Adding tables to a Subject Area There are three main places for populating a subject area, each of which is described in the following sections. From the Model Overview From the Related Tables pop-up menu From the Application Hierarchy 3.36.1 Populating a Subject Area from the Model Overview This approach to populating a subject area uses the current set of tables in the Model Overview. The Subject Area form needs to be open in addition to the Model Overview. Individual tables can be added to the currently selected subject area by dragging and dropping from the Model Overview into the Subject Area. Alternatively, use the Select Tables features described above (see ‘Selecting tables in the model overview’) to reduce the list of tables to a manageable size. Then, Right Mouse Click on the list of tables in the Model Overview and click the ‘Add All ....to Subject Area…’ button. USER GUIDE 56 B R O W S I N G T H E M E T A D A T A I N S A F Y R Populating a Subject Area from the Model Overview You will be asked to confirm the action and then a pop-up form shows the selected set of tables being added to the subject area. 3.36.2 Populating a Subject Area from the Related Tabled pop-up menu Another method of adding tables to a subject area is to choose tables from the Related Tables form. This is useful when looking for tables that are ‘parent’ or ‘child’ tables of a given table. To achieve this display the Related Tables form for the appropriate table (see ‘Viewing parent/child relationships’ in this chapter). Now drag and drop individual tables from the Related Tables form into the current subject area, or right mouse click on the Parent Tables or Child Tables area and then choose ‘Add the selected …..tables to the subject area….’ from the resulting pop-up menu. USER GUIDE 57 B R O W S I N G T H E M E T A D A T A I N S A F Y R Adding related tables to a subject area USER GUIDE 58 B R O W S I N G 3.36.3 T H E M E T A D A T A I N S A F Y R Populating a Subject Area from the Application Hierarchy The Application Hierarchy presents tables and views as nodes of a ‘tree’ where the nodes represent application modules and sub-modules. Any node of this tree can be used to populate a subject area. Either drag and drop the node or table from the hierarchy into the subject area, or use the right mouse menu and select one of the ‘Add all…’ options to add the tables and/or views belonging to that node to the subject area. Populating a subject area from the Application Hierarchy USER GUIDE 59 B R O W S I N G T H E M E T A D A T A I N S A F Y R 3.37 Expanding a Subject Area with related Parent or Child tables The sections above have dealt with populating a Subject Area by finding tables and adding those tables to the Subject Area. The Subject Area itself can also be used to ‘expand’ the tables in the Subject Area by finding the related Parent and/or Child tables. This feature uses the tables already in the Subject Area as ‘seed tables’. The user can then choose options that will generate a list of tables related to each table in the Subject Area to a user-specified level of Parent and/or Child tables. This generated list can then be reviewed and the tables either added to the starting Subject Area, or added to a separate Subject Area. The expansion process is started by choosing the Subject Area containing the ‘seed’ tables and then clicking the icon on the Subject Area tool bar. This will display a screen for selecting the levels of related tables to be included. Specifying levels of tables to be included in a Subject Area expansion USER GUIDE 60 B R O W S I N G T H E M E T A D A T A I N S A F Y R Possible Settings are: Follow Parent Relationships. This option will include any tables that have ‘Parent’ relationships to the tables in the Subject area chosen. For each of the two options available, the level number dictates how many generations of ‘ancestors’ to include. ‘1’ indicates direct parent ancestors. ‘2’ would indicate parents of the parents and so on. The two further options within this are: o Indentifying relationships up to level: includes those relationships where the primary key fields of the ‘parent’ table form part of the primary key of the child table o Non Identifying relationships up to level: includes those relationships where the primary key fields of the ‘parent’ table do not form part of the primary key of the child table Follow Child Relationships: - This option will include any tables that have ‘Child’ relationships to the tables in the subject area. This option is further qualified by the next option of ‘Type’. Type – this determines the scope of the ‘child’ related tables to be included. Possible values are: All child relationships Identifying only child relationships - only includes ‘child’ tables where the primary key fields of the ‘parent’ table form part of the primary key of the child table. Limit To: The Maximum Number of Entities to be assembled. ‘0’ denotes no limit. Include original Subject Area tables/views in result: The set of tables in the Subject Area that are used as the basis of finding related tables will also be included in the result set if this option is selected. After setting the Relationship Levels as described above, clicking the ‘Next’ button will start the process of assembling the related table list. The resulting set of tables are then displayed. USER GUIDE 61 B R O W S I N G T H E M E T A D A T A I N S A F Y R Result set from using the Expand Subject Area feature The number of tables in the list is displayed at the top right of the screen. From this screen the options for the user can be: Clicking the ‘Back’ button to refine the selection criteria to produce a different list of tables Clicking the ‘Close’ button to terminate the process Selecting rows from the result set and adding these to the original Subject Area or a different Subject Area. USER GUIDE 62 B R O W S I N G T H E M E T A D A T A I N S A F Y R Using the Right Mouse Click menu to select and then add the relationships to a Subject Area 3.38 Creating additional Relationships not extracted from the source Application Safyr represents relationships from SAP by extracting the relationship definitions defined within the SAP Repository. This means that the relationships represented by Safyr are the same as those viewable by the ABAP Workbench Data Dictionary tool. In the case of J.D. Edwards EnterpriseOne, there are no formal relationship definitions within the data dictionary. The PeopleSoft data dictionary defines some relationships but not really enough to allow good data models to be derived. Safyr users can use features within the product to add additional relationships to those found in the ERP data dictionary. Slightly different approaches have been taken for SAP, PeopleSoft Enterprise and J.D. Edwards EnterpriseOne, taking into account the characteristics of these three applications. There are two possible methods for creating these additional relationships: USER GUIDE 63 B R O W S I N G T H E M E T A D A T A I N S A F Y R Creating Rules Based Relationships This method is available for PeopleSoft and JDEdwards repositories. Safyr uses a set of spreadsheet based relationship definitions to build additional relationships. Creating Extended Relationships This method is available for SAP, PeopleSoft and JDEdwards repositories. Safyr infers additional relationships by looking for possible Primary Key and Foreign Key pairings. Full details of these methods are described in Appendix B. 3.39 Creating additional Relationships The creation of additional relationships is normally carried out as part of the application extraction process (see the Safyr ‘Getting Started Guide’, Chapter 3 – Extracting Metadata for more details.) Setting the extraction options to only run the ‘Generate Relationships’ process 3.40 Reviewing generated Relationships Safyr creates rules-based and extended relationships using the approach described above. Using such an approach, it may be possible that relationships are created that do not have a ‘real world’ existence. To accommodate this, a Delete feature is available to physically remove the relationship from the Safyr repository. USER GUIDE 64 B R O W S I N G 3.40.1 T H E M E T A D A T A I N S A F Y R To delete a Rules Based or Extended Relationship Locate the Relationship to be removed and open the Relationship details in the Table Details form. Right Mouse Click on the join conditions of the chosen relationship to show a pop-up form. The Rules based/Extended Relationship Delete Pop-up From the pop-up choose ‘Delete Rules Based relationship’ or ‘Delete Extended Relationship’. It will be necessary to confirm the deletion to actually remove the relationship from the Safyr repository. This ‘Delete’ feature is not enabled for ERP-based relationships. Note: Once a Rules Based or Extended Relationship has been removed from the repository, the only way to reinstate is to rerun the ‘Generate Rules Based Relationship’/’Generate Extended Relationship’ option again. USER GUIDE 65 E X P O R T I N G M E T A D A T A F R O M S A F Y R 4 Exporting metadata from Safyr Describes how to move metadata out of Safyr and into other environments T he exploration features described in the previous chapter are principally aimed at locating data items of interest from the set of tables available in the Safyr repository. There will often be a need to move subsets of the objects into other tools in use within the organization. The vehicle for exporting metadata from Safyr is the Subject Area. Whilst the target tool that requires the metadata will differ in how it deals with the information provided by Safyr, the general procedures for exporting metadata are identical. 4.1 Getting ready to export To begin the process of exporting the chosen data definitions to the tool of choice, click the icon on the Safyr tool bar, or choose ‘Export Data Model as…’ from the File menu. This opens the Export Data Model Wizard. Click the ‘Next’ button to start the export steps. The ‘Define Subject Areas’ form is for selecting one or more subject areas to be exported. Click the ‘Add Subject Areas’ button and then use drag and drop to add one or more subject areas you require. Click the ‘Next’ button to progress to the next stage of the export wizard. The Export Wizard – specifying the subject areas required The next form displayed is the place to choose the export format. The actual export formats displayed and the subsequent wizard steps will depend on the formats that your Safyr installation has been configured to use. USER GUIDE 66 E X P O R T I N G M E T A D A T A F R O M S A F Y R Export Wizard – choosing the export format Export to: This is for choosing the target for the Export information. The available options will depend upon the Safyr product license. File Name and Location: Use this control to specify a location and name for the export file. Click the ‘Next’ button to move to the next stage of the Export wizard. USER GUIDE 67 E X P O R T I N G M E T A D A T A F R O M S A F Y R The export functionality is influenced by the ‘Building Options’ form, which is the next step of the export wizard. Export Wizard Building Options Possible Settings are: Follow Parent Relationships. This option will include any tables that have ‘Parent’ relationships to the tables in the Subject area chosen. For each of the two options available, the level number dictates how many generations of ‘ancestors’ to include. ‘1’ indicates direct parent ancestors. ‘2’ would indicate parents of the parents and so on. The two further options within this are: o Indentifying relationships up to level: includes those relationships where the primary key fields of the ‘parent’ table form part of the primary key of the child table o Non Identifying relationships up to level: includes those relationships where the primary key fields of the ‘parent’ table do not form part of the primary key of the child table Follow Child Relationships: - This option will include any tables that have ‘Child’ relationships to the tables in the subject area. This option is further qualified by the next option of ‘Type’. Type – this determines the scope of the ‘child’ related tables to be included. Possible values are: All child relationships Identifying only child relationships - only includes ‘child’ tables where the primary key fields of the ‘parent’ table form part of the primary key of the child table. USER GUIDE 68 E X P O R T I N G M E T A D A T A F R O M S A F Y R Limit To: - The Maximum Number of Entities to be exported. 0 denotes no limit. Export using Physical Table Names (not Table Name): - This option only applies to PeopleSoft systems. Checking this option will use the PeopleSoft physical name for the export rather than the internal Table Name. An example of these two names is PS_PERSONAL_DATA (Physical Table Name), PERSONALDATA (Table Name). Now click the ‘Start Export’ button to begin the export process. The export Status form is displayed to allow you to monitor the progress of the export. This shows a ‘hierarchy’ of tables being exported and a running total of the objects being exported. Once this process has completed, the exported information will be available for use. Export Wizard – Export Status USER GUIDE 69 E X P O R T I N G 4.2 M E T A D A T A F R O M S A F Y R The CSV export format Whilst the available Export formats may vary depending upon the Safyr license agreement, one Export Format is always present and that is the CSV (Comma Separated Values) Format. This is a proprietary, text-based file, aimed at providing a means to export metadata from Safyr for any third party tool to access. The CSV format includes details of Tables, Columns and Relationships and is in a self-documenting format. <TABLES> TABLE_OBJECT_ID,PHYSICAL_NAME,LOGICAL_NAME,IS_VIEW,IS_POOL,POOLTABLE,POOLDES C 0,MARA,Material Master General Data,0,0,, <END_TABLES> <COLUMNS> COLUMN_OBJECT_ID,TABLE_OBJECT_ID,PHYSICAL_NAME,LOGICAL_NAME,IS_PK,IS_FKEY,IS _NULLABLE,FULLSQLTYPE,LEN,DEC,SQLTYPE,DOMAIN_DATATYPE,POOLEXPR,POOLDLLFLDNR 10001,0,MANDT,Client,1,0,0,VARCHAR(3),3,0,VARCHAR,CLNT,, 10002,0,MATNR,Material,1,0,0,VARCHAR(18),18,0,VARCHAR,CHAR,, 10003,0,ERSDA,Created on,0,0,1,CHAR(8),8,0,CHAR,DATS,, 10004,0,ERNAM,Created by,0,0,1,VARCHAR(12),12,0,VARCHAR,CHAR,, 10005,0,LAEDA,Last change,0,0,1,CHAR(8),8,0,CHAR,DATS,, 10006,0,AENAM,Last changed by,0,0,1,VARCHAR(12),12,0,VARCHAR,CHAR,, 10007,0,VPSTA,Compl maint status,0,0,1,VARCHAR(15),15,0,VARCHAR,CHAR,, Sample CSV file output USER GUIDE 70 E X P O R T I N G 4.3 M E T A D A T A F R O M S A F Y R Exporting to the Safyr ER Diagrammer One of the optional export formats available with the product is Safyr’s own diagramming environment, ER Diagrammer. This provides a simple method for representing the chosen tables as a datamodel. To create a diagram in ER Diagrammer, use the Export Wizard, as described above, choosing ‘Safyr ER Diagrammer’ as the Export type. Choosing the ER Diagrammer export format Once the export process is completed, the diagram will appear as a new window within the Safyr environment. The ER Diagrammer window USER GUIDE 71 E X P O R T I N G 4.3.1 M E T A D A T A F R O M S A F Y R The ER Diagrammer toolbar ER Diagrammer has its own toolbar. The available options are described in the table below. Tool Button Tool Button Name Details Open diagram Open an existing diagram, saved in ER Diagrammer Save diagram Save the diagram Export diagram as image Print Export the diagram in bitmap or Windows metafile format Print the current diagram Print Preview Show how the model will look when printed Select Tool Zoom In Switch to the Select tool for selecting objects on the diagram After selecting this, click on the diagram and select an area to be copied to the clipboard Increase the magnification level for the diagram Zoom out Decrease the magnification level for the diagram Set zoom level Enter a percentage scale for zooming the diagram, or select one of the preset levels using the drop down list. Snapshot Tool 4.3.2 The ER Diagrammer Right Mouse Click Menu A right mouse click on the diagram will show a pop-up menu with a range of options for refining the model display. ER Diagrammer Right Mouse Click menu USER GUIDE 72 E X P O R T I N G M E T A D A T A F R O M S A F Y R This menu is context sensitive. All available options are summarized in the following table: Menu Sub-menu Details Zoom tools Zoom In Changes the cursor to the ‘Zoom in’ tool. Zoom Out Changes the cursor to the ‘Zoom out’ tool. Fit Model Fits the diagram into the available ER Diagrammer work space Fits the diagram to encompass selected objects. If no objects are selected, the behaviour is the same as for ‘Fit Model’ Changes the diagram to display only Entity names (i.e. no Attributes are displayed) Changes the diagram to display only Primary Key attributes Fit Selection Model Display Level Entity Primary Key Primary Keys Model Display Type Model Display Notation and Foreign Changes the diagram to display only Primary and Foreign Key attributes All Attributes Changes the diagram to display all Attributes Logical Display Logical Entity and Attribute names on the diagram Physical Display Physical Entity and Attribute names on the diagram Logical/Physical Display both Logical and Physical Entity and Attribute names on the diagram Information Engineering Use Information Engineering for the model notation Use IDEF1X for the model notation IDEF1X Entity Display View Display Domain For each Entity in the model, show the Domain name of each Attribute Datatype For each Entity in the model, show the Data type of each Attribute Datatype For each View in the model, show the Data type of each Attribute Null Option For each View in the model, show the Nullability of each Attribute Domain For each View in the model, show the Domain name of each Attribute For each View in the model, where an Attribute is a calculated field, show the Expression for that field Show the Primary Key Designator (‘PK’) for each Primary Key Attribute Expression Key Display Primary Key Designator USER GUIDE 73 E X P O R T I N G M E T A D A T A F R O M S A F Y R Foreign Key Designator Show the Foreign Key Designator (‘FK’) for each Foreign Key Attribute Primary Key Icon Show the Primary Key Icon for each Primary Key Attribute Foreign Key Icon Show the Foreign Key Icon for each Foreign Key Attribute Hide Selected Objects Hide objects on the diagram, previously selected using standard Windows selection techniques (e.g. Shift Click on each object) Undo Last Undo the most recent ‘Hide’ activity Undo All Undo all ‘Hide’ activities Copy to Clipboard as Metafile Copy the diagram to the Windows Clipboard (e.g. for subsequent pasting into a Word Document) Show Ruler Toggle the diagram ruler Autolayout Redraw the Diagram taking account of any display changes Autosize by Text Length Resizes the Entity boxes based upon the length of the Entity name. USER GUIDE 74 C O M P A R I N G M E T A D A T A 5 Comparing metadata Describes how to use the Safyr compare feature to identify differences between subject areas from different repositories T his chapter describes features for comparing metadata from two different Safyr repositories. The two systems might be different release levels, or different installations. The feature requires the user to export one or more Safyr subject areas into a special comparison file format for each of the systems to be compared. The comparison function then takes these comparison files and reports the differences via a text-based comparison report. Two Repositories will need to be defined for the two differing sets of metadata before the comparison can take place (see Chapter 2 – ‘The Repository Manager’ for details of configuring repositories). 5.1 Creating a Comparison File One of the ‘Export To’ radio buttons on the ‘Export Wizard’ is ‘Comparison File’. Selection of this will create a special comparison file for use by the Compare routines. To create a comparison file, create and populate one or more Safyr subject areas as per normal. Use these subject areas in the Export Wizard and check ‘Comparison file’ as the export format. A file selection form will request the name and location for a .MTA file which forms the Comparison Details file. Now switch to another repository, define and export a similar subject area set. The two .MTA files will now be ready for comparison. USER GUIDE 75 C O M P A R I N G M E T A D A T A Choosing the Comparison File format in the Export Wizard USER GUIDE 76 C O M P A R I N G 5.2 M E T A D A T A Performing the Subject Area comparison The Comparison feature is accessed from the Tools Menu, ‘Compare Subject Areas’. The Compare Subject Areas form Specify the two comparison MTA files to be compared using the file selectors at the top of the form. Check the ‘compare only objects…’ box to exclude any objects from the comparison that do not exist in both models. Click the ‘Start Compare’ button to perform the comparison. 5.3 Results of a comparison The results of the comparison are displayed in the text window. Scroll through this to review the results, or click the ‘Copy to Clipboard’ button and then Paste into a Text Editor or Word Processing package. USER GUIDE 77 C O M P A R I N G M E T A D A T A Results of a Comparison 5.4 Analyzing the comparison report The results shown in the Comparison Report will depend upon which of the two models is chosen as the ‘Reference’ model. The terms ‘Reference Model’ and ‘New Model’ are arbitrary and really only serve to differentiate the two models. The report has two major sections. The first compares objects in the Reference Model with those in the New Model, and for each of the object types Domain, Attribute, Entity and Relationship, identifies where a given instance of these object types is not in the New Model, or has different properties to the New Model. Where the properties are different, the difference is identified. The second report section examines the same set of object types looking for instances of those objects that are present in the Reference Model but no longer exist in the New Model. USER GUIDE 78 S P E C I A L P R O D U C T F E A T U R E S F O R S A P B W 6 Special Product Features for SAP BW Describes features in Safyr that are specific to working with metadata from a SAP BW system S AP BW (Also known as SAP BI) is a particular type of SAP system, largely orientated around the representation multi-dimensional reporting ‘Cubes’, known as InfoCubes. The main aim of the Safyr features for a SAP BW instance is to represent an InfoCube in the form of a ‘Star Schema’. Once the metadata from a SAP BW system has been loaded into Safyr, there are a number of BW-specific features that make the process of creating a Star Schema easier. 6.1 How Safyr represents InfoCubes There are two popular approaches to the representation of multi-dimensional feature such as an InfoCube. A Star Schema: A Fact Table and its related Dimensions. A Snowflake: A Fact Table, associated Dimension tables and one or more levels of related Master tables (known as Characteristics in BW) Safyr extracts and stores the appropriate BW tables to allow both these representations. In addition, Safyr can display an InfoCube in both ‘Logical’ and ‘Physical’ forms. To achieve a Logical representation, a set of ‘Virtual’ tables are generated in the Safyr Repository. These virtual tables are created in order to bypass some of the complexities of the BW physical model. USER GUIDE 79 S P E C I A L 6.2 P R O D U C T F E A T U R E S F O R S A P B W The Model Overview and BW BW metadata appears in the Model Overview in the same manner as for any other system handled by Safyr with one exception, and that is the usage of Table Type. The Table Type in a Safyr BW system describes the purpose of the table. Possible values are shown in the table below. Table Description BW Fact (F) Fact Table BW Fact MP (F) Fact Table for a Multi-Provider BW Dim (D) Dimension Table BW DIM MP (D) Dimension Table for a Multi-Provider BW Charact.SID View (R) A View table that acts as an intersection between a SID table and a Dimension BW Charact. (S) Characteristic SID table BW Charact.Attr (P) Table defining the attributes of a Characteristic BW Charact.Attr (Q) Table defining the attributes of a Time-dependent Characteristic BW Charact.Attr (T) Table defining the text attributes of a Characteristic BW ODS (A) An ODS table (Operational Data Store) BW Logical Fact A ‘virtual’ table that presents a Logical view of a Fact table BW Logical Fact MP A ‘virtual’ table that presents a Logical view of a Multi-Provider Fact table BW Logical Dim A ‘virtual’ table that presents a Logical view of a Dimension table BW Logical Dim MP A ‘virtual’ table that presents a Logical view of a Multi-Provider Dimension table BW Logical Charact. A ‘virtual’ table that presents a Logical view of a Characteristic table USER GUIDE 80 S P E C I A L 6.2.1 P R O D U C T F E A T U R E S F O R S A P B W Using Advanced Search to select BW Table types The Advanced Search feature ‘Standard filter’ tab (see Chapter 3 for more details), has a Table Type dropdown list that, for a BW system, displays the possible Table Types listed in the table above. Advanced Search showing BW Table Types The Table Type selection can be used in combination with any of the other search features to limit the range of tables displayed in the Model Overview. 6.3 The Application Hierarchy and BW There are two Application Hierarchies created in Safyr for BW. In Both cases the nodes of the tree structure are InfoAreas (An InfoArea is a BW concept for grouping together objects). The two hierarchies are: Logical InfoArea Tree This tree shows the hierarchy of InfoAreas with the ‘virtual’ Fact tables (FV prefix) and ODS tables as the lowest node level. Physical InfoArea Tree This tree shows the hierarchy of InfoAreas with the ‘physical’ Fact tables (F prefix) and ODS tables as the lowest node level. Both hierarchies will show identical sets of InfoAreas, and in both cases, the only tables represented in the hierarchy are Fact tables and ODS tables. USER GUIDE 81 S P E C I A L 6.3.1 P R O D U C T F E A T U R E S F O R S A P B W Choosing which Hierarchy to Use The purpose of the two hierarchies for BW is to aid in the location of the Fact table that will be the focus of the required model. If the model is to show a ‘physical’ representation of a cube, with all the tables that are involved, then the Physical InfoArea Tree is the one to use. If the model is to be a ‘logical’ representation of a cube, then Logical InfoArea Tree would be the start point. 6.4 Right Mouse Click Options for BW Repositories Special Right Mouse Click (RMC) options are available for Safyr BW Repositories. These RMC options are only available when a Subject Area is open. There are two areas where these RMC options are available. 6.4.1 RMC Options from the Model Overview Choosing to RMC on a Fact (‘Physical’ Fact) table in the Model Overview when a Subject Area is open will display a popup menu that includes the option ‘Add SAP-BW Physical Cube <cube name> to Subject Area <subject area name>’ RMC Options for a Fact table on the Model Overview USER GUIDE 82 S P E C I A L P R O D U C T F E A T U R E S F O R S A P B W Clicking on this option displays a subsidiary menu with three entries. These control which tables will be added to the Subject Area. The three options are: Star Schema Physical Model The Fact and associated Dimension tables are added Snowflake Physical Model The Fact, Dimensions and all associated tables needed to include the related Characteristic tables are added Extended Physical Snowflake As for the Snowflake Model, but in addition, any Characteristic table ‘parent’ tables (Characteristic tables related to Characteristic tables) are also included A similar set of options exist when selecting an RMC on a ‘Logical’ Fact Table.(FV table): Star Schema Logical Model The Fact and associated Dimension tables are added Snowflake Logical Model The Fact, Dimensions and associated Characteristic tables are added Extended Logical Snowflake As for the Snowflake Model, but in addition, any Characteristic table ‘parent’ tables (Characteristic tables related to Characteristic tables) are also included 6.4.2 RMC Options from the Application Hierarchy When Right Mouse Clicking on a Logical or Physical Fact Table in the Application Hierarchy, similar options are available to those described for the Model Overview above. USER GUIDE 83 T H E S A F Y R M E T A M O D E L Appendix A. The Safyr Meta Model Below are descriptions of the Tables that make up the Safyr Meta Model. Each table is briefly described, the attributes listed and comments provided where applicable. Table Name: DD_DATAELEMENT Definition: A data element is a definition of an attribute, independent of an entity Table Column Name DD_DATAELEMENTNAME DD_DOMAINNAME DD_ORIGIN Table Column Comment Data Element Name Parent Domain Name Possible Values – E –from ERP, GE – Generic Element (generated by Safyr) TEMP_EXTRACT_INFO1 TECH_DESC Table Name: DD_DATAELEMENT_DESC Definition: The descriptive text for a Data Element Table Column Name DD_DATAELEMENTNAME DD_LANGUAGE_ID SHORT_DESC LOGICAL_UNIQUENAME LONG_DESC Table Column Comment Data Element Name Language Code Table Name: DD_DOMAIN Definition: A Domain is a generic definition of an Attribute type Table Column Name DD_DOMAINNAME DD_DATATYPE DD_DATATYPE_ERP DATA_LENGTH DATA_DECIMALS DD_LOOKUP_ENTITYNAME DD_ORIGIN Table Column Comment Domain Name Logical Datatype ERP-specific Datatype Datatype length Datatype Decimals Name of the associated Entity Lookup table Possible Values – E –from ERP, GD – Generic Domain (generated by Safyr) TEMP_EXTRACT_INFO1 TECH_DESC Table Name: DD_DOMAIN_DESC Definition: The descriptive text for a Domain Table Column Name DD_DOMAINNAME DD_LANGUAGE_ID SHORT_DESC LOGICAL_UNIQUENAME LONG_DESC Table Column Comment Domain Name Language Code USER GUIDE 84 T H E S A F Y R M E T A M O D E L Table Name: DD_DOMAINVALUE Definition: A set of fixed values associated with a Domain Table Column Name DD_DOMAINNAME DD_DOMAINVALUE_KEY POSIT TECH_DESC Table Column Comment Domain Name Domain Value Key Table Name: DD_DOMAINVALUE_DESC Definition: The descriptive text for a Domain value Table Column Name DD_DOMAINNAME DD_DOMAINVALUE_KEY DD_LANGUAGE_ID SHORT_DESC LONG_DESC Table Column Comment Domain Name Domain Value Key Language Code Table Name: DD_FIELD Definition: A Field is an attribute belonging to a Table Table Column Name DD_TABLENAME DD_FIELDNAME POSIT KEY_FLAG MANDATORY DD_DATAELEMENTNAME DD_DOMAINNAME DD_PARENT_TABLENAME DD_PARENT_FIELDNAME Table Column Comment Table Name Field Name Indicates a Primary Key field – Possible values are ‘Y’ or ‘N’ Indicates if Field is Mandatory – Possible values are ‘Y’ or ‘N’ Parent Data Element Name Parent Domain Name Where the Fields is a Foreign Key, the Parent Table Name Where the Fields is a Foreign Key, the Parent Field Name TEMP_EXTRACT_INFO1 TEMP_EXTRACT_INFO2 TECH_DESC Table Name: DD_FIELD_DESC Definition: The descriptive text for a Field Table Column Name DD_TABLENAME DD_FIELDNAME DD_LANGUAGE_ID SHORT_DESC LOGICAL_UNIQUENAME LONG_DESC Table Column Comment Table Name Field Name Language Code USER GUIDE 85 T H E S A F Y R M E T A M O D E L Table Name: DD_INDEX Definition: An Index is a definition of a database index for a Table Table Column Name DD_TABLENAME DD_INDEXNAME DD_INDEXTYPE Table Column Comment Table Name Index Name The Index Type – A for Alternate, I for Inversion Entry, P for Primary Key Index TECH_DESC Table Name: DD_INDEX_DESC Definition: The descriptive text for an Index Table Column Name DD_TABLENAME DD_INDEXNAME DD_LANGUAGE_ID SHORT_DESC LONG_DESC Table Column Comment Table Name Index Name Language Code Table Name: DD_INDEXITEM Definition: An Index Item is a definition of a field that belongs to an Index Table Column Name DD_TABLENAME DD_INDEXNAME POSIT DD_FIELDNAME DESCENDING Table Column Comment Table Name Index Name Indicates if Index Item is a Descending Index Item – possible values are ‘Y’ or ‘N’ Table Name: DD_LANGUAGE Definition: A definition of a Language for descriptive text fields Table Column Name DD_LANGUAGE_ID SHORT_DESC Table Column Comment Language Code Table Name: DD_RELATIONSHIP Definition: A Relationship defines a link between two tables Table Column Name DD_RELATIONSHIP_ID DD_PARENT_TABLENAME DD_CHILD_TABLENAME DD_RELATTYPE DD_CARDINALITY DD_ORIGIN Table Column Comment Relationship Id Parent Table Name Child Table Name The Relationship Type. I – for Identifying, N for Non-Identifying The Relationship Cardinality. Possible values are: ZM - Zero, one or more 1M - One or more Z1 - Zero or 1 E1 - Exact 1 The origin of the Relationship. Possible values are ‘E’ – from the ERP, ‘XR’ – Extended relationship, ‘RR’ – Rules Based relationship TEMP_EXTRACT_INFO1 TECH_DESC USER GUIDE 86 T H E S A F Y R M E T A M O D E L Table Name: DD_RELATIONSHIP_DESC Definition: The descriptive text for a Relationship Table Column Name DD_RELATIONSHIP_ID DD_LANGUAGE_ID SHORT_DESC LONG_DESC Table Column Comment Relationship Id Language Code Table Name: DD_RELATIONSHIPITEM Definition: A relationship Item is a definition of a Field that belongs to a Relationship Table Column Name DD_RELATIONSHIP_ID POSIT DD_PARENT_TABLENAME DD_PARENT_FIELDNAME DD_CHILD_TABLENAME DD_CHILD_FIELDNAME DD_CHILD_FIELDVALUE_FIXED Table Column Comment Relationship Id The Parent Table for the Relationship The Parent Field for the Relationship Item The Child Table for the Relationship The Child Field for the Relationship Item Where the Relationship Item is to a ‘fixed’ value, the fixed value TECH_DESC Table Name: DD_SUBJECTAREA Definition: A Subject Area is a grouping of Tables and/or Views Table Column Name DD_SUBJECTAREA_ID DD_SUBJECTAREANAME Table Column Comment Subject Area Id Table Name: DD_SUBJECTAREA_TABLE Definition: An intersect table between a Subject Area and a Table Table Column Name DD_SUBJECTAREA_ID DD_TABLENAME Table Column Comment Subject Area Id Table Name Table Name: DD_SUBJECTAREA_VIEW Definition: A n intersect table between a Subject Area and a View Table Column Name DD_SUBJECTAREA_ID DD_VIEWTYPE DD_VIEWNAME Table Column Comment Subject Area Id (For a future release of Safyr) View Name Table Name: DD_TABLE Definition: A table is a definition of a database Base Table Table Column Name DD_TABLENAME DD_TABLETYPE PHYSICAL_TABLENAME NUMBER_OF_PARENT_TABLES NUMBER_OF_CHILD_TABLES HAS_DATA TEMP_EXTRACT_INFO1 TEMP_EXTRACT_INFO2 TECH_DESC Table Column Comment Table Name The Table Type – T – Transparent, P – Pool, C – Cluster (P & C values are only relevant to SAP) Physical Table Name Row Count, if available USER GUIDE 87 T H E S A F Y R M E T A M O D E L Table Name: DD_TABLE_DESC Definition: The descriptive text for a Table Table Column Name DD_TABLENAME DD_LANGUAGE_ID SHORT_DESC LOGICAL_UNIQUENAME LONG_DESC Table Column Comment Table Name Language Code Table Name: DD_TREE Definition: A definition of a Tree Type for the Application Hierarchy Table Column Name DD_TREE_ID DD_ROOTNODE_ID Table Column Comment Tree Id Table Name: DD_TREE_DESC Definition: The descriptive text for a Tree type Table Column Name DD_TREE_ID DD_LANGUAGE_ID SHORT_DESC Table Column Comment Tree Id Language Code Table Name: DD_TREENODE Definition: A definition of a Tree Node within the Application Hierarchy Table Column Name DD_TREE_ID DD_TREENODE_ID DD_TREENODECLASS_ID HAS_CHILDNODES HAS_TREENODE_TABLES HAS_TREENODE_VIEWS Table Column Comment Tree Id Indicates if there are Nodes below current level – possible values are ‘Y’ or ‘N’ Indicates if there are Nodes containing Tables associated with this Node – possible values are ‘Y’ or ‘N’ Indicates if there are Nodes containing Views associated with this Node – possible values are ‘Y’ or ‘N’ TEMP_EXTRACT_INFO1 TEMP_EXTRACT_INFO2 Table Name: DD_TREENODE_DESC Definition: The descriptive text for a Tree Node Table Column Name DD_TREE_ID DD_TREENODE_ID DD_LANGUAGE_ID SHORT_DESC Table Column Comment Tree Id Tree Node Id Language Code Table Name: DD_TREENODE_TABLE Definition: An intersect between a Tree Node and a Table Table Column Name DD_TREE_ID DD_TREENODE_ID DD_TABLENAME Table Column Comment Tree Id Tree Node Id Table Name USER GUIDE 88 T H E S A F Y R M E T A M O D E L Table Name: DD_TREENODE_VIEW Definition: An intersect between a Tree Node and a View Table Column Name DD_TREE_ID DD_TREENODE_ID DD_VIEWTYPE DD_VIEWNAME Table Column Comment Tree Id Tree Node Id (For a future release of Safyr) View Name Table Name: DD_TREENODECLASS Definition: A classification of a Tree Node Table Column Name DD_TREE_ID DD_TREENODECLASS_ID ICON_ID DELETEIFHASNOCHILDS Table Column Comment Tree Id Tree Node Class Id Indicates the type of icon to be used for this Tree Node Class Should this Tree Node type be deleted if there are no levels below it. Possible values are ‘Y’ or ‘N’ Table Name: DD_TREENODECLASS_DESC Definition: The descriptive text for a Tree Node Class Table Column Name DD_TREE_ID DD_TREENODECLASS_ID DD_LANGUAGE_ID SHORT_DESC DESC_SUFFIX Table Column Comment Tree Id Tree Node Class Id Language Code Table Name: DD_TREESTRUCT Definition: The link between a Parent and Child Node in a Tree Table Column Name DD_TREE_ID DD_PARENTNODE_ID DD_CHILDNODE_ID TEMP_EXTRACT_INFO1 Table Column Comment Tree Id Id of Parent Node Id of Child Node Table Name: DD_VIEW Definition: Details of each View (a View can be a Database View, or an ‘abstracted view’) Table Column Name DD_VIEWTYPE DD_VIEWNAME TEMP_EXTRACT_INFO1 TECH_DESC Table Column Comment (For a future release of Safyr) View Name Table Name: DD_VIEW_DESC Definition: The descriptive text for a View Table Column Name DD_VIEWTYPE DD_VIEWNAME DD_LANGUAGE_ID SHORT_DESC LOGICAL_UNIQUENAME LONG_DESC Table Column Comment (For a future release of Safyr) View Name Language Code USER GUIDE 89 T H E S A F Y R M E T A M O D E L Table Name: DD_VIEWFIELD Definition: A View Field is an attribute of a View Table Column Name DD_VIEWTYPE DD_VIEWNAME DD_VIEWFIELDNAME POSIT DD_VIEWFIELDTYPE DD_TABLENAME DD_FIELDNAME DD_PARENT_VIEWTYPE DD_PARENT_VIEWNAME DD_PARENT_VIEWFIELDNAME DD_DATAELEMENTNAME TEMP_EXTRACT_INFO1 TECH_DESC Table Column Comment (For a future release of Safyr) View Name View Field Name The View Field type. Possible values are: UK -Undefined TB – maps to a Table VW – maps to another View CL – Calculated Field Table Name Field Name (For a future release of Safyr) Where a View Field is based upon another View, the View Name of that Parent Where a View Field is based upon another View, the View Field Name of that Parent Parent Data Element Name Table Name: DD_VIEWFIELD_DESC Definition: The descriptive text for a View Field Table Column Name DD_VIEWTYPE DD_VIEWNAME DD_VIEWFIELDNAME DD_LANGUAGE_ID SHORT_DESC LOGICAL_UNIQUENAME LONG_DESC Table Column Comment (For a future release of Safyr) View Name View Field Name Language Code USER GUIDE 90 A D D I N G A D D I T I O N A L Appendix B. R E L A T I O N S H I P S Adding Additional Relationships Details of the Safyr features for creating additional relationships based upon a series of spreadsheet-based rules and inference rules S aphir creates relationships for a PeopleSoft system by looking at the relationships defined in the PeopleSoft data dictionary. However, there are a number of relationships not explicitly defined in these tables. For a JDEdwards system, there are no relationships explicitly defined in the Data Dictionary. For both of these environments, Safyr users can extend the relationships extracted from the ERP by defining relationship creation rules in the SafyrSettings.xls spreadsheet. Safyr refers to these relationships as ‘Rule Based Relationships’. In addition, Safyr has an inference process which can create relationships for SAP, PeopleSoft and JDEdwards. Safyr refers to these as ‘Extended Relationships’. The following sections describe these features in detail. USER GUIDE 91 A D D I N G A D D I T I O N A L R E L A T I O N S H I P S B.1 Understanding the PeopleSoft and JDEdwards rules sheets The SafyrSettings.xls Excel spreadsheet is located in the Safyr installation folder (normally \Program Files\Silwood\Safyr 6\). There are two sheets in the spreadsheet for influencing the relationship creation process: PSoftRuleBasedRelationships for PeopleSoft and JDEDRuleBasedRelationships for JDEdwards The PeopleSoft rules sheet has a layout as shown in the following example. The JDEdwards sheet has an identical layout. PeopleSoft Rules Sheet of SafyrSettings.xls The spreadsheet columns are as follows: ChildTableName: The name of the Child table for the relationship. ChildFieldNames: See ‘Defining a Rule’ below for details of the possible values. ParentTableName: The name of the Parent table for the relationship. RuleNotActive: If blank, then the rule is active. If ‘X’ then the rule will be ignored. ExtGenRelParent Used by the Extended Relationship generation process (See ‘Influencing the Extended Relationship generation process for PeopleSoft and JDEdwards relationships’ below for details). Remark: A free-format comment area for entry of optional notes describing the rule When the PeopleSoft or JDEdwards Extraction process is run (see ‘Extracting metadata from PeopleSoft Enterprise’ and ‘Extracting metadata from JDEdwards EnterpriseOne’ in the Safyr Getting Started Guide), if the user has elected to include Rules-based relationships, each entry in this sheet is processed and a relationship added (subject to the details being correct). USER GUIDE 92 A D D I N G A D D I T I O N A L R E L A T I O N S H I P S B.2 Special Considerations for PeopleSoft Relationships Many PeopleSoft tables have fields EFFDT, EFFSEQ and SETID, which have particular purposes in the PeopleSoft architecture. Safyr will ignore these fields when building a relationship as they are not truly part of a logical relationship between tables. B.3 Defining a Rule To define a new rule, decide which tables the relationship is to be between. Then add a new row to the spreadsheet, enter the name of the Parent table in the ParentTableName and the name of the Child table in the ChildTableName. The content of the ChildFieldNames will depend upon the nature of the relationship. Possible values for ChildFieldNames are as follows: Leave blank to have a relationship built matching all the Primary Key attributes of the Parent Table with correspondingly-named attributes in the Child Table. (Note: for a PeopleSoft system, this will exclude fields named EFFDT, EFFSEQ and SETID – see ‘Special Considerations for PeopleSoft relationships’ above). MYFIELD1;MYFIELD2 A list of the child field names that the Parent Primary Key fields are to be matched with. The field names must be in the same order as the Primary Key fields in the parent table. (Note: for a PeopleSoft system, the optional fields EFFDT, EFFSEQ and SETID cannot be specified). *;;MYFIELD3 the child table. * or ;; define fields within the parent table that do not have a corresponding field in 'X';MYFIELD2 'X' (any simple string can be used) is a fixed value in the Parent table not having a corresponding field in the child table +REPLLAST;MYROLENAME; Uses the default field mapping between Parent and Child fields but replaces the last field name in with the field MYROLENAME. +EFFDT Only applicable to PeopleSoft - EFFDT will be included explicitly in the relationship +EFFSEQ Only applicable to PeopleSoft - EFFSEQ will be included explicitly in the relationship +SETID Only applicable to PeopleSoft - SETID will be included explicitly in the relationship B.4 Examples of using the rules 1) RoleNames ‘Parent’ table with Primary Key fields ParentA, ParentB, ParentC. ChildA,ChildB,ChildC. ‘Child’ table fields of To form a relationship where ParentA maps to ChildA, ParentB to ChildB and ParentC to ChildC the ChildFieldNames would contain: USER GUIDE 93 A D D I N G A D D I T I O N A L R E L A T I O N S H I P S ChildA;ChildB;ChildC 2) Partial-Relationships Same Parent and Child tables as example (1) but the relationship is to be formed from ParentA mapping to ChildA and ParentC to ChildC. In this case the ChildFieldNames would contain: ChildA;*;ChildC (ChildA;;ChildC would have the same result) 3) Last-Attribute-Rolenamed ‘Parent’ table with Primary Key fields AAA, BBB, CCC. ‘Child’ table fields of AAA, BBB, TTT. To form a relationship where AAA ChildFieldNames would contain: maps to AAA, BBB to BBB and CCC to TTT the +REPLAST;TTT 4) Include-optional-Attributes Parent’ table with Primary Key fields SETID, BBB. ‘Child’ table fields of SETID, BBB. To form a relationship where SETID maps to SETID and BBB to BBB the ChildFieldNames would contain: +SETID B.5 Adding rules to the spreadsheet Safyr users may want to add rules to the spreadsheet in order to create additional relationships in the Safyr repository. Before doing this, copy the SafyrSetting.xls and use this to create a copy named SafyrSettings_Cust.xls in the Safyr installation folder. Then add the required rules to this SafyrSettings_Cust.xls spreadsheet. When the Safyr application is started, if the file SafyrSettings_Cust.xls exists, then this will be used instead of the delivered SafyrSetting.xls file. USER GUIDE 94 A D D I N G A D D I T I O N A L R E L A T I O N S H I P S B.6 Running an update to process new rules Rules added to the spreadsheet are actioned by running the ERP Extraction process. However, it is not necessary to run the entire extraction of metadata each time, the extraction options can be set to only process the relationship creation elements of the extraction process. From the Extraction Steps screen of the PeopleSoft or JDEdwards Extraction Wizard, check the ‘Generate Rules Based Relationships’ checkbox and then Right Mouse Click. Now choose ‘Select Start Step and Required Steps’ Using Right Mouse click to select the Starting Step for Extraction This will set all the necessary steps for the extraction process to process the Rules. Now proceed with the extraction as normal. USER GUIDE 95 A D D I N G A D D I T I O N A L R E L A T I O N S H I P S Extraction Options after selecting Starting Step for Rule Based relationships B.7 What happens if a spreadsheet rule conflicts with an Existing Relationship? If at least one rule based relationships is identifying for a child-table, than all other identifying relationships (ERP-derived or Extended) are removed for that child-table. This is an implicit ‘Delete’ function to allow an existing relationship to be replaced by a user-defined rule. B.8 Method for Generating Extended Relationships This ‘Extended Relationship’ process involves an automatic search for possible pairings of Primary and Foreign Keys. The process involves up to 6 passes through the Safyr Repository. For SAP, only pass 1 is USER GUIDE 96 A D D I N G A D D I T I O N A L R E L A T I O N S H I P S applicable. For PeopleSoft Enterprise, only the first 3 passes are applicable, and J.D. Edwards EnterpriseOne systems will require all 6 passes B.8.1 Pass 1: identifying relationships The first phase, involves selecting all Tables with at least 2 Primary Key Fields (for SAP, where the first Primary Key field has the physical name of ‘MANDT’, or for PeopleSoft where the first Primary Key field has the physical name of ‘SETID’, the selection will be for at least 3 Primary Key Fields). The last field in the Primary Key must not be part of any existing Relationship. These form the set of potential ‘Child Tables’ for identifying relationships. For each of the tables in this set, a search is made for a match of ‘all the Primary Key-Fields minus the last Primary Key field’ for a parent table with the same set and order of fields. These are potential Parents of a 1:N-identifying relationship. In addition to the above criteria: For SAP and PeopleSoft: only Parents with existing ‘Children’ are selected. For J.D. Edwards EnterpriseOne: only Parent-Child-Relationships that are represented by a join in the EnterpriseOne ‘Business Views’ are considered. Given the above criteria, if exactly 1 Parent is found, then a relationship is added. If more than 1 potential parent is found then: For SAP: the parent table showing to the Default Domain Lookup Table is selected. If the ‘potential parent’ already has its own ‘Parent’ based upon the same ‘field set’ then this same relationship is also applied to the child (For example if Table A is already a parent to Table B and a potential child table (Table C) to Table B is found with the same potential foreign key, then Table C is made a child of Table A, not Table B. For J.D. Edwards EnterpriseOne: if the first 3 Characters of the Table Names of the two tables correspond then this Parent is chosen. For PeopleSoft:: reference is made to the ‘PSOFTHINTS’ area of the Safyr.ini file to see if there is a preferred parent listed (see the section ‘Influencing the generation of additional PeopleSoft relationships’ below). If no ‘parent’ is found in the .ini file, then the first of the available potential parents is chosen. These steps are then repeated for smaller sets of Primary Key-Fields down to: J.D Edwards EnterpriseOne: 1 Field. SAP: If Primary Key-Field 1 is MANDT then MANDT plus 1 Field, otherwise 1 Field. PeopleSoft: If Primary Key-Field 1 is SETID then SETID plus 1 Field, otherwise 1 Field. USER GUIDE 97 A D D I N G B.8.2 A D D I T I O N A L R E L A T I O N S H I P S Pass 2: identifying relationships (PeopleSoft & J.D. Edwards EnterpriseOne only) This is the same as Pass 1 but: For J.D.Edwards EnterpriseOne: the requirement for there to be a corresponding join in the Business Views is dropped and instead only Parent tables with existing Child tables are considered. For PeopleSoft: only Parent tables that were found as ‘Child’ tables in Pass 1 are considered as new potential ’Parents’, and with only 1 level of difference between the Primary Key and potential Foreign Key attributes. B.8.3 Pass 3: identifying relationships (PeopleSoft & J.D. Edwards EnterpriseOne only) This is the same as Pass 2 but: For J.D.Edwards EnterpriseOne: allows any order of the attributes in the Parent-to-Child Relationship. For PeopleSoft Enterprise: no restriction on the number of levels of difference between the Primary Key and potential Foreign Key attributes. B.8.4 Pass 4: ‘Dimension’ search (J.D. Edwards EnterpriseOne only) A search is made for all Tables with just 1 Primary Key (typically those tables that would form the dimensions in a data warehouse). Then a search for potential child tables is made by searching all tables for fields with the same Role Name as the potential Dimension-Master-Table Primary Key. A relationship is then added only if the two tables being considered are used in the same ‘Business View’. B.8.5 Pass 5: ‘Dimension’ search (J.D. Edwards EnterpriseOne only) A search for all Tables with just 1 Primary Key that are already part of an existing relationship is made (these will be based on relationships generated by previous passes). Child tables are then selected in the same way as for pass 4, but the need for a join to exist in the Business View between the two tables being considered is replaced with a match between the first 3 letters of the two table names involved (for example F0111 and F0112 would be a match). B.8.6 Pass 6: ‘Dimension’ search (J.D. Edwards EnterpriseOneOnly) A search is made for all Tables with just 1 Primary Key and having an existing relationship (these will be based upon relationship generated by previous passes.) A select of child tables is made, similar to in pass 4, but without the restriction on there needing to be a join in the Business Views for the two tables. USER GUIDE 98 A D D I N G B.8.7 A D D I T I O N A L R E L A T I O N S H I P S Influencing the Extended Relationship generation process for PeopleSoft and JDEdwards relationships When inferring relationships for PeopleSoft Enterprise and JDEdwards, there are often circumstances where there is more than one potential ‘parent’ table for a relationship. Users can influence the relative importance of a table by making entries in the SafyrSettings.xls file (see Appendix B of the Safyr ‘Getting Started Guide’ for details of the SafyrSettings.xls file). The worksheets ‘PSoftRuleBasedRelationships’ and ‘JDEDRuleBasedRelationships’ contain a column named ExtRelGenParent where a Table Name can be recorded. The generation rule is that if there is more than one potential Parent for a relationship, the inference process will use this list to help determine which to use. USER GUIDE 99 I N D E X Index Advanced Search, 18 Application Hierarchy, 35, 36 available actions, 37 JDEdwards, 41 Oracle EBS, 41 PeopleSoft, 41 SAP, 41 Siebel, 41 comparing metadata creating file for, 75 results of, 77, 78 context pop-up menu, 34 CSV export format, 70 data drilling into, 42 exporting, 34, 45 Data Elements, 16 searching for tables using, 32 Domains, 16 searching for tables using, 34 ER Diagrammer, 71 importing/exporting, 6 maintenance, 7 Manager, 5 Managing Multiple, 8 opening, 5 settings, 6 Repository Manager toolbar, 6 Row Count, 15 Safyr .ini file, 13 Manuals, 4 Meta Model, 84 toolbar, 12 Safyr export formats, 68 Safyr Settings .ini file, 8 SAP BW, 79 search criteria, 17 Search Criteria Clearing, 23 toolbar, 72 Select statement Extract Log, 53 indexes, 26 InfoCube, 79 JDEdwards Sorting, 22 SQL Query, 22 SQL Script relationships, 99 Licensing, 8 Licensing Information, 13 menus, 10, 11 metadata browsing, 14 exporting, 66 Model Overview, 14 Data Elements, 32 Domains, 33 Views, 29 PeopleSoft Physical Table Name, 69 relationships, 99 QBE, 43 relationships, 27, 28 creating, 64 creating additional, 63 deleting, 65 reviewing, 64 Repository copying, 6 deleting, 6 generate, 48 creating, 48 Statistics, 52 status bar, 10 Subject Areas, 54 comparing, 77 Expanding, 60 import/export, 55 populating, 56 Table Attribute Report, 50 Table details Viewing, 23 Table List Export, 51 Tables Searching for, 38 Toolbar, 10 Tree Nodes Searching for, 40 View statement generate, 48 Views, 16 Searching for, 38 Workspace, 10 USER GUIDE 100