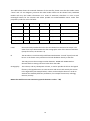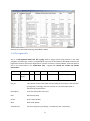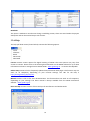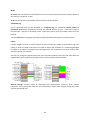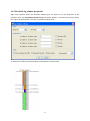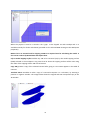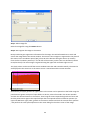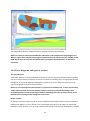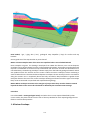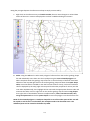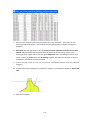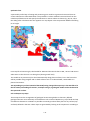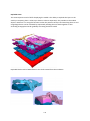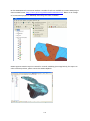
1
GSI3D 2011
Software manual and methodolgy
Geological Modelling Systems Team
Open Report OR/11/020
BRITISH GEOLOGICAL SURVEY
OPEN REPORT OR/11/020
Keywords
3D Geological Modelling, GSI3D
Software
GSI3D 2011
Front cover
Splash screen for the GSI3D 2011
version
Bibliographical reference
Software manual and
methodolgy
MATHERS, S J, WOOD, B & KESSLER, H.
2011. GSI3D 2011 software manual
and methodology. British
Geological Survey Internal Report,
OR/11/020. 152pp.
Copyright in materials derived
from the British Geological
Survey’s work is owned by the
Natural Environment Research
Council (NERC) and/or the
authority that commissioned
the work. You may not copy or
adapt this publication without
first obtaining permission.
Contact the BGS Intellectual
Property Rights Section, British
Geological Survey, Keyworth,
e-mail [email protected]. You may
quote extracts of a reasonable
length without prior permission,
provided a full acknowledgement is
given of the source of the extract.
S J Mathers, B Wood & H Kessler
Contributors
Ricky Terrington, Jon Ford, Helen Burke, Tony Myers, Jennifer Plim
Many maps and diagrams in this
manual use topography based on
OS topography © Crown Copyright.
All rights reserved. BGS
100017897/2011
Keyworth, Nottingham British Geological Survey 2011
© NERC 2011. All rights reserved
Table of Contents
Acknowledgements ............................................................................................ 5
1. GSI3D Philosophy and Workflow ..................................................................... 6
2. Assembling the main file types........................................................................ 9
2.1 Model capping surface (DTM, DEM) ............................................................................................. 9
2.2 GVS ................................................................................................................................................ 9
2.3 The Legend file ............................................................................................................................ 11
2.4 Borehole Data ............................................................................................................................. 12
2.5 Geological Linework .................................................................................................................... 13
3 The User Interface .......................................................................................... 14
3.1 General layout............................................................................................................................. 14
3.1.1 Bottom Toolbar .................................................................................................................... 16
3.2 Pull down menus etc. .................................................................................................................. 16
3.2.1 File ........................................................................................................................................ 17
3.2.2 Add Objects .......................................................................................................................... 19
3.2.3 Tools ..................................................................................................................................... 25
3.2.4 Calculate............................................................................................................................... 28
3.2.5 Windows .............................................................................................................................. 28
3.2.6 Help ...................................................................................................................................... 30
3.2.7 Floating tooltips ................................................................................................................... 31
3.2.8 Window folder options ........................................................................................................ 31
3.3 Map window ............................................................................................................................... 32
3.3.1 Toolbar ................................................................................................................................. 33
3.3.2 Map window properties...................................................................................................... 38
3.4 Section window .......................................................................................................................... 39
3.4.1 Toolbar ................................................................................................................................. 39
3.4.2 Section window properties .................................................................................................. 44
3.5 3D Window.................................................................................................................................. 51
3.5.1 Toolbar and tabs .................................................................................................................. 53
3.6 Borehole log window ................................................................................................................. 55
3.6.1 Toolbar ................................................................................................................................. 56
3.6.2 Borehole log window properties ......................................................................................... 57
3
4.Working with projects and objects ................................................................. 59
4.1 Building and Saving a project ...................................................................................................... 59
4.1.1 Using the GVS-Legend Editor ............................................................................................... 60
4.1.2 Model capping surfaces ....................................................................................................... 67
4.2 GRIDs ........................................................................................................................................... 68
4.3 TINs ............................................................................................................................................. 70
4.4 Sections ...................................................................................................................................... 77
4.4.1 Section tools and properties ................................................................................................ 77
4.4.2 Simple Section construction ................................................................................................ 85
4.4.4 Fence diagrams and types of sections ................................................................................. 90
4.4.5 Section checking, editing and snapping tools ...................................................................... 92
4.5 Geological units........................................................................................................................... 99
4.5.1 Geological units tools and properties .................................................................................. 99
4.5.2 Constructing and working with Envelopes ........................................................................ 110
4.6 Boreholes .............................................................................................................................. 127
4.7 Maps.......................................................................................................................................... 127
4.8 Folds .......................................................................................................................................... 128
4.8.1 Fold tools and properties ................................................................................................... 128
4.8.2 Digitising and Shaping fold axes......................................................................................... 129
4.9 Contours .................................................................................................................................... 133
5. Calculating and delivering models ............................................................... 133
5.1 Checking, analysing, visualising and exporting models. ........................................................... 135
7. Glossary ...................................................................................................... 148
8. Bibliography ................................................................................................ 150
9. Appendix .................................................................................................... 151
4
Acknowledgements
The Geological Surveying and Investigation in 3 Dimensions (GSI3DTM) software tool and
methodology has been developed by Dr. Hans-Georg Sobisch (INSIGHT GmbH) over the last 18 years.
Initially development was in collaboration with Drs. Carsten Hinze and Heinrich Mengeling of the
NLfB (Niedersaechsisches Landesamt fuer Bodenforschung - Soil and Geological Survey of Lower
Saxony) based in Hannover (Hinze, Sobisch and Voss, 1999; Sobisch 2000). BGS acted as a test bed
for the accelerated development of the tool and methodology from 2002 and from 2006 to 2010
BGS and Hans-Georg Sobisch worked on the extension of GSI3D to deal with complex bedrock
geology. Many people have used the software and contributed to the development over the past 10
years and it is credit to those users (and their patience) that GSI3D has developed into the useful and
usable tool it is now.
Since April 2010 the GSI3D methodology and software is on release through the GSI3D Research
Consortium www.gsi3d.org.uk.
5
1. GSI3D Philosophy and Workflow
„Nur einfache Lösungen sind gute Lösungen“
Only simple solutions are good solutions
(Hans-Georg Sobisch, 2001)
‘The familiarity which geologists and geophysicists have with this methodology [working with
cross-sections] suggests it as a sensible, user-friendly approach to working with a truly threedimensional modelling system.’
(Dabek, et al. 1989)
The 3D investigation and characterisation of the Earth’s sub-surface is the prime objective of any
geological investigation or survey. Until recently the outputs of such surveys have been mainly 2dimensional analogue and then digital geological maps (polygons without height information) and in
some cases supported by contoured surfaces of key layers or boundaries. These maps cannot depict
key detail on the sub-surface distribution of many of the units present in the stratigraphic sequence.
GIS systems have progressed matters by enabling topologically correct ordering of geological units
that can be expressed as a complete stack of distributions or coverages displayed as surfaces but still
without full attribution of the z parameter in terms of 3D geometry.
With advances in computing power and technology and the availability of increasingly precise and
sophisticated Digital Terrain Models (DTM) it is now possible to envisage a new survey concept and a
totally new output: - the 3D geological framework model (Kessler & Mathers 2004; Kessler et al.
2009). This can also be considered as a 3D geological map, or, as the geological map extended into
the third dimension.
Today there are many sophisticated geological modelling packages available to build 3D models and
many targeted at the petroleum and mining sector are very complex requiring expert modellers and
are costly to licence. GSI3D differs in being a software tool and methodology designed by geologists
for their colleagues, and as such it is intuitive and easy to use and has gained widespread
acceptance. GSI3D enables the construction of 3D models In order to meet the objectives of many
geological investigations and follows the approach that the creation of a model must rest in the
hands of the geologists who knows the ground. Only their specialized tacit knowledge of the
geological processes and evolution of a landscape can ensure the integrity of a 3D geological
framework model.
The success of the GSI3D methodology and software is based on the fact that it utilizes albeit
digitally, exactly the same data and methods that geologists have been using for two centuries in
order to make geological maps: data types commonly include
6
1.
2.
3.
4.
5.
6.
7.
8.
Boreholes classified lithologically and interpreted stratigraphically
Geological outcrop data (linework and measurements)
Topographic maps and latterly Digital Terrain Models (DTMs)
Cross-sections
Contoured maps of buried surfaces
Geophysical data
Geochemical and geotechnical measurements
Hydrogeological data
The true difference to conventional surveying practice is the increased speed/efficiency at which all
data can be visualized and analysed in relation to all other information enabling new insights into
the geometries and arrangement of the deposits.
The use of intersecting user-defined cross-sections has been proved to be a solid and possibly the
only tool to model the often complex geological situations in the shallow geosphere (Mathers &
Zalasiewicz, 1985, Dabek et al. 1989, Sobisch 2000, Kessler & Mathers 2004).
In addition as part of the 3D modelling exercise the scientist is forced to continuously revise the
integrity of the local stratigraphy. The entire ‘stacking order’ (4-D topology) of all deposits in a study
area are captured in a Generalized Vertical Sequence (GVS).
Using GSI3D, once the geoscientist has:
a) defined the local stratigraphy
b) completed the correlation of all units in cross-sections
c) created all the boundaries of each geological units at surface and at depth (outcrop and
subcrop)
The 3D model of the area is completed by computation. In this process the form of all the geological
units in the model are calculated as closed triangulated, topologically ordered objects (a.k.a. shells,
volumes).
Using GSI3D the geologist can query the computed model to produce new thematic maps,
uncovered maps, domain maps, thickness plots, volume calculations, borehole prognoses and virtual
sections and slices according to specific applied requirements (see Section 5).
The GSI3D methodology aims to maintain a dynamic model of the near surface as part of the
strategic surveying and continuous data revision process carried out by geologists. When new data
or knowledge is obtained the geologist can review the new data (say boreholes), then, as needed,
iterate the sections, unit distributions or even introduce new units into the stratigraphy. The
ultimate aim is not to store fixed outputs (such as traditional maps, GIS layers or grids) but to
maintain and continually upgrade an integrated dynamic geological model.
7
8
2. Assembling the main file types
A small sample dataset is available on www.gsi3d.org.uk/downloads.html
2.1 Model capping surface (DTM, DEM)
Existing surfaces and elevation models can be loaded into GSI3D as non-proprietary ASCII grid files
(*.asc) in the following file format:
The data is spatially referenced to the lower left corner (xll,yll) of the grid. Its extent is then
governed by the number of columns/rows and the cell size in metres.
For reference see: http://en.wikipedia.org/wiki/ESRI_grid
Any other required surfaces such as the base Quaternary, watertable, or an unconformity can be
imported in this same format and viewed in 2D or 3D. These surfaces can also be selected to cap the
calculation of the model so themed outputs can be generated with the geology truncated along
surfaces other than the ground surface.
2.2 GVS
The Geological Vertical Sequence - GVS file is a tab separated ASCII text file; (*.gvs) and forms the
backbone of the GSI3D project. It is produced by the modeller using a text editor and evolves
throughout the project to finally contain all units in their correct and unique super-positional order
(stratigraphy). The order defines the ‘model stack’ that is calculated to make the 3D geological
framework model. Geological stratigraphies can be extended to encompass a chronology of manmade deposit as needed.
An exception to the ordered stack is lenses enclosed within single units which are added on to the
bottom of the list in the format below.
9
The table below shows the essential elements of the GVS file, please note that the Header name
“name” and “id” are obligatory, whereas the other header names can be chosen freely. Published
models will carry the header information as a series of attributes, therefore it is wise to pick
meaningful names for the columns and where possible use understandable names rather than
proprietary codes for use in the fields.
name
id
Stratigraphy
Lithology
Genesis
Free text
Alv
10
ALV
CZ
Fluv
Overbank...
Lgfg
20
LGFG
SV
glac_fluv
Sheet sands...
Loft
30
LOFT
CSZV
Glac
Lodgement till…
Sand_lens_t
-150
SAND_L
S
glac_fluv
Intra till lense (top)
Sand_lens_b
150
SAND_L
S
glac_fluv
Intra till lense (base)
name
the model code provides the link to the correlation lines and must be unique. The
order from top to bottom MUST be the stratigraphic order of the entire model area.
(except for lenses, see Section 2.3)
id
The ID column is used internally to differentiate between “normal” layers/units and
lenses. In the future it may also be used to link databases directly to the GVS.
The LINK_ID must be an integer number between -65000 and +65000 with no
decimals with increasing numerical value down the table
Stratigraphy… This column, and any subsequent columns, is used to provide the link to the legend
file entry. The legend entries are case sensitive and must match exactly the entries
in the legend file (see example below). There can be multiple columns in order to
attribute the model by different parameters, for example Chronostrat, Lithology,
Genesis, Porosity.
NOTE: The GVS file must not contain any special characters such as ‘ “& $
10
Example of an extended GVS being assembled in EXCEL
2.3 The Legend file
This is a tab separated ASCII text file (*.gleg) used to assign colours and textures to the map
polygons, borehole logs, sections, and geological units and can be edited in Wordpad or EXCEL. The
legend file contains one line per legend entry. The file structure is outlined below; note that the first
row in the table below is for explanation only – legend files should not contain any header
information.
LEG_ID
Description
ALV
Sandy,
clayey …
Red
55
Green
66
Blue
Transparency
77
255
Texture link
TEXTURES\gravel.jpg
LEG_ID
This column contains the codes corresponding to the entries in the GVS files
(Stratigraphy, Lithology, Genesis, Porosity etc.) and the codes used in
borehole log classifications
Description
Free text description of the unit
Red
Red value (0-255)
Green
Green value (0-255)
Blue
Blue value (0-255)
Transparency
Pre-set transparency (0-255) (0 = transparent; 255 = full colour)
11
Texture link
This field contains the file path to the image that will be used for texturing. If
a relative file path is specified then the path will be relative to the folder in which GSI3D is installed.
This is to provide support for standard texture libraries. For non-standard texture images absolute
file paths are required.
Note: Both the GVS and the Legend file can be created and edited within GSI3D using the GVS and
Legend editor described in Section 4.1. At time of writing the editor is in BETA release and cannot
handle lenses. If a project does contain lenses the GVS and Legend file should be edited outside
GSI3D in Wordpad, Excel or similar.
NOTE: GSI3D 2011 only supports Red Green Blue (RGB) values for legend colours. If users have
existing legends in CMYK or other colour space please contact the GSI3D Helpdesk for advice.
NOTE: Users with old projects and texture libraries should contact the GSI3D Helpdesk for advice if
any difficulties arise in migrating projects from older versions of GSI3D.
2.4 Borehole Data
Two tab separated ASCII text files are required, an index or location file (*bid) and a downhole log
file (*.blg).
The *.bid file is the borehole index file, containing a unique ID, x, and y coordinates to define
borehole location, and the start (collar) height of the borehole ( z parameter) relative to the project
datum.
The borehole index file (*.bid) needs to be prepared with the following structure:
Unique Borehole ID
Easting
Northing
Start Height
SE64SW23.
123456
123456
11.22
All boreholes MUST contain a number in the start height column. (-99999 if not known). GSI3D
displays borehole logs according to their own start height, although the user has the option to ‘hang’
all sticks on the DTM if that is preferred or considered more reliable. This option should be used with
care, taking into account the relative confidence in the borehole datum’s compared to the DTM. If
confidence in the borehole data is high, use the start height. If not, and the confidence in the DTM is
relatively high, consider hanging the borehole sticks from the DTM.
The *.blg file is the downhole log file, with information on the depth (z) in metres to the base of
each of the identified units starting from the start height. The log must be ‘complete’ from the
surface downwards and not intermittent, intervals of core loss and uncertainty should be coded as
absent data not left blank.
The borehole log file (*.blg) needs to be prepared with the following structure:
12
Unique
Borehole ID
Depth to
base of Unit
from start
height (in
metres)
Lithostrat Code
Lithology Code
Other
codes
More
codes
SE64SW23.
1.23
ALV
CZ
ABC
DEF
SE64SW23.
4.56
LGFG
SV
ABC
DEF
SE64SW23.
7.89
LOFT
CSZV
ABC
DEF
NOTE: The *bid and *blg files must NOT contain any header information
The choice of boreholes should be largely independent of any pre-conceived geological model.
Whilst the project remit may require that boreholes offering a certain type of information are
included, care should be taken to ensure that an objective approach is used when including or
excluding primary data.
The borehole stratigraphical classification can be revised as an iterative process during the
development of the sections and the geological model. The level of refinement of the coding is
largely driven by the intended resolution of the model. Coding of distinct lithologies within
members and formations is also recommended to permit subsequent analysis of facies patterns.
2.5 Geological Linework
Polygons and lines can be loaded into GSI3D as standard ESRI shape files (*.shp) and will be
displayed in the map window. Polygons can then be used to create ‘envelopes’ (Section 4.5.2).
Note: GSI3D does not support 3D shape files.
Multiple shape files may be needed in order to complete a modelling project, these might include
layers such as:
Man-made deposits and features
Mass-movement
Surface geology
Superficial deposits
Bedrock geology
Linear Features (e.g. faults)
13
3 The User Interface
3.1 General layout
Start the GSI3D software from the desktop shortcut or via Start > Programs.
The MS DOS console window and splash screen with version number are displayed briefly:
NOTE: Closing the MS DOS console window will automatically shut down the programme and any
unsaved data will be lost!
Then the main screen is displayed with its default arrangement of windows. The user can arrange
the windows manually or split them up (see Section 3.2.5) During usual modelling sessions the
windows are arranged as shown below. On exit the current set-up of windows will be stored for the
start of the next session.
14
Map
3D
Borehole
Log
Section
The basic layout is composed of four individual windows, the borehole viewer left, the map window
top centre, the 3D window top right and the section window below. Arrows on the margins of the
windows allow each to be maximized or minimized, whilst clicking on the edges allow dragging of
the windows to any preferred size depending on the type of work being undertaken. Similarly the
left hand Table of Contents (ToC) margin present within each window can also be enlarged or
reduced in width within its own window.
A series of commonly used predefined layouts of the windows can be accessed using the Windows >
Perspectives pull down menu on the top toolbar (see Section 3.2.5) or by using Keystroke F3. By
using the split-dock window toggle function from at Windows > Split/dock (or Keystroke F11) all the
windows can be split and maximised and minimised individually, and docked together again to
return to the standard layout.
All toolbars can be made to float by dragging the left hand side of the toolbar to anywhere in the
software window. Pressing the ‘X’ on the top right of the toolbar re-docks the toolbar in its original
place. The image below shows floating toolbars.
15
3.1.1 Bottom Toolbar
Located on the bottom toolbar are tabs to allow work to occur in modelling mode (normal default
working) and Checking mode. The latter opens a window with two panels.
Events and messages is a log of events (shown below), each with a description, severity and time
stamp. This list is not maintained between sessions, the software begins a new log when it is started
up. Critical errors which have stopped an operation from happening or which have caused part of
the software to crash will usually be alerted to the user via a specific message pop-up as well as
being logged to the console. The green checking button in the bottom right of the main GSI3D
window will turn red if there are un-read errors in the list.
Tasks, jobs and processes is not active in GSI3D v2011 and can be ignored.
Other options on the bottom toolbar include an option to open a blank notepad to record metadata
or observations that are then saved along with the project, and a Help option that contains a link
within the software to supporting user documentation. At the far right is a progress bar.
3.2 Pull down menus etc.
The top toolbar of the main GSI3D window contains six pull down menu options as follows :
16
3.2.1 File
The File menu contains the following options:
Clicking the Open Project option opens a browser box to navigate and select the *.gsipr project file
required. GSI3D only allows one project to be open in a single software session at any one time,
although by opening the software multiple times more projects can be loaded for inspection. Only
one version is editable at any one time.
The additional option Open... when expanded presents a link to open any of the most recently used
modelling project (see below) to continue working.
After one project has been opened the loading options become inactive. To load a different project
the user must re-start GSI3D.
Selecting Save Project as... enables the current project be saved as a project workspace *.gsipr. Use
the standard explorer dialog box (shown below) to navigate to a preferred folder location, name the
file and Save.
17
This Properties option displays the dialog box used to define the properties and links of the
workspace that are being used in a session. This functionality and the dialog box are described fully
at Section 4.1.
Under the General tab the dialog contains a GVS and a General section. In the GVS section the user
can select and edit the GVS and Legends, as well as set the overall attribute for the GSI3D project.
Also the *.blg borehole is located and the overall capping surface (usually the DTM) is selected.
18
The Exit button closes the application. The user will get the dialog box below offering one chance to
cancel this operation after that any previously unsaved data is lost. Clicking on the close icon on the
GSI3D layout window has the same effect.
3.2.2 Add Objects
This is the main menu for loading data from prepared files and/or other projects into a GSI3D
project.
Clicking on the DEM / GRID (*.asc) option produces the loading and properties box shown below.
19
Click Browse button at the top-right to navigate through the file structure to the particular DEM you
wish to load. Once located select and open the .asc file and load into the file box and the file name is
inserted into the Surface name box. The name can be altered here.
The remaining properties enable various methods of adjusting and enhancing the display of the DEM
including colour ramps, shading, aspect and transparency and can be experimented with to produce
the desired effect.
Finally click OK to load the DEM that should then appear in the map window. Large grid files may
take a few seconds to load. Extremely large grids may cause GSI3D to crash due to a lack of memory.
If this happens you will need to reduce the resolution or the extent of the grid data.
NOTE: DTMs etc loaded through this function are used for visualisation and reference only. The
DTM or “Model Capping Surface” used as section profiles and for the model calculation must be
created as a TIN (triangle mesh) from this grid (or other data) as described below in Section 4.1.1.
A Grid can be converted into a TIN object via right-click > Convert to TIN.
NOTE: Please see the Glossary at Section 7 for the definition of the DTM, DEM and DSM as used in
the software and this manual.
Selecting Map Image (*.jpg, *.png, *.gif) produces the properties box shown below. Click the
Browse button at the top-right to navigate through the file structure to the particular digital map file
you wish to load (supports JPEG, PNG and GIF images). Once located select and open the image file
to load into the Image field. The file name may be assigned or changed here if needed using the
Name field.
Check the Convert to grayscale box if appropriate and adjust the Transparency setting to suit. The
default is 0 i.e. solid colour/opaque, a setting of 0.5 is recommended if a degree of transparency is
required.
Click OK and the image will load from the file into the map window and added to the maps folder in
the map window object tree.
NOTE: The file must be accompanied by a geo-registration file (world file) (e.g. *.jpw/*jpgw for
JPEG images).
Selecting Shapes (*.shp) produces the dialog box below.
20
Click the Browse button to navigate through the file structure to the particular shapefile (*.shp)e you
wish to load. Once located select and open the *.shp file; this is loaded into the file box and the file
name is inserted into the Name of map box. The file name may be changed for display purposes
here if needed.
The Select field for legend box displays the attributes of that particular shape file such as LEX for
Stratigraphic Lexicon entry and ROCK for lithology in the case of BGS DiGMapGB shapes.
Check the Draw boundaries and Fill polygons options to show the coloured polygons in the map
window.
In the Attach map to grid box all the DEMs that are loaded are listed, it is important to highlight and
select the correct DEM that corresponds to the geographical location of the .shp file (e.g. surface
geological map with DTM and bedrock map with rockhead – base Quaternary). This enables the user
to visualise the crop lines in the section view. This is an elementary function in GSI3D because it
allows the integration of 3D subsurface data with the surveyed geological linework (2D).
NOTE: a DTM covering a larger area than the individual .shp file can be used, and several .shp files
can be loaded to tile the area of a large DTM. GSI3D however becomes confused if you try to load
multiple .shp files (e.g. map tiles) and then register them to more than one DTM (e.g.
corresponding DTM tiles). It is thus advisable to have DTMs available for the complete project area
as well as tiled DTMs if modelling is proceeding on a sheet-by-sheet basis. In this way individual
sheets can be modelled and deposited in corporate data stores whilst bespoke project areas and
regional compilations can also be viewed as a whole in the GSI3D map window.
In the Height of outcrop-band field the user can set the vertical height in metres for the display of
the polygon theme (usually the geological unit at outcrop) along the DTM profile on the line of
section. This facility aids the drawing of sections by producing bands of colour along the DTM surface
trace using the same colour scheme as defined by the Legend file. Inserting a positive value colours
up a band above the DTM profile, a negative height value colours up the band below the DTM
profile.
21
Adjust Transparency to suit from 0 to 1. Default is 0 i.e. solid colour, we recommend a setting of 0.5
if a degree of transparency is required.
Click OK and the coloured map polygons will be loaded and display in the map window. If the
shapefile is large this may take a few moments.
Note: GSI3D does not support 3D shape files
The Boreholes (*.bid / *.blg) option produces the borehole loading screen shown below:
Click the two separate Browse buttons to navigate through the file structure to the two borehole
files needed. The upper file locator requires the *.bid index file listing the unique borehole number,
coordinates and start height. This file is the master table and is automatically listed in the Name of
Object box, all the boreholes in this table are also automatically listed in the Drill-logs field with a
note of the total number of records above. The lower file selector requires a *.blg downhole log file
giving properties such as stratigraphy, lithology, texture etc. together with depths to the base of
each unit from the start height of the borehole.
The selected boreholes display their unique identifier in the Drill-logs box. Highlighting one and
pressing Ctrl-A selects them all, otherwise select those required. A range of entries can be selected
by holding down the Shift key, and a collection of entries can be selected by holding down the Ctrl
key. Editing of the borehole list is made possible through the Append, Insert and Delete buttons.
Once the required boreholes are all listed in the Selection, click OK and they will be loaded into the
workspace. Boreholes are plotted in the map window, those with simple location details only colour
red whilst those with downhole coded units (i.e. suitable for modelling) are coloured black or green
depending on their total depth, this cut off can be adjusted by right clicking on the borehole file in
the maps folder in the map window object tree and selecting Properties and entering the desired
cut-off value.
22
Horizontal geophysical image enables a geo-registered image to be loaded at a defined elevation (z)
value or alternatively draped on a surface.
In order to display geophysical horizontal slices as maps and in 3D, the slices have to be geocoded,
by defining the lower left corner and the pixel or cell size (m/Pixel) of the slice.
Click the Browse button to navigate through the file structure to the slice you want to geocode. This
can either be a picture or a grid file (*.gif, *.jpg, *.rst, *.asc or *.grd). Type in the coordinates for the
lower left corner Image origin X and Image origin Y, as well as the Pixel/ cell size in m/Pixel. If
necessary, you can change the angle of the slice in counter-clockwise orientation from the NorthSouth direction, by filling in the setting box Orientation Angle (0-360°). If a *.rst, *.asc or *.grd file is
loaded you can define the Colour scheme (in the usual way of changing colour settings), Interval
(lower) limit 1 (>0 in %), Interval (upper) limit 2 (>0 in %), Interval (>0), the Contrast enhancement
(>0) and check the Log scale box if appropriate. For both, pictures and grids you can now or at any
point later in the working session choose the Transparency 2D settings. Default is 0 a solid colour,
we recommend a setting of 0.5 if a degree of transparency is required.
The lower part of the properties box is restricted for the definition of the 3D-Parameter of the
horizontal slice, either connecting the elevation of the slice in relation to the DTM or other surface
or giving an absolute height above or below datum as a sheet. In order to link the slice to the DTM or
any other surface use the file locator icon to navigate through the file structure to the appropriate
file and define the relative distance of the horizontal geophysical slice to the surface in the
Reference height (m above or below) settings box. The Fixed height box in the same line turns off
23
automatically in this case. In cases where the slice was taken with an absolute height related to OD,
define this elevation in the Reference height (m above or below 0D) box. These absolute settings
can be modified any time during the working session. If necessary choose the Transparency 3D
properties. Default is 0 a solid colour, we recommend a setting of 0.5 if a degree of transparency is
required.
Click OK and the horizontal slice appears as a map in the ToC file tree of the map window.
The geo-registered and displayed horizontal geophysical slices can be stored in the saved *.gsipr
project file.
NOTE: The coordinate setting properties can only be changed before the first visualization of the
slice, not during the first or any other working session.
NOTE: The project *.gsipr file only stores a link to the geophysical picture or grid, referring to the
location of the respective picture or grid while geocoding. Changing the location of the picture or
grid into another folder will result in loss of the data for the picture or grid. But if these files are in
the same directory as the *.gsipr project file the system automatically checks this directory and
chooses the indicated picture. This enables the transfer of the complete folder (*.gsipr and slices)
into a different directory environment.
The following three options enable the direct import of objects from existing GSI3D *.gsipr or oldstyle *gxml files. These options are only used when merging work from different projects.
Load Sections (*.gxml, *.gsipr)
Selecting this option produces the dialog box below in which clicking the folder buttons requires
navigation to and selection of the desired *.gsipr and *.blg files (downhole borehole interpretation
file) for the sections. If no boreholes are present in the sections simply selecting any *.blg file will
suffice. The sections available are listed in the bottom right box and can be Appended, Inserted or
Deleted into the selection box on the left. Once data is selected the OK button at bottom left
becomes bold and clicking on it loads the selected items.
24
The Load Envelopes or TINs (of geological units) and Folds options operate in exactly the same way.
3.2.3 Tools
This menu contains a selection of tools and functions used in the modelling process.
Selecting the Create new TIN option produces a dialog box to name the TIN.
Multiple Tins can be created and are stored in the *.gsipr file. The one to be used for calculation (the
Model Capping Surface) is defined and stored in the Workspace properties settings (see Section
3.2.1).
Creating a new TIN object produces an empty object under the TINs and grids folder in the map
window object tree. The TIN data is created by the procedure described below in Section 4.1.1.
Selecting Create geological unit(s) displays the colour coded GVS as a listing and enables selection of
the units required to be created within the geological units folder within the map window ToC.
These units are simply placeholder entries for the units and are subsequently populated with their
distributions (envelopes) and calculated TINs during the modelling process.
Create new section opens a dialog box requesting the input of a name for the section object. The
name must be unique, duplicates will be rejected by GSI3D. Be systematic in labelling sections
making use of the sheet on which they occur and their direction and sequential number where
possible e.g. TM14_NS2 is the second north-south aligned section on the TM14 25K tile. Once
selected this section appears at the bottom of the list of sections in the ToC of the section window
and is ticked as the active section enabling construction to commence. This function is also used to
specify the alignment of synthetic sections, once the model is calculated as described in Section 5.
NOTE: Always open all existing sections and geological units prior to creating new ones so that all
the sections and envelopes will appear in the saved *.gsipr file at the end of the session. GSI3D
only stores what is loaded at the time saving is executed and doesn’t automatically append data
from previous sessions.
Create new fold similarly produce dialog boxes asking the user to name the object and then placing
it as an entry in the appropriate folder in the ToC.
Create TIN from combined unit bases allows the user to create a new TIN object by combining the
bases of previously calculated units.
25
The image below shows the dialog box where users first define the desired cell size and enter the
upper right and lower left corners for the surface, this can be done by entering numbers or by
placing the red cursor triangle at the right place in the map window (using the info tool) and then
hitting the button to transfer the Eastings and Northings.
Under calculated geological units the user can choose which units to merge. If the DTM needs to be
part of the desired surface (e.g. where a rockhead surface equals the DTM) this needs to be selected
as well from the TINs and Grids folder.
After pressing ok the user has to specify a name for the TIN and following that it appears in the TIN
ToC. The TIN can be exported as an ascii grid should this be desired.
The image below shows a rockhead surface (calculated by combining all Quaternary units) in the 3D
window (where it overlies the green Chalk bedrock unit) and in section view (as the pink line)
26
The Generate section from boreholes option opens the borehole-loading screen explained above in
Section 3.2.2. Selecting borehole locations from a borehole index file (*.bid) automatically generates
a section from the specified string of boreholes.
NOTE: The points will be connected to a section as listed in the Selection list on the right, so the
user must add the borehole string in the correct order.
27
Send map to 3D produces a dialog box with a file selector to identify a grid to attach the selected
map to. The map is specified in the Name of 3D map box. Alternatively a fixed reference height can
be applied to the map by checking this option and entering the required elevation, transparency
settings are also included.
User Options contains some user specific settings.
3.2.4 Calculate
The Calculate menu contains 2 options to start the calculation of a geological model and is described
in Section 5.
Create horizontal slice allows the user to define a horizontal plane to create a synthetic section
(map) after the model has been calculated. The new map is consequently listed under the map
folder in the table of contents and can be viewed in the 3D window or be exported as a shape file via
right-click > export.
3.2.5 Windows
Perspectives (F3)
Layout perspectives adjust the layout of the different windows to preset locations in order to
facilitate the accomplishment of a particular task. They are designed to reduce the labour involved in
setting up the user interface when you are switching between different modelling tasks. In previous
versions this would have required the user to drag all of the window dividers to their desired
positions.
There are five built in layout perspectives to choose from:
28
You can also quickly cycle between the different available perspectives by pressing the F3 key on the
keyboard.
Map and Section
This layout minimizes all except the map and section windows. The section window is made smaller
in relation to the map window owing to the usually linear nature of section graphics, allowing the
map to occupy the majority of the screen real estate. This perspective is designed to facilitate the
initial building of lines of section from the map data.
Map
This layout minimizes all except the map window. This allows you to work on interrogating and build
objects in the map. For example, you may wish to use this mode to build geological units from
surface linework.
Map and Borehole
This layout minimizes all except the map and borehole windows. The borehole window is made
smaller in relation to the map window owing to the usually vertical nature of the borehole graphics,
allowing the map to occupy the majority of the screen real estate. This perspective is designed to
facilitate interrogation of the borehole data represented on the map.
3D
This layout minimizes all except the 3D window. This allows you to investigate the model objects in
3Dimensions more easily.
Standard
This opens all windows (borehole, map, section and 3D) to reasonable default sizes, allowing you to
inspect and work on the model in any way you wish.
Split /Dock F11
This function enables the component windows to be separated and reassembled into the default
layout. Once split the windows are available for resizing, minimizing etc as desired to achieve a
perspective of choice for a particular task or session. If a window is closed accidentally the interface
should be re-docked, and then split again to regain the lost window.
View GVS
Selecting this option brings up a display of the GVS table in a separate window to give a quick
overview of the loaded GVS. The GVS can be edited using the GVS-Legend editor from the workspace
dialog box (see section 4.1.1) or outside GSI3D using notepad or wordpad.
29
Notebook
This opens a window to record notes during a modelling session, these are saved within the project
workspace and can be used to keep a trail of notes.
3.2.6 Help
The help pull down menu (shown below) contains the following options
License contains various options for digital licensing of GSI3D. The exact options may vary from
version-to-version. Please refer to the licensing documentation on the GSI3D website for up-to-date
information on how to manage licenses within GSI3D - www.gsi3d.org.uk - or contact the Helpdesk.
Online FAQ contains a link to frequently updated FAQ consortium web pages. This function may not
work on all computers, depending on your internet settings. The URL for the FAQ is
http://www.gsi3d.org.uk/faq.html.
Manual contains a link to the user documentation. This function does not work on all computers,
depending on your settings. The latest manual is always available from the GSI3D Consortium
website – www.gsi3d.org.uk.
Hints and Tips contains a series of hints and tips of new features and workarounds.
30
About GSI3D gives information about version number, copyright and the development team
NOTE: When publishing output from GSI3D the software should be referred to as GSI3D TM
3.2.7 Floating tooltips
Floating tooltips are available for objects in the Map and Section windows. Hovering with the cursor
on objects in these windows allows you to quickly identify objects without using the info tool.
Tooltips can be activated temporarily in any navigation mode by holding down the Shift key and
then hovering the mouse cursor over the line or object that you wish to identify.
Tooltips can be activated permanently in both windows by pressing the F7 key. Pressing the key a
second time will switch them back off again. When in permanent tooltip mode, tooltips will be
rendered as you hover the mouse over lines or objects you wish to identify. It is not advisable to use
permanent tooltip mode in a map or section window that contains a lot of data because you may
find that performance is reduced or you may experience graphics flicker as you move across objects.
Tooltip in section and map window identifying unit name of correlation line and section name.
Note that the tooltip is semi-transparent, allowing you to see the linework behind it even when the
tooptip is visible.
3.2.8 Window folder options
The folders present in each of the four dynamically linked GSI3D windows are tabulated below
Map
Section
3D
Grids -TINs
*
*
Geological Units
*
*
Cross sections
*
*
*
31
Borehole
Maps
*
*
Drill logs
*
Faults
*
*
Folds
*
*
Contours
*
*
3.3 Map window
An example map window is shown below, in common with the other windows it has a main screen
with a Table of Contents (ToC) at left, the icon toolbar at the top and the x, y coordinate display for
the cross hair position in the status bar at the bottom of the window. Other query information also
displays in the status bar when the info tool is selected from the toolbar. The border between the
main screen and the ToC can be resized to suit by hovering on the border until the double arrow is
displayed and then dragging by holding down the left mouse button, release button to stop.
32
3.3.1 Toolbar
The standard toolbar contains the following icons:
1
2
3
4
5
6
7
Once expanded additional icons are available (8-14)
8
9
10 11
12
13 14
and with a geological unit editable the polygon tools editing icons are added (15-21)
15 16 17 18 19 20 21
1. Zoom to full extent
Click fits the whole object to the extent of the map window
2. Zoom In
Click on, then click in window and hold down whilst dragging mouse to construct a marquee around
the area to zoom in to, release on completion. The mouse wheel can also be used to zoom in and
out.
3. Zoom Out
Click on, click in window, and repeat to incrementally reduce the magnification. This tool cannot
draw a box to zoom out to a specified area. The mouse wheel can also be used to zoom in and out.
4. Pan
Click, then click in window and hold, drag to new position and release, drag and drop.
5. Back to previous view
Click, displays previous views, useful in scale changes, (NOTE: not an undo button).
6. Info tool
Click to activate and then click on objects (sections, faults, polygons) within the window to display
their identity on the bottom bar. See also Tooltips at Section 2.1 above.
33
7. Extra tools flyout button
Click to display extra tools 8-14.
8. Select background colour
Click brings up the dialog box below to select a suitable background colour in 3 different ways:
The Swatches tab shows 270 colour tiles, the HSB (Hue, Saturation, Brightness) and RGB (Red, Green,
Blue) tabs allows selection by interactive slider bars.
9. Save map window as image
Saves the contents of the map window as a geo-registered *.jpeg or *.png image. The default is to
save a png file, by typing the file name with the *.jpg extension a jpeg is saved.
34
When saving a registration file is generated automatically (*.jpgw/jgw or *.pngw), enabling the
import of the map to GIS systems.
10. Measuring tool
Enables a line to be drawn in the map window and the total length is displayed in the status bar on
the right hand side, double click to complete the operation.
11. Synthetic log
This button is only relevant once geological units (volumes) have been calculated (see Section 2.1)
and enables the creation of synthetic logs displayed in the borehole viewer. After activating the
button, clicks anywhere within the modelled area are displayed in the map window as a log in order
to instantly display a predicted geological sequence at that point in the borehole viewer.
12. Graticule
Click to display graticule.
The map graticule is a rectangular grid overlay, calibrated in metres. It is used to help the modeller
decide on the positions of map objects and can also be used in graphical outputs. The graticule is
operated by a toggle button in the map window toolbar. Clicking the button once will toggle the
graticule on, clicking it again will toggle the graticule off. The graticule can also be toggled using the
keyboard shortcut Ctrl + H.
When the graticule is toggled on a new set of controls appears at the base of the map window which
allow the user to specify the settings for the graticule. These options allow the graticule spacing to
be set and also the line style. The grid spacing can be set differently for the vertical and horizontal
lines.
35
13. Show/Hide cross hairs
Toggles the map window cross-hairs on and off.
14. Select borehole to project
This function allows selected boreholes to be projected graphically (not added) to the active section
for reference purposes. This enables the use of close-by borehole information without affecting the
line of the section. Click the button to activate the tool, and then pick boreholes in the map window
to project them into the currently active section. Projected boreholes can be cleared out of a section
via right-click > Remove projected boreholes on an individual section object in the section window
ToC.
The image below shows projected boreholes which are of varied transparency in proportion to their
distance away from the line of section. They are labelled in section with their offset distance normal
to the section and in map view with a label ‘P’. Only boreholes where a line can be drawn from the
borehole position perpendicular (at 90 degrees) to the line of section can be projected onto that
section. Boreholes that lie between two section limbs will be projected into both positons in the
section and displayed twice int he section picture:
Polygon and line tools (15-21)
36
The polygon and line construction and editing tools within red brackets are only displayed when a
geological unit is in editable mode.
15. Construct Polygon
Enables the construction of a new polygon during envelope building,
Click to activate, click at start position, and then click to add nodes to make shape double click to
complete and close the polygon.
16. Node editor
Mainly used in editing polygon shapes or dragging nodes to overlap adjacent polygons to enable
combination.
Click to activate, right click to select any polygon, displays all existing nodes. Enables addition of
nodes to line by clicking on it and removing nodes by double clicking on them.
17. Split Polygon
Very useful for chopping away chunks of a polygon during the construction of envelopes.
Click to activate, click at point outside polygon to start a line for splitting, then drag to beyond other
side of polygon and double click to produce a line crossing the polygon splitting it in two.
Then use polygon info tool (see below), click on it to activate it, then right click on any segment of
line in the half of the polygon you wish to be deleted, and select delete polygon from pull down
menu, finally confirm your decision.
NOTE: When splitting a polygon the initial and final clicks that define the cut line must be within
the same polygon. A cut line cannot be produced by starting the cut line in one polygon traversing
a second to terminate in a third polygon i.e. A-B-A works A-B-C does not.
18. Combine overlapping polygons
Click, automatically combines any polygons in the editable layer that overlap each other. Useful for
the drawing of envelopes that include surface outcrops and subcrops.
37
19. Combine adjacent polygons and fill holes
Click, automatically merges all selected polygons with common (mutual) boundaries and
incorporates (deletes) all polygons totally enclosed within those selected polygons i.e. fills islandsholes. Useful for combining polygons of all overlying units in the construction of envelopes of partly
or largely concealed strata. It is important to select all polygons to be combined to form the
envelope first then click this button, any holes in the distribution should then be cut out (deleted)
using the Info (select) and then Select Polygon functions in the normal way.
20. Clean polygons
Click, the tool automatically cleans up coinciding nodes from two separate polygons along mutual
boundaries. It also cleans polygons according to the Minimum node spacing defined in the
workspace properties (see Section 4.1)
21. Insert selected polygon
After selecting a polygon using the Info tool the polygon can be incorporated into the envelope
(layer data) by clicking on this button. The info tool leaves a red triangle in the map view to help you
visualise which polygon has been selected. When importing intricate polygons the Minimal Point
distance must be set to 0 in order to avoid slivers of no data (see Section 3.7).
3.3.2 Map window properties
Mouse wheel zooming
The map window can be zoomed in and out using the mouse wheel. Scroll the wheel forwards to
zoom in and backwards to zoom out.
Mouse clicks
Use the left mouse click in conjunction with the Info tool (icon 6 above) to query objects such as
boreholes, DiGMapGB polygons, section lines, faults and grids displayed in the map window. The
query information is displayed at the bottom left corner of the map window. See also floating
tooltips Section 3.2.7.
NOTE: Every mouse click in ‘info’ mode leaves behind a small red triangle that indicates the
location of the previous query.
38
Right click anywhere within the map window produces the following options:
Insert comment
Produces a dialog box to type in free text to add a note at the selected location (red triangle).
Comments can be displayed as balloon symbols by ticking on the show comments box in the window
properties settings box
Window properties
Produces a settings box comprising a series of options to display (by ticking) or hide certain
properties within the map window.
Show cross-section
Right click on a section line gives the option to display this section in the section window. Sections
must be visible in the map window for this function to operate – the query will not look for hidden
sections.
Insert borehole or knick point
First select a borehole by clicking on it using info mode, then right click on part of the active section
line (the section that is currently displayed in the section window is known as the active section and
its map linework is red) gives the option to insert the last-selected borehole log into that line
segment or alternatively add an additional coordinate point specified immediately before clicking
on the line.
3.4 Section window
3.4.1 Toolbar
Once expanded
1 2 3
the toolbar contains the following icons from left to right,
4 5 6 7 8
9 10 11 12 13
14
15
16 17 18 19 20 21 22
1. Undo
Undo the last edit. Note that the undo-redo is not active for 100% of all possible actions. General
actions such as digitizing, editing etc are supported, but some more complex actions may not be
undoable.
2. Redo
Undo the last edit. Note that the undo-redo is not active for 100% of all possible actions. General
actions such as digitizing, editing etc are supported, but some more complex actions may not be
undoable.
39
3. Zoom to full extent
Fits the whole object to the dimensions of the section window.
4. Zoom In
Click on to activate, then click in window and hold down whilst dragging mouse to construct
marquee around area to zoom in to, release on completion.
5. Zoom Out
Click on, click in window, and repeat to incrementally reduce the magnification.
NOTE: if the mouse has a wheel, this can also be used for zooming in and out.
6. PAN
Click to activate, then click in window and hold button down, drag to new position and release.
7. Back to previous view
Displays previous view (zoom and pan), not an undo button.
8. Info tool
Click to activate info mode, then position mouse cursor on the object or location you wish to
interrogate, the x and z coordinates automatically display and scroll in the status bar, if a correlation
line is clicked on its identity is displayed instead.
Line tools
In red brackets (9-11)
9. Draw line
Click on the icon to activate drawing (digitizing) mode. In the section window, left-click once at each
desired node location to construct the new line. Double click to complete the line.
When digitizing in section it is best to use the GVS selector to pick a unit name before digitizing. This
automatically attributes each digitized line with the selected GVS attribute and saves a lot of time
naming the lines individually:
40
If NONE is selected in the GVS selector (or there is no GVS loaded) a prompt will appear for the name
of the digitized line when the line is completed via a double-click:
10. Edit line
Click on the icon to activate. Click on the line you wish to edit to make it active, the nodes are
displayed as grey boxes.
Edit the nodes as follows:
To reposition: click and hold the node, drag and release at new position.
To insert a new node: click on the line where a new node is required.
To delete a node: double click on the node you wish to delete.
NOTE: The last 3 nodes of a correlation line cannot be deleted. Use right click to delete line!
11. Split line
Click on the icon to activate: Draw a line of two nodes crossing the correlation line at right angles
where you wish the split performed. Double click when placing the second node to terminate the
cutting line. Select the node display (Edit line icon, 12 above) to check the split has been performed.
Each segment retains its original attribution.
NOTE: The last 2 nodes of a correlation line cannot be split as this would leave a solitary node
which does not constitute a line.
12. Add borehole to section
For use in adding borehole positions to the end of sections (added to the right-hand end of the
section in the section window). With the desired borehole selected in the map window using the
Info tool (and displayed in the borehole viewer to validate its worth) simply click on the icon to add
the currently selected borehole to the section under construction (active section).
13. Add point to section
For use in adding knick-points whilst constructing sections, with the desired coordinate location
selected in the map window using the Info tool, simply click on the icon to add the location to the
section under construction (added to the right-hand end of the section in the section window).
41
14. Set vertical exaggeration
This field enables the setting of vertical exaggeration, simply select a value from the pull-down list.
To specify a value that is not in the defaul list, type the desired value into the field and hit enter. The
new value will be added to the list.
15. GVS selector
This produces a pull-down list of the GVS entries. You can use this to digitize correlation lines of a
particular unit one after the other and have them be attributed with the current selection in that list
automatically. Simply select the unit you want to draw and start creating linework. They will be
attributed and coloured up by that unit. To stop using this function, select “NONE” from the top of
the list. Note that the pull-down list displays the relevant colour for each unit for ease of
identification.
16. Extra tools flyout button
Click to display extra tools 15-22.
17. Select background colour
Brings up a standard colour palette from which to choose a background colour for the section
window (as described above for Map window Section 3.3.1.).
18. Save section window as image
Saves a synthetic or a correlated section as *.png or *.jpg, png is the default setting .jpg needs to be
added to the file name if JPEG is required. No geo-registration file will be produced unlike the map
window. Only the visible part of active section will be exported, best results are achieved when the
section window is expanded as much as possible. The result is the equivalent to a screenshot. When
the image is saved there is an option to register the image into the section as a section raster.
42
19. Fit section view to view in map window
This function enables the user to zoom in the map window to exactly the same segment of a section
that is currently displayed in the map window thus coupling the two scales
20. Measuring tool
Draw a line within the section window, its length will be displayed in the status bar at extreme right,
double click to finish.
21. Graticule
The section graticule is a rectangular grid overlay, calibrated in metres. It is used to help the
modeller decide on the positions of correlation lines and can also be used in graphical outputs. The
graticule is operated by a toggle button in the section window toolbar. Clicking the button once will
toggle the graticule on, clicking it again will toggle the graticule off. The graticule can also be toggled
using the keyboard shortcut Ctrl + G.
When the graticule is toggled on a new set of controls appears at the base of the section window
which allow the user to specify the settings for the graticule. These options allow the graticule
spacing to be set and also the line style. The grid spacing can be set differently for the vertical and
horizontal lines.
43
22. Clinometer
A clinometer tool is available in the section window to assist in the drawing of correlation lines.
When selected the clinometer will appear when you digitize a line.
Click on the clinometer icon to activate this tool for line construction, and then select the draw line
tool (above) with the placement of the first node the clinometer appears centered on the node to
aid the positioning of successive nodes. The clinometer migrates to centre on the last node of the
string as line drawing progresses.
Initially it will display a default set of angles. These can be altered by going into the section
properties r-click > Properties and clicking on the Clino settings button in the properties dialog
(described below in Section 3.4.2).
Alternatively an angle label can be displayed next to the mouse cursor when digitizing, which may be
easier to use than the full clinometer. Normally this is active by default, and it can be toggled on and
off via Tools > User options > Section (tab) > Display angle label when drawing line.
3.4.2 Section window properties
Use the left mouse click with the Info tool highlighted to query objects such as boreholes, correlation
lines, and cross-points. The query information is displayed at the bottom left corner of the section
window. Alternatively you can hold down Ctrl and hover over a line, crop arrow and cross-hair to
display a tooltip with the attribute.
Right click on a borehole or a knickpoint position (this option must first be selected in the section
properties box to display) gives the extra option to delete it.
Right clicking on a cross-points arrow gives the additional option to show crossing section i.e. switch
to the intersecting section the point queried is then highlighted on the intersecting section with a
red cross.
44
Right click anywhere within the section window produces the following standard menu
Update
Refreshes the section window
Set Regional strike and dip
Once values have been set for regional dip and strike the option to show lines at log positions will
also display the strike of each limb of the section and the apparent dip that would be present in that
limb if the units at that point were striking and dipping according to the user-defined regional values.
Note that both strike and dip must be set to enable this. The benefit of this is that it allows the
modeller to see how far from the regional trend their own correlation lines are within the section
panels and hence gives an opportunity to review in light of this information. Additionally the
apparent dip is displayed whilst drawing a correlation line. The image below shows how dip and
strike information can be displayed during the modelling process.
NOTE: to display the Apparent Dip and Azimuth for each section limb the display must be enabled
in the section properties window (see below)
45
Active section properties
This option is available via right-click on the section window and is also available from a right click on
any section in the ToC > Properties and will affect the individual section only. To make settings on all
sections, use right-click > Properties (all sections) on the sections folder in the section window ToC.
46
Under the Standard settings tab:
Correlated section rendering contains boxes to show (checked) or hide (unchecked) polygons, lines,
textures and send to front. This affects the display of digitised correlation lines.
Synthetic section rendering contains show/hide boxes for polygons, lines and textures. Synthetic
sections are those displayed after a model has been calculated (see Section 5).
Log display contains show-hide boxes for borehole logs in 2D and 3D plus the Log display settings
box for the logs shown below. It also contains the option to switch on/off the display of projected
logs.
47
Width
In section sets the thickness of the borehole stick in the section window in metres (scaled relative to
the section). The default is 25m.
In 3D sets the thickness of borehole columns/sticks in the 3D window.
Composite Log
Up to 4 borehole sticks can be displayed in a composite log, the numbered column number or
parameter-name boxes are filled by entering the selected columns (0,1,2 3… from left to right) in
the downhole *.blg file or parameters from a point data source, here the header value has to be
entered.
Tick the Textures box alongside each field to display representative textures instead of colours.
Labels
Includes toggles to show or hide the depth of units and the unit coding in the borehole logs. The
option to show unit bases and TINs can be used to display the elevation of a calculated geological
unit base or an arbitrary workspace TIN in the log picture. This could be used to show a water table
surface in the log, for example.
The user can change the appearance of the text on section windows in the font size input field. The
image below shows composite logs with textures, point parameter data and labels.
General settings contains boxes to show/hide drill log-knickpoint positions, draw azimuth
compasses, hang all borehole sticks on the selected dtm, display map polygons along the profile
surface, display fold axes.
48
The Extra settings tab contains show/hide boxes as follows
Geological contact points, crossing section arrows and cropline arrows
Layers, display raster backdrops , comments and comment labels
Labelling, section name, status/confidence, azimuth labels and fold labels
Other: Clino settings
Click on the clino settings button to open the Clinometer settings window (below)
49
Use the dialog to adjust the appearance of the clinometer to suit. Note that the clinometer tool is
activated using the clinometer on the icon toolbar (see above) and only displays in line drawing
mode.
Specify the size of the clinometer on-screen
The options in this first panel allow you to set the physical size of the clinometer on screen in pixels
up to a maximum of 400 pixels. As you change this setting you will see a preview of how big the
clinometer will actually appear on screen. It also allows you to preview what the clinometer will look
like at a vertical exaggeration (note that setting the vertical exaggeration in this dialog has no effect
on the section, it is purely for previewing within the dialog itself).
Add a new angle to the clinometer
Use the settings on this panel to add more angles to the clinometer display. You can also specify
whether the angle you wish to add will be drawn as a full line or just a tick line. Click Add to see how
the new angle will appear in the preview pane of the dialog. If an angle already exists in the
clinometer settings and you wish to change the line style then use the add function to do this also by
adding the angle a second time with the preferred line style; this will re-draw the angle in the way
you chose.
Remove an angle from the clinometer
Use these options to remove individual angles from the clinometer display. First select the angle you
wish to remove from the pull-down list and then click remove. Note also the “Restore defaults”
button which allows you to go back to the system settings for the clinometer.
The settings you specify for the clinometer in the section window will apply only to that section,
meaning you can calibrate the clinometer differently for each section in your model. Note that these
settings are lost when you close the program
Insert comment
Produces a free text box to annotate the section with comments, these are placed at the location
last selected using a left mouse click in the section window and are saved into the project file when
the workspace is saved via File > Save as...
Right-click on a correlation line produces the extra three functions below:
50
Copy line
A correlation line can be copied within a section by doing r-click > Copy line in the section window.
Before the line is copied the user is prompted to specify how far away (in metres) the new line
should be created from the line being copied. To place the new line below the existing line the user
should specify a negative value in the prompt. The example here shows what the user would enter
to copy the line plus 5 metres above the line being copied. If a GVS unit is selected the copied line
will inherit that attribute, if none is selected the line will be attributed with NN
NOTE: This tool is fine for areas of parallel or open folding but must be used with care in areas
where cylindrical or tight folding is suspected and where competency differences exist within the
sequence leading to different responses and shaped units within the folded sequences (e.g.
stratigraphic thickening, accommodation structures).
Densify line is used to add nodes to a correlation line for detail see Section 4.4.5
Smooth line is used to add nodes and smooth a correlation line for detail see Section 4.4.5
3.5 3D Window
An example screenshot of the 3D window is shown below illustrating a calculated model of
discontinuous superficial deposits resting on chalk bedrock (in green).
51
Navigation
Navigating in the 3D window is mainly carried out using mouse control although some basic
functions are still included in the toolbar:
Holding the left mouse button down and moving the mouse around rotates the model in all
directions.
Holding the right (or middle) mouse button down and dragging down the page zooms in,
dragging the cursor up the page zoom out again.
Holding down both left and right mouse buttons enables repositioning and centering of the
model.
52
3.5.1 Toolbar and tabs
When expanded the toolbar contains the following icons from left to right
1
2
3
4
5
6
7
8
9
10 11
12
13
1 .Zoom to full extent
Click, fits the whole object (fence diagram, surface, envelope, grid ‘model’) to the dimensions of the
3D window.
2. Refresh window
Refreshes the 3D graphics.
3. Show or hide the frame
Toggles the frame on and off.
4. Plan view
Adjusts the 3D view to a vertical view, i.e. the model is viewed from above in plan view.
5. Side View
This instantly adjusts the model to a side horizontal view.
6. Info tool
Click the tool to activate then left click on objects such as geological unit panels within sections, and
unit surfaces in 3D window these are then highlighted by changing colour (to bright yellow) and their
identity is displayed in the status bar.
7. Set vertical exaggeration
This field enables the setting of vertical exaggeration, simply select a value from the pull-down list.
To specify a value that is not in the defaul list, type the desired value into the field and hit enter. The
new value will be added to the list.
8. Icon expansion-contraction arrow
Toggle to expand and contract the toolbar.
9. Select background colour
Click brings up a standard palette to select background colour.
10. Save 3D window as image
NOTE: File extensions must be entered in the File name dialog box.
53
11. Rotate right
Click, starts the model spinning incrementally to the right, anticlockwise about a vertical axis
preserving any tilt (inclination) present at the start. Once spinning the icon changes to a stop sign
that when clicked halts the spin.
12. Rotate left
Click, starts the model spinning incrementally to the left, clockwise about a vertical axis preserving
any tilt (inclination) present at the start. Once spinning the icon changes to a stop sign that when
clicked halts the spin. NOTE: rotation speed will depend on model size!
13. Render on/off
Toggle button that switches off the 3D window to save memory and back on again.
Explode, Video tab
The Table of Contents border also contains a screen which can be expanded or minimised using
arrows as for the main windows. This screen contains two selectable tabs at its header Explode and
Video (shown below).
Explode
Checking the Explode Model box separates all the geological units in the model according to the GVS
order with the topmost units displayed highest. Use the slider bars to change the exploded view in
the x, y and z dimensions.
54
3.6 Borehole log window
A typical borehole viewer screen is shown below. Boreholes are selected in the map window and
display as logs in the Borehole Viewer. When logs are first sent across they require resizing and the
properties setting to obtain a reasonable image. This log contains full annotation of the units. Once
several boreholes have been selected switching between them is achieved in the Table of Contents
of this window by checking the required borehole.
In the table of contents real boreholes are listed under logs and synthetic boreholes under synthetic
logs
55
3.6.1 Toolbar
The toolbar contains the following icons from left to right.
1
2
3
4
5
6
7
8
1. Zoom to full extent
Click, fits the whole object (annotated log) to the dimensions of the section window.
2. Zoom In
Click on, then click in window and hold down whilst dragging mouse to construct marquee around
area to zoom in to, release on completion.
3. Zoom out
Incremental zoom out.
4. Pan
Click, then click in window and hold, drag to new position and release, drag and drop.
5. Back to previous view
Click, displays previous view.
6. Select background colour
Click brings up a standard palette to select background colour.
7. Save window as an image
8. Borehole number, refers to the displayed log.
NOTE: When the first log is displayed in each session it is necessary to scale the borehole log
appropriately using zoom to full extent and the properties settings.
56
3.6.2 Borehole log window properties
Right click anywhere within the borehole window gives the option to set the properties of the
borehole sticks. The Log display settings dialog box (shown below) is the same as the one used for
the section window Section 3.4.2 and is explained in detail there.
An example of a fully annotated multiple stick borehole is shown below
57
Switching on the show calculated unit bases and TINs allows geological unit bases and other surfaces
to be displayed in the borehole log (both real and synthetic). This is useful for spot checking the
model as well as displaying surfaces such as watertables against boreholes. An example of this
display is shown below.
58
4.Working with projects and objects
4.1 Building and Saving a project
A GSI3D project is comprised of data and links to data that represent the model. A project always
has a core project file which has a *.gsipr file extension. The GSIPR file contains all of the primary
data for the model including geological unit envelopes/lines and the section correlation linework. It
may also hold other supporting data such as a model capping surface and other triangulated
surfaces.
The GSIPR file also holds links to supporting data. Usually this includes at least a link to the
stratigraphy file (GVS) and the legend file (GLEG). Additionally there may be links to vector
information (GIS shapefiles), georegistered raster maps and borehole maps.
The *.gsipr file is XML based. The file format is not based on a standard schema and should be
treated as proprietary as the exact syntax of the XML is subject to change without notice between
versions of the software. Therefore, if you intend to build tools outside of GSI3D which will rely on
the file structure you should take advice from the GSI3D Helpdesk on the potential risks.
Note whilst loading any already established *.gsipr file the whole screen will grey-out to prevent
further operation.
To establish a project from scratch or to change the parameters of an existing project, the Properties
dialog box is used (from the edit pull down menu)
Under the General tab the Workspace files and settings dialog box enables the user to:
1. Browse and select the location of the GVS file (*.gvs)
2. Browse and select the location of the Legend file (*.gleg)
3. Browse and select the location of the Downhole Interpretation File (*.blg)
4. Select the Capping surface to be used for model calculation from a pull down menu of
available surfaces within the project (the DTM must be created under Grids and TINs first,
see sections 4.2-4.3 below)
5. Minimum Point Distance sets the minimum spacing distance (in metres) between nodes
used for calculation (in x,y) below this threshold points will be discarded
6. Max tolerance for lense envelope detection sets the maximum tolerance (in metres) for the
difference between a lense correlation and the lense envelope (in x,y)
7. Maximum z-tolerance sets the distance (in z) below which points will be discarded
8. Model depth cut-off (will only be operational in future bedrock releases)
9. Maximum model height (will only be operational in future bedrock releases)
10. Unit attribute sets the overall GVS attribute (column header) for the project on start up.
11. Nominal scale enables the user to assign a nominal scale to the project, this is stored as a
tag in the project workspace only and does not affect the calculation.
59
All settings and files can be changed and re-saved during a session.
4.1.1 Using the GVS-Legend Editor
The GVS and legend files can be created manually using spreadsheet software such as Excel or a
simple text editor such as Wordpad or Notepad. However, GSI3D v2011 also contains a BETA release
of a new GVS and legend creation and editing tool which enables the creation and editing of these
files interactively from within the software.
The editor can be used to modify existing GVS and legend files, and it can also be used to create new
GVS and legend files from scratch.
NOTE: At the current time the GVS-Legend editor has no support for lenses. Therefore, if lenses
are being modelled, do not use the GVS-Legend editor. The new editor is provided as BETA
functionality and it is very important that you keep backup copies of existing GVS and legend files
before attempting to modify them in the GVS-Legend editor in case of any problems.
Creating a new GVS and Legend
Open the workspace properties dialog via File > Properties. Select a location for the new GVS and
Legend files using the file browse buttons against the fields GVS file and Legend file, respectively.
60
Click Edit GVS and legend... to open the GVS-Legend editor. The dialog will appear as below:
There are three tabs in the GVS-Legend editor dialog. When creating a new GVS and legend from
scratch the Attributes tab will be selected by default when the dialog opens.
Step 1: Create attributes
The GVS and legend cannot exist without attributes, so at least one attribute must be created to
begin with. Attributes are the lookup values which GSI3D will use to decide how to draw geological
units and other objects in the various windows. Typical attributes include Lithology, Stratigraphy,
Chronostratighaphy, Porosity etc.
Click the add icon to create a new attribute and enter a name such as “Stratigraphy”.
61
The new attribute will be added to the attribute listing. Note also that the attribute appears in the
Unit attribute preview selection box at the top of the dialog.
Continue adding attributes as desired. Shown below is a simple attribute listing containing
Stratigraphy, Lithology and Porosity:
Step 2: Create Legend entries
As soon as at least one attribute is added to the attribute listing the legend can be constructed. It is
possible to construct the GVS before the legend, but if legend values are available the construction
and setup of the GVS will be easier.
The values entered in the legend are independent of the GVS. The legend will contain a list of all
possible legend lookup values for all attribute values including Lithology, Stratigraphy etc.
Click on the legend tab and click the add icon to create a new legend entry. The legend entry dialog
will be displayed. Enter a name for the legend entry and optionally a description, and then choose a
colour and optionally a colour transparency and texture image. When all values are set, click Apply >
OK. The new legend entry will be added to the legend listing.
62
Continue adding new legend entries until all desired values are in the listing. Note that the legend
listing can be in any order so the values can be added in any sequence (unlike the GVS listing which is
constructed in stratigraphical order). Shown below is an example legend with some lookup values
that could be used to colour by the attributes Stratigraphy, Lithology and Porosity:
63
Step 3: Create GVS entries
Once some attribution and legend information is entered the GVS can be constructed. Select the
GVS tab and note the 4 buttons that are available:
1)
2)
3)
4)
Moves the selected GVS entry one position up the listing
Moves the selected GVS entry one position down the listing
Creates a new GVS entry
Deletes the selected GVS entry
The additional tools 1 and 2 are required for sorting the GVS listing because the entries in this listing
are required to be in stratigraphical order, with the top-most or youngest stratigraphic unit at the
top of the list.
First, click the add icon to display a blank GVS entry dialog. First enter a name for the GVS entry. This
name will be the master code that is used throughout GSI3D for the geological unit, for example it
will be the name used on section correlation lines for this unit. The name can be a real name, or a
coded value (for example Sherwood Sandstone Group could be coded as SSG for convenience).
NOTE: The field labelled Unit type is currently not used in GSI3D v2011. It contains only one value
and can be ignored.
The next step is to choose legend lookup values for each available unit attribute. The two selection
boxes on the bottom row of the GVS entry dialog allow the attribution to be selected. The box on
the left contains a list of all the entries in the Attributes tab; the box on the right contains a list of all
the entries in the Legend tab. First choose an attribute on the left, and then select a legend lookup
value from the list on the right.
64
NOTE: Each time an attribute-legend pair is set, click Apply to apply the selection.
When all values have been set, click OK. The new GVS entry will be displayed in the GVS entry listing.
Repeat the whole process once for each GVS entry that is required.
The GVS listing can be constructed in any order initially, but to be usable in a model the list must be
ordered stratigraphically using the up and down buttons in the toolbar of the GVS tab. To move a
GVS entry, click on it once to highlight in the listing, and then click the up or down button to move it
through the list.
Note that clicking once on a GVS entry to highlight it will also display a summary of the entries
attributes in the lower area of the GVS tab.
Step 4: Saving the files
When working in the GVS-Legend editor all of the objects and edits are held in the working session
only. To reflect any creation or edits back to the selected GVS and GLEG files press Save in the GVSLegend editor dialog. Always make sure you keep backups of GVS and GLEG files in case of any
problems with the file save function.
65
Editing an existing GVS and legend
The GVS-Legend editor can be used to modify an existing GVS and legend. If the GVS and legend are
part of a GSI3D project they will be automatically loaded when the project GSIPR file is loaded;
otherwise simply start GSI3D and select the relevant GVS and GLEG files manually in the File >
Properties dialog to begin editing.
NOTE: The GVS-Legend editor has no support for lenses. If a project or GVS contains lenses do not
use the GSV-Editor. Instead, modify the files manually in Excel, Wordpad, Notepad or similar.
Always take backups of important GVS and GLEG files when working to mitigate any risk of file
corruption.
With the GVS and legend files loaded in the workspace, click on Edit GVS and legend.. to open the
GVS-Legend editor dialog. This will display the entries for the GVS, legend and attributes for the
currently loaded GVS and legend.
To delete entries from any tab, single click on the desired entry to highlight and click the delete icon:
66
To edit a GVS or legend entry, simply double click on its entry in the appropriate listing (attributes
cannot be edited once create). This will open the appropriate edit dialog. For details of how to use
the GVS and legend edit dialogs, refer to the above section on creating new GVS and legend entries.
NOTE: GVS names cannot be edited once created. This is because there is currently no mechanism
to cascade the change through a project (e.g. to rename correlation linework with a new value).
Any changes made in the GVS-Editor dialog will be reflected in the GSI3D workspace immediately
when the OK button is clicked, but will be lost when the program is closed down. To save any
changes into the GVS and GLEG files make sure to press Save.
NOTE: Saving the GSI3D project via File > Save as... will not save any changes to the GVS and
legend. The Save function in the GVS-Editor dialog is currently independent of the GSIPR save
function.
The Graphics tab contains options for setting the vertical exaggeration for sections and 3D display.
These settings are not applied immediately, but will be stored in the project file and used as the
default when the project is next loaded.
4.1.2 Model capping surfaces
Every GSI3D project should have at minimum one model capping surface. The model capping surface
provides a cap to the model in a range of important situations. For example, in order to build a
section a capping surface is required to prevent the section geometry (and hence the graphics) from
flooding upwards into the 'sky'. A model capping surface is also vital when calculating geological unit
bases and volumes because the surface constrains the calculation of these objects. In many
situations, GSI3D is programmed not to allow you to perform certain operations unless a capping
surface is specified in the project.
In a superficial geology model, the capping surface will usually be a DTM (Digital Terrain Model)
whereas in a bedrock model the capping surface might alternatively be a rockhead (top bedrock)
surface or an unconformity.
To specify a capping surface you must first import a suitable one into your project workspace.
Surfaces can be imported as a GRID or as a TIN via the Add objects pull down menu Section 3.2. 2.
Once imported these objects will appear in the map window ToC under Grids or TINs. GSI3D uses
67
TINs to calculate models, therefore an imported GRID object must be converted to a TIN object this
is done via a right-click on the object and selecting Convert to TIN.
Once you have a usable TIN object in your map window ToC you must specify it as the model cap via
File > Properties and then select the desired capping object from the Capping surface pull-down list.
Note that this list only contains available TIN objects.
NOTE: Capping surfaces are usually the largest data objects in a GSI3D project. The *.gsipr file will
become much larger when you add a TIN surface to it and save the project. Always ensure that the
capping surface is at an appropriate resolution for the scale of the modelling work. Very high
resolution DTMs for example will make the project file extremely large and will reduce the
calculation performance considerably. If the surfaces are exceptionally large GSI3D could run out
of memory and crash.
4.2 GRIDs
When obtaining GRID data for use inside GSI3D it is important to make sure that you obtain an ASCII
version of the data. ASCII format is in plain text. The ESRI binary version of this format (the
proprietary binary ESRI grid, which is the usual format when working inside an ESRI environment)
cannot be loaded into GSI3D. If you have a binary format file you will need to convert it to ASCII via
an ESRI tool such as ArcToolbox.
Once you have obtained an ASCII format GRID file you can import it into the map window object tree
via Add objects > DEM/GRID.
Grids are used in GSI3D for visualisation, display in cross-sections and as DTM capping layers,
however these need to be converted to TINs to perform model calculation as described above at
Section 4.1.1. The grids are held in the TINs and Grids folder in the map window. The individual
objects are identified in the ToC as either TINs or grids, right clicking on the objects produces
differing pull down menus as explained below. Additionally right clicking the overall folder offers the
option to Create new TIN in addition to the standard self-explanatory options listed below.
Right clicking on an individual grid produces the following menu:
68
Convert to TIN is used to convert a GRID to a TIN for use in model calculation and is described above
at Section 4.1.1
Export raster enables saving of ascii grids as surfer grids, and vice versa
Send to 3D view sends an individual surface grid to the 3D viewer
Properties calls up the property box shown below which is identical to that for fold axial planes and
TIN objects (Section 4.3)
The display settings can be specified for the map, section and 3D windows, switching on visible in
sections enables the display of the grid in the section view.
A grid can be made visible in section, the Colour of the line can be specified and the visible switch
needs to be ticked. The image below shows a Grid displayed as a shaded relief map and as a purple
line in section
69
Send to front
self explanatory
Send to back
ditto
Delete object
ditto
Isolate object
ditto
Isolate within group
ditto
4.3 TINs
A TIN is a Triangulated Irregular Network. It is used inside GSI3D to represent a surface; In GSI3D, TIN
objects are stored inside the *.gsipr project file. TINs can be imported in several ways
Importing from another GSI3D project
You can import a TIN object from an existing GSI3D project file (*.gsipr) via Add objects > Envelopes
and TINs. You should see the following dialog.
70
Use the browse button to select the *.gsipr file containing the TIN needed. When this loads you will
see a list of all available TINs in the list on the left. Highlight the desired entry (or highlight multiple
entries using Shift or Ctrl key) and click on Append to copy them to the selection list on the right.
Choose the desired options using the checkboxes at the bottom of the dialog box and click OK (for a
simple TIN import you will usually only need the TIN base option to be checked).
Importing from GOCAD
If you have a GOCAD surface (TSurf format .TS file) you can import this into GSI3D as a TIN. Firstly
you must create a new blank TIN object to hold the GOCAD data. Select Tools > Create new TIN and
specify a name for the new object when prompted. The new blank TIN object will be added to the
map window ToC. Find the new blank TIN object in the ToC and choose right-click to give Import and
Export > Import Gocad TIN. In the dialog that appears, browse for and open the .TS GOCAD surface
file that you wish to load into the TIN object. After a few moments the data will be loaded into the
GSI3D TIN object. When you save the GSI3D project this data will be stored in GSI3D TIN format
inside the project *.gsipr file.
Right clicking on an individual TIN will produce this menu
Create, edit and merge contains functions as follows
71
Trim TIN to boundary
As imported the TIN and its corresponding envelope (coverage) initially equates to the full extent of
the loaded dataset.
These settings can be adjusted using the property box for the individual TIN.
The next picture below shows properties adjusted to display the semi-transparent envelope and the
triangulated surface whose extents coincide. The envelope can be made editable, right click > switch
on edit, and then the envelope may be revised to a bespoke area or shape for calculation by
dragging and inserting nodes to shape, (second picture below) this can include holes and islands in
the same way as the envelope for any geological unit.
72
Once the envelope is satisfactory switch off edit and then select from the extra functions select the
Trim TIN option. The TIN is then trimmed to the extent of the envelope as in the third picture below.
Alternatively the default envelope can be deleted and a new bespoke one created using the polygon
construction tools.
73
When the project is saved it is stored in the *.gsipr as the clipped Tin and envelope and so is
available instantly for further calculation (provided it is the selected DTM coverage in the Workspace
properties).
NOTE: This is an essential tool for clipping a DTM to a required area for calculating the model. It
also can be used to clip GoCad TINs and export them.
Clip to model capping surface enables any TIN to be truncated (cut) by the model capping surface
(DTM) selected in the workspace. Any points that lie above the capping surface will be reset using
the value of the capping surface TIN at that location.
Copy TIN greatest a copy of the selected TIN and after giving it a new name appears in the table of
contents.
Translate TIN in Z enables to take a copy of a TIN and transpose it in z elevation, by entering a
positive or negative number. The image below shows the original and 50m transposed copy in the
3D window
74
Delete TIN boundary deletes the boundary polygon of the selected TIN object.
Merge TIN from workspace allows the merging of 2 TIN objects that are open in the active session.
Import and Export
Import elevation grid
Selecting this option allows the user to convert an ascii grid into a TIN object. In this process the
raster is automatically triangulated and so can be used in model calculation and also it can be stored
and clipped as part of a model file.
Import GOCAD TIN
This function allows the direct import of GoCad Tsurf TINs into a GSI3D project When saving the
project the imported surface(s) it will be saved as part of the model *.gsipr file.
Add scattered data points
This function allows extra data points such as contour datasets of to create a TIN object. The data
points are imported as tab-separated xyz ascii data in *.dat format.,
NOTE: this file does not contain a header which is shown below for explanation only.
X
Y
Z
620227
245907
21.36207
Export as grid (*.asc)
This function enables the export of the TIN object as an ASCII grid.
75
This standard save box requires the user to define the cell size and extent of the grid, the default
value the cell size is model dependant and the extent is the whole project area.
The following two options enable interchange of surfaces with the GoCad modelling package
Export as GoCad TIN
This function will export the TIN into GoCad tsurf format. The resulting TIN is an exact copy of the
GSI3D TIN .
Export scattered data points exports all points of the selected TIN into tab separated *.dat format
(format see above)
Send to 3D sends an individual surface TIN to the 3D window
Properties calls up the tin property box shown below
The display settings of the TIN can be specified for the map, section and 3D windows
In the Map Settings the TIN can be displayed as an Envelope (coverage) as the TIN , as points or as
the areal extent as a blue line
76
In the 3D Settings are options for Gouraud, triangle mesh, flat and contour plus a dialog box to
specify Contour Interval Transparency and select Colour via a palette.
The Section Settings enable the TIN to be displayed in the section window by switching the option
on. The Colour of the TIN to can be specified, and the thickness of the line can be specified in
metres.
NOTE: the TIN that is set as the Model capping surface is always displayed in blue
This image shows the capping surface (DTM in blue) and a 5m transposed TIN in red with the line
thickened to 3m
Send to front
self explanatory
Send to back
ditto
Switch on edit
makes the object editable
Delete object
ditto
Isolate object
ditto
Isolate within group
ditto
4.4 Sections
4.4.1 Section tools and properties
77
The sections loaded from the *.gsipr file are by default displayed in the map and the section
window. Double click on the folder expands to lists all the loaded sections
The section lines are specified in the map window (see section construction below at Sections 4.4 2
and 4.4.3 whilst the actual section construction and editing occurs in the section window. In the
section window only one section can be shown (by ticking box) at once.
The tools and properties for working with sections are only available from the section window and
are as follows.
Right click on the cross-section folder in the section window ToC gives a menu as follows
Send all objects to 3D Click this option to load all the sections into the 3D window.
Send visible objects to 3D loads the active (ticked) section into the 3D window
Delete all objects: self explanatory
Update all sections: self explanatory
With the cross-section folder expanded right clicking on the individual sections gives
Undo self explanatory
Redo self explanatory
Expanding the Create, edit merge option displays the following sub-menu
78
Invert direction of section
Reverses the section in the display and will be saved in this changed orientation unless switched
back.
TIP: Additional positions (boreholes or points) can only be added to the end (right-hand end) of a
section. So you can invert a section to add points beyond the start point of a previously digitized
section. The section can then be inverted a second time to enable correlation to be completed (if
preferred) in the original orientation.
Densify adds nodes to all correlation lines in the relevant section (see Section 4.4.5)
Smooth line smoothes and adds nodes to all correlation lines (see Section 4.4.5)
Project near-by boreholes into section allows the user to set a buffer (see below) around the section
and project boreholes on to it.
Remove projected boreholes removes all projected boreholes from the section
Import and Export option expands to the following sub-menu:
These options enable the import and management of rasters (images) in section. Rasters imported
into a section are treated as a graphical backdrop, allowing linework to be digitised over the top of
the image. Examples of such imports include scanned field notes, photographs of cliff sections and
depth-converted seismic images (note that GSI3D has no depth-conversion functionality for seismic
data or images, and this process should be carried out using specialist software). Support is provided
for the standard image formats JPG, PNG and GIF.
NOTE: section raster support has changed in v2011. If importing existing section images from a
v2.6.3 project (which we’re previously visible only in 3D along straight sections), please contact
the GSI3D Helpdesk for advice on how to migrate.
Rasters can be imported into existing sections, or a new section can be created for the raster. Either
way, a section object must be present before importing the images.
Import raster backdrop displays the following dialog which provides for the import of a new raster
image into the section:
79
Step 1: Select image file
Select the image file using the Browse button.
Step 2: Geo-register the image in the section
Next provide the geo-registration information for the image. This will tell GSI3D how to scale and
stretch the image within the section window. The section raster images are registered in the plane of
the section in the coordinate space [W,Z], where W is the distance along the section (in metres)
from the first ‘borehole’ position (i.e. the far left of the section), and Z is the true elevation (relative
to OD/sea-level). The raster image is registered using the upper-left and lower-right corners.
The [W,Z] values can be read off the section window status bar and entered manually. The W and Z
are displayed in the status bar as the mouse cursor is moved around the section window:
Alternatively, the [W,Z] position of a given point in the section can be pasted into the fields using the
paste buttons against each pair of input fields. To do this, select info mode in the section window
and click the desired location in the section. Then bring the raster import dialog back into focus and
click the paste button against the input field pair that corresponds with the clicked-on position (i.e.
upper-left OR lower-right). Next, go back to the section window and click the second corner potision
, and perform the same paste operation in the raster dialog for the other corner of the image.
80
NOTE: the geo-registration can handle sections that are not straight on the map, so raster images
can be added to sections with kink-points.
Step3: Convert to grayscale (optional)
If desired, check the box Convert to grayscale to change the image from full colour to grayscale. This
may be useful for certain types of image and is provided only for convenience. Note that the image
file itself will not be modified by this setting.
Step 4: OK
Click OK to import the image into the section. To see the image in the section it might be necessary
to refresh/update the section window using the F5 key, or right-click > update in the section
window.
Example import – below is an example of importing a cliff section photograph. The image is
registered between upper-left of [0, 310] and lower-right of [615,2].
NOTE: any rasters imports made during a working session will be saved into the project file (GSIPR
file) when the project is saved.
81
Hunstanton Cliff image © Copyright NERC.
For more images and full terms and conditions visit GeoScenic: http://geoscenic.bgs.ac.uk
The raster image can now be digitised over:
Any number of raster images can be imported into a single section. NOTE: importing several raster
images and/or importing raster images that have large file zies can adversely impact the
performance of the graphics in GSI3D, depending on the image files.
82
Manage rasters provides options for managing individual raster images within a section. A list of all
rasters in the section is displayed. Use the checkboxes to the left of each entry to show and hide
individual raster images in the section. The changes will take effect when the OK button is clicked.
To delete an entry, click to highlight it in the listing and then click Delete. To edit an entry, click to
highlight it, and then click the Edit button.
The Edit button opens the properties for the section image. Edits can be made in this dialog to adjust
the transparency of the image and some other filters and settings can be applied.
Overall transparency adjusts the transparency of the entire image (0 is opaque, 1 is fully
transparent).
Transparent colour allows the selection of a single colour to make transparent in the image. This
option is useful for removing white backgrounds on images, for example, because making the white
background transparent makes the section graphics clearer. To use this option, pick a colour, and
then use the checkbox to apply the transparency.
Image filters provides some rudimentary filtering capability on the image, such as grayscaling and
edge detection. NOTE: depending on the image file these filters may not apply correctly in all
cases, and are provided as a convenience only. Advanced image processing should be carried out
using specialist software.
All raster images within a section can be hidden via the properties dialog for the section object (and
also the section window via right-click, which affects all sections), using the checkbox Show raster
backdrops.
83
Send to 3D Self explanatory
Properties
Click on Properties to reach the cross-section layout window described in Section 3.4.2 and gives the
option to set the properties for the relevant section only.
In addition the setting for an individual section contain Info and Metadata tabs
The Info tab produces a display listing the units present within the section and details of its overall
dimensions (see below), the information is also displayed in the tab on the right hand side of the
section window.
84
Both windows give the user the option to switch individual geological units in the section on and off,
see example below, where units BSA and loft have been switched off
the Metadata tab produces a free text box for comments, these will be stored in the project file as
xml tagged text.
Delete Object self explanatory
NOTE: Remember if a section is deleted from the table of contents in this way and then a new
version of the *.gsipr file is saved the deleted section will not exist in the new *.gsipr file.
Rename Object produces a dialog box to rename the section
4.4.2 Simple Section construction
This example section is constructed from the following datasets, *.gvs, *.gleg, *asc. (grid dtm), *.shp
(surface geology polygons), *.bid (borehole index) and *.blg (downhole classification).
85
The screen grabs are produced with the polygons and lines for correlated sections switched on, also
the synthetic lines, 2D logs and map polygons all other settings switched off . Log display settings
have all labels switched off. Under extra setting tab show crossing section arrows is switched off
initially (screen grabs A-D) then turned on to assist correlating the deepest unit. In normal section
construction all crossing section intercepts (if any) would normally be displayed from the start.
Initial simple section construction and correlation of an area might use the following steps. This
example is for unfaulted artificial, Quaternary and layer- cake bedrock geology with digital geological
mapping (*.shp) and coded boreholes available.
1. From the File pull down menu select Properties and load the *.gvs and *.gleg
files and specify the *.blg file that will be used. Using the Add Objects pull down
menu load the DEM (*.asc), and also Create TIN using the DTM. Then load
geology shapes files (*.shp) and ensure it is attached to the correct DTM, then
add boreholes (*.bid and *.blg). Arrange the windows to display map and
section windows and borehole windows. Save the workspace.
2. Select Create new section from the Tools pull down menu and give it an
appropriate sequential name e.g. TM14_NS1 in the dialog box. This name will
automatically appear ticked (editable) in the ToC of the map and section
window.
3. Looking at the data decide a rough alignment for your first section and begin to
use the Info tool in the map window to examine the logs of any boreholes close
to the intended line of section. (Display logs in Borehole window see Section 3.6)
4. Using the Info tool Start your section either by selecting a borehole or if none is
suitable selecting a start point by clicking in the map window (red triangle marks
the spot)
5. Click on either the add borehole or add point icon (whichever refers) on the
section window toolbar.
6. Pan along your intended line of section and select your next borehole or point
on it and add noting the section window refreshes, then continue to add points,
and/or boreholes until the section is complete.
NOTE: as the section line is constructed it is highlighted as active (in red) and
grows across the map window. Sometimes you need to Update or Zoom to full
extent to refresh the section display
7. Use the Show full extent icon in the section window to examine the string of
coloured boreholes sticks and points and the trace of the DTM produced (see A
below) check it looks OK, adjust properties (see above for example settings) by
right clicking in the window and selecting Properties and also the Vertical
Exaggeration by typing in or selecting an appropriate value in the toolbar.
8. If a surface geology Shapes *.shp file is loaded (as here) tick the Display map
polygons box in the cross-section layout box to show a coloured layer of the
relevant geological map along the DTM ( check you attached on the shape file to
the dtm on loading, you can adjust the ribbon thickness if necessary. This should
produce a section analogous to B below
NOTE: It is possible to display multiple map bands across the DTM but a
surface geology map (often combined superficial and bedrock) should ideally
be used as this is the geology at the DTM .
9. Using the surface geology, boreholes and your understanding of the area start
to draw correlation lines using the Draw line tool in the section window toolbar
86
10.
11.
12.
13.
14.
15.
first along the base of the youngest unit in the section (see C below) Select this
unit from the GVS pull down menu so that the correlation line is automatically
labelled. The unit should colour instantly as far as the dtm or in the case of lower
units the base of the overlying unit. Any errors in colouring up indicate vertical
stacking of units that do not agree with the stratigraphy (*.gvs) file. If the
polygons do not colour first check that they are ticked on in the Section layout
properties box. Use the Zoom in tool where needed and produce precise lines
with regularly spaced nodes giving geologically sensible shapes to the units.
Start with the youngest and work down the GVS sequence (its like exhuming
progressively older palaeosurfaces, erosional contacts and unconformities).
The Rename line option (right click on the line with the Info tool selected) can
be used to rectify any wrong attribution using the correct gvs code for the unit
base. Proceed to work down the section drawing lower and lower bases. At
depth are they are likely to extend uninterrupted across the whole section.
Check all units colour up correctly as you go (see C and D below).
When you are happy with the section select File > Save project label the file
e.g.TM14_v1.gsipr This saves your first section in case of a crash as you continue
to work.
Again select Tools > Create new section, label it and then construct a second
section in the same way and save the project again as a new version. as e.g.
TM14_v2.gsipr.
Start to cross the area with regularly spaced sections in two orthogonal
directions. Once some sections cross switch on the Show Crossing section
arrows box form the Extra Settings tab of the cross-section layout and refresh
to display the positions of contacts in intersecting lines (see E below).
Whilst correlating snap fit the lines to the intersections. This is achieved once
the line is drawn, by selecting the Display nodes icon, then left clicking on the
line to show the node string and dragging a node (click and holding down left
button) to the approximate crossing arrow position, a dialog should appears
asking you if you wish to snap the two lines. The software only allows lines with
the same attribution to be snapped avoiding erroneous correlations. If the
dialog doesn’t appear this may be the cause. Alternatively adjust the crossing
section to fit the active one if the evidence suggests it is a better solution. It is
easy to swap between the intersecting lines by highlighting the Info tool and
right click on the crossing arrow base and select the top option to show the
crossing section. A red triangle appears at the selected point from the first
section.
Bespoke project areas may require a different orientation and frequency of
section lines depending on the envisaged output. Save the work frequently and
keep all the sections you have drawn loaded in the section window table of
contents, any disasters can be immediately selected and deleted from this table
before saving allowing their sequential numbers to be reassigned.
87
A: DTM, borehole sticks coloured and outcrop-band coloured TM14NE_WE1
B: Base of till showing nodes
C: All Superficial geological units correlated
88
D: Most bedrock units correlated
E: Levels of base LLTE inserted as arrows from crossing sections
89
The image above shows a completed section snapped to outcrop and subcrops.
NOTE: for subcrops to become available the subcrop has to be completed in the geological unit.
When a project starts off with the geological map band and crop ticks will only be available at the
DTM. Ideally cross-sections and unit distributions (envelopes) should therefore be worked on
iteratively.
4.4.4 Fence diagrams and types of sections
The Fence Diagram
A full fence diagram is usually composed of sections of various types (listed below). Where possible
one set of major sections should aim to intersect structures and valleys close to right angles and the
orthogonal set should be aligned at 90 degrees to the first set , but in detail still take account of
surface topography and sub-surface structure.
NOTE: It is not essential to draw all sections in a particular orientation first, in many case drawing
widely spaced sections in two orientations normal to each other first and then filling in with
intervening sections is better especially in bedrock modelling where the overall structure can be
defined at an early stage of fence diagram construction.
Helper sections
In addition to the main fence or grid of sections additional short helper sections may be required to
model linear deposits, such as alluvial tracts, and isolated outcrops such as outliers in a dissected
landscape. These sections are to provide sufficient information on the base of the deposits to enable
90
satisfactory triangulation of its shape. Helper sections along linear tracts are best run along the axis
of the deposits so that triangulation from side to side of the deposit producing a flat basal surface
cannot occur. Any small patches of deposits without cross sections will end up being calculated as a
very thin layer on the dtm, in certain cases e.g. thin blanketing head deposits this can represent a
satisfactory solution enabling the distribution of the deposit to be seen. In the case of helper
sections it is only necessary to correlate the units requiring “help” plus any that overlie them.
Docker sections
Docker sections are produced along the limits of the project area, these may be either follow grid
lines or be digitized to follow more irregular boundaries such as watersheds or city limits. They are
produced in the normal way. It is important though that all sections meeting the docker sections are
extended slightly beyond them so their intersection points (cross-ticks) can help construct the
docker section.
The main function of docker sections is to ensure a perfect fit between adjacent modelled tiles or
areas (by sharing the common docker section). Docker sections are often revised when modelling
proceeds to adjacent areas and further data is examined, in such cases the revised section is then
returned to the original tile and intersections are adjusted to it.
To allow proper construction of docking sections it is necessary to work with a DTM slightly larger
than the project area, this buffering ensures a complete DTM trace is available for the construction
of the section along the project edge.
TM14 Central Docking Section
TM24
The convention of labelling docking and helper sections so that their purpose can be identified is
recommended, e.g. TM24_Dock_W. The section carries the same name in the two adjacent model
tiles.
The image below shows 4 Docking sections surrounding a non-rectangular project, in map, 2D and
3D window.
91
Digitizing sections from rasters
Sections can also be produced by digitizing over georeferenced vertical sections that can be
displayed in the section window as rasters. These might for example include sketches of exposures,
depth converted seismic profiles, geophysical sections or pre-existing published sections. Raster
management is described in section 4.4.1.
4.4.5 Section checking, editing and snapping tools
NOTE: The following functions update all lines in the selected section.
Densify line displays an entry screen to type in the maximum distance (in the ‘W’ dimension – i.e.
along section from left to right) in metres between two adjacent nodes that is permitted along
correlation lines, where this distance is exceeded an equally spaced node(s) are inserted to populate
the line.
Smooth line displays an entry screen to type in the distance in metres (in the x dimension) between
two adjacent nodes that is permitted along correlation lines, this function however not only
populates the line but changes the shape of the line to a smoother shape.
92
Line before population or smoothing
Line populated (nodes every x metres in x dimension), line shape remains
Line smoothed (nodes every y metres in x dimension) line shape smoother
Join correlation lines
To join two correlation lines, with the Info tool in the section window active hold down Ctrl on the
keyboard and click on the two lines one after the other. If the lines are of the same attribute and
their end-points do not overlap then a dialog appears and the join will be performed. If the lines
overlap the user is prompted thus:
93
Clicking “No” will perform a naïve join and will result in an overturned fold in the correlation line. If
the user attempts to join two lines with different attributes then the join can still proceed but the
user must respond to the following prompt:
Clicking “No” will abort the join operation. Clicking “Yes” will re-attribute the second line to that of
the first and then perform the join. The result of a successful join operation will be shown
immediately in the section window.
Snapping correlation lines to map linework
It is desirable, that the correlation line digitizing is as accurate as possible with-respect-to the map
linework. Correlation lines can be ‘snapped’ to map linework positions where the unit name
attributes match. Locations in the section where a piece of map linework crosses over are shown by
crop arrows with small rectangular boxes displaying the colour of the map line unit:
Hovering over these arrows whilst holding down the Shift key will display a tooltip describing the
type of map linework that is crossing over.
These arrows are calculated by finding the intersection between the line of the section on the map
and the piece of map linework (i.e. the boundary of a unit envelope). Their elevation in the section
(Z-position) is calculated on-the-fly by using the model cap (DTM) and the GVS to find where the
arrow should sit relative to any existing correlation lines in the section. By default, the arrows will
rest on the model capping surface (DTM), and hence represent locations where the correlation line
94
outcrops at the ground surface. If a correlation line of a unit that is stratigraphically higher up is
present at that location the arrow will automatically drop down to rest on the other unit’s
correlation line. This represents a position of subcrop of the unit represented by the arrow against
the base of another overlying unit.
When a correlation line is drawn in section, GSI3D will automatically attempt to snap the line to the
crop arrows. In the below example, an outcrop of Sandstone exists between the two arrows. BY
drawing the line roughly as below:
GSI3D tries to snap the ends of the line automatically to the arrows upon the double-click to end
line. The following confirm dialog is shown, together with an option to hide such messages:
And the line is auto-snapped:
This helps to improve the accuracy of correlation in section by encouraging the interpretation to
match the map linework.
NOTE: To prevent auto-snap, hold down the Ctrl key whilst digitizing.
95
Existing linework can be snapped retrospectively by using the node edit tool in the section window.
To snap an existing correlation line to an outcrop or subcrop arrow, use the line edit tool and hold
down the Ctrl key on the keyboard whilst dragging the correlation line node towards the base of the
arrow. If the geological unit attribution of the map arrow and the correlation line match then the
line node will snap to the arrow.
The ideal situation is to have all correlation lines snapped to their outcrop and/or subcrop locations
in section.
Snapping correlation lines to other sections
It is desirable, that the correlation line digitizing is as accurate as possible with-respect-to the
correlations digitized in other sections that intersect with the current section (known as ‘crossing
sections’). Correlation lines can be ‘snapped’ to crossing section positions where the unit name
attributes of the correlation line match. Locations in the section where a correlation line from
another section intersects with the current section are shown by crossing section arrows which
display in the colour of the intersecting correlation line’s unit attribute. The attribution of the
crossing section arrow can be interrogated by holding down the Shift key in info mode, and hovering
over the arrow. Arrows usually appear as a vertical stack signifying where multiple correlation lines
from one section intersect with the current section:
When digitizing, GSI3D tries to snap nodes of the line automatically to the crossing section arrows
upon the double-click to end line. GSI3D will do this by inserting a new node at the location of the
crossing section arrow. The following confirm dialog is shown, together with an option to hide such
messages:
96
NOTE: To prevent auto-snap, hold down the Ctrl key whilst digitizing.
Existing linework can be snapped retrospectively by using the node edit tool in the section window.
To snap an existing correlation line to a crossing section arrow, use the line edit tool and hold down
the Ctrl key on the keyboard whilst dragging the correlation line node towards the base of the
arrow. If the geological unit attribution of the crossing section arrow and the correlation line match
then the line node will snap to the arrow.
The ideal situation is to have all correlation lines snapped to their corresponding crossing section
arrows.
Snapping map linework to sections
As well as being able to snap correlation lines in the section to the cropline arrows it is also possible
to snap the map linework to the correlated extent in the map window. This function is not active by
default because the calculation of these positions can impede graphics performance. To activate the
functions, right-click in the map window and choose Window Properties. In the properties dialog
that appears, make sure that the options for “Geological contact points” are checked on and click
OK:
97
Make a geological unit editable via Right-click > Switch on edit in the ToC. The map will now show
the correlated extent of that unit as a series of thick lines; these lines show where the unit has been
correlated in the sections. Also, the end-points of the correlations lines will be shown as “target”
circles.
The map linework (envelope boundary) can be snapped to these target circles. To do this, use the
node edit tool in the map window toolbar to select an envelope boundary. Next, choose the node
that will be snapped to the target circle. Hold down the Ctrl key on the keyboard and drag the node
towards the target. When the node is close to the target the snap will occur. A confirmation will be
shown:
98
There are two types of target circles; outcrop and subcrop. Green target circles indicate positions
where the end of the correlation line in the section is at (or very close to) the ground surface or
model capping layer (DTM). Hence the green targets represent outcrop positions. Red target circles
indicate positions where the end of the correlation line in the section is beneath the surface. Hence
the red target circles represent subcrop positions. The picture below shows a geological unit resting
partially on top of the one being edited. Note how the target circles are red where the overlying unit
sits on top of the unit being edited (the overlying unit is shown with 50% transparency so that the
unit below is visible)
4.5Geological units
This folder, present only in the map and 3D windows, contains the individual geological units, for
ease of working these are usually ordered in accordance with the gvs.
The units contain shapes or coverages defining the extent (presence-absence) of the unit in plan
view. Their coverage may be composed of outcrop and/or subcrop.
After calculation the triangulated top/base and volumes are contained within the individual unit
entries in the ToC of the map window.
4.5.1 Geological units tools and properties
A right click on the overall geological units folder gives the following options
99
Create geological unit(s)
This option produces the list of geological units contained in the GVS that have not yet been created
in the project. The required unit(s) is/are selected and clicking OK opens an empty object with the
unit name(s) in the folder.
The following options are self-explanatory
Send all objects to 3D
Send visible objects to 3D (i.e. all sections currently switched on)
Hide all objects
Show all objects
Delete all objects
100
Draw units in map in list order orders the geological units in the map view as they are listed in the
ToC (which might not be the right order in the GVS, see below)
Invert list reverts the order in the ToC, but not in the map, Draw units in map in list order must be
used to re-order the map view.
Sort unit list in GVS order orders the ToC list in GVS order – again the map view will not changed
unless Draw units in map in list order is used.
Import and Export expands to the following sub-menu
Export all to GOCAD exports all geological untis into Gocad *.ts format. The
dialog box below show the default setting which will export the top, base
and unit shell, removing ticks allows for example only shells to be exported.
The Export all as grids option brings up the standard windows save box enabling the user to save the
top, base and thickness (unitname_b for base, unitname_t for top and unitname_th for its
thickness), of all the modelled units as individual ASCII or surfer grids. This is carried out as a batch
job for all the units in the stack. The cell size can be selected and the grid extent is set to the total
area of the model, but this can also be changed to export a bspoke area of the model. Clicking on the
folder icon on the top left brings up the standard Windows save dialog, here a folder needs to be
selected for the export.
101
Export unit map as shapefile exports the map window content as an attributed shape file (*shp).
NOTE: This option does not export the full coverages of all units but deliberately creates a single
shape file of the current map view. To obtain full coverage of a geological unit as a shape file the
unit can be isolated and the exported. Alternatively the ESRI toolbox (see section 6) can be used to
batch convert all coverages.
Layout contains
Set map transparency on all units Self Explanatory
Set map transparency on visible units Self Explanatory
Right click on the individual geological units produces the following menu.
102
Undo Self-explanatory
Redo Self-explanatory
Unit ID displays the gvs code for unit (inactive )
Expanding the calculate option gives the following sub-menu
Calculate unit (non-faulted unit) calculates this individual unit in isolation from the rest of the stack
– this allows for a quick look at the emerging unit.
NOTE: the unit top will not be correct if it is overlain by other geological units, as these will not be
considered in the calculation.
Clean geological unit (top/base errors) cleans any areas of the unit’s calculated top and base where
the two surfaces overlap, cross-cut or coincide. Depending on the model this may only make a very
small difference to the end result, but in some cases may provide a cleaner calculated result. The
normal calculation routine ignores this step by default.
Clip to model capping surface will do the same as Calculate unit (non-faulted unit) but trim any
triangles that go above the capping surface see Section 5
Volume and Area displays the volume and area of the calculated unit (in sq and cu metres)
Create edit, merge and paste tools contains functions to:
Paste shapes
This function pastes polygons copied from the geological shape file into the receiving editable unit
after copying from objects in the map folder (see below)
103
Merge (dissolve) another unit into this unit can be used to merge (dissolve) other geological units in
the project into the active unit using the selection dialog shown below.
NOTE: This function should be used with care as it cannot be un-done
After a successful merge the user gets prompted to also re-attribute all correlation lines from the
merged unit, see screen below. Again, this should be carried out with care.
Simplify unit map linework simplifies the map linework using the Douglas-Peucker algorithm and a
user-specified distance tolerance. All vertices in the simplified linework will be within this distance of
the original line.
http://en.wikipedia.org/wiki/Ramer%E2%80%93Douglas%E2%80%93Peucker_algorithm
104
Import and Export expands to
Import linework from another GSI3D project allows the import of envelopes from legacy projects
directly into this geological unit.
Import Elevation grid
Selecting this option allows the user to import an existing ascii grid into a geological unit using the
following standard loading box.
In this process the raster is automatically triangulated and so can be used in model calculation
NOTE: When saving the project the imported surface(s) it will be saved as part of the model *.gsipr
file.
Import GOCAD TIN (TOP) & (BASE)
This function allows the direct import of GoCad Tsurf TINs into a geological unit for calculation.
NOTE: When saving the project the imported surface(s) it will be saved as part of the model *.gsipr
file.
105
Add scattered data points
This function allows extra data points such as points along contour lines or scattered helper points
where data is sparse to support the conceptualised geometry of the unit. Selecting the option
produces a standard loading box.
The data points are imported as tab-separated xyz ascii data in *.dat format., note this file does not
contain a header which is shown below for explanation only. The unit must already contain an
envelope.
Point name
X
Y
Z
A1
620227
245907
21.36207
NOTE: When saving the project the imported data points will not be saved as part of the model
*.gsipr file.
Export as grid (*.asc)
This function enables the export of the base and/or top of an individual geological unit as an ASCII
grid. Use the Top/Base check boxes to choose which aspects to export.
106
This standard save box requires the user to define the cell size and extent of the grid, the default
value the cell size is model dependant and the extent is the whole project area.
The following two options enable interchange of surfaces with the GoCad modelling package
Export to GOCAD
This function will export the geological unit into proprietary GoCad format. The created TINs will be
an exact copy of the GSI3D TIN .
The default option is to export the base, to and shell of the geological unit. The image below shows a
GSI3D modelled unit in Gocad (top and base as well as the entire watertight shell)
107
108
Export Correlation points
This function exports all the correlation points (excludes envelope derived x,y,z) from the sections as
comma-separated x,y,z values in ascii format (see below) to a named file *.txt
This function exports all points (envelopes and correlation nodes) as comma-separated x,y,z values
in ascii format to a named file *.dat
Export all points exports all base points of the geological units (includes correlation and envelope)
into the same format as above.
Send to 3D
sends an individual geological unit to the 3D viewer
Properties as shown below
Layout tab
The display settings of the TIN can be specified for the map, section and 3D windows
In the 2D Settings the TIN can be displayed as an Envelope (coverage) as the TIN , as points or as the
areal extent. Transparency can be set and a texture image can be loaded
109
In the 3D Settings are options for Gouraud, triangle mesh, flat and contour plus a dialog box to
specify Transparency on the tops, bases and walls of the geological unit.
Send to front
self-explanatory
Send to back
self-explanatory
Switch on edit
makes the object editable
Delete object
self-explanatory
Isolate object
self-explanatory
Isolate within group
self-explanatory
Exclude/Include when calculating when calculating can be used to exclude a unit (for example made
ground or all Quaternary deposits) from the calculation
General Info tab gives a very basic summary of the number of lines for the geological unit in the
map, and the number of nodes digitised in section for the unit.
4.5.2 Constructing and working with Envelopes
There is often no unique or correct way to construct an envelope but some general guidance is
provided here using data from the TM14 mapsheet around Ipswich in southeast England..
Geological map of TM14 Ipswich showing surface geology (10 x 10 km)
110
111
Data loaded, *.gvs, *.gleg, dtm (*.asc) geological map shapefiles (*.shp) for surface and top
bedrock.
Screen grabs are of the map window or parts thereof.
NOTE: In these examples some of the units are superficial others are unfaulted bedrock
Here examples are given for drawing 6 envelopes from TM14 the alluvium, river terrace deposits
envelopes can be largely drawn from the surface geological linework, the Kesgrave sands and gravels
requires a combination of surface outcrop information and data from sections and boreholes on its
concealed limits, the Red Crag envelope is drawn simply from the bedrock geological linework which
was produced from the sections and the Lower London Tertiaries envelope involves combining a
stack of bedrock units. The Glacial Channel deposits envelope is drawn entirely from the correlations
along the sections as it is completely buried and only recorded in deep boreholes. Together these
examples illustrate the use of the various envelope drawing tool functions and the types of envelope
likely to be encountered in superficial and simple bedrock geology.
NOTE: Where envelopes continue to the margins of project areas they must be drawn to extend
beyond the limits of the area to be calculated as defined by the interactive TIN coverage.
Procedure
First select Tools > Create geological unit(s) and select the six units required identified by their
correct codes, this places entries into the ToC of the map window for each. Expand geological units
folder to confirm their presence
1. Alluvium Envelope
112
Being the youngest deposit the alluvium envelope is simply constructed by
1. Right click on the alluvium entry and switch on edit, the unit name changes to red and the4
extent of the unit in sections is displayed as a colour coded band along the sections
2. Either using the Info tool to select each polygon of alluvium from the surface geology shape
file and individually insert them into the envelope using the insert selected polygon tool.
When complete switch the geology map off and on to check all strips of alluvium have been
added into the layer Or right click on the surface geology map and select show Open shape
table, resize the table as needed to view the first few columns clearly, click on the attribute
column displayed by the map (right click map and check under properties if unsure) and the
rows order alphabetically, then highlight all the rows with the appropriate alluvium code and
minimise the table, return to right click on the surface geology map and select copy shapes
then right click on the editable alluvium unit (destination) >Extra Functions>Create, edit,
merge and paste tools and select paste shapes to insert the polygons into the Alluvium unit.
NOTE: if the selected polygon is a multipart shape file in Arc all the other parts of this unit will
be copied as well. If this is not desirable, the multipart needs to be dissolved in Arc. The
individual parts can be viewed in the below shp table.
113
3. Return to the attribute table and select all entries in the table (Ctrl + A) to return to the
surface geology map display , switch off the surface geology map to inspect the alluvium
polygons.
4. Switch off edit and right click on the unit>Extra Functions>Calculate>Calculate unit as nonfaulted unit, the display should refresh with the extent of the unit along sections now
showing in green. Right click on the unit again>Properties and in the dialog box tick on and
select a colour for points within the 2D settings. Update, the nodes for the base of the unit
available for calculation are now displayed.
5. Ensure that the bases of the unit in sections correspond precisely with the selected
polygons.
6. Stretch the envelope (polygons) at mapsheet margins to just beyond boundaries, Switch off
edit
7. Save the workspace
114
Completed Alluvium envelope of TM14
Detail of the Alluvium envelope showing lines of continuous correlation (green line) along sections
and nodes(green crosses) along sections and boundaries.
115
2. River Terrace Deposits Envelope
These occur flanking the alluvium, peat and intertidal deposits and almost everywhere beneath
them. We will assume that laterally they pinch out to coincide with the edge of these overlying
deposits where no fringing river terrace exists. The low terrace fringing the alluvial tract and the
deposits beneath the alluvial tract (lowest terrace) are not subdivided in this illustration.
Procedure
1. Right click on the river terrace deposits entry and switch on edit, the unit name changes to
red and the extent of the unit in sections is displayed as a colour coded band along the
sections
2. Either using the Info tool to select each polygon of river terrace, alluvium, peat and
intertidal deposits from the surface geology shape file and individually insert them into the
envelope using the insert selected polygon tool. When complete switch the geology map off
and on to check all strips of river terrace have been added into the layer Or right click on the
surface geology map and select show Open shape table, resize the table as needed to view
the first few columns clearly, click on the attribute column displayed by the map (right click
map and check under properties if unsure) and the rows order alphabetically, then highlight
all the rows with the appropriate, alluvium, peat, intertidal deposits and river terrace code
and minimise the table, return to right click on the surface geology map and select copy
shapes then right click on the editable river terrace unit (destination) >Extra
Functions>Create, edit, merge and paste tools and select paste shapes to insert the
polygons into the river terrace unit.
3. Return to the attribute table and select all entries in the table (Ctrl + A) to return to the
surface geology map display , switch off the surface geology map to inspect the river terrace
polygons.
4. Click on the Fill islands/holes icon and allow time to refresh, the polygons where in contact
or should fuse to make an envelope corresponding to all the alluvial deposits along the
valleys.
5. Switch off edit and right click on the unit>Extra Functions>Calculate>Calculate unit as nonfaulted unit, the display should refresh with the extent of the unit along sections now
showing in green. Right click on the unit again>Properties and in the dialog box tick on and
select a colour for points within the 2D settings. Update, the nodes for the base of the unit
available for calculation are now displayed.
6. Within the area of the selected envelopes there should be no breaks in the green correlation
line along any of the sections. If there are, then at these points river terrace deposits are
thought to be absent and if such cases are found then Switch on edit and use the polygon
drawing tool to draw the absent areas, these are then cuts it out from the envelope leaving
a hole within the polygon
Note the river terrace deposits are assumed to be present throughout unless otherwise
proven.
116
7. Stretch the envelope (polygons) at mapsheet margins to just beyond boundaries, Switch off
edit
8. Save the workspace
Completed River Terrace Deposits envelope
3. Kesgrave Sands and Gravels Envelope
The drawing of the Kesgrave Sands and Gravels envelope is more complicated and there are several
ways to approach it. The approach described below starts by selecting just the surface outcrop
polygons and extends them outwards and merges them as needed to produce the envelope.
1.
Right click on the Kesgrave Sands and Gravels entry and switch on edit, the unit name
changes to red and the extent of the unit in sections is displayed as a colour coded band
along the sections
2. Either using the Info tool to select each polygon of Kesgrave Sands and Gravels from the
surface geology shape file and individually insert them into the envelope using the insert
selected polygon tool. When complete switch the geology map off and on to check all crops
of Kesgrave Sands and Gravels have been added into the layer Or right click on the surface
geology map and select show Open shape table, resize the table as needed to view the first
few columns clearly, click on the attribute column displayed by the map (right click map and
check under properties if unsure) and the rows order alphabetically, then highlight all the
rows with the appropriate Kesgrave Sands and Gravels code and minimise the table, return
to right click on the surface geology map and select copy shapes then right click on the
editable Kesgrave Sands and Gravels unit (destination) >Extra Functions>Create, edit,
117
merge and paste tools and select paste shapes to insert the polygons into the Kesgrave
Sands and Gravels unit.
3. Return to the attribute table and select all entries in the table (Ctrl + A) to return to the
surface geology map display , switch off the surface geology map to inspect the Kesgrave
Sands and Gravels polygons.
4. Start to extend the surface outcrop polygons by chopping off using the split polygon
function large chunks encompassed by the top of the unit i.e. areas where younger strata
generally overlie the Kesgrave Sands and Gravels. Extend the simplified polygon produced by
using the polygon cutting tool ( which can be used to cut away areas of absence as well as
presence) to conform to the extent of the unit at depth as shown as a colour band along the
sections.
5. Where two of these expanding polygons meet drag one over the other to create an obvious
overlap and then use the combine polygons tool to unify them.
6. Compare the emerging pattern with the geological map, and identify any areas where totally
buried subcrops are present, insert these into the layer using the draw polygon tool to
encompass colour band areas along the sections and query any nearby boreholes not on
sections to help refine the shape.
7. Identify any holes within the main polygons where the Kesgrave Sands and Gravels are cut
through by younger deposits, this is done by examining the continuity of the correlation
colour band along the sections where identified also examine any nearby boreholes not
incorporated in sections to help refine the shape. Again use the draw polygon tool to cut
away the deposit
8. Switch off edit and right click on the unit>Extra Functions>Calculate>Calculate unit as nonfaulted unit, the display should refresh with the extent of the unit along sections now
showing in green. Right click on the unit again>Properties and in the dialog box tick on and
select a colour for points within the 2D settings. Update, the nodes for the base of the unit
available for calculation are now displayed.
9. Ensure that the bases of the unit in sections correspond precisely with the selected and
constructed polygons. To make changes Switch on edit
10. Stretch the envelope (polygons) at mapsheet margins to just beyond boundaries
11. Save the workspace
118
Outcrop of the Kesgrave Sands and Gravels and nodes shown as crosses along sections showing
extent of subcrops
Detail of above
119
Completed envelope for the Kesgrave Sands and Gravels
4. Red Crag Envelope
The Red Crag is a bedrock unit, its envelope is best constructed using the bedrock geology map
polygons rather than the surface geology version. It is overlain in parts of the area by the Chillesford
Sand the uppermost bedrock unit shown in mustard colour on the bedrock geology map.
1. Right click on the Red Crag entry and switch on edit, the unit name changes to red and the
extent of the unit in sections is displayed as a colour coded band along the sections
2. Either using the Info tool to select each polygon of Red Crag and Chillesford Sand from the
bedrock geology shape file and individually insert them into the envelope using the insert
selected polygon tool. When complete switch the geology map off and on to check all the
crops of Red Crag have been added into the layer Or right click on the bedrock geology map
and select show Open shape table, resize the table as needed to view the first few columns
clearly, click on the attribute column displayed by the map (right click map and check under
properties if unsure) and the rows order alphabetically, then highlight all the rows with the
appropriate Red Crag code and minimise the table, return to right click on the surface
geology map and select copy shapes then right click on the editable Red Crag unit
(destination) >Extra Functions>Create, edit, merge and paste tools and select paste shapes
to insert the polygons into the Red crag unit.
120
3. Return to the attribute table and select all entries in the table (Ctrl + A) to return to the
surface geology map display , switch off the surface geology map to inspect the Red Crag
polygons.
4. Hit the fill island/holes button to merge the crops of the Red Crag and Chillesford Sand
where they are in contact.
5.
Switch off edit and right click on the unit>Extra Functions>Calculate>Calculate unit as nonfaulted unit, the display should refresh with the extent of the unit along sections now
showing in green. Right click on the unit again>Properties and in the dialog box tick on and
select a colour for points within the 2D settings. Update, the nodes for the base of the unit
available for calculation are now displayed. Switch on edit
6. Update the map window and use the crosses and green correlation lines on the sections and
boreholes if any to decide whether the Red Crag extends beneath all the Chillesford Sand
crops. Revise polygons as necessary.
7. Stretch envelopes at mapsheet margins to just beyond boundaries
8. Switch off edit and save workspace
Red Crag envelope
5. Lower London Tertiaries Envelope
121
The Lower London Tertiaries bedrock envelope (Lambeth Group and Thanet Sand Formation
undifferentiated) is again relatively straightforward , where it is present it always rests on the
Chalk and is not cut through in this area by any younger bedrock units.
1. Right click on the Lower London Tertiaries entry and switch on edit, the unit name changes
to red and the extent of the unit in sections is displayed as a colour coded band along the
sections
2. Either using the Info tool to select each polygon of Lower London Tertiaries and the
overlying London Clay, Red Crag and Chillesford Sand from the bedrock geology shape file
and individually insert them into the envelope using the insert selected polygon tool. When
complete switch the geology map off and on to check all the crops of have been added into
the layer Or right click on the bedrock geology map and select show Open shape table,
resize the table as needed to view the first few columns clearly, click on the attribute column
displayed by the map (right click map and check under properties if unsure) and the rows
order alphabetically, then highlight all the rows with the appropriate Lower London
Tertiaries and the overlying London Clay, Red Crag and Chillesford Sand codes and minimise
the table, return to right click on the surface geology map and select copy shapes then right
click on the editable Lower London Tertiaries unit (destination) >Extra Functions>Create,
edit, merge and paste tools and select paste shapes to insert the polygons into the Lower
London Tertiaries unit.
3. Return to the attribute table and select all entries in the table (Ctrl + A) to return to the
surface geology map display , switch off the surface geology map to inspect the Lower
London Tertiaries polygons.
4. Hit the fill island/holes button to merge the crops of the Lower London Tertiaries , London
Clay Red Crag and Chillesford Sand where they are in contact.
5. Switch off edit and right click on the unit>Extra Functions>Calculate>Calculate unit as nonfaulted unit, the display should refresh with the extent of the unit along sections now
showing in green. Right click on the unit again>Properties and in the dialog box tick on and
select a colour for points within the 2D settings. Update, the nodes for the base of the unit
available for calculation are now displayed. Switch on Edit
6. Use the crosses and green correlation lines on the sections and boreholes, if any, to decide
whether the Lower London Tertiaries extends beneath all the London Clay, Red Crag and
Chillesford Sand crops. Revise polygons as necessary.
7. Identify any windows where quarries or superficial deposits have cut through the Lower
London Tertiaries into Chalk by examining the bedrock map closely and also spotting breaks
in the green line continuity of the deposits along sections crossing the major polygons, there
are 5 in all. If polygons are mapped select polygons to produce holes, otherwise use the
draw polygon tool to produce the holes.
8. Stretch envelopes at mapsheet margins to just beyond boundaries
122
9. Switch off edit and save workspace
Bedrock geology of TM14 mustard colour Chillesford Sands, purple Red Crag, blue London Clay red
Lower London Tertiaries and white Chalk. Produced by stacking envelopes in their correct
stratigraphic order.
Lower London Tertiaries envelope
123
6. Glacial Channel deposits Envelope
Glacial Channel deposits up to 50m thick occur infilling deeply incised tunnel-valleys in the Ipswich
area. Some but not all of these features lie below the floors of the major present day valleys such as
the Gipping-Orwell system.
The deposits are known only from boreholes and they do not crop out at surface, construction of an
envelope for these deposits is thus achieved by displaying the correlation nodes along the sections in
the map window. In this case it was useful to draw additional short helper sections in varied
orientations to include all boreholes encountering the deposits in order to define tightly the extent
of these buried deposits. The surface geology of central Ipswich is shown below left The extent of
the deposits is indicated below right as a continuous purple line along the lines of section with each
node shown as a cross. Even with closely spaced sections several possible ways of joining up the
segments of purple lines-crosses. In this case the alignment of the present valley and the expected
direction of ice-flow were taken into account in drawing the form of the final envelope.
1. Right click on the glacial channel deposits entry and switch on edit, the unit name changes
to red and the extent of the unit in sections is displayed as a colour coded band along the
sections.
2. Using the draw polygon tool construct polygons to envelope the extent of the deposits
proved in the sections (all available boreholes were used to produce the sections)
3. Stretch the envelope (polygons) at mapsheet margins to just beyond boundaries if needed,
Switch off edit
4. Save the workspace
Some 19 units are represented in the stacked model for TM14 of which six have been presented
here as examples of varied styles of envelope construction. The main types are:
Totally exposed units i.e. outcrop = envelope (young unit not overlain) e.g. the Alluvium
example above.
Units with outcrop and subcrop exemplified by the Kesgrave Sand and Gravel envelope i.e.
envelope = outcrop + subcrop
Concealed units such as the Glacial Channel deposits i.e. envelope = subcrop
124
Merging envelopes
By loading two adjacent projects into the same project (and saving as a new*.gsipr project file) the
overlapping envelopes which are stretched just beyond tile limits in construction they can then be
merged into continuous envelopes using the envelope editing tools.
Merging two geological units into a single entity
It is possible to merge one geological unit into another. This might be useful if bringing two sets of
work together where the same unit has been attributed differently by two workers, or where, during
the course of modelling, a decision is made to merge two units into one for geological reasons or for
reasons of generalization. For example, if two river terraces have been modelled and on further
inspection are found to be parts of the same unit.
NOTE: it is always advisable to backup or save the project immediately before a merge operation
as a backup to avoid unnecessary un-picking if the result is not what was desired.
The merge function has two phases, the second of which is optional.
1. Take a copy of the map linework into the 'master' unit
2. Optionally synchronize all section correlation lines with the change by re-attributing lines
First choose which of the two geological units will be the ‘master’ unit. This is the unit which has the
attribution and name that you wish to keep. To merge the two units, R-click on the unit selected as
the host or 'master' unit and select Extra functions > Create, edit, merge and paste tools > Merge
(dissolve) one unit into this unit. You will be presented with a list of all the other geological units in
the project workspace.
125
From the list, select the unit to merge into the 'master' unit, and click OK. Then when prompted
confirm the merge because some aspects of the merge are potentially profound and cannot be
undone simply.
Phase I - Copy map linework
The first phase will take a copy of any map linework found (i.e. envelopes) and paste into the master
unit. Note that this copy of the linework is now fully independent of the other unit's linework and
following the merge it is possible to delete the other unit from the project (GSI3D will not do this
automatically, it will leave the other unit in the workspace complete with its original map linework).
Also note that GSI3D will not check for duplicate lines, so if present it is necessary to remove them
manually in the usual way. When linework has been pasted in, the following confirmation occurs.
Phase II - Synchronize all sections
The second phase is optional. It allows synchronization all of the sections in the project with the
change to the master geological unit. This action will rename all correlation lines attributed as the
'mergee' unit to match the attribution of the master unit. GSI3D will again produce a confirmation
dialog (below). Note that this operation is undoable, but only on a section-by-section basis, so think
carefully before undertaking this operation as the undo process will be extremely laborious when
the project contains many sections.
Note: It is always best to take a backup of the project before attempting such operations in case
the end result is not desirable.
126
Choosing to synchronize the sections will carry out this task and then report how many sections
were affected by the renaming.
Once the merge is complete hit F5 to refresh the section and the map to see the effects of the
changes. At this stage carry out some checks to confirm that you achieved the expected result have
been achieved before proceeding with modelling.
4.6 Boreholes
Much of the work involved with boreholes takes place outside the GSI3D software and involves the
assembling of borehole index (*.bid) and downhole (*blg) tab-separated files using a text editor.
Data held in other tables or spreadsheets can be readily imported and edited into the required
formats shown in Section 2.4. Consistency of coding and the establishment of codes for lithology,
stratigraphy etc. is all an integral part of building a GSI3D model.
Within the project the borehole locations are displayed in the map window and these can be colour
coded into those that have downhole logs and those that don’t, also a depth interval can be
specified to discriminate between shallow and deeper boreholes.
The boreholes when selected in the Map window are displayed in the borehole log window with
labels for the coding and depths. Up to 4 separate parameters can be displayed for a single log
drawing on the columns in the *.gvs file. Both colours and textures can be displayed. The boreholes
can be incorporated into sections with the same display options as in the borehole log window and
also sent to the 3D window for visualisation alongside other datasets. Whilst borehole information is
very desirable in modelling it is not a prerequisite and many satisfactory models have been
constructed without any boreholes.
Once a model has been calculated synthetic boreholes can be ‘drilled’ through the model by
identifying the location in the map window, and selecting the synthetic borehole icon from the map
window toolbar (Section 3.3.1) the results are displayed in the borehole log window.
4.7 Maps
Maps imported as raster images (commonly as *.jpg, *.png and *.gif) are held in the maps folder in
the ToC of the map window. They can also be sent to the 3D window as flat objects or draped onto
surfaces such as a dtm. The maps require correct georegistration into a metric grid format contained
in an accompanying worldfile e.g. *.jpgw file. Maps used commonly include topographic maps for
locational control, geological maps to be used as a guide for section construction (e.g. thickness,
contours, extent plots). Also classified as map objects are plan view images such as colour-ramped
dtms , aerial photographs, satellite imagery, horizontal geophysical scans and borehole-datapoint
locations.
127
After right-click on a map image object the below dialog box allows for setting of transparency,
grayscale and other filters.
Tip: Using the Save Map as image function (see Section 3.3.1) a map can be created of the current
view and directly re-loaded into the map window
NOTE: Raster images commonly produce very large files and these can adversely impact on the
performance of GSI3D. Degraded or sub sampled images should be used where possible. A
maximum size of 10Mb is recommended.
4.8Folds
Fold axes can be inserted into GSI3D sections as a guide for drawing, they are however not used in
calculation. They are drawn in the Map window, displayed in sections and can be sent to the 3D view
for visualisation.
4.8.1 Fold tools and properties
Right click on the folds folder in the ToC gives the following options
Create new fold
Layout expands to a toggle to display or switch off the areal extent of the fold axial planes
Plus the following self-explanatory items, Send all objects to 3D, Send visible objects to 3D, Hide all
objects, Show all objects and Delete all objects.
128
Right click on an individual fold in the ToC gives
Model fold axial plane See below Section 4.9.2
Extra Functions contains options to export the fold axial plane , Export as grid (.asc), Export as
GeoObject TIN and Export TIN as GOCAD TS.
Send to 3D Self Explanatory
Properties Exactly as for faults (Section 4.8.1) and TINs (Section 4.3)
And the self explanatory options to Send to front, Send to back, Switch off/on edit (toggle) Delete
object, Rename object, Isolate object, Isolate within group
4.8.2 Digitising and Shaping fold axes
Digitising fold axial traces
1. Right-click on the folds folder icon in the Table of Contents of the Map Window and
select Create new fold from the drop down menu
2. Give the fold a unique identification e.g. “axis” in the dialog box, the fold is then added
to the folder
3. Right click on the individual fold name and select switch on edit from the drop down
menu, the fold name becomes highlighted in blue to indicate it is the active editable
object
4. Select the draw line icon from the toolbar and left click at one end of the fold axis to
place a node and then place nodes along the mapped fold axis at regular intervals
finishing the line with a double click, the axis then colours blue and is labelled at its
origin
5. Select the edit nodes icon to perform adjustments to the node string if required, click on
the line to display the nodes then drag nodes using left click and hold (drag and drop). A
single click along the line inserts an extra node and double clicking deletes a node.
6. When satisfied with the digitized fold axis right click on the fold name in the Table of
Contents and select switch off edit from the drop down menu. Save the workspace
7. Repeat the procedure for the next fold and so on.
129
Antiform (editable) and synform axial traces in the map window
Shaping the fold axial plane
Once a fold or a network of folds, have been digitized there are two methods of defining the shape
Planar fold axial planes
Right click on the fold name (check edit switched off) select Model fold plane. This produces a dialog
box as shown below. There is an option in the header bar to identify the fold as an antiform or a
synform using the drop down list.
The fold axes are by default synforms with crosses indicating converging dips on the trace, whereas
the antiform has diamonds indicating diverging dips. The option exists to make the fold axial plane
planar at a specified dip or shape it by digitizing in the fold modeller window
130
The name of the fold is displayed in the header bar and the vertices (nodes) along the trace are
listed in red with cross symbols in the Table of Contents. Only the settings in the header bar are used
for planar faults enabling the geologist to specify the direction the axial plane dips, left or right w.r.t.
digitization direction ,the Top capping surface is selected from a drop down list the Dip angle of the
plane is specified (0-89.9 degrees, but not vertical) , and the Depth limit of the fold in metres.
Pressing the Make planar propagates the settings along all of the trace, the node (stick) labels turn
black and the fold plane is constructed.
Right click on the folds folder and select Layout and toggle areal extent rendering of fold planes to
on and check the plane(s) dips in the desired direction, if not return to the digitizing window and
switch between left and right
Non-planar fold axes
Here the geologist draws the shape the axialplane at selected points (nodes) along the length of the
trace. This should be used also for a fold axis composed of more than one planar element.
Right click on the fold name, select Model fold plane. Again the Fold Plane Digitizing box opens. The
name of the fold is displayed in the header bar and the vertices (nodes) along the trace are listed in
red with cross symbols in the Table of Contents. The left hand pane is for drawing the fold plane.
On loading the digitizer defaults to the first vertex (node) of the trace switching is by double click
with the editable vertex then highlighted in brown. The pane displays a cross point from which the
dtm (or other capping surface) runs normally to the left of the digitizing direction. If the fold plane
dips to the right switch over the pane by clicking the right button. The blue upper quadrant
represents sky above the dtm (black line) and the grey opposing quadrant is the ground on the other
side of the vertical as the direction of dip.
The shape of the fold plane is digitized in the lower right quadrant, the origin point is already
detected, select the draw line icon and draw the plane using a singleclick to place a node and a
double click to terminate the plane at depth. Once drawn and completed nodes can be dragged and
131
dropped, additional nodes can be added (double click along existing line) and deleted (treble click on
node). On completion the Vertex name in the Table of Contents turns black accompanied by a green
tick.
The fold plane can then be shaped along its’ length in the digitized direction at each vertex (node)
along the trace if required. Where little information exists the shape can be propagated from one
node to others by right clicking on the parent node, select Propagate this brings up a dialog enabling
propogation to a specified number of nodes forwards or backwards along the trace, producing
clones, with the added option to propagate the shape to all other nodes. Other options include
Reset, Show in window and Convert to clone
In the toolbar familiar icons allow, zoom to maximum extent, magnify, zoom out, pan, draw line, edit
nodes, and set vertical exaggeration. In addition a floating clinometer icon is available (click on the
icon and then drag as required) and this can be adjusted using the final clino settings icon. The
window operates at a default vertical exaggeration of 1.
As the fold plane is constructed it is displayed in the map window as a green strip extending from
the axial trace is shown if the areal extent rendering is switched on (r click of folds folder> Layout >),
and the individual nodes on the trace and plane are also displayed. This is a useful check to ensure
that the fold plane has been constructed with the correct dip direction.
Once completed the folds display in any sections drawn across them.
132
4.9 Contours
By right clicking on the contours folder it is possible to create a hand drawn contour, name it and
give it an elevation in the property settings. The contours can then be displayed in cross-sections as
ticks to aid correlations (to show in sections, use right-click> Update in the section window).
Contours cannot be imported from a contour dataset and cannot be displayed in the 3D window.
The image below shows 4 hand digitised contours and their display in section.
5. Calculating and delivering models
NOTE: Before any calculation switch off editing on all objects!
The calculate pull down menu is shown below and expands to two options
Calculate all units from sections and envelopes
This function starts the standard calculation of all geological objects as Triangulated Irregular
Networks (TINs). This process calculates all tops, bases from loaded sections and envelopes. Walls
are calculated where the unit extends to the edge of the calculated area as specified by the DTM.
133
NOTE: It is not always desirable to use the same TIN for the model construction (model capping
surface) and the model calculation (calculation TIN). For calculation to proceed cleanly a second
copy of the capping surface TIN can be created and then trimmed back to fit within the correlated
area of the model (i.e. trimmed back to be within the area covered by sections). This is done by
editing the calculation TIN and drawing a polygon for the boundary, and then trimming the TIN
data back to that polygon boundary.
During model calculation the progress bar on the bottom right of the screen shows progress.
Also, the legend box alongside each unit in the map window ToC will display an asterisk “*” after it
has been calculated. This acts as a visual guide to calculation progress, and the asterisks will be
removed after the calculation run. Units are calculated from the top of the GVS to the bottom in
order.
Once the calculation is complete, a dialog appears to confirm the process has finished. Press ok to
return to the project.
Model calculation can take from a few seconds to several tens of minutes, and the following factors
will affect the time required to calculate the entire model:
Scale and resolution of the model capping TIN (DTM).
Number of geological units modelled.
Complexity (node density and line polygon count) of unit envelopes.
Complexity (node density within and number of sections) of sections.
NOTE: In GSI3D v2011 the model calculation runs as a separate process. This means that the
graphical interface of GSI3D will remain responsive, even during very long model calculation runs.
134
This may be useful, but the user should be aware that making edits to linework during a
calculation could have unpredictable results and should be avoided.
The calculated TINs are added to the geological units in the ToC and can be displayed in the Map
Window by changing their Properties or in the 3D Window by right click and send to 3D view. Full
details on how to display calculated geological objects are in Section 5
The Calculate all units (to DTM) from sections and envelopes function allows the calculation to be
trimmed by the dtm. This will remove all triangulations above the DTM and produce a cleaner
model, but the calculation will take longer to complete.
NOTE: where these errors occur (e.g. triangles penetrate the DTM) the geological unit will be
removed and not pushed beneath the DTM
Create horizontal slice enables the user to cut a precalculated superficial model at a specified
elevation and produce a map which can be exported as a shape filed and viewed in 2D and 3D.
The image below shows a synthetic horizontal section in the map window and a series of slices in 3D.
5.1 Checking, analysing, visualising and exporting models.
As with any process of building a model there is the need for continual checking, cross checking,
editing and validation of the data and the model using all the tools and functions described. This is
an iterative process and continues until the confidence in the model produced is high enough for it
to be deposited in the appropriate geological data store(s) or published.
135
All the following analytical and visualisation functions are useful for validating calculated models.
For a detailed check of the calculated model it is recommended that each constructed section is
displayed with its correlation lines together with those of the calculated model (see picture below).
This is best done with the polygons switched off, as this shows any mismatches very well. Correlation
lines can then be iterated and using the update function the revised lines can be viewed instantly
and more nodes can be added to the correlation line if necessary.
Model checking – where the lines appear yellow there is an exact match between correlation line
(black) and model line (blue)
136
Synthetic boreholes
As described in section XXX after calculation the model can be inspected using the synthetic log
button. All synthetic logs are displayed and listed in the borehole window.
Synthetic sections
One of the best insights into the integrity of the produced model is to draw synthetic sections
through it this can be along or across geological and geomorphological structures
To create synthetic sections:
1. Load the project and calculate
2. Go to Tools: create new section. Name the section then use the info tool to place the cursor
on the map and use add point to section in the section window. Repeat this until you have
the completed cross-section.
3. Set the properties in the section window (right click) and tick on synthetic lines, polygons
and textures to display the section.
4. Set the appropriate vertical exaggeration
137
A particular use of this functionality is to predict ground conditions along pre-determined routes
such as flood embankments, tunnels and pipelines, or to help to evaluate the merits of several
proposed routes.
Combining multiple sections in the 3D window leads to the creation of fence diagrams such as the
one below, based on a regular 2 kilometre spacing.
Synthetic fence diagram for TL83, viewed from the south-east, note these are calculated not drawn
sections.
138
Synthetic slices
A particularly useful way of testing and presenting your model is to generate horizontal slices at
various elevations as illustrated below. The procedure is select calculate horizontal slice from the
calculate pull down menu and specify the elevation in metres relative to datum (e.g. 50, 10,-10) in
the dialog. After calculation the slice appears as a map object in the map window labelled according
to its height.
From top left to bottom right, solid model for TM14 and horizontal slices at OD, +20 and +40 metres
white areas in the slices are cut through air (above ground level).
The model can at present only be sliced automatically along planar surfaces, but in the future this
will be possible along irregular and or tilted surfaces such as a reduced DTM, a watertable or a
planned excavation.
TIP: By loading any surface instead of the DTM (having changed the top entry in the GVS file to fit
the file name) and loading all sections, envelopes and gvs, a geological model can be calculated at
that particular surface.
Sub- and Supercrop maps
These maps show the arrangement of geological strata resting below or above any defined
geological horizon most commonly unconformities such as base of Quaternary, top of Chalk and top
of Palaeozoic basement. In GSI3D it is possible to instantly produce these plots for any surface (top
and base) defined in the GVS. These maps are generated by looking at the sequence in ascending or
139
descending order (see Section XX) and switching on or off the units you which to be represented in
the ToC of the Map Window
.
Below are two examples taken from the Ipswich area.
Supercrop map on the top of the bedrock for TM24 (areas in white show “air” e.g. bedrock at
outcrop)
Subcrop map on the base of Anglian and younger deposits.
140
Contoured surfaces and thicknesses
It is possible to analyse every geological unit by displaying the elevation of its top and base and
thickness as a shaded relief map or with contour lines at user specified intervals.
Contours on the base of the Red Crag Formation for TM24: Colour ramp red for low elevations to
green for high elevations, interval 1m.
Shaded relief map of the top of the Red Crag Formation for TM24: Colour ramp from brown for high
elevations through green to blue for low elevations.
Shaded relief maps can also be produced for the thickness of individual layers or combined packets
of strata. Several examples are given below
141
Relief shaded map of the thickness of the Red Crag Formation for TM24: Colour ramp from brown
for thickest deposits through green to blue for thin deposits. Notice the feather edge to the deposits
on valley sides depicted by the blue rim.
The below image shows a thickness grid in map view, a crossection view of the thickness (purple
line) and a comparison between the thickness grid and the actual till body in 3D
142
Exploded views
The most impressive tool of all for displaying the model is the ability to explode the layers in the
stack by transposing their z values up or down to achieve separation, this procedure is described
above in Section 3.4.2. Using this function to alter the positions of layers and switching them on and
off geological time can be recreated by sequentially welding the units back together in their
ascending stratigraphical order gradually recreating the block model.
Exploded block model of TM24 down to the Chalk viewed from the northwest.
143
By switching off certain layers in the ToC of the 3D window the geometry of individual or selected
units can be examined as shown above.
Model delivery
Models are only useful if they are fit for purpose and are delivered in ways that suit the needs and
skills of the end users. GSI3D directly supports a range of standard outputs that enable you to
publish your modelling in several different ways. Many more outputs such as 3D shape files, real
time fly throughs can be generated and visualised using 3rd party software by converting or directly
importing the project xml (*.gsipr). Outputs from GSI3D modelling can include:
Images (map, cross section and 3D) to produce diagrams for reports, an example blow
Videos captures of the 3D window (described in Section 3.5.1)
3D PDFs
144
In order to create a 3DPDF from GSI3D 2011Adobe Acrobat Pro Extended needs to be installed on
the computer,. Then follow the workflow below.
1. Open GSI3D Project. Decide what you what to make a 3D PDF of (Cross-Sections, Calculated
model, surfaces)
2. Open Adobe Acrobat 9 Pro Extended
3. In Adobe Acrobat go to File – Create 3D PDF – From 3D Capture
4. A dialog box will open (Fig.1 ) Click on Yes as this will enable to use GSI3D for 3D PDF
capture.
5. Close down the GSI3D and re-open with your preferred 3D objects (Note - this only has to
be done once as Adobe Acrobat will recognise the GSI3D software in the future)
6. Send objects to GSI3D 3D Window and put the object in the 3D window into Plan View
(Fig.2)
7.
You can change the settings using the following dialog box in Adobe Acrobat (Fig.3) – accept
defaults for first attempt
8. Press the Print Screen key on your keyboard – this will make the 3D Window flash in GSI3D
and bring up the following dialog box in Adobe Acrobat (Fig. 4)
145
9. In the 3D Conversion settings in Adobe Acrobat 3D – change the default settings to U3D
ECMA Standard Ed 3. This will allow you to edit the 3D PDF using the 3D Reviewer (allows
you to re-name objects and pre-set views etc...). Accept the other defaults.
10. The GSI3D 3D object will be captured as a 3D PDF (Fig.5). Please note that the vertical
exaggeration of the 3D PDF will revert back to ‘1’.
Exports to other geoscience and environmental modelling packages such as ESRI and Gocad (e.g.
GRID or triangle mesh data files)
146
On the GSI3D Research Consortium website a number of tools are available to convert GSI3D project
data into ESRI format: http://www.gsi3d.org/additionalDownloads.html. Below is an image
of a converted project in ARCMap 9showing the tools available.
GSI3D supports seamless export to Gocad for onwards modelling (see image below), for exports to
other software products, please contact the GSI3D Helpdesk.
147
7. Glossary
ASCII
American Standard Code for Information Interchange
Base
The lower boundary of a particular geological unit GSI3D deals exclusively
with the base of geological units in drawing cross-sections
DEM
Digital Elevation Model. Collective term for DTMs and DSMs
DTM
Digital Terrain Model – Model of surface of the solid Earth (generally the
boundary between geosphere and atmosphere or hydrosphere). This is
traditionally derived from OS contours and spot heights and should
therefore exclude all buildings, trees, hedges, crops, animals etc. Sometimes
also referred to as ‘bald earth’ models
DSM
Digital Surface Models are elevation models that include height information
from surface objects, such as trees and buildings, as well as from the terrain
itself. Examples include unfiltered LIDAR, NEXTMap and photogrammetry
produced elevation models
Envelope
Defined here as the extent of a geological deposit in plan view (2D): forming
a distribution map of the particular unit, a presence – absence map.
GeoSciML
Geoscience Mark-up Language
GSI3D
Geological Surveying and Investigation in 3D
GML
Geoscience Mark-up language
GOCAD
Geoscience modelling package developed by a French-led consortium
Grid
A rectangular grid attributed with elevation or thickness values of a
particular geological unit. GSI3D exports grids as ‘ASCII grids’ (*.asc) or
SURFER grids (*.grd)
GSI3D TIN
Proprietary TIN export from GSI3D in VRML format 1997
GSIPR
The GSI3D mark-up schema and file extension for project files since Version
2.5.
GXML
The GSI3D mark-up schema and file extension for project and TIN files up to
version 2
Java
The software programming language in which GSI3D is written. GSI3D runs
within a Java process called the Java Runtime Environment, which is
installed as part of the GSI3D setup.
Map
A map is the polygonal representation of geological units or domains
projected to a plane perpendicular to the earth’s surface.
148
Objects
Geological units in a model stack comprising top, base and walls (a.k.a
Volumes).
OD
Ordnance Datum, reference base level used in the UK
Outcrop
The area where a geological unit is intersected by the earth’s surface (DTM).
Project File
A *.gsipr file generated in GSI3D containing constructed sections and
envelopes prior to model calculation
RCS
Rock Classification Scheme (in 4 volumes) describing and defining all ‘Rock
types’ occurring in BGS datasets . These have been codified into an ORACLE
table and are published on the www.
Rockhead
Loose term referring to the surface at the top of the bedrock, where
Superficial Deposits are present it corresponds to their base.
Section
Defined here as a vertical x, z plane
Shells
The outer bounding surface or skin of a 3D object or volume
Slice
Defined here for a horizontal x, y plane
Start Height
Term used in SOBI for the level at the top of a borehole, usually equates
with the height of the surface (DTM) but not always. Equivalent to the collar
height.
Subcrop
The distribution of a buried/concealed geological unit beneath younger
deposits.
Subsurface Viewer
An independent software produced by INSIGHT GmbH used to package
finished models for sale to customers. The viewer enables basic slicing and
dicing analysis of the model which is encrypted within the software. The
model cannot be altered or import additional data, the software is not
available in a stand-alone form at present.
Supercrop
The distribution of geological units above an older deposit or on a plane of
unconformity.
Superficial Deposits
Term used to describe the Quaternary, generally unconsolidated, geological
deposits. Sometimes also called drift
Surface
Base or top of a geological unit exported as grid or TIN
ToC
Table of Contents, the left hand marginal panel of the four dynamically
linked GSI3D windows
TIN
Triangular Irregular Network. GSI3D exports TINs in Indexed Triangle Mesh
format (VRML97)
149
Unit
A geological unit is a particular geological deposit that has been identified
and mapped out during a GSI3D project. A unit is defined by a surface on its
base and an envelope of its lateral extent.
Volumes
Geological units in a calculated model stack comprising top, base and walls
(a.k.a Objects).
XML
Extended Mark-up language.
XMML
Extended Mining and Exploration Mark-up language
8. Bibliography
A full bibliography of GSI3D related outputs can be found at http://en.wikipedia.org/wiki/GSI3D
Refernces cited in this manual include
Dabek, Z.K., Williamson, J.P., Lee, M.K., Green C.A. and Evans C.J. 1989. Development of advanced
interactive modelling techniques for multicomponent three-dimensional interpretation of
geophysical data. Periodic Report to the Commission of the European Communities. British
Geological Survey Technical Report WK/89/23R
Hinze, C., Sobisch, H-G & Voss, H-H: 1999 Spatial modelling in Geology and its practical Use.
Mathematische Geologie, 4, 51-60.
Kessler, H & Mathers S.J. 2004 Maps to models Geoscientist 14/10 4-6.
Kessler, H., Mathers, S.J. & H.-G. Sobisch. 2009. The capture and dissemination of integrated 3D
geospatial knowledge at the British Geological Survey using GSI3D software and methodology.
Computers & Geosciences, 35, 1311–1321.
Mathers, S.J. & Zalasiewicz, J.A. 1985. Producing a comprehensive geological map, a case study – The
Aldeburgh – Orford area of East Anglia. Modern Geology 9, 207-220.
Sobisch, H-G. 2000. Ein digitales raeumliches Modell des Quartaers der GK25 Blatt 3508 Nordhorn
auf der Basis vernetzter Profilschnitte. Shaker Verlag, Aachen.113pp.
150
9. Appendix
Keyboard shortcuts
A number of keyboard shortcuts and keyboard modifiers allow you to access functionality more
conveniently then via complex menu options. Here is a list of the keyboard shortcuts found in GSI3D
that are designed to make modelling tasks easier, quicker or more accurate.
F-Keys
F1 - Help
Opens the online help or user manual, depending on the version of the software.
F3 – Layout perspectives
Cycles through the available window layout perspectives. Layout perspectives alter the size and
position of the windows in the UI to make particular tasks easier. They save you having to arrange
the screen yourself by manually dragging window dividers. Press repeatedly to see all of the
available perspectives.
F4 – Correlation line nodes
Toggles the display of correlation line nodes in a section. When active the digitized nodes of all
correlation lines will be drawn as a small rectangle. End nodes are filled with blue. This is very useful
for checking sections.
F5 – Refresh/Update
Performs the same function as R-Click > Update in the section window to force a complete refresh of
the graphics.
F7 – Tooltips
151
Toggles tooltips on and off. Press once to activate tooltips, press again to de-activate them. Tooltips
appear in the section and map windows when the mouse is hovered over an identifiable object. In
the section window you can identify unit names on correlation lines and information about crossing
sections. When the tooltips are switched off you can also enable them temporarily by holding down
the Shift key whilst hovering the mouse cursor over linework or objects. Note that tooltips may
cause graphics to flicker where there is lots of data or complex linework.
F11 – Undock/Dock windows
Undocks and re-docks the UI windows. When undocking, all of the windows and the menu bar are
separated out into individual windows. When docking the windows again the standard layout
perspective is applied. The same functionality can also be accessed via Windows > Split/Dock.
Other keys
Esc – Cancel operation
The function of the Esc (Escape) key varies depending upon the context. When digitizing linework in
sections it will delete the current line you are working on.
Ctrl+G – Section graticule
Toggles the section graticule on and off.
Ctrl+H – Map graticule
Toggles the map graticule on and off.
Ctrl+K – Toggle clinometer
Toggles clinometer on and off in the section window.
Shift – Mouse modifier
In the section and map windows, holding down the shift key whilst moving the mouse cursor will
activate tooltips. If you move the mouse over a suitable object (e.g. a correlation line or a crossing
section down-arrow) you will see a tooptip describing that object. This is similar to some of the
functionality of the info tool but without having to switch navigation modes.
Ctrl – Mouse modifier
In the section window, holding down Ctrl then clicking two lines will attempt to join those lines into
a single object.
152