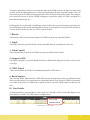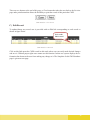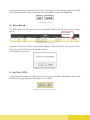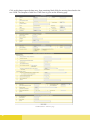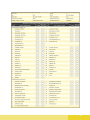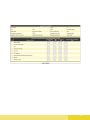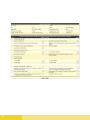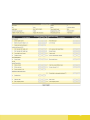
1
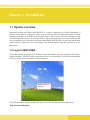
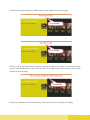
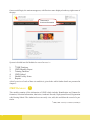
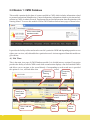
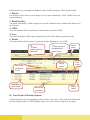
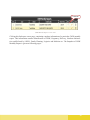
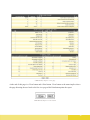
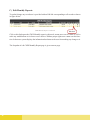
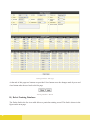
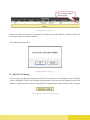
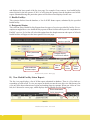
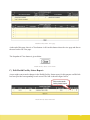
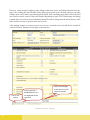
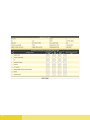
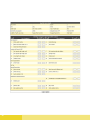
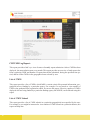
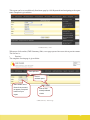
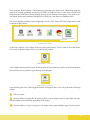
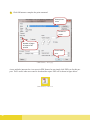
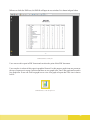
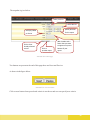
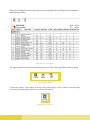
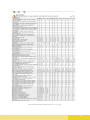
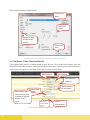
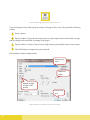
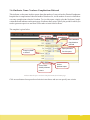
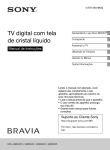
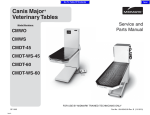
User’s Manual
MNCH Managment Information System
Document Series
2011-2012
copyright © 2012
No parts of this document shall be manually or digitally copied without written consent of Technical Resource
Facility. For further information, please contact TRF.
Table of Contents
Chapter 1: Introduction
1.1 System overview
1.2 Login to MNCH-MIS
1.3 Data Flow Diagram
1.4 Contacts
Chapter 2: Data Management
1
3
3
8
8
2.1 Menu
13
2.2 Module 1: CMW Database
A) List View:
B) View Details:
C) Edit Record:
D) Delete Record:
E) Add new CMW
2.3 Module 2: CMW Monthly Reports
A) List View:
B) View Detail
C) Edit Monthly Reports:
D) Delete Monthly Report:
E) Add New Report
2.4 Module 3: Training Database
A) List View:
B) View Detials of Training Database
C) Edit Training Database:
D) Delete Training Database:
E) Add New Training:
2.5 Module 4: CMW Schools
A) List View:
B) View Details of CMW Schools
C) Edit CMW Schools
C.1- Add New Batch:
14
14
15
17
19
19
21
21
22
26
30
30
33
33
34
35
36
37
40
40
41
42
43
ii
Table of Contents
C.2- Edit Batch:
C.3- Delete Batch:
D) Delete CMW School
E) Add New School
2.2 Module 5: Health Facility Status
A) List View
B) View Health Facility Status Report
C) Edit Health Facility Status Report
C) Delete Health Facility Status Report
D) Add New Health Facility Status Report
47
47
48
53
60
61
3.1 Reports
3.2 CMW MR Log Report
3.3 CMW Summary
3.4 Antenatal Care
3.5 MNCH-DHIS Indicator Mapped Report
3.6 Indicator Base Report
3.6.1 Indicator Name-Antenatal Care Percentage
3.6.2 Indicator Name: Maternal complications Referred
3.6.3 Indicator Name: Maternal Deaths
3.6.4 Indicator Name: Newborn Complications Referred
71
74
80
88
93
99
100
103
106
109
Chapter 3: Reports
iii
44
44
45
46
69
Chapter 1
General Information
• Module 1 CMW Database
• Module 2: CMW Monthly Reports
Chapter 1: Introduction
1.1 System overview
Maternal Newborn and Child Health (MNCH) is a project, undertaken by Health Department of
Pakistan which aims to congregate, collect, process and store all the information related to Health
Department so that it is available to the decision makers. This in turn is expected to improve status
of health and health services. As the name implies, this project primarily focuses on availability and
access to health services of mothers, newborns and children. MNCH-MIS is a web based information
system which is expected to serve this purpose. This manual explains what this system how to use
this system.
1.2 Login to MNCH-MIS
To use this system you need access to internet. To open the database in a page, navigate to the browser
(Internet Explorer, Mozilla Firefox, google chrome etc.) icon on desktop or click start menu and then
click icon for the browser installed on your computer.
Double click your
browser
This will open a new window as shown in figure where you can type the following address:
http://www.mnchmis.pk
3
Type URL(in address bar)
Following window will appear in front of user.
User will click the login button and this will open a dialogue box, where user can enter his/her credentials in order to get access to the system.
Enter Username
This is security
code
Type security
code here
4
Enter Password
Click to login
On incorrect username and password detection, system displays the error message.
Error Message
Error Message
Security code is generated afresh everytime user has to login to the system. User must type they
security code into the text box just below this code. If user types an incorrect security code, system
displays an error message.
Error Message
If however, username, password and security code is also correct, user logins successfully.
5
On successful login, the main menu appears, with Province name displayed at the top right corner of
the page.
Username &
Province Information
System is divided into Six Modules for ease of access. i.e.
1:
2:
3:
4:
5:
6:
1CMW Database
CMW Monthly Report
Training Database
CMW School
Health Facility Status
Reports
A brief overview of each of these six modules is given below while further details are presented in
chapter 2:
CMW Database.
1
This module contains all the information of CMW which includes Identification and Content Information, Selection Information, Admission, Academic Records, Deployment Record, Registration
with Nursing School. The Authorized user can easily view, add, edit and delete the record of a particular
1CMW.(CMW: stands for Community Mid Wife)
6
CMW Monthly Reports
2
This module contains the CMW monthly reports submitted by CMWs. These reports provide information related to number of cases attended by CMW including Pregnancy, Delivery, Newborn
Information, Number of Referrals by LHW’s, Family Planning, Logistics and Medicine availability
information etc.
All these information is for particular month. The Authorized user can view, add, edit and delete the
monthly report of a particular CMW.
Training Database
3
This module contains the information about trainings, which include Identification information (like
topic and level of training, training period, venue and sponsor information), Trainers, and Participants records. In Health Department, different type of trainings are held for skills improvement of
CMW’s. All these trainings information are saved in this module. The Authorized user can view, add,
edit and delete the training report.
CMW School
4
This module contains information of all the CMW Schools which are working under Health Department. The Authorized user can view, add, edit and delete school from the system.
Health Facility Status
5
This module contains the information about Health Facility status including identification information about health facility (like Facility code, Facility type (BHU, RHC, etc), Facility Name, and
Quarter Year) and all relevant information about health facility which includes information of general
management and infrastructure, staff, medicine, supplies, equipments and information about clinical
audits (number of deaths investigated) at the health facilities. The Authorized user can view, add, edit
and delete health facility status report.
Reports
6
This module contains reports about everything in MNCH, such as List of CMW, List of CMW School,
CMW MR Log Report, Summary CMW School batch, CMW summary, antenatal care, CMW monthly activity, CMW MR consolidated, MNCH-DHIS Indicators mapped, Indicator base reports. Difference between these reports and CMW Monthly Reports is that CMW Monthly Reports are individual
reports while these are consolidated reports. The Authorized user can preview and print the reports.
Moreover, user can also view reports in PDF format once he has opened a report for preview.
7
1.3 Data Flow Diagram
Log In
CMW DB
CMW MR
•
•
•
•
•
•
•
•
View
Add New
Edit
Delete
View
Add New
Edit
Delete
1.4 Contacts
Islamabad:
Mr. Mata-U-Rehman
Support Manger
Phone# 051-2823179
Website: www.eycon.co
Sindh:
Mr. Zeeshan Aslam
Support Engineer
Phone# 051-2823179
Website: www.eycon.co
Khyber Pakhtukhwa:
Mr. Basit Elahi
Support Engineer
Phone# 051-2823179
Website: www.eycon.co
8
Training
Database
•
•
•
•
View
Add New
Edit
Delete
HF Status
CMW
School
•
•
•
•
View
Add New
Edit
Delete
•
•
•
•
View
Add New
Edit
Delete
Reports
•
•
Preview
Reports
Print
Reports
Punjab:
Mr. Salman javaid Awan
Support Engineer
Phone# 042-35511112, 35291827
Website: www.eycon.co
Balochistan:
Mr. Mata-U-Rehman
Support Engineer
Phone# 051-2823179
Website: www.eycon.co
Azad Jammu & Kashmir (AJ&K):
Mr. Mata-U-Rehman
Support Engineer
Phone# 051-2823179
Website: www.eycon.co
9
Chapter 2
Data Management
• Module 1: CMW Database
• Module 2: CMW Monthly Reports
• Module 3: Training Database
• Module 4: CMW Schools
• Module 5: Health Facility Status Checklist
Chapter 2: Data Management
In this chapter we explain all modules of MNCH-MIS in detail.
2.1 Menu
On successful login user is directed to the Home page that contains links to all modules of MNCHMIS. Moreover, there are two additional links “history” and “Management”. History page contains a
log of activities performed by user after logging onto the system. User can therefore keep track of his
activities on the system. Management button on the other hand, allows user to change password and
provides the flexibility to select a desired color scheme for the system to suit the taste of user.
Snapshot of homepage showing links to various modules is given below:
There are six modules of the system as shown in figure above and briefly discussed in previous chapter:
•
CMW Database
•
CMW Monthly Reports
•
Training Database
•
CMW Schools
•
Health Facility Status
•
Reports (This module contains consolidated reports about each and everything that is
part of MNCH MIS, discussed later in this chapter)
13
2.2 Module 1: CMW Database
This module contains the bio-data of women enrolled in CMW which includes information related
to personal and national Identification, Contact Information, information related to selection and admission in CMW, Academic Records, Deployment Record and information about Registration with
Nursing School. To access this module click on CMW Database link on home page as shown below:
Click to access CMW
database module
It provides the facility to filter and search record of a particular CMW and depending upon the access
rights; user can view, add, edit and delete a particular record. Actions supported from this module are
given below:
A) List View:
This is the main view page of CMW Database module. It is divided into two sections. First section
provides the facility to search CMW record while second section displays a list of all entitled CMWs
and allows you to navigate to the record directly. Corresponding to each record user is provided
the option to view, edit and delete that
record.
Search by
specific
criteria
Search by
entering
CMW name
1
View from a
List of CMW
records
Click to add new
CMW
14
2
Click to search
Clears preselected
criteria
Click to
View
Click to
Edit
Click to
Delete
To search a particular record, user can enter the name of the CMW as shown in figure by mark 1 and
on click of search button (adjacent to text box) system displays the user requested record/s. User can
also search records of CMWs based on particular criteria as shown in figure by mark 2. For example,
user can search records of all the CMWs belonging to a particular school, or CMWs assigned to a
particular Health Facility etc.
In filter panel, user is provided with different criteria to filter the records. Selecting a particular criterion will display all the records matching that criterion, in lower panel of the page which can then be
viewed, edited or deleted by the user. Those criteria include:
1. District:
On selection of this criteria system displays all CMWs from the user specified District.
2. Tehsil:
All CMWs from user specified Tehsil within a particular district, are displayed to the user.
3. Union Council:
This criterion filters records of all CMWs from user specified Union Council.
4. Assigned to HF:
All CMWs assigned to a specific Health Facility are filtered and displayed in lower section of list
view page.
5. CMW School:
This criterion filters all CMWs who attended a particular CMW school.
6. Batch Number:
This criterion further filter down the CMW School results by displaying to the user all batches from
above specified school. User can then select a particular batch to view records of CMWs in that batch.
As a result of this filter all CMWs from a specific batch of a specific CMW school are shown to the
user.
B) View Details:
As discussed above, corresponding to each record is a View link. A click on this link displays complete detail of a CMW. View link is shown in figure below:
Click to view
complete record
CMW Database: Edit Link
15
Clicking this link opens a new page, displaying complete information of a particular CMW. This
information contains Identification and Contact Information, information related to selection and
admission in CMW program, Registration with Pakistan Nursing School, Academic and Deployment
Record. The Snapshot of View Page is given below:
CMW Database: View page
16
There are two buttons at the end of this page: a Close button that takes the user back to the list view
page and a print button that allows the flexibility to print the record of this particular CMW.
CMW Database: Close button
C) Edit Record:
To update/change any record user is provided with an Edit link corresponding to each record as
shown in figure below.
Click to edit
CMW record
CMW Database: Edit Link
Click on this link opens the CMW record in edit mode where user can easily make desired changes
and save it. Without proper rights user cannot use this function. In that case system displays the information but obstructs the user from making any change to it. The Snapshot of edit CMW database
page is given on next page.
17
CMW Database: Edit page
18
At the end of this page two buttons are provided. Save button saves the changes made by user while
Cancel button discards changes and exits to main page without saving any modifications.
CMW Database: Buttons
D) Delete Record:
The Delete link in the list view table deletes a particular CMW record. The link is shown in figure
below.
Click to delete
CMW record
CMW Database: Delete Link
When user clicks on the link, he is prompted to confirm or deny the deletion. User may click OK to
delete the record or click Cancel to terminate deletion.
The Snapshot is given below.
CMW Database: Delete dialogbox
E) Add New CMW:
Authorized user can add a new CMW record. For this purpose Add New CMW Button is given at the
end of list view page. Snapshot of this button is given below.
CMW Database: Add New CMW button
19
Click on this button opens the data entry form containing blank fields for entering data related to the
new CMW. The Snapshot of Add New CMW form is given on the following page.
CMW Database: Add New page
20
User fills the form with details about a particular CMW, whose record user intends to add to the system. At the end of the page user is provided with two buttons. Save button saves the new record to
the database while the Cancel button discards the new record and takes the user back to the list view
page.
CMW Database: Buttons
2.3 Module 2: CMW Monthly Reports
This module contains the CMW monthly reports submitted by CMWs. To access this module click
on CMW Monthly Reports link on the home page as shown below:
Click to access CMW
Monthly Reports Module
These reports provide information related to number of cases attended by CMW including Pregnancy, Delivery, Newborn Information, Number of Referrals by LHW’s, Family Planning, Logistics and
Medicine availability information etc. All these information is for a particular month. The Authorized
user can view, add, edit and delete the monthly report of a particular CMW. Actions supported from
this module are given below:
A) List View:
This is the main view page of CMW Monthly Reports Module. It displays list of monthly reports submitted by CMWs. Corresponding to each record user is provided the option to view, edit and delete
that record.
Main view page is divided into two sections. The upper section provides the facility to search reports
while lower section facilitates direct navigation to reports. In upper section you can search reports
based on CMW name (by entering CMW name in search textbox) and clicking search button adjacent
to search textbox. This will display all the reports submitted by her. Moreover, “Filter By” allows the
facility to filter a group of records based on particular criteria.
21
In filter panel, user is provided with different criteria to filter the reports. Those criteria include:
1. District:
On selection of this criteria system displays list of reports submitted by all the CMWs of the user
specified District.
2. Health Facility:
All reports submitted by CMWs assigned to a specific Health Facility are filtered and displayed in
the list panel.
3. CMW:
This criterion filters all the reports that are submitted by a particular CMW.
4. Year:
This criterion displays CMW reports submitted by all the CMWs during a particular month.
5. Month:
This criterion filters all the report of a particular month, submitted by every CMW.
1
Search
monthly reports by
CMW name
Filter a group of
records based on
specific criteria
Click to
search
Click to clear
preselected
criteria
CMW Monthly
report record
2
Click to add
new report
Click to
search
Click
to edit
Click to
delete
B) View Details of Monthly Reports:
As discussed above that corresponding to each record is a View link. A click on this link displays the
full and complete detail of a CMW monthly report. View link is shown in figure on next page.
22
View link
CMW Monthly Reports: View Link
Clicking this link opens a new page, containing complete information of a particular CMW monthly
report. This information contains Identification of CMW, Pregnancy, Delivery, Newborn Information, and Referral by LHW’s, Family Planning, Logistics and Medicine etc. The Snapshot of CMW
Monthly Report is given on following pages:
23
24
CMW Monthly Reports: View page
At the end of this page is a Close button and a Print button. Close button as the name implies closes
the page directing the user back to the list view page while Print button prints the report.
CMW Monthly Reports: Close button
25
C) Edit Monthly Reports:
To update/change any record user is provided with an Edit link corresponding to all records as shown
in figure below.’
CMW Monthly Reports: Edit Link
Edit Link
Click on this link opens the CMW Monthly report in edit mode, means user can view data as well as
make any modifications to it wherever user desires. Without proper rights user cannot use this function. In that case system displays the information but obstructs the user from making any change to it.
The Snapshot of edit CMW Monthly Report page is given on next page.
26
27
28
CMW Monthly Reports: Edit page
29
At the end of this page two buttons are provided. Save button saves the changes made by user and
close button takes the user back to the list page.
CMW Monthly Reports: Buttons
D) Delete Monthly Report:
The Delete link in the list view table deletes a particular CMW monthly report record. The link is
shown in figure below.
Delete Link
CMW Monthly Reports: Delete Link
When user clicks on the link, he is prompted to confirm or deny the deletion. Click ok to delete the
record and cancel to terminate deletion.
The Snapshot is given below.
CMW Monthly Reports: Delete page
E) Add New Report:
This feature is available for only specific authorized users. At the end of the list view page, user is
provided with an Add New Report Button.
CMW Monthly Reports: Add New CMW button
30
Click on this button opens the data entry form. It contains blank fields for entering data of new
CMW Monthly Report. Snapshot of Add New Report form is given on next page.
31
CMW Monthly Reports: Add New Report page
At the end of the page user is provided with two buttons. Save button saves the new record while the
cancel button terminates the process and takes the user back to the list view page.
CMW Monthly Reports: Buttons
32
2.4 Module 3. Training Database
As has been discussed previously, for capacity building of CMWs various trainings are conducted
from time to time. This module contains the information about trainings given to CMWs. To access
this module, click on Training Database link on home page as shown below.
Click to access
training module
This module provides three types of information; that is about Training, Trainers, and Participants.
User can filter trainings based on topic of training and depending upon the access rights; user can
view, add, edit and delete a particular training record. Actions supported from this module are given
below:
A) List View:
This is the main view page of Training Database module. It has two panels; upper panel has the facility to filter records based on certain specified criteria, while lower panel displays a list of all training
sessions and user can directly navigate to view details of a particular session. Corresponding to each
record user is provided the option to view, add, edit and delete that record.
In filter panel, user is provided with different criteria to filter the records. Those criteria include:
1. District:
On selection of this criterion system displays all training sessions that are held in the user specified
District
2. Supported by:
On selection of this criterion system displays all trainings that have been sponsored by a particular
(specified by the user) organization. In this list box, all the organizations that have sponsored one
or more training are listed and user can select a particular organization to view details of trainings
sponsored by it.
3. Topic:
On selection of this criterion system displays all training sessions that have been held to impart skills
about user specified topic.
33
4. Sub Topic:
This criterion further filters down the training results by displaying to the user all sub topics from
above specified topic. As a result, all trainings from a specific domain of a training topic are shown
to the user.
Click to filter a group
of records on the basis
of specified criteria
Click to
view
Clears preselected
criteria in textboxes
Click
to edit
Click to
delete
Click to add new
training record
CMW training
record
Training Database: Main page
B) View Details of Training Database:
Each training session that has been entered in database forms a training record. As discussed above,
corresponding to each record, there is a View link. A click on this link displays complete detail of that
particular training session. View link is shown in figure below.
Click to view training
session record
As in the above snapshot, record of training on topic DHIS is shown. To view details of this training,
user can click on the view link adjacent to this record and this will direct him/her to a new page displaying all three types of information (training, trainers and participants) about this training session.
This information contains Training Identification, Trainers, and Participants records. The Snapshot of
View Page is given on the following page.
34
Training Database: View page
At the end of this page is a Close button that takes the user back to the list view page.
Training Database: Close button
C) Edit Training Database:
User might want to make some modifications to the information that he has previously entered. To
update/change any record user is provided with an Edit link corresponding to each record as shown
in figure below.
Click to edit training
session record
Training Database: Edit Link
Click on this link takes the user to a new page containing the information related the selected training
and the facility to change/edit that information. Without proper rights user cannot use this function.
In that case system displays the information but obstruct the user from making any change to it. The
Snapshot of edit training database page is given on next page.
35
Training Database: Edit page
At the end of this page two buttons are provided. Save button saves the changes made by user and
close button takes the user back to the list page.
Training Database: Buttons
D) Delete Training Database:
The Delete link in the list view table deletes a particular training record. This link is shown in the
figure on the next page.
36
Click to delete training
session record
Training Database: Delete Link
When user clicks on the link, he is prompted to confirm or deny the deletion. Click ok to delete the
record and cancel to terminate deletion.
The Snapshot is given below.
Training Database: Delete page
E) Add New Training:
Not every user can add a new training record. However, whenever a new training session is held for
capacity building of CMWs, the designated person needs to add record of this training session to the
database. Authorized user can do so using Add New Training button at the end of the list view page.
Training Database: Add New Training button
.
37
When user clicks on this button, a message box appears, asking number of participants of training,
as shown in figure
Training Database: Msg. Box
User needs to enter the number of participants and click OK button to proceed further. On the other
hand, user might click cancel button to terminate the process of adding training record. However, if
user enters number of participants and proceeds further, a data entry form appears, which contains
blank fields for entering data related to the new training. The Snapshot of Add New Training form is
given on next page.
38
Training Database: Add new page
At the end of the page user is provided with two buttons. Save button saves the new record while the
cancel button terminates the process and takes the user back to the list view page.
Training Database: Buttons
39
2.5 Module 4: CMW Schools
This module contains information about CMW Schools which are working under Health Department.
To access this module click on CMW Schools link on homepage as shown below:
Click to access CMW
Schools Module
A) List View:
This is the main view page of CMW School module. It lists down all CMW Schools with view, edit
and delete options displayed corresponding to each record.
Upper section of this page provides the facility to filter records by specifying certain criteria. This
displays all the records that fulfill those criteria. In filter panel, user is provided with following criteria:
1. Province:
On selection of this criterion system displays all CMW Schools from the user specified Province.
2. District:
This criterion further filter down province results and displays all CMW Schools from user specified
District within Province.
Click to clear
already selected
criteria in
textboxes
Click to filter a group of
records of CMW School,
based on specified criteria
Click to add
new school
Click to
view
CMW Schools: Main page
40
Click to
delete
Click to
edit
B) View Details of CMW Schools:
As discussed above that corresponding to each record is a View link. A click on this link displays
complete details of a CMW School. View link is shown in figure below.
Click to view
details of CMW
School
CMW Schools: View Links
Clicking this link opens a new page. This page has two panels; upper panel displays complete information of a particular CMW School while the lower panel displays information about student batches
of that school. The Snapshot of View Page is given on next page.
CMW Schools: View page
At the end of this page is a Close button that takes the user back to the list view page.
CMW Schools: Close button
41
C) Edit CMW Schools:
To update/change any record user is provided with an Edit link corresponding to each record as
shown in figure below.
CMW Schools: Edit Link
Click on this link takes the user to a new page containing the information related to selected CMW
School and the facility to change/edit that information. Without proper rights user cannot exercise
this function. In that case system displays the information but obstructs the user from making any
change to it. The Snapshot of edit CMW School page is given below.
CMW School
Information
School batch
record
Click to add
new batch
Information about
student batches
of this CMW
School
CMW Schools: Edit page
Click to edit a
student batch
Click to delete a
student batch
Just like view CMW School page, edit CMW School page also has two sections, with upper section
42
displaying information about selected CMW School while lower section listing down student batches
of that school. Corresponding to each batch record user is provided the option to edit and delete that
record. While editing a CMW School, user might make changes to School information or he/she may
want to edit information about student batches of that particular school. Both encompass making
changes to that particular school record and for either of these, user needs to use Edit CMW School
option. At the end of this page two buttons are provided. Save button saves the changes made by user
and close button takes the user back to the list view page.
CMW Schools: Buttons
C.1- Add New Batch:
Every time a new batch of students takes admission, the concerned person needs to add a new batch to
this CMW School record. At the end of the edit page, user is provided with an Add New Batch button.
CMW Schools: Add new Batch button
Click on this button opens the data entry form. It contains blank fields for entering data related to the
new batch. The Snapshot of Add New Batch form is given on next page.
CMW Schools: Add new Batch
At the end of the page user is provided with two buttons. Save button saves the new record (which
then appears in the list of school batches in lower section of Edit CMW School page) while Cancel
button terminates the process. However, in either case user is directed back to the Edit CMW School
page.
CMW Schools: Buttons
43
C.2- Edit Batch:
User might want to change something about a particular student batch for example end date might
need to be changed. To update/change any information related to a batch, user is provided with an
Edit link corresponding to each record as shown in figure below.
Click to edit
school batch
CMW Schools: Edit Link
Click on this link opens information related to selected batch in edit mode where user can make appropriate changes. Without proper rights user cannot use this function. The Snapshot of edit batch
page is given on next page.
CMW Schools: Edit page
At the end of this page Save and Cancel button are provided. Save button saves the changes made
by user while cancel button terminates the process and discards modifications. In either case user is
directed back to edit CMW School page.
CMW Schools: Button
C.3- Delete Batch:
The Delete link in the list view table deletes a particular batch record. The link is shown in figure
below.
Click to delete
school batch
CMW Schools: Delete link
44
When user clicks on the link, he is prompted to confirm or deny the deletion. Click OK to delete the
record and Cancel to terminate deletion.
The Snapshot is given below.
CMW Schools: Delete page
D) Delete CMW Schools:
As mentioned earlier, corresponding to each record, view, edit and delete link are provided. The Delete link on the list view page deletes a particular CMW School record. The link is shown in figure
below.
Click to delete
CMW School
CMW Schools: Delete link
When user clicks on this link, he is prompted to confirm or deny the deletion. User can click OK to
delete the record or he/she might click Cancel to terminate deletion.
The Snapshot is given below.
CMW Schools: Delete page
45
E) Add New School:
This feature is available for only specific authorized users. Adding new school means there has been
opened a new CMW School in the district. Therefore, adding a school is restricted to only concerned
authorities. At the end of the list view page, user is provided with an Add New School button.
CMW Schools: Add New School button
Click on this button opens the data entry form. It contains blank fields for entering data related to the
new CMW School. The Snapshot of Add New CMW school form is given below.
CMW Schools: Add new page
At the end of the page user is provided with two buttons. Save button saves the new record while the
cancel button terminates the process and takes the user back to the list view page.
CMW Schools: Buttons
46
2.6 Module 5: Health Facility Status
This module contains information about status of Health Facilities which are working under Health
Department. To access this module click on Health Facility Status link on homepage as shown below:
Click to access Health
Facility Status Module
It provides basic information about health facility along with detailed information about current status of its management and infrastructure, MNCH care staff, MNCH and EmONC services and availability of medicine and equipment. All these information are available for each health facility while
user can also filter a group of health facilities by specifying criteria. Depending upon the access
rights; user can add a new record and view, edit or delete a particular record. Actions supported from
this module are given below:
A) List View:
This is the main view page of Health Facility Status module. Like all modules this page has two panels; upper panel is filter panel while lower panel displays list of all Health Facilities which are linked
to the program and submitting status report. Corresponding to each record user is provided the option
to view, edit and delete that record.
Filter panel allows user to filter records matching a certain criteria. In filter panel, user is provided
with different criteria to filter the records. Those criteria include:
1. District:
On selection of this criterion system displays Health Facility Status report records of all health facilities from the user specified District.
2. Tehsil:
This criterion further filters down District results by displaying all health facilities from user specified
Tehsil within District.
3. Union Council:
On selection of this criterion system displays all health facilities from user specified Union Council
within a District.
4. Quarter:
Health Facility Status reports for a particular quarter, submitted by all health facilities, are filtered
47
and displayed in lower panel of the list view page. For example if user wants to view health facility
status reports for the last quarter of 2011, he will select this quarter from the dropdown and all the
reports submitted during this particular quarter will be filtered and displayed to the user.
5. Health Facility:
This criterion fetches from the database, a list of all HF Status reports, submitted by the specified
health facility.
6. Designated Status:
This criterion filters Health Facility Reports based on types of services provided by facility. For example user might like to view health facility reports of those facilities which provide comprehensive
EmONC services. So, he/she will select this option from the dropdown menu and reports of all such
health facilities will appear in the lower panel of list view page.
Filter records
based on specified
criteria
Clears preselected
criteria in
textboxes
Navigate directly
from a list of records
Click to
view
Click to add new
HF Status report
Click
to edit
Click to
delete
Health Facility Status: Main page
B) View Health Facility Status Report:
The list view page displays a list of all the reports submitted in database. There is a View link corresponding to each record. To view any report in details user needs to use this view link because list
view only tells about submission of report and nothing about its contents. When user clicks on View
link, he is directed to a new page, which displays detailed Health Facility Status Report.
Click to view Health
Facility Status Report
Health Facility Status: View Link
48
As discussed previously, health facility status report provides some basic information about the health
facility to which this report belongs and then follows its management and infrastructure information,
followed by an account of availability of MNCH staff, provision of basic and comprehensive EmONC
services, LHW Referrals, availability of labour room and operation theater equipment, availability of
essential medicine and supplies information.
At the end of the form there are two additional sections which include clinical audit (an account of
number of deaths (maternal, neonatal, child) investigated at the health facility) and follow up and
feedback form that incorporates responses and serve to monitor performance against set targets.
View page is shown in detail on the following pages.
49
50
51
52
Health Facility Status: View page
At the end of this page, there is a Close button. A click on this button closes the view page and directs
the user back to list view page.
The Snapshot of Close button is given below.
Health Facility Status: Close button
C) Edit Health Facility Status Report:
A user might want to make changes in the Health Facility Status report; for this purpose an Edit link
has been provided corresponding to each record. The link is shown in figure below.
Click to edit Health
Facility Status Report
Health Facility Status: Edit Link
53
However, a user must have rights to make changes; otherwise system will obstruct him/her from doing so. By clicking edit link, Health Facility Status report opens up in edit mode and user can make
changes quite easily. Status report being quite detailed, form containing report data has been divided
into various sections; some of which are disabled depending on type of HF. Default page for editing
contains first two sections (basic information about HF and its management & infrastructure) while
links to other sections are present at the end of form.
After making changes to current section, user can save it and then click on link for the section he
wants to edit next. Snapshot of edit page is shown below:
Links to next
sections
Link to section 6 is
disabled because it is
not applicable to this
type of HF
Click to save changes
to this section or click
cancel to exit edit
page
Health Facility Status: Edit page
54
After Editing there is two buttons in end of page i.e.
•
Save
•
Cancel
Health Facility Status: Buttons
If user made any changes to this section which he wants to save, he can click “Save” button to save
these changes. Otherwise, he can click cancel to exit to the list view page.
This form contains eight sections and links are given in the end of form so that user can directly go
to the section which he wants to edit.
•
Section 3
•
Section 4
•
Section 5
•
Section 6
•
Section 7
•
Section 8
•
Follow up Form
Health Facility Status: Sections
In the above snapshot link for section 6 has been disabled because it is not applicable to current HF
type. By clicking each section can open their own page then user can make essential changes quite
easily. Snapshots of each of these sections (accessible by clicking on their respective links) are given
on the following pages:
55
56
57
58
59
D) Delete Health Facility Status Report:
On list view page there is a Delete link which facilitates the deletion of a record in case user wants
to remove a health facility status report from database. Upon clicking delete link, a dialogue box appears which asks to confirm or deny the deletion.
The link is shown in figure below.
Click to delete Health
Facility Status Report
Figure 2.6(D.1): Health Facility Status: Delete link
Dialogue box displays message “Are you sure, you want to delete?” user can click OK button to confirm his/her action. It is quite possible that user have clicked delete link by mistake and do not intend
to delete record. He/she can click cancel to terminate the process of deletion.
60
The Snapshot of message box is given below.
Health Facility Status: Delete page
E) Add New Health Facility Status Report:
Authorized user can add new Health Facility Status Report. For this purpose, Add New Report button
is present at the end of list view page.
Snapshot of the button is shown below.
Health Facility Status: Add new Report Button
Clicking this button opens the data entry form having blank fields for entering health facility status
report data. This form has been divided into sections and user needs to fill in and save a section before proceeding to the next section. Once user has entered and saved basic information about HF, it
continues to appear on top of each of the following sections.
The Snapshots of each of these sections are given on the following pages:
61
Health Facility Status: Add New Report page
User can fill this form with relevant information about the Health Facility for which he is submitting
status report. Clicking save button will take the user to the next section. However, if any of critical
field has been left blank, system will ask user to fill that field first before proceeding to the next section. For example, if user leaves Health facility name blank, even if he clicks save button, system will
not direct him to the next section.
62
63
64
65
66
User will continue to fill each of these sections and click Save to be directed to the next section. At
any stage user can click cancel button which will close the data entry form and direct user to the list
view page. However, once first section is saved record is added to the database even if user cancels
the process later on.
67
Chapter 3
Reports
• Report 1: CMW MR Log Report
• Report 2: List of CMW
• Report 3: List of CMW School
• Report 4: Summary CMW School Batch
• Report 5: CMW Summary
• Report 6: Antenatal Care
• Report 7: CMW Monthly Activity Summary
• Report 8: CMW MR Consolidated
• Report 9: MNCH-DHIS Indicators Mapped
• Report 10: Indicator Base Reports
• Report 11: Demographic Value Report of CMW
CHAPTER 3: Reports
3.1 REPORTS:
This is the last module of MNCH MIS and serves the main purpose of MNCH MIS. As we discussed
before that MNCH MIS is meant to improve status of maternal and child health and provision of
health facilities by facilitating in decision making. All the data that is gathered in MNCH MIS, is
summarized and arranged to provide valuable information for decision makers so that resources can
be shuffled and provided where they are needed the most. So, this module allows user to generate a
number of reports based on a number of criteria. Following Types of reports are available most of
which can be grouped based on district or CMWs.
• CMW MR Log Report
• List of CMW
• List of CMW School
• Summary CMW School Batch
• CMW Summary
• Antenatal Care
• CMW Monthly Activity Summary
• CMW MR Consolidated
• MNCH-DHIS Indicators Mapped
• Indicator Base Reports
• Demographic Value Report of CMW
71
CMW MR Log Report:
This report provides a bird’s eye view of status of monthly report submission. After a CMW has been
deployed, she must submit report every month. This report provides an overview of total reports due
from a particular CMW and number of reports that she has submitted, during the specified time period; and for all the CMWs in the geographical area selected by user.
List of CMW:
This report provides a list of CMWs which fulfill a certain criteria like personal information, geographical area or funding by a particular agency. For example if a user needs to view number of
CMWs who graduated from a particular school, he can use this report. Likewise, number of CMWs
deployed who are being funded by a particular funding agency like MNCH, can be filtered using this
report.
List of CMW School:
This report provides a list of CMW schools in a particular geographical area specified by the user.
For example, a user might be interested to view number of CMW schools in a particular district; this
report can help him.
72
Summary CMW School Batch:
This report can be considered an extension of the previous report (list of CMW School) as it provides
information about number of student batches in a particular CMW School. For example a user might
be interested to know how many batches have been enrolled in this school till date, how many of
them have passed out and how many are still studying in this school. This report is meant to serve
this kind of purposes.
CMW Summary:
This report provides a list of CMWs. That is if user needs to know how many CMWs are there in a
particular district or province or any geographical area specified by the user; this report is meant to
serve his/her purpose.
Antenatal Care:
This report provides an overall status of antenatal care and can be based on CMW or district. In case
of CMW, this report will tell for each CMW, the number of expected pregnancies within catchment
area of each CMW, the number that is registered and status of antenatal care visits. In case of district,
this report will provide the same information for entire district rather than on the basis of CMW.
CMW Monthly Activity Summary:
This report provides brief information about the status of activities performed by a CMW as part
of her job. This information include number of registered pregnancies, number of ANC visits by
patients, deliveries conducted by CMW, family planning services provided by CMW and number of
patients referred by her. All these are basic duties of a CMW. Thus, with the help of this report, a user
can briefly view the overall performance of a particular CMW.
CMW MR Consolidated:
This report is a summed up version of all the information contained in all the Monthly reports submitted by all the CMWs within a particular district. So, information contained in each report is summed
up to provide overall status for entire district.
MNCH-DHIS Indicators Mapped:
This report provides a consolidated view of health services by combining indicators of DHIS with
MNCH and providing an overall report to the user that is much more broad in its scope.
Demographic Value Report of CMW:
This report provides a consolidated view of demographic statistics of patients that are expected to be
73
handled by a particular CMW. For example, it tells total catchment area population assigned to a particular CMW, number of women in that area, number of married women and the number of expected
and registered pregnancies in that area.
Indicator Base Reports:
This report provides status of particular indicator (for example ANC) for entire district or for geographical area specified by the user.
Indicator Base Report can be generated based on a number of indicators which are listed here:
•
Antenatal Care (ANC%)
•
ANC 4% and TT2 2%
•
Delivery%
•
Live Birth %
•
Still Birth%
•
Abortion%
•
Maternal Death%
•
Postnatal (PNC) %
•
Maternal Complications Referred
•
Newborn Complications Referred
•
Family Planning Clients
•
Pregnant Women Referred by LHW
•
Equipments/ Misc. Items
•
Medicines/Supplies
Selecting a particular indicator will generate a report about status of that indicator. For example, if
a user selects maternal deaths percentage, he will get a report indicating number of maternal deaths
during specified time period for which he/she has generated the report.
Each of the above mentioned reports can be accessed directly from home page using Reports tab as
shown in previous figure. Format for accessing each report is fairly same. For the purpose of demonstration a few reports are being discussed here.
3.2 CMW MR Log Report:
CMW MR Log Report contains complete year vise information about CMW Monthly Reports. So,
user can see which month a CMW has submitted a report and which month she missed it. As a CMW
74
must submit report each month, so a report is due each month. This report shows number of reports
due from a CMW within specified time period and number of reports submitted by CMW during that
time. This report can be accessed directly from home page by click Reports tab. Snapshot is given
below.
CMW MR Log Report: Link
When user clicks on the (CMW MR Log Report) link, a new page will open where user can specify
criteria for report by selecting from list boxes. These list boxes are
•
Province
•
District
•
Year
•
Group by
The snapshot is given on next page.
Select province
Select district
Group by CMW or district
Add a header and a
footer that you want
to appear on top and
bottom of your
report
Click to clear
already selected
criteria
Click to
preview report
CMW MR Log Report: Main page
75
Two buttons are present at the end of this page those are Reset and Preview.
As shown in the figure below.
CMW MR Log Report: Preview button
Click on reset button clears preselected criteria in text boxes and user can specify new criteria. When
user clicks on Preview button, report based on specified criteria will open in new window, as shown
in figure below.
CMW MR Log Report: Preview page
Now the above figure shows to user the complete information about a Log of each CMW’s MR.
The above snapshot contains a menu displaying icons for Close, Print, PDF, Bar Graph and Line
Graph as shown in figure.
CMW MR Log Report: Menu
76
As the name implies, each of these icons serves the same purpose. If user wants to close this report,
Close icon as shown in figure below is meant for this purpose.
CMW MR Log Report: Close icon
A user might want to print this report for the purpose of future reference. Print icon as shown in figure
below allows user to print this report directly from webpage.
CMW MR Log Report: Print icon
Upon clicking print icon, following print window will appear. Here, user will perform the following
steps:
1 Select a printer
2
Specify number of pages that he wants to print (a report might consist of more than one page,
and user might not be interested in printing all the pages)
3
Specify number of copies of report (a user might want to print multiple copies of same report)
4
Click OK button to complete the print command.
Print window is shown in figure below.
Select printer
name
Number of
copies
Number of pages
of report to be
printed
Click to take
print
CMW MR Log Report: Print page
77
A user might be interested to view report in PDF format; he can simply click PDF icon for this purpose. This is useful when user wants to download the report. PDF icon is shown in figure below.
CMW MR Log Report: PDF icon
When user clicks the PDF icon, the PDF file will open in new window. It is shown in figure below.
Figure 3.3.10: CMW MR Log Report: PDF file
User can save this report in PDF format and can also take print of this PDF document.
User can also view data of this report in graphical format. For this purpose graph icons are present at
the top of report preview page. In this menu there are two graph icons. One is bar graph and second is
line graph icon. A user can click bar graph icon to view a bar graph of report data. This icon is shown
below:
CMW MR Log Report: Bar Graph icon
78
After clicking on the bar graph icon, the graph will open in new window as shown below:
CMW MR Log Report: Bar Graph
This graph shows number of reports due and number of reports submitted by each CMW. Likewise
user can view a line graph of this report by clicking Line Graph icon in top menu. This icon is shown
in figure below.
CMW MR Log Report: Line Graph icon
79
After clicking on the line graph icon the graph will appear as shown on following page:
CMW MR Log Report: Line Graph
This report is again providing the same information. As red line indicates reports due, which are 17
each month, as represented in this graph while we can see only 5 reports have been submitted during
January while 2 reports have been submitted during February.
3.3 CMW Summary:
As discussed previously, this report provides information about number of CMWs within specified
geographical area. For a provincial user, this report provides status wise information about number
of CMWs within each district.
80
This report can be accessed directly from home page by click Reports tab and navigating to the report
name. Snapshot is given below.
CMW Summary: Link
When user clicks on the (CMW Summary) link, a new page opens where user selects province name.
The list box is:
•
Province
The snapshot of main page is given below.
Select province
Click to
preview report
Add a header and a
footer that you want
to appear on top and
bottom of your
report
Click to clear
already selected
criteria
CMW Summary: Main Page
81
Two buttons are present at the end of this page those are Reset and Preview.
As shown in the figure below.
CMW Summary: Preview button
Click on reset button clears preselected criteria in text boxes and user can specify new criteria. When
user clicks on Preview button, report based on specified criteria will open in new window, as shown
in figure below.
82
Now as shown in above figure, CMW summary report provides district wise information about the
number of selected, graduated, and deployed CMWs in Sindh Province. It also shows CMWS who
dropped from CMW School during training process. At the bottom of this report, a bar graph is present which shows total, graduated and deployed CMWs for each district of Sindh province.
The above snapshot contains a menu displaying icons for Close, Print, PDF, Bar Graph and Pie chart
as shown in figure below.
CMW Summary: Menu
As the name implies, each of these icons serves the same purpose. If user wants to close this report,
Close icon as shown in figure below is meant for this purpose.
CMW Summary: Close icon
A user might want to print this report for the purpose of future reference. Print icon as shown in figure
below allows user to print this report directly from webpage.
CMW Summary: Print icon
Upon clicking print icon, following print window will appear. Here, user will perform the following
actions:
1
Select a printer
2
Specify number of pages that he wants to print (a report might consist of more than one page,
and user might not be interested in printing all the pages)
3
Specify number of copies of report (a user might want to print multiple copies of same report)
83
4 Click OK button to complete the print command.
Select printer
name
Number of
copies
Number of pages
of report to be
printed
Click to take
print
CMW Summary: Print page
A user might be interested to view report in PDF format; he can simply click PDF icon for this purpose. This is useful when user wants to download the report. PDF icon is shown in figure below.
CMW Summary: PDF icon
84
When user clicks the PDF icon, the PDF file will open in new window. It is shown in figure below
CMW Summary: PDF file
User can save this report in PDF format and can also take print of this PDF document.
User can also view data of this report in graphical format. For this purpose graph icons are present at
the top of report preview page. In this menu there are two graph icons. One is bar graph and second is
line graph icon. A user can click bar graph icon to view a bar graph of report data. This icon is shown
below:
CMW Summary: Bar Graph icon
85
After clicking on the bar graph icon, the graph will open in new window as shown below:
CMW Summary: Bar Graph
This graph shows total number of CMWs as well as graduated, dropped out and deployed CMWs.
Likewise user can view a Pie Chart of this report by clicking Pie Chart icon in top menu. This icon is
shown in figure below.
CMW Summary: Pie Chart icon
86
After clicking on the pie chart icon the chart will appear in new window as shown in figure below:
CMW Summary: Pie Chart
This chart facilitates visualization of proportion of graduating and remaining CMWs. It also shows
how many CMWs drop out before completing their course. Last icon in this menu is excel icon as
shown below:
CMW Summary: Pie Chart icon
This allows user to export report data in Microsoft excel, where it can be processed further, using
various tools available in Ms Excel.
87
3.4 Antenatal Care
This report provides information about status of antenatal care. It tells expected and registered pregnancies and antenatal care visits by patients, for each CMW or for each district. This report can be
accessed directly from home page by click Reports tab and navigating to Antenatal Care. Snapshot is
given below. The snapshot is given below.
Antenatal Care: Link
When user clicks on the (Antenatal Care) link, a new page opens where user specifies filter criteria
from list boxes. The list boxes are:
1
Province
2
District
3
To
4
From
5
88
Group by
The snapshot is given below.
Select province
Select district
Specify duration
for this report
Group by CMW
or district
Click to clear
already selected
criteria
Click to
preview report
Add a header and a
footer that you want
to appear on top and
bottom of your
report
Antenatal Care: Main page
Two buttons are present at the end of this page those are Reset and Preview.
As shown in the figure below.
Antenatal Care: Preview button
Click on reset button clears preselected criteria in text boxes and user can specify new criteria.
89
When user clicks on Preview button, report based on specified criteria will open in new window, as
shown in figure below.
Antenatal Care: Preview page
The above snapshot contains a menu displaying icons for Close, Print and PDF as shown in figure.
Antenatal Care: Menu
As the name implies, each of these icons serves the same purpose. If user wants to close this report,
Close icon as shown in figure below is meant for this purpose.
Antenatal Care: Close icon
90
A user might want to print this report for the purpose of future reference. Print icon as shown in
figure below allows user to print this report directly from webpage.
Antenatal Care: Print icon
Upon clicking print icon, following print window will appear. Here, user will perform the following
actions:
1
Select a printer
2
Specify number of pages that he wants to print (a report might consist of more than one page,
and user might not be interested in printing all the pages)
3
Specify number of copies of report (a user might want to print multiple copies of same report).
4
Click OK button to complete the print command.
Select printer
name
Number of
copies
Number of pages
of report to be
printed
Click to take
print
Antenatal Care: Print page
91
A user might be interested to view report in PDF format; he can simply click PDF icon for this purpose. This is useful when user wants to download the report. PDF icon is shown in figure below.
Antenatal Care: PDF icon
When user clicks the PDF icon, the PDF file will open in new window. It is shown in figure below.
Antenatal Care: PDF file
User can save this report in PDF format and can also take print of this PDF document.
92
3.5 MNCH-DHIS Indicators Mapped Report:
As discussed previously, this report provides a consolidated view of status of health services by
combining indicators of DHIS with MNCH and providing an overall report to the user that is much
broader in its scope. This report can be accessed directly from home page by clicking Reports tab.
Snapshot is given below.
MNCH-DHIS Indicators Mapped Report: Link
When user clicks on the (MNCH-DHIS Indicators Mapped) link, a new page will open where user
can specify criteria for report by selecting from list boxes. These list boxes are:
1 Province
2 District
3 Period(time frame for which user wants to view report like Monthly, quarter-
ly or yearly; for each of these periods user will specify start and end of the period)
93
The snapshot is given below.
Select province
Select district
Add a header and a
footer that you want
to appear on top and
bottom of your
report
Click to clear
already selected
criteria
Click radio button to
select period as either
monthly, quarterly or
yearly and specify the
start and end of period
Click to
preview report
MNCH-DHIS Indicators Mapped Report: Main page
Two buttons are present at the end of this page those are Reset and Preview.
As shown in the figure below.
MNCH-DHIS Indicators Mapped Report: Preview button
Click on reset button clears preselected criteria in text boxes and user can specify new criteria. When
user clicks on Preview button, report based on specified criteria will open in new window, as shown
in figure on next page.
94
MNCH-DHIS Indicators Mapped Report: Preview page
95
The above snapshot contains a menu displaying icons for Close, Print and PDF as shown in figure.
Antenatal Care: Menu
As the name implies, each of these icons serves the same purpose. If user wants to close this report,
Close icon as shown in figure below is meant for this purpose.
Antenatal Care: Close icon
A user might want to print this report for the purpose of future reference. Print icon as shown in
figure below allows user to print this report directly from webpage.
Antenatal Care: Print icon
Upon clicking print icon, following print window will appear. Here, user will perform the following
actions:
1
Select a printer
2
Specify number of pages that he wants to print (a report might consist of more than one page,
and user might not be interested in printing all the pages)
96
3
Specify number of copies of report (a user might want to print multiple copies of same report).
4
Click OK button to complete the print command.
Print window is shown in figure below.
Select printer
name
Number of
copies
Number of pages
of report to be
printed
Click to take
print
MNCH-DHIS Indicators Mapped Report: Print page
A user might be interested to view report in PDF format; he can simply click PDF icon for this purpose. This is useful when user wants to download the report. PDF icon is shown in figure below.
Antenatal Care: PDF icon
97
When user clicks the PDF icon, the PDF file will open in new window. It is shown in figure below.
Antenatal Care: PDF file
User can save this report in PDF format and can also take print of this PDF document.
98
3.6 Indicator Base Report:
This report provides status of particular indicator (for example ANC) for entire district or for geographical area specified by the user. Report of each indicator can be generated in exactly same manner as the others. So, for the purpose of illustration, a few of them are being presented here. This
report can be accessed directly from home page by click Reports tab and navigating to its name.
Snapshot is given below.
Indicator Base Report: Link
When user clicks on the (Indicator Base Report) link a new page opens where user can specify criteria
for this report from list boxes. These list boxes are
1 Province
2 District
3 Indicator
4 From
5 To
6 Group by
99
Select province
Select district
Select indicator
Specify duration
for this report
Group by CMW
or district
Add a header and a
footer that you want
to appear on top and
bottom of your
report
Click to clear
already selected
criteria
Click to
preview report
Indicator Base Report: Main Page
Two buttons are present at the end of this page those are Reset and Preview.
As shown in the figure below.
Indicator Base Report: Preview button
Click on reset button clears preselected criteria in text boxes and user can specify new criteria. When
user clicks on Preview button, report based on specified criteria will open in new window. Here, as
discussed at the start of this module, many indicators are available for which user can generate a report. We are discussing some of them here:
3.6.1 Indicator Name-Antenatal Care Percentage
This indicator provides percentage of ANC visits. As we know that each of the pregnant women
registered for Antenatal Care will visit the health facility as first, second and third ANC visits are
planned. So, this indicator tells how many, among all the registered pregnancies made the ANC visit
to the health facility and was examined by CMW. To view this report simply select the Antenatal Care
(ANC) % indicator on the main page of indicator base report.
100
Specify the period for which you need to generate report in to and from. Select other criteria from
list boxes. The snapshot is given below.
Select province
Select district
Select ANC%
Specify duration
for this report
Group by CMW
or district
Add a header and a
footer that you want
to appear on top and
bottom of your
report
Click to clear
already selected
criteria
Click to
preview report
Indicator Base Report-Antenatal Care (ANC) %: Main page
Click on reset button clears preselected criteria in text boxes and user can specify new criteria. When
user clicks on Preview button, report based on specified criteria will open in new window, as shown
in figure below.
Indicator Base Report-Antenatal Care (ANC) %: Preview page
101
The above snapshot contains a menu displaying icons for Close and Print as shown in figure.
Indicator Base Report-Antenatal Care (ANC) %: Menu
As the name implies, each of these icons serves the same purpose. If user wants to close this report,
Close icon as shown in figure below is meant for this purpose.
Indicator Base Report-Antenatal Care (ANC) %: Close icon
A user might want to print this report for the purpose of future reference. Print icon as shown in figure
below allows user to print this report directly from webpage.
Indicator Base Report-Antenatal Care (ANC) %: Print icon
Upon clicking print icon, following print window will appear. Here, user will perform the following
actions:
1 Select a printer
2 Specify number of pages that he wants to print (a report might consist of more than one page,
and user might not be interested in printing all the pages)
3
Specify number of copies of report (a user might want to print multiple copies of same report).
4 Click OK button to complete the print command.
102
Print window is shown in figure below.
Select printer
name
Number of
copies
Number of pages
of report to be
printed
Click to take
print
I
ndicator Base Report-Antenatal Care (ANC) %: Print page
3.6.2 Indicator Name: Maternal complications Referred
This indicator, as the name implies reports about the number of cases referred to District Headquarter
hospital due to complications related to delivery or maternal health. So, it tells number of cases in
which there was some maternal complication. To view this report, simply select the Maternal Complications Referred indicator on the main page of indicator base report. Specify the period for which
you need to generate report in to and from. Select other criteria from list boxes.
103
The snapshot is given below.
Select province
Select district
Select Maternal
Complications
referred
Group by CMW
or district
Add a header and a
footer that you want
to appear on top and
bottom of your
report
Specify duration
for this report
Click to clear
already selected
criteria
Click to
preview report
Indicator Based report-Maternal Complications Referred: Main page
Click on reset button clears preselected criteria in text boxes and user can specify new criteria. When
user clicks on Preview button, report based on specified criteria will open in new window, as shown
in figure below.
Indicator Based report-Maternal Complications Referred: Preview page
104
The above snapshot contains a menu displaying icons for Close and Print as shown in figure.
Indicator Based report-Maternal Complications Referred: Menu
As the name implies, each of these icons serves the same purpose. If user wants to close this report,
Close icon as shown in figure below is meant for this purpose.
Indicator Based report-Maternal Complications Referred: Close icon
A user might want to print this report for the purpose of future reference. Print icon as shown in figure
below allows user to print this report directly from webpage.
Indicator Based report-Maternal Complications Referred: Print icon
Upon clicking print icon, following print window will appear. Here, user will perform the following
actions:
1
Select a printer
2
Specify number of pages that he wants to print (a report might consist of more than one page,
and user might not be interested in printing all the pages)
3
Specify number of copies of report (a user might want to print multiple copies of same report).
4
Click OK button to complete the print command.
105
Print window is shown in figure below.
Select printer
name
Number of
copies
Number of pages
of report to be
printed
Click to take
print
Indicator Based report-Maternal Complications Referred: Print page
3.6.3 Indicator Name: Maternal Deaths
This indicator tells number of deaths during or after delivery. To view this report simply select the
Maternal Deaths indicator on the main page of indicator base report. Specify the period for which you
need to generate report in to and from. Select other criteria from list boxes.
Select province
Select district
Select Maternal
Deaths %
Group by CMW
Add a header and a or district
footer that you want
to appear on top and
bottom of your
report
Specify duration
for this report
Click to clear
already selected
criteria
Click to
preview report
Indicator Based report-Maternal Deaths: Main page
106
Click on reset button clears preselected criteria in text boxes and user can specify new criteria. When
user clicks on Preview button, report based on specified criteria will open in new window, as shown
in figure below.
Indicator Based report-Maternal Deaths: Preview page
The above snapshot contains a menu displaying icons for Close and Print as shown in figure.
Indicator Based report-Maternal Deaths: Menu
As the name implies, each of these icons serves the same purpose. If user wants to close this report,
Close icon as shown in figure below is meant for this purpose.
Indicator Based report-Maternal Deaths: Close icon
A user might want to print this report for the purpose of future reference. Print icon as shown in figure
below allows user to print this report directly from webpage.
107
Indicator Based report-Maternal Deaths: Print icon
Upon clicking print icon, following print window will appear. Here, user will perform the following
actions:
1 Select a printer
2
Specify number of pages that he wants to print (a report might consist of more than one page,
and user might not be interested in printing all the pages)
3
Specify number of copies of report (a user might want to print multiple copies of same report).
4 Click OK button to complete the print command.
Print window is shown in figure below.
Select printer
name
Number of
copies
Number of pages
of report to be
printed
Click to take
print
Indicator Based report-Maternal Deaths: Print page
108
3.6.4 Indicator Name: Newborn Complications Referred
This indicator, as the name implies reports about the number of cases referred to District Headquarter
hospital due to complications related to health of Newborn. So, it tells number of cases in which there
was some complication related to Newborn. To view this report, simply select the Newborn Complications Referred indicator on the main page of indicator base report. Specify the period for which you
need to generate report in to and from. Select other criteria from list boxes.
The snapshot is given below.
Select province
Select district
Select Newborn
Complications
referred
Specify duration
for this report
Group by CMW
or district
Click to clear
already selected
criteria
Click to
preview report
Indicator Based report- Newborn Complications Referred: Main page
Click on reset button clears preselected criteria in text boxes and user can specify new criteria.
109
When user clicks on Preview button, report based on specified criteria will open in new window, as
shown in figure below.
Indicator Based report- Newborn Complications Referred: Preview page
The above snapshot contains a menu displaying icons for Close and Print as shown in figure.
Indicator Based report- Newborn Complications Referred: Menu
As the name implies, each of these icons serves the same purpose. If user wants to close this report,
Close icon as shown in figure below is meant for this purpose.
Indicator Based report- Newborn Complications Referred: Close icon
110
A user might want to print this report for the purpose of future reference. Print icon as shown in figure
below allows user to print this report directly from webpage.
Indicator Based report- Newborn Complications Referred: Print icon
Upon clicking print icon, following print window will appear. Here, user will perform the following
actions:
1
Select a printer
2
Specify number of pages that he wants to print (a report might consist of more than one page,
and user might not be interested in printing all the pages)
3
Specify number of copies of report (a user might want to print multiple copies of same report).
4
Click OK button to complete the print command.
Print window is shown in figure below.
Select printer
name
Number of
copies
Number of pages
of report to be
printed
Click to take
print
Indicator Based report-Newborn Complications Referred: Print page
111