1
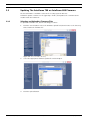
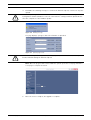
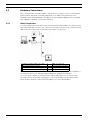
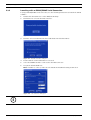
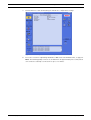
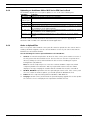
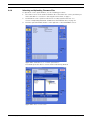
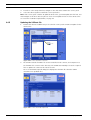
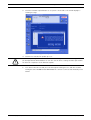
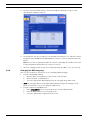
Firmware Update Manual AutoDome 100/600/700/800 and MIC Series 550 en User Manual Table of Contents | en iii Table of Contents 1 IP AutoDome Firmware Updates via a TCP/IP Network............................................................................ 1 1.1 Upgrading the AutoDome 700 or AutoDome 800 ........................................................................................ 1 1.2 Beginning the Firmware Update Process..................................................................................................... 2 1.3 Updating The AutoDome 700 or AutoDome 800 Firmware.......................................................................... 4 1.3.1 Selecting and Uploading Firmware Files ..................................................................................................... 4 2 Analog Camera Firmware Updates via the CTFID...................................................................................... 7 2.1 Selecting the Service Pack .......................................................................................................................... 7 2.2 Hardware Connections ................................................................................................................................ 8 2.2.1 Bilinx Connections....................................................................................................................................... 8 2.2.2 Serial Connections....................................................................................................................................... 9 2.3 Launching the CTFID Software .................................................................................................................... 9 2.3.1 Launching with a Bilinx Connection ............................................................................................................ 9 2.3.2 Launching with an RS232/RS485 Serial Connection ................................................................................ 10 2.4 Uploading AutoDome or MIC Series 550 Firmware Files .......................................................................... 12 2.4.1 Uploading an AutoDome 100 Service Pack................................................................................................ 12 2.4.2 Uploading an AutoDome 600 or MIC Series 550 Service Pack .................................................................. 14 2.4.3 Order to Upload Files ................................................................................................................................ 14 2.4.4 Selecting and Uploading Firmware Files ................................................................................................... 15 2.4.5 Updating the SC Boot file .......................................................................................................................... 16 2.4.6 Updating the G5Main or MICMain Files ..................................................................................................... 18 2.4.7 Additional Language Option ...................................................................................................................... 21 2.4.8 Changing the OSD Language ..................................................................................................................... 22 3 Troubleshooting ........................................................................................................................................ 23 3.1 AutoDome 600 Firmware Version Identification ........................................................................................ 23 3.2 AutoDome 700 / AutoDome 800................................................................................................................ 24 3.2.1 Web Browser Issues .................................................................................................................................. 24 3.2.2 IP Firmware Upgrade Fails......................................................................................................................... 24 3.3 Upgrading Firmware with the CTFID ......................................................................................................... 24 3.3.1 CTFID does not Connect ........................................................................................................................... 24 3.3.2 BILINX ........................................................................................................................................................ 25 3.3.3 Serial (RS232 or RS485)............................................................................................................................ 25 3.3.4 Firmware Upgrade via CTFID Fails............................................................................................................. 25 3.4 Auto Tracker Does not Activate with ON 78 ENTER................................................................................... 26 Bosch Security Systems, Inc. Firmware Update Manual F.01U.097.269 | 4.0 | 2012.02 iv en | Table of Contents F.01U.097.269 | 4.0 | 2012.02 Firmware Update Manual Bosch Security Systems, Inc. AutoDome 700/800 1 IP AutoDome Firmware Updates via a TCP/IP Network | en 1 IP AutoDome Firmware Updates via a TCP/IP Network The AutoDome 700 and AutoDome 800 incorporate a network video server in the IP module. The primary function of the server is to encode video and control data for transmission over a TCP/IP network. The IP AutoDome also allows an operator to update the AutoDome firmware via the TCP/IP network. Refer to the AutoDome 700 or AutoDome 800 Installation and User Manuals for specific instructions on configuring an IP AutoDome. To update firmware on an AutoDome 100 or an AutoDome 600 see Section 2 Analog Camera Firmware Updates via the CTFID, page 7. 1.1 Upgrading the AutoDome 700 or AutoDome 800 The preferred method to update an IP AutoDome is through a direct connection between the AutoDome and a PC. This method entails connecting the Ethernet cable from the IP AutoDome directly to the Ethernet port of a PC. If the direct-connect method is not practical you can also update the IP AutoDome through a Local Area Network (LAN). You cannot, however, update the IP AutoDome through a Wide Area Network (WAN) or via the Internet. Bosch Security Systems, Inc. Firmware Update Manual F.01U.097.269 | 4.0 | 2012.02 2 1.2 en | IP AutoDome Firmware Updates via a TCP/IP Network AutoDome 700/800 Beginning the Firmware Update Process Use this procedure to connect to your IP AutoDome and to navigate to the Firmware Update page. 1. Launch Internet Explorer and type the IP address for the AutoDome in the Address bar and click Go. Internet Explorer opens the Livepage view for the IP AutoDome. 2. Click the SETTINGS link, located at the top of the page. Figure 1.1 3. Click the Service link in the left pane. Figure 1.2 F.01U.097.269 | 4.0 | 2012.02 Select SETTINGS link Select the Service link Firmware Update Manual Bosch Security Systems, Inc. AutoDome 700/800 IP AutoDome Firmware Updates via a TCP/IP Network | en 4. 3 Click the Maintenance link below the Service link. Figure 1.3 Service Settings Maintenance option Bosch Security Systems, Inc. Firmware Update Manual F.01U.097.269 | 4.0 | 2012.02 4 en | IP AutoDome Firmware Updates via a TCP/IP Network 1.3 AutoDome 700/800 Updating The AutoDome 700 or AutoDome 800 Firmware The latest firmware is available on the Bosch Security Systems Web site. A firmware update contains one file (typically a .fw file) and updates the communications module inside the AutoDome. 1.3.1 Selecting and Uploading Firmware Files To upload the firmware file, use the following procedure: 1. Click the Search button next to the Firmware Upload field; then browse to the directory that contains the firmware file. Figure 1.4 2. Select the appropriate firmware update file and click Open. Figure 1.5 3. F.01U.097.269 | 4.0 | 2012.02 Choose firmware directory Select a Firmware file to upload Click the Upload button. Firmware Update Manual Bosch Security Systems, Inc. AutoDome 700/800 IP AutoDome Firmware Updates via a TCP/IP Network | en 4. 5 Click OK to the warning message to continue the firmware upload, or Cancel to stop the upload. ! CAUTION! Updating the firmware erases all device settings. To save these settings, click the Configuration download button to save the current device settings and then upload this file after the completion of the firmware update. Figure 1.6 Warning message The page displays a progress bar as the firmware is uploaded. Figure 1.7 Upload progress bar ! CAUTION! Do not perform any action, click any object in, or minimize the Internet Explorer browser window during the firmware upload. Note: Once the progress bar reaches 100% the system opens the reset page. Allow the reset page to complete its action. Figure 1.8 System Reset 5. Bosch Security Systems, Inc. Once the reset is complete, the upgrade is complete. Firmware Update Manual F.01U.097.269 | 4.0 | 2012.02 6 en | IP AutoDome Firmware Updates via a TCP/IP Network F.01U.097.269 | 4.0 | 2012.02 Firmware Update Manual AutoDome 700/800 Bosch Security Systems, Inc. Analog Camera Firmware Updates via the CTFID | en 2 7 Analog Camera Firmware Updates via the CTFID This chapter details the procedure to update the firmware files for an AutoDome 100, AutoDome 600, a MIC Series 550 and a MIC Series 550 UIR analog camera using the Configuration Tool for Imaging Devices (CTFID). The CTFID connects a computer to an analog camera using a BNC to USB (Bilinx) connection or via a serial (RS232/RS485) connection. Bilinx is a communication protocol that allows you to update the firmware for an analog camera over the video cable (coaxial or passive UTP). For a Bilinx connection, the CTFID is connected to an analog camera using a BNC to USB converter (Bosch part VP-USB). For a serial connection, the analog camera is connected to a computer through the DB9 Com port. The version of the CTFID software must be version 3.13 or higher to interface with an analog camera. (Visit www.boschsecurity.com for the latest version of the CTFID software). For further references and details, refer to the CTFID online help, to the CTFID User’s Manual and to the AutoDome 600 Installation Manual. The latest service pack is available on the Bosch Security Systems Web site. i 2.1 NOTICE! Use this upgrade method with an AutoDome 100, an AutoDome 600, a MIC Series 550, and a MIC Series 550 IR camera only. If you are updating the AuotDome 700 Series, refer to Section 1 IP AutoDome Firmware Updates via a TCP/IP Network, on page 1. Selecting the Service Pack The analog service packs are cumulative. Before you begin a firmware update, check the version of the System Controller Main (SC) firmware currently installed in the camera. The SC Main firmware version determines the service pack with which you must start. To determine the SC Main firmware version, issue the ON-66-ENTER command on the keyboard or from the CTFID. The camera displays the current firmware levels for the camera files. The SC Main firmware level is indicated as item 1 in the illustration below. Bosch Security Sys. AutoDome(r) 600 Series Day/Night 36X 5.00.00.03/1.05.00.02 1.00.00.00 5.00.00.03 1.13.01.05 1.02.00.01 SC Boot FPGA VCA_boot STD Comm No Heater FastAddress: Not Set Figure 2.1 AutoDome Status Screen Bosch Security Sys. MIC Series 550 Day/Night 36X 1.00.00.24 2.00.00.00 FastAddress: Not Set Figure 2.2 Bosch Security Systems, Inc. MIC Series 550 Status Screen Firmware Update Manual F.01U.097.269 | 4.0 | 2012.02 8 en | Analog Camera Firmware Updates via the CTFID 2.2 Hardware Connections This section provides a brief description of the devices necessary to connect a PC (with the CTFID software installed) to an analog AutoDome or to a MIC Series 550. Refer to the AutoDome 600 Installation Manual or the MIC Series 550 Installation Manual and to the CTFID User’s Manual for detailed connection information. 2.2.1 Bilinx Connections To create a Bilinx interface between a PC and an AutoDome 600 or MIC Series 550 you must have a Bosch VP-USB connector. The connector has a USB connector on one end and a female BNC on the other end. Figure 2.3 illustrates the interface connections: Figure 2.3 1 2 3 4 PC to AutoDome Bilinx Connections AutoDome 600 or MIC Series 550 PC running CTFID software USB Port VP-USB adapter 5 6 7 BNC “T” connector Coax to input of monitor Typical CCTV monitor It is recommended that the CTFID software be installed prior to connecting the hardware to the USB port. Refer to the CTFID Installation Manual for additional information. To see the device output, use a CCTV monitor with looping inputs or a T connector (not provided) for the coaxial cable, and plug the second coaxial cable into the CCTV monitor. Ensure that the monitor is either auto-terminating or is set to low impedance. F.01U.097.269 | 4.0 | 2012.02 Firmware Update Manual Bosch Security Systems, Inc. Analog Camera Firmware Updates via the CTFID | en 2.2.2 9 Serial Connections The CTFID can also communicate with an AutoDome 600 or MIC Series 550 via an RS232 or an RS485 serial cable connected to a PC with a DB9 connection. The following illustration depicts a typical serial connection (refer to the CTFID User’s Manual for detailed connection instructions) . Figure 2.4 1 2 3 4 5 2.3 PC to AutoDome Serial Connections AutoDome 100 or 600 Series AutoDome or MIC Series 550 PC Running CTFID Software RS-232 Connection Coax to Monitor Input Typical CCTV Monitor Launching the CTFID Software You must install the CTFID software on the computer from which you will configure a camera. To install the CTFID software, refer to the CTFID User’s Manual for instructions. The method in which the CTFID software responds depends on the type of connection (Bilinx or serial) it detects. The CTFID initially checks for a Bilinx connection through a USB port. If the CTFID does not detect a Bilinx connection, the software prompts you to identify the type of serial connection. 2.3.1 Launching with a Bilinx Connection If using a Bilinx connection, use the following instructions to launch the CTFID software: 1. Double-click the CTFID icon on the Windows Desktop. The CTFID software automatically checks for the Bilinx signal from the AutoDome. Once connected, the CTFID displays the Main Screen: Figure 2.5 CTFID Main Screen 2. Bosch Security Systems, Inc. Proceed to Section 2.4 Uploading AutoDome or MIC Series 550 Firmware Files, on page 12. Firmware Update Manual F.01U.097.269 | 4.0 | 2012.02 10 en | Analog Camera Firmware Updates via the CTFID 2.3.2 Launching with an RS232/RS485 Serial Connection If using a RS232/RS485 serial connection, use the following instructions to launch the CTFID software. 1. Double-click the CTFID icon on the Windows Desktop. 2. Click Cancel to select an alternate interface. Figure 2.6 3. CTFID Detect Device Screen Click the Select an alternate interface radio button and click Continue. \ Figure 2.7 Alternate Interface dialog box 4. Ensure that the Serial radio button is selected. 5. Select the COM Port that is connected to the DB9 connector. 6. Accept the default baud rate. Note: If unable to connect, make sure the AutoDome AutoBaud setting is turned on. Figure 2.8 i Select Interface dialog box NOTICE! The VP-RS2BLNX device is not available in the United States. F.01U.097.269 | 4.0 | 2012.02 Firmware Update Manual Bosch Security Systems, Inc. Analog Camera Firmware Updates via the CTFID | en 7. 11 Click Continue to start downloading the AutoDome configuration settings. Figure 2.9 Downloading AutoDome Device Settings 8. Proceed to Section 2.4 Uploading AutoDome or MIC Series 550 Firmware Files, on page 12. Note: The CTFID typically connects to an AutoDome in approximately 15 seconds, but it can continue to attempt a connection for up to one minute. Bosch Security Systems, Inc. Firmware Update Manual F.01U.097.269 | 4.0 | 2012.02 12 en | Analog Camera Firmware Updates via the CTFID 2.4 Uploading AutoDome or MIC Series 550 Firmware Files The service packs are available on the Bosch Security Systems Web site. Refer to the next section for instructions to upload firmware files to an AutoDome 100. Skip to Section 2.4.2 Uploading an AutoDome 600 or MIC Series 550 Service Pack, on page 14, for information and instructions for uploading firmware files to an AutoDome 600 or to a MIC Series 550. Note: When uploading a service pack to an analog camera you can choose to install the files which are automatically selected, or skip a file by deselecting it. If you choose to skip a file that is a newer version than the one already installed, you will receive a warning that skipping a particular file may cause system instability. 2.4.1 Uploading an AutoDome 100 Service Pack The upgrade process for an AutoDome 100 differs from the process to upgrade an AutoDome 600. The firmware update process for an AutoDome 100 requires you to upload one image (.img) file to the AutoDome. If you are upgrading an AutoDome 100 refer to section Section 2.2 Hardware Connections, on page 8, for instructions on connecting an AutoDome 100 to the CTIFD application. 1. Download the AutoDome 100 firmware image (.img) file, from the Bosch Security Systems Web site, and save this file to a computer with the CTFID application. 2. Click the Upload Firmware button on the right side of the CTFID Main Screen. Figure 2.10 F.01U.097.269 | 4.0 | 2012.02 Upload Firmware Button Firmware Update Manual Bosch Security Systems, Inc. Analog Camera Firmware Updates via the CTFID | en 3. Navigate to the location of the firmware update file. 4. Select the appropriate file for your Device Model and Video Type; then click OK. Figure 2.11 13 Select AutoDome 100 Series Firmware Image File The CTFID displays a message warning you that the firmware update process erases all device settings and returns the settings to the factory default value. 5. Click OK to accept the warning and to start the update process. The CTFID begins the firmware update and marks the update progress at the bottom of the screen. This process may take several minutes to complete. 6. Once the firmware update is complete, the CTFID displays a message that the firmware update was successful. 7. 8. Click OK to confirm the message. The CTFID reloads the settings from the camera and displays the Device Information screen. 9. Bosch Security Systems, Inc. Ensure that the Firmware Version field reflects the new firmware version. Firmware Update Manual F.01U.097.269 | 4.0 | 2012.02 14 en | Analog Camera Firmware Updates via the CTFID 2.4.2 Uploading an AutoDome 600 or MIC Series 550 Service Pack The firmware upgrade process requires updates to one or all of the following files: File Name Function SCBootApp.g4i Updates the system controller boot firmware. G5Main.g4i Updates the system controller firmware. MICMain.g4i FPGA_SC.g4i Updates the FPGA chip. FPGA_VCA.g4i Updates the FPGA chip. VCA_boot.g4i Updates PTZ camera Video Content Analysis firmware. Install this file during VCA_app.g4i the installation of the SCBoot.g4i file. Updates PTZ camera Video Content Analysis firmware. Install this file during the installation of the SCMain.g4i file. language_Lang Uploads an additional language file for the AutoDome on-screen display menus. The next sections contain information and instructions you need before upgrading an AutoDome 600 or a MIC Series 550 with the CTFID application. 2.4.3 Order to Upload Files There is a specific order in which service pack files must be uploaded to the camera. Before starting a firmware upgrade, note the current firmware version of your camera listed in the CTFID Device Information window. Use the following file order to upload firmware to the AutoDome: 1. SC Boot: You must first upload the SC Boot file if the service pack contains a version of the file greater than the installed version. The boot files are stored in a separate Boot directory. Always check for and install this file before before installing the System Configuration (SC) Main file. Note: The SC Boot upload process erases the resident SC Main components, which completely disables the AutoDome. When you upload the SC Boot files the CTFID displays a message notifying the installer that the SC Main files must be reinstalled. 2. G5 Main, MIC Main: Upload this file after uploading the SC Boot file. If the service pack does not contain an SC Boot update, you should upload the G5 Main file first. 3. FPGA: This file is uploaded along with the G5 Main or MIC Main file. 4. Language: Certain service packs include an optional language upgrade file used to update the camera’s on-screen display menus. Upload this firmware file last. F.01U.097.269 | 4.0 | 2012.02 Firmware Update Manual Bosch Security Systems, Inc. Analog Camera Firmware Updates via the CTFID | en 2.4.4 15 Selecting and Uploading Firmware Files To upload the service pack firmware, use the following procedure: 1. Check the version of the SC Boot firmware file to determine the service pack that you must start with. See Section 2.1 Selecting the Service Pack, on page 7. 2. Download the service pack from the Bosch Security Systems Web site. See Section 2.4 Uploading AutoDome or MIC Series 550 Firmware Files, on page 12 3. Click the Upload Firmware button on the right side of the CTFID Main Screen. Figure 2.12 CTFID Main Screen - Firmware Upload Button The CTFID opens the Choose Service Pack Folder dialog window. Figure 2.13 Bosch Security Systems, Inc. Choose a Service Pack Firmware Update Manual F.01U.097.269 | 4.0 | 2012.02 16 en | Analog Camera Firmware Updates via the CTFID 4. From the Look In drop-down list, navigate to the drive that contains the service pack. 5. Select the directory that contains the service pack files. Note: If the service pack contains an updated SC Boot file, you must update this file first. You must navigate to the Boot directory first to check for an updated version of the SC Boot file. See Section 2.4.3 Order to Upload Files, on page 14. 2.4.5 Updating the SC Boot file 1. Double-click the Boot subdirectory to check if the service pack contains an update for the SC Boot file. Figure 2.14 2. Service Pack File Selections The CTFID reads the firmware file versions installed on the camera, and compares it to the firmware file versions in the directory. The CTFID automatically selects the required files to update the camera to the latest versions. The Select Firmware Upload dialog box displays the firmware files that the CTFID determines are updated files. Figure 2.15 F.01U.097.269 | 4.0 | 2012.02 Service Pack subcomponents Firmware Update Manual Bosch Security Systems, Inc. Analog Camera Firmware Updates via the CTFID | en 17 A highlighted filename with a check mark in the box indicates that the service pack directory contains that file. The subcomponent list also displays the version of the file in the service pack and the version of the file currently installed in the camera (Device Version). The CTFID automatically selects a service pack file for uploading if its version is greater than the version of the file installed in the camera. Note: Boot files are stored in a separate Boot directory. If you are not in the Boot directory, the Firmware Upload window does not highlight the boot files even though they are included in the service pack. ! 3. Click the Upload Firmware button to accept the checked files. 4. Click Yes to the Warning message to start the update process. CAUTION! Updating the firmware erases all device settings. To save these settings, click on the Configuration download button to save the current device settings and then upload this file after the completion of the firmware update. Figure 2.16 5. Firmware Update Warning The AutoDome disconnects from the CTFID; then restarts into the BootLoader mode and reconnects to the CTFID. Figure 2.17 Bosch Security Systems, Inc. BootLoader Mode Firmware Update Manual F.01U.097.269 | 4.0 | 2012.02 18 en | Analog Camera Firmware Updates via the CTFID 6. Click OK to continue uploading the service pack files. Figure 2.18 2.4.6 Successful SCBoot Upgrade Updating the G5Main or MICMain Files The G5Main or MICMain file must be uploaded next. 1. Navigate to the Service Pack directory that contains the G5Main or MICMain files and double-click on the folder to refresh the Files In Service Pack list. Figure 2.19 2. Choose Service Pack Folder The CTFID reads the firmware file versions installed on the camera, and compares it to the firmware file versions in the Service Pack directory. The CTFID automatically selects the required files to update the camera to the latest versions. The Select Firmware Upload dialog box displays the firmware files that the CTFID determines are updated files. F.01U.097.269 | 4.0 | 2012.02 Firmware Update Manual Bosch Security Systems, Inc. Analog Camera Firmware Updates via the CTFID | en 3. 19 Click the Firmware Upload button to accept the checked files. The CTFID displays a warning message. Figure 2.20 4. ! Firmware upgrade warning Click Yes to start the file update process. CAUTION! Updating the firmware erases all device settings. To save these settings, click on the Configuration download button to save the current device settings and then upload this file after the completion of the firmware update. 5. The camera disconnects and proceeds through its homing process, and then restarts. During this time DO NOT CLICK ANYTHING! The camera reconnects automatically to the CTFID. Bosch Security Systems, Inc. Firmware Update Manual F.01U.097.269 | 4.0 | 2012.02 20 en | Analog Camera Firmware Updates via the CTFID 6. Click OK to complete the upgrade process. Figure 2.21 i Successful upload message NOTICE! When the upgrade operation is complete, the CTFID may display the Load Configuration dialog box. Disregard this dialog box; the CTFID removes the dialog box once the camera reconnects to the CTFID. 7. Confirm that the CTFID Main Screen displays the new firmware version for the camera. Figure 2.22 F.01U.097.269 | 4.0 | 2012.02 Confirm firmware version Firmware Update Manual Bosch Security Systems, Inc. Analog Camera Firmware Updates via the CTFID | en 2.4.7 21 Additional Language Option Certain Service Packs may include the option to upload the additional languages to the camera. The firmware file to add a new language is located in the Language folder. Before installing an additional language, you must first upgrade the SCBoot and the SC Main files (refer to Section 2.4.4 Selecting and Uploading Firmware Files). The procedure for uploading an additional language is the same as uploading the other files. Note: The AutoDome 600 and MIC Series 550 supports one additional language. To install an additional language to the camera do the following: 1. From the CTFID Main Window, click the Firmware Upload button located on the lower left side of the right pane. 2. Navigate to the Language folder and double-click on the folder to refresh the files in the Choose Service Pack Folder pane on the left. 3. Click the Select button to display the sub-component file list. Figure 2.23 4. Select Language folder Check the Language Table box in the Select Firmware Upload dialogue window. Note: You must check the Language Table box in the sub-components list to select the additional language file for upload. Bosch Security Systems, Inc. Firmware Update Manual F.01U.097.269 | 4.0 | 2012.02 22 en | Analog Camera Firmware Updates via the CTFID 5. Click the Upload Firmware button, and acknowledge the Warning message to start uploading the Language Table file. Figure 2.24 6. Upload Language table The AutoDome disconnects and proceeds through its homing process, and then restarts. During this time DO NOT CLICK ANYTHING! The camera reconnects automatically to the CTFID. Note: Do not click on any buttons while the camera is uploading. The CTFID removes the Load Configuration window after the camera reconnects. 7. 2.4.8 Once the Language Table file has successfully uploaded, click OK to close the message. Changing the OSD Language There are two methods to change the on-screen-display (OSD) language: 1. From the CTFID Main window: a. Click the Online Config button on the left side of the window. b. Click on Display - Setting Group 1. c. Select the appropriate OSD language from the Language drop down menu. Note: The Language button on the Main CTFID window changes the language for the CTFID user interface, It does not change the OSD menu. 2. From the AutoDome 600 OSD menu: a. F.01U.097.269 | 4.0 | 2012.02 Enter ON-46-ENTER from a control keyboard to open the Main window. b. From the Main window select Language menu. c. Select the appropriate Language from the menu. Firmware Update Manual Bosch Security Systems, Inc. Troubleshooting | en 3 23 Troubleshooting This section provides information for issues that may arise during the upgrade process of an AutoDome 100, 600, 700 or 800. 3.1 AutoDome 600 Firmware Version Identification Each service pack contains a version of the files in the illustration below. The version number of the Service Pack is sequential, but the versions of the firmware modules included in the service pack varies. Although all files are included in a service pack, only a few of these files are upgraded with each service pack release. To display the current versions of the AutoDome 600 firmware files: Issue the ON-66-ENTER command twice, in quick succession. The AutoDome displays the current firmware levels for the AutoDome files. Compare these version numbers to the latest versions identified in the Release Notes, included with the Service Pack to determine if the AutoDome requires an upgrade. Bosch Security Sys. AutoDome(r) 5.00.00.03/1.05.00.02 1.00.00.00 600 Series Day/Night 36X 5.00.00.03 1.13.01.05 1.02.00.01 SC Boot FPGA VCA_boot STD Comm No Heater FastAddress: Not Set Figure 3.1 Firmware File Version On-screen Display Ref. Module Name Bosch Security Systems, Inc. Filename 1 System Controller (SC) SCMain.G4i 2 AutoTracker/Motion Detection VCA_app.g4i 3 System Controller (SC) Boot SCBootApp.G4i 4 Field Programmable Gate Array (500 series) FPGA_VCA.G4i 5 VCA Boot VCA_boot.G4i Firmware Update Manual F.01U.097.269 | 4.0 | 2012.02 24 en | Troubleshooting 3.2 AutoDome 700 / AutoDome 800 This section offers suggestions if a firmware upgrade fails in an AutoDome 700 or an AutoDome 800. 3.2.1 Web Browser Issues The browser displayed video correctly before the upgrade, but is no longer streams after completing the upgrade process. Do a manual refresh of the LivePage. If this does not work, check to ensure the following: – Microsoft® Internet Explorer® version You must use Internet Explorer version 7.0 or higher. – Bosch MPEG ActiveX version Compare the Bosch MPEG ActiveX version number, displayed in the Internet Explorer information bar, to the latest version available on the Bosch Security Systems Web site (www.boschsecurity.us). – Java version Microsoft Java is not longer supported. Install the latest Sun Java VM available on the V the Bosch Security Systems Web site (www.boschsecurity.us). – DirectX version The version of DirectX must be 9.0c or higher. Install the latest version available on the Bosch Security Systems Web site (www.boschsecurity.us). 3.2.2 IP Firmware Upgrade Fails If an error message appears stating that the IP firmware upgrade has failed, navigate to the following special URL: http://IP_AutoDome_IP_Address/upload.htm Where IP_AutoDome_IP_Address is the IP address for your IP AutoDome. The browser then displays the following window: Figure 3.2 IP Firmware Upgrade URL Click Browse and navigate to the IP directory. Select the IP firmware file and click OK. Then click Upload to attempt the IP firmware upload again. If the upgrade fails again, contact Bosch technical support for assistance. 3.3 Upgrading Firmware with the CTFID These suggestions are applicable if upgrading using the CTFID software with either a Bilinx or a serial hardware connection. 3.3.1 CTFID does not Connect Ensure that the latest version of CTFID has been installed from a CD or downloaded from the Bosch web site (www.boschsecurity.us). F.01U.097.269 | 4.0 | 2012.02 Firmware Update Manual Bosch Security Systems, Inc. Troubleshooting | en 3.3.2 25 BILINX – Ensure that only one BILINX device is connected to the PC. For example, only one VP-USB may be connected to a PC at one time. In addition, disconnect the video output from the AutoDome from any other BILINX controller during a firmware upgrade. – Confirm that all connections are correct and that the maximum recommended distance has not been exceeded. – Confirm that there is a direct coax connection to the dome. BILINX cannot be transmitted through fiber without special fiber modules. BILINX also cannot be passed through analog distribution amplifiers, with the exception to the Bosch LTC 5231/90 and LTC 5234/90. – 3.3.3 Confirm that the coax signal is correctly terminated with only one 75 ohm load. Serial (RS232 or RS485) – Ensure that the CPU switch is set to the correct format. The factory default setting is RS485. Refer to the AutoDome Series Installation Manual for more information. – Confirm that the correct COM port was selected and that the cable is connected firmly to the DB9 connector. – Ensure that all connections are correct and that the maximum recommended distance has not been exceeded. 3.3.4 – Ensure that the RS232 GROUND connection has been used. – If using RS485, ensure that the termination resistor has been installed. – Ensure the AutoDome AutoBaud is turned on. Firmware Upgrade via CTFID Fails Try to repeat the upgrade a second time. If the upgrade continues to fail, contact Bosch technical support. Bosch Security Systems, Inc. Firmware Update Manual F.01U.097.269 | 4.0 | 2012.02 26 3.4 en | Troubleshooting Auto Tracker Does not Activate with ON 78 ENTER If the Auto Tracker does not activate when you enter the ON 78 ENTER command, check the version of the VCA firmware. To determine the firmware versions installed on an AutoDome, issue the AUX ON 66 command twice. If the version of the VCA firmware is 0.00.00.00, then the VCA firmware was not installed correctly. To correct this issue, use the following steps: 1. Obtain the latest Service Pack from www.boschsecurity.us. 2. Connect to the AutoDome using the CTFID (RS232, RS485, or Bilinx connection). 3. Re-install the VCA_boot.g4i and the VCA_App.g4i files from the service pack. Refer to Section 2 Analog Camera Firmware Updates via the CTFID, page 7, OR Section 1 IP AutoDome Firmware Updates via a TCP/IP Network, page 1 for detailed steps to install the firmware updates). 4. Once the VCA_boot.g4i and the VCA_App.g4i files are successfully installed, the AutoDome will restart and the Auto Tracker will operate correctly. F.01U.097.269 | 4.0 | 2012.02 Firmware Update Manual Bosch Security Systems, Inc. Bosch Security Systems, Inc. 850 Greenfield Road Lancaster, PA 17601 USA www.boschsecurity.us © Bosch Security Systems, Inc.; 2012