1
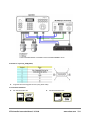
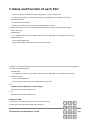
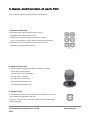
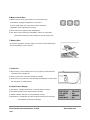
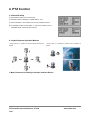
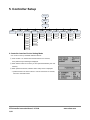
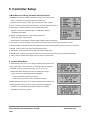
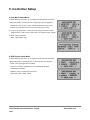
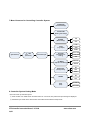
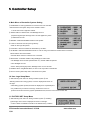
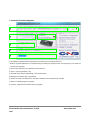
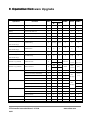
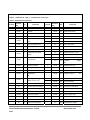
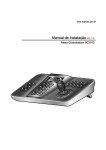
www.cnbtec.co Installation and User s Manual Ver 1.2 SC3100 KEYBOARD CONTROLLER CAUTION Do not open to prevent electric shock. CAUTION : In order to avoid electric shock, do not open cover or disassemble the product. There are no user serviceable parts inside. Contact the qualified service personnel for service. This symbol is to warn the user of danger from non-insulated high voltage that may be generated within the product to cause electric shock to persons. This symbol is to alert the user of important operating and maintenance (servicing) instructions for the product. Warning : In order to prevent danger from fire accident or electric shock, do not expose the product to rain or moist conditions. PTZ Controller Instruction Manual / SC3100 www.cnbtec.com 2/21 PRECAUTIONS Safety Precautions 1. Careful Reading of User’s Manual Carefully read all the safety precautions and operation methods of the product before operating. 2. Keeping of User’s Manual The safety and operating manual should be retained for future reference. 3. Attachment Do not use attachments not recommended by the equipment manufacturer as they may cause hazards. 4. Installation Conditions Do not use this product under wet or humid conditions. 5. Installation Do not install the product in unstable position or put on unstable location. The product may cause severe injury to person or serious damage on the product if improperly mounted. Use fixture sold with the product or recommended by the manufacturer. Attach the product according to installation method of the manufacture and be sure to use the parts recommended by the manufacturer. 6. Power Supply This product is able to operate under rated power supply. Precautions for Use ■ Use of Product z Check if wiring and power connection are correct before using. z If any abnormal state or malfunction is observed during operation, stop using and immediately contact the supplier. ■ Handling z Do not disassemble the product and be careful not touch the parts within it. z In order to avoid any damage on the product, do not drop or apply vibration and impact on it. ■ Installation and Storage z Do not install the product in the place with temperature exceeding operating range. z Avoid installing the product in moist or dusty place. z Avoid installing the product on radioactive place. It may cause failure on the parts. z Avoid installing the product in the place having strong magnetic field or electric signal. z Avoid installing the product in the place with strong vibration. z Never expose the product to rain or water. PTZ Controller Instruction Manual / SC3100 www.cnbtec.com 3/21 Contents 1. Introduction and Features 1. Introduction...................................................................................................................................................... 5 2. Features …………………………………………………...................................................................................... 5 2. Product Configuration and System Diagram 1. Product Configuration...................................................................................................................................... 6 2. System Diagram.............................................................................................................................................. 6 1. System Connection.................................................................................................................................... 6 2. RS-232 Pin Layout (D_SUB_MALE).......................................................................................................... 7 3. Termination DIP Switch............................................................................................................................... 7 4. General Connection.................................................................................................................................... 7 3. Name and Function of each Part 1. Camera Setup Part.......................................................................................................................................... 8 2. Numeric Pad.................................................................................................................................................... 9 3. General Control Part........................................................................................................................................ 9 4. Camera Control Part......................................... .............................................................................................. 9 5. System LOCK.................................................................................................................................................. 9 6. Menu Control Part........................................................................................................................................... 9 7. Battery Part...................................................................................................................................................... 9 4. PTZ Control 1. Power On......................................................................................................................................................... 11 2. Initial Screen Display....................................................................................................................................... 11 3. Camera ID Setup............................................................................................................................................. 11 4. Joystick/Camera Operation Method................................................................................................................. 11 5. Controller Setup 1. Menu Structure for Setting Controller Interface Device.................................................................................... 12 2. Controller Interface Device Setting Mode........................................................................................................ 12 3. Main Menu for Setting Controller Interface Device.......................................................................................... 13 4. Joystick Setting Menu...................................................................................................................................... 13 5. User Mode Setup Menu……………………………............................................................................................ 14 6. DVR Device Setup Menu................................................................................................................................. 14 7. Menu Structure for Controlling Controller System............................................................................................ 15 8. Controller System Setting Mode...................................................................................................................... 15 9. Main Menu of Controller System Setting.......................................................................................................... 16 10. User Logo Setup Menu................................................................................................................................ 16 11. FACTORY SET Setup Menu......................................................................................................................... 16 6. Controller Firmware upgrade PTZ Controller Instruction Manual / SC3100 www.cnbtec.com 4/21 1. Introduction and Features 1. Controller Firmware upgrade........................................................................................................................... 17 7. Operation List 1. Operation List ……........................................................................................................................................... 18 8. Product Appearance and Specifications 1. Product Appearance......................................................................................................................................... 21 2. Product Specifications...................................................................................................................................... 21 1. Introduction SC3100 is a dedicated CCTV controller consisting of 28 function keys, 3 axis joystick and LCD display in order to directly control devices such as Speed Dome Camera, DVR, etc. 2. Features z One controller is capable of commanding up to 255 devices including Pan/Tilt/Zoom camera. z With RS-485 communication, it provides long distance remote control up to 1.2km. z It supports different protocols for each channel. (Pelco D, Pelco P, Samsung Elec, Panasonic, Bosch, Samsung Techwin) z It is able to control various kinds of functions of the devices such as Preset, Pattern, Swing, Group, etc. z Using joystick, it can control Pan/Tilt speed of the camera. z Adopting 4 Line Text LCD, it provides functions including menu control, company logo input, etc. z Using function keys for convenience, it is possible to easily operate functions such as Preset, Pattern, Swing, and Group. z It provides password setup of the administrator. z It is possible to use up to 4 slave controllers. z It provides Firmware Upgrade using RS-232. z It provides USB Mouse function. PTZ Controller Instruction Manual / SC3100 www.cnbtec.com 5/21 2. Product Configuration and System Diagram 1. Product Configuration ● User s Manual ● Main Body ● USB Cable, RJ-45 Cable (Option), Battery (Option), Adaptor(Option) Upon purchasing the product, be sure to check if it contains all of the items listed below. z KEYBOARD CONTROLLER 1EA z USB CABLE 1EA z USER S MANUAL 1EA 2. System Diagram 1. System Connection PTZ Controller Instruction Manual / SC3100 www.cnbtec.com 6/21 2. RS-232 Pin Layout (D_SUB_MALE) z Supported Firmware Upgrade function (using direct cable). 3. Termination DIP Switch z RS-485 Termination ON PTZ Controller Instruction Manual / SC3100 z RS-485 Termination OFF www.cnbtec.com 7/21 2. Product Configuration and System Diagram 4. General Connection 1. Camera Setup Part ① PRESET: Used when moving to Preset Point. • PRESET Setting: ⓐ Move the camera to the desired position using joystick or camera control button. ⓑ Enter PRESET No. ⓒ Press PRESET button for 2 seconds, then the current position is set to PRESET No. • PRESET Execution: ⓐ Enter PRESET No. ⓑ Press PRESET button shortly, then the camera moves to the specified PRESET position. ② PATT-N: It stores jog operation and PRESET operation patterns executed for a specified period, and allows executing them again. • PATTERN Setup: ⓐ Enter desired PATTERN No. ⓑ Press PATT-N button for 2 seconds long. PTZ Controller Instruction Manual / SC3100 www.cnbtec.com 8/21 3. Name and Function of each Part ⓒ Move the camera to the desired position using joystick or camera control button. ⓓ Store/cancel the pattern using NEAR/FAR key button. (applicable to the supported camera only) • PATTERN Execution: ⓐ Enter desired PATTERN No. ⓑ Press PATT-N button shortly, then the desired PATTERN is executed. ③ SWING: This function can select 2 Preset positions remembered on Preset Setup and automatically Monitor repeatedly. • SWING Setup: ⓐ It is possible to directly set up it within camera OSD menu. (applicable to the supported camera only) • SWING Execution: ⓐ Enter desired SWING No. ⓑ Press SWING button shortly, then desired SWING is executed. ④ GROUP: It provides repeated sequential monitoring with specified speed and waiting time by combining PRESET, PATTERN and SWING functions. • GROUP Setup: ⓐ It is possible to directly set it up within camera OSD menu. (applicable on the supported camera only) • GROUP Execution: ⓐ Enter desired GROUP No.. ⓑ Press GROUP button shortly, then desired GROUP is executed. ⑤ F1 : • USB Mouse function On/Off(Press it button longly) • Refer to the section titled “Operation List”. ⑥ F2 • Refer to the section titled “Operation List”. 2. Numeric Pad ① Numbers (0 ~ 9): Used for entering camera ID, or other functions. ② CAM: Used for storing data specified when entering ID. PTZ Controller Instruction Manual / SC3100 www.cnbtec.com 9/21 3. Name and Function of each Part ③ CLR: Used for deleting camera ID and other entered function. 3. General Control Part ① IRIS Open/Close: Used to adjust iris of zoom camera. (applicable on the supported camera only) ② TELE/WIDE: Used for executing zoom operation of camera. TELE : Mouse left button function, WIDE : Mouse right button function. ③ NEAR/FAR: Used for controlling focus when using zoom lens. (applicable in the supported camera only) 4. Camera Control Part ① Joystick: Used for controlling Pan/Tilt/Zoom operations of camera. • Tilt Up: Moves camera upward. • Tilt Down: Moves camera downward. • Pan Left: Moves camera left. • Pan Right: Moves camera right. • Zoom Tele: Executes TELE zoom. • Zoom Wide: Execute WIDE zoom. 5. System LOCK • It is located at the upper right side of keyboard controller and used to protect the controller being operated by other user. • Press it for 2 seconds, then it enters into LOCK status, and released when entering password. PTZ Controller Instruction Manual / SC3100 10/21 www.cnbtec.com 6. Menu Control Part ① MENU: Press it shortly, then it enters into camera OSD menu. And “MENU” message is displayed on LCD monitor. Press it shortly again, then it exits out of camera OSD menu. (applicable on the supported protocol only) ② BACK: Move to the upper-menu(In OSD MENU). ③ SET: Move to the sub-menu(In OSD MENU). Press it for a specified period with numeric keys, then it enters into function setup mode. 7. Battery Part • As shown on right figure, push the battery cover down to the inside direction And pull, then battery cover is opened. 1. Power On ① Before turning on the controller power, turn on power for external devices connected to the controller first. ② Press a power button on the rear left side of controller. ③ As the verson, logo and main screen message are displayed on LCD monitor the controller is on enabled status. 2. Initial Screen Display ① PROTOCOL: Indicates PROTOCOL of camera selected currently. ② PTZ ADDR: Indicates ID of camera selected currently. ③ SPEED: Indicates data rate of camera selected currently. ④ NUM INPUT: It is displayed only when entering number with numeric pad and indicatres the entered number(ID). PTZ Controller Instruction Manual / SC3100 11/21 www.cnbtec.com 4. PTZ Control 3. Camera ID Setup ① Enter desired number form numeric pad. ② Selected number is displayed . ex)NUM INPUT : 001 ③ Press CAM button, then camera ID is set to the selected number. ④ It is possible to select number within 1 ~ 255. If the number is out of selectable range, camera ID will not be set. 4. Joystick/Camera Operation Method • Using joystick, it is possible to operate Pan/Tilt movement of • Using joystick, it is possible to operate zoom movement of camera. camera. 1. Menu Structure for Setting Controller Interface Device PTZ Controller Instruction Manual / SC3100 12/21 www.cnbtec.com 5. Controller Setup Device Setup 1 + SET (2seconds) Password Input NUMBER (Device No.) TYPE (Device Type) PTZ PROTOCOL (Protocol Setup) SPEED (Data Rate Setup) JOYSTICK STOP PACKET (Operation Mode Sensitivity Setup) (No. of Stop Packet Setup) MODE SLAVE DEV (Display Mode Select) (Slave Device Select) MOUSE SET EXIT (End) (Mouse Speed Setup) PELCO D 2400 BPS JOYSTICK SET 2 NOR SC3. LOW SAVE & EXIT PELCO P 4800 BPS FIXED SPEED 3 USER DVR MID EXIT ONLY SAMS.E 9600 BPS P-NEW P-CON 4 FAST 19200 BPS 38400 BPS SAMS.T BOSCH 2. Controller Interface Device Setting Mode • It is a menu to set up conbtroller interface devices. ① Press number 1 on intial screen and SET button for 2 seconds, then password input message is displayed. ② Enter default “0000” set on factory or other password defied by the user arbitrary. ③ When password matches, interface device setup menu is displayed. • If password does not match 3 times or it is not entered for 10 seconds, it moves to the initial screen. PTZ Controller Instruction Manual / SC3100 13/21 www.cnbtec.com 5. Controller Setup 3. Main Menu for Setting Controller Interface Device ① NUMBER: It indicates camera ID selected currently. It may be a number within 1 ~ 255 and set up using joystick and numeric pad. (However, in case of using numeric pad, it is required to enter 3 digits.) ② TYPE: It indicates the currently selected device. (SC3100 supports PTZ only.) ③ PROTOCOL: It indicates protocol of the currently selected ID. (PELCO D, PELCO P, SAMSUNG ELEC, PANASONIC, BOSCH, SAMSUNG TECHWIN) ④ SPEED: It indicates data rate of the currently selected ID. (2400, 4800, 9600, 19200, 38400), • DATA, PARITY and STOP BIT are fixed to 8BIT, NONE and1BIT respectively. ⑤ JOY STICK: It sets up sensitivity, center position and fixed speed of joystick. (See joystick setup menu.) ⑥ STOP PACKET: It indicates number of stop packets to be sent when transmitting joystick and function commands. ⑦ MODE : It sets up user mode. (See User Mode Setup menu) ⑧ SLAVE DEV : It sets up slave device. (See DVR Device Setup menu) ⑨ MOUSE SET : It sets up mouse speed. When mouse function is used, SC3100 can t control the speed dome. ⑩ EXIT: It stores interface device setup menu and moves to initial screen. 4. Joystick Setup Menu ① When selecting main menu ⑤ for setting controller interface device and tilting joystick right, a menu as shown on upper right figure is displayed. • CENTER: It sets up sensitivity of joystick. (10, 15, 20, 25, 30) • ORIGIN SET: When selecting this menu and tilting joystick right, a menu as shown on middle right figure is displayed. • It sets up CENTER POSITION of joystick. • Position the joystick at the center, and store the position. ② When selecting main menu ⑤ for setting controller interface device and tilting joystick left, a menu as shown on lower right figure is displayed. • It operates in L (low speed), M (medium speed), F (fast speed) regardless to tilting of the joystick. PTZ Controller Instruction Manual / SC3100 14/21 www.cnbtec.com 5. Controller Setup 5. User Mode Setup Menu ① When selecting main menu ⑦ for setting controller interface device and tilting joystick right, a menu as shown on upper right figure is displayed. • MONITOR: It sets up user monitor number and DVR Channel number. • CAM ID: It sets up the camera ID to be connected to the monitor. ② It may be a number within 1~255 and set up using joystick and numeric pad(However, in case of using numeric pad, it is required to enter 3 digits.) ③ SAVE : Tilting joystick left. EXIT : Tilting joystick right. 6. DVR Device Setup Menu ① When selecting main menu ⑧ for setting controller interface device and tilting joystick right, a menu as shown on upper right figure is displayed. • PROT: It sets up the protocol of the DVR. (PELCO D, PELCO P, SAMSUNG ELEC, PANASONIC, BOSCH, SAMSUNG TECHWIN) • SPEED: It sets up the data rate of the DVR. (2400, 4800, 9600, 19200, 38400) PTZ Controller Instruction Manual / SC3100 15/21 www.cnbtec.com 7. Menu Structure for Controlling Controller System PASSWORD (Password Setup) SLEEP TIME (Waiting Time Setup) BUZZER (Buzzer Setup) ON OFF PTZ LOGO (Logo Input) CNB USER System Setup 2 + SET (2seconds) Password Input FACTORY (Initialization of Setting) OP MODE (Operation of Setting) CLR ALL DATA CLR EDIT DATA EXIT MASTER SLAVE ON BACKLIGHT (Backlight Setup) OFF AUTO ON DUMMY OFF EXIT (End) SAVE&EXIT EXIT ONLY 8. Controller System Setting Mode • This menu sets up controller system. ① Press number 2 on initial screen and SET button for 2 seconds, then password input message is displayed. ② Password Input: Refer to the section titled “Controller Interface Device Setup Mode.” PTZ Controller Instruction Manual / SC3100 16/21 www.cnbtec.com 5. Controller Setup 9. Main Menu of Controller System Setting ① PASSWORD: It sets up password to be used to enter into controller interface device and system setup menu. Default is “0000.” • It is set when all of 4 digits are entered. ② SLEEP TIME: It indicates when LCD Backlight turns on. It requires keypad input with larger than 10s and applies only when ⑦ BACKLIGHT is ON. ③ BUZZER: It indicates BUZZER ON/OFF of the system. ④ LOGO: It allows the user to input logo directly. • Refer to user logo setup menu. ⑤ FACTORY: It sets the controller to default factory condition. ⑥ OP MODE: It indicates Master/Slave mode. In case of using one master and several slaves connected, slaves shall be set to Slave Mode. • SC3100 allows maximum 4 slaves to be connected. ⑦ BACKLIGHT: It indicates whether using Backlight of LCD monitor. • ON: Backlight turns off when specified time on ② SLEEP TIME has passed. • OFF: Backlight turns off. • AUTO: When pressing key button, Backlight turns on for 5 seconds. ⑧ DUMMY: When using Master/Slave, be sure to set only master controller ON. ⑨ EXIT: It stores system setup menu and reboots the system. 10. User Logo Setup Menu ① After selecting main menu for setting controller system ④ and Selecting USER menu using joystick, a menu is displayed as shown on the right. • When tilting joystick up/down,character is displayed on a specified point. • It is possible to input 2 lines of user logo. Position the cursor on up/down arrows and move the joystick upward/downward, then the cursor moves to each line. 11. FACTORY SET Setup Menu ① After selecting main menu for setting controller system ⑤ and tilting joystick right, then a menu is displayed as shown on the right. • CLR ALL DATA: It initializes controller to the default factory condition. PTZ Controller Instruction Manual / SC3100 17/21 www.cnbtec.com 5. Controller Setup • CLR EDIT DATA: It initializes all of data except for Joystick, and PROTOCOL menu. PTZ Controller Instruction Manual / SC3100 18/21 www.cnbtec.com 1. Controller Firmware Upgrade • It is possible to execute firmware upgrade of the controller at PC through RS-232 Port. • Firmware upgrade application is not provided when purchasing the equipment and only original buyer can obtain the new firmware upgrades. ① Check if the controller to be upgraded is connected to PC. ② Open: It opens upgrade file (.cnb). ③ File Path: When opening upgrade file, it shows the file path. ④ Messages: It indicates type of upgrade file. ⑤ System Init: When it is selected, the controller is initialized to the default factory condition. ⑥ Status: It indicates progress of upgrade. ⑦ Progress: It indicates transmission status of upgrade. PTZ Controller Instruction Manual / SC3100 19/21 www.cnbtec.com 6. Controller 7. Operation List Firmware Upgrade Operation Function PEL* PANAS* N* C* SAMS* BOSCH SAMT* [KEYPAD 1-255] + [CAM] Using for entering camera ID ◎ [1-99] [1-99] ◎ ◎ ◎ [MENU] Camera OSD MENU ON ◎ ◎ ◎ ◎ ◎ ◎ [MENU] Camera OSD MENU OFF X ◎ ◎ ◎ X X [SET] Move to the sub-menu(In OSD MENU) ◎ ◎ ◎ ◎ ◎ ◎ [BACK] Move to the upper-menu(In OSD MENU) ◎ ◎ ◎ ◎ ◎ ◎ [KEYPAD 1-255] + [PRESET] PRESET Execution ◎ [1-256] [1-64] ◎ ◎ ◎ PRESET Setting ◎ [1-256] [1-64] ◎ ◎ ◎ PRESET Delete X X X ◎ X ◎ PATTERN Execution ◎ ◎ ◎ [1-3] [1-2] ◎ PATTERN Setting ◎ ◎ ◎ X [1-2] ◎ SORT SORT AUTO PAN [1~3] SWING Execution ◎ [1+SWING] (P, T, P/T) [KEYPAD 1-255] + [PRESET] Press it button longly [KEYPAD 1-255] + [F1] Press it button longly [KEYPAD 1-4] + [PATT-N] [KEYPAD 1-4] + [PATT-N] Press it button longly [KEYPAD 1-8] + [SWING] [KEYPAD 1-8] + [GROUP] [F1] GROUP Execution AUTO PAN 1+SWING 1+SWING SEQ SEQ ◎ TOUR SCAN 1+GROUP 1+GROUP [1-6] [1+GROUP] Save Patterns X ◎ ◎ X Same as F2 function(In OSD MENU) X ◎ ◎ X ◎ ◎ TOUR See Change to the Aux Mode X X X ◎ [1+F1] Next page [F2] Same as Enter function(In OSD MENU) X X X ◎ Same as F3 function(In OSD MENU) X ◎ ◎ X X See Reset function(Press it button shortly) X X X ◎ P/T Next page ◎ Reset function(Press it button longly) X X X Factory Select Camera ID ◎ ◎ ◎ ◎ ◎ ◎ direction key(2,4,6,8, In OSD MENU) X ◎ ◎ ◎ X X Using for AUX key X X X ◎ X X [CAM] Move to the sub-menu(In OSD MENU) X ◎ ◎ X X X [CLR] Move to the upper-menu(In OSD MENU) X ◎ ◎ X X X [KEYPAD 0-9] PTZ Controller Instruction Manual / SC3100 20/21 www.cnbtec.com • PEL* : PELCO PROTOCOL • SAMT* : SAMSUNG TECHWIN PROTOCOL • PANAS* : PANASONIC(N* : NEW, C* : CONVENTIONAL) PROTOCOL • SAMS* : SAMSUNG ELEC PROTOCOL Locked Function Key No. Command Locked Function Key No. Command On/Off 1 Scan 360° On/Off 56 Night Mode menu On/Off 2 Autopan On/Off 57 Night Mode setting √ On/Off 3 Iris Control √ On/Off 58 Day/Night Threshold √ On/Off 4 Focus Control √ On/Off 60 On Screen Display 7 Play Custom Pre-Position √ On 61 Display Adjust On 62 Pre-Position Title menu On 63 Zone Title menu On/Off Tour √ On/Off 8 Play Pre-position Tour √ On/Off 9 Inactivity Mode On 64 Alarm Status √ On/Off 11 Auto Iris Level adjust Off 65 Alarm Acknowledge 14 Set Autopan and Scan On 66 Display software version Speed On 72 Re-initialize camera ♦ On/Off 78 AutoTrack ♦ On 79 Camera On/Off 15 On/Off Set Pre-Position Tour Period(dwell) √ Height ♦ √ √ On/Off 18 AutoPivot Enable On/Off 20 On/Off On/Off √ On/Off 80 Digital Zoom Lock Backlight Comp On/Off 81 Physical output 1 ♦ 23 Electronic Shutter On/Off 82 Physical output 2 ♦ 24 Stabilization On/Off 83 Physical output 3 ♦ On/Off 84 Physical output 4 ♦ ♦ On/Off 26 Wide Dynamic Range (WDR camera only) √ On/Off 86 Sector Blanking √ On/Off 87 Privacy Masking On/Off 90 Command Lock/Unlock √ On/Off 35 White Balance Mode √ On 40 Restore Camera Settings √ On/Off 41 Line Lock Phase Adjust √ On/Off 91 Lens Polarity menu √ On/Off 42 Sync Mode √ On/Off 92 Lens Polarity menu √ On/Off 43 Auto Gain Control √ On/Off 93 Lens Polarity menu √ On/Off 44 Sharpness On/Off 100 Record A √ On 46 Advanced menu On/Off 101 Record B On 47 View Factory Settings On 997 FastAddress, display PTZ Controller Instruction Manual / SC3100 21/21 www.cnbtec.com 7. Operation List(for Bosch protocol) Locked On/Off 50 Playback A, continuous On/Off 51 Playback A, single On/Off 52 Playback B, continuous On/Off 53 On/Off 53 Function On 998 On 999 Playback B, single Set 1-99 Pre-position programming Playback B, single Shot 1-99 Pre-position recall Function FastAddress, Unaddressed domes No. Command Set 100 Pre-position menu Set 900 Edit Tour1 (Standard) Set/Shot 101 Autopan left limit Shot 900 Edit Tour2 (Custom) Set/Shot 102 Autopan right limit 901 Adds/removes a Set 110 Factory P/T home position ~ Preposition shot from √ Set 802 Edit Password 999 Tour 1 √ Set 899 Reset ALL Key Locked FastAddress, all units Key Set/Shot No. Command ♦ : This packet is not tested. On : [KEYPAD + F1] Press it button shortly Shot : [KEYPAD + F1] Press it button longly Off : [KEYPAD + F2] Press it button shortly Set PTZ Controller Instruction Manual / SC3100 22/21 : [KEYPAD + F2] Press it button longly www.cnbtec.com 8. Product Appearance and Specifications 1. Product Appearance PTZ Controller Instruction Manual / SC3100 23/21 www.cnbtec.com 2. Product Specifications Category SC3100 Pan/Tilt : RS-485 (Remote control up to 1.2km) Communication Type DVR interface : RS-485, USB USB : USB Mouse function support Protocol : Pelco D, Pelco P, Samsung Elec, Panasonic, Bosch, Samsung Techwin LCD Display 20 x 4 Character LCD PTZ Control Joystick (3 Axis Twist Zoom) Sub Keyboard Max 4 Devices Type: Asynchronous Serial, 1 Start Bit, No Parity, 1 Stop Bit RS-485 Specification Transmission Type: Half Duplex Data Rate: 2400 ~ 38400 bps RS-232 Specificaion D-SUB 9P, Firmware Upgrade Operation Power 12V DC / 9V Battery/ USB(PC), Max 150mA Operation Temperature 0 ~ +50℃ / 60% Dimensions 400(W) x 200(H) x 99.97(D)mm Weight About 1.24kg(Excluding Adaptor) PTZ Controller Instruction Manual / SC3100 24/21 www.cnbtec.com