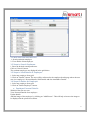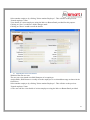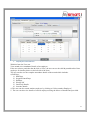
1
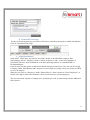
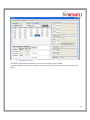
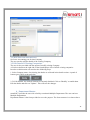
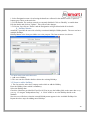
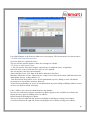
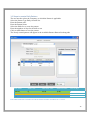
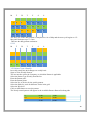
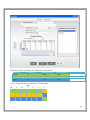
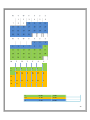
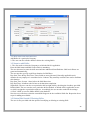
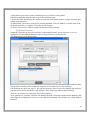
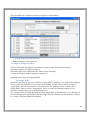
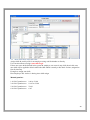
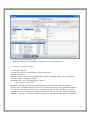
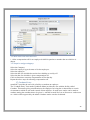
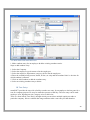
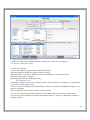
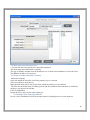
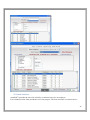
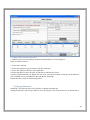
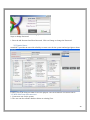
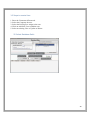
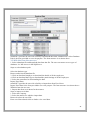
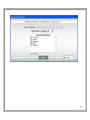
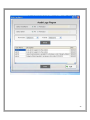
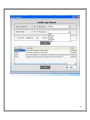
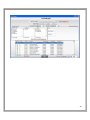
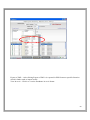
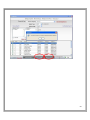
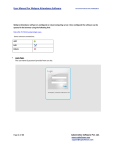
USER MANUAL
smartSOFT classic Plus.
RELEASE DATE: 12-Sep-2011
Disclaimer
The instructions in this document have been carefully checked for accuracy and are presumed to be
reliable. Smart I Electronics Systems Pvt Ltd. and its writers assume no responsibility for
inaccuracies and reserve the right to modify and revise this document without notice.
It is Smart I’s goal to supply accurate and reliable documentation. If you discover a discrepancy in
this document, please e-mail your comments to [email protected]
smartSOFT classic plus User Manual : V-1.2
Updated Document Release Date: 21-01-15
smartSOFT classic Plus Version : V-1.2.1.8
1
Contents
How to Use smartSOFT :....................................................................................................................... 5
1.
How to get data from the controllers ............................................................................................. 5
A. Download Data from Hardware: .................................................................................................... 5
B.
Download Time logs: ..................................................................................................................... 6
2.
Employee Master: .......................................................................................................................... 6
1.1
With this form the user can- ....................................................................................................... 7
1.2
Steps to Search Employee: ......................................................................................................... 7
1.3
Steps to View Details of Employee: .......................................................................................... 7
1.4
Steps to Delete An Employee: ................................................................................................... 7
a.
Employee Personal Details: ........................................................................................................... 7
b.
Employee Shift Structure: .............................................................................................................. 8
c.
Employee Attendance: ................................................................................................................... 9
3.
Company Master: ......................................................................................................................... 10
1.1
With this form the user can- ..................................................................................................... 11
1.2
Edit Details Of Existing Companies: ....................................................................................... 11
4.
Department Master:...................................................................................................................... 11
1.1
With this form the user can- ..................................................................................................... 12
1.2
Steps to add a Department: ...................................................................................................... 12
1.3
Delete/Edit Details Of Existing Departments: ......................................................................... 12
5.
Designation Master: ..................................................................................................................... 12
1.1
With this form the user can- ..................................................................................................... 12
1.2
Steps to add a Designation: ...................................................................................................... 12
1.3
Delete/Edit Details of Existing Designations: .......................................................................... 12
6.
Holiday Master:............................................................................................................................ 13
1.1
With this form the user can- ..................................................................................................... 13
1.2
Steps to add a Holiday: ............................................................................................................ 13
1.3
Delete/Edit Details Of Existing Holidays: ............................................................................... 14
7.
Leaves Code Master: .................................................................................................................... 14
1.1
With this form the user can- ..................................................................................................... 14
1.2
Steps to add a Leave Code: ...................................................................................................... 14
2
1.3
8.
Delete/Edit Details of Existing Leaves: ................................................................................... 14
Leave Rules Master:..................................................................................................................... 14
1.1
With this form the user can- ..................................................................................................... 15
1.2
Steps to add Leave Rules: ........................................................................................................ 15
9.
Shift Roaster: ............................................................................................................................... 16
1.1
Steps to create Daily Pattern .................................................................................................... 17
1.2
Pattern Type : Weekly. ............................................................................................................. 18
1.3
Pattern Type: Monthly ............................................................................................................. 20
10.
Category Master: Setting Attendance Policies/Rules............................................................... 23
1.1
With this form the user can- ..................................................................................................... 23
1.2
Steps to add Category: ............................................................................................................. 23
11.
Shifts Master: ........................................................................................................................... 24
1.1
With this form the user can- ..................................................................................................... 25
1.2
Steps to add Shifts: ................................................................................................................... 25
1.3
Delete/Edit Details Of Existing Shifts: .................................................................................... 25
12.
Manual Punches: ...................................................................................................................... 26
1.1
Steps to add Manual punches: .................................................................................................. 27
13.
Assign Company: ..................................................................................................................... 27
1.1
With this form the user can- ..................................................................................................... 28
1.2
Steps to Assign Company: ....................................................................................................... 28
14.
Assign Shifts: ........................................................................................................................... 28
1.1
With this form the user can- ..................................................................................................... 29
1.2
Steps to add Assign Shifts: ....................................................................................................... 30
15.
Assign Category: ...................................................................................................................... 30
1.1
With this form the user can- ..................................................................................................... 31
1.2
Steps to assign category: .......................................................................................................... 31
16.
Compensation Off: ................................................................................................................... 31
1.1
With this form the user can- ..................................................................................................... 32
1.2
Steps to assign category: .......................................................................................................... 32
17.
Condone Entry : ....................................................................................................................... 32
1.1
With this form the user can- ..................................................................................................... 33
3
18.
Tour Entry: ............................................................................................................................... 33
1.1
With this form the user can- ..................................................................................................... 34
1.2
Steps to add tour entry: ............................................................................................................ 34
19.
Outdoor Entry: ......................................................................................................................... 34
1.1
With this form the user can- ..................................................................................................... 35
20.
Late/Early Penalty: ................................................................................................................... 35
1.1
With this form the user can- ..................................................................................................... 36
1.2
Steps to make Late/Early Penalty: ........................................................................................... 36
21
Setting Leave Opening Balance: .............................................................................................. 36
22
Leave Sanction: ........................................................................................................................ 37
1.1
With this form the user can- ..................................................................................................... 38
23
Change Password: .................................................................................................................... 38
24
Create Users: ............................................................................................................................ 39
1.1
With this form the user can- ..................................................................................................... 39
1.2
Steps to create User: ................................................................................................................. 40
25
Select Database Path : .............................................................................................................. 40
1.1
With this form the user can- ..................................................................................................... 41
26
Reports: .................................................................................................................................... 42
27
Monthly Reports : .................................................................................................................... 43
28
Continuous Reports : ................................................................................................................ 43
29
Leave Reports........................................................................................................................... 43
30
Tally report:- ............................................................................................................................ 52
4
How to Use smartSOFT :
1. How to get data from the controllers:
A. Download Data from Hardware:
smartSOFT works on Employee Data and their time logs.
This data is first transferred from the hardware through Data capturing Software ie Download Engine
or smartENGINE 30 to their relevant Databases. So first you need to connect to a download engine
or smartENGINE 30 and transfer all your machine data to it.
smartSOFT then connects to the database and then allows you to download the data to the server
database.
For this purpose you are provided with the form "Select Database Path" under "Settings" Menu.
Select Database Path:
The image at the right shows you how to select database. You are provided with a facility to connect
to 2 types of databases i.e. MS-Access and MS-SQL Server.
Then you can browse the required database file. The path is displayed in the textbox shown.
Then you need to click on "Save Settings" which would save the settings to download data.
5
B. Download Time logs:
In order to download time logs you need to first Select Controllers among the available list and then
click on "Download Time Logs”
2. Employee Master:
smart SOFT classic plus provides the user with a facility to download the employee data
(Information) such as - Employee Name; Card No; Employee Code - to the server database of
smartSOFT Advance from the database of the data capturing software viz smartENGINE or
Download Engine.
Later the user can edit, update or delete their details through various forms. The user can also assign
Company, Shifts, Shift Roaster and Categories to these employees using various user forms provided
to serve the purpose.
When the user click on “Employee" under "Master Menu" a form is shown to "Select Employee" as
shown in the figure which also facilitates various search criteria to search employees.
The user can search employee Company wise, by Employee code, by name along with the additional
filters shown.
6
1.1 With this form the user can1. Search particular employee.
2. View details of that employee.
1.2 Steps to Search Employee:
1. Enter the desired search parameters.
Click on "Search" button.
The resultant employees are displayed in the grid below.
1.3 Steps to View Details of Employee:
1. Select any employee from grid.
2. Click on "Details” button. The user will be redirected to the employee details page where the user
can view employee’s Personal details, Shift Details and also Attendance Details.
1.4 Steps to Delete An Employee:
1. Select any employee from grid.
2. Click on "Delete Employee" button.
a. Employee Personal Details:
With this form the user canView Personal Details of an employee.
Update details.
Add the image of the employee by clicking on "Add Picture". This will help to browse the image to
be displayed in the picture box shown.
7
Select another employee by clicking "Select another Employee". This will take to the previous
"Search employee" form.
View details of various employees using the Move to Button Panel provided for this purpose.
Clicking on "Save" would save all the changes made.
Clicking on "Reset" would reset all the details.
b. Employee Shift Structure:
With this form the user canThe user can view month wise Shift Structure of an employee.
Assign Shifts, Shift Roaster or weekly off to the employee for a selected date range as shown in the
form above.
Select another employee by clicking "Select another Employee". This will take to the previous
"Search employee" form
4. The user can also view details of various employees using the Move to Button Panel provided.
8
c. Employee Attendance:
With this form the User canView month wise Attendance Details of an employee.
If the user select a particular date & click on View, the user can see the shift & punch details of that
employee for that day below on the left side of the form.
The user can also see the complete attendance details of the month which includes:
a) Full Days
1) Half Days
2) Irregular Punch Days
3) Holidays
4) Weekly Off
5) Late/Early Details
6) Overtime details
4. The user can also search another employee by clicking on "Select another Employee".
5. The user can also view details of various employees using the Move to Button Panel provided.
9
3. Company Master:
smartSOFT classic plus provides the user only one company can be added.
Company Master is the form provided to serve the purpose. The form structure is as shown in the
figure.
10
1.1 With this form the user canSet Leave Accounting year for that Company
The user can also edit the details of the existing Company.
1.2 Edit Details Of Existing Companies:
The user is also provided with the option of modify existing Company.
A List box shown on the right side of the form displays a list of all the existing companies.
In order to edit them the user need to take following steps:
1. Select Company name. On selecting the details are reflected in the details section. A panel of
buttons gets visible as shown below.
2. To Edit Details: The textbox controls are currently disabled. Click on "Modify" to enable them.
Edit the details and click on "Update". This will save the changes.
4. Department Master:
smartSOFT provides the user with a facility to maintain Multiple Department. The user can have
Multiple Departments.
Department Master is the form provided to serve the purpose. The form structure is as shown above.
11
1.1 With this form the user can1. Add a New Department.
2. The user can also edit the details or delete the existing Departments.
1.2 Steps to add a Department:
Enter the Department Name which is mandatory.
Enter other details required.
Click "ADD" to save the Department details to the database.
Now the user will observe that the entered Department name appears in the Available Departments
list.
Repeat the above steps for adding more Departments.
1.3 Delete/Edit Details of Existing Departments:
The user is also provided with the option of modifying or deleting an existing Department. A List
box shown on the right side of the form displays a list of the entire existing Department.
In order to edit/delete them the user need to take following steps:
1. Select Department name. On selecting the details are reflected in the details section. A panel of
buttons gets visible as shown below.
2. To Edit Details: The textbox controls are currently disabled. Click on "Modify" to enable them.
Edit the details and click on "Update". This will save the changes.
3. To Delete: Just click on "Delete" and the Department will get deleted with all its details.
5. Designation Master:
smartSOFT provides the user with a facility to maintain Multiple Designations. The user can have
multiple designations for employees.
Designation Master is the form provided to serve the purpose. The form structure is as shown above.
1.1 With this form the user can1. Add a new Designation.
2. The user can also edit the details or delete the existing Designations.
1.2 Steps to add a Designation:
1. The user need to select the Company under which to add the Designation.
Enter the Designation Name which is mandatory.
Enter other details required.
Click "ADD" to save the Designation details to the database.
Now the user will observe that the entered Designation name appears in the Available Designations
list.
Repeat the above steps for adding more Designations.
1.3 Delete/Edit Details of Existing Designations:
The user is also provided with the option of modifying or deleting an existing Designation. A List
box shown on the right side of the form displays a list of all the existing Designation.
In order to edit/delete them the user need to take following steps:
12
1. Select Designation name. On selecting the details are reflected in the details section. A panel of
buttons gets visible as shown below.
2. To Edit Details: The textbox controls are currently disabled. Click on "Modify" to enable them.
Edit the details and click on "Update". This will save the changes.
3. To Delete: Just click on "Delete" and the Designation will get deleted with all its details.
6. Holiday Master:
smartSOFT provides the user with a facility to maintain Multiple Holiday details . The user can have
multiple Holidays.
Holiday Master is the form provided to serve the purpose. The form structure is as shown.
1.1 With this form the user can1. Add a new Holiday.
2. The user can also edit the details or delete the existing Holidays.
1.2 Steps to add a Holiday:
1. The user need to select the Company under which to add the Holiday.
Enter the Holiday Name which is mandatory.
Select the Holiday date.
Check the Checkbox provided for Fixed for All Year in case the holiday falls on the same date every
year e.g. 15th August “Independence Day”. 4. Click "ADD" to save the Holiday details to the
database.
Now the user will observe that the entered Holiday name appears in the Available Holidays list.
Repeat the above steps for adding more Holidays.
13
1.3 Delete/Edit Details of Existing Holidays:
The user is also provided with the option of modifying or deleting an existing Holiday.
A List box shown on the right side of the form displays a list of all the existing Holidays.
In order to edit/delete them the user need to take following steps:
1. Select Holiday name. On selecting the details are reflected in the details section. A panel of
buttons gets visible as shown below.
To Edit Details: The textbox controls are currently disabled. Click on "Modify" to enable them. Edit
the details and click on "Update". This will save the changes.
To Delete: Just click on "Delete" and the Holiday will get deleted with all its details.
7. Leaves Code Master:
smartSOFT provides the user with a facility to maintain Multiple Leaves details . The user can have
multiple Leaves under Company maintained according to Leave Codes.
Leaves Master is the form provided to serve the purpose. The form structure is as shown above.
1.1 With this form the user can1. Add a new Leave.
2. The user can also edit the details or delete the existing Leaves.
1.2 Steps to add a Leave Code:
Enter the Leaves Code which is mandatory.
Enter other details that are required.
Click "ADD" to save the Leaves details to the database.
Now the user will observe that the entered Leaves code appears in the Available Leaves list.
Repeat the above steps for adding more Leaves.
1.3 Delete/Edit Details of Existing Leaves:
The user is also provided with the option of modifying or deleting an existing Leaves.
A List box shown on the right side of the form displays a list of all the existing Leaves.
In order to edit/delete them the user need to take following steps:
1. Select Leave code. On selecting the details are reflected in the details section. A panel of buttons
gets visible as shown below.
To Edit Details: The textbox controls are currently disabled. Click on "Modify" to enable them. Edit
the details and click on "Update". This will save the changes.
To Delete: Just click on "Delete" and the Leave details will get deleted.
8. Leave Rules Master:
smartSOFT provides the user with a facility to set Leave Rules. Leave Rules can be applied to a
particular leave under a particular Category.
14
Leave Rules Master is the form provided to serve the purpose. The form structure is as shown above.
1.1 With this form the user canSet Leave Rules for a particular Leave.
The user can also edit the details or delete the existing Leave Rules.
1.2 Steps to add Leave Rules:
1. The user need to select the Company, and Category to which the Leave is applicable.
Select the leave code to which the leave rules are to be applied.
The user needs to enter the required details.
Allow Half Day Leave: Tick mark if the half is allowed for this leave.
Min Days Allowed at a Time : Enter min nos. of days of leave that can be taken if half allowed is tick
marked then min nos. of days shall be 0.5.
Treat IN between Week Off as Leave: If tick marked then any leave falling on week off shall be
treated as leave else shall be treated as Week off.
Treat IN between Holidays as Leave: If tick marked then any leave falling on Holiday shall be treated
as leave else shall be treated as Holiday.
Click "ADD" to save the Leave Rules details to the database.
Now the user will observe that the entered Leave Rules appears in the Available Leave Rules list.
Repeat the above steps for adding more Leave Rules.
Delete Details Of Existing Leave Rules:
The user is also provided with the option of modifying or deleting an existing Leaves Rules.
A List box shown on the right side of the form displays a list of all the existing Leaves Rules.
15
In order to edit/delete them the user need to take following steps:
1. Select Leave Rule. On selecting the details are reflected in the details section. A panel of buttons
gets visible as shown below.
2. To Delete: Just click on "Delete" and the Leave Rules will get deleted.
9. Shift Roaster:
Shift Roaster is use to create or define shift pattern for creating or managing rotation of the shifts of a
single or a group of employees.
The user can create or define 3 types of shift patterns
Daily basis.
Weekly basis.
Monthly basis.
Pattern Type: Daily.
In this type of pattern the shift rotates on the numbers of days specified.
E.g. there are 3 shifts that are defined in the shift master as under:
16
1.1 Steps to create Daily Pattern
The user needs to select the Company, to which the Pattern is applicable.
Select the Pattern Type Daily from the list.
Enter the Pattern code.
Enter the Pattern Name
Select the Shifts for to create the pattern.
Enter the numbers of days for the shift to run.
Click on ADD button to save the pattern.
The Newly created pattern will appear in the Available Roaster Pattern list along side.
Shift Name
General
General 2
Night
Shift Code
G
G2
N
Shift Start Time
09:00
11:00
22:00
Shift End Time
18:00
20:00
06:00
Nos of days
5
4
7
FOR THE PURPOSE OF EXPLANATION THE PATTERN STARTS ON 1ST MAY
17
M
T
W
T
F
S
S
1
2
3
4
5
6
7
8
9
10
11
12
13
14
15
16
17
18
19
20
21
22
23
24
25
26
27
28
29
30
31
The first cycle of the daily pattern is completed on 16th of May and the next cycle begins on 17th
May and continuous up to 1st June.
This how the daily pattern continuous
JUNE
M
T
W
T
F
S
S
1
2
3
4
5
6
7
8
9
10
11
12
13
14
15
16
17
18
19
20
21
22
23
24
25
26
27
28
29
30
1.2 Pattern Type: Weekly.
In weekly pattern the shift changes on weekly basis.
Steps to create Weekly Pattern:
The user needs to select the Company, to which the Pattern is applicable.
Select the Pattern Type Weekly from the list.
Enter the Pattern code.
Enter the Pattern Name
Select the No. of Weeks for the weekly pattern.
Select the Shifts for week for different weeks in the grid.
Select the Week off.
Click on ADD button to save the pattern.
The Newly created pattern will appear in the Available Roaster Pattern list along side.
G
G2
N
09:00
11:00
22:00
18:00
20:00
06:00
18
Refer above figure as example for setting the weekly pattern
Shift Name
Shift Code
Shift Start Time
General
G
09:00
General 2
G2
11:00
Night
N
22:00
Shift End Time
18:00
20:00
06:00
In the example the pattern starts from 1st of the month.
May
M
T
W
T
F
S
S
1
2
3
4
5
6
7
8
9
10
11
12
13
14
15
16
17
18
19
20
19
21
28
22
29
JUNE
M
T
23
30
24
31
25
26
27
W
T
F
S
S
1
2
3
4
5
6
7
8
9
10
11
12
13
14
15
16
17
24
18
25
19
26
20
27
21
28
22
29
23
30
1.3 Pattern Type: Monthly
In monthly pattern the shift changes on monthly basis ie after every 30 days.
Steps to create Monthly Pattern:
The user needs to select the Company, to which the Pattern is applicable.
Select the Pattern Type Monthly from the list.
Enter the Pattern code.
Enter the Pattern Name
Select the No. of Weeks for the weekly pattern.
Select the Shifts from the list of shifts and move to the list box alongside.
Select the date of the month from where the shift must change.
Click on ADD button to save the pattern.
The Newly created pattern will appear in the Available Roaster Pattern list along side.
G
G2
N
09:00
11:00
22:00
18:00
20:00
06:00
20
Refer the above diagram for e.g.
Shift Name
Shift Code
General
G
General 2
G2
Night
N
Shift Start Time
09:00
11:00
22:00
Shift End Time
18:00
20:00
06:00
The shift in the pattern changes from 10th of every month.
May
21
JUNE
JULY
M
T
W
T
F
S
S
1
8
2
9
3
4
5
6
7
10
17
11
18
12
19
13
20
14
21
15
22
23
24
25
26
27
28
29
30
31
16
G
G2
N
09:00
11:00
22:00
18:00
20:00
06:00
22
AUGUST
10. Category Master: Setting Attendance Policies/Rules
smartSOFT provides the user with a facility to set Category. Category can be prepared under the
Company.
Category Master is the form provided to serve the purpose. The form structure is as shown above.
1.1 With this form the user can1. Add Category for a particular Company.
2.The user can also edit the details or delete the existing Category.
1.2 Steps to add Category:
The user needs to select the Company to which the Category is applicable.
Enter the Category Code and name which is mandatory.
Compensation off Settings:
If the employee works on holidays and weekly off ,those work hours can be transferred to some
Absent day. For that the user need to set the compensation off.
Specify Min. hours applicable to Comp. Off. It indicates that compensation off would be considered
only after the user work for the specified hours.
Also specify no. of comp. offs allowed in a month.
Overtime settings:
1. Select radio button in order to apply or Ignore Overtime Settings.
Set time interval after & before the shift work hours to start overtime.
Select "+" to indicate time after Shift Work Hours.
Select "-" to indicate time before Shift Work Hours.
Select Grace Overtime Hours: This indicates the time interval that would be given as grace to the
employee for Overtime consideration.
The user can also provide settings for compulsory overtime before or after shift. Minimum OT hours
Before Shift: If the user check this checkbox and specify certain time interval, Overtime will be
calculated only if the employee works for that time before shift.
Minimum OT hours After Shift: If the user check this checkbox and specify certain time interval,
Overtime will be calculated only if the employee works for that time after shift.
23
Late/Early settings:
Grace Late Time: It is time that employee is allowed to come late from the scheduled shift start time
without any marking on a day’s attendance.
Grace Early Time: It is same as above except it denotes early going from the scheduled end time.
Late allowed Limit: Late allowed limit is the time that an employee is allowed to come late with the
day’s attendance showing late mark. If the employee comes later than the specified time then the first
half is marked absent for the employee
Early Allowed Limit: It is same as above except it denotes early going from the scheduled end time. .
If the employee leaves earlier than the specified time then the second half is marked absent for the
employee.
1. Check the Checkbox at the top to Apply Early/Late Settings.
Set Late/Early Count as interval.
If After every interval check box is checked, then the following conditions are applied only after
those many late counts.
The user can either deduct leave or attendance days for late counts. If Deduct from Leave is True,
then specified no. of leaves would be deducted from specified leave type.
If Deduct from Attendance is true specified no. of days would be deducted from attendance. Other
settings are same as Late/Early settings.
Repeat the above steps for adding more Categories.
Delete/Edit Details of Existing Categories:
The user is also provided with the option of modifying or deleting existing Categories.
A list shown on the left side of the form displays a list of all the existing Categories. In order to
edit/delete them the user need to take following steps:
1. Select the Category. On selecting the details are reflected in the details section. A panel of buttons
gets visible as shown below.
2. To Edit Details: The textbox controls are currently disabled. Click on "Modify" to enable them.
Edit the details and click on "Update". This will save the changes.
3. To Delete: Just click on "Delete" and the Shift Calendar details will get deleted.
11. Shifts Master:
smartSOFT provides the user with a facility to set Shifts. Shifts can be applied to a particular
employee under a particular Company.
Shifts Master is the form provided to serve the purpose. The form structure is as shown.
24
1.1 With this form the user canAdd Shifts for a particular Company.
2. The user can also edit the details or delete the existing Shifts.
1.2 Steps to add Shifts:
1. The user need to select the Company to which the Shift is applicable.
Enter the Shift name and Shift Code which is mandatory.
The user also need to enter the shift start/end time and Break Start/End time. Shift work Hours are
generated automatically.
The user needs to specify work Hour duration for Half Days.
Day Start Time & Day End Time: These fields are auto-generated. Generally applicable work
duration for any employee is considered to be 24 hours. Day start/Day end times are used to facilitate
this duration.
Day Start Time: It starts 1 hour before the Shift Start time.
Day End Time: It indicates the 24 hour work duration completion.
Night Shift: The user can also set a particular shift as night shift by checking the checkbox provided.
Default Shift: The user can also set a particular shift as default. A default shift is applicable in case
no shift is assigned to a particular employee. Accordingly the user needs to make all the settings.
4. Click "ADD" to save the Shifts details to the database.
Now the user will observe that the entered Shift appears in the Available Shifts list. Repeat the above
steps for adding more Shifts.
1.3 Delete/Edit Details Of Existing Shifts:
The user is also provided with the option of modifying or deleting an existing Shift.
25
A grid shown at the bottom of the form displays a list of all the existing Shifts.
In order to edit/delete them the user need to take following steps:
1. Select the Shift. On selecting the details are reflected in the details section. A panel of buttons gets
visible as shown below.
To Edit Details: The textbox controls are currently disabled. Click on "Modify" to enable them. Edit
the details and click on "Update". This will save the changes.
To Delete: Just click on "Delete" and the Shift details will get deleted.
12. Manual Punches:
smartSOFT provides the user with a facility to add manual punches for an employee or a no. of
employees at a time. Manual Punches is the form provided to serve the purpose.
The form structure is as shown below
smartSOFT works on Employee Data and their time logs and also provides facility to update the data.
This software basically works on the time logs that are recorded across every employee.
Punch timings are these time logs i.e. the time the employee enter or leave the company the employee
punches the card at the attendance Card machine. These timing are called as Punch timings.
These are saved date wise separately across each employee.
These punches are generally read from the machine through a download engine into the database. But
there might be circumstances when you need to add them manually. These puches are called "Manual
Punches".
26
For e.g. .when an employee forgets to carry the cards or the finger are injured etc. To handle such
situations smartSOFT provides the user an interface to add manual punches through a form named
"Manual Punches"
Punches: Punches generally represent the following events:
1. Check In
2. Break In
3. Break Out
4. Check Out
Select Suitable Date Range: Here you need to first select a date range for which to add manual
punches.
Adding Manual Punch Timings:
You can select multiple employees of a particular company.
You can then add manual punches as shown .You can specify Check IN., Check OUT, break in and
also Break Out timings as required i.e. all or any of them. And then Save the details by clicking on
"Assign" which will update the database
With this form the user can1. Add manual punches for an employee.
1.1 Steps to add Manual punches:
1. Select the Company.
2. Select the employee for which to add manual punches.
3. Enter the shift-timings
4. Click on Assign to assign manual punches.
Repeat the above steps for adding manual punches.
13. Assign Company:
smartSOFT provides the user with a facility to assign employee to certain Company out of multiple
companies. The user can assign Company to an employee or a number of employees at a time.
Assign Company is the form provided to serve the purpose. The form structure is as shown above.
Assign Employee Company: There is a form "Assign Employee Company” where you can search
employees by Emp Code or Name. Then, you can select multiple employees and assign any other
company to them.
As shown aside you can choose your search criteria. The search results are shown in a grid at the
bottom.
From this grid you can select multiple employees. Select a particular Company to assign and then
click on "Assign".
27
This will update the company for all those employees in the database
1.1 With this form the user can1. Assign Company to the employees.
1.2 Steps to Assign Company:
The user can search the employee according to employee code, first name or last name.
Select the Company to assign to employee.
Select the employees for which the user want to assign Company.
4. Click on Assign to assign Company to employees.
Repeat the above steps for assigning shifts.
14. Assign Shifts:
smartSOFT provides the user with a facility to assign shifts to employee. The shifts can be assigned
directly within particular dates or by using a shift calendar. Weekly-offs can also be assigned.
Assign Shifts is the form provided to serve the purpose. The form structure is as shown above.
Assign Shifts: There is a form "Assign Shifts” where you can select multiple employees of a
particular company directly or even department wise.
You can also select a suitable date range and then assign Shifts or Shift Roaster or even Weekly Off
for selected employees applicable for the date range selected. And then Save the details by clicking
on "Assign" which will update the database.
28
1.1 With this form the user canAssign shifts & weekly-offs for an employee using a shift-calendar or directly.
User can also allow to assign Auto shift Logic:
If there are some shifts defined in the system & employee can come in any shift, then in this case
auto shift will be applied to him in which the shift which is nearby to his check in time ,assigned to
him for that Day
Example to assign auto shift:
Here Employee Ms. Anita s is having Auto shift assign.
Manual punches:
1-01-2015 punches are
2-01-2015 punches are
5-01-2015 punches are
6-01-2015 punches are
9:46 to 21:00
10:45 to 22:00
22.00
6:45
29
1.2 Steps to add Assign Shifts:
Select the Company.
Select the employee-type & status to list the employees.
Select the employee & dates within which to apply the shifts or weekly-offs.
Shifts can be assigned employee-wise or department-wise i.e to all employees in a department.
Click on assign to assign shifts.
Repeat the above steps for assigning shifts.
15. Assign Category:
smartSOFT provides the user with a facility to set a category to an employee which contains the
settings for the employee.
Assign Category is the form provided to serve the purpose. The form structure is as shown above.
Set Category: There is a form "Set Category” where you can select multiple employees of a particular
company also department wise.
You can select the required Category to assign. You can also select a suitable date range and then
save the changes by clicking on "Assign" which will update the database.
30
1.1 With this form the user can1. Assign the category for an employee--employee-wise or department-wise
1.2 Steps to assign category:
1. Select the Company.
2. Select the employee-type & status to list the employees.
Select the employees.
Select the category to be assigned and the dates within which that category is to be applied.
Click on assign to assign the category.
Repeat the above steps for assigning the category.
16. Compensation Off:
smartSOFT provides the user with a facility to allow compensation off for an employee.
This is a form "Compensation Off” where you can select an employee of a particular company.
You can select the date for which to give compensation and also date on which to give the
compensation. You can also view the time log details for the selected date. And then Save the
changes by clicking on "Sanction" which will apply the compensation and update the database.
31
1.1 With this form the user can1. Allow compensation off for an employee & shift his punches to another date on which he is
absent.
1.2 Steps to assign category:
Select the Company.
Select the employee-type & status to list the employees.
Select the employee.
Select the date for which he has worked on a holiday or weekly-off.
Select the date for which he is given compensation-off.
Click on Sanction to sanction compensation-off for that day.
Repeat the above steps for allowing compensation-off.
17. Condone Entry :
smartSOFT provides the user with a facility to condone an employee.
The "Condone Entry” form under Updations Menu provides the user with the facility called
Condone. This means giving consideration to the employee for being late or absent due to certain
circumstances which are not under control of that employee. In such cases entries can be made as
condone stating the consideration to be given i.e. whether to mark No Late or Present etc. and reason
etc. which will be approved by the admin. Condone entries can also be deleted.
32
1.1 With this form the user can1. Make condone entry for an employee & delete existing condone entries.
Steps to add condone entry:
1. Select the Company.
2. Select the employee-type & status to list the employees.
3. Select the employee, department, category, shift to list the employees.
4. Enter the condone mode-present, absent, no late, no early and the condone limit i.e. the time for
which condone is allowed.
5. Click on Add Condone to add the condone entry.
6. Select an existing condone entry to delete.
18. Tour Entry:
smartSOFT provides the user with a facility to make tour entry for an employee who has gone for a
tour for company-purpose. He may be marked as present or half-day. The tour-entry can be made
employee-wise, department-wise, category-wise or shift-wise.
There is a form called "Tour Entry" through which you can select multiple employees under a
particular company. Select a suitable date range and thus make a tour entry for that duration.
33
1.1 With this form the user can1. Make tour entry for an employee & delete existing tour entries for an employee.
1.2 Steps to add tour entry:
1. Select the Company.
2. Select the employee-type & status to list the employees.
Select the employee & date for which to make tour entry.
Select the mode i.e. present or half-day & click on Add Entry to make the tour entry.
Select an existing entry to delete it.
Repeat the above steps for adding tour entry.
19. Outdoor Entry:
smartSOFT provides the user with a facility to make outdoor entry for an employee i.e. punches can
be selected to make outdoor entry.
There is a form provided named "Outdoor Entry” where you can select an individual employee of a
particular company.
Select a particular date for which to make Outdoor entries.
You can see all the punches of that employee for that date in the form of a list as shown aside.
You can select one or multiple punches made and then click on "Assign” to mark those punches as
Outdoor punches.
34
1.1 With this form the user can1. Make outdoor entry for an employee.
Steps to add outdoor entry:
1. Select the Company.
2. Select the employee-type & status to list the employees.
3. Select the employee & date for which to make outdoor entry.
4. Select the punches for which to make outdoor entry.
5. Click on Add Entry to add the outdoor entry.
Repeat the above steps for adding outdoor entry.
20. Late/Early Penalty:
smartSOFT provides the user with a facility to make Late/Early penalty manually. This penalties are
generated as per the late/early rules set in the category Master for a particular category to which the
employee belongs.
Late/Early Penalty is the form provided to serve the purpose. The form structure is as shown
35
1.1 With this form the user can1. Execute the late/early penalty for a particular employee.
The form shows the total number of penalty.
The type of Penalty whether from the deduction is to be done from Attendance or from the Leave.
The Balance Penalty to be executed.
1.2 Steps to make Late/Early Penalty:
Select the Company.
Select the Month in which the Late/Early penalty is to be executed.
Select the employee from the list.
Mark the date along side in the list box from which the penalty is to be effected.
The First list shows the dates of full day present and the second list shows the date on which the
employee was present for half day.
Click on Add Button.
Repeat the above steps for the other employees.
21 Setting Leave Opening Balance:
In case of new installations; this form assigns number of pending leaves to each employee.
36
22 Leave Sanction:
smartSOFT provides the user with a facility to sanction leaves for an employee.
Leave Sanction is the form provided to serve the purpose. The form structure is as shown above.
37
1.1 With this form the user can1. Sanction leaves for an employee & delete sanctioned leaves of an employee.
Steps to Sanction Leaves:
1. Select the Company.
2. Select the employee-type & status to list the employees.
3. Select the employee & leave code applicable.
4. Select the dates for leave & click on sanction to sanction the leaves.
5. Select a sanctioned leave to delete it in case if an error has been done on the part of the operator.
The Available leaves get updated in the grid shown along side.
Repeat the above steps for sanctioning leaves.
23 Change Password:
smartSOFT provides the user with a facility to change the password.
Change Password is the form provided to serve the purpose. The form structure is as shown above.
38
With this form the user can- 1. Change your Password.
Steps to change Password:
1. Enter the old Password and New Password. Click on Change to change the Password.
24 Create Users:
smartSOFT provides the user with a facility to create users for the system and assign rights to them.
Create Users is the form provided to serve the purpose. The form structure is as shown above.
1.1 With this form the user can1. Create new user for the system.
2. The user can also edit the details or delete an existing User.
39
1.2 Steps to create User:
1. Enter the Username & Password.
2. Select the Company the user.
3. Select the Privileges to assign to the user.
4. Click on Add New User to add the user.
5. Select an existing User to Update or Delete.
25 Select Database Path :
40
smartSOFT provides the user with a facility to download data from a database file. Select Database
Path is the form provided to serve the purpose. The form structure is as shown above.
1.1 With this form the user can1. Select a database file and download data from that file. The user can connect to two types of
databases viz. MS-Access or MS SQLServer.
Steps to select database path:
Select the database type.
Browse and select the database file.
3. Click on download employee to download the details of all the employees.
4. Click on download time logs to download the punch timings of all the employees.
5. Select the controllers for downloading the data.
Import Excel Data:
smartSOFT provides the user with a facility to import data from Excel sheet.
Import Excel Data is the form provided to serve the purpose. The form structure is as shown above.
With this form the user can1. Import data from excel sheets for the masters.
Steps to import excel data:
1. Select the Company.
2. Select the masters for which to import data.
Browse & select the excel file.
Enter excel sheet data & click on load to view excel data.
41
Click on Save to upload data.
26 Reports:
Master Reports:
42
27 Monthly Reports :
28 Continuous Reports :
29 Leave Reports
43
44
45
46
47
48
49
50
51
30 Tally report:Employee Monthly Report (For Tally):This form generates Employee monthly attendance report in excel and XML formats.
Field selection: - Click on field selection and Enter the column names same as in tally in Import
Fieldname.
52
Export to XML: - After clicking Export to XML it is exported in XML format at specified location
which is further used to import in tally.
View In excel: - Click it to view the attendance in excel format.
53
54