1
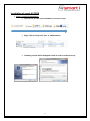
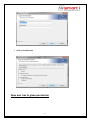
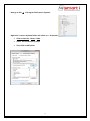
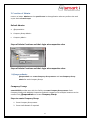
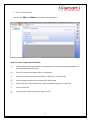
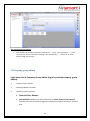
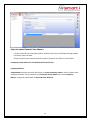
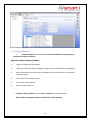
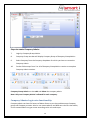
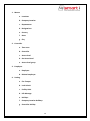
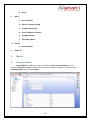
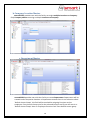
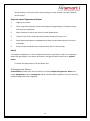
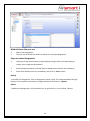
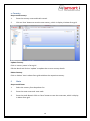
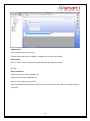
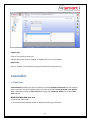
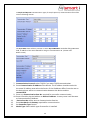
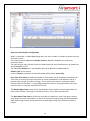
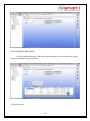
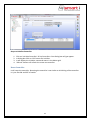
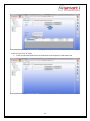
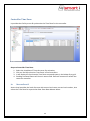
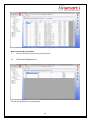
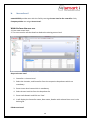
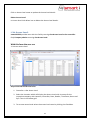
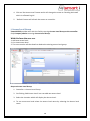
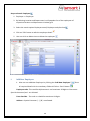
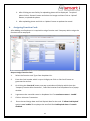
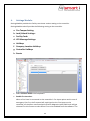
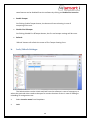
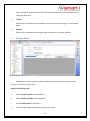
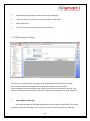
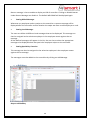
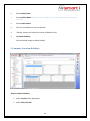
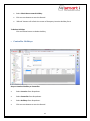
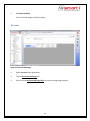
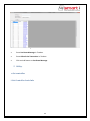
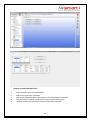
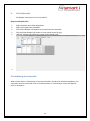
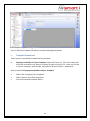
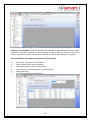
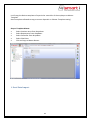
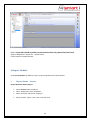
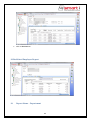
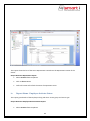
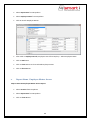
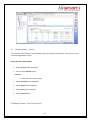
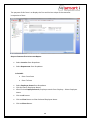
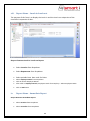
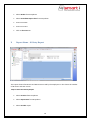
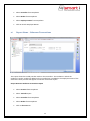
USER MANUAL Disclaimer The instructions in this document have been carefully checked for accuracy and are presumed to be reliable. Smart I Electronics Systems Pvt. Ltd. and its writers assume no responsibility for inaccuracies and reserve the right to modify and revise this document without notice. It is Smart I’s goal to supply accurate and reliable documentation. If you discover a discrepancy in this document, please e-mail your comments to [email protected] smartACCESS User Manual: Version: Login Info: 1 smartACCESS 2 Contents Installation of smart ACCESS……………………………………………………………………………………………………………..5 2 Creation of Admin…………………………………………………………………………………………………………………………..8 A @superadmin: .................................................................................................................................... 8 B Company group admin ...................................................................................................................... 10 C. Company Admin:.............................................................................................................................. 12 Company Admin’s Login wise functionality: ......................................................................................... 13 1. Master ........................................................................................................................................... 15 a.Location Master ................................................................................................................................. 15 b Company Location Master. ................................................................................................................ 16 c. Department Master........................................................................................................................... 16 d Designation Master ............................................................................................................................ 17 e. Country.............................................................................................................................................. 19 f. State ................................................................................................................................................... 19 g. City .................................................................................................................................................... 20 a. Time Zone.......................................................................................................................................... 21 b. Controller .......................................................................................................................................... 23 i. Adding & Configuring Controller ........................................................................................................ 23 ii. Readers configuration: .................................................................................................................. 26 iii.Set Controllers ................................................................................................................................... 28 Set Controller Basic Info........................................................................................................................ 29 Set Reader Info: .................................................................................................................................... 29 Initialize Controllers .............................................................................................................................. 30 Reset Controller. ................................................................................................................................... 31 Synchronize Date & Time. ..................................................................................................................... 32 Controller Time Zone ............................................................................................................................ 33 iv.Access Level:...................................................................................................................................... 33 v. Transaction Controller....................................................................................................................... 34 vi. Activated Employees..................................................................................................................... 35 h. Access Level .................................................................................................................................. 36 i. Set Access Level.................................................................................................................................. 37 j. Access Level Group ............................................................................................................................ 38 k. Employee ........................................................................................................................................... 39 i. Add New Employee: ...................................................................................................................... 40 3 ii. Assigning Function Card: ............................................................................................................... 41 iii. Employee Controller Authentication Details: ............................................................................... 43 l. Delete Employee: ............................................................................................................................. 44 4. Settings Module: ........................................................................................................................... 45 b. Lock/Unlock Settings: .................................................................................................................... 46 c. Facility Code: ................................................................................................................................. 47 d. LCD Message Settings: .................................................................................................................. 48 e Holidays ......................................................................................................................................... 49 f. Company Location Holidays............................................................................................................... 50 e. Controller Holidays. ...................................................................................................................... 51 h.Events................................................................................................................................................. 52 i. Set Controller basic Info ..................................................................................................................... 53 ii. Set Reader info:............................................................................................................................. 55 iii. Initializing the Controller: ................................................................................................................. 55 iv. Reset Controller: .............................................................................................................................. 56 v. Synchronization of Date and Time: ............................................................................................... 57 b. Master Template Settings ................................................................................................................. 58 c. Template Download. ..................................................................................................................... 59 d. Employee Card/Template Activation ................................................................................................ 61 Step to ................................................................................................................................................... 61 e. Template Master ............................................................................................................................ 61 f. Excel Data Import............................................................................................................................... 62 6 Report Module. .................................................................................................................................. 63 i. Report Name – Access .................................................................................................................. 63 iii. Report Name – Department .......................................................................................................... 64 iv. Report Name - Employee Activate Status ..................................................................................... 65 v. Report Name - Employee Master Access ...................................................................................... 66 vi. Report Name – Event.................................................................................................................... 67 vii.Report Name – First in Last out........................................................................................................ 67 viii. Report Name – Lunch in Lunch out........................................................................................... 69 ix. Report Name – Immediate Report ............................................................................................... 69 X Report Name – IO Entry Report .................................................................................................... 70 xi. Report Name – Unknown Transactions ........................................................................................ 71 4 Installation of smart ACCESS Steps To Install The Application:- Open the set up folder (Smart ACCESS) and follow the steps. Right click on setup and Run as administrator Following screen will be displayed->Click on next to continue set up 5 Click on Install button Now user has to given permission 6 Now go to link C:\Program Files\smart I Systems Right click-> smart I Systems folder and select on--> Properties Click on Security Users Edit Select the Permission 1) Allow Then click on OK button. 7 2 Creation of Admin. Creation of Admin. Admins are the special users in the application who can perform the task as per their role and scope. Default Admins: a. @superadmin : b. Company Group Admin : c. Company Admin : Steps of Admin Creations and their login wise respective roles Steps of Admin Creations and their login wise respective roles: A @superadmin: @superadmin can create Company Group master and one Company Group admin for each Company Group. Company Group: smartACCESS provides user with the facility to create Company Group master. Each Company Group with Multiple Companies and each company with multiple locations can be created. Only @superadmin can create Company Group. Steps to create Company Group 1. Enter Company Group name. 2. Enter Audit Remark if required. 8 3. Click on Save button You can also Edit and Delete the Company Group Master. Steps to create Company Group Admin: a) Select Company Group available it the drop down to create company group admin of that selected Company Group. b) Enter First Name, Last Name which is mandatory. c) Enter User Name which starts with @, to indicate it is a special user. d) Enter Password and Confirm Password for admin login. e) Enter Email ID to send notification of any application approval or rejection. f) Enter Contact No. g) Enter all other fields and click on ‘Save’ button. 9 SQL Connectivity Parameters: After adding correct SQL Connectivity parameters -- > Click “Test Connection” -- > if the connection is correct it will show message “Test Successfully” -- > then click on “Save” button of SQL Connectivity. B Company group admin Login wise role of Company Group Admin (Login by created company group admin): Financial Year creation. Company Master Creation. Company Admin creation. Financial Year Master: smartACCESS provides user with the facility to create Financial Year Master Financial year will be further assigned to company to define company’s financial year. 10 Steps to create Financial Year Master: 1. Enter Financial Year Start Date and its relative Financial Year End Date will get appear in financial year End date. 2 Enter Financial year name and Audit remark if required and Click on save button. Company Group admin can also delete the Financial Year. Company Master: smartACCESS provides user with the facility to create Company master. Each Company with multiple Locations can be created. Only Company Group admin can create Company Master. Company should have its Financial Year defined. 11 C. Company Admin: Company admin can have access of full smartACCESS except Company group and company creation. Steps to create Company Admin: 1. Login by Company Group Admin. 2. Company Group text box will display Company Group of Company Group Admin. 3. Select Company from the Company dropdown for which you have to create the Company Admin. 4. Enter first name and last name. 5. User name and password. 6. Email id and contact no. Company Group Admin can also edit and delete the company admin. Note: Only one Company Admin is allowed for each company. 12 Steps to create Company Admin: 7. Login by Company Group Admin. 8. Company Group text box will display Company Group of Company Group Admin. 9. Select Company from the Company dropdown for which you have to create the Company Admin. 10. Further follow steps from 5 to 10 of Company Group Admin creation to complete Company Admin creation. Company Group Admin can also edit and delete the company admin. Note: Only one Company Admin is allowed for each company. Company Admins Login wise functionality: Company admin can have full access of below forms as per the module except Company group and Company creation. Also he can create admins and different roles for that admin, so the created admin can get access according to his role and scope. 13 1. Master a. Locations b. Company Location c. Departments d. Designations e. Country f. State g. City 2. Controller a. Time zone b. Controller c. Access level d. Set Access level e. Access level group 3. Employee. a. Employee. b. Deleted employee 4. Setting. a. Fire Tamper b. Lock Unlock c. Facility Code d. LCD Message e. Holidays f. Company Location Holidays g. Controller Holiday 14 h. Event. 5 Utility. a. Set Controllers b. Master Template setting c. Template Download d. Card/ Template Activation e. Template Master f. Excel Data Import. 6 Report a. Access Reports 7 About Us 1. Master a. Location Master smartACCESS provides user with the facility to create Location Master for the particular Company Group. Each Location can then be further assigned to Company Only Company admin can create Locations. 15 b. Company Location Master. smartACCESS provides user with the facility to assign multiple Locations to Company. Only Company admin can assign multiple Locations to Company. c. Department Master smartACCESS provides user with the facility to create Department. Department will be created under Companies location. In Department master there is one selection called ’Default Access Group’, this field will be used while assigning Function card to employee. If any Access Group exist for the selected location and if you will save it as ‘Default Access Group’ then on ‘Employee Function Card‘ form default access group 16 will get display. If user wants then he can change or save function card with ‘Default Access Group’. Steps to create Department Master 1. Login by any admin 2. Their respected Company Group and Company will get display in Company Group and Company dropdown. 3. Select location for which you have to create Department. 4. If present and if you want then select Access Group else keep as it is. 5. Enter Department Name and Department Code (can be alphanumeric) which are mandatory. 6. Enter all other fields which are required and click on ‘Save’ button. Modify To modify the department, click on department name in grid click on edit. The respected details will get display in the above text boxes. Change the details and click on ‘Update’. Delete To delete the department, click on delete icon d Designation Master smartACCESS provides user with the facility to create multiple Designations. Admin can create Designation master. Designation will be created under Company. The user can have multiple designations for employees. 17 With this form the user can1. 2. Add a new Designation. The user can also edit the details or delete the existing Designations. Steps to create Designation 1. Company Group and Company will get display of login admin (corresponding to scope) in the respective dropdowns. 2. Enter Designation Name and Code (can be alphanumeric) which are mandatory. 3. Enter other details which are mandatory and click on ‘Save’ button. Modify To modify the designation, click on designation name in grid. The respected details will get display in the respective text boxes. Change the details and click on ‘Update’. Delete To delete the designation, click on delete icon in grid which is in the ‘Delete’ column. 18 e. Country Steps to add country: 1. Enter the country name and Audit remark. 2. Click on ‘Save’ button to save the new country, which is display in below form grid. Update Country: Click on country name in form grid. Edit the detail and click on ‘update’ to update the current country details. Delete Country. Click on ‘delete’ icon in above form grid to delete the respective country. f. State Steps to add State: 1. Select the country from dropdown list. 2. Enter the state name and state code 3. Enter the Audit Remark Click on ‘Save’ button to save the new state, which is display in below form grid. 19 Update State: Click on State name in form grid. Edit the detail and click on ‘update’ to update the current State details. Delete State Click on ‘delete’ icon in below form grid to delete the respective State. g. City Steps to add City: Select the country from dropdown list. Select the State from dropdown list. Enter the city name and city code. Enter the Audit Remark Click on ‘Save’ button to save the new City, which is display in below form grid. 20 Update City: Click on City name in form grid. Edit the detail and click on ‘update’ to update the current City details. Delete City. Click on ‘Delete’ icon in below form grid to delete the respective City. Controller a. Time Zone smartACCESS provides user with the facility to create multiple Time Zones for the location with a specific Time Zone number which can then be further set to controller. Any admin who is having the scope of Time Zone form along with Company Admin can create Time Zone master. With this form the user can1. Add a new Time Zone. 2. The user can also edit the details or delete the existing Time Zone. 21 Steps to create Time Zone: 1. Controller => Time Zone =>Add Time Slot. 2. Select Location from Location dropdown for which you have to create Time Zone. 3. Enter Time Slot Name which is mandatory. 4. Select available Time Slot from dropdown. 5. Enter Time Slots for each day (Sunday-Monday) to define the Time Zone. 6. Enter Audit Remark if required and Click on ‘Save’. Copy Time Slots: SmartACCESS provides user with the facility of ‘Copy Time Slot’. If you want to assign same Time Slot for each day, then enter all Time Slots for ‘Sunday’ and click on ‘Copy Time Slots’ button. The Time Slot will get assigned to all other days from Monday. 22 To edit the Time Zone click on Time Zone name and click on edit button, make changes and click on ‘Update’ button. To delete the Time Zone click on delete icon above b. Controller i. Adding & Configuring Controller In order to download the transactions/logs stored in the controller’s memory and also to configure the controllers, the smartACCESS needs to communicate with the controllers. To make this possible the said controller’s needs to be added and configured in the smart ACCESS as under: 23 Steps to create Controller Master Any admin can create Controller. Controllers => Add Access Controller. 1. Select Location for which you have to create controller. 2. Enter Unique Controller no. (Controller number can be at most 9999) which has to matched by device using *996 function key. 3. The slave id has to be same as the one assigned on the Controller through *91 function key. If the slave ids mismatch, the smartACCESS will not communicate with the controller. 4. Enter user friendly Controller Name. This will help user identify the controller’s place of installation and in other related operation to be done on the controller. Communication Type select as Simple / Dyna IP/ Dyna DNS. 5 24 In Simple and Dyna IP Communication Type, for TCP/IP protocol, communication info will be same in following manner. For Dyna DNS, there will be a provision to enter Dyna DNS Name. And after filling DNS name field, IP address of the same DNS will be assign to communication IP. (Please refer Below screen) 7. Communication Protocol select TCP/IP if you want TCP/IP communication. 8. Enter Communication IP Address of the Device. The IP address should match with the actual IP address entered on the Device. If the IP address differs from the one on the device there will be no communication between the device and the smartACCESS. 9. Enter any Communication Port No. required for controller communication. 10. Enter Controller physical address as Device IP address. In many cases it will be same as Communication IP Address. 11. Device Port No will be same as Communication Port No. 12. Enter Net Mask and Gateway required for communication. 13. Set Controller Type ‘Access’ 14. Model Type: Select which type of controller is installed. 25 15. 16. 17. 18. 19. 20. 21. 22. 23. 24. 25. 1. 2 Door 2 Reader: It can have at most 2 readers to control 2 doors. 2. 4Door 4 Reader: It can have at most 4 Readers to control 4 doors. 3. 4Door 8 Reader: It can have at most 8 Readers to control 8 doors. 4. Single Door: It can have at most 2 Readers to control 2 doors. 5. 2Door 4 Reader: It can have at most 4 Readers to control 4 doors Model No: Model no will be generating on change of Model Type. Max No of Reader: Select Max No of Reader in dropdown. Controller Authentication Type i. Normal Type: When an external reader connected are the normal Readers without Keypad then the controllers selected shall be NORMAL. The Access Type assigned to the user shall be Card only type. The Normal Type is Selectable when the controller Model Type is 4 Doors 4 Readers. ii. Advance Type: This is visible when the Model Type selected is 2 Doors 2 Readers. The Access type set when activating the cards shall be configurable via Card + Finger; Finger only; Finger + PIN etc. Enrolment Status is to enable for to mark controller as enrolment controller. If enable then on ‘Get Card’ of Employee Function Card you will get this controller to get the last swipe card number. Transaction Download: ii. Enable – If status is enable then transactions will be downloaded from Controller. iii. Disable - If status is disable then transactions will be not downloaded from Controller. MAC Status is to Enable/Disable for considering MAC address while device Communication. Enter Controller’s Serial No. Response Time parameter needs to be set in Milliseconds only when the response i.e. replies time is very high and the controller shows offline or time out Set Swipe Frequency is for setting the time interval between two successive swipes made by the same card no. APB Status can be set to Enable or Disable for the Anti-Pass back to set on the selected Reader. Setting APB Type: There are two types of Anti Pass back that can be set on a controller. Setting Soft Anti Pass back: Whenever an Anti-Pass back is generating for a card the user will still be granted access but an event shall be generated as a Soft Anti Pass back. Setting Hard Anti Pass back: In this type of Anti Pass back the user’s Access will be restricted and also an anti-pass back event will be registered in the controller. 26. Controller Pin Status can be set to Enable or Disable. Enter Audit Remark if required and click on ‘Save’ button. ii. Readers configuration: 26 Steps to create Readers configuration When a controller is added depending upon the max number of reader selected from the controller’s form. The channels will be added with Reader names as Reader1, Reader2 etc. prefix with controller name. The user can give user-friendly names to reader Name for easy identification e.g. Reader1 as IN and Reader2 as OUT. The Controller Reader no. is not editable. But can be deleted or added later on. Reader Type can be Access. In case of access transaction of selected reader will be taken access only. Free Time Zone Status on Selective Reader of a controller can be enabled or Disabled. Free Time Zone is set for the Lock on the Door to remain unlocked for a set Duration and at a present time through Time Zone settings. This is useful when there is maximum flow of human traffic on that door i.e. during beginning of the shift or during lunchtime. Only one free time zone in a day per controller can be set. The Reader Open Time can be set for the duration of the reader to remain open after the valid card is flashed. The range is from 00 to 99 secs. This is done channel wise. The Door Open Time Limit is set for the controller to response in case if the door remains open longer than the set duration. In such a case an event is generated and downloaded as Door Open Long Time On and a reset event as Door Open Long Time Off after the door is closed. 27 DOTL Status can either be enabled or Disabled. In case if the DOTL Status is set to Disable the DOTL event will not be generated even though the Magnetic contact is connected to the controller. Share Lock on Selective Reader of a controller can be enabled or Disabled. Note- Share lock should be added to even number of reader. PIN Status: Can be set to enabled or disabled. If set to enabled the PIN given to the user for Card type Finger + PIN or Card + PIN then in this case the system will prompt the User to enter the PIN. If disabled then the system shall not prompt for PIN where the user show the card or places the finger for authentication. Door You can assign reader to the Door. You can create New Door. Select New Door in Door drop down and enter Door Name. If you want to assign same door to two readers then Select same door for second reader. You can also edit door name by changing the door name in text box. Note-Once door name is give it cannot be reused again even controller is deleted. Edit Reader: In reader grid select Reader Name to edit reader details. Delete Reader: In reader grid select delete icon to delete the reader. iii.Set Controllers smartACCESS provides user with the facility to set the setting from the software to the controller. 28 Set Controller Basic Info It will set the Controller No., APB Type, Swipe Frequency, and Controller Pin, Facility code from software to the controller. Set Reader Info: 29 It will set the reader info on controller. After setting Reader and controller information in the smartACCESS the information to take effect needs to be activated or uploaded on the respective controllers. Whenever or every time after making changes to the Reader and controller information, it has to be activated or uploaded as explained above. Steps to Set Reader Info. 1. 2 3 Click on ‘Set Reader Info’ of Set Controllers. It will display the reader’s info in the below grid. ‘Refresh’ button will refresh the status on controller. Initialize Controllers It will initialize the controller to its default value or factory setting and all transaction will be lost. 30 Steps to Initialize Controller 1. 2. 3. 4. Click on ‘Initialize Controller’ of Set Controllers. One dialog box will get appear. In dialog box Click on ‘OK’ button for Initialize. It will display the Initialize command status in the below grid. ‘Refresh’ button will refresh the status on controller. Reset Controller. It will reset the controller. Resetting the controller is not similar to Initializing of the controller. It is just like ON and OFF of switch. 31 Synchronize Date & Time. It will synchronize date & time of controller with Computer’s Date and Time. 32 Controller Time Zone It provides the facility to set & synchronize the Time Zone for the controller. Steps to Controller Time Zone. 1. 2. 3. 4. iv. Select the checkbox of Time slot name for activation. Click on ‘Set &Synchronize Time Zone’ of Set Controllers. It will display the Synchronize Time Zone command status in the below form grid. Pending Activated status will show in status field. ‘Refresh’ button will refresh the status on controller. Access Level: Access level provides the level of access with access level name, access level number, also select the Time Zone for a particular Door from Door Master Name. 33 Steps to Controller Access Level 1. Go to Controller=> Access Level 2. Enter the Access Level Name and select Access level No from dropdown list. User cannot select one same access level no twice for same controller. 3. After entering the detail Click on ‘Save’ of Access level Controllers to save the access level. 4. It will display the Controller name, Door name, Reader with selected time zone in the below grid 5. ‘Refresh’ button will refresh the status on controller. Edit Access Level: Click on Access level name to update the Access level details. Delete Access Level: In Access level grid select delete icon to delete the Access level details. v. Transaction Controller. It will show the transaction in the below grid. 34 Steps to Controller Transaction 1. Click on ‘Refresh’ button to refresh the record. vi. Activated Employees. This tab will display the list of Employee. 35 h. Access Level smartACCESS provides user with the facility to assign Access Level to the controller. Only Company admin can assign Access Level. With this form the user can1. Enter new access level. 2. The user can also edit the details or delete the existing access level. Steps to Access Level 1. Controller => Access Level. 2. Select the Location, and Controller from the respective dropdowns which are mandatory. 3. Enter Access level name which is mandatory. 4. Select Access Level No from the dropdown list 5. Enter Audit Remark and Click on ‘Save’. 6. It will display the Controller name, Door name, Reader with selected time zone in the below grid. Edit Access Level: 36 Click on Access level name to update the Access level details. Delete Access Level: In Access level click delete icon to delete the Access level details. i. Set Access Level. smartACCESS provides user with the facility to assign Set Access Level to the controller. Only Company admin can assign Set Access Level. With this form the user can 1. Set new access level. Steps Controller Set Access Level 1. Controller =>Set Access Level 2. Select the Location which will display the Access Level with its name for the respective company with Location, Controller, Door, Reader, Time Zone, Status and Sync Time in the below grid. 3. To set new access level select the access level name by clicking the Checkbox. 37 4. Click on ‘Set Access Level’ button and it will change the status to ‘Pending Activated’ which is reflected in grid. 5. ‘Refresh’ button will refresh the status on controller. j. Access Level Group smartACCESS provides user with the facility to assign Access Level Group to the controller. Only Company admin can assign Access Level Group. With this form the user can1. Add new access level. 2. Can view Access level 2. The user can also edit the details or delete the existing access level group. Steps to Access Level Group 1. Controller => Access Level Group 2. On Clicking ‘Add Access Level’ user can add new access level. 3. Select the Location which will display the Access Level. 4. To set new access level select the access level name by selecting the Access level name. 38 5. Enter Access group name and click Save button 6. ‘Refresh’ button will refresh the status on controller. Edit Access Level Group: Click on Access Level Group name to update the Access Level Group details. Delete Access Level Group: In Access Group click delete icon to delete the Access Level Group details. k. Employee smartACCESS provides user with the facility to Search Employee to the controller. Only Company admin can Search Employee. With this form the user can 1. Search Employee. 2. Can Add New Employee 3. Delete Employee. 39 Steps to Search Employee: 1. Employee => Employee. 2. By Selecting Location and Department it will populate list of the employees of respective location and department in below grid. 3. Select the search option Employee name/ Employee code/card no. 4. Click on ‘Edit’ button to edit the employee detail. 5. User can click on delete icon to delete the employee. i. Add New Employee: 1. Also user can add New Employee by Clicking the ‘Add New Employee’. Enter all required detail with its mandatory field and Click on ‘Save’ Button. Employee code- This could be Alphanumeric and maximum 20 digits or Characters. Special characters/and - are allowed. Enter Card No – The card no. should be maximum 10 digits. Address – Special character / - () &,’ are allowed. 40 2. After Clicking on save facility for uploading photo will be displayed. To upload photo click on ‘Browse’ button and select the image and then Click on ‘Upload’ button, to upload the photo. 3. After uploading photo and click on ‘Update’ button to update the record. ii. Assigning Function Card: After Adding new Employee It is required to assign function card. Company admin assign the function card to employee. Step to Assign Function Card: 1. Select the Function card Type from dropdown list. 2. Enter the Card number which is up to 10 digits, or Click on ‘Get Card’ button to generate the card no. 3. On clicking the ‘Get Card’ button one pop up window will display which show the ‘Company Location Wise Controller’ , select the location from dropdown list of popup window 4. It generates the controller name in dropdown list if its enrolment status is ‘enable’. 5. Click on Unknown Transaction. 6. Enter the card Assign date and Card Expired date for the card. If ‘Allow Card Expired’ option is not ‘enable’ for employee the text field for Card Expired date will remain disabled. 41 7. Select the access group for function card. 8. Enter the Audit Trail remark if required and Click on ‘Save’ button. 9. List of Assign Function Card will display in below grid. 10. List will display the ‘Function Card Type’, Card No, Card Assign Date, Card Expiry Date, and Access group 11. List also provide the button for ‘Delete’, ‘Activate Card’, ‘Show Card Status’, ‘Deactivate’, ‘Re-Activate’, and ‘Secondary Location’ activity. On Clicking ‘Delete’ button the function card for the Employee will be deleted. On Clicking ‘Activate Card’ button the function card will be activated. On Clicking ‘Show Card Status’ it will display the card status as ‘pending’ and display the dialog box showing the form grid with controller name, card no, Updated Time, Synchronized Time, Status. On Clicking the ‘Deactivate’ button card will be deactivated for respective Employee. This will also generate the dialog box which show the 2 buttons for ‘Deactivate’ and ‘Delete’, User can select the controller for which the card to be deactivate or delete. On Clicking ‘Re-Activate’ button the user can reactivate the card for a particular controller. This activity will update the Card status by adding new template for card if any. E.g. If update the Card Expiry to ‘enable’ for particular Controller which is assign to Employee then that changes are reflected to the function card On Clicking ‘Secondary Location’ user can assign the same Function Card to another Location for same controller. On Clicking the ‘Secondary Location’ button one dialog box will appear which display the Card no and select the another location from dropdown list for ‘Location’ and Click on ‘Save’ button. 12. The secondary location of same employee has to activated again’ from that second location. 42 iii. Employee Controller Authentication Details: After assigning the Function Card to Employee the tab for Employee Controller Authentication Details will appear under Add Employee. In Assign function card activity all the Authentication Type is shown in dropdown list for ‘Authentication Type’ for Employee. In Employee Controller Authentication Details the default Authentication Type are display in below form grid. 43 iv. Employee Transaction It will show the transaction in the form grid. l. Delete Employee: Smart ACCESS provides user with the facility to Delete Employee to the controller. Only Company admin can Delete Employee. With this form the user can1. Delete Employee permanently. Steps to Delete Employee 1. Employee=>Delete Employee 2. By Selecting Location it will display list of the employees from ‘Search Employee’ form which is deleted, in below grid. 3. Employee status filtration resigned and deleted. 4. Click on ‘Delete’ button to delete the employee permanently. Delete Employee: In Delete Employee from grid select delete button to delete the Employee permanently. 44 4. Settings Module: Setting Module provides the facility to activate various setting to the controller. Setting Module tab will provide the following setting to the controller. a. Fire Tamper Setting. b. Lock/Unlock Settings: c. Facility Code: d. LCD Message Settings: e. Holidays f. Company Location Holidays g. Controller Holidays h. Events Select Location name from Dropdown. Enable Fire Intrusion: When a Fire Panel is connected on the controller’s Fire inputs points and in case of emergency like Fire, the fire panel will send signal to the Fire inputs on the controller, all the doors connected with (Electro Magnetic Locks) EML locks will get released. For this feature to take effect it has to be enabled from the software. The 45 same feature can be disabled from the software by clicking on Disable Fire Intrusion Enable Tamper: On Clicking Enable Tamper button, the buzzer will start alarming in case of tampering of the unit. Disable Fire &Tamper: On Clicking Disable Fire &Tamper button, the fire and tamper settings will be reset. Refresh: ‘Refresh’ button will refresh the status of Fire Tamper Setting Form. b. Lock/Unlock Settings: The Selective door can be Unlock and lock from the software in case of emergency or when that particular door needs to be open for certain duration of time in case of loading or unloading of consignments etc. Select Location name from Dropdown. Lock 46 When clicked on Lock button the door will be locked and will not be opened even on swiping a valid card. Unlock When click on Unlock the selected door will remain unlock as long as it is not locked again. Normal When click on Normal button will get back the door to its original position. c. Facility Code: Coded data in access control cards that identify the location of the access control system it is called as Facility Code. Step to add Facility Code Select Location name from Dropdown. Select Facility Code No from Dropdown. Enter Facility Code (3 Character) Click on Add Facility Code button to Save the Record. 47 Saved data will get display in the below Facility Code grid. ‘Refresh’ button will refresh the status of Facility Code Form. Select Check box. To View Status Click on Show Facility Codes button. d. LCD Message Settings: This feature is used to set the messages to be displayed on the LCD of the controller. There are four types of messages that can be set to display on the controller. These messages can be displayed on the selective or on all the controllers in the list. The controllers need to be selected from the list on which these messages are to be displayed. Setting Banner Message: By default the Banner message displayed on the controller is WELCOME. This can be changed to any other message viz the company’s name. After setting the user defined 48 Banner message, it has to enable to display on LCD of controller. Clicking on Disable button Under Banner Message can disable it. The default WELCOME will be displayed again. Setting Global Message: Whenever any employee makes a swipe on the controller a common message will be displayed after the controller verifies whether the swipe was from a valid employee or card. Setting Local Message: The user can define 44 different local messages that can be displayed. This message can then be assigned to the selective employee in the employee master against the set message. All the defined messages will appear in the list, the user has to select the appropriate message to be displayed when that particular employee swipes on the controller. Setting Special Key Function This message can then be assigned to the selective employee in the employee master against the set message. The messages are to be added on the controllers by clicking on Add Message. e.Holidays Step to add Holiday. 49 Enter Holiday Date. Enter Holiday Name.—Note if same holiday is consecutive days enter name say as D1,D2,D3 Enter Audit remark. Click on save button to save the Record. ‘Refresh’ button will refresh the status of Holiday Form. To Delete Holidays. Click on Delete Image to delete holiday. f. Company Location Holidays Step to Attached Holiday Select Location from Dropdown. Select Financial Year. 50 Select Check box to attach Holiday. Click on save button to save the Record. ‘Refresh’ button will refresh the status of Company Location Holiday Form. To Delete Holidays Click on Delete button to delete holiday. e. Controller Holidays. Step to Attached Holiday to Controller Select Location from Dropdown. Select Controller from Dropdown. Select Holidays from Dropdown. Click on save button to save the Record. 51 To Delete Holidays Click on Delete Image to delete holiday. h.Events Step to Set Event Message Select Location from Dropdown. Click on Set Event Message link After Click on Set Event Message link set event message page displays 52 Enter Event Message in Textbox. Enter Set Event Message in Textbox. Enter Allow Print Transaction in Textbox. Click on Add button to Set Event Message. 5 Utility. a.Set controller i. Set Controller basic Info 53 Step to set Controller basic info: Select location name from dropdown. Select all or particular Checkbox Click on Set Controller Basic info button to set command on controller. Click on Show Controller info button to view saved record in grid. ‘Refresh’ button will refresh the status of Controller basic info. 54 ii. Set Reader info: Set Reader information on the controllers. Step to Set Reader info: Select location name from dropdown Select all or particular Checkbox Click on Set Reader info button to set command on controller. Click on Show Reader info button to view saved record in grid. ‘Refresh’ button will refresh the status of Set Reader info. iii. Initializing the Controller: When all the data or information set on the controllers needs to be deleted completely, the controller must be initialized. Click on Initialize button. A confirmation screen will appear. Click on ok button. 55 iv. Reset Controller: The controller can be reset from the software. Step to Reset Controller: Select location name from dropdown Select all or particular Checkbox Click on Reset Controller button to set command on controller. ‘Refresh’ button will refresh the status Reset Controller. 56 v. Synchronization of Date and Time: To synchronize Date and Time on the controller with the Computer’s system select the controller from the list and then click on Synchronize Date and Time button. The software will ask for confirmation, click on ok button. A confirmation will appear informing that the Date and Time as been updated on the selected controllers. Step to Set Synchronization of Date and Time Select location name from dropdown Select all or particular Checkbox Click Set & Synchronize Date time button to save the record. ‘Refresh’ button will refresh the status of Set Synchronization of Date and Time. 57 b. Master Template Settings This form will be for setting of how many template allowed downloading & how many templates allowed enrolling for each controller of that location. User can download maximum templates set in this functionality & it can upload templates (I.e. enrol) as per the setting he has done. By default it will maximum download 10 & upload 3 templates. Step to Set Master Template Settings Select location name from dropdown Enter Max No. Of Template Enter Max Template Allowed to Enrol. Enter Audit Remark Click Save button to save the records. ‘Refresh’ button will refresh the status of Master Template Management 58 Edit Master Template Management: Click on Edit link to update the Master Template Management details. c. Template Download. Three options are available to download the template. 1. Employee available in Device Template takes their Back Up. Take that employee’s Card no & controller from ‘Device Template’ & take its back-up (i.e. insert new record in ‘Device Template’ with card No, Controller ID & Synch Status = ‘Download’). Step to Download Employee available in Device Template Select Take Template From dropdown Select location name from dropdown Click on Download Template Button. 59 Employee not available in ‘Device Template’ but available in activate table. Take activated employee’s card No, Controller No. & insert new record in ‘Device Template’ with Synch Status = ‘Download’ to take back up from Controller on which the employee is activated. Step to Download Activated Employee Not Having Template Select Take Template From dropdown Select location name from dropdown Select Department name from dropdown Click on Search Employee Button to search record Select Check box Click on Download Template Button. 60 3. Pass Card No. : If employee is not activated & his template is enrolled on controller, then Insert new record in ‘Device Template’ with Synch Status = ‘Download’ to take back up from the controller on which the template is enrolled with the given Card No. Step to Download Passing Card No & Controller Select Take Template From dropdown Select location name from dropdown Enter Card No Select Check box Click on Download Template Button. d. Employee Card/Template Activation Step to Employee Card/Template Activation Tick on Check box from location name. Click on View Access Group button. On clicking on view access group button, Access Group Data will be generated as per defined Location. Click on checkbox for controller. Click on search button. Click the check box Refer device template Then click button Activate card and Template. e. Template Master From where the data will come into ‘Master Template’ table? 1. The templates moved from ‘Device Template’ table to ‘Master Template’ table. 61 It will copy the Device templates of a particular controller of the employee to Master Template. No of templates allowed to copy to master depends on ‘Master Template setting’. Step to Template Master Select location name from dropdown Select Department from dropdown Select Controller from dropdown Select Check box Click on Copy to Master Button f. Excel Data Import. 62 Note-> Controller should be online on that location then only upload Excel will work Click on Download button for sample excel. Fill the excel as sample format. 6 Report Module. Under Access Report the different types of reports generated are shown below: i. Report Name – Access Step to Generate Access Report Select Location from Dropdown. Select Department from Dropdown Select controller and search employee Select periodic report –Start date and End Date 63 Click on Show Button. ii.Blacklisted Employee Report. iii. Report Name – Department 64 This report shows the list of the entire Department entered into the Department master of the SmartI. Step to Generate Department Report Select Location from Dropdown. Click on Show Button ‘Refresh’ button will refresh the status of Department Form. iv. Report Name - Employee Activate Status This report gives details of the Employee along with their access group and access type. Step to Generate Employee Activate Status Report Select Location from Dropdown. 65 Select Department from Dropdown. Select Employee Status from Dropdown. Click On Search Employee Button. After Click on Employee Search, Employee search form Displays – Select Employee Name. Click on OK button. Click on Clear Button to Clear Selected Employee Name. Click on Show Button. v. Report Name - Employee Master Access Step to Generate Employee Master Access Report Select Location from Dropdown. Select Department from Dropdown. Click on show Button. 66 vi. Report Name – Event The controller stores different events besides valid and invalid Punches/Swipes. These events can be viewed through EVENT reports. Step to Generate Event Report Select Location from Dropdown. We can check Periodic report In Periodic Enter Start Date and End date. Select Controller from Dropdown. Select Reader from Dropdown. Select Event from Dropdown. Click on Show Button. Vii.Report Name – First in Last out 67 The purpose of this form is to display the first and the last swipe of the controller irrespective of door. Step to Generate First in Last out Report. Select Location from Dropdown. Select Department from Dropdown. In Periodic Enter From Date Enter To Date Select Employee Status from Dropdown. Click On Search Employee Button. After Click on Employee Search, Employee search form Displays – Select Employee Name. Click on ok button. Click on Clear Button to Clear Selected Employee Name. Click on Show Button. 68 viii. Report Name – Lunch in Lunch out The purpose of this form is to display the Lunch in and the Lunch out swipe time of the controller irrespective of door. Step to Generate Lunch in Lunch out Report Select Location from Dropdown. Select Department from Dropdown. Select periodic-Start date and End date Select Employee Status from Dropdown. Click On Search Employee Button. After Click on Employee Search, Employee search form Displays – Select Employee Name. Click on OK button. ix. Report Name – Immediate Report Step to Generate Immediate Report Select Location from Dropdown. Select Controller from Dropdown. 69 Select Reader from Dropdown. Select Immediate Report Filter from Dropdown. Enter Form Date Enter From Time Click on Show Button. X Report Name – IO Entry Report This report shows all IN Entries and OUT Entries made by the employees. It also shows the number of IN entries and OUT entries. Step to Generate IO Entry Report Select Location from Dropdown. Select Department from Dropdown. Select Periodic report 70 Select Controller from Dropdown. Select Reader from Dropdown. Select Employee Status from Dropdown. Click On Search Employee Button. xi. Report Name – Unknown Transactions This report shows the invalid punches made on the controllers. The condition in which the employee’s card is enrolled or added on the controller but not added in the employee master of the Smart then these punches will appear in unknown transaction report. Step to Generate Unknown Transaction Report Select Location from Dropdown. Select Periodic report Select Controller from Dropdown. Select Reader from Dropdown. Click on Show Button. 71


![Intelligent Multi Door [4] Access Control Panel](http://vs1.manualzilla.com/store/data/005798503_1-5afef044e5faf65af74eeb67e2f6e9c7-150x150.png)