1
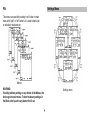
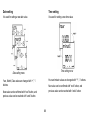
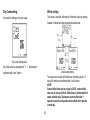
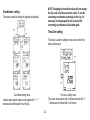
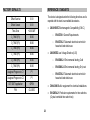
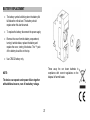
ateltek Astronomical Time Switch User Manual AR-01S / AR-01D / AR-01S-NFC / AR-01D-NFC AR-02S / AR-02D / AR-02S-NFC / AR-02D-NFC Rev. 2015.0.2 SAFETY WARNINGS…..…………………………..…..…1 TECHNICAL SPECIFICATIONS……………...……………....1 PROGRAM SPECIFICATIONS……………………...………..2 GENERAL.…………………………………………………….…2 DIMENSIONS.…………………………………………………...3 CONNECTION DIAGRAM..……………………………………3 INSTALLATION…..……………………………………………..4 DIN Rail Installation……...……………………..……….4 Wall Installation……….…………………………...….…4 DISPLAY AND BUTTON DESCRIPTION...………………….5 DEVICE OPERATION AND FIRST SETTINGS.…………….6 MANUAL OPERATION…………………………….................8 MENUS………....………………………………………………..8 Settings Menu…………………………………………....9 Date Setting ..........................................................10 Time Setting.………………………………………...10 City Code Setting …………………………………..11 Offset Setting………………..…………………..…..11 Coordinates Setting…………………………………12 Time zone Setting………………………….…….....12 CET/DST setting…………………………………….13 Language Setting…………………………………...13 Program Menu………………………………………….14 Program Setting……………………………………….....14 P3 and P4 Program Time setting…………................…...15 P5 and P6 Program Time setting............………………...16 Display Menu……...………………………………………...17 Reset Menu………………………………………………….17 PIN Menu……………….…………………………………...18 Create new PIN...........………………………………….17 Enter into the Menu while PIN is active......................18 PRE-SET PROGRAMS…………..…………………………….....20 P1 Program.…………………………………………………20 P2 Program.…………………………………………………20 P3 Program.…………………………………………………20 P4 Program.…………………………………………………20 P5 Program.…………………………………………………21 P6 Program.…………………………………………………21 PROGRAM AND PARAMETER UPDATE VIA NFC SUPPORTED MOBILE DEVICE …………………………….......21 TURKEY CITY CODES..……………………………………….....25 FACTORY DEFAULTS………………………………………..…..26 REFERENCE STANDARDS…………..………………………….26 BATTERY REPLACEMENT………………………………………27 TECHNICAL SPECIFICATIONS SAFETY WARNINGS Power Supply Relay Output The device must be installed and activated by qualified personnel, following the connection diagram provided in this manual. The electricity should be cut down before the installation of the device. Don’t open the case of the device. The electricity should be cut down before battery replacement. Install the device into a place safeguarded from outdoor. Use only dry cloth for cleaning the device. Contact only with the qualified technical service regarding the troubles of the device. 230 VAC ±10% 50/60 Hz 16A/4000VA x 1 adet (AR-01S&AR-01S-NFC) 16A/4000VA x 2 adet (AR-01D&AR-01D-NFC) 10A/2500VA x 1 adet (AR-02S&AR-02S-NFC) 10A/2500VA x 2 adet (AR-02D&AR-02D-NFC) Additional Reserve Battery / Battery Life Renewal Display Size Dimension Time Precision Sunset and Sunrise Accuracy Operating Temperature Storage Temperature Installation Protection Class The manufacturer is not responsible in case of damages under failure to follow the above safety warnings. WARNING: The device is out of warranty when warranty sticker is removed. Other Specifications 1 (*) only in NFC models 9~12 hours CR2032 / 5 years 1 sec 1,45 ‘’ LCD 2 DIN ≤ 1 sec/Day ≤ 1 min -20ºC / 60ºC -30ºC / 60ºC DIN Rail or Wall mounting IP20 (terminals) / IP41 (front panel) Battery Replacement Sealable Button Cover Backlit LCD Display Parameter Update with NFC (*) PROGRAM SPECIFICATIONS GENERAL AR-xxS/AR-xxS and AR-xxD/AR-xxD models are programmable switch to turn on electric utilities between sunset and sunrise accordingly to the coordinates automatically for the built-in coordinates of the city codes or manually configured coordinates for the assigned programs to the contacts. Turkish and English Menu. Each contact can be programmed separately. Each program can be assigned to different days separately. Automatic or manual CET/DST selection. Offset feature selection for sunrise and sunset up to ±9:59 (hh:mm) Time zone selection with a ± 30 minute interval up to ±14 hours. Built-in 81 city codes selection option or coordinate selection as latitude and longitude. Manual operation option. Automatic operation in next sunset or sunrise even if its forgotten on manual operation All configurations can be reset with reset menu. All configurations can be viewed on display via short cut key. Pin option to block off unqualified persons usage. In AR-xxS-NFC and AR-xxD-NFC models, Settings and Program menus can be updated quickly via NFC (Near Field Communication) supported mobile device. Usable for Street, road, field lighting, parks, garden illumination, parking, luminous signboards and other illumination applications. WARNING: If the device is not connected to electricity, it goes into sleep mode in 20 minutes if there is no action on any button. In this mode the display is off. It will continue to operate when pushing on any button. 2 DIMENSIONS CONNECTION DIAGRAM NOTE: AR-xxD and AR-xxD-NFC, includes C1 and C2 contacts AR-xxS and AR-xxS-NFC, includes only C1 contact 3 INSTALLATION Wall Installation The device can be mounted on DIN rail or wall. DIN Rail Installation Move the lock mechanism one level down with screw driver. After that the wall installation can done with screw seen on the figure. Place the grave accent to the DIN rail. Then place the bottom case with pushing hand. 4 DISPLAY AND BUTTON DESCRIPTION The contact symbols within the lock symbol. Shows the concerning contact. Battery status symbol. Blinks when the battery life fall down to critical level. The symbol which shows the days of the week. General Usage; “undo” button symbol. Used to go to previous progress or escape. Special Usage: One time push in Main Menu brings City Code-Sunrise-Sunset information to the display. Pushing for 5 sec. to “undo” button on Main Menu brings the Tracing Menu and all configurations are shown as slide. “left” button symbol. Used for go to the previous Menu. “right” button symbol. Used for go to the next Menu. “-“(minus) button symbol. Used for decrease the value while making settings in the Menu. “+” (plus) button symbol. Used for increase the value while making settings in the Menu Shows the on - off status of the concerning contact. Lock symbol. Disables to use the manual operation. To remove this symbol, push on for 5 sec. to the “right” or “left” button. 5 “Next” button symbol. Used for entry into a Menu or confirm value/activation while making settings. CET/DST symbol. Active if CET/DST Mode is active. The symbol is in OFF mode when CET/ DST mode is inactive. Second symbol. Blinking in main menu one in a second. DEVICE OPERATION AND FIRST SETTINGS WARNING: The electricity should be cut down before the installation of the device. Remove the electrical cables if connected. NOTE: Apply the following steps: When battery is placed, all symbols are ON for 2 second and the Date-Time-City Code settings can done respectively. The values can change via “+”, “-“ buttons, confirm with “Next” Button and correct with “undo” button. Remove the battery from its package and insert it in the housing on the rear of the device, so that the (+) pole is on the top as shown in the figure. Then secure the cover, turning it clockwise. 6 Language setting Date setting (preset) Time setting (preset) City Code setting (preset) Language menu Time menu City code menu After these settings the main menu can be open. For the other settings use the menu chapter. Date menu 7 MANUAL OPERATION: Program To operate the contacts manually push for 5 sec to the concerning contact (C1 or C2) and the lock symbol will be off on the display in the concerning contact and manual operation is activated. Pushing 1 sec to the concerning contact button will change the contacts to the other one. To activate the automatic mode it is necessary to push for 5 sec to the concerning contact button again. This menu can reached with pushing on first “next” button in main menu and with “right” or “left” button. The concerning program can be signed on the concerning contact. Display This menu can used with pushing “next” button in main menu with “right” or “left” buttons. It is used for see all settings. Reset NOTE: The device will continue to operate in automatic mode in next sunset or sunrise time, even if it will let into manual mode or forgotten on manual mode. This menu can used with pushing “next” button in main menu with “right” or “left” buttons. It is used to return back to factory defaults. MENUS Settings It is necessary to push “next” button in main menu to reach to this menu. Used to adjust Date, Time, City Code, Offset, coordinate, time zone and CET/DST settings. 8 PIN Settings Menu This menu can used with pushing “next” button in main menu with “right” or “left” buttons. It is used to define pin or activate or inactivate pin. Menus WARNING: If waiting without pushing on any button in the Menus, the device go into main menu. To don’t make any settings in the Menu, don’t push to any button for 20 sec. Settings menu 9 Date setting Time setting It is used for setting a new date value. It is used for setting a new time value. Time setting menu Date setting menu Hour and minute values are changed with “+”, “-“ buttons. Year, Month, Date values are changed with “+”, “-“ buttons. New value can be confirmed with “next” button, and previous value can be reached with “undo” button. New value can be confirmed with “next” button, and previous value can be reached with “undo” button. 10 City Code setting Offset setting It is used for setting a city code value. This menu is used for defining the offset time value as putting forward or falling back the sunset and sunrise time. City code setting menu City Code value is changed with “+”, “-“ buttons and confirmed with “next” button. Offset setting menu The sunset and sunrise offset time can be setting up to ± 9 hours 59 minute and confirmed with “next” button. NOTE: Sunset offset time can be set up to 23.59, sunset offset time can be set up to 00.00. Offset time is limited with the same calendar day. That means sunset offset don’t operate in previous day and sunrise offset don’t operate in next day. 11 NOTE: Changing the coordinate values will not change the city code, it will be as previous value. To use the concerning coordinates accordingly to the city, it is necessary to change again the city code and the concerning coordinates will be loaded again. Coordinates setting This menu is used for setting for longitude and latitude. Time Zone setting This menu is used for setting the time zone in which the device will be used. Time zone setting menu Time zone can be select with 30 minutes interval with “+”, “-“ buttons and confirmed with “next” button. Coordinate setting menu Latitude and longitude values are changed with “+”, “-“ buttons and confirmed with “next” button. 12 Language Setting CET/DST (Central European Time/Daylight Saving Time) setting This menu is used for select language. This menu is used for open/close CET/DST application. Language Menu The selection may be done with “right”, “left“ buttons and confirmed with “next” button. CET / DST Menu CET/DST can be open with “right”, “left“ buttons and confirmed with “next” button. 13 Program Menu Program Menu Program setting This menu is used to assign the preset program to the concerning contact and to select the specific days in the week. Program assignment menu To assign the program for all days in the week, select “all days” and push “next” button for confirmation. (See page 20 for P1, P2, P3, P4, P5 and P6 programs) 14 To select a specific day/days push “undo” button and go to the concerning day with “right” and “left”, push on “next” button to activate/inactivate the day. After selection the days it is necessary to push for 5 second to the “next” button for confirmation. All settings can be controlled with Display Menu P3 C_TIME; it is the closing time of the contact after sunset in P3 program. NOTE: The assigned program is operated between the sunset of assigned day and sunrise of next day. This menu is used for setting the closing time of P4 program. P3 o_TIME; it is the opening time of the contact after P3 C_TIME. Time Setting of P4 Program Time Setting of P3 Program This menu is used for setting the close/open time of P3 program. P4 program menu P4 C_TIME; it is the closing time of the contact after sunset in P4 program. P3 program menu 15 Time Setting of P5 Program Time Setting of P6 Program This menu is used to set the opening time of P5 program. This menu is used for setting the open/close time of P6 program P5 program menu P6 program menu P5 o _TIME; it is the opening time of the contact after P6 o_TIME; it is the opening time of the contact after sunset in P6 program. sunset in P5 program. P6 C_TIME; it is the closing time of the contact after P6 o_TIME. 16 Display Menu It is possible to review the settings with “right”, “left” buttons and exit with “undo” button. NOTE: This menu can be used also with pushing for 5 sec to the “undo” button in main menu. All settings can be traced in this menu. In this menu the settings couldn’t be changed. Reset Menu Display menu Reset menu This menu is used to bring the device into factory defaults. To reset the device push “next” button to “will reset” and “reset confirm” warnings in menu and reset will be confirmed. After reset the device, all symbols will be on for 2 sec and the device will continue to operate after setting date, time and city code. 17 PIN Menu This menu is used to enable block off the menu for unqualified persons. NOTE: The pin application is closed in first setting. It may be activated from the menu. WARNING: After activation of the pin menu, it will be impossible to use the pin for entering into the menus. Contact with the qualified technical person if the pin is forgotten. New pin creating Sample: To create pin 5761, push on “next” button in main menu and go to pin menu via pushing “right” or “left” buttons. To enter to this menu push “next” button. Select “pin open” with “right” or “left” buttons. New pin will be appear on the menu. Enter new pin and confirm. The new pin will be activated and used to enter into the menus. New pin menu 18 Enter into the menu while pin is active To enter into a menu while pin is active, it is necessary to enter the pin. If enter a wrong pin, pin wrong warning will be appear on menu. The menu input can be done after entering the correct pin. Pin input will be necessary for each input into the menu. If you need long time for setting the device, disable pin and enable it after finishing all settings. WARNING: The pin is passive in default settings. Therefore when reset the device the pin will be inactive even if it was activated before reset. Pin Menu 19 PRE-SET PROGRAMS P3 Program The device is equipped with 4 pre-set programs that allows the user to program the device. These are P1, P2, P3, P4, P5 and P6 programs. In P3 Program, the concerning contact is deactivated in the defined duration between sunset and sunrise. This time can be set from P3 menu. P1 Program P1 Program is operating accordingly to astronomical time zone. The concerning contact is active in the sunset and passive in the sunrise. P4 Program P4 Program brings the concerning contact after the sunset passive according to the concerning time. This time can be set from P4 menu. P2 Program In P2 program the concerning contact is passive all day. 20 P5 Program PROGRAM AND PARAMETER UPDATE VIA NFC SUPPORTED MOBILE DEVICE P5 Program is the reverse of P4 program. P5 Program brings the concerning contact active after sunset according to the defined time until sunrise. This time can be set from P5 menu. P6 Program P6 Program is the reverse of P3 Program. The concerning contact is activated in the defined duration between sunset and sunrise. This time can be set from P6 menu. The setting and Program menu of the device can be updated via NFC (Near Field Communication) supported mobile device. All you need is to download the “ASTROID ateltek” application to the mobile device. All settings in the setting menu and program menu can be updated via mobile device. 21 Update while first settings With this application it is possible to get the coordinates, Time and Date information via GPS signals accordingly to UTC (Coordinated Universal Time) and update the Astronomical Time Switch. While first setting, all settings and program menu settings can be done with mobile device. The first settings (Date,Time and city code (or coordinate)) can be done via mobile device and the device can be operate with main menu. It is possible to make the update in the following ways: - While the device is closed - Update while first settings - Update in the Main Menu Update in the main menu While operating, all parameters in the setting and program menu can be updated. Update while the device is closed It is possible to make update via mobile device while the device is closed. The device will operate accordingly to the setting time. Note: While update during operation, the device menu should be open each time before NFC update. If the settings of Date, Time and City Code or Coordinates are done, the first setting menu will skip and operation will continue with normal menu. Update via NFC: Download and install the “ASTROID ateltek” application from Google Play Store with the Android mobile device. Note: The Date and Time informations should be updated in first operation. 22 Language Selection: After language selection, if location setting is selected as manual, Longitude and latitude can be set manually. Meantime checking the “set” box will enable to select the city codes from the list and the coordinates can be set automatically to the concerning city. After opening the “ASTROID ateltek” application, you can select the language in first menu and continue to make all settings with the selected language. After selecting the language, all settings will be open in a new menu. Time Setting: Time setting can be set as automatically or manually. Location Selection: Automatic: In automatic mode the date and time data will be set automatically via GPS signals according to UTC (Coordinated Universal Time). Location can be set automatically or manually. Automatic: After language selection, the application will find the coordinates automatically via GPS signals. The latitude and longitude values will be fixed after GPS signals are fixed. Manual: In manual mode, Date and time can be set manually. Note : The application will request to open NFC and GPS features if closed. Other Settings: All settings in the setting menu can be set from this area. Manual: CET/DST: CET/DST application can be open and closed. After language selection, if location setting is selected as manual, Longitude and latitude can be set manually. Offset Sunrise: Sunrise offset can be set from this area. 23 Offset Sunset: Sunset offset can be set from this area. If the device is closed while update, it will start to operate with the parameters while first settings. Time zone: Time zone can be set from this area. If the device is updated while first operation and Date, Time and City code (or coordinates) are set via NFC application, the first setting menu will be skipped. If the device is updated in normal operation, necessary parameters will be updated and the device will continue in normal operation. Program Update: C1 and C2 program update can be set from this area. The time setting can be set manually according to the concerning Program. Parameter Update: After setting all necessary parameters on mobile device, it is necessary to approach to the NFC antenna of the device (Astronomical Time Switch) with the mobile device and push to WRITE to start the update. A message will appear on the mobile device when the update process will result successful. After that the mobile device should be removed from the Astronomical Time Switch. Don’t approach the mobile device to the Time Switch until the update will done. 24 TURKEY CITY CODES 1 Adana 15 Burdur 29 Gumushane 43 Kutahya 57 Sinop 71 Kirikkale 2 Adiyaman 16 Bursa 30 Hakkari 44 Malatya 58 Sivas 72 Batman 3 Afyon 17 Canakkale 31 Hatay 45 Manisa 59 Tekirdag 73 Sirnak 4 Agri 18 Cankiri 32 Isparta 46 K.Maras 60 Tokat 74 Bartin 5 Amasya 19 Corum 33 Icel 47 Mardin 61 Trabzon 75 Ardahan 6 Ankara 20 Denizli 34 Istanbul 48 Mugla 62 Tunceli 76 Igdir 7 Antalya 21 Diyarbakir 35 Izmir 49 Mus 63 Sanlıurfa 77 Yalova 8 Artvin 22 Edirne 36 Kars 50 Nevsehir 64 Usak 78 Karabuk 9 Aydin 23 Elazig 37 Kastamonu 51 Nigde 65 Van 79 Kilis 10 Balikesir 24 Erzincan 38 Kayseri 52 Ordu 66 Yozgat 80 Osmaniye 11 Bilecik 25 Erzurum 39 Kirklareli 53 Rize 67 Zonguldak 81 Duzce 12 Bingol 26 Eskisehir 40 Kirsehir 54 Sakarya 68 Aksaray 13 Bitlis 27 Gaziantep 41 Kocaeli 55 Samsun 69 Bayburt 14 Bolu 28 Giresun 42 Konya 56 Siirt 70 Karaman 25 FACTORY DEFAULTS Offset Sunrise REFERENCE STANDARTS The device is designed under the following directives and is reported with the tests in accredited laboratories. 0:00 Offset Sunset 0:00 Time Zone +2:00 GMT C_TIME (P3) 00:00 o EN 60730-1 General Requirements O_TIME (P3) 00:00 o C_TIME (P4) 00:00 EN 60730-2-7 Automatic electrical controls for household and similar use C_TIME (P5) 00:00 O_TIME (P6) 00:00 o EN 60068-2-1 Environmental testing; Cold C_TIME (P6) 00:00 o EN 60068-2-2 Environmental testing; Dry heat Assigned Program to C1 P1 o Assigned Program to C2 P1 EN 60730-2-7 Automatic electrical controls for household and similar use CET/DST Application OPEN PIN CLOSED 26 2004/108/EC Electromagnetic Compatibility (E.M.C.) 2006/95/EC Low Voltage Directive (LVD) DIN 43 880 Built-in equipment for electrical installations EN 62054–21 Particular requirements for time switches (Crystal controlled time switch test) BATTERY REPLACEMENT The battery symbol is blinking when the battery life fall below the critical level. The battery should replace when this alert observed. To replace the battery; disconnect the power supply Remove the cover from the battery compartment, turning it anticlockwise, replace the battery and replace the cover, turning it clockwise. The “+” pole of the battery should be on the top. Use CR2032 battery only. Throw away the run down batteries in compliance with current regulations on the disposal of harmful waste. NOTE: The device can operate under power failure together with additional reserve, even of low battery voltage. 27 ATEL Teknoloji ve Savunma Sanayi A.S. / ATEL Technology and Defense Industry Inc. Co. Hilal Mah. 677. Cad. No:9 Yildiz - Cankaya - Ankara / Turkey t : +90 312 441 42 20 f : +90 312 441 42 18 www.ateltek.com / [email protected] www.astronomikrole.com / [email protected] Ateltek is a brand of ATEL Technology and Defense Industry Inc. Co.