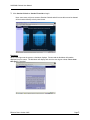
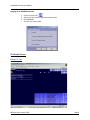
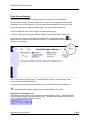
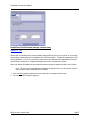
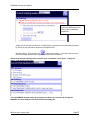
1
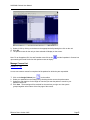
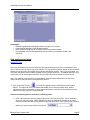
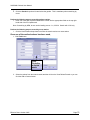
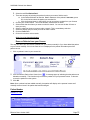
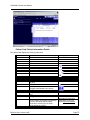
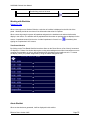
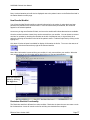
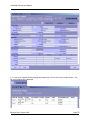
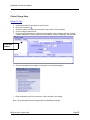
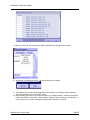
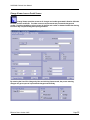
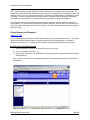
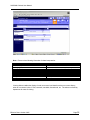
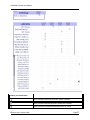
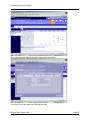
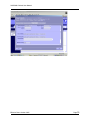
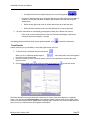
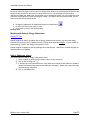
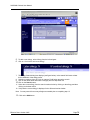
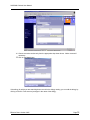
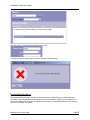
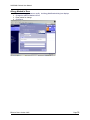
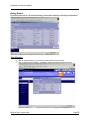
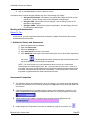
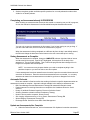
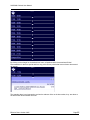
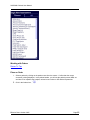
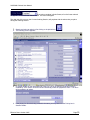
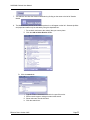
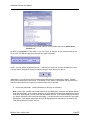
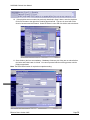
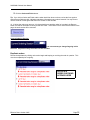
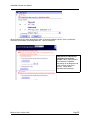
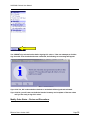
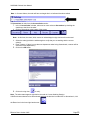
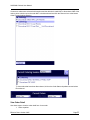
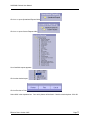
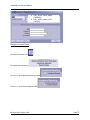
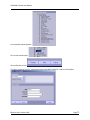
SOARIAN Clinicals User Manual 1. Logon to Soarian Clinicals 2. The Portal Screen 3. Healthcare Unit Selection 4. Manage Census List 5. Find a Patient 6. Patient Header 7. Access Patient Information from the Patient Census 8. Working with Worklists 9. Patient Demographic Information 10. Clinical Charge Entry 11. Patient Record 12. Navigation Tool/ Timeline 13. Working with Patient Allergy Information 14. Working with Assessment 15. Update Clinical Data 16. Interventions & Clinical Documentation 17. Time Based Worklist 18. Working with Orders 19. View Visit Information 20. Transfer a Patient 21. Change in Level of Care 22. Discharge a Patient 23. Working with Links to External Applications 24. Printing 25. Appendix SOARIAN Clinicals Functionality SOARIAN Clinicals allows users to perform a range of tasks to manage daily workflow. When a user signs on to the system a portal screen displays with their patient census and worklists. From the portal screen, the clinician can easily view patient records to find information such as new or existing results and demographic information. The clinician can also place orders or modify existing orders. In the future, Soarian will include the ability to record clinical notes and vital signs, giving the clinician a complete view of patient data. Working with SOARIAN Clinicals Logon to SOARIAN Clinicals Return To Top 1. Double click the Internet Browser program located on the computer Desktop. Effective Date: October 2005 Page 1 SOARIAN Clinicals User Manual 2. Click on Login or Biometry. If using Login, A. Type the Username, press TAB. B. Type the Password. Note: The password is case sensitive. C. Click the Login button. If using Biometry, A. Type Username. B. Click Biometry. Place finger on mouse as prompted by screen display. Effective Date: October 2005 Page 2 SOARIAN Clinicals User Manual 3. Click Soarian Clinicals or Soarian Financials to begin. Note: some users only have access to Soarian Clinicals and will not see this screen but instead will be launched directly to their portal screen. Disclaimer When a user logs onto the system, a disclaimer displays. Please read the disclaimer information displayed on your screen. The disclaimer will display each time the user logs on unless “Don’t show this again” is checked. Effective Date: October 2005 Page 3 SOARIAN Clinicals User Manual Logging off of SOARIAN Clinicals 1. Click on Log Out icon, . 2. Select ’Log off’ from the Logoff confirmation screen. 3. Click OK button. • The user can cancel logoff. The Portal Screen Return To Top Effective Date: October 2005 Page 4 SOARIAN Clinicals User Manual Portal Screen Elements The portal screen is displayed when a user logs onto the Soarian Clinicals workspace. The top left-hand corner of the screen displays the current user name logged onto Soarian and the Health Care Unit (HCU) hyperlink. The HCU displayed determines the current census view. The top right-hand corner contains Toolbar Buttons. (Icons are listed in Appendix A) On the left hand side of the screen worklists will appear based on user. On the lower right, the patient census displays. Again, the census displayed is based on the HCU selected or it can be customized for a particular user. On this patient census, a will appear next to the patient’s name indicating VIP status. VIP indicates that a patient has either opted out or is an inmate. VIP Patien t A red or green square may be present. These indicate new results. Green indicates normal results; Red indicates abnormal results. I f the patient has been identified as an Infection Control Isolation patient, the Biohazard icon will be present on the Patient Card and in the Patient Header on every page. SDS Patient on the Inpatient Unit A SDS patient can be cared for on an Inpatient unit following specific criteria. Transfer the patient to the Inpatient bed and provide care based on policy. The SDS patient appears as shown below on your regular Inpatient Portal Screen census. Effective Date: October 2005 Page 5 SOARIAN Clinicals User Manual Working with Patient Census The current user’s Patient Census is displayed on the right side of the screen. It can be sorted by patient location or patient name by clicking one of the two arrow icons, , in the top middle of the screen. The 3rd icon is sort by walking order, which we don’t use. Fields displayed on the census are the patient’s location, name, age, sex, and a button to navigate to patient record. If more than 13 patients appear on a unit’s census, there are 2 ways to navigate from page to page of the census. You can click on the icon listed at the top of the census and navigate by selecting the appropriate series of room numbers. Or, you may click on the arrows at the top and the bottom of the census. In the outpatient areas, there continues to be a scroll bar to the right of the census instead of the new options shown above. Note: When it is necessary to print the unit census, you will click on the Print icon at the top of the screen. Effective Date: October 2005 Page 6 SOARIAN Clinicals User Manual HealthCare Unit Selection (change census view) Return To Top Nurses and unit secretaries do not have patients assigned directly to them. The census for a nurse and unit secretary is generated from a HealthCare Unit (HCU) association. Patients are assigned to a HCU during registration. A nurse or unit secretary is given access to different HCUs depending on their job requirements or assignment. All patients assigned to that HCU comprise your census. Users can change the HealthCare Unit selection and thus change the patients viewed in their Census. Note: For those users (Case Managers, Manager Nursing Services, etc) who need to view the entire census, select IP Williamsport or IP Muncy. 1. Click the HCU hyperlink located next to the username in the upper left-hand corner. 2. The “Select a Unit” Dialog box appears. Effective Date: October 2005 Page 7 SOARIAN Clinicals User Manual 3. Select a HCU by clicking on the doors to the appropriate facility/setting then click on the unit. 4. Click OK. 5. The patient census for the unit you have selected will display on the screen. Note: For an Outpatient HCU, the staff member must click on the upon entering the Portal Screen for their patient census to display. Include Outpatient in Census icon Manage Census List Return To Top A nurse can create a census list comprised of the patients for which they are responsible. 1. Click on the Assign Patients icon, , on the toolbar. 2. Select your patients from the Dialog box by checking the box next to the patient name. 3. Update the end date/time for the length of time that you want the patient to remain in your personal census list. 4. Click Save. These settings will be retained for the next time you sign on to the system grouped together at the bottom of the first page of the census. Effective Date: October 2005 Page 8 SOARIAN Clinicals User Manual Advantageso Patients highlighted and displayed at bottom of page one of census. o Patient results displayed in New Results Worklist. o Nurse displayed via Nurse link in Patient Card for other staff members. o Documentation and Time Based Worklist will show ONLY your patients instead of the entire unit. Find and Select a Patient Return To Top There may be situations when you need access to a patient although he or she is not assigned to your HCU. There are various ways to search for patients. You can search for patients based on specific patient details, such as last name and gender or by a patient identification number. Once you find a patient, you can look at the patient record or add the patient to your personal census list. That patient will stay in your census and you can access their information until you manually remove him/her from your census. Note: This function will be useful for Case Managers, Social Services, Dieticians etc as they cover multiple units but may not see all of the patients on the unit. 1. Click on the Find Tool icon, . The Find Tool appears with the Find Patient tab selected by default. The upper half of the Find Patient tab enables you to enter the patient name, patient identification number information, or nurse station information to filter the list of patient names that appear in the lower half of the Find Patient tab. Perform the following steps to search for a patient by name. 1. Enter a few characters from the patient’s last name in the Last Name field. This is mandatory when you search by name. When searching by name, the application searches for an exact match if you enter less than four characters in the Last Name field. If not real sure how a name is spelled, you may use the Phonetic search icon. Effective Date: October 2005 Page 9 SOARIAN Clinicals User Manual 2. Click the Gender drop-down list and select the gender. This is mandatory when searching by name. Perform the following steps to search by patient number. 1. Enter one of the sets of patient identification criteria into the appropriate fields on the top right hand side of the Find patient tab. Note: If searching by MR#, do not use the leading zeroes. i.e., 001234. Search with 1234 only. Perform the following steps to search by nurse station. 1. Click the Nurse Station drop-down list to filter the search results to a nurse station. Once one of the methods above has been used, 1. Click Find button. Click Find after a choice made 2. Select the patient from the search results and then click on the View Patient Record or you can click the Add to Census button. Effective Date: October 2005 Page 10 SOARIAN Clinicals User Manual Note: Viewable from the screen above is the Entity and Location of the patient. Merged? If a chart has been merged, yes would be on this screen. Find Results The ‘Find tool’ makes it easier for you to find a specific result for a patient. Instead of selecting a patient and opening the patient record you can search for this result directly in the ‘Find tool’ 1. In your Census select the ‘Find tool’ icon, . Patients from the unit I have as my HCU. Results Assessments Notes Click dropdown to select specific search criteria Last 24 hours or specific date range. Effective Date: October 2005 Page 11 SOARIAN Clinicals User Manual 2. Select the tab ‘Find Patient Data”. 3. There are two ways of selecting the patient for whom you want to find the result a. In the Patient field enter at least the first 3 characters of the patient’s last name, press GO. In the list box select the patient you searched for. b. Click the Census button. In the list box you can now select a patient from your Census 4. Choose your content search. This will be Results, Assessments or Notes. 5. Select within what time frame you want to make the search. You can use the last 24 hours or enter your own. 6. Select in what Flow sheet you want to make a search. This is a mandatory selection. 7. Select the display group in which you want to make a search. 8. Click the Find button. 9. Click on the result to review results. Click Cancel to close the window. Remove Patients from your Census The only time when you can remove a patient from your census manually is if you have added the patient to your census manually. If this is the case an icon is displayed in the patient information part of the patient census. 1. Click on patient’s name in your census list. 2. Click the Remove Patient from Census icon, 3. . A message pops up indicating that the patient was deleted successfully. This function only removes the patient from your personal census. It does not remove the patient from the system. Click OK. Note: Once a patient has been added manually, that patient will display on the personal census until manually removed even if the patient has been discharged. Patient Header Return To Top Effective Date: October 2005 Page 12 SOARIAN Clinicals User Manual Key information is displayed in the Patient Header in all the functions of Soarian Clinicals. Name, Age, Gender, Patient Number, MR#, Visit Type and location are key. Physicians/Nurses now viewable. VIP indicator will appear when applicable Biohazard icon viewable when applicable. White house outline indicates active encounter. When the user hovers over the house, it indicates this is an active encounter. Filled in white house indicates not an active encounter. When the user hovers over the house, it indicates this is a closed encounter. Patient list In Soarian it is easy to move between different patient’s records. Instead of having to close a record, go back to the portal to view your census and select a new patient, you can click the ‘Patient List’ icon located all throughout the system. When you click on this icon, all patients in your census will be displayed in a list. Effective Date: October 2005 Page 13 SOARIAN Clinicals User Manual Select the patient you want to work with, and the current screen is updated with that patient’s information. Access Patient Information from the Patient Census Return To Top From the Portal you can click on any patient name to get more detail regarding that patient. 1. Click on the patient’s name from the patient census list. Effective Date: October 2005 Page 14 SOARIAN Clinicals User Manual Patient Card/ Patient Information Details The patient card displays the following information. Row 1 Definition Patient Location, Healthcare Unit NAME. Patient Name Age Sex Link to patient record, icon As Displayed Link to Charting, icon Link to Orders, icon Link to Visit Row 2 Row 3 Results Effective Date: October 2005 Definition Patient number (PT #) Patient ID, Medical Record or MPI Number Link to face sheet button Link to remove patient from census since the patient was added to the census. Definition Length of stay in days together with a bed icon. Allergy Doctor-patient, Nurse-patient relationship (name of attending and consulting physicians; nurses only if the nurse personalized the census. Definition As Displayed As Displayed Underlined, click to see listed allergy information Underlined, click to see listed Physicians/Nurses As Displayed Page 15 SOARIAN Clinicals User Manual Results from previous 24 hours View latest Results Working with Worklists Return To Top When a user signs on to Soarian Clinicals, a selection of worklists is displayed on the left side of the portal. Worklists provide an overview of new information that exists for a patient. When a nurse logs onto the system all inpatients assigned to the healthcare unit where she/he works display in the census. The worklists will be populated with information on patients that are displayed in the census. Outpatient areas will click on the ‘Include Outpatients in Census’ icon, signing on to update their HCU census. immediately after Time Based Worklist By clicking on the Time Based Worklist icon above Alerts on the Portal Screen, a list of hourly increments are displayed. Patient Care Orders that require nursing acknowledgement as either Interventions or more complete documentation on a form, will be listed here for all patients on the healthcare unit. To narrow the display, select your patient assignment by using the Patient Assignment tool. Alerts Worklist When an alert has been generated, it will be displayed in this worklist. Effective Date: October 2005 Page 16 SOARIAN Clinicals User Manual Note: A red exclamation point will also be displayed next to the patient’s name on the Patient Card and in the Patient Header on each page. New Results Worklist You will use the New Results worklist to maintain information for the results of orders that have been placed for the patients on the selected census. If the census has been personalized, the results will appear for the selected patients. As soon as you sign onto Soarian Clinicals, an icon on the worklist will indicate that results are available. Once the results have been viewed, they can be removed from your worklist. You can choose to remove one item for a patient by checking the checkbox to the left of a particular item, or sign all items for a patient by selecting the checkbox to the left of the patient’s name. Finalize this process by clicking on the signing icon. Only about 3 inches of space is available for display of information in this list. To move to the next set of information, click the arrows at the top right of the selected worklist. Note: When information is removed from your worklist, it is only removed from your worklist. When the next person signs on, the information will be there for them to view and acknowledge. Sign the selected items by clicking the sign icon. Reminders Worklist Functionality The Reminders worklist is different from other worklists. Reminders is where the user can create a to-do list for themselves. Items will remain on the list until they are checked off as complete. Effective Date: October 2005 Page 17 SOARIAN Clinicals User Manual 1. Click to access the Reminders worklist. 2. Type text in the provided line. 3. Click to add the item to the list. 4. The system saves the added text reminder to the worklist, and redisplays the worklist with the new item appearing at the top of the worklist. 5. To edit a reminder, click the checkbox next to the item, click 6. When edits are complete, click 7. To cancel edits, click . . . To remove a completed item in the reminder list, click the checkbox next to the completed item, and then click . Working with Patient Demographic Information Return To Top Patient Demographic Information Follow these steps to view or print patient demographic information. To access demographic information from other visits/encounters, click on the visit drop-down list to select the patient visit for which you want to view detailed information. (i.e., insurance, demographic data, emergency contact, employment status, and admission/transfer information). 1. Click on a patient name in the census to open preview of patient record. 2. Click on the Face Sheet icon, . 3. Click on the Print button to print patient demographics. 4. Click on the Close button. Effective Date: October 2005 Page 18 SOARIAN Clinicals User Manual 5. To view a list of patient locations during this hospital stay, click on the icon by Location History. The list of all locations will be displayed. Effective Date: October 2005 Page 19 SOARIAN Clinicals User Manual Clinical Charge Entry Return To Top 1. Select patient name in the census or use Find tool. 2. Click on the visit icon, 3. Select the correct visit listed on the left side of the screen to view visit detail. 4. Click on Charge Capture arrow. 5. Click on the Picklist button for a picklist of all chargeable items in Soarian Clinicals. Picklist includes: Respiratory, Nursing, Non-Invasive Cardiology, Invasive Cardiology, SDS and L&D. Click this button. 6. Click on the hyperlink for a display of all charges in the selected category. 7. Enter the quantity to the left of each item. When complete, click charge. Note: These are patient specific charges NOT total department charges. Effective Date: October 2005 Page 20 SOARIAN Clinicals User Manual 8. When you click Add, the information entered is listed back on Charge Capture screen. 8. At this time, you will cancel or sign. No other information is required. 9. The following day, a report can be printed thru Links function icon- Charge Capture reporting. Users will continue to receive their REV report. 10. After reviewing this report, if any errors are noted, go to Charge Capture. Select the appropriate picklist and make the corrections. Add omissions. However, when crediting an overcharge, you must credit the entire number charged and then go back and enter it correctly. Effective Date: October 2005 Page 21 SOARIAN Clinicals User Manual Charge Viewer Icon on Portal Screen Charge Viewer provides access to all charges and credits generated in Soarian Clinicals from the various workflows. Provides access to unprocessed and processed charges and credits. Provides capability to print a report of charges and credits on demand rather than having to wait for day end processing and report generation. By entering the User ID in Charges by User and clicking Unprocessed, the person entering charges can get a report of unprocessed charges entered today Effective Date: October 2005 Page 22 SOARIAN Clinicals User Manual Once information entered, click Generate Worklist and a list of charges will appear as seen below. Patient Record/ Working with Results Display Patient Record Information From the Patient Census, results from the past 24 hours will appear when the Patient card is opened. Effective Date: October 2005 Page 23 SOARIAN Clinicals User Manual For a complete listing of results, access the Patient Record tab once a patient has been selected. The Patient Record tab provides the healthcare professional access to patient results including laboratory and radiology results, etc over a selected period of time. Results are grouped together on flowsheets for ease of viewing. The user can switch between flowsheet views as needed. Result information displayed on the flowsheet can be selected for trend analysis either in a graphical or linear representation. The Patient Record screen provides you with the ability to navigate to the desired point in a patient's medical history. The upper section contains the Encounter Navigator, which is used to set the time frame for the information that is presented in the lower section. The lower section includes the Clinical Summary and Result View. Patient Record and Flowsheet Return To Top Once a patient has been selected from the patient census you can access the patient record. The system retrieves information to build a display of results (Flowsheet) for the selected patient. You select a flowsheet from the list box. All display groups associated with that flowsheet display on the screen. View Results in Patient Record 1. Select a patient by clicking on the patient name from your census. 2. Click on the patient record icon, 3. Select a Result Flowsheet; all results within the selected timeframe associated with this flowsheet will be displayed. Note: 7 days of information is automatically displayed for an Inpatient and 30 days of information for an outpatient. Effective Date: October 2005 Page 24 SOARIAN Clinicals User Manual By clicking on the icon at the top of the results section, you can select alternate views. If there are results in the category selected, the department will be backlit…i.e., a white background will appear behind the department as opposed to a blue background. There is a checkmark next to each backlit category. Display Group Focus: Provides the user the ability to quickly focus on results or observations in a specific display group by clicking on the display group name in the list on the left. Any category with results will be highlighted and a checkmark will be in the checkbox. To narrow the focus, remove the checkmark from categories you do not wish to see and leave the checkmark in the category you do wish to see. Click the Refresh arrow. Note: Click on display group name and that display group will come up in view if not already displayed on the screen. Effective Date: October 2005 Page 25 SOARIAN Clinicals User Manual Note: Please review following information for data interpretation: Information Type Yellow triangle Red triangle Black Text Italics Black Text N Red Text H Red Text HH Red Text L Red Text LL Description Information has been edited. Comment added or a note written Information is incomplete. Results – Preliminary. Normal Range Abnormal High Critical High Abnormal Low Critical Low Viewing Orders enables the display of order occurrence level details such as occurrence history, when an occurrence is due, if held, resumed, cancelled, discontinued, etc. The orders are listed by department for ease of viewing. Effective Date: October 2005 Page 26 SOARIAN Clinicals User Manual Orders (non-medication) Order occurrence has been performed. Status Complete Order occurrence was not performed. Status Not Complete Order occurrence is planned/scheduled but has no activity Effective Date: October 2005 Page 27 SOARIAN Clinicals User Manual Order status Discontinued, Cancel, Invalid Order status In Progress Viewing Order Detail Screen from Patient Record 1. In Patient Record, select Orders from drop down box. 2. Click on the name of the order to be viewed. 3. Review Details and History by clicking on tabs at top of the order. 4. Click Close. Scheduled and PRN Medication Orders Viewable Effective Date: October 2005 Page 28 SOARIAN Clinicals User Manual Click on the Medication name to view the Dispense detail and History. You can also view Order Details and ordering physician. Effective Date: October 2005 Page 29 SOARIAN Clinicals User Manual Effective Date: October 2005 Page 30 SOARIAN Clinicals User Manual Navigation Tool (Timeline) Return To Top 1. The Encounter Navigator at the top of the Patient Record screen enables you to set the date range of the information presented in the Patient Record. Use the screen shot below as a reference to the instructions for using the Encounter Navigator The Scale Selector enables you to set the viewable date range for the Date Selector. o Select All to show a complete lifetime clinical record view for the selected patient. Each box in the Encounter Navigator represents one month. • • o Select 365 to show a one-year date range. Each Date Selector box in the Encounter Navigator represents nine days. o Select 120 to show a four-months date range. Each Date Selector box in the Encounter Navigator represents three days. o Select 31 to show a one-month date range. Each Date Selector box in the Encounter Navigator represents one day. The Date Selector enables you to set the start date and end date for the Patient Record information. Dates proceed from right to left in reverse chronological order. • Click the left end of the Date Selector to scroll forward in time. • Click the right end to scroll backward in time. When you scroll backward in time a NOW scale appears to the left of the Scale Selector, to enable you to jump back to the current date range. A dark bar above the Date Selector indicates the span of each patient visit or encounter. Click an encounter indicator bar to present the Patient Record information that is applicable to the date range of the selected encounter. • An outpatient encounter is indicated by the icon of a walking person Effective Date: October 2005 . Page 31 SOARIAN Clinicals User Manual • • An inpatient encounter is indicated by the icon of a reclining person . Perform the following steps to set a specific date range for Patient Record information, if needed. The start and end dates will appear yellow and the selected date range will appear white. • Select the top right-hand corner of a Date Selector box to set the start date. • Select the lower left-hand corner of a Date Selector box to set the end date. 5. All active information for each display group appears initially in the Result View section. Filter the list of active information from the User Preferences Manager in the Result Flowsheet preference category, if needed. If the background of the Result View section appears shaded, click to refresh the information Trend Results Soarian Clinicals give you the ability to trend and graph results over time. 1. To trend numeric result data click the trend button, . When you do so, additional buttons appear: . Also notice that a check box appears to the left of each service listed. 2. Select the results you wish to trend by putting a check in the checkbox to the left of the result (service) name. 3. Click either the graph icon to graph the results or the trend icon to trend the results. The Result Graph/Trend screen shows the results that you chose. Each result displays in a separate graph. You can choose Combined graphs in the legend to display multiple results on one graph. There is a limit of 8 services that can be displayed per combined graph. There are also scroll bars that will allow you to scroll if you cannot see the whole graph in the window. Effective Date: October 2005 Page 32 SOARIAN Clinicals User Manual On the left hand side of the screen are the Time Range fields. What is currently displayed is based on the number of days selected on the timeline on the previous screen. You can adjust the time range by changing the ‘from’ and ‘until’ fields, this will allow you to see different results. You can change the result order from chronological to reverse chronological. Lastly, if you want to see the results trended, you can select trend and click the refresh button. 4. Change any parameters as needed and select the refresh button . 5. Click Print to print out the graph or trend. 6. Click Close to return to the results display. . Charting Icon Working with Patient Allergy Information Return To Top Soarian supports an Alert if the patient has an allergy entered into the system. You can reach allergy information at anytime while in a patient record by clicking on the hyperlink Allergies. You can modify an existing allergy or add a new allergy to the patient’s record. Soarian supports a catalog for both drug allergies and other allergies. Latex and IV contrast allergies are required entries for all patients. Add or Update an allergy Follow these steps to add an allergy to the patient record. 1. Select a patient by clicking on the patient’s name in your census list. 2. Click on the Charting icon, . 3. If allergies have not been assessed or if they have been marked as NKA, NKDA or Unable to assess, the Patient Allergy Assessment dialog box will display. Update the screen with newly assessed allergy information. 4. Click on the Save button. Effective Date: October 2005 Page 33 SOARIAN Clinicals User Manual 5. To add a new allergy, select Allergy from the left navigator. 6. Click on “click here to add a new allergy” 7. The Allergy Search dialog box displays (see figure below). In the search field enter at least three characters of the allergy name. 8. Selecting a category from the “Limit by category” field helps narrow the search. 9. Click on the down arrow and select a category from the drop-down list. 10. Click on the Search button. 11. Select the correct allergy from the search results window by clicking on the allergy and then clicking on the down arrow. 12. Verify that the correct allergy is displayed in the Selected results window. Note: You may search for as many allergies as needed prior to completing step 13. 13. Click on the Add button. Effective Date: October 2005 Page 34 SOARIAN Clinicals User Manual 14. Choose a reaction and severity from the appropriate drop down boxes. Add a comment if necessary. 15. Click on the Save button. If the allergy for which you are searching does not exist in the allergy catalog, you can add the allergy by clicking on the link ‘Free text entry’ and type in the name of the allergy. Effective Date: October 2005 Page 35 SOARIAN Clinicals User Manual The Type must be entered as either Medication or Other. If you do not enter the allergy type, you will not be able to add the allergy. Reassess/Verify Allergy Reassess indicates that visit information has been changed or allergies may have been associated incorrectly to the selected patient and therefore need to be reassessed. When a record merge occurs with a newer MR# to the older one for example and there are no documented allergies on the "merge to" record, this message may appear. Effective Date: October 2005 Page 36 SOARIAN Clinicals User Manual Modify an allergy 1. Select a patient by clicking on the patient’s name in your census list. 2. Click on the Charting icon, . 3. Click on the text ‘Allergy’ in the navigator. Select Allergy to modify. 4. Select the allergy you want to modify. An Allergy Modification dialog box displays. 5. You can change the Status, Onset, Reaction or Severity of the allergy. 6. When you make a change to an allergy, you will be required to enter a Reason for Change. 7. Click on the Save button to save the changes. 8. Press Cancel. Effective Date: October 2005 Page 37 SOARIAN Clinicals User Manual Allergy Marked in Error 1. 2. 3. 4. Select the allergy you want to modify. An Allergy Modification dialog box displays. Change the status to Marked in Error. Enter reason for change. Click Save. Effective Date: October 2005 Page 38 SOARIAN Clinicals User Manual History Button By clicking this button, all historical allergy information displays including modifications. View Allergies 2. Click on a patient name in your census to open patient record preview. 3. Click on the Allergies hyperlink. (Available if patient has allergies listed on record.) Effective Date: October 2005 Page 39 SOARIAN Clinicals User Manual 4. Click on the Close button to return to previous screen. If the patient does not have allergies available any one of the following may display: • Allergies Not Assessed - Will display if the patient had a status of NKA at the last patient visit. Use the Allergy choice on the Navigator to add allergies. • Allergies: NKA - Patient has no known allergies. Use the Allergy choice on the Navigator to add allergies. • Allergies: NKDA - Patient has no known drug allergies. Use the Allergy choice on the Navigator to add allergies. Working with Assessment Return To Top In this section, you can complete the Admission Assessment, Update Clinical Data, other routine assessments and interventions 1. Admission History and Assessment 1. 2. 3. 4. 5. Select the patient from the Census. Open the Patient Card. Select the Charting Icon. Click Assessment on the left of the screen. Click Admission on the right of the screen and click the ok icon at the lower right side of the screen . The appropriate Admission Assessment will be pulled based on the age of the patient and how the patient is registered. NOTE: If for some reason, the correct assessment does not come up, all Admission Assessments are located under the ALL tab. You may select the correct one. However, if the patient was to have a SDS assessment and instead an inpatient assessment was tied to the patient, an assessment will NOT print automatically. The automatic print is tied to how the patient is registered and not which assessment is picked. Assessment Completion 1. The Admission History and Assessment is set up in Chapters. At any time during the admission process, the information can be saved by clicking on the sign button at the lower right hand side of the screen. 2. Based on hospital policy or Accrediting Agency criteria, some information is required. If you leave a chapter without completing the required information, a red flag will appear to alert you. 3. When re-entering this chapter, incomplete required areas will be highlighted as pink. 4. Height, Weight and Temperature conversion is available by using the conversion icon. Effective Date: October 2005 Page 40 SOARIAN Clinicals User Manual 5. Soarian recognizes gender and hides specific questions for our male patients but makes them visible for our female patients. Completing an Assessment already IN PROGRESS When finishing an assessment that someone else started or re-entering one you left in progress, click on the Admission Assessment in the Scheduled/Incomplete Assessments section. You can only re-enter the assessment in this manner if you’ve been saving as you go along. If you don’t save and leave, there will not be an assessment in progress. When the assessment is being completed on a different day from the day it was initially started, the RN must change the date saved at the bottom to the new current date prior to saving. Saving Assessment as Complete When the assessment is complete, change to COMPLETE at bottom right hand side of screen and save and click on pencil. If pencil NOT highlighted, click anywhere in the body of the assessment. The pencil will highlight. Then, confirm the progress has been changed from In Progress to Complete and click the pencil. NOTE: You must enter every chapter whether you need to complete anything in that particular chapter or you won’t be able to save as complete. If extra assessments have been started but aren’t needed, open the un-needed documents and save them as Erroneous. Enter the reason these assessments are not needed, i.e., too many assessments started or extra assessment not needed to get them to disappear from the list. Automatic Referrals Rules are available in Soarian to allow the sending of referrals to specific departments when an assessment is saved as complete. Automatic referrals available in the admission assessment are: o BMI- Case Management and Enterostomal Therapy RN contacted for Bariatric needs. o Patient interested in receiving information on completion of a Healthcare Directive- Social Services o History of Antibiotic Resistant Organism- Director of Infection Control o Smoking Cessation education desired- Respiratory Therapy o Nutrition Screen positive response- Dietary consult o Skin Integrity Assessment score of 16 or greater- Enterostomal Therapy RN o Wound Staging- Enterostomal Therapy RN o Discharge Needs- Social Services and/or Case Management Update an Assessment after Complete a. Under the Patient Record icon, click on Assessment/ Clin Update to locate the assessment. Effective Date: October 2005 Page 41 SOARIAN Clinicals User Manual b. If it has been longer than the current display setting (i.e., 5 days) then you may need to adjust the navigation tool and hit refresh to view the Admission Assessment. c. Click on the document and click EDIT. d. After all changes made, click save and enter the reason for the change. Entering an Assessment after a Downtime a. At the bottom of the Assessment, there is a blank that says “Charted for”. b. Fill in the blank with the name of the person who collected the data on the Downtime form. Note: Keep the handwritten downtime document as a permanent part of the medical record when entering data for another user. Viewing History of Assessment Documentation 1. Under the Patient Record icon, click on Assessment/ Clin Update to locate the assessment. 2. If it has been longer than the current display setting (i.e., 5 days) then you may need to adjust the navigation tool and hit refresh to view the Admission Assessment. 3. Click on the document and click History. 4. The date and time of each save is listed and the user is listed along with the status. N Nurse B Good 5. To view changes made to the assessment by user, click on the date hyperlink next to the different nurse’s name. N Nurse B Good The Old Value will appear and the New Value will appear. 2. Update Clinical Data Return To Top Select the patient. Open the Patient Card. Select the Charting icon Click Assessment on the left side of the screen. Effective Date: October 2005 Page 42 SOARIAN Clinicals User Manual Click on Update Clinical Data and click OK in the lower right hand corner Some information carries over from the Admission History and Assessment; Emergency Contact, Healthcare Directive information, Admission Height/Weight and History of Present Illness. Once the initial Update Clinical Data document is completed, all further changes should be made in the Patient Record by editing the document previously completed. Case Managers and Social Services will enter name of who is following patient in this section when applicable. 3. Interventions and Clinical Documentation Return To Top Definitions: Interventions- Tasks that simply require acknowledgement by the appropriate individual. Clinical Documentation- Detailed documentation on a specific flow sheet. To complete documentation of patient care, the enduser may need to use interventions, clinical documentation or both. No matter which approach is selected, the Interventions or Clinical documentation requirement will be removed from the list of tasks to perform under Clinical Documentation, Interventions and the Time Based Worklist for all users once they have been completed. Clinical Documentation The enduser can click on Clinical Documentation from the worklist on the left of the Portal Screen. When this Worklist is open, patient names will appear. If the enduser has personalized their worklist, only those patients they are caring for will appear on this list. Otherwise, it is the entire patient census. Effective Date: October 2005 Page 43 SOARIAN Clinicals User Manual When the enduser clicks on the triangle to the left of the patient’s name, the scheduled documentation for that patient will be present. By clicking on the desired documentation, the enduser will be taken to the appropriate flow sheet where the documentation can be completed. Once the form is signed as complete, the enduser will be returned to the Assessment screen in Patient Charting. The enduser can at that point in time, select another form to document on, change to Interventions under Patient Charting or return to the Portal Screen to continue to work from the Worklist. The enduser can also change patients by clicking on the Patient List. Interventions The enduser can click on Interventions from the worklist on the left of the Portal Screen. When this Worklist is open, patient names will appear. If the enduser has personalized their worklist, only those patients they are caring for will appear on this list. Otherwise, it is the entire patient census. Effective Date: October 2005 Page 44 SOARIAN Clinicals User Manual More than one Intervention can be acknowledged from the worklist at a time. Place a check next to one or more interventions and click the sign icon. Time Based Worklist Return To Top The enduser can also click on the Time Based Worklist icon to access an hour by hour breakdown of all Interventions and Clinical Documentation for their assigned patients. Effective Date: October 2005 Page 45 SOARIAN Clinicals User Manual By clicking on the triangle for the desired time frame, all patients and the Interventions/Clinical Documentation for that time period and from any previous time periods that have not been documented will appear. The example above is an Intervention so when the enduser clicks on the Intervention, they are taken to the Intervention documentation time slot. Effective Date: October 2005 Page 46 SOARIAN Clinicals User Manual When signed as complete, the enduser can remain on the Intervention screen and complete further documentation. Any documentation completed here is also removed from the Intervention and Time Based worklist. If the enduser were documenting on a form, they would remain in Assessment in Charting and could access other required documentation. If at any time, there is a need to retrieve a form that does not have an order tied to it, the enduser can go to the Begin New Assessment Filtered Tab and select the form and click OK. Then, complete the necessary documentation. Effective Date: October 2005 Page 47 SOARIAN Clinicals User Manual Working with Orders Return To Top Place an Order 1. Select a patient by clicking on the patient name from the census. Confirm that the correct encounter is being displayed. In the patient header, you will see the patient’s name, MR#, etc and also IP for Inpatient, the hospital, unit and room number or OP and the Department. 2. Click in the Orders icon, Effective Date: October 2005 . Page 48 SOARIAN Clinicals User Manual On the left side of the screen, Current orders for the patient will display. Orders are organized by departments, which appear in the blue banners. Time and Order Status selection box at the top of Current orders. The Default View for Time is any order since Registration that meets the criteria in Order Status. The Default View for Order Status is Active and In Progress. You may click on the drop down box to select another viewing option. To view anything else, click on the dropdown box. Note: Viewing Results from Current Orders Effective Date: October 2005 Page 49 SOARIAN Clinicals User Manual If you select complete in Order Status, a list of all tests ordered will appear. Click on the test. Select Result. The result will appear. The right side of the screen, the Current Ordering Session, will populate with the orders that you place during this ordering session. 3. Search and select an order by first clicking or the picklist icon : 4. The following screen appears: 5. In Session Details on the right hand side of the box, type in the ordering physician’s name in Ordered By. Click Search. In the box under Ordered by, select the physician’s name. The name will be applied to all orders. 6. If the priority for all orders being entered is the same, you may enter it in the Priority box in Session Details. Effective Date: October 2005 Page 50 SOARIAN Clinicals User Manual 7. The enduser can close the Session Details box by clicking on the arrow to the left of Session details. 8. The Most Common picklist for the unit the patient is on will appear on the left. Alternate picklists and preprinted orders may be selected by using the dropdown box. i. Put a check mark next to the order(s) that you want to place. ii. Click the Add to Order Session button. b. Click the search tab i. ii. iii. iv. . Type in at least 3 characters to search for a specific service. Select a service type or subtype to narrow the search. Show order sets must be checked. Click the search icon. Effective Date: October 2005 Page 51 SOARIAN Clinicals User Manual v. Select the correct order from the search results and click the Add to Order Session icon. DO NOT CLICK CLOSE AT THIS TIME. If you click “Close” at this time, all your selections will be lost. Click “Close” AFTER all Order Detail Screens have been completed. NOTE: You may Search by department only. If this option is used, only 40 items will appear at a time. You may need to navigate from page to page by using the arrow at the top of the list. Added bonus, you can select from a Picklist and also Search before completing the orders. Multiple orders can be selected from the Picklist. If the Search is very specific, the enduser can only select one order but if the search is by a category, numerous orders can be selected. 9. Review the order detail. Modify information on the form as necessary. Note: When a set of orders has several orders from one department, a selection will appear halfway down the page which, once checked, allows you to group orders from that same department onto one order form. By doing this, you only enter the data details one time. If not selected with the first order, you will be required to enter each order individually. Use this choice as a time-saver BUT only when appropriate. It will appear when orders from similar departments are ordered by if the detail of the order will be different, DO NOT select it. Effective Date: October 2005 Page 52 SOARIAN Clinicals User Manual However, if there is a required field on the order, you will get the following error message. Prior to checking “Add to Order Session”, complete the Required field, in this instance Site/Source and then click “Add to Order Session” to continue. Note: If there are several orders, you do not need to add the physician’s name multiple times. The physician can be changed from order to order if necessary. Prep Notes: Prep notes are described on the Order Detail Screen and also print to the unit’s and Pharmacy’s printer for additional transcription/follow-up. The Prep note will also print to the Kardex with the ordered test. Effective Date: October 2005 Page 53 SOARIAN Clinicals User Manual 10. If the physician was not entered as previously described in Step 5 above, enter the physician. Click on the button to the right of the Ordering physician field. Type one or more letter of the doctor’s last name and click Search. Select the doctor’s name and click Add to select the doctor. 11. Some fields on the form are mandatory. Mandatory fields turn pink if they are not valued before the Order and Finish button is clicked. You cannot proceed with the ordering process until the fields are populated. Note: The PEM Order Number is required on outpatient testing. Effective Date: October 2005 Page 54 SOARIAN Clinicals User Manual 12. Click the Order and Finish button. Tip: If you click on Order and Finish and the order detail form does not close, review the form again to ensure that no fields are pink, indicating mandatory information has not been entered. You may have to use the scroll bar on the right hand side of the screen to view all fields. 13. If during the order entry process, it is determined that a particular order isn’t needed, the Remove Order icon can be checked to remove just that one order. If the Cancel icon is clicked at the bottom of the page, the entire series will be removed. Current Ordering Session It is not necessary to change Ongoing in this selection. Physicians using CPOE will use this function. Duplicate orders Review the duplicates by clicking on the red triangle and keeping or revoking the order in question. This must be completed prior to signing. DUPLICATE ORDER CHECKING APPEARS HERE Effective Date: October 2005 Page 55 SOARIAN Clinicals User Manual When the decision is to Keep the duplicate order, a Comment must be entered. Some pre-defined comments are available via the drop down box. Then click ACCEPT. ABN (Advanced Beneficiary Notification) Processing prompt.: When placing orders on a Medicare Outpatient depending on the diagnosis and order you may receive this prompt. Please follow departmental procedures. Effective Date: October 2005 Page 56 SOARIAN Clinicals User Manual ABN processing will also be invoked for Mammogram and PSA screens on Medicare outpatients. Orders can be reviewed one last time or modified prior to signing in the Current Ordering Session by clicking on the order which opens the order detail screen. Sign the order(s). Click the sign icon, , to process the order(s). The orders will move from the Current Order Session on the right to the Current orders on the left. Orders in the Current ordering session do NOT have a checkmark next to them. To sign ALL orders, click the pencil Sign icon. You can REMOVE selected orders by checking the orders to be removed and clicking the REMOVE icon at the bottom of the Order Session Summary box. Effective Date: October 2005 Page 57 SOARIAN Clinicals User Manual You CANNOT sign selected orders before signing ALL orders. If the user attempts to click the sign icon with some checked and some unchecked, the following error message will appear. If you click Yes, ALL orders whether checked or unchecked will be signed and activated. If you click No, you will return to the Order Session Summary and complete or Remove orders until you are ready to sign ALL orders. Modify Order Status – Revise and Discontinue Effective Date: October 2005 Page 58 SOARIAN Clinicals User Manual The functionality associated with revised orders causes the original order to be discontinued, making an order that has a revision a new order and therefore a NEW ORDER NUMBER. The view in the Patient Record reflects that functionality. • An open-ended order is one that does not have a stop date, order duration or number of times entered. Typically nursing orders and/or intervention type orders will use open-ended orders. The open-ended order shows text “until discontinued”, e.g., “walk patient down hall twice daily until discontinued”. Orders can be Revised, Changed and Discontinued from the Current Order section. 1. Select a patient. 2. Select orders. To Revise/Change an order from the Current Order section: 1. Click on the order requiring the revision/change. 2. Click on Revise. 3. The Order Detail Screen appears. Make all necessary changes. Make sure to adjust the date 4. 5. 6. and time if necessary. Click Apply. The order will move to the Current Ordering Session side. Click Sign. Note: The old order has been discontinued and the new order has been generated. If the order is going to a department via an interface i.e., Novius Lab, wait at least 3 minutes prior to making any change to an order in the Current Orders section to allow appropriate communication from Soarian Clinicals to the other system. If changes made too soon, the appropriate communication does not take place between the 2 systems. Effective Date: October 2005 Page 59 SOARIAN Clinicals User Manual Note: In Current Orders, the order will have a triangle after it to indicate it has been edited. To Discontinue an order from the Current Order section: 1. In the “Current Order” window, select one or more orders to discontinue by checking the checkbox to the left of the order. 2. Click on Discontinue at the bottom of the screen Note: At this time, the renew, hold, resume or acknowledge/co-sign choices will not be used. 3. Select the order(s) within the window again to verify that you are working with the correct order(s). 4. Enter a reason. (If there is more than one department order being discontinued, a reason will be entered for each department.) 5. Click on the OK button. 6. Click on the sign icon, to verify. Note: The order status appears right before the order in Current Ordering Session. If ONE order was selected to be discontinued and then the decision is made NOT to discontinue it, click the Reset icon in the lower right hand corner. Effective Date: October 2005 Page 60 SOARIAN Clinicals User Manual If numerous orders were selected to discontinue and the decision is made NOT to discontinue ONE of the orders, place a check next to the order NOT to be discontinued and click the Remove icon at the bottom of the Current Ordering Session. To view orders that have been discontinued, click on the Order Status dropdown box and select Discontinued. View Order Detail Use these steps to view the order detail form for an order. 1. Select a patient. Effective Date: October 2005 Page 61 SOARIAN Clinicals User Manual 2. Select order icon. 3. Click on the order description and select Detail. 4. The Order Detail form that was completed when the order was placed will display. No action can be taken. It is view only. View Order History 1. Locate the order as above. 2. Click on the order description and select History. 3. The History screen will display. Working with Patient Visit Information The visit icon allows the clinical user to link to the Soarian Financial system to Transfer or Discharge a patient. Charge Capture and Level of Care changes will also occur through this function. View Visit Information Return To Top 1. Click on patient name in your census to open patient record preview. 2. Click on the patient visit icon, . 3. Choose visit from the list on the left hand side of the screen. 4. After viewing, click on the ‘Back to Census’ icon Effective Date: October 2005 . Page 62 SOARIAN Clinicals User Manual Note: Prior to selecting the visit to the left of the screen, Death Registration appears at the bottom of the screen. This is not used. Transfer a Patient Return To Top 1. Select patient name in the census or use Find tool. 2. Click on the visit icon, 3. Select the correct visit listed on the left side of the screen to view visit detail. 4. Click on “Transfer” and enter all required information for transfer. Click Flashlight to Find New Location Effective Date: October 2005 Page 63 SOARIAN Clinicals User Manual Change in Level of Care Return To Top 1. If changing Level of Care during an actual location transfer, please use the following function. Effective Date: October 2005 Page 64 SOARIAN Clinicals User Manual 2. When no room/bed transfer is involved, please click on the Other Functions icon at the bottom of the initial Visit page. a. Select SF Level of Care b. Select New level of care. c. Click Done. Discharge a Patient Return To Top 1. Click on patient name in the census or use Find tool. 2. Click on the visit icon, . 3. Select the correct encounter listed on the left side of the screen to view visit detail. 4. Click on “Discharge” and enter all required information for discharge. 5. Are you ready to complete check out now? Click yes or no. Effective Date: October 2005 Page 65 SOARIAN Clinicals User Manual Note: There is not Reversal of Discharge option. If a patient is discharged, all orders will be removed. Admissions will be contacted to readmit the patient! All orders will need to be reentered. Be very careful!! Effective Date: October 2005 Page 66 SOARIAN Clinicals User Manual Working with Links to External Applications Return To Top Links to External Applications will be used for Operational Reporting such as a Kardex, Unit Orders, Department Orders and Prep Notes. This link will also be used to access information such as Brochures, Learning Resources, Policies and Procedures, Micromedex. 1. Click the button on the top right of the screen to link to patient specific external applications. 2. Click one of the applications listed. • • SF Charge Batch Entry-For those areas that complete large volume charging…i.e., ER, OR SHS Brochures- Click on the link. Select your cost center. Enter your name and where to send the brochure(s). Click Submit. An alphabetical list of brochures will be present. Type the Effective Date: October 2005 Page 67 SOARIAN Clinicals User Manual quantity desired next to the brochure title. Scroll to the bottom of the page and click Submit Order. Confirm your order then click Submit Order. • Clinical Websites- This links to all the Learning Resources information that was on the left hand side of the Clinician Resource Center’s screen…Literature Search, Pub Med….etc • Micromedex- Click here to access Micromedex. Its function has not changed. • Operational Reporting- Printing Unit/Department orders and Printing Census, etc. will occur through this function. Printing Return To Top Printing to a Local Device: Provides the option to print documents and reports in Soarian to devices attached to the local workstation. As a result, users are not limited to printer configured as part of the hospital routing network. Print Request Status Indicator: To provide feedback to a user on the status of an ad-hoc print request, a visual indicator has been added to the print dialog. The status will change from “Your print request is being processed” to “complete”. A. Printing from Results Display Note: This method is for Lab results only at this time. There is a Printer icon on the right side of the bar in the results section. By clicking on the printer icon, the following box will appear with all results for the category selected. ONLY the results on the page being viewed will print. Effective Date: October 2005 Page 68 SOARIAN Clinicals User Manual Click the printer icon at the top of the box that is at the top of the page. The following box appears. Click OK at the bottom of the box. Effective Date: October 2005 Page 69 SOARIAN Clinicals User Manual B. Printing from Patient Record By clicking the Printer icon from the icons at the top of the page, you can select more than one type of Lab results to print with one request. When you click this printer icon, the following box appears. By selecting from the Display Group Name on the left and then clicking the left/right arrows, print request can be personalized. your When all requested results moved to the right hand side, click OK at the bottom of the box. C. Reports to HCU Click Other Functions icon Click Operational Reporting Effective Date: October 2005 Page 70 SOARIAN Clinicals User Manual Click on + to open Operational Reports folder Click on + to open Custom Reports folder List of available reports appears. Click on the desired report. Click on Preview or Print Select HCU in the dropdown box. Your unit’s printers will be listed. Check the desired printer. Click OK. Effective Date: October 2005 Page 71 SOARIAN Clinicals User Manual TWH_4EAST_BACK_AREA [T4EBACK] TWH_4EAST_NURS_STAT [T4EAST] Reports to Local Printer Click Other Functions icon Click Operational Reporting Click on + to open Operational Reports folder Click on + to open Custom Reports folder Effective Date: October 2005 Page 72 SOARIAN Clinicals User Manual List of available reports appears. Click on the desired report. Click on Preview or Print To print to a printer at your PC, follow these steps. Enter MR#, Patient ID, Location or Room/Bed. Effective Date: October 2005 Page 73 SOARIAN Clinicals User Manual Click OK You are taken to Adobe Reader 7 Click the Printer icon in the upper left hand corner of this Adobe Reader box. Click OK Effective Date: October 2005 Page 74 SOARIAN Clinicals User Manual Appendix A-Toolbar Buttons Return To Top The list below details the buttons used in Clinicals with their functions. View Charges Will not be used at this time. External Link to many non-patient specific functions. Print User Preferences Configuration –will not be used at this time. Patient Browser - Find Patient based on individual patient. Help. Log out. Face Sheet – Patient Demographic Data Refresh Census, or Patient Results after interacting with Timeline Give other physicians access right to your census Include/Exclude Outpatients in your Census Nurses to define their census for this shift Back to Census screen (when on any other page than Portal Screen, click this icon to return to Portal screen) Change view to Time Based Worklist Effective Date: October 2005 Page 75 SOARIAN Clinicals User Manual Navigate to Patient Record Navigate to Charting Navigate to Order Entry Navigate to Visit (for transfer, discharge and charge entry) Display Graphs from selected services Display Trends from selected services Sort by Patient by location, Alphabetically or Walking order Pages of Patients in Census Effective Date: October 2005 Page 76