1
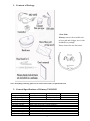
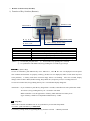
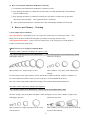
User’s Manual Model 2MJ-03SE Exported by Appreciate Co., Ltd. KYOTO, JAPAN Manufactured by MJ Laboratory Japan SUZUKA, JAPAN Table of Contents Contents Page Disclaimer, Warnings, Cautions Contents of Package, Nose Pad, General Specifications Frequency and Duty Ratio How to use Primary (Operation) - Charging Battery - Controller Display and Function, - Remote Control Unit 2 3 4 5 6 7, 8 9 - Synchronization How to use Primary (Training) - Two unique effects - Hints for how to set Frequency and Duty Ratio - How to carry vision training, Care, and Cleaning Basic Trouble Shooting, Warranty, Privacy Policy, Customer Service 1 9 9 10 11 DISCLAIMER Primary Strobe Glasses is a dynamic precision training tool that requires careful consideration and precautions when used. For safe, trouble, and injury free use of this stroboscopic technology, all users are required to carefully read all contents of this disclaimer prior to using Primary. Primary is not and should not be used for entertainment or recreational purposes of any kind. training and conditioning purposes only. They are strictly intended for If any part of the contents should be unclear or questionable, please seek clarification by asking either a party you purchased from, or directly with the exporter. cautions listed below is a MUST when you use Primary. Observance of warnings and The manufacturer, exporter, distributor, retailer and all parties involved in the sale of Primary are absolutely free from any and all responsibilities and liabilities related to results of non-observance of warnings and cautions listed below and also any and all other inadequate and inappropriate use of Primary out of this user’s manual. WARNINGS DO NOT wear/use Primary repeatedly during your daily activities, such as walking, jogging, running, etc., both indoors and outdoors without intending to carry your vision training.. DO NOT use Primary while driving a vehicle, such as, automobile, motorcycle, bicycle, and all other vehicles, or operating any machine. This may cause a fatal accident. DO NOT wear Primary while using roller/ice skates, skateboards, snowboards, skis, and all other moving sports equipment, except under supervision and when instructed and/or directed by appropriate coach(s) or instructor(s). Primary is not designed to be a protective device. it is necessary during the training. Be sure to wear properly designed protective eye wear over Primary when The use of Primary in such manner without appropriate protective eye wear may result damage or injury of eye(s) and other body parts. This is a MUST when the training involves solid objects, such as baseball, softball, hockey puck, ice hockey puck, etc. CAUTIONS It is known that certain visual stimulus trigger photosensitive seizures, migraine episodes in susceptible individuals. If you know you are susceptible, DO NOT use Primary under any conditions or circumstances. If you or your supervisor(s) have any concern about your susceptibility, it is strongly recommended that you consult with a physician and/or qualified sports vision trainer prior to the use of Primary. It is recommended to avoid large red color backgrounds and object contrast of 40% or higher when you use Primary, especially in the range of 10-30 Hz. It is known that blinking red color and high object contrast are prone to trigger PPR*(1). All users younger than 18 year-old are required to use Primary under supervision of a qualified instructor. When user(s) younger than 18 year-old purchase Primary, he/she is required to have consent from a supervisor. A head-band is included in the accessories. should fly off during use. Always use a headband with Primary, as the unit can be damaged by impact if it Adjust the band length to have Primary comfortably and firmly fit to your face and head. Primary is designed for athletic training, but is a precision device, which requires adequate handling and care. Do not drop it on a hard surface, twist or warp the frame or push or hit lenses with excessive force. As described above, it is mandatory to read this manual prior to use Primary. By reading above Disclaimers, Warnings, and Cautions, it is understood that the user fully agrees to observe the warnings and cautions listed above. suggested in this manual must be done on users’ own risk. Any other use than those Warranty will be void when and if Primary is used without observance of warnings, cautions and instructions in this manual. *(1) PPR = Photo Paroxysmal Response 2 1. Contents of Package <Nose Pad> Primary comes with a smaller size of nose pad and a bigger size is also included in a package. Please choose the one fits better. Note: If anything is missing, please be in contact with a seller you purchased from. 2. General Specifications of Primary 2MJ-03SE Main Unit Battery Charger Voltage Charging Voltage Charging Time Main Unit Battery Power Consumption Operating Current Controller Battery Wireless System Connector Duty-Ratio Range Frequency Range Rechargeable Temp./Humidity 0-50℃/30%-80% 100VAC-240VAC Sleep mode Amp. 2.5 mA 5VDC Storing Temp. -20 – 60℃ 1.5 - 2 hours at 15-35℃ (*4 hours for the first time) Polymer Lithium Battery (170mAh), 3.7VDC (Strobe Glasses) 33mW at 99% duty-ratio, 150 Hz frequency 9mA at 99% duty-ratio, 150 Hz frequency CR2032 or compatible Lithium battery, 3VDC Bluetooth technology Freq. 2.4 GHz, Range 5 meters 8-pin USB 30% - 95% (1 % increment) 1Hz – 200 Hz (1 Hz increment) 3 3. Frequency and Duty Ratio Frequency: Number of cycles per second, which a lens turns into transparent and opaque stages alternatively. Each set of lens transparent (or visible) and opaque (or blocked) stage makes one cycle. (1 Hz increment) In Figure 1, the upper trace shows the frequency with 10 cycles, with the LCD lenses being clear 50% of the time. The lower trace shows the frequency with 5 cycles, and the cycles still permit vision 50% of the time. Varying the Frequency (H-value) Fig. 1 Duty Ratio: Ratio of lens opaque time in one cycle in percentage. (1% increment) These features with extremely high performance of LCD make Primary very versatile. In Figure 2, the frequency is the same, but the duty ratio is varied. In the upper trace, vision is blocked by 80% of the time, while in the lower trace, the vision is blocked by 50% of the time. Varying the Duty Ratio (D-value) Fig 2 Controller Display and Function of Strobe Glasses Display H001 H002 H003 |H199 H200 Frequency 1 Hz 2 Hz 3 Hz 199 Hz 200 Hz Display D30 D31 D32 D94 D95 Not Visible 30% 31% 32% 94% 95% 4 Visible 70% 69% 68% 6% 5% 4. How to use PRIMARY - Operation 1) Charging Battery Follow procedures shown below to charge *The square mark of plug must be toward outside. battery safely: (1) Confirm Power OFF (2) Connect carefully one end of USB cable to a connector of Primary, located under the battery compartment. Connect the other end to a USB jack of AC Adopter supplied as an accessory, or any standard USB output of computer, etc. (3) Blue lamp turns on. (4) When the blue lamp turns off, the battery is fully charged. Note: When the contrast of LCD glasses become dim or less bright, battery needs charging. Fig. Connection of USB cab Notes The first time only, charge battery for four hours. From the second time, it may take about two hours until the blue lamp turns off. The battery lifetime is approximately three years at an average charging interval of once in every two weeks. There is no guarantee for above figures as each case differs due to usage, handling, and environmental conditions. Warranty for a battery is one year from the date of purchase. As Polymer Lithium Battery is used, you may charge a battery even if it is not empty yet. CAUTION 1. When you use AC Adopter, be sure to charge from 100VAC-240VAC wall outlet. 2. Any problem caused by using any other charger except a standard charger will void warranty. (1) Never use wet or damp charger and/or USB cable. Be sure to dry it before use. (2) To unplug USB cable from Primary and/or charger, hold a connector of the cable and pull. Never pull the cable. (3) Please ask your seller/dealer to install a new battery when necessary. Battery change by an unauthorized party or an individual buyer will void warranty. A battery for Controller is CR2032 Lithium Battery, 3VDC. 5 2) Strobe Glasses (Main Unit) ON/OFF Key: Push this key to turn on Strobe Glasses. Both lenses begin to blink at a default setting (Frequency = 5 Hz, Duty Ratio = 50%) or at the setting when it was turned off last time. While Strobe Glasses are on, push the key to turn on Sleep Mode (Yellow lamp turns on). When Strobe Glasses are in sleep (Yellow lamp On), push the key to release the Sleep Mode and resume the latest setting. To turn off power of Strobe Glasses, keep pushing the key for 3 seconds. When Red & Yellow lamp turn on simultaneously, release the key, then Strobe Glasses turns off. <Attention!> If you continue to push the key longer than 5 seconds, Strobe Glasses turn into synchronize mode and the controller becomes out of operation. To release it, just push the key once again and then it turns to the normal mode. While Strobe Glasses are on, blinking Red lamp indicates low battery level. Function Power On Sleep Mode Charging Power Off / Synchronizing Lamp Red Yellow Blue Red & Yellow Descriptions On for Power On / Blinking for low battery level On for Sleep Mode On for recharging battery / Off for full charge Both On for Power Off / Main Unit & Controller are synchronized 6 3. Remote Control Unit (Controller) 1) Function of Key Switches (Buttons) POWER ON / OFF SW Switch D / H ▲ Up ▼ Down D / H Key Switch Indication ON / OFF* SLEEP UP DOWN SWITCH STATUS SL D/H ST Status Sleep / Memory Setting Blinking / Memory Setting Function turns ON/OFF Power, (Synchronize Mode) turns ON/OFF Sleep Mode, (Memory Setting) increases value of Frequency / Duty-Ratio decreases value of Frequency / Duty-Ratio switches between Frequency / Duty-Ratio selects control of Right and/or Left Lens(es) (Memory Reading) (Note: * ① To turn ON, just push once. ② To turn OFF, keep pushing for 3 seconds. ③ To synchronize with Main Unit, keep pushing for 5 seconds to get 3 beeps. ON/OFF Key (Power Key) To turn on Controller, push ON/OFF key once. “► D 8 8” , and “► H 8 8 8” are displayed on LCD panel. This confirms all functions are properly working. (If these are not displayed, either or both units may have some problem.) A battery mark dose not mean empty unless it is blinking. After two seconds, display changes either to D50 / H005 (default setting; Duty-Ratio 50%, Frequency 5 Hz) or a setting last used. To turn off a control unit, keep pushing this key for 3 seconds until display disappears. <Attention!> - If you continue to push the key longer than 5 seconds, Controller turns into synchronize mode. To release it, keep pushing this key for 3 seconds to turn OFF. -While controller is on, the appearance of battery mark indicates low battery level. -Type of battery: CR2032 or compatible Lithium battery. 3VDC. SL Sleep Key While both Controller and Main Unit are on, push this key to turn into Sleep Mode. To resume, push ON/OFF key of Main Unit. For memory setting mode, keep pushing this key for three seconds. →Memory Function 7 ▲ Up Key While both Controller and Main Unit are on, this key increases value of Duty-Ratio or Frequency, whichever selected. Either D or H are selected with ► mark by SW. Keep pushing the key for a few seconds, the display turns into quick increase mode. ▼ Down Key While both Controller and Main Unit are on, this key decreases value of Duty-Ratio or Frequency, whichever selected. Either D or H are selected with ► mark by SW. Keep pushing the key for a few seconds, the display turns into quick decrease mode. SW Switch Key While both Controller and Main Unit are on, this key changes selection between Duty-Ratio and Frequency alternatively. A function with ► mark is a selected one. ST Status Key Primary is featured with two wide range adjustable parameters for each lens (Right and Left) either simultaneously or independently: While both Controller and Main Unit are on, this key changes between 3 selections of lens status; i.e. (1) both lenses are blinking, (2) left lens only, (3) right lens only. The indication of each status is LCD lens itself; i.e. blinking lens(es) is a selected one. For memory reading mode, keep pushing this key for three seconds. →Memory Function 2) Sound Alert When Controller turns on, Controller makes a short single beep sound. Each time controller signal is transmitted, Controller makes a single beep sound. When Main Unit is off, Controller cannot transmit signals to Main Unit and no sound is made. When you change Main Unit settings, be sure to hear beep sounds; no beep sound means no signal transmission. When the synchronization begins, Controller makes single longer beep. When it is completed, three short beep sounds are made. 3) Memory Function Primary has a memory function, which can hold up to 5 different settings. How to adjust and save preset setting(s) Turn on Controller and keep pushing SL key for approx. 3 seconds. The controller turns into memory setting mode. ► mark is indicated to both D and H and one of ► mark is blinking. While controller is in memory mode, SW key changes selection between Frequency and Duty-Ratio. Both Frequency and Duty-Ratio can be changed by using UP and Down key. Push ST key to proceed to next memory entry position. This can go up to the fifth memory position. To save settings and finish memory mode, keep pushing ON/OFF key to turn off controller. How to recall preset settings While Controller is on, keep pushing ST key for approx. 3 seconds. The unit turns into memory reading mode. ► mark is indicated to both D and H without blinking. Push ST key to proceed to next memory. To finish memory reading mode, keep pushing ON/OFF key to turn off controller. This can go up to the fifth memory position. 8 4) How to synchronize Main unit and Remote Controller ① Confirm the both of Main Unit and Remote Controller are OFF. ② Keep pushing ON/OFF key of Main Unit for more than 5 seconds until Red and Yellow Indicator turn on simultaneously. ③ Keep pushing ON/OFF key of Remote Controller for more than 5 seconds until you hear three short beep-sound repeatedly. Then synchronization is confirmed. ④ After synchronization, Remote Controller turns OFF automatically and Main Unit turns ON. 5. How to use Primary – Training 1) Two unique effects of Primary Slow-Motion Effect - By blinking LCD, you can get slow-motion effect or stroboscopic effect. This Helps you see the ball’s rotation and strengthen your ability to anticipate the ball’s orbit. Vision Enhancement Effect – Sport visions are trained by the cyclic closing time by LCD shutter as it makes a training task much harder. 2)Hints for how to set Frequency and Duty Ratio Frequency shall be adjusted according to the object’s speed. 1Hz < slower blinking, heavier vision enhancement ~ faster blinking, lighter vision enhancement> 200Hz With higher frequency With lower frequency More suitable to see a ball's rotation or orbit. More suitable to carry sport vision enhancement training. For slow-motion effect, approximately 1Hz for 1km/h, that is, 50Hz for 50km/h, 100Hz for 100km/h., etc. For vision enhancement effect, about 10% less Frequency is recommended than the above. Note: The actual setting shall be adjusted according to the situation and individual differences. Duty Ratio shall be adjusted according to the brightness. 30% < brighter, lighter vision enhancement ~ darker, heavier vision enhancement > 95% The basic setting is 50% Duty Ratio and adjust it either to brighter (=lower ratio) or darker (=higher ratio). With higher duty ratio With lower duty ratio More suitable to see high speed Object but the vision More suitable to see lower speed object to check the becomes darker. stream of that with tails. 9 3)How to carry vision training - example: Baseball – applicable to other sports Introduction Put on Primary with D50%, H60. Play catch-ball with slow speed balls for 2-3 minutes. Slow-Motion Effect See your target ball like a high speed of 130km/h with Primary with D50%, H130Hz. Adjust the setting to the one with which you can see and feel the best. You can just see balls beside or behind a catcher, no need to hit a ball. Keep watching for about 5 minutes with a good concentration. Vision Enhancement Effect Start a batting training with a very slow ball, even tee batting or toss batting, never start it with a very high speed ball. Put on Primary with D70%, H20. After achieving your task, you may proceed to next trainings with faster ball speed with higher Frequency. Remember that Frequency setting shall be less 10% from the setting for Slow-Motion Effect so that you get an enhancement effect. Note: During training with Primary, you might feel bad or sea-sick. Stop training immediately, put off Primary, and take a rest. You may re-start training after you feel all right but shall shorten training time. Do not continue training for more than 30 minutes in one day. Frequency less than 20Hz shall be done especially carefully. 6. Care and Cleaning of Primary Cleaning – use soft, damp piece of cloth to clean the unit. For cleaning the lenses, use the micro-fiber lens cleaning cloth included as an accessory. Do not use any cleaning agent like window cleaner on the lenses. Avoid excessive heat - do not leave the unit in very hot place, more than 60℃, like a car dashboard under strong sunshine) - or damage the battery or other components. Primary is not designed to be used in or around water, and could be damaged if it becomes wet. Should it get wet, dry it immediately with a cloth or towel, and allow to dry. Keep Primary in a hard case comes as an accessory when not in use, and store in a cool and dry place when it will not be used for an extended period of time. 7. Basic Trouble Shooting Symptom Potential causes What to do Power does not turn on LCD display low contrast Not enough charging Charge battery Unable to adjust settings Cannot charge battery Charging cable may be damaged. Battery charges too quick May need a new battery Suddenly unable to charge Battery wiring may be damaged 10 Contact seller 8. Warranty Your Primary will be covered by one year warranty; i.e. all damages and/or problems caused by normal use will be repaired with no charge, except shipping charge from the user to the customer service shown below. The repaired unit will be sent back to the user. (Shipping back charge is included.) Warranty will void when; 1. The user did not follow warnings and cautions. 2. The user used/handled Primary inappropriate manner or conditions. 3. Primary was disassembled or modified without an approval or consent of manufacturer. 4. The problem occurred after one (1) year from the date of purchase. 9. Privacy Policy We collect contact information – your name, address, phone number, e-mail address, etc., when necessary. The purpose of collecting information is to provide the services and customer support when necessary. We guarantee that all such information collected will never be used for any other purpose than above mentioned, and the information will never be given any third party. 10.Customer Service Should you require any customer service after purchasing your Primary Strobe Glasses, please contact to the local distributor below. You may contact also to the exporter described below whenever you feel necessary. Distributor: Exporter: Primary Shop Company: Appreciate Co., Ltd. Address: 4FD2A MB Bldg., Motohon-noji-cho, Nakagyo-ku, Kyoto, 604-8244 JAPAN E-mail: [email protected] TEL:+81-75-708-6911 FAX: +81-75-708-6911 URL: http://dynamicvision.jp Attn.: Mr. Tamura Tetsuya, MD & CEO 11