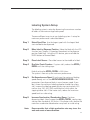
1
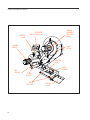
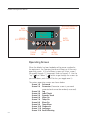
TM L200A Label Applicator User Manual Refer all servicing to qualified personnel. This manual is intended for use by qualified mechanics and electricians who install or service the Hoppmann™ L200A Label Applicator. Record your serial plate information here for future reference Ü First Edition, Revision 1, All Rights Reserved. Copyright 2013 by Shibuya Hoppmann Corporation. Duplication of this manual, in whole or in part, requires prior written consent from Shibuya Hoppmann Corporation. Model Number Serial Number/Date HeadquartersSales Manufacturing 13129 Airpark Drive 1445 Brookville Way 281 Dillard Road Suite 120 Suite F Madison Heights, VA Elkwood, VA 22718 Indianapolis, IN 46239 24572 540.829.2564 t 317.322.0754 t 434.929.4746 t 800.368.3582 t 800.368.3582 t 800.543.0915 t 540.829.1726 f317.322.0794 f434.929.4959 f www.ShibuyaHoppmann.com | [email protected] Quick Start Thank You for Choosing Shibuya Hoppmann Thank you for purchasing a labeler from Shibuya Hoppmann. Our labelers, prefeeders, feeders, and automated systems possess an industry-wide reputation of excellence for their quiet and rapid handling of parts, ease of use and low maintenance requirements. About This Manual Assumptions Shibuya Hoppmann Corporation assumes that all procedures contained in this manual will be performed by a qualified mechanic or electrician who must install or service the L200A Label Applicator. Who Should Read This manual is intended for those who install and/or operate the L200A Label Applicator. The manual is not intended to meet the training needs of persons new to labeling; nor is it intended to meet the needs of personnel who wish to completely overhaul the unit. These needs will require assistance of experienced personnel and are outside the scope of this manual. Please read the entire manual carefully before operating your labeler. Caution Symbols Caution symbols and messages in this manual call attention to and Messages hazardous voltages, moving parts, and other hazardous conditions. The lightning bolt caution symbol denotes possible personal injury and/or damage to the equipment from electrical hazards. The exclamation point caution symbol denotes possible personal injury and/or damage to the equipment. Equipment Improvements & Document Revisions Notice 2 Shibuya Hoppmann Corporation continually improves its products, and reserves the right to change or discontinue specifications and designs shown in this manual without notice and without incurring obligation. Shibuya Hoppmann Corporation has made every effort to verify the information contained in this manual, but reserves the right to correct any error at the time of the manual’s next revision. 05.2013. Quick Start Other Documentation Product specifications and vendor subcomponents are incorporated into this manual at the discretion of the manufacturer. Terms and Definitions Terms and Definitions Term Equivalent Word, Definition and/or Abbreviation Blow Module, Label Blow-On Applicator Module. Aids in applying the Blow-On Module label to product with the use of blowing air. Tamp Module, Label Tamp-On Applicator Module. Aids in applying the Tamp-On Module label to product with the use of pushing the label onto the product with pneumatics. FR Filter Combination pneumatic pressure regulator and secondary particle filter. Peeler Bar; An edged, flat piece of metal around which the backing or label web material is threaded–the prime function being a mechanical Peeler Plate device which causes a pressure-sensitive label to be dispensed from the backing material. Any medium to which the labels are applied (boxes, bottles, containers, Product etc.) Web Webbing; Backing; Label Strip; Label Ribbon; Waste; Continuous Backing; The part of the label with the adhesive exposed before the label is Flag completely removed from the webbing. Labeler Label Applicator; Applicator; L3500PA PA Print & Apply; Indicates the labeler has a print engine. Print Engine Thermal transfer printer; thermal printer; in-line printer. Print Head Label applicator unit; Print & Apply label applicator; Labeler 3 Table of Contents Chapter Name Quick Start Page About This Manual Terms and Definitions Table of Contents 2 3 4 1 Description The L200A Label Applicator and Specifications Specifications of the L200A Figures: Figure 1-1. Front View of L200A Right Hand Applicator Table 1-1. Applicator Specifications Figure 1-2. L200A Dimensional Views Table 1-2. Applicator Dimensions Figure 1-3. Rear View of Motor/Rewind Assembly Figure 1-4. L200A Encoder Kit (Optional) 6 8 9 9 10 10 Safety Precautions Safety Precautions Specific Warnings and Cautions 11 11 Installation & Start-Up Unpacking and Inspection Applicator Positioning Applicator Setup Label Threading Interface Panel Power Supply Converting to 230VAC/50Hz Power Rewind Clutch Adjustment Setup Instructions for the Label Sensor Labeling System Setup Figures: Figure 3-1. Correct/Incorrect Positioning of Labeling Applicator Figure 3-2. Peeler Tip Rotational Adjustment Figure 3-3. T-Stand and U-Arm Adjustments Figure 3-4. Warnings for T-Stand Table 3-1. Label and Web Specifications Chart Figure 3-5. Label Threading Figure 3-6. Disengage Nip Roller Figure 3-7. Web Holding Pin on Rewind Wheel Figure 3-8. Electrical Connection and Interface Connections Figure 3-9. Rewind Clutch Assembly Adjustment Figure 3-10. Label - Eye Label Sensor (Located on Wiper Arm) 13 13 16 17 19 20 20 20 22 23 2 3 4 7 8 13 14 15 15 16 17 18 18 19 21 22 Table of Contents 4 Chapter Name Page Operator Interface Operator Interface Map Operating Mode Operating Screen Password Screen Parameter Display Screen Parameter Menu - Wipe Parameter Menu - Tamp Parameter Menu - Blow Parameter Menu - Tamp/Blow Parameter Menu - Jog Parameter Menu - Setup Parameter Menu - Program Number Parameter Menu - Broken Web Jog Menu Label-Teach Menu Encoder-Teach Menu Operational Modes: Wipe-On Mode Operational Modes: Tamp-On, Blow-On, Tamp-Blow Diagnostics Language Reset Warning Figures: Figure 4-1. Operator Screen Figure 4-2. Mapping of Operator Interface Figure 4-3. Operating Screen 25 25 28 29 29 30 33 35 37 37 38 41 42 42 42 44 44 46 46 47 48 Maintenance & Preventive Maintenance TroubleshootingTroubleshooting Figures: Figure 5-1. Stepper Drive Motor Fault Display 49 49 Replacement Parts Replacement Parts L200A Label Applicator Mechanical Spares L200A Label Applicator Electrical Spares Figures: Figure 6-1. Sample Serial Plate (2013) 51 53 54 5 6 7 WarrantyWarranty 25 26 28 49 51 55 L200A Label Applicator Manual DANCER ARM UNWIND ASSEMBLY FOR LABEL STOCK OPERATOR PANEL/CONTROLS REWIND WHEEL LABEL STOCK WIPE-ON ARM NIP ROLLER LABEL SENSOR DRIVE ROLLER IDLER ROLLERS PEELER PLATE Figure 1-1. Front View of L200A Right Hand Applicator 6 Description & Specifications 1 The L200A Label Applicator Function The L200A Label Applicator (see Figure 1-1 on Page 6) can be integrated into an inline product handling system, be used as a stand-alone unit, or dispense single labels as needed. This applicator is designed to dispense blank or pre-printed labels. The standard L200A will dispense labels up to 5 1/2" wide. Design features of the label applicator include: Ü Membrane or push button control Ü Label to product speed matching Ü Up to 12" diameter label rolls Ü Powered label drive and torque clutch adjustable rewind Ü Rapid configuration and changeover of applicator modules Ü One button auto-teach for fast, easy, repeatable changeover Ü Access to main components for maintenance and changeover Ü Convertible from left-hand to right-hand The label applicator is offered as a stand-alone unit or as a module which can be integrated into a product handling system. In either case, the applicator includes a controller, operator LCD interface and product detector. Refer to page 8 for applicator upgrades and options that will expand the capabilities of the L200A Label Applicator. 7 L200A Label Applicator Manual Specifications of the L200A Standard Features The L200A comes standard with on-board diagnostics, product recipe capabilities, "On-The-Fly" label adjustments, streamlined footprint, and no tool-required label changeover. Optional Features Assorted modules, such as Tamp-On, Blow-On, Tamp-Blow and Wipe-On, are available, as well as a swing arm pallet, wipe-on brush accessory kits, harsh environment setup, line encoder kit, label low level sensor and beacon fault upgrades, and adjustable stands and machine mount supports. Specifications Please refer to the tables below for L200A specifications: Specification Description Labeling Rate (PPM) 150ppm to 300ppm (Dependent upon label and application) Label Head Speed 1,000"/min (423mm/sec) Accuracy ± 0.02" (±0.5mm) Controls Programmable Logic Controller Label Drive Motor High Torque Micro Stepper Unwind Roll Diameter 12" (305mm) OD x 3" (76mm) ID Label Detection Photo Electric Power Requirements 115/230 VAC, 50/60 Hz, 8 Amp Environment 41-104˚ F (5-40˚ C), 25-85% Relative Humidity Table 1-1. Applicator Specifications 8 Chapter 1 Feeder Description and Specifications Figure 1-2. L200A Dimensional Views Dimension Specifications A Applicator Width ANSI 28.35" Metric 721mm B Overall Width (Including Stand) 45.50" 1155mm C Applicator Height 24.90" 632mm D Applicator Depth 21.63" 549mm E Stand Height 67.77" 1721mm Table 1-2. L200A Applicator Dimensions 9 L200A Label Applicator Manual OPERATOR PANEL/CONTROLS REWIND WHEEL DRIVE MOTOR REWIND HUB Figure 1-3. Rear View of Motor and Rewind Assembly (Right Hand Style) ENCODER WHEEL Figure 1-4. L200A Encoder Kit (Optional) 10 Safety Precautions 2 Safety Precautions This labeler has been designed to be as safe as possible for operators. However, even well-built machines can be installed or operated in a hazardous manner. Safety precautions must be observed by users. Specific Warnings & Cautions Turn Power Off! Before servicing the labeler, make sure you have turned off compressed air and electrical power in a way that prevents accidental reactivation. Padlock, and clearly tag, the appropriate electrical and pneumatic disconnects. After disconnecting the electrical power, wait at least two minutes for the motor capacitor to discharge. Dress Properly and Wear Safety Glasses! To reduce the risk of injury from moving parts, secure loose clothing. Do not wear jewelry or neckties near the machine. Wear safety glasses or other protective eye wear at all times. Avoid Pinch Points! Exposed pinch points include the unwind and rewind assemblies, nip and drive rollers and shafts, dancer arm, idler rollers, pull pins, the wipe-on arm and the different modules. Avoid Dangerous Conditions! The standard labeler should not be placed in washdown environments nor is it designed to be used in explosive conditions. The L200A Applicator will be damaged when sprayed by a fire suppressant sprinkler system. Dry conditions are critical for long life duration of the machine. Potentially explosive environments, such as areas where flammable gas and vapors are present, should be avoided due to static electricity caused by normal operations. 11 Operations Manual Notes 12 Installation & Start-Up 3 This chapter covers unpacking, inspection, positioning and power and air hookups for the label applicator. Unpacking Step 1. and Inspection Check the Shipping Container. The shipping container protects the applicator under most circumstances. Visually inspect the outside of the container and report any damage to the Shipping Carrier immediately. The applicator can weigh in excess of 100 pounds (68kg.). Step 2. Unpack the Applicator. Remove the top and sides of the shipping crate to expose the applicator. Remove the packing material. Inventory the container. Applicator Positioning The standard applicator has mounting holes that are located on the back plate of the applicator. The optional U-arm supports the applicator at those mounting locations. CORRECT POSITIONING INCORRECT POSITIONING TWO SURFACES SHOULD BE PARALLEL PRODUCT A smooth labeling operation requires correct positioning. Keep the applicator parallel to the product surface (refer to Figure 3-1). PRODUCT Figure 3-1. Correct and Incorrect Positioning of Label Applicator 13 L200A Label Applicator Manual The rotational adjustment of the wiper arm places the flagged label as close to the product as possible. Adjust the wiper arm to an angle of 13 degrees relative to the product. Then rotate the peeler tip as needed. Refer to Figure 3-2. The peeler plate is located just above the product. ADJUSTABLE PEELER PLATE 13˚ ADJUSTABLE WIPER ARM PRODUCT PRODUCT Figure 3-2. Peeler Tip Rotational Adjustment Note: Any adjustments of the label placement to the product must result in a smooth, non-vibrating process. The wiper arm and peeler plate do not "float." Damage to the applicator, peeler plate and the product may occur when the product hits them. Position the applicator to prevent or minimize vibration and movement during operation. Vibration to the applicator during operation directly affects label placement accuracy. Make adjustments after mounting the applicator to the U-arm. 14 To position the peeler tip closer or further away from the product, rotate the applicator or the peeler plate, or both. To rotate the applicator, loosen the large hex nut that fastens the U-arm to the T-stand. Retighten the nut to secure the applicator's position. The amount of rotation is limited (see Figure 3-3). Chapter 3 Installation & Start-Up HANDLE FOR VERTICAL MOVEMENT U-ARM U-ARM (MOUNTING BRACKET) CASTERS Figure 3-3. T-Stand and U-Arm Adjustments To position the applicator for top, side, or bottom panel labeling; loosen the two socket head cap screws on the U-arm. Rotate the applicator into a position until the peeler plate or application module is parallel to the surface of the product. Retighten the U-arm mounting screws. Use the handle at the top of the T-stand to raise or lower the applicator to the desired height relative to the product. INCORRECT! LABEL HEAD L HE ABEL AD L BE LA EAD H To change the horizontal position, unlock the casters on the bottom of the T-stand and roll the applicator to the desired location. Re-lock the casters. *Note: A horizontal adjuster is optional. CORRECT! To avoid tipping and instability, keep label head center of gravity above front leg as shown in Figure 3-4. LABEL HEAD LABEL HEAD Always adjust labeling head to lowest position before moving. Figure 3-4. Warnings for T-Stand 15 L200A Label Applicator Manual Applicator Setup Label Specifications Only use labels that can be removed from the webbing. See the table below (Table 3-1) for label and web specifications additional requirements. Before installing a label roll, read Table 3-1, Label & Web Specifications to insure the selection of proper label stock. Label and Web Specifications LABEL STYLE ACCURACY ROLL PUT-UP SPLICES LABEL TOLERANCE LABEL NOTE: Stripped out form only. Minimum spacing of 0.125" (3mm). Remove all die cut waste (skeleton). Label backing must have a release agent such as silicon. Label must free peel when pulled around a standard peeler plate with a minimum label gap of 0.125" (3mm). (A) Linear position of label relative to web or backing must be centered. (B) Die cutting and edge slitting must be controlled to avoid cutting or nicking of the web backing. Failure to regulate this may result in web failure and label dispensing problems. (C) Web must be a minimum of 0.25" (6mm) wider than label to be dispensed. Maximum OD of roll is 12" (305mm) with a core ID of 3" (76mm). Label orientation is based on equipment and product orientation. Wind labels to the outside of the roll. Splices should be avoided as much as possible. When splices are needed, please use "angle-style," flush to the edge on both sides of backing, using 1" (25mm) cellophane splice tape. Replace the label in the spliced area. The label tolerance of ± 0.032" (0.81mm) can be maintained provided that: (A) Labels are manufactured to the right label specification with no die cuts into the webbing; and (B) Lateral position of labels is within 0.0025" (0.06mm) on the x and y axis. Capacitance sensors will be damaged by metal or foil labels. Table 3-1. Label and Web Specifications Chart 16 Chapter 3 Installation & Start-Up Label Threading Refer to numbered sequences in Figure 3-5 to thread labels through the labeler (shown: Right-Hand labeler). Step 1. Remove the outside lexan cover on the unwind shaft by pulling the two outside tabs forward. Place the label stock spool onto the unwind shaft. Secure the outside lexan cover by pressing the lexan cover against the label stock and pushing the tabs back so they are parallel with the lexan cover. For the right-hand applicator, the labels run over the top and down the right hand side [1]. For left-hand, the labels run over the top and down the left side [1]. Step 2. The webbing is routed under the first idler bar [2] and up to the dancer arm [3]. 1 2 3 4 5 6 7 8 9 10 Unwind Spool Idler Bar 1 Dancer Arm 3 Idler Bar (On Wiper Arm) Label Sensor Peeler Plate Idler Bar (On Wiper Arm) Drive Roller 9 10 8 2 4 7 Nip Roller Rewind Hub 5 6 Figure 3-5. Label Threading 17 L200A Label Applicator Manual Step 3. The webbing goes over and around the dancer arm [3]. Step 4. The webbing is routed to the wiper arm, under the first idler bar [4], through the middle of the label sensor [5], and under the 2nd idler bar. Step 5. The webbing is routed around the peeler plate [6], then back under the two idler bars on the wiper arm [7]. Step 6. Pull the nip roller knob (see Figure 3-6) out, disengaging the nip roller assembly. Then route the webbing under and then over the knurled drive roller [8]. Engage the nip roller [9], and route the webbing over the top of the roller (forming a reverse "S" shape). PULL KNOB OUT Step 7. TO RELEASE Remove the pull pin (see Figure 3-7) and wrap the webbing under, around the back and over the top of the Rewind Shaft [10]. Replace the pull pin so that the label stock is NIP ROLLER/ DRIVE SHAFT captured. ON HINGE SHIFTS TO ALLOW FOR WEB THREADING Figure 3-6. Disengage Nip Roller ROUNDED NOTCHES ON HUB LONGER END HOLDS LABEL WEB "WASTE" IN PLACE ON WHEEL Figure 3-7. Web Holding Pin on Rewind Wheel 18 WEB WASTE Chapter 3 Installation & Start-Up Interface Panel Connections for the interface panel are found on the side of the labeler electrical box (see Figure 3-8). These connections are easily accessible for quick changeover between modes of operation. The following is an explanation of each device: POWER CORD HMI CONNECTION Cord supplies AC power to the labeler. Plug in which the operator panel is connected. Plug in which an optional encoder is connected. The encoder is used for synchronous mode labeling, which can apply the label ENCODER CONNECTION at the speed the product is traveling. It is recommended to use an incremental encoder with at least 1024 increments. PRODUCT SENSOR Plug in which the product sensor is connected. Plug in which the label sensor is connected. The label sensor is LABEL SENSOR found on the wiper arm assembly. MOTOR CONNECTION Connects to the stepper motor. ENCODER CONNECTION HMI CONNECTION MOTOR POWER CORD LABEL SENSOR CONNECTION PRODUCT SENSOR AC POWER CORD Figure 3-8. Electrical Connections and Interface Connections 19 L200A Label Applicator Manual Power Supply Verify Main Power Providing the unit with the correct supply voltage permits safe and efficient operation. Refer to Table 1-1 for exact specifications. The labeler is supplied with a power cord for AC operation. Plug the power cord into an outlet with the proper voltage (115 VAC) and ground (if 230VAC is required, refer to the section, "Converting to 230VAC, 50Hz Power, below). Make sure the power cord is securely connected to the labeler and the outlet. Due to the wide variety of plugs used worldwide, the power cord that is shipped with the labeler has a standard U.S. plug. If you need a power cord with a different type of plug, purchase a power cord approved by local government or identified with an HAR (Harmonized Standard) label. 115 VAC and 230 VAC are the two voltages accommodated for in the labeler. Improper voltage may cause harm and/or damage to the operator and/or the labeler. Converting to 230VAC, 50Hz Power Step 1. Remove power from the labeler. Step 2. Remove jumper wire from terminals VS1EVS2 of the Stepper Drive. Rewind Clutch Adjustment The rewind clutch is located behind the large cap on the end of the rewind wheel (see Figure 3-9 on the following page). The clutch can be adjusted by turning the knurled end ring. To increase take-up rate, turn the clutch on the rewind shaft clockwise to apply more pressure on the friction washer (less slip). To decrease the take-up rate, turn the clutch on the rewind shaft counterclockwise to reduce the pressure on the friction washer (more slip). 20 Chapter 3 Installation & Start-Up As the rewind shaft fills, the rewinding speed will slow. This is due to the increased diameter of web waste on the rewind shaft. To compensate for the slowdown, adjust the rewind speed as if the rewind shaft was full. RETAINING RING REWIND SHAFT REWIND BEARING REWIND HUB SPACER BALL BEARING (5/8" BORE) DOWEL PINS* PULL PIN HOLE PLUG (CAP) REWIND CLUTCH RETAINING RING BACKING DISC *Dowel pins are permanently pressed in hub Figure 3-9. Rewind Assembly 21 L200A Label Applicator Manual Set-Up Instructions for the Label Sensor Normal Backing The L200A uses the Label • Eye sensor, designed specifically for the detection of labels. The sensor, affixed to the wiper arm of the TM label applicator, has an Autoset program for easy setup. TM To start Autoset , use the external alignment guides to position the gap between labels in line with the dot in the detection zone TM (see Figure 3-10). Once the label is in place, push the Autoset button marked "NORMAL." If the red and green LED indicators blink four times, the sensor cannot penetrate the backing materials or the presence of labels. DETECTION ZONE OUTPUT LED AUTOSET LED AUTOSET – NORMAL BUTTON EXTERNAL ALIGNMENT GUIDES AUTOSET – TRANSLUCENT BUTTON Figure 3-10. Label-Eye Label Sensor (Located on Wiper Arm) Translucent Backing 22 The sensor cannot always detect transparent labels on transparent backing. However, in some cases it may detect the label. Use the TM Autoset procedure above, placing the gap between the label between the external alignment guides, so that it is in line with the dot in the detection zone (see Figure 3-10). Once the label is TM in place, push the Autoset button marked "TRANSLUCENT." If it is detectable, the red LED indicator should go on when the label passes through the detection zone. Chapter 3 Installation & Start-Up Labeling System Setup The labeling system is setup for dispensing the maximum number of labels at the maximum applicator speed. There are different ways to set up a labeling system. A setup for maximum performance is described below: Step 1. Select Spool Size. Use the largest spool with the largest label size intended to be dispensed. Step 2. Move Label to Dispense Position. Move the label with the JOG Step 3. Place Label Sensor. Place label sensor to the middle of a label. Step 4. Run Auto-Teach Function. If system stalls, reduce the ACCEL/ DECEL until the stalling stops. Step 5. function (see Chapter 4, Operation Procedures) to the dispense position (label flag). Using the JOG feature, press and hold the ENTER button to forward labels. Default setting for ACCEL/DECEL is 200 Hz/ms. The system is now set up for maximum performance. Set Asynchronous Speed. If you know the maximum labeling speed already, set it as the ASYNCHRONOUS SPEED in the parameters then dispense labels in asynchronous mode. If you don't know the maximum labeling speed or should the system stall, increase the labeling speed step-by-step starting from 250 mm/sec (e.g. 250, 400, 508) and find out at which point the stepping motor stalls. If the motor stalls, reduce the maximum speed back to a safe rating. Step 6. Increase Acceleration/Deceleration Ramp. Continue dispensing labels. Now increase the ACCEL/DECEL, step-by-step, starting from the default 200 Hz/ms. If the motor stalls, reduce the maximum acceleration /deceleration ramp back to a safe rating. Note: Please consider that a high acceleration rate may stress the web and create a loose condition. 23 L200A Label Applicator Manual 24 Step 7. Note: Setup Complete. As a result of the actions 1 to 6, the system is now set up for maximum performance (most likely required on labeling machines). Reference all bold capped terms in Operator Interface Chapter. Operator Interface 4 Operator Interface Map The following information explains the different parameters found within the Operator Panel. These parameters are extremely important in obtaining a reliable labeling operation. The operator should take time to sample various settings and observe how they affect the performance of the labeler. The more the operator understands the following information, the easier the transition from application to application will become. On the following page you will find a brief illustration of the program layout. Figure 4-1. Operator Screen Operating Mode The two wipe-on operating modes available are synchronous and asynchronous. The operator may change between modes by simply choosing the appropriate setting within the operating display. When synchronous mode is chosen, the labeler will dispense labels at the speed determined by the encoder pulses sent to the controller. This mode is used for high speed, precise labeling or varying conveyor speed applications. When asynchronous mode is chosen, the labeler will dispense labels at a constant speed determined by the Values entered into the operator panel. The settings the operator enters into the operator panel will affect the labeler differently depending on the mode the operator has chosen. 25 L200A Label Applicator Manual Password Stop Distance Start Compensation Parameter 2.1 Parameter - WIPE Stop Compensation Asynchronous Speed Acceleration/Deceleration Ratio Adjust Imprinter Asynchronous Start Delay 2.2 Parameter - TAMP Tamp Delay Tamp Dwell Vac. Off Delay Vac. Off Dwell Assist Delay Assist Dwell 2.3 Parameter - BLOW Blow Delay Blow Dwell Assist Delay Assist Dwell 2.4 Parameter - TBLOW Tamp Delay Tamp Dwell Vac. Off Delay Vac. Off Dwell Assist Delay Assist Dwell TMP/BLW Delay TMP/BLW Dwell Low-Speed 2.5 Parameter - JOG Continued on Next Page Continued on Next Page Figure 4-2. Mapping of the Operator Interface 26 High-Speed Acc/Dec Ramp Chapter 4 Operator Interface Continued from Previous Page Gear Numerator Gear Denominator Parameter 2.6 Parameter - SETUP Label Pitch 2.7 Parameter - PROGRAM NUMBER Product Sense Edge 2.8 Parameter - BROKEN WEB Label Sensor Edge Motor Direction Jog Single Step Low Speed Max Miss Label Label Time Out High Speed Label Dispense Label-Teach Label Pitch Stop Distance Jog Encoder Teach Wipe-On Teach Asynchronous Speed - Increase/Decrease Delay - Increase/Decrease Tamp-On Synchronous Delay Speed - Increase/Decrease Phase Delay - % Change Blow-On Tamp-Blow 10.1 Speed/Inputs Diagnostic 10.2 Inputs 10.3 Battery Level Language Katakana English Reset Warning Low Label Low Battery Figure 4-2. Mapping of the Operator Interface (Continued) 27 L200A Label Applicator Manual ACCESS HIGHLIGHTED/ FLASHING SCREEN BACK BUTTON 1.0Password 2.0 Parameter 3.0 Jog 4.0 Label-Teach ESCAPE (EXIT SCREEN) ENTER BUTTON ESC MOD ENTER DEL TOGGLE DOWN TOGGLE UP MODIFY BUTTON Figure 4-3. Operator Screen Operating Screen When the labeler has been loaded and the power supplied to the equipment, the Operator Interface will boot up to the main operating screen. A list of different screens will show, screen 1 (Password) through 11 (Language). Refer to Figure 4-3. Use the "up"[ ]and "down" [ ] arrows to go through the screens (as you move down, each line will flash as you toggle over it). The various operating screens are shown below: Screen 1.0 Password Screen 2.0 Parameter (Parameter screen is password protected and cannot be randomly accessed). Screen 3.0 Jog Screen 4.0 Label-Teach Screen 5.0 Encoder Teach Screen 6.0Wipe-On Screen 7.0Tamp-On Screen 8.0Blow-On Screen 9.0Tamp-Blow Screen 10.0 Diagnostic Screen 11.0 Language Screen 12.0 Reset Warning 28 Chapter 4 Operator Interface Password Screen PASSWORD **** : CURRENT LEVEL RESET To enter the Parameter screens the operator must first enter the password. Use the toggle arrows to move up and down the screen list until the password screen (1.0) is flashing. Use the right "arrow" [ ] to enter the password screen. To enter the current password, press the MOD button [ MOD ]. Use this button whenever a modification to a Value needs to be made during operation. The " * * * *" (password Value) will be highlighted and flashing. Use the right and left arrows to move the cursor over the four asterisks. When just one asterisk is flashing, use the up and down arrows to input the password Value, then use the right or left arrow to move the cursor to the next Value. Once the password is correct, press enter [ ENTER ], and then to leave this screen, use the ESC button [ ESC ]. The operator can now access the parameter screens. Ü Default password: 0000 Parameter Display Screen The Parameter Group Screens allows the operator to select the pppp 1.0Password group (parameter) to display or edit. Use the up and down arrows 2.0Parameter (qp) to choose the parameter. The choices are as follows: 3.0Jog Ü 2.1 Parameter - Wipe 4.0Label-Teach 2.1 Parameter - Wipe 2.2 Parameter-Tamp 2.3Parameter-Blow 2.4Parameter-TBlow ESC DEL pppp Ü 2.2 Parameter - Tamp Ü 2.3 Parameter - Blow Ü 2.4 Parameter - TBlow Ü 2.5 Parameter - Jog Ü 2.6 Parameter - Setup Ü 2.7 Program Number Ü 2.8 Broken Web MOD ENTER 29 L200A Label Applicator Manual Parameter Menu - Wipe Asyn. Speed 0 pppp STOP DISTANCE The Stop Distance parameter defines the position of the label Stop Distance 0 sensor relative to the label. It references the position from which Start Comp. 0 each dispensing cycle is started. Stop Comp. 0 pppp The “Label-Teach” function acquires this Value automatically based on the label flag requirement. Refer to Label-Teach operation further in this chapter. Accel/Decel0 Ratio Adjust 0 Min Value: 0 (steps); Max Value: 65535 (steps) Ü Imprinter0 Ü Default setting: 0 Asy Strt Delay 0 Ü Setting is retained when power is turned off. START COMPENSATION The Start Compensation is a linear interpolation of the product delay between low speed and high speed in Synchronous mode. min 0 Line SP As the product speed increases while in Synchronous mode, 0 0 max 0 Delay the label will tend to drift back on the product. This can be 0 0 overcome by determining a compensation Value between low speed and high speed. By executing the below procedure, a linear interpolation is calculated, and will assist in maintaining the correct label position when adjusting the product/conveyor speed from low to high. How to Setup the Start Compensation: Step 1: Enter into Start Comp. within the Parameter Screen or within the Delay screen in Synchronous (std) screens. 30 Step 2: Run the product/conveyor at the lowest production speed required and begin to adjust the "Delay" until the label is in the correct position. To dispense a label, press the "Enter" button. To adjust the "Delay", press "Mod" button until the "Delay" value is flashing. Adjust the up and down arrows to change the value, then press "ESC" to exit the delay adjust. Press "Enter" to see label location change and continue this delay adjustment until the label is in the correct position at this speed. Chapter 4 Operator Interface Step 3: Once the “Delay” Value is correct at the lowest production speed, press “Enter”. To enter this established Value into memory, press “Mod” until the “Min” Value is flashing and then hit “Enter”. You will see the Value reside in the “Min” parameter. Step 4: Run the product/conveyor at the highest production speed required and begin to adjust the “Delay” until the label is in the correct position. To dispense a label, press the "Enter" button. To adjust the "Delay" press "Mod" button until the "Delay" value is flashing. Adjust the up and down arrows to change the value, and press "ESC" to exit the delay adjust. Press "Enter" to see label location change and continue this delay adjustment until the label is in the correct position at this speed. Step 5: Once the “Delay” Value is correct at the highest production speed, press “Enter”. To enter this established Value into memory, press “Mod” until the “Max” Value is flashing and then hit “Enter”. You will see the Value reside in the “Max” parameter. At this point you have completed the Start Compensation for Synchronous Mode. Please note this procedure is not necessary for Asynchronous Mode. STOP COMPENSATION The Stop Compensation Value is set by the factory and should not be adjusted. Stop Comp. 0 ASYNCHRONOUS SPEED Asynchronous speed is the speed at which the label dispenses Asyn. Speed 0 from the peeler tip. This speed is typically set to the product line speed. (Information continued on next page) 31 L200A Label Applicator Manual (*Factory Setting based on gearing) ASYNCHRONOUS SPEED CALCULATION: Product/Conveyor Speed: Resolution of Applicator: 100ft/min 0.06mm/step* CALCULATION: ( ) ( )( 100ft min 12in 1 ft Conveyor/ Product Speed )( ) ( 25.4mm 1in 1min 60sec Unit Conversion ) Step 0.06mm Applicator Resolution = 8466 step/sec (or 8466 Hz) Ü Min Value: 100 (Hz) Max Value: 20000 (Hz) Ü Default Value: 7000 Note: Screen input is only relevant in the ASYNCHRONOUS mode. It cannot exceed the maximum speed of the labeler. The asynchronous speed Value (Hz) is dependent on the motor resolution setting and gear factor. Please see example of calculating asynchronous speed at left. ACCEL./DECEL This defines the acceleration and deceleration ramp for the synchronous and asynchronous dispensing operation mode. ACC (Hz/ms) 0 A ramp that is set too high can cause the stepping motor to stall and a loss of position will occur. Ü Min Value: 1 (Hz/ms); Max Value: 1000 (Hz/ms) Ü Default Value: 320 Ratio adjust The Ratio Adjust is used to override the gear factor set by the gear numerator and gear denominator (thereby overriding the encoder Ratio 0 pulses). This parameter is only used in the synchronous dispensing mode and represents a percentage of the theoretical speed. Ü Min Value: 50 (%); Max Value: 150 (%) Ü Default Value: 110 To slow the label dispense speed enter a Value less than 100. To increase the label dispense speed, enter a Value greater than 100. 32 Chapter 4 Operator Interface IMPRINTER The Imprinter timer is started in Wipe-On mode when the label Imprint Delay 0 cycle is completed. It can be used to trigger peripheral equipment Imprint Dwell (counters, etc.). Imprint Delay is a time in milliseconds (ms) that the signal is delayed in being sent to the device. Imprint Dwell is the length of time in milliseconds (ms) of the signal duration that is sent to the device. Ü Min Value: 0 (ms); Max Value: 65535 (ms) Ü Default Value: 10 Asynchronous start delay The start delay parameter is used to adjust the position of the label on the product. Once the product sensor detects the product, the Asy. Strt. Delay 0 Asynchronous start delay (in ms) is the amount of time until the label dispenses. Ü Min Value: 1 (ms); Max Value: 2000 (ms) Ü Default Value: 250 Parameter Menu - Tamp TAMP DELAY Sets delay between sensing of product and activation of tamp Tamp Delay 0 assembly. Larger number to position label closer to trailing edge of product. Smaller number to position label closer to leading edge of product. Ü Min Value: 0 (ms); Max Value: 65535 (ms) Ü Default Value: 1000 33 L200A Label Applicator Manual TAMP DWELL Sets dwell time for the tamp assembly. Tamp Dwell 0 Larger number to extend the time the tamp is extended. Smaller number to reduce the time the tamp is extended. Ü Min Value: 0 (ms); Max Value: 65535 (ms) Ü Default Value: 500 VACUUM DELAY The Vacuum Delay sets the amount of time the vacuum stays off while the label is fed onto the pad. Setting is initiated when the Vac. Off Delay 0 tamp home sensors goes "high" (tamp is retracted). Larger number to keep the vacuum off for a longer period of time. Smaller number to turn the vacuum on sooner. Ü If the leading edge of the label does not arrive all the way to the far edge of the vacuum pad, it is recommended to increase the setting. Ü Min Value: 0 (ms); Max Value: 65535 (ms) Ü Default Value: 1000 VACUUM DWELL Sets how long the vacuum stays on as the tamp is applying a label to the product. Setting is initiated when the tamp home sensor Vac. Off Dwell 0 goes "low" (tamp begins to extend). A larger number keeps the vacuum on longer during the tamp cycle. A lower number turns the vacuum off sooner during the tamp cycle. Ü If the label is retracting with the vacuum pad instead of being applied to the product, lower this value to ensure vacuum is not still on during label application. Ü Min Value: 0 (ms); Max Value: 65535 (ms) Ü Default Value: 500 34 Chapter 4 Operator Interface AIR (ASSIST) DELAY Used to smooth the transition of the label from the peeler tip to the tamp pad. See also Vacuum Delay screen. Air Delay 0 Larger number to turn the air assist valve on later. Smaller number to turn the air assist valve on earlier. Ü Delays activation of the air assist valve. Delay starts when the tamp assembly is fully retracted (tamp home position). Ü Min Value: 0 (ms); Max Value: 65535 (ms) Ü Default Value: 1000 AIR (ASSIST) DWELL Used to help push the label further onto the tamp pad. Air Dwell 0 Larger number to keep the air assist valve activated for more time. Smaller number to keep the air assist valve activated for less time. Ü Sets how long air assist valve stays activated to blow the label up onto the tamp pad. Ü Min Value: 0 (ms); Max Value: 65535 (ms) Ü Default Value: 500 Parameter Menu - Blow BLOW DELAY Sets delay between sensing of product and activation of blow assembly. Blow Delay 0 Larger number to position label closer to trailing edge of product. Smaller number to position label closer to leading edge of product. Ü Min Value: 0 (ms); Max Value: 65535 (ms) Ü Default Value: 1300 35 L200A Label Applicator Manual BLOW DWELL Sets dwell time for the blow assembly. Blow Dwell 0 Larger number to extend the time the blow assembly is activated. Smaller number to reduce the time the blow assembly is activated. Ü When a blow assembly is installed, Vacuum Dwell affects how firmly the label is affixed to the product. Ü Min Value: 0 (ms); Max Value: 65535 (ms) Ü Default Value: 500 AIR (ASSIST) DELAY Used to smooth the transition of the label from the peeler tip to the blow assembly. Air Delay 0 Larger number to turn the air assist valve on later. Smaller number to turn the air assist valve on earlier. Ü Delays activation of the air assist valve. Ü Min Value: 0 (ms); Max Value: 65535 (ms). Default Value: 500 AIR (ASSIST) DWELL Used to help push the label further onto the blow assembly. Air Dwell 0 Larger number to keep the air assist valve activated for more time. Smaller number to keep the air assist valve activated for less time. Ü Sets how long air assist valve stays activated to blow the label up onto the blow assembly. Ü Min Value: 0 (ms); Max Value: 65535 (ms). Default Value: 1000 36 Chapter 4 Operator Interface Parameter Menu - Tamp-Blow* TMP/BLW (Tamp-blow) DELAY Sets delay before the blow is activated. TMP/BLW Delay 0 Larger number to position label closer to trailing edge of product. Smaller number to position label closer to leading edge of product. Ü Min Value: 0 (ms); Max Value: 65535 (ms). Default Value: 1300 TMP/BLW Dwell 0 TMP/BLW (Tamp-blow) DWELL Sets dwell time (how long the blow is activated) for the tamp-blow assembly. Ü Min Value: 0 (ms); Max Value: 65535 (ms) Ü Default Value: 500 Parameter Menu - Jog LOW SPEED Sets the low speed in the jog mode. It also defines the speed in LABEL TEACH mode. Low Speed 0 Ü Min Value: 1 (Hz); Max Value: 20000 (Hz) Ü Default Value: 500 HIGH SPEED Sets the high speed in the jog mode. High Speed 0 Ü Min Value: 1 (Hz); Max Value: 20000 (Hz) Ü Default Value: 5000 *Other parameter settings, such as Tamp-Delay, Vacuum Off Delay, etc., are covered in the above parameter menus (Parameter-Tamp, Parameter-Blow, etc.). Refer to those sections for more information 37 L200A Label Applicator Manual ACCEL./DECEL This defines the acceleration and deceleration ramp for the jog speed mode. ACC (Hz/ms) 0 A ramp that is set too high can cause the stepping motor to stall and a loss of position will occur. Ü Min Value: 1 (Hz/ms); Max Value: 1000 (Hz/ms) Ü Default Value: 250 Parameter Menu - Setup GEAR NUMERATOR This is the factory default Value established from the size of the drive roller and gearing of the labeler. Gear Num. 0 Ü Min Value: 0; Max Value: 65535 Ü Default Value: 1607 The value shouldn't changed unless authorized by the manufacturer. GEAR DENOMINATOR This factor defines the rate of “incoming” encoder increments to the stepper drive. It is used to speed match the label dispense Gear Den. 0 speed to the product speed. Using the encoder teach, this Value can automatically be obtained. When using a non-manufacturer supplied encoder, refer to the section in this chapter for the ENCODER TEACH instructions. To manually calculate required Value for a certain encoder connection, see examples on the following page. 38 Chapter 4 Operator Interface RATIOS: 720/100 = 7.2 : 1 ratio 80/20 = 4:1 ratio Conveyor/Turret DP100 Therefore, 20 RPM Turret = 576 RPM Encoder Shaft Calculation: 720mm dia. = (720mm) * ( ) = 2262mm Circumference DP20 DP720 ( )( 2262mm Rev Rev 5000 Inc DP80 Total Ratio = 28.8 : 1 Encoder (5000 pulses/REV) )( ) 1 28.8 p = 0.0157 mm/inc. Resolution of Encoder Required Increments for 100mm: 127mm Dia. CONVEYOR Encoder = 6369 ( )( 398.98mm REV REV 1024pulses p ) = 398.98mm Circumference ) = 0.0389mm/inc. Required Increments for 100mm: CONVEYOR 100 0.0157 Calculation: (127mm diameter) * ( ENCODER: 1024 Pulses/Rev. ( ) ( ) 100 0.0389 = 2570 LABEL PITCH The label pitch is the sum of the label length and the gap between the label and the next label. If known, the pitch can be manually Label Pitch 0 entered as a parameter. This is calculated automatically using the LABEL-TEACH programming which will determine the exact pitch length and will automatically enter the information into the operator system. Ü Min Value: 1 (steps); Max Value: 65535 (steps) Ü Default Value: 5300 39 L200A Label Applicator Manual PRODUCT SENSOR EDGE Toggles between Lead and Trail detection on the product sensor. Press "MOD" then use "ENTER" to switch to "Light On" for Light On Product ON leading, or "Dark On" for trailing. Sensor Edge OFF Dark On (Light On) – Lead (Default) (Dark On) – Trail Lead – Initiates timing on the leading edge of the product. Trail – Initiates timing on the trailing edge of the product. Note: Settings valid if product sensor is set to light operated mode. Ü Default Value: Leading Edge LABEL SENSOR EDGE Toggles between Lead and Trail detection on the label sensor. Press "MOD" then use "ENTER" to switch to "Light On" for leading, or Light On Label ON "Dark On" for trailing. Sensor Edge Dark On (Light On) – Lead (Default) (Dark On) – Trail Trail – Detects trailing edge of the label. Lead – Detects leading edge of the label. OFF Ü Default Value: Leading Edge MOTOR DIRECTION Allows the motor rotation to switch from clockwise (forward) to counterclockwise (reverse). Press "MOD" then use "ENTER" to Motor FWD switch to between FWD and RVS. Direction RVS (FWD) – CW Rotation (positive) [Looking on top of motor shaft] (RVS) – CCW Rotation (negative) [Looking on top of motor shaft] Ü Default Value: CW (Forward) 40 Chapter 4 Operator Interface MAX. MISSING LABELS Defines how many consecutive missing labels (on the web, or media) that can occur before the controller will show a label error Max Miss Labels 0 situation. Time Out 0 Ü Min Value: 0 (select); Max Value: 65535 (select) Ü Default Value: 0 Label Timeout This parameter is used to ensure the controller does not fault out when dispensing long labels. If the label sensor does not see an Max Miss Labels 0 edge of a label in a certain period of time, the controller will fault on the assumption of max missing labels. If a long label is being Time Out 0 dispensed, the time can be increased using this parameter, which allows the label sensor additional time to detect the label edge. If after this time the label sensor still does not detect the edge, the controller will fault with the max missing label message. Parameter Menu - Program Number PROGRAM NUMBER The HMI controller can store up to 10 different labeling programs. The program selection is from 0 to 9. You select the program Program Number 0 number you want, then set up your parameters for that particular program. The parameters will be saved even if the unit loses power or is shut down. The only way the programs can be erased is if the software program resets it. 41 L200A Label Applicator Manual Parameter Menu - Broken Web Broken web sensor The broken web sensor (optional) can be turned on or off. The sensor will detect if the web is broken at any point and the labeler Broken Web will stop. Sensor OFF On/Off To activate the sensor, press MOD, then ENTER. The display will show the sensor to be "on". Ü Default Value: Off Note: Broken web sensor is optional and the parameter is only valid if installed. Jog Menu The JOG function allows the operator to jog the labeler when loading labels into the labeler, to line up the labels, or to use Single Step LABEL-TEACH. The different levels (set in the Parameter Jog – Low Speed Menu) of JOG are: High Speed p Label Dispense Ü SINGLE STEP: Labeler cycles one single motor step. Ü LOW SPEED: Labeler cycles slowly to dispense one label. Ü HIGH SPEED: Labeler cycles faster (yet still slow) to dispense one label. Ü LABEL DISPENSE: Once JOG speed has been chosen, press , and then press ENTER to dispense one label. Label-Teach Menu This function is used to determine the length of a label pitch and the stop distances used for the labeling process. It begins when :12345 Label Pitch START is pressed. The speed for the Label-Teach mode is the low :12345 Stop Distance jog speed. The stepper controller determines the position of the Jog Teach motor while the motor is running in relation to the label sensor input signal. 42 Chapter 4 Operator Interface Option 1. There are two ways to enter the label pitch and stop distance for the Label-Teach operation (Automatic and Manual): [Automatic Entry - Recommended] Place label web using jog to the dispensing position. Then activate the LABEL-TEACH to start teach in procedure (Note: motor moves with the low jog speed). While setting up the labeling machine, the JOG operation is required to move the label to the correct position at the peel plate. The LABEL-TEACH learning movement function is used to determine the requested label position for the AUTOMATIC OPERATION. The LABEL-TEACH learning movement is started by selection LABEL-TEACH in the main menu. The function advances the web 3-4 label lengths with the manual low speed. With feedback from the LABEL SENSOR, a total of 3 label lengths including the gaps between the labels are measured and the average length of the 3 label lengths is then calculated as a set Value (LABEL PITCH) then later used in the actual labeling operations. In addition, the position of the label sensor is determined and automatically entered into the STOP DISTANCE parameter. Problems with the adjustment of the label sensor or with label web itself can be detected with the learning movement. It is recommended to move the label sensor further away from the label edge if the sensor is located close to the leading edge or trailing edge of the label. The close proximity to the label edges may cause false errors during operation. Only after an error free LABEL-TEACH learning movement all the measuring results are accepted by the controller and saved as operating parameters permanently. 1. The label pitch (pitch = label length + gap between labels) 2. The stop distance. 43 L200A Label Applicator Manual Option 2. [Manual Entry - Not Recommended] Measure label pitch (length + gap) and stop distance and enter as parameters using the terminal. Note: All Values are in motor steps. STOP DISTANCE is the distance from the end of the previous label to the label sensor. If the label sensor is too close to the edge of the label, it may not read the edge. The operator may need to move the sensor. Encoder-Teach Menu This function is used in conjunction with the encoder and the product conveyor. Using a 100mm block on the conveyor, start Start Block the ENCODER TEACH. The labeler's product sensor will detect the leading edge of the block and the trailing edge of the block and 0 calculate the encoder pulses received throughout the 100mm. A Pitch in Counts Value is then automatically calculated and entered into the Gear Denomination Value. Note: It is recommended to run the conveyor and 100mm block at the slowest operating speed when performing this operation. Operational Modes - Wipe-On Mode The WIPE-ON mode can operate in either Asynchronous or Synchronous mode. The mode is selected by entering the WipeOn screen and using the up/down arrows until the required mode is flashing. Then use the arrow [ ] to enter the mode selected. To enable this mode, press MOD on the keypad until the flashing cursor is on the ON object. Press ENTER, and at this point, the labeler is now active and labels will dispense if product is presented to the product sensor. Ensure hands and clothing are clear of labeler’s moving parts prior to entering the Asynchronous Mode or Synchronous Mode screen. 44 Chapter 4 Operator Interface Asynchronous Mode This mode is used when an encoder is not connected. The label dispense speed is manually entered based on the product/conveyor Asynchronous ON speed. See Asynchronous Speed parameter within this manual to determine the appropriate Value to enter. Speed0 NOTE: To enable, press ON to activate mode. Delay0 The Speed and Delay can be adjusted “on the fly” while labeling continues. To adjust these parameters, use the MOD key to toggle through the Speed and Delay up/down arrows. For example, to increase the Delay, press the MOD key until the flashing cursor is over the arrow [ ], then press the ENTER [ ENTER ]key to increase the existing Value. This process is identical for increasing or decreasing the Speed or Delay Values. Synchronous Mode This mode is used when an encoder is connected and automatic tracking of the product/conveyor speed is necessary. The Gear Synch mode. ON Denominator Value must be correct to ensure proper label Delay Speed0 speed tracking and label placement. See Gear Denominator Phase Delay 0% parameter within this manual to determine the correct Value. In addition, it is recommended to setup the Start Compensation prior to labeling production. See Start Compensation parameter within this manual to determine the correct Values. NOTE: To enable, press ON to activate mode. The Speed and Delay can be adjusted “on the fly” while labeling continues. To adjust these parameters, use the MOD key to toggle through the Speed and Phase Delay up/down arrows. For example, to increase the Delay, press the MOD key until the flashing cursor is over the right arrow [ ], of the Phase Delay, then press the ENTER [ ENTER ] key to increase the existing Value. This process is identical for increasing or decreasing the Speed or Delay Values. You will note there is both a Phase Delay and Delay option. Delay When selecting the Delay option, you will be prompted with the Start Compensation screen. This is the same screen as found in the Parameter menu and is used to compensate label placement 45 L200A Label Applicator Manual between low and high speeds. See Start Compensation parameter within this manual for further explanation of this operation. When performing this operation, it can be accommodated through the Synchronous Mode or the Parameter screens, the Values obtained are stored in both locations. The Phase Delay option adjusts the label placement once the delay (START COMPENSATION) is executed. Phase Delay Use the MOD key to toggle to the arrow keys [ or ] and press the ENTER [ ENTER ] key to adjust the Value. This adjusts the label placement location on the product and is used in conjunction with the Start Compensation. Please note the Delay (Start Compensation) should be executed before adjusting the Phase Delay. Operational Modes: Tamp-On, Blow-On, and Tamp-Blow Tamp On Using the main screen, different operating modes can be chosen: Tamp-On, Blow-On, Tamp-Blow or Wipe-On (previously discussed.) To enable this mode, press MOD on the keypad until the flashing cursor is on the ON object. Press ENTER, and at this point, the labeler is now active and labels will dispense if product is presented to the product sensor. Diagnostics Diagnostics The diagnostics mode can be used to check the function of all the Diagnostics sensors, encoder status and battery level status. 10.1 Speed/Inputs 10.2 Inputs 10.3 Force Outputs Frequency Encoder: scaled: 46 0 Hz 0mm/s SPEED/INPUTS shows the Encoder speed (in Hz) and the scaled speed in millimeters per second. Chapter 4 Operator Interface Input 00010203040506 Battery Level Remaining 93% INPUTS shows the inputs occurring in the system. Reference electrical schematic for details of inputs. BATTERY LEVEL shows the battery level remaining of the external battery. Once level goes to 0% a battery warning will be displayed as a flashing green on the light beacon (optional). This warning can be reset through the “Reset Warning” screen. The battery level can also be viewed on the PLC within the electrical control, if the percentage is less then 50%, the “Batt” led on the front face will flash. If the battery level is at 0%, the “Batt” led will be a steady “red”. Caution – Once the external battery level is depleted, if power remains Off for more then three days, the PLC has the potential to boot in “Stop” mode. Therefore it is recommended to replace the external battery per controller’s instructions once these warning conditions arise. Note – Replacement external battery for PLC is 1/2AA, 3.6V, lithium battery. Please call factory for pricing and availability. APPLIC. LANGUAGE Language KATAKANA LANGUAGE The language function allows the operator to choose the display language used on the operations screens. Press MOD, then use the up/down [ ] [ ] arrows keys to switch between Katakana (Japanese) and English. Once the language is selected, press the enter [ ENTER ] key, then ESC to return to the main menu. 47 L200A Label Applicator Manual Reset Warning RESET WARNING This screen provides means to reset Low Label and Low Battery warning lights on the light beacon (optional). If one or both of the conditions are true, the light icon within the screen will be ON. Low Label To reset, use the MOD button to select the appropriate icon and press the enter [ ENTER ] key on the membrane. Low Battery 48 Note – The warning condition must be satisfied to reset the light. Maintenance and Troubleshooting 5 Preventive Maintenance The following are guidelines for preventative maintenance on the applicator. This information can be used for producing a maintenance schedule, which should be performed routinely. Once familiar with the unit, operators or technicians may add additional items to the list. If there are any service questions, please contact your distributor. Ü Examine the drive roller, idler rollers and peeler tip for excessive adhesive buildup or dust collection. Rubbing alcohol may be used to clean problem areas. Do not use compressed air to blow dust from the labeler. Ü Examine the nip rollers for excessive adhesive buildup or dust collection. A mild detergent solution may be used to clean problem areas. Do not use compressed air to blow dust from the labeler. Ü Inspect all electrical plugs for secure connections. Ü Verify that all components and modules are securely fastened. Ü Inspect the unit for loose screws, guides, or covers and tighten as necessary. Ü Gently clean dust from the lens of the product sensor. Ü Inspect the drive belt for proper tension. Adjust idler if additional tension is needed. Troubleshooting LED DISPLAY INDICATES FAULT Figure 5-1. Stepper Drive Motor Fault Display Drive Errors Drive errors, or “fatal errors” that stop each action immediately and involve the stepper motor. If a “fatal error” occurs, your current label may not be applied properly. Stepper driver errors can be: over-temperatures (of motor or power amplifier), short circuit (between two motor phases or between motor phase against PE), over-voltage, lowvoltage, rotation monitoring (RM) fault, power amplifier deactivation, or motor current free. Refer to the LED status display of the stepper motor drive inside the electrical cabinet (see Figure 5-1). 49 L200A Label Applicator Manual Labeling Errors Labeling errors can be caused by missing labels on the label web, label paper in the gaps, wrongly adjusted or defective label sensor or an empty supply roll. Motor Rotation Positive motor direction is defined as the direction on which the label web is moved forward towards the peeler plate. How to Check the Motor Rotation: Step 1. Make sure adequate jog speeds are set in the parameters. Recommended are 100 Hz for the slow speed and 1000 Hz for the high speed. Step 2. Press the JOG button to start movement in positive direction. Step 3. Check if the web is moving forward towards the peeler plate. Step 4. Release JOG button to stop web at desired position. If the motor is rotating in the wrong direction, you will need to follow the steps below to correct: Solution 1: The hardware solution: If using a 3 phase BERGER LAHR stepping motor system interchange two motor wires (only at shut down system with no mains power connected). For other systems refer to the manual. Some of the drives (e.g. BERGER LAHR 5 phase stepper systems have a direction switch). Solution 2: The software solution: Change the corresponding parameter with the terminal. See chapter parameter setup for this. 50 Replacement Parts 6 Replacement Parts Replacement parts lists for the Shibuya Hoppmann L200A Label Applicator listed on the following pages. When ordering replacement parts, please reference the model name and number of your labeler located on the serial plate (see Figure 6-1). This helps in making sure you receive the correct replacement parts. If you received a customized Shibuya Hoppmann system which incorporated your labeler, please refer to your system's Operation Manual when ordering spares, as your system may have been altered. Having the serial number in addition to the part number you wish to order will help us to accurately assist you in getting the correct parts. You may order your labeler's spare parts directly from Shibuya Hoppmann by email, phone or fax (see the contact information listed below). Shibuya Hoppmann Spares and Service Department Ü Email:[email protected] Ü Phone: 540.829.2564 (1.800.368.3582) Ü Fax:540.829.1726 Ü Mail: Shibuya Hoppmann Corporation Attn: Spares Department 13129 Airpark Drive, Suite 120 Elkwood, Virginia 22718 USA www.ShibuyaHoppmann.com TM SERIAL # MODEL # INVENTORY # PROJECT NUMBER DATE www.shibuyahoppmann.com • (800) 368-3582 Figure 6-1. Sample Serial Plate (2013) 51 L200A Label Applicator Manual L200A Label Applicator Replacement Parts 5 REWIND ASSEMBLY 3 4 6 2 1 LOCKING COLLAR 19 UNWIND ASSEMBLY 7 8 11 6 WIPE ARM BRACKET 17 12 18 BASE MODULE with DRIVE ASSEMBLY 9 10 15 12 5 14 5 16 13 10 52 Chapter 6 Replacement Parts L200A Label Applicator - Mechanical Replacement Parts Loc. 1 2 3 4 5 6 7 8 9 10 11 12 13 14 15 16 17 18 19 Part Number Description Qty. L050601134 Rewind Pull Pin 1 HOLE000001 Hole Plug, 2.43" Diameter, Unwind/Rewind Cap 1 TORQPOLY01 Slip Clutch, 2 Disc 1 L050600719 Rewind Bushing 2 BRNGBALL18 Flange Bearing, 1/2" ID x 5/8" OD x 1/2" 2 RRNG000004 Retaining Ring, .625" Nom Ext. 1 L050600780 Brake Belt 1 BRNG000031 Bearing, 5/8" Bore 1 L020800509 Spring Collar, 2" Roller 1 L050400004 Idler Roller, 2" 2 SPREXT0007 Extension Spring, Music Wire 1 BUSHFB8104 Bearing, Flange 5/8" OD x 1/2" 2 L050400906 Nip Friction Roller, 6" 1 LEVR000006 Indexing Plunger, M16 Non-Lock 1 BELT000039 Timing Belt, 1/5" P, 1/4" Wide, 17" Long 1 L030120106 Stepper Motor 1 L050601118 Gap Sensor Idler Roller (Wiper Arm) 1 L070100065 Peeler Plate, 6" x 4" 3 L050600049 Locking Collar Assembly 1 53 L200A Label Applicator Manual L200A Label Applicator - Electrical Replacement Parts Part Number Description Qty. SWITLOK001 Enclosed Disc, 20-250A 1 PZG42CB Sensor, Diffuse, 24VDC 1 DR4524 Power Supply, 2A, 24VDC 1 SD326DU24S2 SD3 Stepper Drive, 2.6A 1 XBT29980 Cable, 6' RJ45 1 XBTN400 HMI Terminal, 4 Line 1 TM238LDD24DT PLC, 14 IN, 10 OUT, Stepper Controller 1 7000080610110500 Cable, 4 Pin, Nano (M8) Female, 5 Meter 1 LERC Label-Eye Sensor 1 8533640000 Terminal Relay Coupler 3 FNQ-10 10 Amp Fuse 5 MDL-6 6 Amp Fuse 5 MDL-2 2 Amp Fuse 5 54 Warranty 7 Warranty Shibuya Hoppmann Corporation warrants that each item of its own manufacture delivered hereunder shall, at the time of delivery and for a period of twelve (12) months thereafter, be free from defects in materials or workmanship; and if any such item shall prove to be defective in material or workmanship under normal intended usage and maintenance during the warranty period, upon examination by Shibuya Hoppmann Corporation, then Shibuya Hoppmann Corporation shall repair or replace, at its sole option, such defective item at its own expense; provided, however, that the owner shall be required to ship such defective item, freight prepaid, to Shibuya Hoppmann Corporation's plant in Elkwood, Virginia. The warranty on components not manufactured by Shibuya Hoppmann Corporation, but a part of the feeder, is limited to the warranty provided by the original manufacturer of said components to the extent, and only to the extent, that such original manufacturer actually honors such warranty. ALL WARRANTIES HEREUNDER ARE EXPRESSLY LIMITED TO THE REPAIR OR REPLACEMENT OF DEFECTIVE ITEMS AS SET FORTH HEREIN, AND IN NO EVENT SHALL SHIBUYA HOPPMANN CORPORATION BE LIABLE FOR SPECIAL, INCIDENTAL OR CONSEQUENTIAL DAMAGES BY REASON OF ANY BREACH OF WARRANTY OR DEFECT IN MATERIAL OR WORKMANSHIP. SHIBUYA HOPPMANN CORPORATION SHALL NOT BE RESPONSIBLE FOR REPAIR OR REPLACEMENT OF ITEMS WHICH HAVE BEEN SUBJECTED TO NEGLECT, ACCIDENT OR IMPROPER USE, OR WHICH HAVE BEEN ALTERED BY OTHER THAN AUTHORIZED SHIBUYA HOPPMANN CORPORATION PERSONNEL. THIS WARRANTY IS IN LIEU OF OTHER WARRANTIES, EXPRESS OR IMPLIED. ALL IMPLIED WARRANTIES, INCLUDING BUT NOT LIMITED TO THE IMPLIED WARRANTIES OF MERCHANTABILITY AND FITNESS FOR A PARTICULAR PURPOSE, ARE HEREBY EXCLUDED. 55 TM Shibuya Hoppmann offers a wide selection of products: Ü Ü Ü Ü Ü Ü Hoppmann Centrifugal Feeders™ Prefeeders Continuous Motion Assembly Turrets Placement Systems Fillers and Cappers Conveyors Ü Ü Ü Ü Ü Ü Product Handling Equipment Aseptic Filling Systems Labelers Decontamination Equipment Intermittent Motion Assembly Systems Complete Integrated Product Lines HeadquartersSales Manufacturing 13129 Airpark Drive 1445 Brookville Way 281 Dillard Road Suite 120 Suite F Madison Heights, VA Elkwood, VA 22718 Indianapolis, IN 46239 24572 540.829.2564 t 317.322.0754 t 434.929.4746 t 800.368.3582 t 800.368.3582 t 800.543.0915 t 540.829.1726 f317.322.0794 f434.929.4959 f