1
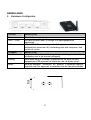
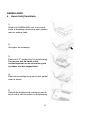
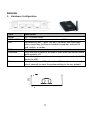
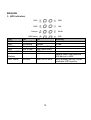
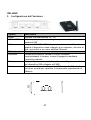
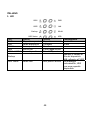
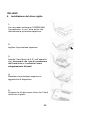
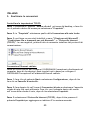
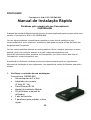
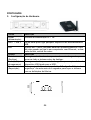
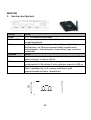
NEDERLANDS
Conceptronic CHD2WLANU Grab’n’GO
Snelstart Handleiding
Gefeliciteerd met de aanschaf van uw
Conceptronic CHD2WLANU
In de bijgaande Snelstart handleiding wordt stap voor stap uitgelegd hoe u de
Conceptronic Grab’n’GO CHD2WLANU installeert.
Ingeval van problemen adviseren wij u onze support-site te bezoeken (ga naar:
www.conceptronic.net en klik op ‘Support’). Hier vindt u een database met
veelgestelde vragen waar u hoogstwaarschijnlijk de oplossing voor uw probleem
kunt vinden.
Heeft u andere vragen over uw product die u niet op de website kunt vinden, neem
dan contact met ons op via e-mail: [email protected]
Voor meer informatie over Conceptronic producten kunt u terecht op de
Conceptronic website: www.conceptronic.net.
Bij software/drivers installatie: Het is mogelijk dat onderstaande installatie iets
afwijkt van de installatie op uw computer. Dit is afhankelijk van de Windows versie
die u gebruikt.
1. Controleer de pakketinhoud
•
•
•
•
•
•
•
•
Conceptronic CHD2WLANU
2.4GHz Antenne
Spanningsadapter (5 Volt DC, 3A)
RJ-45 Netwerk kabel
Snelstart handleiding
CD (utilities en handleiding)
2x rubberen voetje
2x schroef (Voor het vastzetten van de
harde schijf)
1
NEDERLANDS
2. Hardware Configuratie
Poorten
Beschrijving
Power
USB1 / USB2
5V / 3A Spanningsingang.
Via deze poorten kunt u overige USB opslagapparaten
aansluiten.
MDI / MDIX LAN aansluiting welke het type netwerkkabel
automatisch detecteert bij verbinding met een computer, hub,
switch of router.
Beschrijving
Houd deze knop 4 seconden ingedrukt om het apparaat uit te
schakelen voor u de stroom loskoppelt.
Houd deze knop 4 seconden ingedrukt om de data van een
aangesloten USB apparaat te kopieren naar de harde schijf.
Houd de knoppen “Shutdown” en “Backup” 6 seconden tegelijk
ingedrukt om het apparaat te resetten naar de fabriekswaarden.
LAN
Knoppen
Shutdown
Backup
Reset
2
NEDERLANDS
3. LED Indicaties
USB1
PWR
USB2
LAN
Backup
WLAN
HDD Status
HDD
LED
Uit
Aan
Knippert
PWR
LAN
Ingeschakeld
Verbonden
In gebruik
WLAN
HDD
Uitgeschakeld
Niet
verbonden
Geen Activiteit
Niet in gebruik
USB 1 / USB 2
Niet in gebruik
In gebruik
HDD
Leest/Schrijft
USB Schijf
gereed
Backup
HDD Status
Geen HDD
HDD vol of error
3
Kopieert bestanden van
aangesloten USB schijf
naar de Harde Schijf.
Bij sneller knipperen,
minder schijfruimte
beschikbaar.
NEDERLANDS
4. Harde Schijf Installatie
1.
Houd u de CHD2WLANU vast in uw hand,
zodat u bovenkap voorzichtig kunt openen
met uw andere hand.
2.
Verwijder de bovenkap.
3.
Plaats de 2.5” harde schijf in de behuizing.
Zorg ervoor dat de harde schijf
connectiepinnen en de connector goed
op elkaar worden aangesloten!
4.
Plaats de bovenkap terug en zet het geheel
weer in elkaar.
5.
Gebruik de bijgeleverde schroeven om de
harde schijf vast te zetten in de behuizing.
4
NEDERLANDS
5. Verbinding Maken
Controleer de TCP/IP instellingen:
Stap 1: Selecteer het icoon “Mijn Netwerkomgeving” op uw bureaublad, klik
hierop met de rechtermuisknop en kies voor “Eigenschappen”.
Stap 2: Selecteer de “Eigenschappen” van de LAN Verbinding.
Stap 3: Controleer of “Client voor Microsoft-netwerken”, “Bestands- en Printer
deling voor Microsoft-netwerken”, en “Internet-protocol (TCP/IP)” zijn
geïnstalleerd. Zo niet, installeer dan deze protocollen eerst.
Bedrade Netwerk verbinding:
Gebruik een netwerkkabel om de Conceptronic CHD2WLANU direct met uw
computer te verbinden. Volg vervolgens de onderstaande stappen om de
Conceptronic CHD2WLANU te gebruiken in een bedrade netwerkomgeving.
Stap 1: Klik op de “Start” knop en kies “Instellingen” en vervolgens
“Configuratiescherm”.
Stap 2: Dubbelklik op “Netwerk-verbindingen” en selecteer de netwerkkaart die
gebruikt wordt. Klik met de rechtermuisknop op het icoon van de netwerkkaart en
kies voor “Eigenschappen”.
Stap 3: Selecteer “Internet-protocol (TCP/IP)”, en kies voor “Eigenschappen”
om handmatig een IP Adres toe te wijzen.
5
NEDERLANDS
Stap 4: Het “IP Adres” kan gekozen worden tussen 192.168.123.1 tot
192.168.123.253. In dit voorbeeld gebruiken we 192.168.123.88 als IP Adres. Het
“Subnetmasker” dient de volgende waarde te hebben: 255.255.255.0 en de
“Standaard-gateway” dient : 192.168.123.254 te zijn. Klik vervolgens op “OK”
om de TCP/IP Configuratie op te slaan.
Draadloze verbinding:
Volg de onderstaande stappen om de Conceptronic CHD2WLANU in een draadloze
omgeving te gebruiken. Er wordt van uitgegaan dat er minstens 1 WLAN kaart
geïnstalleerd is op uw computer en de Conceptronic CHD2WLANU is ingeschakeld.
Stap 1: Zorg dat de WLAN kaart is ingeschakeld en open de “Eigenschappen” van
de “Draadloze Netwerkverbinding” in de eigenschappen van “Mijn
Netwerkomgeving”.
Stap 2: Selecteer de optie “Draadloze netwerken” nadat u zich in de
eigenschappen van de “Draadloze Netwerkverbinding” bevindt. U zal het
netwerk “Conceptronic” vinden in de lijst met beschikbare netwerken. Selecteer
het netwerk “Conceptronic” en klik op “Verbinden” om te verbinden. Als het
netwerk “Conceptronic”, niet getoond wordt, ververs dan de netwerklijst.
Het gebruik van de draadloze encryptie mogelijkheid of Gebruikers
Toegangsregels op uw Conceptronic CHD2WLANU wordt zeer sterk aangeraden.
Zonder deze beveiliging kan elke gebruiker een draadloze verbinding opzetten
met het apparaat en de opgeslagen data benaderen.
6
NEDERLANDS
6. Bestandsdeling
De Conceptronic CHD2WLANU kan als een gedeelde netwerkschijf gebruikt worden
in een bestaande netwerkomgeving (draadloos of bedraad). De gebruikers in
dezelfde netwerkomgeving kunnen data lezen en schrijven op het apparaat. Volg
de onderstaande stappen om de netwerkschijf te gebruiken.
De Netwerkschijf benaderen via “Mijn Netwerkomgeving”:
Selecteer “Mijn Netwerkomgeving” en voer het adres van het apparaat,
“\\AP_Storage”, in en druk op “Enter”. U zult een “Storage” icoon zien.
Het apparaat opzoeken:
Open “Deze Computer” op uw bureaublad / Start menu en gebruik de optie
“Zoeken” om het apparaat “AP_Storage” te vinden.
7
NEDERLANDS
Handmatig zoeken binnen uw “Volledig Netwerk”:
Open “Windows Verkenner”, en klik op het icoon “Mijn Netwerkomgeving”.
Dubbelklik op het “Volledig Netwerk” om alle componenten van het netwerk te
zien. Klik vervolgens op “Microsoft Windows-netwerk”, om de verschillende
werkgroepen weer te geven. De standaard werkgroep van de Conceptronic
CHD2WLANU is “Mshome”.
7. Instellingen maken op de CHD2WLANU
De Conceptronic CHD2WLANU kan geconfigureerd worden via uw webbrowser
(Internet Explorer of Netscape) of met de bijgeleverde Configuratie Utility.
Configureren via de web browser:
Open Internet Explorer (of Netscape) op uw computer, en voer het IP Adres van
de Conceptronic CHD2WLANU in bij het Adres veld.
NOTITIE: Het standaard IP Adres van de Conceptronic CHD2WLANU is
192.168.123.254.
8
NEDERLANDS
Configureren via de Configuratie Utility:
Zelfs als u niet meer weet welk IP Adres er door de Conceptronic CHD2WLANU
wordt gebruikt zal de Configuratie Utility u helpen om deze te vinden. Voordat u
dit kunt doen dient u eerst de Configuratie Utility te installeren vanaf de CD-ROM.
Vervolgens kunt u, na herstarten van de software, de “Query” knop gebruiken om
het apparaat te benaderen.
NOTITIE: De status van uw netwerkomgeving kan anders zijn dan in de
onderstaande afbeelding:
9
ENGLISH
Conceptronic CHD2WLANU Grab’n’GO
Quick Installation Guide
Congratulations on the purchase of your
Conceptronic CHD2WLANU
The enclosed Quick Installation Guide gives you a step-by-step explanation of how
to install the Conceptronic Grab’n’GO CHD2WLANU.
When problems occur, we advise you to go to our support-site (go to
www.conceptronic.net and click ‘Support’. Here you will find the Frequently
Asked Questions Database.
When you have other questions about your product and you cannot find it at our
website, then contact us by e-mail: [email protected]
For more information about Conceptronic products, please visit the Conceptronic
Web Site: www.conceptronic.net
The Software installation as described below, may be slightly different from the
installation on your computer. This depends on the Windows version you are using.
1. Check Your Package Contents
Conceptronic CHD2WLANU
2.4GHz dipole antenna
•
•
Power adapter (5 Volts DC, 3A)
•
RJ-45 Ethernet cable
Quick installation guide
•
•
CD (utilities and user manual)
•
Rubber feet x2
Screws x2 (For fixing hard drive)
•
10
ENGLISH
2. Hardware Configuration
Ports
Description
Power
USB1 / USB2
LAN
5V / 3A Power inlet.
The ports where you can connect to any USB storage.
Automatically MDI / MDIX LAN port can sense the cable type
when connecting to Ethernet-enabled computer, network of
hub, switch, or router.
Description
Press the button about 4 seconds to shut down the whole system
before power-off.
Press the button over 4 seconds to copy data from attached USB
device to HDD.
Press the buttons of “Shutdown” and “Backup” simultaneously
over 6 seconds to reset the system setting to factory default.
Buttons
Shutdown
Backup
Reset
11
ENGLISH
3. LED Indicators
USB1
PWR
USB2
LAN
Backup
WLAN
HDD Status
LED
PWR
LAN
WLAN
HDD
USB 1 / USB 2
Off
Power off
No device
No packet
Not in use
No device
HDD
On
Power on
Linked
On transmitting
HDD read/write
USB drive ready
Backup
HDD Status
No HDD
HDD full or error
12
Blinking
In use.
Backup files from attached
USB device to HDD.
More blinking quickly, fewer
available HDD capacity.
ENGLISH
4. Hard Disk Installation
1.
Use one hand to hold on the Conceptronic
CHD2WLANU, and the other hand to open
the upper cover carefully.
2.
Remove the upper cover.
3.
Insert the 2.5” hard drive into the slot.
Make sure the hard drive connecting pins
and the connectors are properly aligned.
4.
Put the upper cover back and assemble the
cover tightly.
5.
Fasten the screws to make sure the hard
drive would not loosen.
13
ENGLISH
5. Making Connections
Check TCP/IP settings:
Step 1: Select the “My Network Places” on the Desktop Menu, and click the right
button of mouse to choose the “Properties”.
Step 2: Choose the “Properties” of Local Area Connection.
Step 3: Check if the “Client for Microsoft Networks”, “File and Printer Sharing
for Microsoft Networks”, and “Internet Protocol (TCP/IP)” are installed or not. If
not, please install those communication protocols first.
Wired Ethernet connection:
Use one Ethernet cable to connect the Conceptronic CHD2WLANU and your
computer directly. Then follow the steps below to connect the Conceptronic
CHD2WLANU under the wired Ethernet environment.
Step 1: Click Start button and choose Settings, then click Control Panel.
Step 2: Double click Network Connections icon and select correct network card
that will be used. Click the right button of the mouse on network card icon, and
then choose Properties.
Step 3: Select Internet Protocol (TCP/IP), and then press Properties button to
add an IP address manually.
14
ENGLISH
Step 4: The IP address which can be from 192.168.123.1 to 192.168.123.253. Here
we use the 192.168.123.88 as the IP address. The Subnet mask must be:
255.255.255.0 and the Default gateway must be: 192.168.123.254. Then click
“OK” button to complete TCP/IP configuration.
Wireless connection:
Follow the steps below to connect to the Conceptronic CHD2WLANU in a wireless
environment. We assume that there is at least one WLAN card installed on your
computer, and Conceptronic CHD2WLANU is powered on.
Step 1: Enable WLAN card first, and check the Wireless Network Connection
properties from My Network Places.
Step 2: Select the Wireless Networks icon after entering the “Wireless Network
Connection Properties”. You will find the “Conceptronic” in the available
network list, then select Conceptronic, and click Connect button to connect.
Otherwise, if you can’t find Conceptronic, please refresh network list again.
We strongly recommend that you enable wireless encryption feature, or add
User Access rules on Conceptronic CHD2WLANU. Otherwise, everyone can
connect to it wirelessly and access data which is stored in your hard drive.
15
ENGLISH
6. File Sharing
The Conceptronic CHD2WLANU can be a shared network hard drive in an existing
wireless or wired network environment. The users in the same network area can
read or write data from the device as required. The following various steps are for
users to start using the network hard drive.
Accessing the network hard drive via My Network Places:
Select the “My Network Places” and type the address of “\\AP_Storage” and press
“Enter”. Then you will find the Storage icon.
Searching the computers:
Open “My Computer” on the desktop menu, and use the “Search” function to
search the computer of “AP_Storage”.
16
ENGLISH
Search the “Entire Network” manually:
Open Windows Explorer, and then click the My Network Places icon. Double click
the Entire Network to view the components of the network. Select and click the
Microsoft Windows Network icon, then the various network components showed
in the list. The default workgroup of Conceptronic CHD2WLANU is Mshome.
7. Making Configuration
The Conceptronic CHD2WLANU can be configured various settings through web
browser (Internet Explorer or Netscape) or the proprietary Configuration Tool.
Configure through web browser:
Launch the Internet Explorer (or Netscape) on your computer, and then type the
IP address of Conceptronic CHD2WLANU in the URL field.
NOTE: The default IP address of Conceptronic CHD2WLANU is
192.168.123.254.
17
ENGLISH
Configure through configuration tool:
Even you don’t know which IP is being used by Conceptronic CHD2WLANU, the
Configuration Tool will help you find it. But before you can do this, you need to
install the configuration tool from installation CD first. After that, all you have to
do is click the “Query” button.
NOTE: The status of your environment may not be the same as this picture.
18
ESPAÑOL
Conceptronic Grab’n’GO CHD2WLANU
Guía de instalación rápida
Enhorabuena por la compra de su Conceptronic
CHD2WLANU
Esta guía de instalación rápida le ofrece una explicación paso a paso de la instalación del
Conceptronic Grab’n’GO CHD2WLANU.
Si encuentra problemas, le aconsejamos que se dirija a nuestra página web
www.conceptronic.net y haga clic en «Support». Aquí encontrará la base de datos de las
preguntas más frecuentes o FAQ.
Si tiene otras preguntas sobre su producto y no las encuentra en nuestro sitio web, póngase
en contacto con nuestro servicio técnico por correo electrónico:
[email protected]
Para obtener más información acerca de productos de Conceptronic por favor visite el lugar
Web de Conceptronic: www.conceptronic.net
La instalación de software, tal y como se describe a continuación, puede ser algo diferente
de la instalación en su ordenador. Eso depende de la versión de Windows que esté usando.
1. Compruebe el contenido del paquete
Conceptronic CHD2WLANU
•
Antena bipolar de 2.4GHz
Adaptador de corriente
•
(5 voltios CC, 3A)
Cable Ethernet RJ-45
•
•
Guía de instalación rápida
•
CD (utilidades y manual de usuario)
•
2x Soportes de goma
2x Tornillos (Para fijar el disco duro)
•
19
ESPAÑOL
2. Configuración del hardware
Puertos
Descripción
Alimentación
USB1 / USB2
5V / 3A Power inlet.
Los puertos donde puede conectar cualquier dispositivo de
almacenamiento USB.
El puerto MDI / MDIX LAN puede detectar el tipo de cable cuando
se conecta a un ordenador, una red de hubs, un switch o un
router que tienen Ethernet activado.
Descripción
Mantenga el botón presionado durante unos 4 segundos para
apagar el sistema antes de desconectar la alimentación.
Mantenga el botón presionado durante más de 4 segundos para
copiar los datos del dispositivo USB al disco duro.
Pulse los botones “Apagar” y “Copia de seguridad”
simultáneamente durante más de 6 segundos para reiniciar el
sistema volviendo a las configuraciones predefinidas de fábrica.
LAN
Botones
Apagar
Copia de
seguridad
Reiniciar
20
ESPAÑOL
3. Indicadores LED
USB1
Alimentación
USB2
LAN
Copia de seguridad
WLAN
Estatus disco duro
LED
Alimentación
LAN
WLAN
Disco duro
USB 1 / USB 2
Apagado
Apagado
Ningún
dispositivo
Ningún
paquete
Inactivo
Ningún
dispositivo
Disco duro
Encendido
Encendido
Conectado
Ningún
disco duro
En uso.
Transmitiendo
Lectura/escritura
de disco duro
Unidad USB lista
Copia de
seguridad
Estatus del
disco duro
Parpadeando
Disco duro lleno o
error
21
Realizando copia de seguridad
de los archivos del dispositivo
USB al disco duro.
Cuanto más rápido es el
parpadeo, menor es el espacio
en disco disponible.
ESPAÑOL
4. Instalación del disco duro
1.
Sujete el Conceptronic CHD2WLANU con
una mano, y con la otra levante la tapa
superior con cuidado.
2.
Retire la tapa superior.
3.
Inserte el disco duro de 2.5” en la ranura.
Asegúrese que los pins del disco duro y
los conectores están bien alineados.
4.
Vuelva a colocar la tapa en su sitio y
encájela.
5.
Fije los tornillos para asegurarse que el
disco duro no se suelte.
22
ESPAÑOL
5. Establecer conexiones
Comprobar las configuraciones de TCP/IP:
Paso 1: Seleccione “Mis sitios de red” en el menú del Escritorio, pulse con el
botón derecho del ratón y seleccione “Propiedades”.
Paso 2: Seleccione “Propiedades” de Conexión de Area Local.
Paso 3: Compruebe si “Cliente de Microsoft Networks”, “Compartir archivos e
impresora para Microsoft Networks” y “Protocolo de Internet (TCP/IP)” están
instalados o no. Si no, instale primero estos protocolos de comunicación.
Conexión Ethernet por cable:
Use un cable Ethernet para conectar directamente el Conceptronic CHD2WLANU a
su ordenador, y a continuación siga los pasos descritos para conectar el
Conceptronic CHD2WLANU a la red Ethernet por cable.
Paso 1: Pulse en Inicio y seleccione Configuraciones, y luego pulse en Panel de
Control.
Paso 2: haga doble clic en el icono de Conexiones de red y seleccione la tarjeta
de red que va a usar. Pulse con el botón derecho sobre el icono y seleccione
Propiedades.
Paso 3: Seleccione Protocolo Internet (TCP/IP), y a continuación pulse el botón
Propiedades para añadir una IP manualmente.
23
ESPAÑOL
Paso 4: La dirección IP, que puede ser desde 192.168.123.1 a 192.168.123.253.
Utilizamos aquí 192.168.123.88 como dirección IP. La máscara de Subred debe ser
255.255.255.0 y la puerta de enlace predeterminada debe ser 192.168.128.254. A
continuación, pulse el botón “OK” para terminar la configuración de TCP/IP.
Conexión inalámbrica:
Siga los pasos explicados a continuación para conectar el Conceptronic
CHD2WLANU a un entorno de red inalámbrica, entendiendo que su ordenador tiene
ya instalada al menos una tarjeta WLAN, y que el Conceptronic CHD2WLANU está
encendido.
Paso 1: Active primero la tarjeta WLAN y compruebe las propiedades de
Conexiones de red inalámbricas en Mis sitios de red.
Paso 2: Una vez dentro de “Propiedades de conexiones de red inalámbricas”,
seleccione el icono de Redes inalámbricas. Allí verá que “Conceptronic” aparece
en la lista de redes disponibles, deberá seleccionarlo y pulsar el botón “conectar”
para conectarse a la red. Si Conceptronic no apareciera en la lista, actualice la
lista de redes.
Es muy recomendable que active la característica de encriptación inalámbrica
para el Conceptronic CHD2WLANU o que establezca normas de acceso para
usuarios. De otro modo, cualquier otra persona podría conectarse a la red
inalámbrica y acceder a datos almacenados en su disco duro.
24
ESPAÑOL
6. Compartir archivos
El Conceptronic CHD2WLANU puede ser una unidad de red compartida integrada
en un entorno de red existente, ya sea inalámbrica o no. Los usuarios de la red
pueden leer o escribir datos en el dispositivo según requieran. Los pasos siguientes
descritos guían al usuario para empezar a usar la unidad de red.
Acceder a la unidad de red a través de Mis sitios de red:
Seleccione “Mis sitios de red”, teclee la dirección “\\AP_Storage” y pulse “Enter”.
Entonces encontrará el icono de Storage.
Buscar los ordenadores:
Abrir “Mi Pc” desde el escritorio, y usar la función “Buscar” para buscar el
ordenador de “AP_Storage”.
25
ESPAÑOL
Buscar manualmente en “Toda la red”:
Abra Windows Explorer, y a continuación pulse en el icono de Mis sitios de red.
Haga doble clic en Toda la red para ver los componentes de la red. Seleccione y
pulse el icono de Red de Microsoft Windows, y se mostrarán una la lista con los
diversos componentes de la red. El grupo de trabajo del Conceptronic CHD2WLANU
es Mshome.
7. Configuración
Varias opciones del Conceptronic CHD2WLANU pueden configurarse a través del
navegador web (Internet Explorer o Netscape) o la herramienta de Configuración
del propietario.
Configurar a través del navegador web:
Abra Internet Explorer (o Netscape) y teclee la dirección IP del Conceptronic
CHD2WLANU en la barra de direcciones.
NOTA: La dirección IP predeterminada del Conceptronic CHD2WLANU es
192.168.123.254.
26
ESPAÑOL
Configurar a través de la herramienta de configuración:
Incluso sin conocer la IP que usa el Conceptronic CHD2WLANU, la herramienta de
Configuración le ayudará a encontrarla. Para usarla deberá haber instalado
previamente la herramienta de configuración que se entrega en el CD de
instalación. Hecho esto, tan sólo deberá pulsar el botón Query “Consulta”.
NOTA: El estado de su entorno de red podría no ser el mismo que el que se
muestra en la imagen.
27
DEUTSCH
Conceptronic Grab’n’GO CHD2WLANU
Schnellstart Anleitung
Wir gratulieren Ihnen zum Kauf Ihres
Conceptronic CHD2WLANU
In beiliegender Schnellinstallationsanleitung wird Ihnen Schritt für Schritt gezeigt,
wie der Conceptronic Grab’n’GO CHD2WLANU installiert werden muss.
Sollten irgendwelche Probleme auftreten, empfehlen wir ihnen, auf unsere
Support-Seite im Internet zu gehen (www.conceptronic.net) und auf 'Support’ zu
klicken. Dort werden sie die "Frequently Asked Questions" Datenbank finden.
Falls sie andere Fragen zu ihrem Produkt haben und sie diese nicht auf unserer
Website finden können, kontaktieren sie uns bitte per E-Mail:
[email protected].
Weitere Informationen zu den Conceptronic Produkte finden Sie auf der Website
von Conceptronic: www.conceptronic.net.
Die nachstehend beschriebene Software-Installation kann sich bei Ihrem Rechner
aufgrund des verwendeten Windows-Version leicht unterscheiden.
1. Überprüfen Sie den Packungsinhalt
Conceptronic CHD2WLANU
•
2,4GHz Dipolantenne
•
Netzteil (5 Volt Gleichstrom, 3A)
•
RJ45-Ethernetkabel
Schnellinstallationsanleitung
•
CD (Utilities und
•
•
Benutzerhandbuch)
•
2 x Gummifüße
•
2x Schrauben (zur Befestigung der
Festplatte)
28
DEUTSCH
2. Hardware-Konfiguration
Ports
Beschreibung
Power
USB1 / USB2
LAN
5V / 3A Stromeingang.
Ports zum Anschließen von USB-Speichern.
Beim Anschluss an Ethernet-aktivierte Computer, Hub-, Switchoder Router-Netzwerke erkennt der MDI / MDIX LAN Port
automatisch den Kabeltyp.
Beschreibung
Diese Taste muss ungefähr 4 Sekunden lang gedrückt werden,
um das System ganz herunterzufahren, bevor das Gerät
ausgeschaltet wird.
Diese Taste muss länger als 4 Sekunden gedrückt werden, um
Daten von angeschlossenen USB-Geräten auf die Festplatte zu
kopieren.
Die Tasten „Shutdown” und „Backup” müssen gleichzeitig länger
als 6 Sekunden gedrückt werden, um das System auf die
Werkseinstellungen zurückzusetzen.
Tasten
Shutdown
Backup
Reset
(Zurücksetzen)
29
DEUTSCH
3. LED-Anzeigen
USB1
PWR
USB2
LAN
WLAN
Backup
HDD
HDD Status
LED
PWR
LAN
WLAN
HDD
[Festplattenla
ufwerk]
USB 1 / USB 2
Aus
Ausgeschaltet
Kein Gerät
angeschlossen
Kein Paket
Nicht in
Betrieb
Kein Gerät
angeschlossen
Ein
Eingeschaltet
Verbunden
Keine
Festplatte
In Betrieb
Am Übertragen
Lesen/Schreib
en von/auf
Festplatte
USB-Laufwerk
bereit
Backup
HDD Status
[Festplattenst
atus]
Blinkend
Festplatte voll
oder Fehler
30
Backup von Dateien des
verbundenen USB-Geräts
auf Festplatte
Je schneller die Anzeige
blinkt, umso weniger
Kapazität steht auf der
Festplatte zur Verfügung
DEUTSCH
4. Installation der Festplatte
1.
Halten Sie den Conceptronic CHD2WLANU
mit einer Hand und öffnen Sie mit der
anderen Hand vorsichtig die obere
Abdeckung.
2.
Entfernen Sie die obere Abdeckung.
3.
Stecken Sie die 2,5”-Festplatte in den
Steckplatz. Achten Sie dabei darauf, dass
die Verbindungsstifte der Festplatte und
die Anschlüsse richtig ausgerichtet sind.
4.
Bringen Sie die obere Abdeckung wieder
an. Stellen Sie sicher, dass die Abdeckung
fest verschlossen ist.
5.
Ziehen Sie die Schrauben an und achten Sie
darauf, dass sich die Festplatte nicht lösen
kann.
31
DEUTSCH
5. Verbindungen herstellen
Überprüfen der TCP/IP-Einstellungen:
Schritt 1: Rechtsklicken Sie im Desktopmenü auf „Netzwerkumgebung” und
wählen Sie „Eigenschaften“.
Schritt 2: Öffnen Sie die „Eigenschaften” der LAN-Verbindung.
Schritt 3: Überprüfen Sie, ob der „Client für Microsoft-Netzwerke”, die „Dateiund Druckerfreigabe für Microsoft-Netzwerke” und das „Internetprotokoll
(TCP/IP)” installiert sind. Wenn nicht, installieren Sie diese
Kommunikationsprotokolle, bevor Sie fortfahren.
Verdrahtete Ethernet-Verbindung:
Schließen Sie den Conceptronic CHD2WLANU mit einem Ethernetkabel direkt an
Ihrem Computer an. Führen Sie dann folgende Schritte aus, um den Conceptronic
CHD2WLANU in der verdrahteten Ethernet-Umgebung anzuschließen.
Schritt 1: Klicken Sie auf die Schaltfläche Start und wählen Sie Einstellungen und
dann Systemsteuerung.
Schritt 2: Doppelklicken Sie auf das Symbol Netzwerkverbindungen und wählen
Sie die Netzwerkkarte, die Sie verwenden werden. Rechtsklicken Sie auf das
Symbol der Netzwerkkarte und wählen Sie Eigenschaften.
Schritt 3: Wählen Sie Internetprotokoll (TCP/IP) und klicken Sie auf die
Schaltfläche Eigenschaften, um manuell eine IP-Adresse einzugeben.
Schritt 4: Die IP-Adresse kann zwischen 192.168.123.1 und 192.168.123.253 liegen.
32
DEUTSCH
In diesem Fall verwenden wir 192.168.123.88 als IP-Adresse. Die Subnetzmake
muss 255.255.255.0 und das Standardgateway 192.168.123.254 sein. Klicken Sie
dann auf „OK”, um die TCP/IP-Konfiguration abzuschließen.
Drahtlose Verbindung:
Führen Sie für den Anschluss des Conceptronic CHD2WLANU in einer drahtlosen
Umgebung die folgenden Schritte aus. Wir gehen davon aus, dass mindestens eine
WLAN-Karte auf Ihrem Computer installiert ist und dass der Conceptronic
CHD2WLANU eingeschaltet ist.
Schritt 1: Aktivieren Sie zuerst die WLAN-Karte und überprüfen Sie die
Eigenschaften der Drahtlosnetzwerkverbindung in der Netzwerkumgebung.
Schritt 2: Wählen Sie nach Eingabe der Eigenschaften des Drahtlosnetzwerks das
Symbol Drahtlosnetzwerke. In der Liste der verfügbaren Netzwerke finden Sie
„Conceptronic”. Wählen Sie Conceptronic, und klicken Sie auf die Schaltfläche
Verbinden, um die Verbindung herzustellen. Wenn Sie Conceptronic nicht finden
sollten, zeigen Sie die Netzwerkliste erneut an.
Wir empfehlen Ihnen, die Funktion ‚drahtlose Verschlüsselung’ zu aktivieren,
oder auf dem Conceptronic CHD2WLANU Zugriffsregeln für Benutzer
festzulegen. Anderenfalls können sich andere Computer drahtlos damit
verbinden und auf Daten zugreifen, die auf Ihrer Festplatte gespeichert sind.
6. Dateifreigabe
Über den Conceptronic CHD2WLANU als Festplatte können in einer bestehenden
drahtlosen oder verdrahteten Netzwerkumgebung Dateien für den Zugriff von
verschiedenen Computern freigegeben werden. Die Benutzer in der selben
Netzwerkumgebung können über dieses Gerät nach Bedarf Daten lesen oder
33
DEUTSCH
schreiben. Folgendes sind die ersten Schritte für die Verwendung der
Netzwerkfestplatte.
Zugriff auf die Netzwerkfestplatte über die Netzwerkumgebung:
Wählen Sie „Netzwerkumgebung” und geben Sie die Adresse „\\AP_Storage” ein.
Es erscheint das Symbol Speicher.
Suche auf dem Computer:
Öffnen Sie den „Arbeitsplatz” im Desktopmenü und klicken Sie auf „Suchen”, um
„AP_Storage” auf Ihrem Computer zu suchen.
34
DEUTSCH
Manuelle Suche auf dem gesamten Netzwerk:
Öffnen Sie den Windows Explorer und klicken Sie auf Netzwerkverbindungen.
Doppelklicken Sie auf Gesamtes Netzwerk, um die Komponenten des Netzwerks
anzuzeigen. Klicken Sie auf das Symbol Microsoft Windows-Netzwerke. Daraufhin
werden die verschiedenen Netzwerkkomponenten in einer Liste angezeigt. Die
Standard-Arbeitsgruppe des Conceptronic CHD2WLANU ist Mshome.
7. Konfigurationen vornehmen
Der Conceptronic CHD2WLANU kann über den Webbrowser (Internet Explorer oder
Netscape) oder mithilfe des Konfigurations-Tools mit verschiedenen Einstellungen
konfiguriert werden.
Konfiguration über den Webbrowser:
Starten Sie den Internet Explorer (oder Netscape) auf Ihrem Computer und geben
Sie im Adressfeld die IP-Adresse des Conceptronic CHD2WLANU ein.
HINWEIS: Die Standard-IP-Adresse des Conceptronic CHD2WLANU ist
192.168.123.254.
35
DEUTSCH
Konfiguration mithilfe des Konfigurations-Tools:
Wenn Sie nicht wissen, welche IP-Adresse für den Conceptronic CHD2WLANU
verwendet wird, können Sie diese über das Konfigurations-Tool ermitteln. Zuerst
müssen Sie jedoch das Konfigurations-Tool von der Installations-CD installieren.
Danach müssen Sie lediglich auf die Schaltfläche „Query [Abfrage]“ klicken.
HINWEIS: Der Status Ihrer Umgebung entspricht möglicherweise nicht dem auf
der folgenden Abbildung.
36
FRANÇAIS
Conceptronic Grab’n’GO CHD2WLANU
Guide d'installation rapide
Nous vous félicitons d'avoir acheté votre
CHD2WLANU de Conceptronic
Ce Guide d'Installation Rapide vous indiquera de manière détaillée comment installer le
CHD2WLANU Grab’n’GO de Conceptronic.
En cas de problèmes, nous vous recommandons de vous adresser à notre service technique
(allez à www.conceptronic.net et cliquez sur «support ».Vous trouverez dans cette section la
Base de Données des Foires Aux Questions.
Si vous avez d’autres questions concernant votre produit et que vous ne trouvez pas la
solution sur notre site web, contactez-nous par e-mail : [email protected]
Pour plus d'informations sur les produits de Conceptronic, visitez notre Site Internet
Conceptronic: www.conceptronic.net
Il est possible que l’installation du matériel décrite ci-dessous diffère parfois de l’installation
sur votre ordinateur. Cela dépend de votre version Windows que vous utilisez.
1. Vérifiez le Contenu du Paquet
•
•
•
•
•
•
•
•
CHD2WLANU de Conceptronic
Antenne dipôle 2,4 GHz.
Adaptateur électrique (5 Volts CC, 3A)
Câble Éthernet RJ-45
Guide d'installation rapide
CD (utilités et manuel d'utilisateur)
pieds en caoutchouc
2 vis (pour fixer le disque dur)
37
FRANÇAIS
2. Configuration du Hardware
Ports
Description
Alimentation
électrique
USB1 / USB2
Entrée d'alimentation 5V / 3A
LAN
Boutons
Shutdown
Backup
Reset
Les ports sur lesquels vous pouvez connecter tous les dispositifs
de stockage USB
Le port LAN MDI / MDIX peut automatiquement détecter le type
de câble lorsque vous le connectez à un ordinateur avec
Éthernet, un réseau de concentrateur, un commutateur, ou un
routeur.
Description
Appuyez sur le bouton pendant environ 4 secondes pour arrêter
tout le système avant d'éteindre.
Appuyez sur le bouton pendant plus de 4 secondes pour copier
des données d'un dispositif USB sur le disque dur.
Appuyez sur les boutons "shutdown" et "backup" simultanément
pendant plus de 6 secondes pour réinitialiser le système aux
paramètres par défaut.
38
FRANÇAIS
3. Voyants LED
USB1
PWR
USB2
LAN
Backup
WLAN
HDD Status
LED
PWR
LAN
WLAN
HDD
USB 1 / USB 2
Allumé
Éteint
Pas de
dispositif
Pas de paquet
de données
Non utilisé
Pas de
dispositif
HDD
Éteint
Allumé
En liaison
Pas de disque
dur
En cours d'utilisation.
Transmission
en cours
Lecture /
écriture disque
dur
Lecteur USB
prêt
Backup
HDD Status
Clignotant
Disque dur
plein ou erreur
39
Sauvegarder des fichiers de
dispositifs USB sur le disque
dur
Plus il clignote rapidement,
plus la capacité du disque dur
est faible.
FRANÇAIS
4. Installation du Disque Dur
1.
Tenez le CHD2WLANU de Conceptronic
d'une main et ouvrez de l'autre main le
couvercle supérieur.
2.
Enlevez le couvercle supérieur.
3.
Insérez le disque dur de 2,5" dans
l'encoche. Vérifiez que les broches de
connexion du disque dur et les
connecteurs sont bien alignés.
4.
Remettez le couvercle supérieur en place
et fermez le couvercle.
5.
Vissez les vis pour être sûr que le disque
dur ne bougera pas.
40
FRANÇAIS
5. Comment faire les Branchements
Vérification des paramètres TCP/IP :
Étape 1 : Sélectionnez le menu "Mes Favoris Réseau" sur le Menu du Bureau, puis
cliquez avec le bouton de droite de la souris pour choisir "Propriétés".
Étape 2 : Sélectionnez "Propriétés" dans Connexion de Réseau Local.
Étape 3 : Vérifiez si les options "Client de Réseaux Microsoft", "Partage de
Fichiers et d'Imprimantes pour Réseaux Microsoft", et "Protocole Internet
(TCP/IP)" sont installées ou pas. Si ce n'est pas le cas, installez d'abord ces
protocoles de communication.
Connexion Éthernet Câblée :
Utilisez un câble Éthernet pour connecter directement le CHD2WLANU de
Conceptronic et votre ordinateur. Puis procédez comme indiqué ci-après pour
connecter le CHD2WLANU de Conceptronic dans l'environnement Éthernet câblé.
Étape 1 : Cliquez sur le bouton Démarrer et sélectionnez Paramètres, puis cliquez
sur Panneau de Configuration.
Étape 2 : Faites double clic sur l'icône Connexions Réseau puis sélectionnez la
carte de réseau correcte qui sera utilisée. Cliquez avec le bouton droit de la souris
sur l'icône de carte de réseau, puis choisissez Propriétés.
41
FRANÇAIS
Étape 3 : Sélectionnez Protocole Internet (TCP/IP) puis appuyez sur le bouton
Propriétés pour ajouter manuellement une adresse IP.
Étape 4 : L'Adresse IP peut être comprise entre 192.168.123.253 et
192.168.123.253. Nous utilisons ici l'adresse 192.168.123.88 comme adresse IP. Le
Masque de sous-réseau doit être : 255.255.255.0 et la Passerelle par défaut doit
être : 192.168.123.254. Puis cliquez sur le bouton "OK" pour compléter la
configuration TCP/IP.
Connexion sans fil :
Procédez comme indiqué ci-après pour connecter le CHD2WLANU de Conceptronic
dans un environnement sans fil. Nous supposons qu'au moins une carte WLAN est
installée sur votre ordinateur, et que le CHD2WLANU de Conceptronic est allumé.
Étape 1 : Activez d'abord la carte WLAN, puis vérifiez les propriétés de Connexion
Réseau Sans Fil dans Mes Favoris Réseau.
Étape 2 : Sélectionnez l'icône de Réseaux Sans Fil après être entré dans
"Propriétés de Connexion de Réseau Sans Fil". Vous trouverez l'option
"Conceptronic" dans la liste de réseaux disponibles. Sélectionnez alors
Conceptronic puis cliquez sur le bouton Connecter pour vous connecter. Si vous ne
trouvez pas Conceptronic, remettez la liste de réseaux à jour.
Nous vous conseillons vivement d'activer l'option de cryptage sans fil, ou
d'ajouter des Règles d'Accès d'Utilisateur sur le CHD2WLANU de Conceptronic.
Dans le cas contraire, n'importe qui pourrait se connecteur sans fil sur votre
réseau et avoir accès aux données enregistrées dans votre disque dur.
42
FRANÇAIS
6. Partage de Fichiers
Le CHD2WLANU de Conceptronic peut être un disque dur de réseau partagé dans
un environnement de réseau sans fil ou câblé. Les utilisateurs du même réseau
peuvent lire ou écrire des données à partir du dispositif. Les points suivants vous
indiquent comment commencer à utiliser le disque dur de réseau.
Accès au disque dur de réseau par Mes Favoris Réseau :
Sélectionnez "Mes Favoris Réseau" et écrivez l'adresse de "//AP_Storage" puis
appuyez sur "Entrée". Vous trouverez l'icône Stockage.
Chercher les ordinateurs :
Ouvrez "Mon Ordinateur" sur le menu du bureau, et utilisez la fonction
"Recherche" pour trouver l'ordinateur de "AP_Storage".
43
FRANÇAIS
Recherche manuelle dans "Réseau Entier" :
Ouvrez Explorateur de Windows puis cliquez sur l'icône Mes Favoris Réseau.
Faites double clic sur Réseau Entier pour visualiser les membres du réseau.
Sélectionnez et cliquez sur l'icône Réseau Windows Microsoft pour afficher les
membres du réseau dans la liste. Le groupe de travail par défaut de CHD2WLANU
de Conceptronic est Mshome.
7. Faire une Configuration
Plusieurs paramètres de CHD2WLANU de Conceptronic peuvent être configurés
grâce au navigateur Web (Internet Explorer ou Netscape) ou à l'Outil de
Configuration.
Configuration avec le navigateur web :
Lancez Internet Explorer (ou Netscape) sur votre ordinateur, puis entrez l'adresse
IP du CHD2WLANYU de Conceptronic dans le champ URL.
REMARQUE : L'adresse IP par défaut de CHD2WLANU de Conceptronic est
192.168.123.254.
44
FRANÇAIS
Configuration avec l'outil de configuration :
Même si vous ne savez pas quelle IP est utilisée par le CHD2WLANU de
Conceptronic, l'Outil de Configuration peut vous aider à la trouver. Mais avant de
faire cela, vous devez installer l'outil de configuration à partir du CD d'installation.
Après ceci il ne vous restera plus qu'à cliquer sur le bouton "Requête"
REMARQUE : L'état de votre environnement peut ne pas être le même que
cette image.
45
ITALIANO
Conceptronic Grab’n’GO CHD2WLANU
Manuale d’installazione rapida
Vi ringraziamo per aver acquistato il
CHD2WLANU Conceptronic
Nel presente manuale d’installazione rapida potrete trovare una spiegazione passo
a passo per installare il Grab’n’GO CHD2WLANU Conceptronic.
Se dovessero esserci dei problemi, vi consigliamo di visitare il nostro sito di
supporto (andate su www.conceptronic.net e cliccate ‘support’), dove potrete
trovare il Database delle Risposte alle Domande più Frequenti (FQA).
Se doveste avere altre domande riguardanti il prodotto che non trovate sul nostro
sito Web vi preghiamo di contattarci attraverso l’e-mail:
[email protected]
Per ulteriori informazioni dei prodotti Conceptronic, la preghiamo di visitare il sito
Web della Conceptronic: www.conceptronic.net
La successiva descrizione relativa all’installazione del software potrebbe essere
leggermente diversa dall’installazione sul vostro computer. Ciò dipende della
versione di Windows in uso.
1. Contenuto della confezione:
CHD2WLANU Conceptronic
Antenna a dipolo da 2.4GHz
•
Adattatore di corrente (5 Volt DC, 3A)
•
•
Cavo Ethernet RJ-45
•
Manuale d’installazione rapida
•
CD (utility e manuale d’uso)
piedini in gomma
•
2 viti (per fissare l’hard drive)
•
46
ITALIANO
2. Configurazione dell’hardware
Ingressi
Descrizione
Power
USB1 / USB2
Ingresso di alimentazione 5V / 3A
Sono le porte per potersi collegare a qualsiasi dispositivo di
memoria USB
L’ingresso LAN MDI / MDIX rileva automaticamente il tipo di cavo
quando il dispositivo viene collegato a un computer, una rete di
hub, uno switch o un router abilitati Ethernet
Descrizione
Premerlo per quattro secondi circa per arrestare
completamente il sistema, invece di spegnerlo mediante
l’apposito pulsante
Premere il pulsante per più di quattro secondi per copiare dati
dal dispositivo USB collegato sull’HDD
Premere simultaneamente i pulsanti “Shutdown” e “Backup” per
più di sei secondi per riportare il sistema sulle impostazioni di
fabbrica
LAN
Pulsanti
Shutdown
Backup
Reset
47
ITALIANO
3. LED
USB1
PWR
USB2
LAN
Backup
WLAN
HDD Status
LED
PWR
LAN
WLAN
HDD
USB 1 / USB 2
Spento
Dispositivo spento
Senza dispositivo
Senza pacchetto
Non in uso
Senza dispositivo
HDD
Acceso
Dispositivo acceso
Collegato
Trasmissione
L’HDD legge/scrive
Drive USB pronto
Backup
HDD Status
Senza HDD
HDD pieno o errore
48
Lampeggiante
In uso
Realizza il backup di
file dal dispositivo
USB collegato all’HDD
Se lampeggia
velocemente, HDD
con poca capacità
disponibile
ITALIANO
4. Installazione del disco rigido
1.
Con una mano sostenere il CHD2WLANU
Conceptronic, e con l’altra aprire con
delicatezza la protezione superiore.
2.
togliere la protezione superiore.
3.
Inserire l’hard drive da 2.5” nell’apposito
slot. Assicurarsi che i pin di connessione
dell’hard drive e i connettori siano
adeguatamente allineati.
4.
Rimettere la protezione superiore e
agganciarla al dispositivo.
5.
Stringere le viti per essere sicuri che l’hard
drive non si sganci.
49
ITALIANO
5. Realizzare le connessioni
Controllare le impostazioni TCP/IP:
Passo 1: selezionare l’opzione “Risorse di rete” nel menu del desktop, e fare clic
con il pulsante destro del mouse per selezionare “Proprietà”.
Passo 2: in “Proprietà” selezionare quelle della Connessione alla rete locale.
Passo 3: verificare se sono stati installati o meno “Client per reti Microsoft”,
“Condivisione file e stampanti per reti Microsoft”, e “Protocollo Internet
(TCP/IP)”. In caso negativo, prima di tutto è necessario installare tali protocolli di
comunicazione.
Connessione Ethernet cablata:
Usare un cavo Ethernet per collegare il CHD2WLANU Conceptronic direttamente al
computer, dopo di che seguire i passi riportati qui in basso per collegare il
CHD2WLANU Conceptronic all’ambiente Ethernet cablato.
Passo 1: fare clic sul pulsante Start e selezionare Configurazione, dopo di che
fare clic su Pannello di controllo.
Passo 2: fare doppio clic sull’icona di Connessioni di rete e selezionare l’apposita
scheda di rete che verrà utilizzata. Fare clic con il pulsante destro del mouse
sull’icona della scheda di rete, dopo di che selezionare Proprietà.
Passo 3: selezionare il Protocollo Internet (TCP/IP), dopo di che premere il
pulsante Proprietà per aggiungere un indirizzo IP in maniera manuale.
50
ITALIANO
Passo 4: l’Indirizzo IP può variare fra 192.168.123.1 e 192.168.123.253. In questo
esempio l’indirizzo IP è 192.168.123.88. La Maschera di sottorete deve essere:
255.255.255.0 e il Gateway predefinito: 192.168.123.254. Poi fare clic su “OK”
per completare la configurazione TCP/IP.
Connessione wireless:
Seguire i passi riportati qui in basso per collegare il CHD2WLANU Conceptronic in
un ambiente wireless. Si dà per scontato che esiste almeno una scheda WLAN
installata sul computer e che il CHD2WLANU Conceptronic sia acceso.
Passo 1: prima di tutto attivare la scheda WLAN, e controllare le proprietà
dell’opzione Connessione rete senza fili in Risorse di rete.
Passo 2: selezionare l’icona di Reti senza fili dopo essere entrati in “Proprietà di
Connessione rete senza fili”. Nell’elenco di reti disponibili apparirà
“Conceptronic”, selezionarlo e fare clic sul pulsante Collega per realizzare la
connessione. Se invece non esiste l’opzione Conceptronic, aggiornare l’elenco di
reti disponibili.
Si consiglia vivamente di attivare l’opzione di codifica wireless, o di aggiungere
regole di Accesso Utente al CHD2WLANU Conceptronic. In caso contrario,
chiunque potrà collegarsi ad esso in modo wireless e accedere ai dati contenuti
nell’hard drive.
51
ITALIANO
6. Condivisione dei file
Il CHD2WLANU Conceptronic si può usare come hard drive di una rete condivisa in
un ambiente wireless o cablato già esistente.
Gli utenti della medesima area di rete potranno leggere o scrivere dati attraverso
il dispositivo, come richiesto. Qui di seguito vengono riportati diversi passi
destinati agli utenti che usano il network hard drive.
Accedere al network hard drive attraverso Risorse direte:
Selezionare l’opzione “Risorse di rete” e introdurre l’indirizzo “\\AP_Storage”
dopo di che premere “Intro”. Subito dopo apparirà l’icona di Memoria.
Ricerca dei computer:
Aprire “Risorse del computer” nel menu del desktop e usare la funzione di
“Ricerca” per localizzare il computer di “AP_Storage”.
52
ITALIANO
Ricerca manuale di “Tutto il network”:
Aprire Esplora risorse, e fare clic sull’icona di Risorse di rete. Fare doppio clic su
Tutta la rete per visualizzare i componenti della rete. Selezionare l’icona di
Microsoft Windows Network e fare clic su di essa, poi sui diversi componenti che
appaiono nell’elenco. Il gruppo di lavoro di default del CHD2WLANU Conceptronic
è Mshome.
7. Realizzare la configurazione
Nel CHD2WLANU Conceptronic è possibile configurare diverse opzioni attraverso il
browser web (Internet Explorer o Netscape) o il Configuration Tool del titolare.
Configurazione attraverso il browser web:
Aprire l’Internet Explorer (o Netscape) sul computer, dopo di che introdurre
l’indirizzo IP del CHD2WLANU Conceptronic nell’apposito campo URL.
NOTA: l’indirizzo IP di default del CHD2WLANU Conceptronic è
192.168.123.254.
53
ITALIANO
Configurazione attraverso il Configuration Tool:
Anche nel caso in cui non si conosca l’indirizzo IP usato dal CHD2WLANU
Conceptronic, il Configuration Tool aiuterà l’utente a trovarlo; prima, però di fare
ciò, sarà necessario installare il Configuration Tool contenuto nel CD, dopo di che
basterà fare clic sul pulsante “Query” (Cerca).
NOTA: lo stato dell’ambiente usato potrebbe non corrispondere a quello
mostrato nell’immagine
54
PORTUGUÊS
Conceptronic Grab’n’GO CHD2WLANU
Manual de Instalação Rápida
Parabéns pela compra do seu Conceptronic
CHD2WLANU
O Manual de Instalação Rápida incluído fornece-lhe uma explicação passo a passo sobre como
instalar o Conceptronic Grab’n’GO CHD2WLANU.
Se tiver algum problema, aconselhamos consultar o nosso site de assistência (vá a
www.conceptronic.net e clique em ‘assistência’ Aqui pode encontrar a Base de Dados das
Perguntas Mais Frequentes.
Se tiver outras questões relativas ao nosso produto e não as conseguir encontrar no nosso
webiste, pode-nos contactar através do e-mail: [email protected]
Para mais informações sobre produtos de Conceptronic, por favor visite o Web Site da
Conceptronic: www.conceptronic.net
A instalação do Software conforme se encontra descrita abaixo pode ser ligeiramente
diferente da instalação do seu computador. Isso depende da versão do Windows que está a
utilizar.
1.
Verifique o conteúdo da sua embalagem
Conceptronic CHD2WLANU
•
Antena bipolar de 2,4 GHz
Adaptador de corrente
•
(5 Volts DC, 3A)
Cabo Ethernet RJ-45
•
•
Manual de Instalação Rápida
•
CD (utilitários e manual do
utilizador)
2 pés de borracha
•
2 parafusos (para prender o disco
•
rígido)
55
PORTUGUÊS
2. Configuração do Hardware
Portas
Descrição
Power
(Alimentação)
USB 1 / USB 2
Entrada de alimentação 5V / 3A.
LAN
Botões
Shutdown
(Desligar)
Backup (Cópia
de segurança)
Reset
(Reposição):
Portas onde pode ligar qualquer dispositivo de armazenamento
USB.
A porta MDI / MDIX LAN pode detectar automaticamente o tipo
de cabo quando se ligar a um computador com Ethernet, a uma
rede de hub, switch ou router.
Descrição
Carregue no botão durante aproximadamente 4 segundos para
encerrar todo o sistema antes de desligar.
Carregue no botão por mais de 4 segundos para copiar dados do
dispositivo USB ligado para o HDD.
Carregue simultaneamente nos botões “Desligar” e “Cópia de
segurança” durante mais de 6 segundos para repor o sistema
com as definições de fábrica.
56
PORTUGUÊS
3. Indicadores LED
USB1
PWR
USB2
LAN
WLAN
Backup
HDD Status
LED
PWR
LAN
WLAN
HDD
USB 1 / USB 2
Desligado
Desligado
Sem
dispositivo
Sem pacote
Sem estar a
ser usado
Sem
dispositivo
HDD
Ligado
Ligado
Ligada
Sem HDD
Em uso.
A transmitir
Leitura/gravação
no HDD
Unidade USB
pronta
Cópia de
segurança
Estado HDD
A piscar
HDD cheio ou
erro
57
Ficheiros de cópia de
segurança do dispositivo USB
ligado para HDD.
Quanto mais depressa
piscar, menos capacidade
livre no HDD.
PORTUGUÊS
4. Instalação do disco rígido
1.
Use uma mão para segurar o Conceptronic
CHD2WLANU, e a outra mão para abrir a
tampa superior com cuidado.
2.
Retire a tampa superior.
3.
Insira o disco rígido de 2,5” na ranhura.
Assegure-se que os pinos de ligação do
disco rígido e os conectores ficam bem
alinhados.
4.
Volte a colocar a tampa superior e
prenda-a bem.
5.
Aperte os parafusos para se assegurar de
que o disco rígido não se solta.
58
PORTUGUÊS
5. Estabelecer ligações
Verificar as configurações TCP/IP:
Passo 1: Seleccione “My Network Places” (Os meus locais na rede) no menu do
Ambiente de Trabalho, e clique com o botão direito do rato em “Properties”
(Propriedades).
Passo 2: Seleccione as “Properties” (Propriedades) da Local Area Connection
(Ligação Local).
Passo 3: Verifique se “Client for Microsoft Networks”, “File and Printer Sharing
for Microsoft Networks”, e “Internet Protocol (TCP/IP)” estão ou não instalados.
Se não estiverem, instale primeiro esses protocolos de comunicação.
Ligação de Ethernet com fios:
Use um cabo de Ethernet para ligar o Conceptronic CHD2WLANU e o seu
computador directamente. Depois siga os passos seguintes para ligar o
Conceptronic CHD2WLANU no ambiente de Ethernet com fios.
Passo 1: Clique em Start (Iniciar) e seleccione Settings (Definições), e depois
clique em Control Panel (Painel de Controlo).
Passo 2: Faça um duplo clique no ícone Network Connections (Ligações de rede) e
seleccione a placa de rede que vai ser usada. Clique com o botão direito do rato no
ícone da placa de rede e depois seleccione Properties (Propriedades).
Passo 3: Seleccione Internet Protocol (TCP/IP), e depois carregue no botão
Properties (Propriedades) para adicionar um endereço IP manualmente.
59
PORTUGUÊS
Passo 4: O endereço IP pode ir desde 192.168.123.1 a 192.168.123.253. Aqui
vamos usar o 192.168.123.88 como endereço IP. A Subnet mask (Máscara de
sub-rede) deve ser: 255.255.255.0 e a Default gateway (porta de ligação
predefinida) deve ser: 192.168.123.254. Depois clique no botão “OK” para
completar a configuração TCP/IP.
Ligação sem fios:
Siga os passos seguintes para ligar o Conceptronic CHD2WLANU num ambiente sem
fios. Assumimos que existe pelo menos uma placa WLAN instalada no seu
computador, e que o Conceptronic CHD2WLANU está ligado.
Passo 1: Active antes de mais a placa WLAN, e verifique as propriedades da
Wireless Network Connection (Ligação de Rede Sem Fios) em My Network Places
(Os Meus Locais na Rede).
Passo 2: Seleccione o ícone Wireless Networks (Redes Sem Fios) depois de entrar
nas “Wireless Network Connection Properties” (Propriedades de Ligação de Rede
Sem Fios). Vai encontrar o “Conceptronic” na lista de redes disponíveis; depois
seleccione Conceptronic e clique no botão Connect (Ligar) para ligar. Caso
contrário, se não encontrar o Conceptronic, actualize a lista de redes novamente.
Recomendamos que active a função de encriptação sem fios ou que adicione
regras de Acesso de Utilizador ao Conceptronic CHD2WLANU. Caso contrário,
qualquer pessoa poderá aceder ao dispositivo sem fios e aceder aos dados que
estiverem guardados no seu disco rígido.
60
PORTUGUÊS
6. Partilha de ficheiros
O Conceptronic CHD2WLANU pode funcionar como disco rígido de rede partilhado
num ambiente de rede existente com ou sem fios. Os utilizadores da mesma área
de rede podem ler ou gravar dados no dispositivo como quiserem. Os passos
seguintes destinam-se aos utilizadores que vão começar a usar o disco rígido de
rede.
Aceder ao disco rígido de rede por Os Meus Locais na Rede:
Seleccione “My Network Places” (Os Meus Locais na Rede) e introduza o endereço
“\\AP_Storage” e carregue em “Enter”. Depois vai encontrar o ícone Storage.
Procurar nos computadores:
Abra “My Computer” (O Meu Computador) no menu do Ambiente de Trabalho, e
use a função “Search” (Procurar) para procurar o computador de
“AP_Storage”.
61
PORTUGUÊS
Procurar “Entire Network” (Toda a rede) manualmente:
Abra o Windows Explorer, e depois clique no ícone My Network Places (Os Meus
Locais na Rede). Faça um duplo clique em Entire Network (Toda a Rede) para ver
os componentes da rede. Seleccione e clique no ícone Microsoft Windows Network,
e depois nos vários componentes da rede que aparecem na lista. O grupo de
trabalho predefinido do Conceptronic CHD2WLANU é Mshome.
7. Fazer a configuração
O Conceptronic CHD2WLANU pode ser configurado em várias funções através do
navegador (Internet Explorer ou Netscape) ou através da própria Ferramenta de
Configuração.
Configurar através do navegador:
Abra o Internet Explorer (ou o Netscape) no seu computador, e depois digite o
endereço IP do Conceptronic CHD2WLANU no campo de URL.
NOTA: O endereço IP predefinido do Conceptronic CHD2WLANU é
192.168.123.254.
62
PORTUGUÊS
Configurar através da ferramenta de configuração:
Mesmo que não saiba que endereço IP é usado pelo Conceptronic CHD2WLANU, a
Ferramenta de Configuração ajuda-o a encontrá-lo. Mas antes de poder fazer isto,
tem de instalar a ferramenta de configuração que está no CD de instalação. Depois
de fazer isso, basta clicar no botão “Querry” (Consulta).
NOTA: O estado do seu ambiente pode não ser o mesmo da imagem.
63
MAGYAR
Conceptronic Grab’n’GO CHD2WLANU
Gyorstelepítési útmutató
Köszönjük, hogy a Conceptronic CHD2WLANU
készülékünket választotta
A mellékelt gyorstelepítési útmutató lépésről lépésre elmagyarázza, miként kell a
Conceptronic Grab’n’GO CHD2WLANU-t telepítenie.
Probléma esetén javasoljuk, hogy vegye igénybe a Support-site-en nyújtott
segítséget(menjen a www.conceptronic.net-re és kattintson a ‘Support’-ra, ahol
megtalálja a Gyakran Ismételt Kérdések adatbázist.
Ha termékünkkel kapcsolatban további kérdése lenne, és weboldalunkon nem talál
rá választ, forduljon hozzánk e-mailben: [email protected]
A Conceptronic termékekkel kapcsolatos további információért kérjük tekintse
meg a Conceptronic weboldalát: www.conceptronic.net
A továbbiakban leírt szoftver installáció kis mértékben eltérhet az Ön
számítógépére való installációtól attól függően, hogy Ön melyik Windows
változatot használja.
1. Ellenőrizze a csomag tartalmát
Conceptronic CHD2WLANU
•
2,4 GHz-es dipólantenna
•
Hálózati adapter (5 V-os egyenáram, 3 A)
•
RJ-45 Ethernet-kábel
Gyorstelepítési útmutató
•
CD (segédprogramok és felhasználói
•
kézikönyv)
•
2x gumiláb
•
2x csavar (a merevlemez-meghajtó
rögzítéséhez)
64
MAGYAR
2. Hardver-konfiguráció
Portok
Leírás
Power
USB1 / USB2
5 V / 3 A bemenőteljesítmény.
Azok a portok, ahová bármilyen USB-tárolóeszközt
csatlakoztathatunk.
Az MDI / MDIX LAN-port automatikusan képes a kábeltípus
érzékelésére, ha Ethernet szempontjából engedélyezett
számítógéphez, hub-hálózathoz, kapcsolóhoz vagy routerhez
csatlakozik.
Leírás
Nyomja le kb. 4 másodpercig a gombot, ha kikapcsolás előtt az
egész rendszert le akarja állítani.
Nyomja le több mint 4 másodpercig a gombot, ha a
csatlakoztatott USB-eszközről kíván adatokat másolni a HDD-re.
Egyidejűleg nyomja le a „Shutdown” és „Backup” gombot több
mint 6 másodpercig, ha a rendszer beállítását gyári
alapértelmezésre kívánja visszaállítani.
LAN
Gombok
Shutdown
Backup
Reset
65
MAGYAR
3. LED-kijelzők
USB1
PWR
USB2
LAN
Backup
WLAN
HDD Status
LED
PWR
LAN
WLAN
HDD
USB 1 /
USB 2
Nem ég
Áramellátás
kikapcsolva
Nincs eszköz
csatlakoztatva
Nincs csomag
Nincs használatban
Nincs eszköz
HDD
Ég
Áramellátás
bekapcsolva
Összekapcsolva
Nincs HDD
Használat alatt.
Továbbításkor
HDD-olvasás/-írás
USB-meghajtó kész
Backup
HDD
Status
Villog
HDD tele vagy hiba
66
Biztonsági másolatok
készítése a
csatlakoztatott
USB-eszközről a HDD-re.
További, gyorsabb
villogás, kisebb a
rendelkezésre álló
HDD-kapacitás.
MAGYAR
4. Merevlemez telepítése
1.
Egyik kezében tartsa a Conceptronic
CHD2WLANU-t, a másikkal pedig óvatosan
nyissa fel a tetőt.
2.
Távolítsa el a tetőt.
3.
Tegye be a 2,5”-os merevlemezmeghajtót
a nyílásba. Gondoskodjon róla, hogy a
merevlemez-meghajtó csatlakozótűi és a
csatlakozók kellőképpen igazodjanak
egymáshoz.
4.
Tegye vissza, majd illessze rá szorosan a
tetőt.
5.
Húzza meg a csavarokat, hogy biztos
lehessen benne, a merevlemez-meghajtó
nem eshet ki.
67
MAGYAR
5. Csatlakozások kialakítása
Ellenőrizze a TCP/IP-beállításokat:
1. lépés: Jelölje ki az asztal menüjén a „My Network Places”-t, majd kattintson
az egér jobb oldali gombjával a „Properties” kijelöléséhez.
2. lépés: Válassza a Helyi kapcsolat tulajdonságait („Properties”).
3. lépés: Ellenőrizze, vajon a „Client for Microsoft Networks”, „File and Printer
Sharing for Microsoft Networks” és „Internet Protocol (TCP/IP)” telepítve van-e
vagy sem. Ha nincs, előbb telepítse ezeket a kommunikációs protokollokat.
Vezetékes Ethernet-kapcsolat:
Ethernet-kábelt használjon a Conceptronic CHD2WLANU és saját számítógépe
közvetlen összekapcsolásához. Majd kövesse az alábbi lépéseket, hogy a
Conceptronic CHD2WLANU-t a vezetékes Ethernet-környezetben csatlakoztathassa.
1. lépés: Kattintson a Start gombra, majd válassza a Settings-t, végül pedig
kattintson a Control Panel-re.
2. lépés: Kattintson kétszer a Network Connections ikonra, majd jelölje ki a
használni kívánt megfelelő hálózati kártyát. Kattintson az egér jobb oldali
gombjával a hálózati kártya ikonjára, majd válassza a Properties-t.
3. lépés: Jelölje ki az Internet Protocol (TCP/IP)-t, majd nyomja le a Properties
gombot, ha manuálisan akar egy IP-címet hozzáadni.
4. lépés: Az IP address (IP-cím) 192.168.123.1-től 192.168.123.253-ig terjedhet.
Ebben az esetben IP-címként a 192.168.123.88-at használjuk. A Subnet mask
(Alhálózati maszk) legyen 255.255.255.0, a Default gateway (Alapértelmezett
átjáró) pedig 192.168.123.254. Majd kattintson az „OK” gombra és ezzel a TCP/IP
konfigurálásának vége.
68
MAGYAR
Vezeték nélküli kapcsolat:
A Conceptronic CHD2WLANU-hoz vezeték nélküli környezetben történő
csatlakoztatáskor kövesse az alábbi lépéseket. Feltételezzük, hogy legalább egy
WLAN-kártya telepítve van a számítógépén, a Conceptronic CHD2WLANU pedig be
lett kapcsolva.
1. lépés: Előbb engedélyezze a WLAN-kártyát, majd ellenőrizze a My Network
Places-ről (Hálózati helyeim) a Wireless Network Connection (Vezeték nélküli
hálózati kapcsolat) tulajdonságait.
2. lépés: Jelölje ki a Wireless Networks (Vezeték nélküli hálózatok) ikont, miután
beírta a „Wireless Network Connection Properties”-t (Vezeték nélküli hálózati
kapcsolat tulajdonságai). A „Conceptronic”-ot az elérhető hálózatok listáján
találja, ezután jelölje ki a Conceptronic-ot, majd kattintson a csatlakoztatás
érdekében a Connect gombra. Egyébként, ha nem találja a Conceptronic-ot,
ismét frissítse a hálózatok listáját.
Nyomatékosan javasoljuk, hogy engedélyezze a vezeték nélküli titkosítást,
mint jellemzőt, vagy – a felhasználói hozzáféréssel kapcsolatban – adja hozzá a
Conceptronic CHD2WLANU-ra vonatkozó szabályokat. Különben mindenki
vezeték nélkül rákapcsolódhat és hozzá is férhet az ön
merevlemez-meghajtóján tárolt adatokhoz.
69
MAGYAR
6. Fájlok megosztása
A Conceptronic CHD2WLANU – már meglévő, vezeték nélküli vagy vezetékes
hálózati környezetben – lehet a megosztott hálózati merevlemez-meghajtó. Az
ugyanazon a hálózati területen belüli felhasználók szükség szerint olvashatják ki,
illetve írhatnak be adatokat az eszközbe. Az alábbi különböző lépések arra
vonatkoznak, amikor a felhasználók a hálózati merevlemez-meghajtó
alkalmazását megkezdik.
Hozzáférés a hálózati merevlemez-meghajtóhoz a My Network Places-en
keresztül:
Jelölje ki a „My Network Places”-t (Hálózati helyeim) és írja be a „\\AP_Storage”
címét, majd nyomja le az „Enter”-t. Ezután keresse meg a Storage ikont.
Számítógépek keresése:
Nyissa meg az asztal menüjén a „My Computer”-t (Sajátgép), majd használja a
„Search” funkciót az „AP_Storage” számítógépének megkereséséhez.
70
MAGYAR
Az „Entire Network” (Egész hálózat) manuális keresése:
Nyissa meg a Windows Explorer-t, majd kattintson a My Network Places ikonra.
Kattintson kétszer az Entire Network-re (Egész hálózat), ha meg kívánja tekinteni
a hálózati komponenseket. Jelölje ki, majd kattintson a Microsoft Windows
Network ikonra, utána pedig a listán megjelenő különböző hálózati
komponensekre. A Conceptronic CHD2WLANU alapértelmezett munkacsoportja a
Mshome.
7. Konfiguráció kialakítása
A Conceptronic CHD2WLANU különböző beállításokkal konfigurálható a
web-böngészőn (Internet Explorer vagy Netscape) keresztül, illetve a saját
konfigurációs eszköz segítségével.
Konfigurálás webböngészőn keresztül:
Indítsa el számítógépén az Internet Explorer-t (vagy a Netscape-t), majd írja be
az URL-mezőn a Conceptronic CHD2WLANU IP-címét.
MEGJEGYZÉS: A Conceptronic CHD2WLANU alapértelmezett IP-címe
192.168.123.254.
71
MAGYAR
Konfigurálás konfigurációs eszköz segítségével:
Még ha nem is tudja, melyik IP-t használja éppen a Conceptronic CHD2WLANU, a
konfigurációs eszköz segít majd azt megtalálni. De még mielőtt erre sor kerülne,
telepítenie kell a telepítő CD-ről a konfigurációs eszközt. Azután pedig semmi
egyebet nem kell tennie, csupán rákattintani a „Query” gombra.
MEGJEGYZÉS: Saját környezetének állapota esetleg nem ugyanaz, mint ami
ezen a képen látható.
72
Declaration of CE Conformity
The manufacturer
Conceptronic
Address
Databankweg 7
3821 AL Amersfoort, the Netherlands
Hereby declares that the product
Type
Product
complies
Wireless Harddisk 2,5”
CHD2WLANU
with following directives:
1995/5/EEC
89/336/EEC
73/23/EEC
R&TTE directive:
Telecommunications Terminal Equipment and Satellite Earth Station Equipment
EMC directive:
Electromagnetic Compatibility
Low Voltage Directive:
Electrical equipment designed for use within certain
voltage limits
The following standards were consulted to assess conformity:
ETS 300 328-2/2000, EN 301 489-17-2000, EN 301 489-1-2000, EN55022/9.98 Class B, EN
61000-3-2/3/4/1995, EN 50082-1/1994, EN 60950/1995
This product is for indoor use only. The purpose of this product is to send and receive data trough the
ether. This is a class 2 product and the transmitted output power is less than 100mW.
The CE symbol confirms that this product conforms to the above named standards and regulations.
This product is suitable for all EU countries.
For France, the output power is restricted if used outdoors and in the range 2454 to 2483,5 MHz.
For Italy, depending on the usage, a general authorization may be required.
Pour tous les pays de I'UE. Pour la France, pour une utilisationen extérieur, la puissance de sortie est
limitée dans la bande 2454 to 2483,5 MHz.Pertutti i paesi ell'EU. Per I'Italia, secondo I'uso, un
'autorizzazione generale puô essere richiesta.
Place and date of issue: Amersfoort, December 20, 2005
Herman Looijen, Product Marketing Manager
73
LICENCE INFORMATION
Licensing Information
This product includes copyrighted third-party software licensed under the terms of the GNU General Public License.
Please see The GNU General Public License for the exact terms and conditions of this license.
Specially, the following parts of this product are subject to the GNU GPL:
•
kernel : linux 2.4.28
•
•
busybox : busybox 1.00 rc2
•
•
•
•
•
•
•
•
•
•
•
•
•
802.1x : 802.1x daemon
dhcpcd : DHCP client daemon
dhcpd : DHCP server
lpd : LPD printer server
syslogd : split from busybox.
bridge-utils
e2fsprogs : ext2 file system utilities 1.27
fdisk : split from util-linux
ftp : ftp client, netkit-ftp-0.16
netatalk : Appletalk client and server
samba : Samba server 2.2.X.
sysutils : system utilities
util-linux : linux utilities
•
Transmission : BT source code, but not in use
vsftpd : Very Secure FTP Daemon, version 2.0.3
•
wireless tools
All listed software packages are copyright by their respective authors. Please see the source code for detailed information.
Availability of source code
Conceptronic. has eposed the full source code of the GPL licensed software, including any scripts to control compilation and
installation of the object code. All future firmware updates will also be accompanied with their respective source code. For
more information on how you can obtain our open source code, please visit our web site.
74
LICENCE INFORMATION
GNU GENERAL PUBLIC LICENSE
Version 2, June 1991
Copyright (C) 1989, 1991 Free Software Foundation, Inc.
Temple Place, Suite 330, Boston, MA
02111-1307 USA
Everyone is permitted to copy and distribute verbatim copies
of this license document, but changing it is not allowed.
Preamble
The licenses for most software are designed to take away your freedom to share and change it. By contrast, the GNU
General Public License is intended to guarantee your freedom to share and change free software--to make sure the software
is free for all its users. This General Public License applies to most of the Free Software Foundation's software and to any
other program whose authors commit to using it. (Some other Free Software Foundation software is covered by the GNU
Library General Public License instead.) You can apply it to your programs, too.
When we speak of free software, we are referring to freedom, not price. Our General Public Licenses are designed to
make sure that you have the freedom to distribute copies of free software (and charge for this service if you wish), that you
receive source code or can get it if you want it, that you can change the software or use pieces of it in new free programs;
and that you know you can do these things.
To protect your rights, we need to make restrictions that forbid anyone to deny you these rights or to ask you to surrender
the rights. These restrictions translate to certain responsibilities for you if you distribute copies of the software, or if you
modify it.
For example, if you distribute copies of such a program, whether gratis or for a fee, you must give the recipients all the
rights that you have. You must make sure that they, too, receive or can get the source code. And you must show them these
terms so they know their rights.
We protect your rights with two steps: (1) copyright the software, and (2) offer you this license which gives you legal
permission to copy, distribute and/or modify the software.
Also, for each author's protection and ours, we want to make certain that everyone understands that there is no warranty
for this free software. If the software is modified by someone else and passed on, we want its recipients to know that what
they have is not the original, so that any problems introduced by others will not reflect on the original authors' reputations.
Finally, any free program is threatened constantly by software patents. We wish to avoid the danger that redistributors of a
free program will individually obtain patent licenses, in effect making the program proprietary. To prevent this, we have
made it clear that any patent must be licensed for everyone's free use or not licensed at all.
The precise terms and conditions for copying, distribution and modification follow.
GNU GENERAL PUBLIC LICENSE
TERMS AND CONDITIONS FOR COPYING, DISTRIBUTION AND MODIFICATION
75
LICENCE INFORMATION
This License applies to any program or other work which contains a notice placed by the copyright holder saying it may be
distributed under the terms of this General Public License. The "Program", below, refers to any such program or work, and a
"work based on the Program" means either the Program or any derivative work under copyright law: that is to say, a work
containing the Program or a portion of it, either verbatim or with modifications and/or translated into another
language. (Hereinafter, translation is included without limitation in the term "modification".) Each licensee is addressed
as "you".
Activities other than copying, distribution and modification are not covered by this License; they are outside its scope.
The act of running the Program is not restricted, and the output from the Program is covered only if its contents constitute
a work based on the Program (independent of having been made by running the Program). Whether that is true depends on
what the Program does.
1. You may copy and distribute verbatim copies of the Program's source code as you receive it, in any medium, provided
that you conspicuously and appropriately publish on each copy an appropriate copyright notice and disclaimer of warranty;
keep intact all the notices that refer to this License and to the absence of any warranty; and give any other recipients of the
Program a copy of this License along with the Program.
You may charge a fee for the physical act of transferring a copy, and you may at your option offer warranty protection in
exchange for a fee.
2. You may modify your copy or copies of the Program or any portion of it, thus forming a work based on the Program, and
copy and distribute such modifications or work under the terms of Section 1 above, provided that you also meet all of these
conditions:
a) You must cause the modified files to carry prominent notices stating that you changed the files and the date of any
change.
b) You must cause any work that you distribute or publish, that in whole or in part contains or is derived from the Program
or any part thereof, to be licensed as a whole at no charge to all third parties under the terms of this License.
c) If the modified program normally reads commands interactively when run, you must cause it, when started running for
such interactive use in the most ordinary way, to print or display an announcement including an appropriate copyright
notice and a notice that there is no warranty (or else, saying that you provide a warranty) and that users may redistribute
the program under these conditions, and telling the user how to view a copy of this License.
(Exception: if the Program
itself is interactive but does not normally print such an announcement, your work based on the Program is not required to
print an announcement.)
These requirements apply to the modified work as a whole. If identifiable sections of that work are not derived from the
Program, and can be reasonably considered independent and separate works in themselves, then this License, and its terms,
do not apply to those sections when you distribute them as separate works. But when you distribute the same sections as
part of a whole which is a work based on the Program, the distribution of the whole must be on the terms of this License,
whose permissions for other licensees extend to the entire whole, and thus to each and every part regardless of who wrote
it.
Thus, it is not the intent of this section to claim rights or contest your rights to work written entirely by you; rather, the
intent is to exercise the right to control the distribution of derivative or collective works based on the Program.
76
LICENCE INFORMATION
In addition, mere aggregation of another work not based on the Program with the Program (or with a work based on the
Program) on a volume of a storage or distribution medium does not bring the other work under the scope of this License.
3. You may copy and distribute the Program (or a work based on it, under Section 2) in object code or executable form
under the terms of Sections 1 and 2 above provided that you also do one of the following:
a) Accompany it with the complete corresponding machine-readable source code, which must be distributed under the
terms of Sections 1 and 2 above on a medium customarily used for software interchange; or,
b) Accompany it with a written offer, valid for at least three years, to give any third party, for a charge no more than your
cost of physically performing source distribution, a complete machine-readable copy of the corresponding source code, to
be distributed under the terms of Sections 1 and 2 above on a medium customarily used for software interchange; or,
c) Accompany it with the information you received as to the offer to distribute corresponding source code. (This
alternative is allowed only for noncommercial distribution and only if you received the program in object code or
executable form with such an offer, in accord with Subsection b above.)
The source code for a work means the preferred form of the work for making modifications to it. For an executable work,
complete source code means all the source code for all modules it contains, plus any associated interface definition files,
plus the scripts used to control compilation and installation of the executable. However, as a special exception, the
source code distributed need not include anything that is normally distributed (in either source or binary form) with the
major components (compiler, kernel, and so on) of the operating system on which the executable runs, unless that
component itself accompanies the executable.
If distribution of executable or object code is made by offering access to copy from a designated place, then offering
equivalent access to copy the source code from the same place counts as distribution of the source code, even though third
parties are not compelled to copy the source along with the object code.
4. You may not copy, modify, sublicense, or distribute the Program except as expressly provided under this License. Any
attempt otherwise to copy, modify, sublicense or distribute the Program is void, and will automatically terminate your
rights under this License. However, parties who have received copies, or rights, from you under this License will not have
their licenses terminated so long as such parties remain in full compliance.
5. You are not required to accept this License, since you have not signed it. However, nothing else grants you permission to
modify or distribute the Program or its derivative works. These actions are prohibited by law if you do not accept this
License. Therefore, by modifying or distributing the Program (or any work based on the Program), you indicate your
acceptance of this License to do so, and all its terms and conditions for copying, distributing or modifying the Program or
works based on it.
6. Each time you redistribute the Program (or any work based on the Program), the recipient automatically receives a
license from the original licensor to copy, distribute or modify the Program subject to these terms and conditions. You may
not impose any further restrictions on the recipients' exercise of the rights granted herein. You are not responsible for
enforcing compliance by third parties to this License.
7. If, as a consequence of a court judgment or allegation of patent infringement or for any other reason (not limited to
patent issues), conditions are imposed on you (whether by court order, agreement or otherwise) that contradict the
77
LICENCE INFORMATION
conditions of this License, they do not excuse you from the conditions of this License. If you cannot distribute so as to satisfy
simultaneously your obligations under this License and any other pertinent obligations, then as a consequence you may not
distribute the Program at all. For example, if a patent license would not permit royalty-free redistribution of the Program
by all those who receive copies directly or indirectly through you, then the only way you could satisfy both it and this
License would be to refrain entirely from distribution of the Program.
If any portion of this section is held invalid or unenforceable under any particular circumstance, the balance of the section
is intended to apply and the section as a whole is intended to apply in other circumstances. It is not the purpose of this
section to induce you to infringe any patents or other property right claims or to contest validity of any such claims; this
section has the sole purpose of protecting the integrity of the free software distribution system, which is implemented by
public license practices. Many people have made generous contributions to the wide range of software distributed through
that system in reliance on consistent application of that system; it is up to the author/donor to decide if he or she is willing
to distribute software through any other system and a licensee cannot impose that choice.
This section is intended to make thoroughly clear what is believed to be a consequence of the rest of this License.
8. If the distribution and/or use of the Program is restricted in certain countries either by patents or by copyrighted
interfaces, the original copyright holder who places the Program under this License may add an explicit geographical
distribution limitation excluding those countries, so that distribution is permitted only in or among countries not thus
excluded. In such case, this License incorporates the limitation as if written in the body of this License.
9. The Free Software Foundation may publish revised and/or new versions of the General Public License from time to time.
Such new versions will be similar in spirit to the present version, but may differ in detail to address new problems or
concerns.
Each version is given a distinguishing version number. If the Program specifies a version number of this License which applies
to it and "any later version", you have the option of following the terms and conditions either of that version or of any later
version published by the Free Software Foundation. If the Program does not specify a version number of this License, you
may choose any version ever published by the Free Software Foundation.
10. If you wish to incorporate parts of the Program into other free programs whose distribution conditions are different,
write to the author to ask for permission. For software which is copyrighted by the Free Software Foundation, write to the
Free Software Foundation; we sometimes make exceptions for this. Our decision will be guided by the two goals of
preserving the free status of all derivatives of our free software and of promoting the sharing and reuse of software
generally.
NO WARRANTY
11. BECAUSE THE PROGRAM IS LICENSED FREE OF CHARGE, THERE IS NO WARRANTY FOR THE PROGRAM, TO THE EXTENT
PERMITTED BY APPLICABLE LAW. EXCEPT WHEN OTHERWISE STATED IN WRITING THE COPYRIGHT HOLDERS AND/OR OTHER
PARTIES PROVIDE THE PROGRAM "AS IS" WITHOUT WARRANTY OF ANY KIND, EITHER EXPRESSED OR IMPLIED, INCLUDING, BUT
NOT LIMITED TO, THE IMPLIED WARRANTIES OF MERCHANTABILITY AND FITNESS FOR A PARTICULAR PURPOSE. THE ENTIRE
RISK AS TO THE QUALITY AND PERFORMANCE OF THE PROGRAM IS WITH YOU. SHOULD THE PROGRAM PROVE DEFECTIVE,
YOU ASSUME THE COST OF ALL NECESSARY SERVICING, REPAIR OR CORRECTION.
78
LICENCE INFORMATION
12. IN NO EVENT UNLESS REQUIRED BY APPLICABLE LAW OR AGREED TO IN WRITING WILL ANY COPYRIGHT HOLDER, OR ANY
OTHER PARTY WHO MAY MODIFY AND/OR REDISTRIBUTE THE PROGRAM AS PERMITTED ABOVE, BE LIABLE TO YOU FOR
DAMAGES, INCLUDING ANY GENERAL, SPECIAL, INCIDENTAL OR CONSEQUENTIAL DAMAGES ARISING OUT OF THE USE OR
INABILITY TO USE THE PROGRAM (INCLUDING BUT NOT LIMITED TO LOSS OF DATA OR DATA BEING RENDERED INACCURATE OR
LOSSES SUSTAINED BY YOU OR THIRD PARTIES OR A FAILURE OF THE PROGRAM TO OPERATE WITH ANY OTHER PROGRAMS),
EVEN IF SUCH HOLDER OR OTHER PARTY HAS BEEN ADVISED OF THE POSSIBILITY OF SUCH DAMAGES.
END OF TERMS AND CONDITIONS
How to Apply These Terms to Your New Programs
If you develop a new program, and you want it to be of the greatest possible use to the public, the best way to achieve this
is to make it free software which everyone can redistribute and change under these terms.
To do so, attach the following notices to the program. It is safest to attach them to the start of each source file to most
effectively convey the exclusion of warranty; and each file should have at least the "copyright" line and a pointer to where
the full notice is found.
, 1 April 1989
Ty Coon, President of Vice
This General Public License does not permit incorporating your program into proprietary programs. If your program is a
subroutine library, you may consider it more useful to permit linking proprietary applications with the library. If this is
what you want to do, use the GNU Library General Public License instead of this License.
79