1
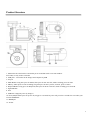
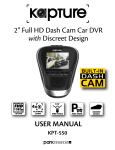
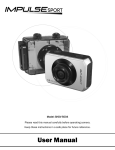
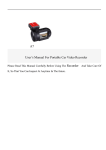
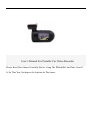
User’s Manual For Portable Car Video Recorder Please Read This Manual Carefully Before Using The Recorder And Take Care Of It, So That You Can Inspect At Anytime In The future . Preface About the Manual Thank you for choosing our product! In order to easily use your product, we attach a detailed user’s manual with the product . Please read it carefully before operation so that you can make better use your product . We are writing this manual with seriousness and sincerity, we hope to provide you the information as exhaustively as possible. If there is a difference between the manual and camcorder, please take the camcorder as standard. We reserve the right to change content or technical rules without prior notice. In addition, the manufacturer reserves the right to change technical specifications without prior notice. We are not responsible for any date loss and personal damage caused by misuse of software or hardware, maintenance, battery replacement or other unforeseen circumstance, we are also not responsible for any indirect loss caused by this .Besides, we can’t control the misunderstanding of users for this manual, so ,we won’t responsible for the accidental loss in the use of manual and the third-party claims arising from the use of the product . If the actual accessories in packaging doesn’t match the attachment items , please take the actual accessories as standard. Accessories : Name Quantity (PCS) Recorder 1 Car Adapter (Output: 5V) 1 USB cable 1 3M sticker 1 Car Fixed Bracket 1 User Manual 1 2 Product Features 120 degree ultra wide angle lens . 1920x1080P FULL HD high quality resolution. 2 mega pixels. 4X digital zoom, still image 8X zoom. 1.5 inch high resolution LCD, can watching while recording. Advanced H.264 video compression technology. GPS, record the latitude and longitude data automatically. Google map, to review your car tracking, speed and G-sensor info. G-sensor, once device detect collision, the current file would be protected. SOS function, to protect the important file in time. Seamless continuous recording will not miss any data. Automatically recording (stop recording) after car power on (off). Support AV out/ HDMI Auto turn on the fill lights under dark environments. 30/60 frames per second for smooth video flow. Automatic circulating video recording, being able to set the record time for each file. 1.5 inch screen to help you to watch video while make video recording in driving. Improve time & date display, no need reset when re-start. Screenshots function, can capture the video screen while video recording and reviewing. Easy operation. TF card , up to 32 GB 64GB optional,double card 3 Product Structure 1. GPS tracker box also bracket: 3M sticker put on it and then stick to car front window. If no GPS, it’s only used as a bracket. 2. USB port 1: can connect to the charger and computer by USB 3. AV port 4. Menu Button: Long time press for Menu; short press for UP /Last file; while recording, press for mute. 5. OK Key: Short press for start recording, long time press to take a picture; in menu, press to ensure. 6. Playback Button: Long press for Playback; short press for down /next file; while recording, press for SOS. 7. Light indicator: 8. Lens 9. USB Port 2 (Support power by charger) 10. Power Button: Short press for power on; long press 2 seconds for power off; press for 8 seconds for reset when your recorder shutdown . 11. HDMI port 12. TF slot 4 Display 1. ICON About the indication of each icon and symbol, see the table below. Video Mode V:-------KM/H Start recording Camera Mode Take a picture Supply light(off) Battery TF Card Motion Detection Car speed monitor after GPS searched satellite. White Balance (Auto) USB connecting FULL HD /1080P/720P Resolution Protected file 2008/01/01 Date and Time Display 01:07AM loop recording time (1 min) GPS 2. Light indicator Red ----charging Blue -----stand by Blue flashing-----recording 5 3. Total Menu Read this chapter to know how to configure the setup and fine-tune the functions Press Menu (Long time press UP button ) , you can see the menu as below .Choose the item you want by up/down button, press OK Key to confirm .Long time press UP button to exit. Main menu: 1. Video resolution: FULL HD, 1080P30, 720P30 2. Photo size: 0.9M, 2M, 3M, 4M 3. Flicker: 50/60Hz (Use this function to set the flicker frequency in your area) 4. AE ISO: AUTO/100/200/400 5. White Balance: AUTO/Sunny/Incandescent/fluorescent/cloudy 6.AE bias 7.AE meter mode 8 TV type: NTSC/PAL 9.AUTO power off 10..Date time display: Date time/off/date/time 11.Motion detect: off/on 13. Power off screen : off/1minutes/3 minutes/5minutes 14. Video recorder mode: Video+audio/video 15. G-sensor precision: 2.5G/3G/3.5G/4G/4.5G/5G/CLOSE 16. G-sensor calibration: Yes / No 17. Beep sound: High/low/off 18. USB Mode: Mass storage/USB camera 19. Choose card : Inner card/outer card (this menu is available in duel-card device only ) 20. Language :English/Russian/Chinese 21. Default setting: Yes/No (This function will restore all the settings to the factory defaults.) 22. Format: Yes/no (Note: use this function, all the data stored in the medium will be gone.) 23. Firmware version Menu in playback mode: 1. Delete file: No /only this/ all 2. Protect file: No/ only this/ all /none 3. Auto play: ON /OFF 4. Copy to another card: Yes/ No (this menu is available in duel-card device only) 5. Choose card: Outer card/ Inner card (this menu is available in duel-card device only) 6 Operations Guide 1.Charging This camcorder can be charged by adapter, also can be charged by connecting computer . 2. Connect to the car charger ⑴When used as a car camcorder ,you’d better turn on the “Loop Recording” function, then connect the camcorder with car by car charger .Once the car launched , the camcorder will start to record automatically; Till the car turned off , the camcorder will also stop recording, and save the files in TF card automatically. ⑵ When connect with the car by car charger, after the car turned off, the camcorder will go on recording for 10 seconds ,then stop and auto turn off.. Attention: Please use the attached car charger to power the DVR, it contains the adaptor which can convert 12V/24V to DC 5V . If the voltage over 5V, it will burn the DVR. 3. Install and remove the TF card ⑴ Insert the TF card in correct direction , wrong direction may damage the card . ⑵ Please use the high-speed SDHC TF card, high-speed card will be signed with “C4”/ “C6” ⑶ If the TF card format is not match the camcorder , it may cannot be read . You can use the camcorder to format the TF card . (4) To protect your TF card, please stop the recording before power off . 4. Setting Date and Time Power on your device. Press Menu (Long press UP button), then press up and down button to choose Date and Time ,press OK button to confirm . 5. Setting Language Power on the camcorder. Press Menu (Long press up button ) ,then press up and down button to choose language and press OK button to confirm . 6. Power ON/OFF and Auto power off . ⑴Short press the Power Button to turn on your camcorder ,long press for 2 seconds to turn off . ⑵To conserve the power ,you can set auto power off . It will be auto turn off when haven’t any operations within set time. 7. Video Mode. ⑴ Choose video resolution: Long time press Menu button ,you can see the setup menu, the first item is video resolution: Full HD(1920*1080P) /1440*1080P /1280*720P . (Full hd is best) (2)Press “OK” Button start to record video, press again to stop recording. During recording, there is an ever-changing “ ” displayed in the screen. 7 8.Take Pictures (1) Choose Photo Size: Long time press Menu, you can see the setup menu, the second item is photo size: 0.9 Mage Pixels/ 2 M/3M/4M. (4M is best, but biggest size).Long press to exit. (2) In standby mode, long press the OK Key to take a picture; During video recording, you press OK key to capture a picture. 9. Playback the video and reviewing the pictures. (1) Long press "Down" button to get in video Playback mode ,long press again to change to photo reviewing mode, long press again to exit. (2)In video playback mode or photo reviewing mode, you can short press UP/ DOWN button to choose files . Press "OK" button to start play. (3) In video playback mode or photo reviewing mode, long press "up" button you can do something setting about the pictures, there are 5 items : DELETE FILE /PROTECT FILE/ AUTO PLAY/ COPY TO ANOTHER CARD / CHOOSE CARD (Last 2 items will be available in duel-card machine only) . Press OK button to confirm your setting. 10. Protect file /Unlock file 1. You can protect(unlock) the file by the menu in playback mode. The second item, protect file. Once protected, the file will be showed with a . You can also unlock the file by this menu, choose “NO” . 2. SOS button(while recording) :While recording a video ,you can short press the Down button ,you will find a appear in the screen. It shows that ,this file is protect . 3. G-sensor auto protect : This device have G-sensor function, once the car collided, G-sensor will senses the collision and auto protect the current 20 seconds file. you can also find a appear in the screen. It shows that ,this file is protect . 11. Copy function for backup video (This function is available in duel-card machine only) Video clip can be copied between external and internal storage, then you will have backup after you hand over card to police or the court. (Optional) 1. Long press "Down" button to get in Movie or picture reviewing mode, choose a file you want to copy. 2. Long press "up" button to get a menu, the forth item is “COPY TO ANOTHER CARD”, choose YES, you can see the device would be copying. If now you are in outer card, so the file you copied will be backup in inner card. 3. Copy ok, you can press UP button again to get in menu, the fifth item CHOOSE CARD, if you finished copy in outer card, so you should choose INNER CARD to see the backup file. 4. Each backup file will be protected with the icon . The protected file, you can’t delete unless you unprotect the file or format the card. 12. Loop setting: Off/1minutes/3minutes/5minutes OFF: (1). The device can not record automatically and can not record by recycled. (2). Maximum length of each recorded video file is 3.66G. When it reaches the maximum, the recording is 8 automatically split and saved as another file. (3). When the memory card is full, the previous files can not be automatically overwritten, so the screen will show” card full, can not loop recording”, you need to delete the files by hand so that the device have enough space to continue recording. When the loop setting mode is "1 min","3min",5min" (1). IF the device is connecting to charger, when it power on, the device will record automatically. (2). IF the memory card is full, the card will be automatically covered and overwritten from the first saved file , it will not stop, so you needn’t worry about card full. 13. Stamp: Time /Date/ Date time/GPS data /driver number/off 1. After you choose a kind of stamp, when you start recording, the stamp would be written into your video file automatically. When you playback the video, you can see the stamp (picture 1). 2. Driver number is 9 character driver numbers, license plate Picture 1. Picture 2. 14. GPS 1).Power on your DVR, the satellite searching will be start automatically. When GPS signal is located, will be showed on the display. When GPS signal is located, the DVR will auto record your driving track and entry the GPS file in you TF card. 2). Car Speed. When GPS signal is located, the screen will display the car speed V: -----KM/H. 3).Google Map. With our special player, you can see your car tracking in the Google Map clearly, the player also show you the vehicle speed and G-Sensor information. See picture 2. 15. Video Player Drive How to get the video player drive 1. Connect the machine (without card) with computer. 2. There are 2 removable disks (if your machine have built-in card function, you will see 3 removable disks) 9 3. Find the flash disk ( one of the removable disks, not card disk), open it ,and copy the file to you D disk(or other place ,but please remember the place) . Double-click to decompress the file, you will get a folder. Google Map 1. Find the GPS player in the folder, open it, you will get a GPS player with Google map (like picture 2) 2. After you record the video with GPS, connect your machine with computer, open the GPS file by press this button your GPS player, then choose you TF card disk →DCIM→100MEDIA, choose the video you want. in PC Camera 1. Find USB Mode in your menu, choose USB Camera 2. Connect your machine with your computer. The screen will display “USB CAM CONNECT” 3. There will be a installation interface appear in your computer ,choose " from a specific location" →Next→enter the selection window→find the video player drive folder→ win drivers→web cam→ choose you computer system (XP, WIN7,VISTA) →Next→Finish. 4.You can use web camera now .( Every time you want to use web camera, you need to choose the USB MODE in the menu of your machine first ;after using , please restore it to Mass Storage in the menu) 10 Specification Image Sensor 1/2.7 CMOS 2.0 Mega-pixel sensor Display 1.5″TFT(650×240 pixels) Chip Ambarella solution, 1080 P 30FPS GPS Module GPS Logger Memory TF card up to 32 G (some model have dual-card function) Lens 4X fixed focus ISO Auto Still images Format:JPEG(EXIF2.2) 、DCF Image resolution:0.9M、2M、3M(Software) 、4M(Software) Videos Format:H.264 (MOV) Resolution: 1920×1080 30fps、1440×1080 30fps、1280×720 30fps Zoom Video:4X Digital Zooming(1440*1080P) Playback still image:Digital Zoom 8X (Maximum) Audio Built-in microphone/ speaker(AAC) Exposure compensation -2.0EV~+2.0EV Loop Recording OFF, 2 mins,5 mins,10mins Auto Power Off OFF, 1 min, 3 mins, 5mins Auto Screen off OFF, 1 min, 3 mins, 5mins PC Interface USB2.0(High-speed) Output HDMI , Audio-Video output AV Output Format NTSC/PAL Battery Built-in polymer battery 3.7V, 350mAh. 11 Troubleshooting Under normal operating conditions, if the product has problems, please refer to the following solution. Can’t record a video or takes picture. Please check whether the TF card is locked, and make sure the card have enough storage space. Stopped automatically while recording Because the data of high-definition video is huge, so please use high-speed TF card that compatible with SDHC. High-speed card will be signed with “C4”/ “C6”. It prompt “File Error” while playback the video or image This is because the wrong storage of data, resulting in the file error, use "Format" in Menu, to format the TF card.. No image display on TV screen Please confirm the AV, HDMI cable is connected correctly, and the TV is set to the correct AV, HDMI mode. Image is blurred Maybe the lens is not clean, please check whether have dirt, fingerprint on the lens .Use lens paper clean the lens before using. Supply light doesn’t work If the power not enough, supply light will not work. Image has horizontal stripes interference This due to the wrong setting of “Flicker” .Please depend on the local power supply frequency, reset the Flicker: 50 Hz/60 Hz. a.It don’t auto start recording after car power on Please make sure the loop recording is 1/3/5 mins, not OFF, it won’t auto start recording when loop recording is OFF; Additional, built-in card can’t auto recording, you need change to outer card. The machine keep automatic recording and can’t stop . Maybe you have turned on the Motion Detect; you can check whether it has an icon on the screen. When the Motion Detect is ON, it will auto start recording when a moving object appears within the range of camera; stop recording standby screen still automatically. When the screen to return to calm, the recording will stop automatically until a moving object appears again. Auto power off setting does not work Please ensure that motion detection is turned off, because if the motion detection is turned on, the machine will always in standby mode (it will start recording when suffer dynamic objects), the machine will not automatically shut down until the power goes What can I do if the machine crashed? If the machine crashed, press the power button for 10 seconds, the machine will reset and restart. 12