1
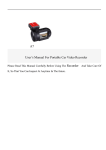
Mini 0803 Car Video Recorder
A7LA50D Ambarella Chip, Super HD 1296P
User Manual
Please read this manual carefully before using the recorder
JKM (UK), Issue 1
2 July 2014
Notes:
1. This manual rewrite was carried out using the external memory version, so the version with internal
memory may not be fully covered.
2. The LDWS (Lane Departure Warning) feature has not been covered, as no information seems to be
available on this feature.
3. Any comments in orange, are my suggested settings
1
Preface
General precautions
Do not expose this product to dusty, dirty or sandy areas to reduce the risk of damaging
components.
Do not expose the recorder to high temperature. High temperature may shorten the life span
of electronic devices, damage the battery and melt specific plastic parts.
Do not situate the recorder under cold environment. When the product is warmed to its normal operating
temperature, condensation moisture inside could damage the circuitry.
Do not drop or subject the recorder to mechanical shock.
Do not clean the recorder with chemicals, cleaning solution or high concentration detergent. Please
wipe it with slightly damp soft cloth.
If there is a fault, send the recorder or any other accessories to the professional service center
for maintenance.
Operational conditions
.According to the design, the recorder should be operated within the temperature range from
00C – 400C (32°F to 1040F)
Do not operate or expose the recorder under following condition:
—Direct sunlight area
—High temperature or dusty area
—Near air conditioner or heaters or any other extreme temperature area
—In a closed car, especially parking in direct sunlight
—Violent vibration area
Brief Introduction to the Recorder
The features and functions are introduced in this chapter, PC system requirement, a list of items and
description of the hardware components are included.
Contents of Box
Item
Recorder
Car Adapter (Output: 5V)
USB cable
Spare 3M sticker
Car Mounting Bracket
User Manual
Quantity (PCS)
I
I
I
I
I
I
PC System Requirements
The PC system needs to meet the following requirements:
Windows Vista/XP/7 operating system
Intel Pentium 4 or better 2.8 GHz CPU or above (recommended 3 GHz ) At least 512 MB
RAM or above (recommended I GB ) Standard USB2.0 port or above
At least 64MB video card or above
2
Recorder appearance and feature icons
1. GPS tracker box also bracket plus 3M sticker to stick to car front window. Note: If no GPS, it is
a bracket only.
2. USB port to a computer (USB lead also provides power to the recorder, via the computer).
3. AV port.
4. Up button/Menu/Mute and Hot button.
5. OK/Enter.
6. Down /SOS button (to lock files).
7. Light indicator: Red: Charging, Blue: Stand by, Blue flashing: Recording.
8. Lens.
9. USB This only provides power to the GPS and recorder (there is no data link to the computer).
10. Power On/Off (Long press to turn off).
11. HDM1port.
12. Memory card slot for Micro SD (TF) card.
Operation
Using a Micro SD (TF) card
Not essential if the recorder has an internal memory, but will provides more space for video and photo
storage. Use high-speed TF card meeting the specification of TFHC, Class 4 or above.
Note: A Class 10 ‘SanDisc Ultra microSDHC UHS-1’ works fine in the 0803.
Inserting card: Press until you hear a ‘click’ to lock it in, press in again to release it.
3
Switching on the recorder: There are three ways to power up the recorder:
a) Press Power button (10) to turn on the power (internal battery must be at least partly charged.
Note: A long press to turn off.
b) Connect the car charger into the (micro USB sized) socket (9) and plug into the car’s 12V outlet.
On most cars, this outlet will be ‘live’ when the ignition is turned on.
c) Connect to a computer, via a USB lead to socket (9).
Note: In both ‘b’ and ‘c’, the recorder will start recording when it turns on.
To stop recording, briefly press the ‘OK’ button.
Initial Set Up and Familiarisation
Before installation into the vehicle, it would be advisable to connect it up so that it is powered from a
computer in order to make it easier to carry out initial settings and to familiarise yourself with the
recorder operation.
To do this, insert the recorder into the mounting bracket/GPS module (1). Then, take the supplied USB
lead and plug the small one into the mounting bracket/GPS module (9) and the large one into the
computer.
Assuming the computer is on, the recorder will boot up and start recording.
Press ‘OK’ (5) to stop it recording and you can now carry out some basic settings via the Menu, such as
Date and Time, Card Format, etc:
Select ‘Menu’ by holding down the▲ (4) button and then press the ▲ and ▼ (6) buttons to select the
function required and press ‘OK’ button to confirm any setting:
Setting Time and Date
From ‘Menu’ select ‘Time Setup’, then press ▲▼buttons to set the date and time and press ‘OK’
button after each step. Note: The first two digits are the GPS offset, only applicable if the GPS module is
fitted and ‘on’ (UK setting is ‘+01’).
Auto Power Off: When the recorder is switched on in battery mode, this can be set to switch it off after a
set period to save power. Options are: 1 (default), 3, 5 minutes, or Never. Set this to ‘Never’
Power Off Screen: This can turn the screen off after the car has been started (to avoid distraction at night
time). Options are: 1 (default), 3, 5 minutes, or Never. Set this to ‘Never’
Format: A new Micro SD card should be formatted in the recorder before use, not on a PC (this also
loads the basic player software on to the card, which can then be transferred to a computer).
Other Menu Settings
Video resolution: 1296P30, 1080P30 (default), 720P30 (best is 1296P30, but see ‘Take a Still Photo’).
Quality: S-Fine (default), Fine, Normal (suggest Fine for best results)
AF Meter Mode: Centre (default) or Spot
WDR: Wide Dynamic Range (default ‘On’ is best).
4
LDWS Detect and Calibration: ‘Lane Departure Warning’ system (default ‘Off’).
Flicker: Minimizes AC mains flicker from streetlamps at night: Default is ‘Auto’ (50Hz in UK).
White Balance: Default is ‘Auto’, which is the best compromise setting.
EV (Exposure offset): Default is ‘0’, other settings are -0.3/-0.7/-I-0/-1.3/-1.7/-2.0/+2.0/+1.7/+1.3/
+1.0+0.7/+0.3. Adjust if the recorded picture (in daylight) tends to be too dark, or too light.
Recycle (or Loop) Setting: This sets the file length/size for each recorded segment and the settings are:
Off, 1 (default), 3, 5 minutes (suggest 1 minute)
Notes:
If Recycle is set to ‘Off’
a. The recorder cannot record automatically.
b. Maximum length of each recorded video file is 3.66G. When it reaches the maximum, the recording
is automatically split and saved as another file.
c. When the memory card is full, the device cannot continue recording by overwriting the oldest files
(Recycle, or Loop) and recording is terminated.
If Recycle is set to ‘1’, ‘3’, ‘5’ min
a. When ignition is on, the device will record automatically
b. If the card is full, the earliest saved file will be automatically overwritten.
Motion Detect: If the recorder is wired in to be ‘always on’. Recording will start whenever there is
movement in the field of view (default is ‘off’).
Warning: Summer car temperatures > 400C (1040F), could damage the recorder.
Date/Time Stamp: Default is ‘Date/Time’, other settings are ‘off’ and ‘Driver Number Stamp’ (which
includes date and time plus the driver name/car number
Driver Number (or Name): The car number, or driver’s name (9 digits), can be burnt into the recordings.
G-Sensor Sensitive: Sets the ‘G’ force needed to lock the file being recorded (to prevent accidental
overwriting). G Force options are: 2, 2.5, 3 (default), 3.5, 4, 4.5 and Close (off).
G-Sensor Calibration: To auto calibrate the recorder when installed in the car.
GPS Module (if supplied): ‘On’ (default), or ‘Off’ (see screen shots on page 8).
With the recorder powered via the GPS mounting bracket, satellite searching will start automatically.
When taking a picture in Camera mode, the location will be recorded automatically.
Velocity Unit (Applicable only with GPS mounting bracket fitted and GPS switched ‘on’).
Options are: Speed in Km/h (default), or M/h.
Note: This is not burnt into the recording and can only be seen via GPS player software.
Choose Card: Inner or outer memory card (only applicable to recorders with internal memory)
Default Setting: This function restores all the settings to the factory defaults.
Firmware version: Current firmware
5
Recording
In normal operation, video recording commences when the recorder is powered up. Recording can be
paused and restarted via the ‘OK’ button.
During Recording
The microphone can also be muted
Press the ▼button to lock
by pressing the ▲ button (press ▲ again to unmute).
the current file to ‘Protect’ it against overwriting (press again to unlock).
Taking a still picture
a) While recording: Long press on ‘OK’ button will take a picture (not in ‘1296P30’ mode).
b) On & Standby (not recording): Long press on "OK" button will take a picture.
This function is more useful after an incident, where the recorder can be unclipped from the bracket,
switched on via the On/Off button and used outside the car to take wide angle photos of the scene.
Note: Battery life will be about 10 - 15 minutes (if fully charged). Some video can also be taken, but
battery life will be considerably reduced.
Reviewing Video and Photos
a) Long press ▼ button and review latest Video file thumbnails images, then long press ▼ button
again to review Photo file thumbnail images. A long press ▼ button again, to return to camera
mode.
b) Use the ▲▼buttons to find the Video, or Photo file you wish to view and press ‘OK’ to select it
(if a video, playback will start immediately). To change the speed of playback, use the ▲button
to increase speed (x2, x4, x8) and the ▼button to decrease speed (x1/2, x1/4, x1/8).
c) To Pause the video playback, press ‘OK’. Note: In Pause mode, the next Video file can be
selected via the ▲▼buttons (Photo mode is the similar). To resume playback, press OK’ again.
Note: Video and photos can be reviewed with the camera unit unclipped from the fixing bracket
(powered by the internal battery).
Reviewing/Playback ‘Menu’: This sets up file protection, deletes files and sets up video playback
modes. To access these menu items, go to review thumbnail mode, then long press ▲ button.
File Protection Operation: This prevents overwriting, or accidental erasure (
symbol). Options
are: Protect Current File, Protect All Files, Unprotect Current File, Unprotect All Files.
Autoplay: Options are: Play One, Play All, Repeat One, Repeat All.
Delete File: Options are: Delete This File, Delete All, Cancel
USB Mode to Transfer Files
Connect the small USB plug to the recorder (2) and the other end to the computer. In this case
the screen will show ‘USB Connecting’. Go to ‘Computer’ (or ‘My Computer’) and find the
‘Removable Disc’, then the DCIM folder, where the recorded files will be listed and can be
downloaded to the computer as required.
The recordings can be played via the QtPlayer (which should be copied from the formatted
6
Micro SD card and installed on the computer).
Note: The recorder produces files that can provide excellent seamless playback (with no gaps
between files). However, while the supplied QtPlayer is fine for playing individual files, it is not
so good for a group of files, as there will be a gap/interruption between each file during
playback. There are other GPS players available without this shortcoming, or the files can be
used in a video editing package and played seamlessly via that (e,g: Pinnacle Studio 15, which
works fine for this).
Connecting the Recorder to a Standard SD TV (Via the AV port (3))
Connect your recorder to the Standard TV via an Accessory AV cable (1296P recording is disabled).
Connecting the Recorder to HDTV
When connecting to HDTV, you can use high resolution to display video files or pictures. Use a HDMI
cable to connect the recorder video/audio signal to the HDTV (recording is disabled).
Installation in a Vehicle
It is preferable to locate the recorder behind the mirror, on the opposite side to the driver. This will
minimize any distraction from the screen and flashing recording light.
Notes:
1. A ‘fine’ marker pen will be useful to mark the final fixing point on the windscreen, before
removing the adhesive pad cover.
2. An external monitor with a larger screen would also assist in finding the best level location. This
can be plugged into the A/V port (3) via a 3.5mm ‘Stereo’ plug (inner is audio, outer is video).
Connect the recorder to the car Aux socket, via the cable provided. Switch on the ignition to auxiliary
power mode and when the recorder boots up and starts recording, press ‘OK’ to stop it recording.
Place it on the windscreen behind the mirror and locate it in the best location for a clear view of the
road (take care to avoid any items in the center that could mask the view, such as a rain sensor).
Important: Most monitor screens tend to have about 4% over scan, so an obstruction not visible on the
recorder monitor, could mask the edge of the view seen via a computer player.
Marking the Final Location: As there is a little bit of ‘give’ between the mounting bracket and the
recorder, it is advisable to hold the recorder by the mounting bracket when you place it at the final
position.
Ensure that it is level and mark the final position with the pen and make a test recording to confirm the
view is level and free from obstruction. Then remove the backing strip from the pad and carefully
stick the mounting bracket to the windscreen (it is easier to do this with the bracket separated from the
recorder).
Run the power cable to the Aux socket, preferably behind the trim on the opposite side to the driver.
Reconnect the recorder and power it up and when it starts recording, press ‘OK’ to stop it. Then select
Menu and set ‘Auto Power Off’ and ‘Power Off Screen’, to something other than ‘Never’ (e.g. the
default of 1min).
7
Display Screens and Icons
After Booting Up:
Battery level (full)
Micro SD card (inserted)
White Balance (Auto)
Recycle time (1 min)
WDR (on)
Video Mode
Microphone
GPS searching
Date & Time
Time remaining on card
Resolution
Recording With flashing red dot
Recording Standby With total rec
(and blue LED on case)
time this session (right)
Video File Review
Playback 5 sec into file (below)
Last recorded file highlighted in
The number bottom right is the
yellow, with file number
file duration (as set by ‘Recycle’)
GPS found
8
Copy function for backup video (4-32 GB internal memory) (Optional)
Video clips can be copied between external and internal storage, then you will have backup after you
hand over card to police or the court.
First you should choose the card (see Menu item ‘Choose Card’ to select), then
1. Long press "Down" button and into Movie reviewing
2. Then long press "up" button you can copy video to another card
Updating the Firmware
Download the new firmware (and unzip the file if necessary)
Updating Instructions (Note: The MicroSD card must have been formatted in the recorder):
1. With the recorder powered off, remove the MicroSD card and plug it into the SD adaptor on the
computer
2. Copy the ‘bin.’ file to the root directory of the card. Note: You may need to rename the firmware file
to ‘firmware’ (so it reads ‘firmware.bin’).
3. With the recorder powered off, reinsert the card
4. Power up the recorder and it should prompt to update automatically (yes/no)
5. After the firmware update is completed be sure to delete the file from the card or you will be
prompted to update again
Appendix
Specification
Image Sensor
Chip
Lens
External memory
Internal memory
ISO
Display
Still images
Videos
Audio
3.2M CMOS
Ambarella A7 1296 P 30FPS
135 Wide angle
Micro SD (TF) card (up to 32 G)
Built-in 4-32GB (Optional)
Auto
1.5"TFT
Format: JPEG, Quality: Auto
Format: H.264 (MOV).
Resolution: 2304 x 1296P 30fps (@ approx 140 Mb per minute),
1920 x 1080P 30fps (@ approx 100 Mb per minute),
1280 x 720P 30fps
Built-in microphone and speaker
White Balance
Auto, Tungsten, Fluorescent, Sunny, Cloudy
Exposure compensation -2.OEV—+2.OEV
Time and date
On/off, date and time, watermarking function
HDMI HD (Mini HDMI) & Audio/Video SD
Outputs
(3.5mm Stereo Jack plug [Centre pin audio])
PC Interface
USB2.0 (High-speed)
AV Output Format
NTSC/PAL
Battery
Built-in Lithium-ion battery
Approx 15 min life
Weight
61g (2.2oz)
9
Troubleshooting
Question
The camcorder is suddenly
turned off
Captured images are not
saved into memory
Memory card cannot be
used
Possible reasons
Auto Off Function is On.
Low battery
Power goes off before the
images are saved.
Memory card is protected.
Memory card contains non
DCF images from other
cameras.
Solutions
Turn recorder on again
Charge battery
Charge battery
Unlock the memory card and format it
(in the recorder)
Note: Before formatting, make sure to
backup any files on the card first.
All the buttons are invalid.
Short-circuit when connecting Long press the power button
camcorder to other equipment.
Complete lock-up, usually
during boot at the welcome
screen, with a continuous
warbling tone and
and all buttons invalid
Software has locked up and is Hold down the On/Off button for 10
seconds.
looping
If this fails to reset:
Disconnect from any external power and
when the internal battery runs down
everything will reset (about 15 minutes)
NOTE: Alterations reserved.
About the Manual
We have tried our best to make sure that what in this manual is correct and up to date. However, we
cannot guarantee that there are no errors, or omissions. If there is a difference between the manual and
recorder, please take the recorder as standard.
We reserve the right to change content or technical regulations without informing you beforehand. In
addition, the manufacturer reserves the right to change technical specification without informing you
beforehand.
If the accessories are different from the ones inside the actual product, please take the actual product as
standard
10