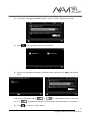
1
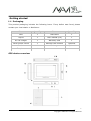
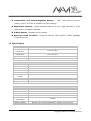
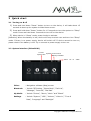
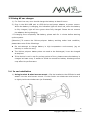
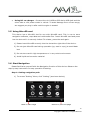
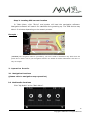
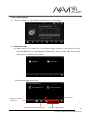
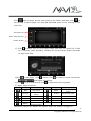
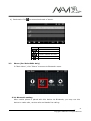
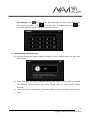
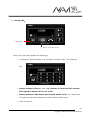
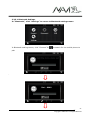
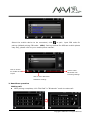
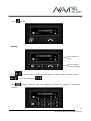
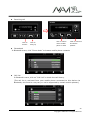
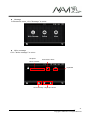
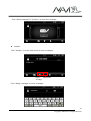
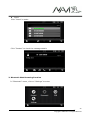
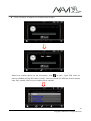
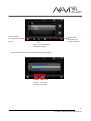
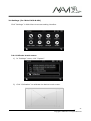
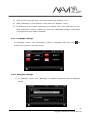
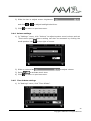
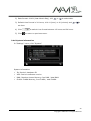
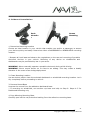
Gator iDriveZ Portable Navigation Device (PND) User Manual Model 430 / 431 / 433 __ 2 Copyright © 2008 Gator. All Rights Reserved. Dear User, Thank you for purchasing Gator iDriveZ navigator! Please read this user manual carefully for proper and safe operation of the device. Please use only the original accessories provided by manufacturer in order to avoid unanticipated damage. Failure to comply with procedures mentioned in this manual or use of accessories or other peripheral devices which are not intended for use with this device will cause the immediate void of product warranty. Please follow local road and traffic conditions to promote safe driving. For your safety, do not operate the navigator device while driving. Its mandatory for most countries to use hands free or Bluetooth function during driving, please respect local laws. All images, illustrations and examples are only for reference, certain specifications may differ from actual product. All product specification may subject to change without further notice. All Gator products come with ONE YEAR Limited Warranty coverage. Please refer to Warranty Card for details. For further enquiries, please contact your nearest dealer or local distributor, you may also contact us directly at the following contacts. Head Office TDJ Australia Pty. Ltd. Tel : 61–3-85878898 (Customer Service and Product Repair) Email : [email protected] Website : www.tdj.com.au __ 3 Copyright © 2008 Gator. All Rights Reserved. LEGAL NOTICES COPYRIGHT Gator Portable Navigation Device User’s Guide issue date: October 2009. Gator and the Gator logo are registered trademarks of TDJ Australia Pty Ltd. Other products or system names appearing in this document are trademarks or registered trademarks of their respective owners. Further, the © or TM symbols are not used in the text. Changes may be made periodically to the information in this publication without obligation to notify any person of such revision or changes. Such changes will be incorporated in new edition of this User’s Guide or supplementary documents and/or publications. No part of this publication may be reproduced, stored in a retrieval system, or transmitted, in any form or by any means, electronic, mechanical, photocopy, recording, or otherwise, without the prior written permission of Gator. DISCLAIMER AND LIMITATION OF LIABILITY Gator and its subsidiaries make no representations or warranties, either expressed or implied, with respect to the contents hereof and specifically disclaims the implied warranties of merchantability or fitness for a particular purpose. Gator and its subsidiaries assume no responsibility for any damage or loss resulting from the use of this Gator Portable Navigation Device. IMPORTANT NOTE This is an original device with device ID, serial number and relevant information. Please register with your respective regional distributor or with Gator website directly for after sales service. The serial number is indicated on the label affixed to your Gator device. All registration should include the serial number, device ID, and purchase information. NOTE: Information in this manual is subject to change without notice. __ 4 Copyright © 2008 Gator. All Rights Reserved. Contents Getting started ............................................................................................... 7 1.1 Packaging .................................................................................... 7 1.3 Product Feature ........................................................................... 8 1.4 Specifications .............................................................................. 9 2 Quick start ................................................................................................ 11 2.1 Turning on & off ........................................................................ 11 2.2 System interface (iDriveZ430) ................................................... 11 2.3 Using AC car charger .................................................................. 12 2.4 In car installation ...................................................................... 12 2.5 Using MicroSD card .................................................................... 13 2.6 Start Navigation ........................................................................ 13 3. Operation Details...................................................................................... 15 3.1 Navigation functions.................................................................. 15 3.2 Multimedia functions ................................................................. 15 3.2.1 Music player ........................................................................... 16 3.2.2 Video Player ............................................................................ 18 3.2.3 Picture Viewer ........................................................................ 19 3.2.4 Ebook Reader ......................................................................... 20 3.3 Phone (For iDriveZ431 Only) ................................................. 21 3.3.3 Bluetooth................................................................................. 26 3.4 Settings (For iDriveZ 430 & 431) ................................................ 37 3.4.1 Calibrate touch screen ............................................................. 37 3.4.2 Language settings .................................................................. 38 3.4.3 Backlight settings ................................................................... 38 3.4.4 Volume settings ...................................................................... 39 3.4.5 Time & date settings ............................................................. 39 __ 5 Copyright © 2008 Gator. All Rights Reserved. 3.4.6 System information ................................................................. 40 4. R-Mount Installation ................................................................................ 41 5. Sync GPS Device with PC .......................................................................... 43 5.1 Application and functions ........................................................... 43 5.2 Operating Environment............................................................... 43 5.3 Active sync software installation ................................................ 43 5.4 Using Active Sync software ........................................................ 46 6. FAQ .......................................................................................................... 48 __ 6 Copyright © 2008 Gator. All Rights Reserved. Getting started 1.1 Packaging This product packaging includes the following items. If any defect was found, please contact your local dealer or distributor. Item Quantity Item Quantity GPS 1 USB Cable 1 Stylus 1 User manual (CD) 1 AC car charger 1 Warranty card 1 Wind screen mount 1 External TMC module Optional Bracket 1 AC charger Optional Ear phone 1 GPS device overview __ 7 Copyright © 2008 Gator. All Rights Reserved. Sign Item A 4.3” TFT touch screen B Charging indication Description User may choose to use the stylus pen provided (D) or finger to select screen for GPS function. Red light is in charging mode. light Turns Green when fully charged. C Microphone For use on Bluetooth handsfree D Stylus E MicroSD slot F “Menu” button G “Power” button H Ear phone jack I USB jack J External antenna jack K Reset button To reset device L Battery cover Contain 1500mAhLi-Polymer battery For use on touch screen To insert MicroSD card Shortcut to “Main Menu” screen Hold 1.5 seconds to “Sleep” mode. Press and hold 3 seconds to turn on or off. Plug to use external ear phone Connect to car / AC charger or USB cable Connect to external GPS antenna 1.3 Product Feature Bluetooth & Hands free : Build in Bluetooth function enables hands free operation and phone calling. Accurate Navigation : High performance built-in GPS receiver allows fast satellite acquisition and position accuracy during navigation Touch Screen Control : 4.3 inch TFT high resolution touch screen monitor with clear and sharp image view, smooth media playback features. Easy to Operate : Touch screen feature made easy for user operation Movie Playback : Enabling playback of various movie file formats, avi, wmv, asf and mov. Music Playback : Support music playback in wma, wav and mid format. High Acoustic Fidelity : Built in high fidelity 1.5W speaker with dual channel stereo ear piece jack,. Photo Viewing : Support image file viewing in jpeg, bmp, gif, tiff, png and tga format. __ 8 Copyright © 2008 Gator. All Rights Reserved. Replaceable and Interchangeable Battery : 1500 mAh lithium polymer battery, with 3-4 hours of operation on full charging. Expandable Memory : Using external memory of up to 4gb, MicroSD to store data and/or navigation software. E-Book Reader : Support txt file format. Real-time Road Condition : Support external TMC function (Traffic Massage Channel) device. 1.4 Specifications Unit size Operating temperature Storage temperature Operating humidity Storage humidity CPU speed CPU RAM ROM Environment Specifications 120mm(L) x 85mm(W) x 18.4mm(H) -10°C to +60°C -20°C to +70°C 45% to 80% RH 30% to 90% RH System Specifications 400MHz SAMSUNG S3C2451XH DDRII 128MB 2GB MicroSD card Up to 4GB(optional) Navigation software storage OS Software compiler Navigation software MicroSD or NAND Flash Screen size Screen resolution Sound quality Sound output Average Sleep mode power consumption Battery Battery standby WINCE 5.0 ARMV4I Navigation software Basic Specifications 4.3 480 x 272 Dual channel CD quality Dual channel0.25W/channel, single channel 1.5W/8Ω 1W <20mW Interchangeable 3.7V 1500mAH Normal use 2 hours(low backlight), standby time 200 hours __ 9 Copyright © 2008 Gator. All Rights Reserved. GPS Hardware Specifications Frequency C/A CODE 1.575 GHZ 1.023 MHZ chip rate Satellite Channel 20 channels Tracking sensitivity -150 dBm Accuracy 10m, 2D RMS & 5m, 3D RMS, WAAS enable Acquisition rate 0.1m/s Data update rate 1HZ Re-acquisition time Average 0.1s Hot start Less than 3s Warm start Average 40s Cold start Less than 100 s Maximum positioning height 18,000m Maximum rate 515m/s Acceleration < 4g Built-in antenna type Built-in antenna Built-in antenna gain rate -1dBi Video & Sound Functions Specifications File Format Resolution Wmv, Asf, Mov, Wma, Jpg, Bmp, Png, Pcx, Tga, Tif, Gif, Ico, Wbmp, txt 480 x 272 TMC Specifications (Optional) Signal Frequency 87.5-108.mhz Signal Receiving Mode RDS Connection External __ 10 Copyright © 2008 Gator. All Rights Reserved. 2 Quick start 2.1 Turning on & off 1) Press and hold down “Power” button to turn on the device, it will take about 15 seconds to boot up the system to Main Menu screen. 2) Press and hold down “Power” button for 1.5 seconds to turn the system to “Sleep” mode. Press and hold down 3 seconds to turn off on the device. 3) When device in “Sleep” mode, press shortly to activate. [Attention] When the battery is low, device will beep to alert user and turn into “Sleep” mode. If there is no power supply, device will switch off. If device cannot be turn on, please check if the battery is low. Try to connect to power supply to turn on. 2.2 System interface (iDriveZ430) Current System sound control system time Battery Indicator Short cut to “GPS” navigation iDrive : Navigation software (Map) access Bluetooth : Include “BT Setting, “Phone Book”, “Call List”, “Message”, “Internet”, “Dial Pad” My Media : Include “Picture”, “Movie, “Music” and “Ebook” Settings : Include “System”, “GPS”, “Volume”, “Video-in”, “Time & Date”, “Language” and “Backlight” __ 11 Copyright © 2008 Gator. All Rights Reserved. 2.3 Using AC car charger 1) For first time use, user should charge the battery at least 8 hours. 2) Plug in the Mini-USB port to GPS device and power adapter to power source. When the battery is charging, the indication light will show red, when the battery is fully charged, light will turn green when fully charged. Please do not remove the adapter during charging. * If charging from completely flat battery, please wait for 1 minute before starting up the system. [Attention] To ensure the lithium-polymer battery working under best condition, please take note of the followings: Do not attempt to charge battery in high temperature environment, (eg. at balcony or under the sun). The lithium polymer battery does not need to be discharged, it can be charged at anytime. If the device is not in use for prolong period of time, please ensure the battery is charged at least every 2 weeks to avoid the excessive battery discharge which may affect its performance. 2.4 In car installation 1) Using bracket & wind screen mount : Clip the bracket to the GPS device and attach it to the wind screen mount. Fix the suction on windscreen and ensure it is tightly held onto windscreen (as illustrated). __ 12 Copyright © 2008 Gator. All Rights Reserved. 2) Using DC car charger : Connect the mini-USB to GPS device USB jack and the other side to 12V power outlet in vehicle. To avoid damage from current surge, we suggest you plug in after vehicle engine is started. 2.5 Using MicroSD card This device has a MicroSD slot for use with MicroSD card. This is use to store navigation software, map data and multimedia files. Insert MicroSD card and press into the slot until it is securely locked. To release, press the card again. 1) Please insert MicroSD correctly into the slot at the right side of the device. 2) Do not eject MicroSD card during operation (eg. read or copy) to avoid data lost. 3) Do not store card in high temperature or in any moist environment. 4) Avoid liquid and corrosive material. 2.6 Start Navigation Please familiarize yourself with the Navigation function of this device. Observe the step by step instruction for easy operation of setting: Step 1: Setting navigation path 1) To access “Setting” Menu, click “Setting” (as shown below). Back to Main Page Return to previous page __ 13 Copyright © 2008 Gator. All Rights Reserved. 2) To access “navigation software path”, click on “GPS” (as shown below) 3) Click to browse and select the directory. 4) Select the navigation software (filename with extension of .exe) and double click。 Select your choice by ticking on”, For 5) Click or for “Navigation Autorun at Power , navigation software will auto-start when the device is turned on. to return to “Main Menu”. __ 14 Copyright © 2008 Gator. All Rights Reserved. Step 2: Locating GPS current location In “Main Menu, click “iDrive” and system will load the navigation software. Navigation software will search for satellites during starting up. The GPS device may take 1-2 minutes depending on the search process. Example : [Attention] The navigation software provided by your local vendor or distributor may differ from the picture above. Please refer to your navigation software user manual for further information. The above is only an example 3. Operatio n D etail s 3.1 Navigation functions (please refer to navigation map operation) 3.2 Multimedia functions Click “My Media” at the “Main Menu”. __ 15 Copyright © 2008 Gator. All Rights Reserved. 3.2.1 Music player 1) Click on “Music” in “My Media” to activate the music player 2) Add music file a) When there is no music file in the Music Player directory, the system will list both NANDFlash and StorageCard (MiscroSD). Select music files from these directories to add to Music Player. b) Select and add music files: Select none Back to previous directory 向下翻页 Add all music files in directory Page up & page down __ 16 Copyright © 2008 Gator. All Rights Reserved. Click path to select all the music files in the folder and then click to return back to Music Player. You may add individual music file by clicking on the music file. Add music file Delete from directory Delete all files c) Click or double click to go to Music Player and play the music file. If idle for 5 seconds, music directory interface will jump to Music Player and start to play music files. d) Click to play music, click to pause, click to slide on sound volume bar and adjust the volume. e) Click to go to Playlist and click to add music files to playlist. f) Music Player functions: Button Function Remark Play Play music Next Play previous music Play next music Mute Mute player Previous Volume Return Adjust volume Return to previous menu Button Function Pause Remark Pause playing music Shuffle Shuffle play mode Loop Loop play mode Playlist Go to Playlist Main Menu Back to Main Menu [Attention] System will disable the speaker when ear phone is plugged in. __ 17 Copyright © 2008 Gator. All Rights Reserved. 3) Display Lyrics: This device is able to display lyrics while playing music files. Download song and lyrics to MicroSD and place in the same directory. Song filename and lyrics filename must be identical. Other instructions are same as above. 3.2.2 Video Player 1) Access Video Player: In “My Media” menu, click on “Movie”. 2) Add video file: a) System will open NANDFlash and MicroSD directory if there is no video file in playlist. b) The instruction to add video files is same as adding music files. c) Click Click to access the playlist. to add video to playlist or click d) Click e) Click to add all videos to playlist. to play video. to get volume sliding bar to adjust volume. __ 18 Copyright © 2008 Gator. All Rights Reserved. 3) Video Player functions: Button Function Remark Play Button Function Remark Play video Mute Mute player Pause Pause video Volume Adjust volume Previous Play previous video Full screen See full screen video Next Play next video Playlist Video Playlist Back Back to previous menu Main Menu Back to Main Menu 3.2.3 Picture Viewer 1) In “My Media”, click “Picture” to launch Picture Viewer. 2) Add photo: Click to picture list and click to add picture to list. __ 19 Copyright © 2008 Gator. All Rights Reserved. 3) Picture Viewer functions : Button Function Play Zoom in Zoom out Rotate Back Remark Play pictures in slide mode Zoom in picture Button Zoom out picture Rotate photo 90 degree Return to previous menu Function Remark Next Next picture Previous Full screen Picture list Main Menu Previous picture See picture in full screen See picture list Return to Main Menu 3.2.4 Ebook Reader 1) In “My Media”, click “Ebook” to launch Ebook Reader. 2) Add Ebook: Click to access ebook list and click to add to ebook list. 3) Ebook function : Button Function Bookmark Scroll up Scroll down Full screen Back Remark Go to bookmark page Scroll page up Scroll page down View in full screen Button Function Remark Previous Read previous article Next Ebook list Main Menu Read next article See ebook list Back to Main Menu Back to previous menu __ 20 Copyright © 2008 Gator. All Rights Reserved. 4) Bookmark: Click to access bookmark of ebook. Button Function Read selected document Save document Delete selected document Delete all Back to Main Menu 3.3 Phone (For iDriveZ431 Only) In “Main Menu”, click “Phone” to access to Bluetooth menu. 3.3.1 Bluetooth setting After mobile phone is paired with this device via Bluetooth, you may use this device to make calls, receive calls and hands free calling. __ 21 Copyright © 2008 Gator. All Rights Reserved. a) Bluetooth pairing with mobile phone: Activate Bluetooth: Go to “Phone” menu and click “Settings” to access Bluetooth menu. b) Bluetooth setting: In “Phone” Menu, click “Settings”. Bluetooth on standby: Click standby. Button shows to activate or deactivate Bluetooth on , it means Bluetooth remains activated in other interface. If not, Bluetooth connection will be disconnected when exit “Bluetooth” menu. Auto answer: Click to activate auto answer mode. __ 22 Copyright © 2008 Gator. All Rights Reserved. IN setting: Click to open small keyboard and set PIN. Input PIN using the small keyboard, click to delete input numbers and click to complete PIN setting and return to previous menu. 2) Pairing with mobile phone a) Activate Bluetooth device search function of your mobile phone to pair with this device. b) Input PIN code for pairing (default pairing PIN code is 1234). Pairing method for different mobile phone may vary, please refer to your mobile phone manual. c) “Dial Pad” icon in “Bluetooth” menu will bright up and “Connect” icon will dim down. __ 23 Copyright © 2008 Gator. All Rights Reserved. 3) Check pairing list: In “Bluetooth” menu, click “Paired List” to see list of paired mobile devices. ② ① ③ ④ 1. List of mobile devices which were previously paired with GPS device using Bluetooth. 2. Click your mobile device is in the list to select for Bluetooth connection. (Note: Bluetooth function in mobile device must be turn-on) 3. Click to disconnect connectivity between GPS device and mobile device. 4. Delete the list of paired devices. 2. Handsfree operation 1) Making call: After pairing completes, click “Dial Pad” in “Bluetooth” mode to make call. ① Backspace Backspace ② Call button ③ Redial ④ Call history __ 24 Copyright © 2008 Gator. All Rights Reserved. 2) During call: ① Dial pad Dial Pad ② Switch to mobile phone During call, you may operate the following: If require to input numbers, e.g. extension number, click ① for dial pad. Eg: Adjust volume: Click on + or - to increase or decrease call volume. Click speaker button to turn on or off. Switch between GPS device and mobile phone: Click ② to switch call to mobile phone and click again to switch back to GPS device. Click to end call. __ 25 Copyright © 2008 Gator. All Rights Reserved. 3) Check call list: In “Dial Pad” menu, click to see the call list. (The call list is retrieved from your mobile phone connected to this device via Bluetooth, this function may vary or not supported by certain mobile phones.) ① ② ③ ④ ⑤ In default, call list display all the call history, you may click on the right panel to check incoming calls, missed calls and outgoing calls. 1. 2. 3. 4. 5. Outgoing calls Incoming calls Missed calls Click on phone number in Call List and click this button to make call Scroll up and down (Applicable for iDriveZ430 model with GPRS (DUN) function only) 3.3.3 Bluetooth In “Main Menu”, click “Bluetooth” to access to Bluetooth menu. __ 26 Copyright © 2008 Gator. All Rights Reserved. 3.3.3.1 Bluetooth Settings In “Bluetooth”, click “Settings” to access to Bluetooth settings menu In Bluetooth settings menu, click “Connect” & to search for the mobile phone to pair. 、 __ 27 Copyright © 2008 Gator. All Rights Reserved. Select the mobile device to be connected, click to pair, input PIN code for pairing (default pairing PIN code : 1234). Pairing method for different mobile phone may vary, please refer to your mobile phone manual. Click to search Click to enter for mobile device Bluetooth web to pair browsing settings Click to enter Bluetooth Handsfree settings 2. Handsfree operation Making call: After pairing completes, click “Dial Pad” in “Bluetooth” mode to make call: __ 28 Copyright © 2008 Gator. All Rights Reserved. Click to call Calling: Click to adjust the volume Click to switch on and off the speaker Click to switch call to GPS and click again to switch back to mobile phone, the icon will change to Click . button, numbers dial pad appears to allow for calling of extension number: __ 29 Copyright © 2008 Gator. All Rights Reserved. Receiving call Click to Click to answer hang up Click to switch Click to switch on call to mobile and off the phone or GPS speaker Phonebook In Bluetooth menu, click “Phone book” to browse mobile phone contacts: Call List In Bluetooth menu, click on “Call List” to check the call history. (The call list is retrieved from your mobile phone connected to this device via Bluetooth, this function may vary or not be supported by certain mobile phones.) __ 30 Copyright © 2008 Gator. All Rights Reserved. Message In Bluetooth menu, click “Message” to enter: Write message Click “Write message” to enter: Recipient Phone number Enter Phone book Keyboard Send message Page Up & Down __ 31 Copyright © 2008 Gator. All Rights Reserved. Click “Send message” & “Confirm” to send the message: Outbox Click “Outbox” to enter and check all sent messages: Reply Call contact message Click “Reply message” to write message: __ 32 Copyright © 2008 Gator. All Rights Reserved. Inbox Click “Inbox” to enter: Click “Contact” to check the message details: 3. Bluetooth Web Browsing Function In “Bluetooth” menu, click on “Settings” to enter: __ 33 Copyright © 2008 Gator. All Rights Reserved. Click “Connect” to search for mobile phone to pair: Select the mobile device to be connected, click to pair, input PIN code for pairing (default pairing PIN code is 1234). Pairing method for different mobile phone may vary, please refer to your mobile phone manual. __ 34 Copyright © 2008 Gator. All Rights Reserved. Click to search Click to enter for mobile device Bluetooth web to pair browsing settings Click to enter Bluetooth Handsfree settings Click Internet Access for web-browsing connection: Connect Disconnect to Web from web browsing browsing __ 35 Copyright © 2008 Gator. All Rights Reserved. Click “Internet Access”, Bluetooth menu appears, click on “Internet” to start web browsing: URL address bar Refresh Stop New web page Exit Internet Access Favourites History Settings Keyboard Full screen __ 36 Copyright © 2008 Gator. All Rights Reserved. 3.4 Settings (For iDriveZ 430 & 431) Click “Settings” in Main Menu to access setting interface. 3.4.1 Calibrate touch screen 1) In “Settings” menu, click “System”. 2) Click “Calibration” to calibrate the device touch screen. __ 37 Copyright © 2008 Gator. All Rights Reserved. 3) Click on the cross sign and it will auto-move from position 1 to 5. 4) After calibration is unsuccessful, it will return to “System” menu. 5) If calibration is successful, the screen will display “OK”, then click “OK” to exit. After calibration, device system will save the calibrated settings. Calibration only applies to new system installed. 3.4.2 Language settings In “Settings” menu, click “Language”. Select a language pack and click to confirm and return to previous menu. 3.4.3 Backlight settings 1) In “Settings” menu, click “Backlight” to adjust brightness and set backlight timing. __ 38 Copyright © 2008 Gator. All Rights Reserved. 2) Slide the bar to adjust screen brightness “ and click 3) Click or ” to adjust backlight shut time. to return to previous menu. 3.4.4 Volume settings 1) In “Settings” menu, click “Volume” to adjust system sound volume and set “Touch-tone option”. Volume setting can also be accessed by clicking the small speaker icon on top-right of screen. 2) Slide on volume bar 3) Select 4) Click to adjust volume. to activate touch tone. to return to previous menu. 3.4.5 Time & date settings 1) In “Settings” menu, click “Time & Date”. __ 39 Copyright © 2008 Gator. All Rights Reserved. 2) Date format: Y-M-D (Year-Month-Day), click or to select date. 3) Default time format is 24 hours, click H (hour) or M (minute) and or to set time. 4) Click 5) Click to switch time format between 12 hours and 24 hours. to return to previous menu. 3.4.6 System information In “Settings” menu, click “System”. System information: ID: Device’s hardware ID VER: Device’s software version RAM: Random Access Memory, free RAM / total RAM FLASH: FLASH Memory, free FLASH / total FLASH __ 40 Copyright © 2008 Gator. All Rights Reserved. 4. R-Mount Inst allati on Dash Mountin g Screen Mounting 1. Determine Mounting Location Choose an ideal location in your vehicle that enables you and/or a passenger to access your device quickly and easily. Determine either a DASHBOARD or WINDSHIELD mounting location. * Respect all local laws and observe the regulations on the use and mounting of portable electronic devices in your vehicle. Mounting of any device on windshields and dashboards may be prohibited by law in your area. WARNING: Never manually operate a portable electronic device while driving. WARNING: Never mount device on or close to an airbag. This may create a deadly situation in the event of an airbag deployment. 2. Clean Mounting Location Use an alcohol pad to clean the selected dashboard or windshield mounting location. Let it dry completely before proceeding to stick it. 3. Remove Mount Base Unscrew the mount from the adhesive dashboard base. * If mounting to windshield, use suction cup base and skip to Step 6. Steps 4-5 for Dashboard Mounting only 4. Prep Adhesive Mounting Base Carefully peel off the red protective backing from the adhesive mounting base. __ 41 Copyright © 2008 Gator. All Rights Reserved. 5. Mount Adhesive Base to Dash Position the adhesive base on the area of the dash you cleaned with the alcohol pad. Press down with even pressure for 30-60 seconds to fully secure base to the dash. * Skip to Step 7. Step 6 for Windshield Mounting only 6. Secure Suction Cup Base to Windshield Install the included suction cup to the mount by pushing the threaded part through the mount so the threads are on the top side of the mount base (hint: press the suction cup threads firmly through the hole on the mount to make sure you can get enough movement when tightening to create a good seal on the glass. If you have trouble attaching to the glass after tightening up the nut you may not have the windshield suction cup base seated far enough into the mount.) Ensure nut is tightened down enough to form a tight seal between mount and windshield glass. Ensure device can be viewed safely/properly in chosen location. 7. Secure Mount to Base Place mount onto base thread. Secure mount to base by tightening nut. Ensure device can be viewed safely/properly in chosen location. 8. Mount Device to Base Using Included Adapters Included adapters are designed to fit a specific device only. Be sure to choose the correct adapter for your specific device/model. WARNING: Improper or incorrect adapter use may damage the mount or the device. Attach the appropriate included adapter onto the back of your device (see images below for reference). Slide the adapter into mount base slot and lock retainer tab as shown. 9. Mount Device Using Universal Adhesive Mount Tabs To attach a device for which an adapter has not been included, use the supplied universal adhesive mount tabs. Attach the adhesive mount tab to an appropriate location on the back of your device. Slide the adapter into mount base adapter slot. To Adjust/Tighten Mount Arm Joints To further adjust mount arm pivot/tension, remove the nut from the mount base and use the integrated hex nut tool to loosen/tighten mount arm pivot joints. After adjusting to desired tension, re-tighten nut down to re-secure mount/ device to base. __ 42 Copyright © 2008 Gator. All Rights Reserved. 5. Sync G PS De vice with PC 5.1 Application and functions This software is developed for mobile device with WIN CE platform to connect and synchronize data with PC. Copyright: This software is under copyright of Microsoft Corporation. 5.2 Operating Environment Hardware platform: PIII hardware and above Software platform: Microsoft Windows 98/ME/2000/2003/XP Requirements: This software is compiled by Windows Install. Installation of this software would require support of MSI service in your PC. 5.3 Active sync software installation 1) Please make sure your system support MSI format installation. Double click “ActiveSync4.5CN.msi”and enter installation interface. Tick to agree the terms and conditions and click “Next”. __ 43 Copyright © 2008 Gator. All Rights Reserved. 2) Input your personal information as required and click “Next”. 3) Choose directory and click “Next” to proceed to click “Install”. __ 44 Copyright © 2008 Gator. All Rights Reserved. 4) Restart PC after installation process complete. Icon of this software will appear on task bar column. 5) After installation of this software, an icon of Mobile Device will show in “My Computer”. When GPS device is connected, user may click on this icon to access folders of the device. __ 45 Copyright © 2008 Gator. All Rights Reserved. 5.4 Using Active Sync software 1) Switch on GPS device and connect to PC. Icon will rotate and shine. 2) Tick in “Establish Connection” and click “Next” to proceed to settings, choose Default Settings and click “Next”, then click “Complete”. __ 46 Copyright © 2008 Gator. All Rights Reserved. 3) Clicking “Complete” will start connection of GPS device and PC. 4) Click “Browse” to see GPS device information and access to folders in the device. User may copy, cut, paste and delete files. __ 47 Copyright © 2008 Gator. All Rights Reserved. 6. FAQ [Attention] If your problem still persists as after using this FAQ, please contact your nearest customer service centre or distributor. 1. Device unable to start-up. In the event when battery power is extreme low will cause the device unable to start-up. Please charge the battery and attempt to start-up again. 2. GPS problems In the event of device unable to acquire satellite signal or bad reception, please make sure that the device is below clear sky without obstacles. Please take note that GPS signal is affected by the following factors : Bad weather condition Existence of obstacles, e.g. building, tunnel, overhead bridge, trees, windscreen coating and etc. Interference by other in-car wireless device 3. Navigation software or map was deleted accidentally. Please contact your nearest customer service centre, dealer or distributor. 4. Standby time of the device too short. The battery standby time varies according to the external temperature. If external temperature is too low or too high, may shorten the duration. We suggest using the device under normal temperature. It also varies according to the method of use, screen of the device has higher power consumption, high sound volume and frequent operating the device will also shorten the standby time. __ 48 Copyright © 2008 Gator. All Rights Reserved.