1
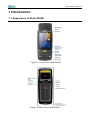
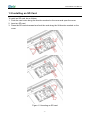
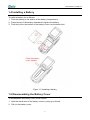
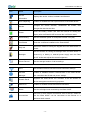
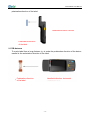
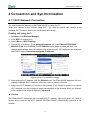
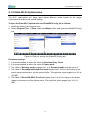
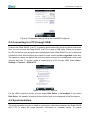
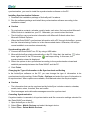
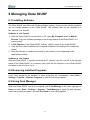
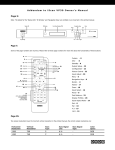
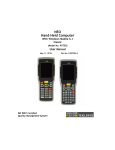
Table of Contents 1 Introduction ................................................................................ 1 1.1 Appearance of iData 90UHF ..................................................................................................... 1 1.2 Installing an SD Card ................................................................................................................. 2 1.4 Installing a Battery ...................................................................................................................... 3 1.5 Disassembling the Battery Cover............................................................................................. 3 1.6 Charging....................................................................................................................................... 4 1.7 Power-on ...................................................................................................................................... 5 2 Instructions on iData 90UHF ..................................................... 6 2.1 Home ............................................................................................................................................ 6 2.2 Status Icons ................................................................................................................................. 6 2.3 Applications Window .................................................................................................................. 7 2.4 Icons of Applications .................................................................................................................. 7 2.5 Keypad Operations................................................................................................................... 11 2.6 Adjusting Volume ...................................................................................................................... 12 2.7 Date and Time ........................................................................................................................... 13 2.8 Setting Ringtone ....................................................................................................................... 13 2.9 Setting Screen........................................................................................................................... 13 2.10 Label Reading Direction ........................................................................................................ 13 3 E-mail ........................................................................................ 15 4 Connection and Synchronization ........................................... 17 4.1.1 Wi-Fi Network Connection ................................................................................................... 17 4.1.2 iData Wi-Fi Optimization....................................................................................................... 18 4.2 Connecting to a PC through USB .......................................................................................... 19 4.3 Synchronization ........................................................................................................................ 19 5 Introduction to iScan ............................................................... 21 5.1 Starting iScan ............................................................................................................................ 21 5.2 Using iScan................................................................................................................................ 21 5.3 Description of iScan Menu ...................................................................................................... 21 6 Managing iData 90UHF............................................................. 23 6.1 Installing Software .................................................................................................................... 23 6.2 Removing Installed Programs................................................................................................. 23 6.3 Using Task Manager................................................................................................................. 23 6.4 Using File Explorer ................................................................................................................... 24 6.5 Restoring Factory Settings ...................................................................................................... 24 7 Precautions and Troubleshooting .......................................... 29 7.1 Precautions ................................................................................................................................ 29 7.2 Troubleshooting ........................................................................................................................ 30 Appendix ...................................................................................... 33 iData 90UHF User Manual 1 Introduction 1.1 Appearance of iData 90UHF Figure 1-1 Front view of iData 90UHF Figure 1-2 Rear view of iData 90UHF -1- iData 90UHF User Manual 1.2 Installing an SD Card To install an SD card, do as follows: 1. Push the card cover along the direction marked on the cover and open the cover. 2. Insert an SD card. 3. Press the SD card downward and lock the card along the IN direction marked on the cover. Figure 1-3 Inserting an SD card -2- iData 90UHF User Manual 1.4 Installing a Battery To install a battery, do as follows: 1. Push the battery to the bottom of the battery compartment. 2. Press the top of the battery downward to tighten the battery. 3. Push the joint at the bottom of the battery cover into the back shell. Press the battery cover inwards Figure 1-5 Installing a battery 1.5 Disassembling the Battery Cover To disassemble the battery cover, do as follows: 1. Hold the rear button of the battery cover by using your thumb. 2. Pull out the battery cover. -3- iData 90UHF User Manual Hold the button at the bottom and pull out the battery cover Figure 1-6 Disassembling the battery cover 1.6 Charging You can charge a battery in the following ways: 1. Charge the iData 90UHF by using a charger. 2. Connect the iData 90UHF to a PC by using a USB cable to charge the iData 90UHF. In the charging status, the LED is red. When the LED becomes blue, charging is complete. If you charge the battery when the iData 90UHF is powered on, the battery icon on the upper right part of the screen changes, indicating that charging starts. When the battery volume is low, an alarm is generated on the screen of the iData 90UHF and the battery volume becomes . When the battery volume is too low, the iData 90UHF is automatically powered off. ★ Caution The battery can be charged for more than or less than three hours. The battery will not be damaged if charging is interrupted. The duration of the battery depends on different applications of the iData 90UHF, for example, selected functions of iData 90UHF, usage mode, and data transmission. Tips To ensure a longer standby time of the iData 90UHF, follow the following tips: Always connect the iData 90UHF to the AC power supply when you do not use it. In the power supply setting, set the iData 90UHF to make it automatically closed after being idle for a short time. -4- iData 90UHF User Manual Set the backlight to make it automatically closed after being idle for a short time. Stop all wireless activities when you do not use the iData 90UHF. 1.7 Power-on After installing a SIM card and a battery and charging the iData 90UHF completely, you can use the iData 90UHF. 1. Press and hold the On/Off key for several seconds. 2. The power-on page is displayed, and the iData 90UHF enters the Windows Mobile operating system after the boot process is complete. When you power on the iData 90UHF for the first time, the iData 90UHF initializes the file system of the flash memory. During the period, the initial page remains for about one minute. Then some basic settings such as screen calibration, date and time, and Email setting appear. If you do not want to set these items, directly skip them. -5- iData 90UHF User Manual 2 Instructions on iData 90UHF 2.1 Home Home is the start page of the iData 90UHF and displays important information such as upcoming appointments and tasks. At Home, you can add items or change the background by selecting Start > Settings > Home. Click a program at Home to open it. The default page of the iData 90UHF is Home. If the iData 90UHF is not at Home, select Start > Home to switch to Home. Figure 2-1 Home ★ Caution When the iData 90UHF is switched to Home, some applications may still run in the background. If you do not wish the applications to run in the background, close the opened applications through the task manager. 2.2 Status Icons Status icons are in the status bar at the upper part of the screen and show device status and notifications. Table 2-1 Status icons Sound on Sound off Vibration mode Charging battery Battery volume The battery volume is low or too low. Current time -6- iData 90UHF User Manual Notification that one or more emails or short messages are received There are multiple notification icons, which are beyond the scope of display. Click it to display remaining icons. Reminder that one calendar event will happen Valid connection Invalid connection Synchronizing Detected that Wi-Fi network is available Using Wi-Fi 2.3 Applications Window Click Start. The applications window is displayed, where icons of applications are placed. You can drag the icons of applications to sequence applications according to your habits. Click the icon of an application to open the application. Figure 2-2 Applications window 2.4 Icons of Applications Icons of Applications Table 2-2 Icons in the applications window Icon Name Description Home Turns to the start page of the iData 90UHF. Settings Manages the iData 90UHF. File Explorer Organizes and manages files on the iData 90UHF. iScan Scans and reads barcodes. -7- iData 90UHF User Manual Icon Name Description Notepad Creates, views and edits files. Internet Explorer Browses web pages and WAP websites and downloads new programs and files from the Internet. ActiveSync Synchronizes information between the iData 90UHF and the host or Exchange Server. Camera Shoots photos or videos. wpctsc Logs in to a remote computer and uses available programs in the remote computer through the iData 90UHF after starting the remote desktop. Google Maps Views the geographical location of a target, obtains the satellite map and life information, and performs GPS-based positioning and vehicle navigation. E-mail Sends or receives emails and text messages. Calendar Views dates, tracks appointments and creates appointments. Alarms Views and sets time/date and sets alarms. Pictures & Videos Views and manages pictures, cartoons and video files. Calculator Performs basic arithmetic operations such as add, subtract, multiply and divide. Windows Media Plays audio and video files. Notes Creates notes, drawings and recordings by writing or typing. Tasks Tracks execution of tasks. Internet Task Manager Help Connects a laptop computer to the Internet through the data connection of the iData 90UHF. Views ongoing processes and allocation of the memory and CPU and stops processes. Views the help information about the current screen or program. Setting Icons Table 2-3 lists the control applications that are preinstalled on the iData 90UHF. Select Start > Settings. The Settings window is displayed. -8- iData 90UHF User Manual Table 2-3 Setting icons in the Settings window Icon Name Description Buttons Allocates keys to a program. Personal tab Owner Enters personal information onto the iData 90UHF. Information Phone Sets call security, services, network, band and ringtone. GPS Setting Sets GPS and views GPS logs and satellite status. System tab Views the basic information about the iData 90UHF, for example, About operating system version, processor type, memory, and device information. Encrypts files on the memory. You can read encrypted files only on Encryption your device. Customer Submits a feedback about Windows Mobile. Feedback Task Manager Views the memory and CPU allocation and stops processes. Memory Checks memory allocation and information about the memory card. Sets the zone configurations to be used, including numbers, Regional Settings currencies, date and time formats displayed on the iData 90UHF. Full screen Mode Sets the screen display mode. Remove Removes programs installed on the iData 90UHF. Programs Sets an appropriate GPS communication port if required. If a External GPS program needs to access GPS data or you have connected the GPS receiver to the iData 90UHF, this operation is needed. Restore Factory Restores factory settings. Defaults Managed Lists the programs installed by the system administrator remotely. Programs -9- iData 90UHF User Manual Icon Name Description Device Displays the device version, hardware and features. Information Error Reporting Enables or disables the error report function of the iData 90UHF. Changes the screen direction, recalibrates the screen, and Screen changes the text size and font. Views the battery volume and sets the interval for closing the Power display after the iData 90UHF becomes idle in different cases. Alarm Setting Sets the automatic power-on and power-off time every day. Certificates Views the certificates installed on the iData 90UHF. Selects the mode for locking the keypad when the iData 90UHF is KeyLock closed. Sets the duration for closing the backlight when the iData 90UHF is Backlight powered by a battery or external power supply and the iData 90UHF is idle and adjusts the screen brightness. Phone Record Sets the storage location of call recordings. Connections tab Wi-Fi Sets wireless network connections and customizes settings. Wireless Enables or disables wireless communication of the iData 90UHF Manager and customizes the WLAN and phone settings. Registers the iData 90UHF as a member in the AD domain for Domain Enroll device management and security purposes. USB to PC Enables or disables enhanced network connection. Beam Sets the IrDA light beam received by the iData 90UHF. Sets one or more modem connections such as dial-up, GPRS so Connections that the iData 90UHF can be connected to the Internet or a dedicated local network. - 10 - iData 90UHF User Manual 2.5 Keypad Operations The iData 90UHF provides two keypads: screen keypad and physical keypad. Using Screen Keypad When you start an application or choose to enter text or numbers, the screen keypad is displayed. Figure 2-3 Screen keypad Displaying Screen Keypad Click any place where text can be entered. The screen keypad is displayed. Hiding Screen Keypad In the text state, click to hide the screen keypad. To display the hidden screen keypad again, click again. Using Physical Keypad Figure 2-4 shows the physical keypad, which has 26 keys in total. In terms of function, the keys are divided into numeric/letter/symbolic keys, direction keys, and scan keys. Figure 2-4 Key layout on the physical keypad Installing the Notification Program of Physical Keypad - 11 - iData 90UHF User Manual MC90UHFKEY_Notify.CAB is the notification program of the physical keypad provided by Wuxi iData Technology Company Ltd. 1. Copy MC90UHFKEY_Notify.CAB to My Device\Program Files\SetupNotify (if the SetupNotify directory does not exist, create the directory). 2. Run MC90UHFKEY_Notify.CAB. 3. After the MC90UHFKEY_Notify.CAB program is installed, the iData 90UHF automatically restarts. 4. Select Start > Tools and click to run the program. After the program is run, you can see the new icon in the status bar on the screen. ★ Note When you press Shift on the physical keypad to switch the input mode, the icon of the physical keypad mode in the status bar also changes. : The physical keypad is in the numeric input mode. : The physical keypad is in the lowercase input mode. : The physical keypad is in the uppercase input mode. 2.6 Adjusting Volume Adjust the system volume or phone volume by clicking the icon of speaker in the status bar. 1. Click the status bar. A drop-down list box is displayed. 2. Click the icon of speaker. The volume dialog box is displayed. 3. Click and move the scroll bar to adjust the system volume and phone volume. Select On, Off, or Vibrate to open or close volume or enter the vibration mode. You can set the system volume in the Sounds & Notifications window by selecting Start > Settings > Sounds & Notifications. Figure 2-5 Speaker Figure 2-6 Volume dialog box - 12 - iData 90UHF User Manual 2.7 Date and Time To change the date and time in the iData 90UHF, do as follows: 1. Select Start > Settings > Clock & Alarm. The Clock & Alarm window is displayed. 2. Click Time Zone, Date, and Time to set the items. 3. Click OK to exit the window. You can also click the icon of clock at Home or the icon of alarm in the applications window. 2.8 Setting Ringtone To change the ringtone of the iData 90UHF, do as follows: 1. Select Start > Settings > Sounds & Notifications. The Sounds & Notifications window is displayed. 2. In the Sounds tab, enable or disable sound for an event. You can also click Screen taps and Hardware buttons to enable or disable sound. 3. In the Notifications tab, select an event, a ringtone type, and a ringtone. 2.9 Setting Screen To set the screen, do as follows: 1. Select Start > Settings > System > Screen. 2. In the General tab, set the screen direction to adjust the screen. 3. In the ClearType tab, set the screen font. 4. In the Text Size tab, adjust the font size. 5. Click OK to exit the window. To adjust the screen brightness, do as follows: 1. Select Start > Settings > System > Backlight. 2. In the Battery Power tab, move the sliding block to adjust the screen brightness and select the Turn off backlight check box to set the duration for closing the screen when the screen is idle. 3. In the External Power tab, move the sliding block to adjust the screen brightness and select the Turn off backlight check box to set the duration for closing the screen when the screen is idle. 4. Click OK to exit the window. 2.10 Label Reading Direction 1. Ceramic Antenna To read a label from a long distance, try to make the screen of the device parallel to the - 13 - iData 90UHF User Manual polarization direction of the label. Handheld direction: vertical Polarization direction of the label 2. PCB Antenna To read a label from a long distance, try to make the polarization direction of the device parallel to the polarization direction of the label. Polarization direction of the label Handheld direction: horizontal - 14 - iData 90UHF User Manual 3 E-mail You can send and receive Emails through the Email account your often use by using the iData 90UHF. Setting Email Account 1. Select Start > Tools > Email. 2. Click Setup E-mail and enter your Email account and password. 3. Select Try to get e-mail settings automatically from the Internet and click Next. 4. Click Next to complete the setting and download Emails. 5. Enter your name and click Next. 6. Enter a user name and click Next. 7. Select the time for Automatic Send&Receive and click Finish. ★ Caution Before setting an Email connection, ensure that the network connection is correct. If the setting of your Email account cannot be completed automatically, you can enter your Email account setting manually. Before entering the Email account setti ng, contact your Email service provider to obtain the correct Email account setting. For example, you need to know whether the type of your Email account is POP3 or IMAP. Deleting an Email Account 1. Select Start > Tools > Email. 2. Select an Email account. 3. Select Menu > Delete. 4. Click Yes. Creating and Sending an Email 1. Select Start > Tools > Email. 2. Select an Email account and click it to open the account. 3. Select Menu > New. 4. Enter the address of the recipient and the subject and edit the content. 5. Click Send . Receiving and Opening Email 1. Select Start > Tools > Email. 2. Select an Email account and open the Email box. 3. Click in the upper left corner and select Inbox. 4. Click Email to open and read the Email. - 15 - iData 90UHF User Manual Deleting an Email 1. Select Start > Tools > Email. 2. Select an Email account and open the Email box. 3. Click in the upper left corner and select Inbox. 4. Select the Email to be deleted. 5. Click in the lower left part. 6. Click Yes. - 16 - iData 90UHF User Manual 4 Connection and Synchronization 4.1.1 Wi-Fi Network Connection You can access the Internet on the iData 90UHF by using Wi-Fi. When you connect to the Internet using Wi-Fi, you need to search and connect to an available Wi-Fi network before you can access the Internet. Enabling and Setting Wi-Fi 1. At Home, click Wireless Manager. 2. Click Wi-Fi to enable Wi-Fi. 3. Select Menu > Wi-Fi Settings. 4. Confirm the IP address. In the Network Adapters tab, select Marvell SDIO8686 Wireless Card and click Edit. The IP Address setting page is displayed. Ask your network administrator which IP address s hould be entered. If IP addresses are assigned over DHCP, select Use server-assigned IP address. Figure 4-3 Wi-Fi connection setting 5. After setting the IP address, click the Wireless tab. The iData 90UHF searches for and displays available Wi-Fi networks, which are open or secure networks. 6. Select one Wi-Fi network to connect to the network. If you intend to connect to a secure Wi-Fi network, you are required to enter the password of the network. After you connect to the network, the network displays Connected. ★ Caution The iData 90UHF memorizes the connected Wi-Fi network. Next time when you need to access and connect to the Wi-Fi network, the iData 90UHF automatically connects to the network. - 17 - iData 90UHF User Manual 4.1.2 iData Wi-Fi Optimization The Wi-Fi optimization tool helps users adjust different values based on the usage environment to achieve the optimal setting. To open the iData Wi-Fi optimization tool iDataWiFiConfig, do as follows: 1. Install the iScan of the latest version. 2. Select Program Files -> iData, open the Addons folder, and open the iDataWiFiConfig tool. Figure 4-4 Path for storing the iDataWiFiConfig tool Parameter settings 1. It is recommended to retain the value of Associate Retry Times. 2. It is recommended to retain the value of Power mode. 3. The value of Roaming mode ranges from 1 to 4. Roaming mode must be set to 4. 4. The value of RoamSignalStrengthThreshold ranges from -100 to 0. According to the actual usage environment, set the optimal value. The empirical value ranges from -80 to -60 (dB). 5. The value of Roam Diff RSSI Threshold ranges from 1 to 50. According to the actual usage environment, set the optimal value. The empirical value ranges from 10 to 15 (dB). - 18 - iData 90UHF User Manual Figure 4-5 Parameter settings using the iDataWiFiConfig tool 4.2 Connecting to a PC through USB Connect the iData 90UHF to a PC to transmit and process files such as picture and music files. You can connect the iData 90UHF to a PC by using a USB cable. When you connect to a PC for the first time, an option box is displayed on the iData 90UHF for you to select the connection mode. After selecting a connection mode, select the No Longer Ask check box. The option box does not appear the next time and a connection is established in the mode selected last time. To set the mode of connecting to a PC through USB, select Start > Settings > Connect > USB to PC. Figure 4-6 USB to PC window For the USB connection mode, you can select Disk Driver or ActiveSync. If you select Disk Driver, file transfer is faster but the memory card is not displayed in the file explorer. 4.3 Synchronization The synchronization function is used to synchronize information between the iData 90UHF and a PC to share the same directory, information or calendar events. To realize - 19 - iData 90UHF User Manual synchronization, you need to install the synchronization software on the PC. Installing Synchronization Software 1. Download the installation package of ActiveSync4.5 or above. 2. Run the software package and install the synchronization software according to the installation wizard. ★ Caution To synchronize contacts, calendar, emails, tasks, and notes, first ensure that Microsoft Office Outlook is installed on your PC. Otherwise, you cannot select the items. The ActiveSync can synchronize information with Microsoft Outlook rather than Microsoft Outlook Express. When the iData 90UHF synchronizes information with a PC through ActiveSync, ensure that the Internet sharing function is in the disconnected status. Otherwise, ActiveSync cannot establish a connection automatically. Synchronizing with a PC 1. Connect the iData 90UHF to a PC by using a USB cable. 2. Microsoft ActiveSync starts automatically on the PC. After that, the task bar lower right corner of the PC becomes and keeps rolling. In this case, the in the synchronization wizard is displayed. 3. Select the options to be synchronized according to the synchronization wizard and establish partnership between the iData 90UHF and the PC. 4. Click Finish. Changing the Type of Information to Be Synchronized and Setting In the ActiveSync software on the PC, you can change the type of information to be synchronized and the setting. Select Tools > Options and select the type of information to be synchronized. When options are available, click Set and select the required option. ★ Caution The information that can be synchronized by ActiveSync includes contacts, calendar, emails, tasks, notes, favorites, files and media. Short messages and multimedia messages cannot be synchronized. Canceling Synchronization If synchronization is canceled, all synchronization and file conversion settings selected for the iData 90UHF are deleted. 1. Open ActiveSync on the PC. 2. Select Files > Mobile Devices and select the target device. 3. Select Files > Delete Mobile Devices. - 20 - iData 90UHF User Manual 5 Introduction to iScan To collect data, you must install and start the scan application on the iData 90UHF. Wuxi iData Technology Company Ltd. provides the embedded system component iScan, which can send the data decoded by a barcode scanner to applications by simulating keypad input. The iData products that are equipped with RFID modules are supported. These products are used to detect compatibility of devices and demonstrate RFID applications. 5.1 Starting iScan The iScan program is started by default after the system is started. You can also select Start > iScan to start iScan. After the iScan program is started, the iScan icon is displayed in the lower area of the iData 90UHF. 5.2 Using iScan 1. Click . A menu is displayed. 2. Select the functions to be enabled. After a function is enabled, is displayed in front of the function. Figure 5-1 iScan menu 5.3 Description of iScan Menu Enable BarCode This function supports barcode scanning and identification. The scanned barcode can be simulated as keypad input and transmitted to the relevant application. Enable RFID This function supports reading IDs of RFID labels, decoding RFID labels and sending the decoding results to the relevant application. - 21 - iData 90UHF User Manual 2D Coding ASCII and UTF-8 codes are supported: ASCII: Decoding involves digits, letters and some symbols, namely barcodes of ASCII characters. UFT-8: Decoding involves all barcodes containing ASCII characters as well as 2D codes of simplified Chinese. Misc Utility Auto ‘ENT’ suffix: Simulate Enter as the acknowledgement for completion of input. WiFi Conn. Keepon: The built-in power management module in the Windows Mobile system disables Wi-Fi by default to save power when the iData 90UHF is in the standby status. After this function is enabled, the Wi-Fi connection can be always retained. Disable Dial/Hangup: Windows Mobile 6.5 supports dialing. By default, if you press the hang-up key, the system exits the current application and returns to Home. After this function is enabled, the default action of the system can be shielded. Enable Keybd: Through software, some keys on the keypad are replaced by some keys that are originally unavailable on the keypad of the iData 90UHF. Simulate Mode Analog input involves keypad message and key action: Message(Fast): Analog input is faster. Event(slow): Analog input is slower. About In the About window, you can view the version of the iScan program. Exit Click Exit to exit the iScan program. - 22 - iData 90UHF User Manual 6 Managing iData 90UHF 6.1 Installing Software The iData 90UHF uses Microsoft Windows Mobile system, which provides infinite scalability. You can install software on the iData 90UHF. The software that can be installed is in the .cab and .exe formats. Software in .cab Format 1. After the iData 90UHF is connected to a PC, open My Computer and find Mobile Devices. Copy the software package to the storage space of the iData 90UHF or a memory card. 2. In File Explorer of the iData 90UHF, find the .cab file copied to the iData 90UHF. 3. Click the file to start installation and complete installation according to the installation wizard. 4. After the software is installed successfully, the software icon is displayed in the applications window. Software in .exe Format After the iData 90UHF is synchronized with a PC, directly copy the .exe file to the storage space of the iData 90UHF or a memory card, open the file explorer on the iData 90UHF, and directly click the file to run it. 6.2 Removing Installed Programs If too many programs are installed or some programs are unnecessary, select Start > Settings > System > Remove Programs to remove relevant programs. 6.3 Using Task Manager When the iData 90UHF runs at a low speed, click Task Manager in the lower right part of Home or select Start > Settings > System > Task Manager to open the task manager, select the required programs, and click End Task to close the programs. - 23 - iData 90UHF User Manual Figure 6-1 Task Manager 6.4 Using File Explorer The file explorer can manage files in the iData 90UHF and a memory card. It can sequence and transfer the files. You can click File Explorer in the lower left part of Home or select Start > File Explorer to open the file explorer. Figure 6-2 File Explorer 6.5 Restoring Factory Settings By restoring factory settings, you can make the iData 90UHF return to the original state. ★ Caution After the factory settings are restored, all data on the iData 90UHF will be deleted. Therefore, before performing the operation, back up important data on the iData 90UHF. 1. Select Start > Settings > System > Restore Factory Defaults. The Restore Factory Defaults window is displayed. 2. Enter 1234 and click YES. - 24 - iData 90UHF User Manual Figure 6-3 Restore Factory Defaults window You can also press and hold the left function key + right function key + power-on/power-off key to restore factory settings. - 25 - iData 90UHF User Manual 7 Precautions and Troubleshooting 7.1 Precautions To ensure that the iData 90UHF does not fail, follow the following precautions during use of the iData 90UHF: Put the iData 90UHF and its components and accessories in the places where children cannot reach. Keep the iData 90UHF dry. Rain, moisture and liquid contain acidic materials and will corrode the circuit board. Do not store or use the iData 90UHF in dusty or dirty places. Do not store the iData 90UHF in a place that is too hot. High temperature will shorten the service life of electronic components. Do not store the iData 90UHF in a place that is too cold. When the temperature inside the iData 90UHF rises, moisture is generated inside the iData 90UHF, which may damage the circuit board. Do not try to disassemble the iData 90UHF. Otherwise, the iData 90UHF may be damaged. Do not touch the screen surface of the iData 90UHF by using a pen, a pencil or other sharp articles in case the screen may be scratched. Do not throw, beat or violently collide the iData 90UHF. Otherwise, the components of the iData 90UHF may be damaged and the iData 90UHF may be faulty. Do not use strong chemical products or strong detergent to clean the iData 90UHF. If the iData 90UHF become dirty, clean the surface of the iData 90UHF by using a soft cloth soaked with dilute glass detergent. Please use the protective film to reduce wear as much as possible. The screen protective film can improve the availability and durability of the screen. Pay attention to the following during use of the battery. The area where the iData 90UHF is charged must keep away from scraps, inflammables or chemical substances. When you charge the battery of a mobile device, the temperature on the battery and charger must be in the range 0C to 40C. Do not use incompatible batteries or chargers, which may cause fire, explosion, leakage or other hazards. Do not disassemble, press, twist, pierce or cut the battery. Do not make the battery short-circuited or contact the connecting terminal of the battery by using metal or other conductive objects. - 29 - iData 90UHF User Manual Do not insert other materials into the battery, contact the battery with water or other liquid, or expose the battery in an open fire, explosive source or other sources of danger. Do not put or store the battery in the environment where the temperature is too high. Do not put the battery in a microwave oven or a drying machine. Do not put the battery into a fire. If the battery leaks, do not let the liquid stain your skin or eyes. Otherwise, wash your skin or eyes with lots of water and go to see the doctor immediately. Cleaning iData 90UHF Shell Clean the shell by using a cloth soaked with alcohol, including keys and space between keys. Display screen You can clean the display screen by using a cloth soaked with alcohol. Do not let the liquid gather around the screen. Otherwise, dry the scree n by using a soft non-woven cloth in case strip marks are left on the screen. Scan lens Clean the scan lens regularly by using lens paper or other articles suitable for cleaning optical materials. 7.2 Troubleshooting Table 7-1 iData 90UHF troubleshooting Fault Cause After the power key is The battery volume is too low or the battery is not Charge the battery or replace the battery. pressed, the iData 90UHF is not powered on. Battery charging fails. Solution charged. The battery is incorrectly Correctly install the battery. installed. The system breaks down. Restore factory settings. The battery fails. Replace the battery. The temperature of the battery is too high or low. Put the battery in normal temperature. During data communication, data is An incorrect data cable is Contact the system administrator. used. not transmitted transmitted data The software or is incomplete. The relevant function is not activated after a user communication Install or reinstall the ActiveSync software to is incorrectly update the driver. installed or configured. The screen is incorrectly Recalibrate the screen. calibrated. - 30 - iData 90UHF User Manual Fault Cause clicks a button or icon. The system respond. No sound can be heard. Solution does not The volume is too low or is disabled. Restart the system. Adjust the volume. After being inactive for a period of time, the iData 90UHF is closed. If the iData 90UHF is The iData closed. 90UHF is The iData 90UHF is in the powered by a battery, set the time segment to a value in the range from 1 to 5 minutes inactive state. and the interval to 1 minute. If the iData 90UHF is powered by external power supply, set the time segment to 1, 2, 10, 15, The battery is used up. A message indicating that the memory of the iData 90UHF is full is displayed. or 30 minutes. Replace the battery. Remove unused memos and records. If Too many files are stored in necessary, save the records on the host or the iData 90UHF. increase the storage capacity by using an SD card. Too many applications are installed 90UHF. on the iData Remove applications installed on the iData 90UHF. The scan application is not Load the iScan program in the iData 90UHF. loaded. The iData 90UHF fails to decode a barcode when reading it. The barcode is defective and the scanner cannot Check that the barcode is not defective. read it. If the scanner stops sending out laser beam The battery volume is low. after you turn on the switch, check the battery volume. Table 7-2 Cable faults Fault Cause Solution Charging fails. The cable contact. is in poor Replace the cable. The ActiveSync software cannot be connected. The cable contact. is in poor Replace the cable. Table 7-3 Wi-Fi faults Fault An AP connected. cannot Cause Solution be A message is displayed, Start the WLAN device. showing that the AP is - 31 - iData 90UHF User Manual Fault Cause Solution unavailable. The DHCP function is not enabled on the AP/router and the IP address cannot be set. In this case, set the IP address manually. The password of the WLAN device is incorrect. A message is displayed, Too many devices access the AP at the same showing that the AP is time. In this case, restart the AP. being connected. When WLAN is in Adhoc mode, modify the advanced setting of WLAN to Access Point only. The password mode of the AP is incorrect. In this case, change the password authentication mode. - 32 - iData 90UHF User Manual Appendix Table 1 Accessories of iData 90UHF Component Description iData 90UHF Thick battery Power adapter Used to charge the battery. Straps Package Used to communicate with the host or charge the iData 90UHF. USB data cable Instructions Warranty card Four-slot battery charger Optional Smart pen Optional Bottom charging cable Optional Industrial-grade capacitive touch panel Optional Table 2 Technical specifications of iData 90UHF Item Description System Configuration CPU 600 MHz high-performance ARM processor Operating System Memory Microsoft Windows Mobile 6.5 512 MB ROM+256 MB RAM Expansion Slot Mini SD card, up to 32 GB (PSAM card optional ) Display Touch Panel 3.5-inch HVGA (320x480), high brightness TFT LCD, LED backlight Resistive touch panel (Industrial-grade capacitive touch panel optional) Camera (Optional) Exit Window 5 Mega pixel, autofocus lens, LED flash Keypad Corning Gorilla glass 28-key durable industrial keypad with interior transmission light Battery 3.7 V 6000 mAh rechargeable lithium polymer battery Audio Built-in microphone Notification Vibrator alerts/LED/Audio notification Vibration Motor Built-in programmable vibration motor Operating Environment Development Tools Visual Studio 2005/2008, with Software Development Kit (SDK) Programming C++, C#, .NET Language Management Tools iData Service Operating Temp. -10℃ to 50℃ (14℉ to 122℉) - 33 - iData 90UHF User Manual Storage Temp. -20℃ to 60℃ (-4℉ to 140℉) Relative Humidity 0 to 95% (non-condensing) Sealing IP65 Electrostatic Discharge Conforms to 15 kV air discharge, 8 kV direct discharge Structural Parameters Dimensions (LxWxD) 189 mm x 70 mm x 43.5 mm Weight 380 g (standard battery included) Communication Transmission Wireless LAN GPS (Optional) Wi-Fi 802.11b/g SiRF Star III (with A-GPS) GPS navigation chip available Input/Output Ports USB Port 1 ( Micro USB port) Charger Port RS232 Port 1 (DC port) 1 Data Collection Specification RFID(UHF) Protocol ISO18000-6C (EPC C1G2) Frequency Antenna 902-928 MHz Circularly polarized 2 dBi / Linearly polarized 1.4 dBi Max Output Power 1 W (<30 dBm) Data Capture Range Within 2.5 m (3.5 m for special tags) 1D Laser Scanner Scan Depth of Field 4 mil 3.81 cm - 60.98 cm Scan Angle 47° 3°(Standard) Scan Speed 102 12 scans/sec. (Bidirectional) Optical Resolution 1D Linear Imager Reading Mode CCD Reading Accuracy 4 mil Decoding Speed 2D Area Imager 300 times/sec. (Max.) Optical Resolution Scan Angle 3 mil Omnidirectional Scan Speed 300 scans/sec. Infrared Communication Module Built-in Infrared Communication Module Structure with two emitting tubes, meter reading distance of up to 5 meters, fully supporting DL/T645 protocol and communication protocols of worldwide mainstream meter manufacturers Interface Initial rate: 1200 bps, supported rates: 1200, 2400, 4800, and 9600 bps - 34 - iData 90UHF User Manual Wuxi iData Technology Company Ltd. All Rights Reserved. This guide is prepared by Wuxi iData Technology Company Ltd. according to the existing information. The content in this document is subject to update without notice. Without written approval of Wuxi iData Technology Company Ltd., no one shall copy, extract, back up, modify, spread, or translate any part of this document in any form or method or use the whole or part of this document for business purposes. If you have any question, you are free to send an email to [email protected] - 35 - iData 90UHF User Manual