1
User Manual
v1.02
In-House Computing
April 2007
In-House Computing
ScanNprint Silver User Manual
Contents
Contents ...................................................................................................................................................2
Introduction..............................................................................................................................................3
Functionality: .......................................................................................................................................3
Applications and Uses: .........................................................................................................................3
Future versions .....................................................................................................................................4
Demonstration version..........................................................................................................................4
Using the ScanNprint Application ............................................................................................................5
Configuring the Application .....................................................................................................................7
The Application Configuration File ......................................................................................................8
Application Control ..........................................................................................................................8
Scanning Symbologies......................................................................................................................9
PLU Definition .................................................................................................................................9
Example use ....................................................................................................................................... 10
Appendix 1 – Data Transfer.................................................................................................................... 12
Appendix 2 – Installation and Registration ............................................................................................. 13
Installation.......................................................................................................................................... 13
Compact Framework .......................................................................................................................... 13
Product Registration ........................................................................................................................... 14
Document History .................................................................................................................................. 15
2 of 15
In-House Computing
ScanNprint Silver User Manual
Introduction
This is the User guide for the In-House Computing ScanNprint Silver application for the Paxar Ultra 6039
barcode scanner and printer.
In this document you will find details of how to configure the ScanNprint application to meet the needs of
your barcode scanning and label printing application.
The ScanNprint application is a user configurable application which means that you need to set up the
application to use your own data, and to print the labels that you need.
The Paxar Ultra uses Paxar’s MCPLII label format language, and the ScanNprint application gives you
full control of the device via the MPCL language. This document does not attempt to describe PCPL –
refer to Paxar’s “Packet Reference Manual”.
You will find descriptions of the ScanNprint application configuration, and details of the required Lookup
file format, and output Log file format here.
Configuration of the application means that it is suitable for a wide variety of “Scanning and Labelling”
requirements.
The user-configurable aspects of the application are:
- Barcode symbologies
- PLU fields and size
- Printer Supply sizes
- Printed Label Formats
- Functionality
By providing a user controlled configuration mechanism the application allows for a wide variety of input
Code files, or PLU files to be handled. The configuration options allow for three independent fields from
the input file to be used in Printed formats, and the specification, usage and printing of this information is
fully controlled by the user.
Functionality:
•
•
•
Single print, or reprint on trigger
Use of PLU price and Description fields, if configured
Optional logging of scanned codes
Applications and Uses:
•
•
•
Item Labelling
Shelf Edge Labelling
Price Mark-down
3 of 15
In-House Computing
ScanNprint Silver User Manual
The application is supplied as a single installable Win CE CAB file.
Future versions
The ScanNprint Silver application is the simplest member of a family of products design to fulfil a ranged
of scanning and printing requirements. Future versions will include:
•
•
•
•
Printing of more than a single label format, under user control
Price check functionality – permits comparison against user entered prices with enhanced
logging.
Handling of “wider” PLU files with enhanced product details and/or more details printed
labels.
Support for RF transfer of PLU and Log files
Demonstration version
The demonstration version of the ScanNprint Silver application is internally configured to only accept the
EAN8 format barcode symbology. The specification of other symbologies on the application
configuration file are ignored. The EAN8 symbology must be explicitly declared in the Configuration
file.
The demonstration version is clearly marked on the Startup screen and the About screen.
4 of 15
In-House Computing
ScanNprint Silver User Manual
Using the ScanNprint Application
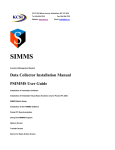
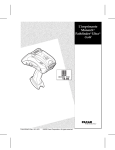
Assuming that the ScanNprint application has been installed on your Paxar 60391, double click the icon
on the Device’s desktop.
This is the ScanNprint Icon
Your will see the Application Startup screen displayed, as shown below.
While that application initialises, the “Please Wait” message
will be shown, and the initialisation details will be displayed
as the ‘status’ message.
When initialisation is compete, the button will display
“Continue”.
Click the “Continue” button and the main application screen
– Scan Barcode – will be displayed.
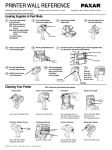
At the main Scan Barcode screen where the user scans or
optionally keys the barcode.
The application will search the loaded PLU files for the
entered code and will print a label based on the loaded
format and batch definitions.
Codes not found on file are reported as ‘invalid’, and if
enabled, all scans are recorded in the Log text file.
The Clear key is used to easily erase an which has been entry
keyed in error.
When a scanned code is found on file, the details for the
found record, as described by the application’s configuration
file ( see later ) are shown on screen below the entered code.
The application will then print the defined label.
1
See the “Installing the Application” section in the manual, if necessary
5 of 15
In-House Computing
ScanNprint Silver User Manual
If the Trigger-Repeat mode is enabled, after the Label has
been printed, the application gives the option to print a
further label2.
In Trigger-repeat mode, the application waits for a further
Trigger press in order to print another label. This
functionality is in addition to any printing commands
provided in the Format and batch file ( On demand printing,
or multiple quantities )
The Clear button cancels trigger-repeat and returns the
screen above, ready for another code entry.
Clicking Exit will close the application.
Additional functionality can be reached by pressing the F10
key ( Function then zero ) at the Scan Barcode prompt.
This screen shows the logged data which has been collected
( if enabled ) and also provides easy access to the printer
Feed and Calibrate functions3.
2
3
This is in addition to any label count specified in the print batch file.
See the Paxar Ultra 6039 manual for details of the Feed and Calibrate printer functions.
6 of 15
In-House Computing
ScanNprint Silver User Manual
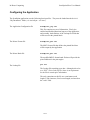
Configuring the Application
The ScanNprint application uses the following four input files. They must be loaded into the device’s
“My Documents” folder ( via ActiveSync – see later ).
The Application Configuration file
ScanNprint_cfg.txt
This file contains two sets of information. Firstly, the
enabled and disabled functional aspects of the application,
and secondly, the definition of the Lookup file fields that
will be used on the printed labels.
The Printer Format file
ScanNprint_fmt.txt
The MPCL format file that defines the printed label that
will be output by the application
The Printer Batch file
ScanNprint_bat.txt
The modified MPCL format batch file that will provide the
print field data for the print engine.
The Lookup file
plu.txt
The Lookup file containing your data. Although referred to
as a “PLU” ( Price Look Up file ) there is no requirement
for the file to contain price information.
The only constraints on this file are a maximum record
length of 128 characters, fixed record length, and sorted on
the “code” field.
7 of 15
In-House Computing
ScanNprint Silver User Manual
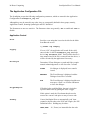
The Application Configuration File
The ScanNprint accepts the following configuration parameters, which are entered in the Application
Configuration file ScanNprint_cfg.txt.
Although they may be entered in any order, they are conceptually defined in three groups, namely,
Application Control, Scanning Symbologies and PLU definition.
The Parameters are not case sensitive. The Parameter values are generally “ON” to enable and “OFF” to
disable.
Application Control
Title
Provides a text string that is used as the title for the Main
Scan Barcode screen.
e.g. TITLE = My Company
Logging
If set to “ON”, the application will record all the valid
entered codes in the file ScanNprint_log.txt in the
device’s My Documents folder. Each record in the file is
time stamped, and if the file is removed from the device, it
will be recreated by the application if necessary.
ErrorStyle
Determines if Error dialogues are used and if they require
manual acknowledgement, or will close after 5 second.
TriggerReprint
SOUND
No dialogue is displayed, but a sound is
issued.
MESSAGE
The Error Message is displayed, and the
Dialogue closes after 5 seconds
ACK
The Error Message is displayed and the user
must press <Enter> or click the OK button
to close the dialogue.
If Enabled, after each label Print, the user is invited to
reprint a further label by pulling the Ultra’s trigger.
If this option is used, the Clear button bust be used to
remove the ‘current’ code prior to entry of a new code.
Padding
Causes ScanNprint Silver to automatically ‘pad’ short
scanned or keyed codes to the PLUCode Length ( See PLU
Definition below. Padding may be either:
LEFT,ZERO
8 of 15
‘0’ ( Zeroes) are inserted before the code
In-House Computing
ScanNprint Silver User Manual
LEFT,SPACE Spaces are added before the code
RIGHT,ZERO Zeroes are added after the code
RIGHT,SPACE Spaces are added after the code
For the purposes of searching the PLU file, ScanNprint
Silver considers ‘spaces’ to be of a lower value than
numerals. i.e. the code “12345” right/space padded to 8
characters, should be placed before the code “12345678” in
the PLU file.
Normally, the ”LEFT,ZERO” option would be used for
numeric codes, and the ”RIGHT,SPACE” option would be
used for alphanumeric codes.
Scanning Symbologies
The following barcode Symbologies are recognised by the ScanNprint Silver application. All
Symbologies are enabled with “ON” and disabled with “OFF”.
EAN8
EAN13
UPCA
CODE128
CODE39
EAN128
The default for all symbologies of “OFF”.
PLU Definition
The PLU definition parameters define the precise location of the entered Code and optional fields within
the PLU file. All field offset begin at character 1 within the PLU file. The field may conceptually
overlap, but must not exceed the maximum record length of 128 characters.
PLUCode
Offset, Length
Character Offset and length of the code field searched for
within the PLU fie. Note the PLU file must be sorted on
ascending order of the code field.
PLUField1
Offset, Length
Character Offset and length of Field 1 extracted from the
9 of 15
In-House Computing
ScanNprint Silver User Manual
PLU fie.
Not used if length is zero
PLUField2
Offset, Length
Character Offset and length of Field 2 extracted from the
PLU fie.
Not used if length is zero
PLUField3
Offset, Length
Character Offset and length of Field 3 extracted from the
PLU fie.
Not used if length is zero
Example use
When the ScanNprint Silver application find the entered Code in the PLU file, it extracts the defined
fields from the ‘current’ record in the PLU file.
The extracted fields, together with the code are then substituted into the ScanNprint_bat.txt batch file
which is then passed to the printer for printing.
The layout and usage of the code and field in the printed label is entirely under user control
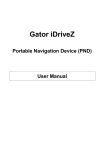
For example,
This simple example ScanNprint configuration file
specifies that EAN13 barcodes may be scanned
( only ) and that character positions 1 to 13 inclusive
represent the code with the user’s PLU file.
ScanNprint_cfg.txt:
EAN13 = ON
PLUCode = 1,13
PLUField1 = 14,22
Furthermore, it defines a 22 character field that starts
in character position 14.
The MPCL Format Configuration file defines 101
mm by 50 mm label with a single EAN13 barcode
field and a 22 character text field.
The modified MPCL Batch Configuration file links
the code and field extracted from the PLU to the
MPLC fields define in the format file.
ScanNprint_fmt.txt:
{F,1,A,F,M,1010,500,"Fmt1"|
B,1,13,F,900,100,7,4,200,1,L,3|
T,2,22,V,500,100,0,50,50,45,B,L,0,3,0|
}
ScanNprint_bat.txt:
{B,1,N,1|E,0,0,1,1,0,1|
1,$CODE$ |
10 of 15
In-House Computing
ScanNprint Silver User Manual
2,$FIELD1$ |
}
This trivial PLU file contains the two fields defined
above.
Note, for the purposes of this document, the ‘~’
character denotes spaces in the plu file.
Plu.txt:
4006381109086Fineliner pens~~~~~~~~
4006381333627Stabilo Marker~~~~~~~~
4006381134910Swing Cool Highlighter
11 of 15
In-House Computing
ScanNprint Silver User Manual
Appendix 1 – Data Transfer
The Four Data files used by the application – The PLU file, the Application Configuration file and the
Printer Format and Batch files are transferred between a Host PC and the Paxar Ultra using Microsoft’s
ActiveSync ( v4.1 or later should be used )
The Datafiles should be copied into the “My Documents” folder of the Ultra.
Additionally, the Log file created by ScanNprint may be copied from the “My Documents” folder. ( If
the Log file is completely removed, it will re-created if necessary by the application )
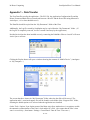
Provided ActiveSync has been installed correctly, connecting the Pathfinder Ultra to a host PC will cause
Active Sync to activate:
Clicking the Explore button will open a windows showing the contents of “Mobile Device” ( Analogous
to “My Computer “ )
The screen shot above shows the “My Documents” folder where the data files will be stored. The
application and it’s associated support files will be found in a sub-folder of the “Program Files” folder,
assuming the default options were selected when the application was installed.
On the Tools / Options / Sync Option menu of the Main ActiveSync window there is an option to enable
the automatic synchronisation of the Ultra’s clock and the PC clock. Also ensure that the Ultra’s time
zone is set correctly ( Start button / Settings / Control Panel / Date & Time / Time zone )
12 of 15
In-House Computing
ScanNprint Silver User Manual
Appendix 2 – Installation and Registration
Installation
The application is supplied as a single installable Win CE Cab file for use on the Paxar Ultra 6039.
Connect the Paxar Ultra to your host PC using ActiveSync4. Use ActiveSync 4.1 or higher.
Copy the Cab file to the device. The device desktop would be a convenient location.
On the device, double click the copied cab file and when asked, accept the default answers to the
installation prompts. The cab file will automatically be removed.
For ease of use, navigate to the “My Device \ Program files \ ScanNprintSilver” folder,
select the ScanNprint application, then use the ”File” menu “Send To \ Desktop as Shortcut”
command to place a shortcut on the device desktop. The Shortcut may be renamed on the desktop to
improve readability if desired.
Should you wish to remove the application from the devoice, use the Control panel – remove program
option.
Compact Framework
For older devices that do not have Microsoft’s .NET Compact Framework v2.0 installed, you will also
need to repeat the installation process with the CE.NET CF.20 Cab file ( NETCFv2.wce5.armv4i.CAB this file may be freely downloaded from Microsoft’s Download Centre )
4
Refer to your Paxar Ultra documentation to achieve this.
13 of 15
In-House Computing
ScanNprint Silver User Manual
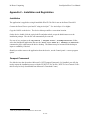
Product Registration
After installation, on first use, the ScanNprintSilver application will show a product registration screen, as
shown below
When shown, this screen will have a seven character Product ID
in the Product ID text box. ( This will vary for each
installation ).
Follow the on-screen instructions and email the displayed
product ID in it entirety to [email protected]
and once purchase details have been confirmed, a Registration
Code will be returned by email. This code should be entered
into the Registration code text box, and the Register button
clicked. Assuming that the Registration code is valid, the
application will continue, and this screen will not be displayed
again.
Clicking the Exit button will cause the application to terminate
without attempting to register then product.
14 of 15
In-House Computing
ScanNprint Silver User Manual
Document History
Version
Date
Comments
v1.00
17/02/07
Original document created.
v1.01
12/03/07
Added Registration Appendix
v1.02
12/04/07
Added Padding configuration option
15 of 15