1
APPROVED
by Order of the First Deputy
Chairman of the Board
No. 295 dated April 13, 2010
USER MANUAL
on installation and operation of "Bank - Client/Internet" System
of JSC Nordea Bank
City of Moscow
2010
Внесены изменения:
1. Приказом Заместителя Председателя Правления № 2025 от 30.12.2011
2. Приказом Первого Заместителя Председателя Правления № 21 от 13.01.2012.
1
Ladies and Gentlemen!
JSC Nordea Bank thanks you for your choice of "Bank-Client/Internet" System, its application
enables to increase our interaction and minimize expenses of your entity.
"Bank-Client/Internet" System provides possibility of electronic circulation of documents between
your entity and the Bank using Internet. Technologies implemented by the Bank guarantee protection of
communication channels and information sent by the System against unauthorized access of third parties.
We hope that application of "Bank-Client/Internet" System improves comfort of your service with
JSC Nordea Bank and promote a further strengthening of our collaboration.
Best regards,
JSC Nordea Bank
Phones of the Bank:
Help Desk: (495) 777 – 34 – 77
Technical Support Service: (495) 777 – 34 – 73
2
Table of contents
No.
s.n.
1.
2.
Contents
Introduction
Requirements presented to the Client's software and hardware tools for organization of
work under "Bank - Client/Internet" System
3.
Preparation for work with the System
4.
First Login
5.
System Services
6.
Work with the System
6.1.
Registration
6.2.
Input of documents
6.2.1.
Payment order
6.2.2.
Transfer of the list of payment orders
6.2.3.
Message
6.2.4.
Documents in foreign currency
6.3.
View of documents
6.3.1.
View of payment documents in RF Rubles
6.3.2.
View of payment documents in foreign currencies
6.3.3.
View of messages
6.3.4.
View of statements
6.3.5.
View of the list of packages
6.4.
Documents for signing
6.5.
Search of documents
6.5.1.
Search of payment documents in RF Rubles
6.5.2.
Search of statements under accounts
6.5.3.
Search of payment documents in foreign currencies
6.6.
Service
6.6.1.
Search of a bank
6.6.2
Exchange rates
6.6.3.
Reference book of clients
6.6.4.
Templates
6.6.5.
General messages
6.6.6.
Personal messages
6.6.7.
Troubleshooting
6.6.8.
Adjustments of the control of duplicated numbers of payment orders
7.
System of the Client warning
8.
Security issues
Supplements:
1
User Manual on Key Generation
Page.
1
2
2
3
4
5
6
6
7
8
9
9
10
10
11
11
11
13
13
14
14
16
16
16
17
17
17
17
18
18
18
18
18
19
22
0
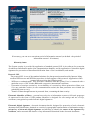
1. Introduction
The present User Manual on installation and operation of "Bank-Client/Internet" System of
JSC Nordea Bank(hereunder - the Manual) is designed for users of "Bank-Client/Internet" System
(hereunder - the System) representing the entities, concluded the Contract on Service of Clients of
JSC Nordea Bank using systems "Bank - Client/Windows" and "Bank - Client/Internet"
(hereunder - the Contract).
You can make a wide range of operations through the System, including the following:
To send to the Bank and to receive from the Bank payment orders and other documents in
electronic form. A set of documents available for you and their format is determined by the Bank
and depends on the System functional abilities;
To receive statements of accounts of your entity with the Bank;
To have access to the archive of documents, forwarded to the Bank or received from the Bank;
To obtain information from the Bank billboard;
To have access to reference books which are constantly renewed, including:
– The list of banks according to the Bank of Russia;
– SWIFT reference book;
– Exchange rates.
Application of "Bank-Client/Internet" System has the following benefits:
No necessity in special software on the client part of the System. For an ordinary work, the
Client needs only a standard WEB-browser Microsoft Internet Explorer. At the same time, the
work with the System occurs as the work with a usual HTML-page. A client of JSC Nordea
Bankcan use any computer connected to Internet with the above mentioned browser installed.
The work with the program does not depend of the connection type.
Constant expansion of the System possibilities and taking into account changes in the
legislation. At expansion of functional possibilities of the System or changes in the legislation of
the Russian Federation which require respective adjustments in the System software, an
automatic renewal of software is performed at the Client's connection with the Bank through the
System; and the Client is able to start the work with the renewed version of the System software
without any additional measures.
High speed of document circulation. Application of electronic communication means for
circulation of documents between the Client and the Bank allows considerable increase of
document circulation speed. Documents sent by the Client are promptly received by the Bank
and sent for execution. A large part of documents received by the Bank from the Client can be
processed automatically (if generated correctly). At application of traditional forms of
information presentation on paper medium, it is impossible to have the same figures of
information transfer and processing.
Security. Application of the most advanced developments in information protection in this
System gives the full guarantee of security. When you work with the System, you can be sure in
confidentiality of information transferred to the Bank and received from the Bank.
An elaborated system of delimitation of access rights to information allows you to be sure that
your documents are received only by authorized persons.
The work technology of JSC Nordea Bankprovides signing of documents presented to the Bank
on behalf of the Client with necessary number of electronic digital signatures of persons
authorized by the Client for signing of the respective documents. Application of electronic digital
signature (hereunder - EDS) which is an electronic analogue of the manual signature of the
Client's authorized person excludes a possibility of such documents transfer by other persons on
behalf of this authorized person.
1
In "Security Issues" section of this Manual, we placed the Bank recommendations on provision of
your security in connection with the System application, and we hope that you follow them:
fulfillment of these recommendations allow you to provide confidentiality of your commercial
information and to prevent an unauthorized access to the System.
2. Requirements presented to
the Client's software and hardware tools for organization of work under "Bank - Client/Internet"
System
To provide a quality work of the System, the Client shall provide the computer equipment
according to the following requirements:
Parameters
Requirements
presented
1. Computer
1.1. Processor (minimum)
Pentium III 500
1.2.RAM (minimum/desirable)
256 Mb/ 512 Mb
1.3. Free disc space for installation
Min. 1 Hb
1.4. Free disc space for operation
Min. 500 Mb
1.5. Video system (video adapter VGA, monitor VGA), support of
Min. 800*600, 256
video modes
colors
2. Accessories
2.1. Printer
Printer, compatible with Windows software
2.2. Modem (necessary for using
Hayes – compatible modem, for Windows
the System "Bank environment and supporting protocol minimum V.34.
Client/Windows" by the Client)
Modem shall be connected to dedicated telephone line
(without parallel/shared phones/ faxes).
Any Internet line is allowed instead of telephone line.
2.3. CD-ROM drive
Mandatory
2.4. USB-port
Mandatory
(Universal Serial Bus)
3. Software
For correct operation of the System one of the following set of license software shall be installed on the
Client's PC:
Windows 98 SE;
Windows NT 4.0 SP6a;
Windows ME;
Windows 2000 SP4;
Windows XP SP2;
Windows Vista;
Windows 7.
Operation system shall be russified with standard means.
For operation of "Bank - Client/Internet" system MS Internet Explorer version 5.5 or higher is required.
3. Preparation for work with the System
One of the "Bank-Client/Internet" System benefits is that it is not necessary to install any special
software to the Client's PC.
To start service under the System, the Client shall perform the following actions in the frameworks of
the Contract concluded with the Bank:
1. To receive from the Bank the System distributives, and to generate on its basis private keys for
each authorized person of the Client, authorized to work with the System (hereunder - the User).
2
A User with the right to sign documents in the "Bank-Client" System with a first or a second
signature, shall be indicated in the card with specimen signatures and seal (blank form No.
0401026 under OKUD) presented by the Client to the Bank for service of its bank accounts.
A User with the right to make any actions in the "Bank-Client/Internet System provided by the
System except for signing documents by a first or a second signature (view of statements,
preparation of documents, and etc.) shall be indicated as a such in the Application for service using
the "Bank-Client" System presented to the Bank at the conclusion of the Contract.
ATTENTION: if the card with specimen signatures and seal (hereunder - the Card)
indicates the persons with the rights of first and second signatures, the Client's documents
passed to the Bank by the System shall be signed by the first and the second signatures, and
therefore the System users shall be minimum one person with the right of the first signature
and one person with the right of second signature.
If the Card indicates only persons with the right of the first signature, the Client's documents
passed to the Bank by the System shall be signed by the first signature, and therefore the
System users shall be minimum one person with the right of the first signature.
2. To generate private keys for each user in accordance with the User Manual of Key Generation
(Supplement 1 to the present Manual).
3. To save private keys of Users on special electronic information medium ruToken..
4. To pass Statement on key acknowledgement to the Bank for key registration in the System.
5. To provide computer and other equipment according to section "Requirements presented to the
Client's software and hardware tools for organization of work under "Bank - Client/Internet"
System".
ATTENTION: The System works only under Microsoft Internet Explorer 5.5 WEB browser
or higher (recommended version - 5.5). This browser is distributed by Microsoft free of
charge and it is included in the standard delivery set of operation systems Windows.
Application of a WEB browser of other companies, for example, Netscape, is not allowed by
the System.
6. To check parameters of works with Internet. You shall mark the following ticks:
Internet Options Advanced Cookies Always accept cookies;
Internet Options Advanced Java VM.
7. To perform adjustment of connection with a remote PC and protocol TCP/IP according to the
following instructions:
If you use Russian version of Internet Explorer:
1. start Internet Explorer;
2. set an average level of security (menu Сервис → paragraph Свойства обозревателя… →
tab Безопасность → zone Интернет → security level Средний) and tick the following
paragraphs in tab Дополнительно:
SSL 2.0
SSL 3.0
If you use English version of Internet Explorer:
1. start Internet Explorer;
2. set an average level of security (menu Tools → paragraph Internet Options... → tab Security
→ zone Internet → security level Medium) and tick the following paragraphs in tab
Advanced:
SSL 2.0
SSL 3.0
3
After successful execution of the above mentioned actions, You can start you interaction with the
Bank by the System.
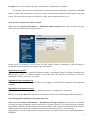
4. First Login
To start your work with the System, you need to start Microsoft Internet Explorer and connect to
the server of JSC Nordea Bank, using standard Internet tools. Then you shall work with standard tools of
WEB browser.
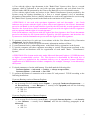
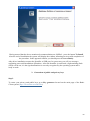
ATTENTION: at first login from a respective computer or at renewals necessary ActiveX
components are loaded from the Bank's server and "Security System Warning" appear (below is
an example of such message)
Depending on the connection speed, this action can take 2 - 3 minutes. Please, wait for this
warning and only then proceed. It is necessary to agree with respective suggestions.
For correct work, you need to set <Medium> level of security in your browser. If you performed all
actions, but ActiveX components can not be installed, try to decrease temporary security level to
<Below medium> or <Low>; after successful completion of ActiveX installation restore all
adjustments (set the security level of your browser to <Medium>).
ATTENTION: your entity's PC provided for installation of the System software can have
restricted rights, and it can prevent you from installation of necessary ActiveX components. In
this case you can need assistance of your respective specialist, and you can also contact employees
of our Bank - specialists of Technical Support Service (phone: (495) 777 – 34 – 73), which can help
you to solve the problem.
After you receive an access to the Bank's server, it is necessary to go to the System's homepage.
The System billboard is located at this page, information available to all persons connected to the Bank
server.
Each clause of the menu and possible actions of a user on generation and processing of documents
are considered in the following sections.
5. System Services
The main menu of the System consists of the following clauses:
Registration.
Your work with the System shall start from this clause. Here you are required to input information
identifying you as the System user, and after registration, you can see the Bank billboard with
general notifications available to all System users and private notices designed only for your
4
entity. Only after registration in the System, the user can see and have access to other clauses of
the System.
Documents for signing.
Before sending a document (notification) to the Bank, you need to affix necessary number of
electronic digital signatures of users. It is necessary for protection of your documents from
falsification and for their execution by the Bank. After affixing necessary EDSs, the document
shall be passed to the Bank for execution.
Input of documents.
Selection of these menu clauses gives you an access to the System facilities on work with payment
documents in Rubles and foreign currency. You can generate a new document and affix a
signature on it, or send it to templates.
View of documents.
In this section you can view current (not archive) documents, i.e. documents, sent to the
Bank for the last four calendar days (including today), statements of accounts and notifications
from the Bank, as well as request the Bank to send a statement under your account. It is possible to
view documents under a stipulated period when indicating necessary parameters.
Search of documents.
Clause “Search” allows you to find all documents sent to the Bank (including archive), responding
to respective criteria set by you. For example, you can perform a search of documents for a
stipulated date or for a random period, search by account number, and etc.
Service.
Selecting this menu clause, you can have access to service properties provided by the
System, for example, work with reference books, access to the Bank billboard, creation of
templates of high-usage documents, and etc.
Exit.
This clause terminates your working session in the System.
The work with the System is, usually, performed by the Clients according to the following scenario:
registration and view of the billboard;
view of your account status, receive of statements from the Bank;
input of payment orders and other documents;
signing of generated documents by respective users (taking into account their rights of first or
second signature) by affixing EDS. Documents, signed by necessary EDSs of users shall be
sent to the Bank for execution;
if necessary, application of service properties of the System;
termination of the work session.
This work scenario is not mandatory and can be changed voluntary in accordance with your wishes. The
only mandatory action of each user is its registration before starting to work with the System.
6. Work with the System
In this section of the Manual the main menu of the System and all its clauses are described in detail.
To start your work with the System it is necessary to become familiar with sections Registration,
Payment Documents, Signing of Documents and View of Documents. You can get familiar with other
sections of the main menu of the System step-by-step, as necessary.
The range of services provided by the Bank can change from time to time and differ from the
services, described in this Manual. In this case you receive additional information from employees of
the Technical Support Service and the Client Department. The Bank will inform you about any changes
through the System Billboard.
5
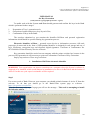
To start the work with the system it is necessary to:
1. start Microsoft Internet Explorer;
2. go to page
https://ibc.nordea.ru/nordea/eng
https://ibc.spb.nordea.ru/nordea/eng
https://ibc.arhangelsk.nordea.ru/nordea/eng
https://ibc.nordea.ru/volgograd/eng
https://ibc.nordea.ru/ekburg/eng
https://ibc.nordea.ru/nsk/eng
https://ibc.penza.nordea.ru/nordea/eng
https://ibc.rostov.nordea.ru/nordea/eng
https://ibc.samara.nordea.ru/nordea/eng
https://ibc.saratov.nordea.ru/nordea/eng
JSC Nordea Bank
St. Petersburg Branch of JSC Nordea Bank
Arkhangelsk Branch of JSC Nordea Bank
Volgograd Branch of JSC Nordea Bank
Yekaterinburg Branch of JSC Nordea Bank
Novosibirsk Branch of JSC Nordea Bank
Penza Branch of JSC Nordea Bank
Rostov Branch of JSC Nordea Bank
Samara Branch of JSC Nordea Bank
Saratov Branch of JSC Nordea Bank
3. agree with the program security system warning;
4. select "Registration" from the menu.
If any mistake on the page occurs, please renew it or try to connect the Bank server again.
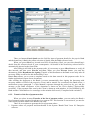
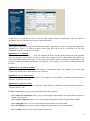
6.1.Registration
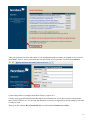
Registration is the first action necessary to start the work with the System. Only when you register
as a User, you are granted an access to the System facilities.
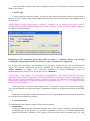
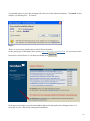
To register, you need to select "Registration" in the main menu. After that the following window
shall appear:
“File with a key” means the information created by you during generation of public and privacy keys.
Access to the specified file is protected by Code phrase (password) entered by you during generation of
these keys (See the User Manual of Key Generation (Supplement 1 to the present Manual).
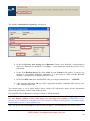
In the field “File path” specify key location (generally it is directory A:\) Having pressed the button to
the right of this field, you can search a file using standard Windows tools.
6
In the filed ‘Code phrase” specify Code phrase protecting the access to file with keys. You should
remember the difference between lowercase and capital letters and enter in the language required for
information input.
In the field “Privacy keys storage” select ruToken as storage
If storage is selected correctly, the field Readout device will be automatically filled in – Active
Co.ru Token
In the field PIN code enter the PIN code put in during key generation..
By using Virtual keyboard while entering PIN code you enhance security and protect the
access to the system Bank-Client from spyware. Put a mark in the window.
In filed Repeat in you can indicate the time in minutes after which the System shall ask you to
repeat your registration.
6.2.Input of Documents
This clause of the menu allows performing transactions with payment documents in Rubles and in
foreign currency and with messages. After selecting this clause, you are offered the following additional
menu, consisting of the following items:
–
–
–
–
Payment documents
Payment Order Платежное поручение
Sending the list of payment orders
Message
Documents in foreign currency
Purchase of foreign currency
Transfer of foreign currency
Sale of foreign currency
Reservation
Reports
Inpayments in foreign currency
Inpayments in Rubles
Confirming documents
Transfer MT 101
Sale of foreign currency from transit account
Depositary transactions
After selecting the necessary item, you can generate the required document, send it to "Documents
for signing", and then sign it by necessary EDS and send it to the Bank.
Below we describe the work with documents in Payment Documents.
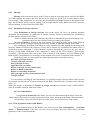
6.2.1. Payment Order
When you select Payment Order item in the menu, you are offered to fill in a display form of the
payment order. You can store the payment order, which you filled in as a template, or you can pass it to
"Documents for signing" item for further signing by necessary EDS and sending to the Bank.
The Bank in accordance with the acting legislation of the Russian Federation stipulates the form of
the payment order, and it is unified for all Clients.
For your convenience, the program allows creation of payment order templates, which you can use
in your work to minimize time for payment order preparation.
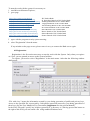
To enter a payment order, it is necessary to go Input of documents Payment documents
Payment order and to fill in the form presented:
7
There are buttons Search bank near the field for input of payment details for the payer's Bank
and the beneficiary's Bank, they allow selection of details from the Bank reference book.
When you press Select key located near INN of beneficiary filed, you can select beneficiary's
details from the reference book of your counterparties. All details of the beneficiary selected will be
automatically inserted to the form fields.
After filling in all fields in the payment order, it is necessary to press Check button, to verify all
data inserted, and then press Execute and Save. When you press Execute button, you send the
document to folder Documents for signing. Transfer of this document to the Bank occurs only after all
necessary EDSs are affixed to this document by Users.
Button Save allows you to create a template based on the data entered in this payment order for its
further application in input of new documents.
After sending the document to the Bank (it occurs automatically after signing the document with
necessary number of EDS of the respective Users) and its transfer for execution to the Bank officer, a
notification system (paragraph 7 of this Manual) responses through the period set by you, and the
message on the Bank acceptance of the document is shown on the User's display ("Successfully
executed"). If the payment order sent by the Client is drawn up with mistakes, it is not fulfilled by the
Bank and the Client shall receive a message on the mistake discovered ("Completed with a mistake").
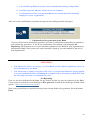
6.2.2. Transfer of the list of payment orders
When you select in menu Transfer of the list of payment orders, you can send to the Bank a
list of payment orders prepared in advance in a separate file. This function is convenient if you need to
send several payment orders to the Bank at one time.
There are two options to generate the list of payment orders:
1. Payment orders are prepared and downloaded to the System "Bank-Client" from 1S: Enterprise
software.
8
2. Payment orders are prepared using other software and downloaded to the System "bank-Client" in
one file. Format of files and payment order shall strictly comply with the format accepted in the
System.
Press Select files button according to the file format and select the files with payment orders to
be sent to the Bank:
After you have selected required files, it is necessary to press Send button, and your documents are
transferred to folder Documents for signing, where you can sign them and send to the Bank for
execution:
9
6.2.3. Message
Message item in the menu allows to the Client to generate a message and to send it to the Bank.
You shall stipulate the subject and enter the text in the respective fields. You can also attach a file to
your message. After preparation of a message and pressing button Execute located in the bottom of the
page, the document will be sent for signing. The message transfer to the Bank occurs only when the
required number of Users has affixed their EDS.
6.2.4. Documents in foreign currency
Using Documents in foreign currency item in the menu, the User can generate payment
documents for performance of transactions in foreign currency. Forms of documents are stipulated by
the bank and are unified for all Clients.
There are buttons near the form elements, they allow to automate the process of filling up of a
document and to use the reference books provided by the System.
The button Execute is located in the page bottom, its pressing provides saving of the filled up
document for its further sending to signing by necessary number of EDS and sending to the Bank.
After sending the document to the Bank (it occurs automatically after signing the document with
necessary number of EDS of the respective Users) and its transfer for execution to the Bank officer, a
notification system (paragraph 7 of this Manual) responses through the period set by you, and the
message on the Bank acceptance of the document is shown on the User's display ("Successfully
executed"). If the payment order sent by the Client is drawn up with mistakes, it is not fulfilled by the
Bank and the Client shall receive a message on the mistake discovered ("Completed with a mistake").
Using the System, you can perform the following transactions in foreign currency:
– Purchase of foreign currency
– Transfer of foreign currency
– Sale of foreign currency
– Application on reservation
– Report on foreign currency transactions
– Report on Ruble transactions
– Report on confirming documents
– Sale of foreign currency from transit account
– Transfer MT 101
For convenience in filling up some documents, it is possible to apply reference books of the System,
for example, reference book of your accounts with the Bank, reference book of country codes, currency
codes, etc.
When you prepare a document of Transfer of foreign currency the reference book of bank SWIFTcodes is available, renewed from time to time.
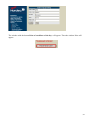
6.3.View of Documents
Using View of documents in the menu, you can view documents and messages sent to the
Bank, cancel (if possible) execution of documents sent earlier, and request the Bank a statement under
your accounts. After selection of this item in the menu, you can select necessary actions.
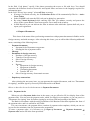
6.3.1. View of payment orders in RF Rubles
To view payment orders in RF Rubles, you need to select View of documents Payment
orders Payment orders. After that, you can see on the display the form, which allows selecting
parameters of the viewed documents.
10
After display, the form is automatically adjusted to show documents for today.
To change parameters for selection of documents you need to fill the following fields:
– Show outgoing documents beginning from – enter in this field the date from which the
information shall be shown. Documents received by the Bank before such date are not shown on the
display;
– blocks by – here you shall indicate the number of documents, shown at the display at one time.
After pressing Renew page button, the System makes selection of documents according to the indicated
parameters. After that the view page shows the table with information on documents found. There is a
button - link in the upper part of the page, which allows you to pass to generation of a new payment
order.
The button Print located under the list allows printing one or several documents without their view. To
do it, you need to place a tick in the left column of the table near the documents, which you wish to
print and pass Print button.
To view the document, you need to press on its number. After that, you can see the page of document
view with the following fields:
– Answers to the document – here the answers to the selected document from the Bank are shown.
– Signatures – here information on the Users signed the document before its sending to the Bank is
shown.
– Print – pressing this button allows you to send the document viewed to printer to obtain its paper
copy.
– Copy – pressing this button transfers all data from the selected document to a new document. The
document received in the result of this action can be edited, signed by necessary number of EDS and
sent to the Bank for execution.
– Cancel – if the document viewed is not executed by the Bank yet, you can cancel its execution by
pressing this key.
If the document is not sent from the System to the automated bank system of the Bank (hereunder the Bank's ABS) at the moment of its cancellation, then the document is cancelled and the User
received "Cancelled" message.
If the document at the moment of its cancellation is already sent from the System to the Bank's ABS,
the User received "Cancellation requested" message. Later after the document cancellation in the
Bank's ABS the User receives "Cancelled" message.
Actions with payment requests are similar to the actions with payment orders.
6.3.2.View of payment documents in foreign currencies
For view of payment documents in foreign currency, you need to select View of documents
Documents in foreign currency in the menu, after that you need to select the item according to the
respective type of documents. Then you shall work as with payment documents in RF Rubles.
6.3.3.View of messages
11
When you select View of documents Messages, you receive an opportunity to view messages sent
to the Bank and received answers. In the field with the search parameters please enter the starting date
for information required. Messages received before this date are not reflected in the display. To select
the message date in accordance with such date it is necessary to press Renew page button.
Activation of Input of a new document (message) sign allows you to generate a new message and
send it to the Bank.
A table of messages found will be shown in the bottom part of the page. Pressing the message number
in the table, you go to the view page, where you can see answers to the respective messages received
from the Bank, and the text of you message below.
Then the work with the view page is similar to the above mentioned procedure with payment documents
in RF Rubles.
6.3.4.View of statements
Selecting View of documents List of statements from the menu, you go to the page where you can
view statements under accounts received from the Bank earlier, as well as to create and to send a
request on a new statement generation to the Bank.
The button Print located under the list allows you to print one or several documents without their
preview. To do that you need to place a mark in the left column of the table against the documents,
which you wish to print, and press the button Print.
To create a new request and send it to the Bank, you need to press Generate a new request for
statement button, located in the upper part of the page. After that you go to the page of request
generation, where you shall enter two dates to determine the period of statement generation, and the
number of account for the statement. The number of account shall be selected by you from the list
offered. It is possible to request the statement under all accounts of the Client, then you shall select
under all accounts in Type of statement generation line.
After all necessary data are stipulated by you, your request on statement provision shall be sent to the
Bank by pressing Generate request.
This request immediately appears in the table of request and it is marked with Processing in the form of
sand glasses (it shows that the request for statement is sent to the Bank but the statement is not received
yet).
The statement processed by the Bank has
symbol in the left column of the table, when you press to
the Bank reference, you can see the statement of your display.
The buttons of documents loading to external files are available in the statement view mode:
– Pressing Save button allows you to download the statement to a text file;
– Pressing Save in 1S format button, allows you to download the statement to txt file for its later
application in 1S program.
12
Notes.
To import the statement to 1S it is necessary to go to service - data exchange – 1S Enterprise –
Client-bank in the menu of 1S. In the tab Exchange adjustments indicate: file name of import
transaction under current accounts – the path to the statement downloaded to the PC, in the
program name – the bank system client – INIST Bank-client ZAO Inist, Coding – Windows.
Then go the Export and Import tab and press Load button.
– Press Save non-standard button to download the statement to CSV file (comma separated values),
the mark for fields separation - “|” (vertical line).
In case of non-standard download the bank statement is exported to the catalogue selected by the
user in the form of two files:
- YYYYMMDD.REST - file of account balance;
- YYYYMMDD.OPER - file of bank transactions,
where YYYYMMDD – the date of the bank statement.
To exclude any mistakes connected with differences in presentation of data in different systems, the
following format of data is determined:
- all amounts shall be entered in kopecks without digit separators
- all dates shall be entered in YYYYMMDD format
Format of the file of account balances under the bank statement (YYYYMMDD.REST):
The following fields shall be filled in consecutively:
statement date
number of the current account
account name
code of the account currency (810 - Rubles, 840 –USD, and etc.)
incoming balance under the account
the date of the incoming balance under the account
amount of debit transaction under the account
amount of credit transactions under the account
outgoing balance under the account
the date of the outgoing balance under the account
Format of the file of bank transactions under the account (YYYYMMDD.OPER):
The following fields shall be filled in consecutively :
date of the bank statement
number of the current account
document date
document number
type of transaction
account of the payer
name of the payer
payer's INN
BIC of the payer's bank
correspondent account of the payer's bank
name of the payer's bank
beneficiary's account
name of the beneficiary
INN of the beneficiary
BIC of the beneficiary's bank
correspondent account of the beneficiary's bank
name of the beneficiary's bank
13
transaction amount
code of the transaction currency (810 - Rubles, 840 –USD)
type of transaction (C – credit, D – debit)
transaction details
The program provides the possibility of the statement view page-by-page (the page size is
according to the display at standard resolution). To apply this function, it is necessary to mark the
respective field in the upper part of the page.
6.3.5. View of the list of packages
All information transferred by Clients in the System is divided to commands and compiled to packages
for transfer to the Bank.
Selecting View of documents List of packages in the menu, the System User can see the list of
command packages generated by him and by other Users, their contents and results of their execution
by the Bank.
To view the contents of a particular package, it is necessary to find it in the table and press to its
number. After that the table contents will be available for view.
The filed Beginning from located at the page allows setting an interval for the package view.
6.4.Documents for signing
All documents generated by you for transfer to the Bank for execution are transferred to the respective
folders of Documents for signing menu. After signing a document with a necessary number of EDS of
respective Users, the document is automatically transferred to the Bank for execution.
ATTENTION: if the Client's card with specimen signatures and seal available at the Bank
indicates the persons with the right of first and second signatures, the Client's documents
transferred to the Bank by the System shall be signed by the User with the right of the first
signature, and the User with the right of the second signature.
IF the card with specimen signatures and seal available at the Bank indicates only persons (a
person) with the right of the first signature, the Client's documents transferred to the Bank by the
System shall be signed by the User with the right of the first signature.
A signing of a document by a User with the signatory authority shall be perform by the selection of a
document for signing (by pressing
symbol against Signature of director or Signature of
accountant text under the respective document depending on the type of the signatory authority of the
User). If the User has a right of the first signature, then he presses to
symbol against Signature of
director text under the respective document, if the User has a right of the second signature then he
presses to
symbol Signature of accountant text. After that
symbol changes to
symbol.
14
These actions can be made with 1 document, with several documents from the available list, and with
all documents simultaneously (it is necessary to press select all button and affix the signature in the
respective line against Signature of director or Signature of accountant text).
After performing of these actions, it is necessary to press Sign button. All documents marked by
symbol will be signed by the User's EDS, and it is confirmed by darkening of signature in
symbol.
ATTENTION: The document can be signed by a User with the right of the first signature if there
is no User with the right of the second signature and vice versa (the priority of document signing
by the User with the right of first and second signatures can be random).
The document signed by necessary number of EDS of respective Users is automatically transferred to
the Bank for execution, and the document is transferred from Documents for signing folder to View of
documents folder.
Print button located under the list of documents allows printing one or several documents without their
preview. To do that, you need to place the mark in the left column of the table against the documents
you wish to print and press Print button.
Delete button allows deleting one or several documents without their preview. To do that, you need to
place the mark in the left column of the table against the documents you wish to delete and press Delete
button.
6.5.Search of documents
6.5.1. Search of documents menu allows you to select the documents according to the set parameters
among bank documents signed by you and sent to the Bank. It is possible also to view archive
documents in this menu. For example, you can view payment orders where some particular payment
details are indicated and which were generated for the period indicated by you. To perform the search
of documents, you are offered a form with search parameters of selected documents. Its own set of
search parameters is provided for each type of documents.
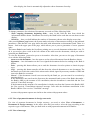
6.5.2. Search of payment documents in RF Rubles
When you select Search of documents Payment orders menu, you go to the page where you are
offered to stipulate search parameters:
15
In this form, it is possible to fill in a part of fields (input of dates is mandatory), and the search of
documents will be performed according to this information.
Stipulation of a period
The period of time for the required information shall be stipulated by dates in format day/month/year
(dd/mm/yyyy). There is a button located on the right from the field for convenience of the date
stipulation, it allows you to use a calendar.
Stipulation of an amount
In fields Amount from … to … , You can stipulate the limits for the amount indicated in the payment
order, for example, from 500.10 to 1000.20 (at that the payment orders for the amount from 500=10 to
1000=200 Rubles shall be selected). In case when you wish to indicate amounts in whole Rubles, it is
possible to indicate without stipulation of .00 symbols (for example, it is possible to indicate from 500
to 1000).
Stipulation of a document number
In Number field, you should stipulate the number of the payment order. For example, if you enter digit
9, then all payment orders with number 9 are selected.
Stipulation of your counterparty
In Counterparty field, you should enter a text fragment, which shall be contained in the documents
searched, in "Beneficiary" line.
Stipulation of payment details
In Details field, please enter a text fragment, which shall be contained in the documents searched in
"Payment details" line.
In Type of search line, you can select the following search options:
– option under all documents allows you to search under all documents sent to the Bank irrespective
to their current status.
– option under completed allows you to search under documents, already executed by the Bank.
– option Outgoing allows you to search among the documents sent to the Bank.
– option Incoming allows you to search among the documents received from the Bank.
– option Archive allows you to search archive documents.
16
In Status line, you can indicate the status of documents, which shall be searched.
To start the search procedure taking into account the parameters stipulated, you shall press Search
button. A table with information on payment orders with stipulated parameters shall appear after such
search. The work with the table is performed as in the mode of payment order view.
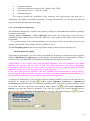
6.5.3. Search of statements under accounts
When you select Search of documents Statements under accounts in the menu, you go to the page
where you can indicate the search parameters:
In this form, it is possible to fill in a part of fields (input of dates is mandatory), and the search of
documents will be performed according to this information.
Stipulation of a period
The period of time for the required information shall be stipulated by dates in format day/month/year
(dd/mm/yyyy). There is a button located on the right from the field for convenience of the date
stipulation, it allows you to use a calendar.
Stipulation of the statement text
In Context (fragment) field, you can enter a text fragment, which shall be contained in the statement
searched.
Stipulation of the Bank reference
In Bank Reference field, you can enter the Bank reference according to the statement.
When you select Archive field, the search of statements will be performed among archive statements.
Search of payment documents in foreign currencies
When you select Search of documents Documents in foreign currencies in the menu, it is possible
to search necessary documents under transactions in foreign currencies. For each document a separate
form shall be filled in, which determine parameters of the search performed. Each form shall contain a
calendar period, currency code, banks details, and other data necessary for your documents.
The principle of search of documents in foreign currencies is similar to the search of payment orders in
RF Rubles.
17
6.6. Service
In Service menu you can use additional options provided by the System, obtain an access to different
reference books, templates, and the billboard.
6.6.1.Search of a bank
In Service Search of a bank menu, you can check details of any bank according to the reference
book of the Bank of Russia.
To perform a search, you need to stipulate the Bank's BIC and its name (a part of its name) in the
respective fields of the form offered. After you indicate these data and press Set button, you would see
information on all banks found in the reference books with the details corresponding to the conditions
stipulated by you.
The buttons located above the list of banks are designed for transition to next or previous page of the
reference book.
6.6.2. Exchange rates
In Service Exchange rates menu you can find information on exchange rates fixed by the Bank for
the date you prefer.
6.6.3. Reference book of clients
In Service Reference books of clients menu, you can place information of your counterparties.
Application of this information can considerably decrease time costs for generation of settlement
documents and decrease risks of mistake in indication of counterparty details. A reference book
generated by you is not available to other Clients of the Bank.
When you fill in a payment order, press Select button, located near INN of beneficiary field, you can
select the required beneficiary from the reference book, and beneficiary details will be entered
automatically to the fields of the form.
If you enter INN of a beneficiary to the line "INN of beneficiary" and press Select button, other details
of your counterparty are entered to the respective fields of the form (if your counterparty is available in
the reference book of clients).
Information entered to the reference book can be edited or deleted from the book by buttons, located in
left columns of the list of your counterparties.
There are fields for search options of your counterparty in the upper part of the window.
6.6.4.Templates
In Service Templates menu, you can place documents, which you use permanently. Application of
templates can considerably decrease time costs for generation of documents and decrease risks of
mistakes in payment details. Templates generated by you are not available to other Clients of the Bank.
You can create a template by the following means:
– Press Enter new template on the page of Service Templates menu, after that fill in and save the
form.
– After entering a new payment document at selection of a respective menu item (for example, for
payment orders – Enter of documents Payment documents Payment order), it is
necessary to enter the template code in the template position (any digits or symbols at your option)
and press Save button.
– Select the payment document necessary for template in View of documents menu, copy it, pressing
Copy button, after that enter the template code in the template position (any digits or symbols at
your option) and press Save button.
18
When you work with templates press
button (Edit/Execute), located in the left column of the list, it
allows the User to go to the mode of the payment document entering with the filled document from the
template on the display.
6.6.5.General messages
In Service General messages menu you can read any message sent by the Bank to all its Clients. To
do that you need to place the cursor on the message and press the left button of the mouse.
6.6.6. Personal messages
In Service Personal messages menu you can read any message sent by the Bank to your entity.
Other Clients of the System do not have any access to these messages. To view information, it is
necessary to place the cursor on the message and press the left button of the mouse.
6.6.7. Troubleshooting
In Service Troubleshooting menu, you can see information on requirements to the software
installed on the workstations of the System Users, as well as recommendation of the Bank on
elimination of possible problems with the System.
If you have any problems with the System, you can call to the Bank to the Technical Support Service,
phone (495) 777–34–73, and the Bank's specialists will help you.
6.6.8. Adjustments of the control of duplicated numbers of payment orders
In Service Settings Settings of duplicated numbers control of p/o menu, you can create
payment orders in RF Rubles with unique numbers.
When you indicate in Period of the control of the number uniqueness (in days) field the number of
days, you can create documents with unique (not repeating) numbers during such period.
When you import payment documents to the System from other software (for example, 1S program),
you can set 2 possible modes of work indicating yes or no in Import p/o with duplicating number of
the text. When you indicate yes in this text field, the payment orders with numbers matching the
available numbers of other payment orders in the System, generated in the respective time, will be
imported to the System. When you indicate no in this text field, these payment orders will not be
imported to the System.
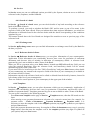
7.System of the Client warning
In the course of your work with the System, you can receive from time to time warnings on events
occurring in the System with your documents; here is an example below:
19
If necessary, you can set a convenient period of information renewal (on default - the period of
information renewal - 20 minutes).
8.Security issues
The System security is provided by application of standard protocol SSL in its software for protection
of transferred information under open communication channels, and by application of electronic-digital
signatures for prevention of document falsification from a User's workstation, and outside.
Protocol SSL
The protocol SSL is one of the standard solutions for data protection transferred by Internet. Many
modern WEB-servers and WEB-browsers have in-built support of this protocol. Application of this
protocol allows solving the following tasks:
– WEB-server authentication. This procedure warrantees that the system User is connected with a
particular server of JSC Nordea Bankwith a respective international certificate;
– Generation of a unique session key. An availability of a session key allows protection of data, even
if in one particular session (in one communication session) the data protection was violated (its
probability tents to zero);
– Transfer of date through Internet in protected form, warranting the data security.
Electronic identifier ruToken – personal access device to information resources, full-scale propotype
of smart-card in the form of USB pendant Identifier is designed for safe storage and use of keys,
certificates, encryption keys and electronic digital signatures
Electronic digital signature– electronic document details, designed for protection of such electronic
document from falsification, obtained as a result of cryptographic transformation of information using a
private key of electronic digital signature and allowing to identify the owner of the signature key
certificate, and to ascertain the absence of any information distortions in the electronic document.
20
Certified system of cryptographic protection Agava-S. The system complies with the state standards:
GOST 28147–89, GOST R34.10–94, GOST R34.11–94, GOST R34.10–2001 and the requirements of
Federal Agency for Government Communications and Information.
21
Supplement 1
to the User Manual on installation and application of
"Bank-Client/Internet" System of JSC Nordea Bank
USER MANUAL
On Key Generation
(used system of cryptographic protection – Agava)
To enable work with the System each User should generate and confirm his keys in the Bank
which is performed in three stages:
1.
2.
3.
Preparation of User’s generation tools;
Generation of public and privacy keys by each User;
Confirmation of keys in the Bank.
The envelope submitted to you contains the identifier RuToken and personal registration
information which should be specified during key generation process..
Electronic identifier ruToken – personal access device to information resources, full-scale
propotype of smart-card in the form of USB pendant Identifier is designed for safe storage and use of
keys, certificates, encryption keys and electronic digital signatures. Certificate of Conformance No.
SF/124-0999 of Federal Security Service of Russia.
Key generation should be carried out on computer with the printer switched on, because in the
process of ket generation it will necessary to print out Cofirmation Certificate of Key Generation.
Step by step actions of User are given below:
1. Installation of RuToken electronic identifier
WARNING: Your organization can impose restrictions on a computer where the System’s software is
supposed to be installed, which could hamper in installation of a driver for RuToken and the lement of
ActiveX. In this case your expert’s assistance will be required.
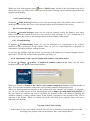
Step 1
For correct work of Bank-Client on your computer you should upload elements of Active X from the
web-site. To do that you should go to the Bank-Client system page to reference https://ibc.nordea.ru/nordea/ibc .
Upon the first entry at the top of a page you will see the message – This node is attempting to install
the following add-in…”
22
You should require to press this message and select out of the shortcut menu bar – To install. In the
window you should press – To install..
Step 2.
Then it is necessary to install a driver for RuToken identifier
On the main page of the Bank-Client system (https://ibc.nordea.ru/nordea/ibc) it is necessary to start
load a driver for RuToken. To do that you should press
In the appeared window press the button Save and specify the path to the catalogue where it is
necessary to save a file for the subsequent installation.
23
Then it is necessary to unzip the downloaded archive rtDrivers.x86.rar into the current catalogue and
startup the file rtDrivers.x86. The Master Installation of Rutoken driver will start up. In the appeared
window press the button Next.
24
Warning: Important! Do not connect Rutoken device to computer before the end of installation. If
it is connected disconnect it.
25
Having assured that the above-mentioned recommendations are fulfilled – press the button To Install.
After the end of installation the system will display the window informing on successful completion of
the procedure. In the appeared window you should press the button Ready.
After driver installation connect the identifier to USB port. In system tray you will see messages
confirming successful installation of Rutoken.. After the identifier is connected, a light-emitting diode
(LED) will be on, it is the sign that Rutoken is correctly recognized by the operating system and is
ready to work.
2. Generation of public and privacy keys
Step 3.
To create your privacy and public keys go to Key generator located on the main page of the BankClient system (https://ibc.nordea.ru/nordea/ibc).
26
Take your personal envelope (the name of you organization and your name are printed on it), received
in the Bank. Open it, enter you details into relevant fields of key generator. Press the button Enter.
Connect the printer to computer and check if there is paper in it.
Connect your personal identifier Rutoken which was submitted to you in the envelope with personal
data. Check if LED is on, it is the sign that Rutoken is correctly recognized by the operating system and
is ready to work.
Then go to the window Key Generation and press the button Generate set of keys.
27
The window Generation of Agava key will appear.
In the field Privacy keys storage select Rutoken. If there is no such title, it means that no
drivers for Rutoken are installed. Go to Step 2 – load, install and repeat the process of key
generation.
In the field Readout device the value Aktiv Co. ru Token 0 will appear, if privacy key
storage is successfully identified. Otherwise, it is necessary to check whether Rutoken
identifier is connected to computer and LED is on.
In the field PIN code enter standard PIN code given by the manufacturer – 12345678.
After pressing the button Ok you will be proposed toreplace a standard PIN code by your
code. Change a PIN code.
You should enter a set of digits and/or letters which will collectively make private information
(password) and will be used for work in the System.
If wrong PIN code for Rutoken is entered 15 times, it will be blocked.
ATTENTION! Always use complex password (which is difficult to guess). While giving passwords
use only Roman sumbols of lower and upper case and digits (for example, Lp6g9f2ous). User’s
privacy key is encoded by code phrase. If you require to change a code phrase, you should apply
to the Bank to receive a new primary key.
After you pressed the button Ok the window Print will appear. You should print Acts in two copies.
ATTENTION! Your Rutoken became a key one.
28
a. You should keep Rutoken in place where unauthorized stealing is impossible;
b. avoid leaving it in USB-port, when you leave a computer
c. you should not transfer your personal Rutoken to the third parties, including
employees of your organization.
After Act on key condifrmation is printed, message on successful generation will appear.
3. Confirmation of key generation in the Bank
Your set of keys has been sussefully generated. Act on key confirmation printed after its generation
will confirm key generation. If Act on key confirmation is not printed, read paragraph Act
Reprinting. This document in two copies should be submitted to the Bank for your registration as a
participant of Bank-Client system (two copies should be signed by you and stamped by the seal of
your organization).
ATTENTION!
You will not be able to use services of Client-Bank system without registration ofActs on
key confirmation by the Bank
You will be able to change a forgotten PIN code to your personal Rutoken, having applied
to a servicing Bank Branch and submitted an Application on formatting of RuToken with
the following resoration of a standard PIN code.
Act Reprinting
If an Act was not confirmed by the Bank for any reasons and the key was not registered in the BankClient system, to reprint acts, you should go to Key generator located on the main page of Bank-Client
system , (https://ibc.nordea.ru/nordea/ibc).
Enter your personal data (see personal envelope) into relevant fields of key generator. Press the button
Enter.
29
The window with the button Print of certificate of the key will appear. Then the window Print will
appear.
30