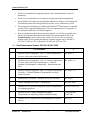
1
Endo PATTM2000 Device User Manual Itamar Medical REF OM1695214 This product and/or method of use, is covered by one or more of the following US patents: 6319205, 6322515, 6461305, 6488633, 6916289, 6939304, 7374540, as well as any pending US patent applications and corresponding patents and/or applications filed in other countries. Endo PATTM , EndoScore™ and PAT™ are trademarks of Itamar Medical, Ltd. ! Caution: Federal (U.S.) law restricts this device to sale by, or on the order of, a physician. Copyright 2002-2014 by Itamar Medical Ltd. Software Version 3.5.x Itamar Medical Ltd. This manual and the information contained herein are confidential and are the sole property of Itamar Medical Ltd. Only Itamar Medical Ltd. or its licensees have the right to use this information. Any unauthorized use, disclosure or reproduction is a direct violation of Itamar Medical’s proprietary rights. THE USE OF THE ENDO PATTM2000 SYSTEM IS GOVERNED BY A LICENSE AGREEMENT. ANY USE OTHER THAN THAT DESCRIBED IN SUCH LICENSE AGREEMENT IS PROHIBITED. DISCLAIMER Itamar Medical Ltd. shall not be held responsible in any manner for any bodily injury and/or property damage arising from operation or use of this device other than that which adheres to the instructions and safety precautions contained herein and in all supplements hereto and according to the terms of the warranty provided in Appendix A. Itamar Medical Ltd. 9 Halamish St., P.O.Box 3579 Caesarea Ind. Park, 3088900, Israel Tel + 972 4 6177000 Fax + 972 4 6275598 www.itamar-medical.com ISO 9001:2008 and EN ISO 13485:2012 See appendix B for contact information of the regulatory authorized representative Endo PATTM2000 i Operation Manual Itamar Medical Ltd. Record of Editions Edition 0 1 2 3 4 5 6 7 8 9 Date Jul 02 Oct 02 May 03 Aug 03 Sept 03 Nov 03 May 04 Dec 04 May 05 Jan 07 Description Preliminary Base Update Update Update Update Update following FDA clearance Update Update Appendix A General update for new S/W version, arm supports and general overhaul of the manual 10 May, 07 General update for new S/W version, new USB to COM driver 11 June 08 Updating ISO logo, list of standards, Medes address. Adding of AI note. 12 Jan 09 Updating Itamar Medical address. 13 July 09 General update for new S/W version (3.2.4). Correction in caution note regarding power supply. Corrections in installation of adaptor drivers. Updated patent information. 14 Jan 10 Probe expiration date 15 Mar. 10 Update for version 3.3.1 16 Mar. 11 Correcting a omission mistakenly done in older version. Update CSA symbol 17 Nov. 2011 Change number of tubes in the kit (removal of spare tube) Updating list of standards 18 Feb 12 Updates for version 3.4.4 19 Feb 13 Updating typo, standards, Labeling Updating minimum requirements Updating Moxa driver version 20 Sep 13 Updating logo of ISO symbol Updating ED2000 label System + Endo PATTM2000 Probe Package 21 Dec 2013 Updating Endo PAT™ report to version 3.5.x Reordering sub sections and minor rephrasing in chapter 7 (analysis) to improve readability. OS support update: remove Vista, add Win8 22 Jan 2014 Updating zip code Updating standard table Update Troubleshooting table Updating Endo PAT™2000 label System 23 March 14 Removing an erroneous restriction entered in version 20 24 March 14 Adding trade-mark symbols and relevant updated MEDES address updating Itamar Medical address updating - zip code, and Ind. Park 25 May 2014 Insert note Updating Endo PAT™2000 label System 26 July 2014 Remove wrong quotation marks Add EndoScore™ Correct Power supplier current Update temperature ranges, related symbols, probe package Note: Latest version of the EndoPAT™ User Manual is available at: http://www.itamar-medical.com/Support/Downloads.html Endo PATTM2000 ii Chapter All All All All All All All All All All Pages All All All All All All All All 54 All All All All i, 4, 5,74,77 All All i, 64, 65, 73 All All All 7.2 10.3,10.4 3.1 1.6 All 56 6,11,22,33,51 44 56,57 9 4-5 All All All -, 10.4 i, 68 , 69 7.4.1 7 3.1, 3.5 10,App D -, App A 1.6 9 10.4 All App B, 10.4 -,10.4 -, 10.4 7.2,7.4.1,7.7 10.5 10.3-10.5 52 46-61 10,16, 66, 84 i , 76 5 64 68 Cover page All 70, 78 i, 70 ii 68 i 48,50,51, 70 67, 69, 70 Operation Manual Itamar Medical Ltd. Table of Contents 1 General Information .............................................................. 1 1.1 Intended Use of the Endo PATTM2000 Device .......................................... 1 1.2 Performance and clinical study information ............................................ 1 1.3 Equipment Classification ........................................................................ 3 1.4 Manufacturers Notice ............................................................................. 3 1.5 Restrictions for Use ................................................................................ 3 1.6 Quality Assurance System: ISO 9001 & ISO 13485 ................................. 4 1.7 Conventions Used in this Manual ............................................................ 5 1.8 Safety Precautions .................................................................................. 6 2 System Overview ................................................................... 8 2.1 How to Use this Manual .......................................................................... 8 3 Installing the System .............................................................. 9 3.1 Basic System Configuration .................................................................... 9 3.2 System description ................................................................................ 10 3.3 Connecting the Endo PATTM2000 device to the Computer ..................... 11 3.4 Endo PATTM2000 Software Installation ................................................ 12 3.5 Installing the RS-232 to USB adaptor.................................................... 15 3.6 Registration .......................................................................................... 15 3.7 Uninstalling Endo PATTM2000 Software ............................................... 19 3.8 Shutting Down the System .................................................................... 19 4 Software Description ........................................................... 20 4.1 Main Screen ......................................................................................... 20 4.2 Main Screen Menu Commands ............................................................. 22 4.3 Main Screen Tool Bar ........................................................................... 22 4.4 Configuring the System ........................................................................ 24 4.5 Using the Timer (Countdown Clock) ..................................................... 29 Endo PATTM2000 iii Operation Manual Itamar Medical Ltd. 4.6 Setting the Default Printer .................................................................... 29 5 Preparing for a Study .......................................................... 30 5.1 Preparing the System for a Study .......................................................... 30 5.2 Connecting the PAT™ Probe ................................................................ 30 5.3 Creating a Patient File .......................................................................... 31 6 Conducting an Endo PATTM2000 Study................................ 36 6.1 Pre-Study ............................................................................................. 36 6.2 Patient and System Setup...................................................................... 38 6.3 Performing the Study ........................................................................... 40 7 Review and Analysis ............................................................ 46 7.1 Study Data Retrieval ............................................................................ 46 7.2 Automatic Analysis ............................................................................... 46 7.3 Study Report ........................................................................................ 49 7.4 Endo PATTM2000 study results ............................................................. 50 7.5 Cardiovascular Risk ............................................................................. 52 7.6 Additional / Research Features ............................................................. 53 7.7 Tabular Report .................................................................................... 56 7.8 Batch Analysis ...................................................................................... 58 7.9 Manual Analysis (Manual Research Mode only) .................................... 58 7.10 Study printing ...................................................................................... 61 7.11 Uploading data to the server ................................................................. 61 8 Maintenance ........................................................................ 62 8.1 Device maintenance .............................................................................. 62 8.2 Probe data ............................................................................................ 62 9 Troubleshooting .................................................................. 63 10 Technical Information ......................................................... 66 10.1 System Minimum Requirements ........................................................... 66 10.2 Operating System ................................................................................. 66 Endo PATTM2000 iv Operation Manual Itamar Medical Ltd. 10.3 Technical information about labeling .................................................... 66 10.4 Labeling ............................................................................................... 68 10.5 Specifications for Endo PATTM2000 system ........................................... 70 Appendix A: License Agreement and Limited Warranty ................. 71 Appendix B: Regulatory Authorized Representative ....................... 77 Appendix C: installing the USB adaptor for Windows XP................ 78 Appendix D: installing the USB adapter for Windows 7 or 8 ............ 84 List of Figures Figure 1 Typical set-up .................................................................................................... 9 Figure 2 - Endo-PATTM2000 device.............................................................................. 10 Figure 3 - Connection of pneumo-electric tubing and USB adaptor ............................. 11 Figure 4 - Installshield wizard ....................................................................................... 12 Figure 5 - License agreement ........................................................................................ 13 Figure 6 - Installation folder selection ........................................................................... 13 Figure 7 – Ready to install the program screen ............................................................. 14 Figure 8 - Completion of installation ............................................................................ 14 Figure 9 - Registration ................................................................................................... 16 Figure 10 - Registration Dialog ..................................................................................... 17 Figure 11 - Registration request file instructions .......................................................... 18 Figure 12 - Main screen ................................................................................................. 20 Figure 13 – Fill site name dialog box ............................................................................ 21 Figure 14 – Registration reminder ................................................................................. 21 Figure 15 - Gain and time-base scroll boxes ................................................................. 24 Figure 16 - The setup command .................................................................................... 25 Figure 17 - The setup dialog box ................................................................................... 25 Figure 18 – Report Appearance dialog box ................................................................... 27 Figure 19 - The example for report header .................................................................... 27 Figure 20 - The PATographer Information dialog box ................................................. 28 Endo PATTM2000 v Operation Manual Itamar Medical Ltd. Figure 21 - COM port search ......................................................................................... 30 Figure 22 - Inserting into slit ......................................................................................... 31 Figure 23 - Clicking in .................................................................................................. 31 Figure 24 - Press to release ............................................................................................ 31 Figure 25 - Probe disconnected ..................................................................................... 31 Figure 26 - Patient information dialog box (metric version) ........................................ 33 Figure 27 – “File ID exists” warning message .............................................................. 33 Figure 28 – Patient Information – Risk Factors ............................................................ 35 Figure 29 - Used probes warning .................................................................................. 38 Figure 30 - Applying the PAT probes ........................................................................... 39 Figure 31 - Hands set-up ............................................................................................... 40 Figure 32 - StandBy mode ............................................................................................. 41 Figure 33 - Recording .................................................................................................... 42 Figure 34 - Occlusion quality assessment ..................................................................... 44 Figure 35 - Open file dialog box ................................................................................... 46 Figure 36 - Automatic analysis ...................................................................................... 47 Figure 37 - Occlusion Popup Menu............................................................................... 48 Figure 38 – non selective population histograms of RHI .............................................. 50 Figure 39 - non selective population histograms of LnRHI .......................................... 51 Figure 40 – LnRHI distribution in non-selective population ........................................ 51 Figure 41 - AI calculation.............................................................................................. 54 Figure 42 – AI result from the report (female example) ............................................... 54 Figure 43- Time domain HRV in the report .................................................................. 55 Figure 44- Frequency domain HRV in the report ......................................................... 55 Figure 45 - Marking Segments and Artifacts ................................................................ 59 Figure 46 - Probes Information ..................................................................................... 62 Figure 47 - MOXA USB Installation – XP1 ................................................................. 78 Figure 48 - MOXA USB Installation – XP2 ................................................................. 79 Figure 49 - MOXA USB Installation – XP3 ................................................................. 79 Figure 50 - MOXA Adapter .......................................................................................... 80 Figure 51 - MOXA Adapter Configuration – XP2 ........................................................ 80 Figure 52 - MOXA Adapter Configuration – XP3 ........................................................ 81 Endo PATTM2000 vi Operation Manual Itamar Medical Ltd. Figure 53 - MOXA Adapter Configuration – XP4 ........................................................ 81 Figure 54 - MOXA Adapter Configuration – XP5 ........................................................ 82 Figure 55 - MOXA Adapter Configuration – XP6 ........................................................ 82 Figure 56- connect MOXA adaptor ............................................................................... 83 Figure 57 – connect COM TO COM ............................................................................. 83 Figure 58 - Win Security ............................................................................................... 84 Figure 59 - Win7 Security ............................................................................................. 85 Figure 60 - MOXA Uport driver installation ................................................................ 85 Figure 61 - MOXA driver installation folder ................................................................ 86 Figure 62 - MOXA driver folder confirmation ............................................................. 86 Figure 63 - MOXA driver installation finish ................................................................. 87 Figure 64 - The MOXA Adapter ................................................................................... 87 Figure 65- connect MOXA adaptor ............................................................................... 89 Figure 66 – connect COM TO COM ............................................................................. 89 List of Tables Table 1 - Main screen pull down menu commands ....................................................... 22 Table 2 - Tool bar buttons and functions ....................................................................... 23 Table 3 – Risk Factors mandatory fields ....................................................................... 35 Table 4 - Table information ........................................................................................... 57 Table 5 - Troubleshooting ............................................................................................. 64 Table 6 - Error messages ............................................................................................... 65 Table 7 - Specifications ................................................................................................. 70 Endo PATTM2000 vii Operation Manual Itamar Medical Ltd. 1 General Information This manual is part of the Endo PATTM2000 system. 1.1 Intended Use of the Endo PATTM2000 Device The Endo PATTM2000 device is a non-invasive device, intended for use as a diagnostic aid in the detection of coronary artery Endothelial Dysfunction (positive or negative) using a reactive hyperemia procedure. The Endo PATTM2000 Device has been shown to be predictive of coronary artery Endothelial Dysfunction in the following patient population: patients with signs or symptoms of ischemic heart disease, who are indicated for coronary artery angiography, but who lack angiographic evidence of obstructive coronary artery disease. The device is intended to be used in a hospital or clinic environment by competent health professionals The Endo PATTM2000 device is not intended for use as a screening test in the general patient population. It is intended to supplement, not substitute, the physician’s decisionmaking process. It should be used in conjunction with knowledge of the patient’s history and other clinical findings. 1.2 Performance and clinical study information The following sensitivity and specificity data were revealed from a clinical study that was performed at the Mayo Clinic Rochester, MN and that had been designed to evaluate the safety and effectiveness of the Endo PATTM2000 device as an aiding tool in the diagnosis of coronary artery Endothelial Dysfunction versus a Gold Standard for coronary Endothelial Dysfunction evaluation, the Intra-coronary Acetylcholine (Ach) Challenge method: All subjects: Sensitivity = 82% (45/55), 95% lower confidence bound = 71% Specificity = 77% (30/39), 95% lower confidence bound = 63% ________________________________________________________________ Females: Sensitivity = 91% (30/33), 95% lower confidence bound = 78% Specificity = 74% (17/23), 95% lower confidence bound = 55% Males: Sensitivity = 68% (15/22), 95% lower confidence bound = 48% Specificity = 81% (13/16), 95% lower confidence bound = 58% The Gold Standard for Endothelial Dysfunction evaluation, the Intra-coronary Acetylcholine (Ach) Challenge method, is routinely performed at the Mayo Clinic. According to the Intra-coronary Acetylcholine (Ach) Challenge method, a catheter is positioned in the origin of the left main coronary artery and Ach is infused with incremental concentration followed by coronary angiogram. The coronary artery diameter is measured in the segment 5mm distal to the tip of a Doppler wire using a computer-based image Endo PATTM2000 Device 1 Operation Manual Itamar Medical Ltd. analysis system. Average peak velocity (APV) is derived from the Doppler flow velocity spectra and coronary blood flow (CBF) is determined as: *(coronary artery diameter/2)2*(APV/2). Endothelium-dependent coronary flow reserve is calculated as percent change in CBF in response to the Ach challenge. Normal coronary endothelial function is defined as an increase in CBF of >50% and an increase or less than 20% decrease in the coronary artery diameter in response to the maximum dose of intra-coronary Ach (ΔCBF > 50% and ΔCAD > -20%) [Al Suwaidi J, Hamasaki S, Higano ST, Nishimura RA, Holmes DR Jr, Lerman A. Long-term followup of patients with mild coronary artery disease and endothelial dysfunction. Circulation 101:948954, 2000] Synopsis of Clinical Study Protocol: Objectives: To evaluate the Endo PATTM2000 device relative to a gold standard procedure as a diagnostic aid for detecting coronary endothelial dysfunction. Methodology: Patients, who had been referred to diagnostic angiography cardiac catheterization laboratory for diagnostic angiography secondary to signs or symptoms of ischemic heart disease and suspected coronary endothelial dysfunction and were found to have normal or near to normal angiogram, underwent Intra-coronary Acetylcholine (Ach) challenge test to assess attenuation in required increases to coronary blood flow (CBF) and coronary artery diameter (CAD), where each of these parameters served as an indicator for coronary endothelial dysfunction. Coronary endothelial dysfunction is diagnosed if one of the following changes is observed in response to the Ach challenge test: ΔCBF ≤ 50% OR ΔCAD ≤ -20%. Patients were then evaluated using the Endo PAT 2000, which measures Peripheral Arterial Tone (PAT) signal changes at the fingertip, to a reactive hyperemia challenge. The PAT signal is a measure of the digital pulsatile volume changes and is measured with a non-invasive disposable PAT probe. The reactive hyperemia procedure consists of a 3-10 minute baseline recording, 4.5-5.5 minutes of blood flow occlusion to one arm using an upper arm blood pressure cuff, and 3-5 minutes of recording after cuff release. The expected response is of a post occlusion increase of the PAT signal amplitude and the PAT score is provided automatically by the system’s software and is basically the ratio between the post- to pre- occlusion average signal size, corrected for systemic changes and baseline level. Planned Enrollment: 100 patients Actual Enrollment: 111 Safety Analysis Cohort: 110 (One patient withdrew consent) Efficacy Analysis Cohort: 94 Criteria for inclusion: Patient Age > 17 Patient referred to diagnostic angiography Normal or near normal angiogram (< 30% stenosis) Evaluation in catheterization laboratory Signed informed consent Criteria for exclusion: Endo PATTM2000 Device 2 Operation Manual Itamar Medical Ltd. Deformities of fingers that preclude adequate signal acquisition with the Endo PATTM2000 device. Short acting NTG less than 6 hours prior to study and calcium channel blockers or alpha-blockers less than 24 hours prior to study. Equipment Classification 1.3 The Endo PATTM2000 device is classified as a Class IIa medical device in accordance with Rule 10 of Annex IX of the Medical Device Directive 93/42 EEC, 2007/47/EC According to IEC 60601-1 / UL 60601-1 Endo PATTM2000 device is classified as Class IIa medical device. Manufacturers Notice 1.4 The information in this document is subject to change without notice. Itamar Medical Ltd. makes no warranty of any kind on this material, including but not limited to, the implied warranties of merchantability and fitness for a particular purpose. Itamar Medical Ltd. shall not be liable for errors contained herein or for incidental or consequential damages in connection with the furnishing, performance, or use of this material. This document contains proprietary information, which is protected by copyright. All rights reserved. No part of this document may be photocopied, reproduced, or translated without the prior written consent of Itamar Medical Ltd. Restrictions for Use 1.5 Only qualified medical personnel may authorize the use of the Endo PATTM2000 device. In the event of equipment malfunction all repairs should be executed by authorized Itamar Medical Ltd. personnel or licensed service agents. The eligibility of a patient for a PAT™ study is generally based upon the patient’s medical status. The following should not be considered for the PAT™ study: Deformities of the digits of the upper extremities, which preclude adequate signal acquisition Patients under the effect of short-acting NTG (3 hours washout period) Patient suffering from a medical condition prohibiting blood flow occlusion in both arms. If occlusion is prohibited in only one arm than the reactive hyperemia procedure that includes the inflation of a blood pressure cuff to a supra-systolic pressure should be performed on the other arm. The Endo PATTM2000 system in whole, or in part, may not be modified in any way. Endo PATTM2000 Device 3 Operation Manual Itamar Medical Ltd. 1.6 The device is intended for diagnostic purposes only, and should not be used for monitoring. The device is not intended as a screening test in the general patient population. Itamar Medical Ltd. makes no representation whatsoever, that the act of reading this User Manual renders the reader qualified to operate, test or calibrate the system. The tracings and calculations provided by the Endo PATTM2000 system are intended as tools for the competent diagnostician. They are explicitly not to be regarded as a sole incontrovertible basis for clinical diagnosis. In the event that the system does not operate properly, or if it fails to respond to the controls in the manner described in this manual, the operator should refer to the Troubleshooting section. If necessary, contact our service office to report the incident, and to receive further instructions (customer support can be reached at +972-4-617 7000 ext. 399, or from the US: (800) 206 6952 ext. 399). Quality Assurance System: ISO 9001 & ISO 13485 STANDARD # 1. Medical electrical equipment – Part 1: General requirements for basic safety and essential performance IEC 60601-1 2. Medical electrical equipment – Part 1-2: General requirements for basic safety and essential performance - Collateral standard: Electromagnetic compatibility - Requirements and tests IEC 60601-1-2 3. Medical electrical equipment - Part 1-4: General requirements for safety – Collateral Standard: Programmable electrical medical systems IEC 60601-1-4 4. Medical Device Software – Software Life Cycle Processes IEC 62304 5. Quality management systems - requirements ISO 9001:2008 6. Medical devices. Quality management systems. Requirements for regulatory purposes EN ISO 13485:2012 7. Medical devices - Quality management systems Requirements for regulatory purposes (Health Canada) CAN/CSA ISO 13485:2003 8. Medical devices. Application of risk management to medical devices ISO 14971 Endo PATTM2000 Device 4 Operation Manual Itamar Medical Ltd. 9. Medical devices. Symbols to be used with medical device labels, labelling and information to be supplied. General requirements ISO 15223-1 10. Graphical symbols for electrical equipment in medical practice IEC TR 60878 11. Graphical symbols -- Safety colours and safety signs -Registered safety signs; refer to instruction manual/ booklet ISO 7010-M002 12. Information supplied by the manufacture with medical devices EN 1041 13. Medical Device Directive MDD 93/42 EEC MDD 2007/47/EC 14. FDA Quality Systems Regulation (QSR) 21 CFR part 820 15. CSA standard for safety CSA 22.2 No. 601.1 16. UL standard for safety UL 60601-1 17. Canadian Medical Devices Regulations SOR/98-282 18. Medical devices - Application of usability engineering to medical devices BS EN 62366 1.7 Conventions Used in this Manual The following conventions are used throughout this manual: Warnings ! Are used to identify conditions or actions, which - if the instructions are ignored - may violate patient safety, or could cause damage/malfunction of the system, resulting in the irretrievable loss of data. Cautions Are used to identify conditions or actions that could cause interference with data acquisition and/or impair study results. Endo PATTM2000 Device 5 Operation Manual Itamar Medical Ltd. Notes Are used to identify an explanation, or to provide additional information for purposes of clarification. There are no additional warnings and cautions, other than those provided in the appropriate sections of this manual. Physicians, nurses, and medical technicians should read the Endo PATTM2000 device Operation Manual carefully, before operating the system. All pictures are for illustrative purposes only. 1.8 Safety Precautions WARNING ! Only the power supply that is provided within the Endo PATTM2000 package will be used for the system. Use of an inappropriate adapter may cause irreparable damage to the device and may compromise patient safety. WARNING TM ! The Endo PAT 2000 device should only be installed with and connected to computer equipment that complies with EN60950 safety regulations. Failure to heed these warnings may compromise patient safety. 1. The Endo PATTM2000 device has been designed and manufactured to meet all safety requirements applicable to medical equipment. To ensure maximum operation safety the system should be used and maintained in strict compliance with the safety precautions, warnings and operating instructions provided in this manual. 2. The system contains no user-serviceable parts. It should be maintained and serviced only by qualified service personnel, authorized by Itamar Medical Ltd. 3. Purchasers of the Endo PATTM2000 device should ensure that only suitably trained, qualified personnel are authorized to operate the equipment. Unauthorized personnel should not be allowed access to the system. It is recommended that a list of authorized operators be maintained. 4. The Endo PATTM2000 device Operation Manual should be carefully studied by the Endo PATTM2000 Device 6 Operation Manual Itamar Medical Ltd. authorized operators, and stored where it is easily accessible. Periodic review of the manual is recommended. 5. The Endo PATTM2000 system is a whole system. To eliminate risk of electrical shock, do not attempt to open or remove system covers or plugs. 6. Do not operate or activate mobile phones, or other devices capable of causing electromagnetic interference, nearby the system. Turn off wireless communication in the computer running the Endo PATTM2000 application. 7. Avoid placing liquids or food on any part of the system. Do not allow conductive fluids to leak into the active circuit components of the system as this may cause a short circuit, which could result in an electrical fire. In this event, only fire extinguishers approved for use on electrical fires should be used. 8. Do not allow fluids to come in contact with the pneumatic connection in the device. 9. Do not operate the equipment in the presence of explosive liquids, vapors or gases. 10. In the event that the system does not operate properly, or if it fails to respond to the controls in the manner described in this manual, the operator should contact customer support. 11. Do not apply the probe to an infected finger or wounded skin. Caution Federal law restricts this device to sale by or on the order of a physician. WARNING ! Probes manufactured before January 2007 contain 50 micrograms or less per gram of natural rubber latex water extractable protein which may cause allergic reactions. Do not use the latex probes on patients who have a known natural rubber protein allergy. Failure to heed this warning will compromise patient safety. The latex probes have a yellow membrane and come in boxes with labels notifying that they contain latex. The new, non-latex probes have green internal membranes. Endo PATTM2000 Device 7 Operation Manual Itamar Medical Ltd. 2 System Overview The Endo PATTM2000 device is a computer-based system for non-invasively assessing vascular endothelial dysfunction. It is based on the use of Peripheral Arterial Tone (PAT™) signal technology, during a clinically established procedure, which measures post-ischemic vascular responsiveness following upper arm blood flow occlusion. PAT™ signal technology is a newly developed proprietary technology for measuring the magnitude and dynamics of arterial tone changes in peripheral arterial beds. PAT™ technology measures peripheral arterial tone, by recording digital pulsatile volume changes without involving painful and risky invasive procedures. The non-invasive PAT™ probe, used with the Endo PATTM2000 device, is a new type of finger plethysmograph that imparts a uniform pressure field to the distal two thirds of the finger including its tip. It was designed to avoid many of the existing problems associated with conventional plethysmographic devices such as distal venous distention and the resulting induction of reflex veno-arteriolar constriction, and it has a higher dynamic range of changes and better clamping to the finger. Its extended pressure field also excludes spurious venous signals while continuously recording the digital arterial pulse wave. Studies using the Endo PATTM2000 device are easily performed in any clinical setting, with a minimal period of training required. The system is fully computerized and the recorded signals are simultaneously displayed on a PC or laptop screen. Recorded data is automatically saved, facilitating subsequent review and computerized automatic analysis. Due to the fact that analysis is performed automatically, there is no question of inter or intra operator interpretation variability. The PAT™ software program is easy to use and has two main operating phases: Real time recording and display Off-line display and analysis Since the system records data in real time, it is possible to follow events as they occur. Data acquired during a study is automatically stored to the computer’s hard disk and may subsequently be retrieved for off-line review and automatic analysis. 2.1 How to Use this Manual This Operation Manual is designed as a general guide to help the user in operating the system. The user will find step-by-step instructions for performing a PAT™ study, and instructions for maintenance of the system. Endo PATTM2000 Device 8 Operation Manual Itamar Medical Ltd. 3 Installing the System Basic System Configuration 3.1 The Endo PATTM2000 device is supplied as a complete package comprising the following components: One Endo PATTM2000 device One Endo PATTM2000 software CD Two pneumo-electric tubing Power adaptor Power cable Operation manual Set of 6 foam finger anchors USB adaptor The supplied Endo PATTM2000 software package can be used with any Windows computer running English versions of Windows XP Windows 7 or Windows 8. The automatic analysis module requires any type of internet browser or Excel 2000 or newer. For details regarding hardware and software requirements, refer to System Requirements in Section 10.1. Although individual system setups may vary, Figure 1 represents a typical setup of a study. Endo PATTM2000 Device Figure 1 Typical set-up 9 Operation Manual Itamar Medical Ltd. 3.2 System description The Endo PATTM2000 device top panel has: Power LED indicator LED indicator for the device-computer communication status Probe’s Deflate and Inflate buttons Power LED Indicator Power Supply DC Connector Communication LED Indicator USB-to-COM adaptor Inflate Button Deflate Button ON/OFF Switch Figure 2 - Endo PATTM2000 device The front panel has two pneumatic input connectors for attaching the pneumo-electric tubing, connecting the PAT™ probes to the Endo PATTM2000 device. The back panel has (Figure 2): Power supply DC connector Communication port ON/OFF switch Endo PATTM2000 Device 10 Operation Manual Itamar Medical Ltd. 3.3 Connecting the Endo PATTM2000 device to the Computer NOTE The Endo PATTM2000 system requires the use of a serial (RS232) port in the computer with a standard 9-pin RS232 cable. The Endo PATTM2000 device can alternatively be connected through a USB to RS232 adapter (supplied with the system) 1. Place the Endo PATTM2000 device and computer in close proximity to the examination bed or chair. The device should be placed at a distance from the bed or chair that is shorter than the pneumo-electric tubing (less than 1.8 meters/ 6 feet). 2. Connect the USB-to-RS232 adapter to the communication port on the Endo PATTM2000 device, and to one of the computer’s USB ports. Hand-tighten the screws to secure the adaptor (see Figure 3). In case RS232 cable is used connect it to both Endo PATTM2000 device and computer and tighten the connecting screws. 3. Connect both pneumo-electric tubing to the Endo PATTM2000 device’s front panel pneumo-electric connectors and secure by hand tightening the screws (see Figure 3). 4. Make sure the power switch is off. Connect the power supply first to the Endo PATTM2000 device and then to an electrical outlet. Turn the power switch on. 5. The power indicator light will glow orange, indicating that the power is turned on. Tighten screws of pneumo-electric tubes Tighten screws of USB-to-COM adaptor Figure 3 - Connection of pneumo-electric tubing and USB adaptor NOTE When using a USB to RS232 adaptor, connect the adaptor to the computer directly and not via USB hub. Endo PATTM2000 Device 11 Operation Manual Itamar Medical Ltd. 3.4 Endo PATTM2000 Software Installation NOTE Prior to software installation, verify that you are in full system administrator mode with full privileges. Otherwise, the installation might not succeed and could cause operational problems. 1. Close all open applications operating on the computer, including background applications, before installing the Endo PATTM2000 software. NOTE TM Uninstall previous Endo PAT 2000 software versions prior to installing a newer version. To uninstall the software please refer to section 3.7. Make sure to backup all your data prior to uninstalling any software. 2. Insert the Endo PATTM2000 software CD into the CD drive. The installation program will load automatically. Alternatively you may execute the 'setup.exe' application from the installation CD. 3. The Installshield wizard prepares the computer for installation. When prompted, click next to proceed with the installation (Figure 4). Figure 4 - Installshield wizard 4. Read the license agreement and select the “I accept” option to agree to license terms. Continue with the installation by pressing “next” (Figure 5). Click “I do not accept” if Endo PATTM2000 Device 12 Operation Manual Itamar Medical Ltd. you do not accept the license terms and wish to abort the installation. Figure 5 - License agreement 5. Click “Next” to set the default target folder for software installation, or click “Change” to select a different folder for the installation (Figure 6). Figure 6 - Installation folder selection Endo PATTM2000 Device 13 Operation Manual Itamar Medical Ltd. NOTE It is not recommended to install the program in the “My Documents” or “Desktop” folders. 6. Press “Install” to complete the installation process or “Back” to review or change any of your installation settings” (Figure 7). Figure 7 – Ready to install the program screen 7. Press “Finish” when the installation is completed (Figure 8). Figure 8 - Completion of installation 8. Two icons will be added to the desktop after installation – link to the application and a link to the data folder (study files storage). 9. If used, install the USB-to-RS232 driver as described in section 3.5. Endo PATTM2000 Device 14 Operation Manual Itamar Medical Ltd. 3.5 Installing the RS-232 to USB adaptor The RS-232 to USB adaptor connects the Endo PATTM2000 device to the computer’s USB port. The adapter kit contains the adapter and a software installation CD with the appropriate drivers for Windows XP, Windows 7 or Windows 8 OS. The installation process depends on your computer’s operating system. Please refer to Appendix C for instructions on how to install the driver on Windows XP, or to Appendix D for instructions on how to install the driver on Windows 7 or Windows 8 OS. 3.5.1 General instruction for installing the driver a. The driver installation must be done before connecting the RS-232 to USB adaptor to the computer. b. Insert the CD into the CD-ROM drive c. Browse into the CD-ROM drive D:\Your_OS\SETUP d. Execute the Driver’s .exe file e. Continue the installation process by clicking ’next‘ until installation ends Note Restart your computer after installation of the Endo PATTM2000 software and the RS-232 to USB adaptor driver. After computer restart, connect the adaptor to computer’s USB port and wait for new hardware recognition by the operating system. When the adaptor installation is completed, start the Endo PATTM2000 software (refer to section 4). The software will search for the appropriate communication port to communicate with the connected RS-232 to USB adaptor as described in section 5.1. Note Refer to the configuration section (Section 4.4) for changing automatic COM port configuration. 3.6 Registration Once the software and driver are installed the system is ready for use in its basic configuration. Endo PATTM2000 Device 15 Operation Manual Itamar Medical Ltd. Itamar Medical strongly recommends that you register your EndoPAT™ software installation. Registration enables you to benefit from our special offers when available, and to be able to activate some of our newer features. Registration enables Itamar Medical to notify you when new version of your product is available and helps Itamar Medical provide you with customer support. To register the software installation you first need to create a registration request file. Use the following instructions to create registration file and register your installation: 3.6.1 Open the registration window: from the “PAT™ Control” menu select Registration… Figure 9 - Registration Endo PATTM2000 Device 16 Operation Manual Itamar Medical Ltd. 3.6.2 The following dialog will be opened: Figure 10 - Registration Dialog 3.6.3 Enter the mandatory information: submitter name, e-mail, company or institute name and device SN. Device SN can be found at the bottom of the device. NOTE The E-mail entered in this dialog will be used for sending back the license file. Please make sure this is a correct e-mail address. Endo PATTM2000 Device 17 Operation Manual Itamar Medical Ltd. 3.6.4 If you wish to enable any of the additional / research features, check the feature you want to activate. The use of these features is limited, and they will be opened subject to Itamar Medical’s approval. NOTE AI, FRHI and HRV have not been submitted to the US Food and Drug Administration (FDA) for clearance and can therefore be used in the US solely for research purposes, and not for clinical use in a patient management setting. 3.6.5 Read and agree to the license terms. 3.6.6 Click register. You will receive a message (Figure 11) directing to the location of the registration request file (EndoRegistration.req). Figure 11 - Registration request file instructions Once you obtain your EndoRegistration.req file, send it to [email protected] or contact your local distributor. Itamar Medical will receive your request, process it and you will receive the License.lic file by e-mail. Place the license file in your installation directory and restart the Endo PAT™ application. NOTE The License file is unique and will only enable your licensed features on the same computer generated the license request file. Endo PATTM2000 Device 18 Operation Manual Itamar Medical Ltd. NOTE Registration may enable you to use different probe types. This will be done based on your agreement with Itamar Medical, and should not be requested separately. Contact Itamar Medical’s representative or your local distributor for more information. 3.7 Uninstalling Endo PATTM2000 Software Enter the computer’s Control Panel and select the Add/Remove programs option. Select the Endo PATTM2000 software and press “Remove”. 3.8 Shutting Down the System a. Shut down the Endo PATTM2000 software program by selecting Exit in the pull down File menu. b. Switch OFF the Endo PATTM2000 device using the on/off switch on the back panel. Endo PATTM2000 Device 19 Operation Manual Itamar Medical Ltd. 4 Software Description Main Screen 4.1 From the Windows desktop double click the (see Figure 12). icon. The following screen will appear Figure 12 - Main screen The Main Menu Screen is the gateway to the functions of the Endo PATTM2000 software. The three primary functions are: perform a study, review and analyze a study and system configuration. The main screen includes: 1. Interfaces: Pull-down menu bar (section 4.2) Tool bar (section 4.3) Scroll bar (section 4.3.2) 2. Display windows: Endo PATTM2000 Device 20 Operation Manual Itamar Medical Ltd. Channels identification column (for the PAT™ waveforms) PAT™ waveforms window Results/calculations column 3. Status bar: PAT™ state (communication status between PAT™ device and computer) Program status Probe status When first launching the Endo PATTM2000 software, a dialog box (Figure 13) will open. Click the OK button and enter the Setup menu. Complete the setup as described in section 4.4. Figure 13 – Fill site name dialog box Upon first launching, the system will also display a Registration reminder message (Figure 14). This reminder will appear as long as there is no license file, and as long as this reminder was not turned off in setup screen. For more information about the need of license file see section 3.6). For more information about turning this reminder off – see section 4.4) Figure 14 – Registration reminder Endo PATTM2000 Device 21 Operation Manual Itamar Medical Ltd. 4.2 Main Screen Menu Commands Table 1 describes the main screen pull-down menu commands: Menu Item File Function Open a previously-saved study Save study data Print screen Exit the Endo PATTM2000 Software PAT™ Control Inflate PAT™ probes Deflate PAT™ probes Stop a study Standby mode - view signals without recording GO - Start recording a study Start Timer Reset Timer Probes Information Setup parameters Registration Open Patient Information dialog box Test Analysis Automatic Analysis Select occlusion period Select Baseline Segment (in Manual Research mode only) Select Test Segment (in Manual Research mode only) Mark segment as artifact (in Manual Research mode only) Clear all marked segments Zoom In View report Open Batch Analysis dialog box Provides access to system information Help Link to Itamar Medical Uploading Service Table 1 - Main screen pull down menu commands 4.3 Main Screen Tool Bar The Main Screen tool bar buttons provide quick access to selected menu commands, opens result table, and to the Gain and Timing settings. Gain and Timing settings are used to adjust the Trace Window display. Dimmed icons indicate that they are not active and cannot be used unless some actions are taken. For example the automatic analysis icon is not active unless there is a data file displayed and ready to be processed. Endo PATTM2000 Device 22 Operation Manual Itamar Medical Ltd. Table 2 lists each button and its function. “Mouse over” a button to trigger bubble help describing the button’s function. Button Function Load file Print screen Open Patient Information Dialog Box Deflate PAT™ probes Inflate PAT™ probes Start study Standby Stop study Automatic Analysis Mark segment as B (in Manual Research mode only) Mark segment as T (in Manual Research mode only) Mark segment as artifact (in Manual Research mode only) Clear all segments Zoom In Open result of last calculation Start/Stop timer Reset timer to the value set in the Setup dialog box View Report Set time base and gains Table 2 - Tool bar buttons and functions Endo PATTM2000 Device 23 Operation Manual Itamar Medical Ltd. 4.3.1 Gain and Time-base trace display Tools Use the Gain command, to adjust the Trace Window display. Figure 15 - Gain and time-base scroll boxes The two gain tools adjust the traces’ display of the PAT™ 1 and PAT™ 2 channels (The scroll boxes are in order from left to right: left is probe1 and right is probe2). Adjustments made to the PAT™ channel gain settings affect only the display of the corresponding trend channels. NOTE Adjusting gain or time-base settings affects only the display and not the recorded signal, even during the recording. To adjust the Gain Setting, click the + or - sign next to the appropriate Gain Tool channel. The gain display setting is increased (+) or decreased (-) and the new setting takes effect accordingly. To Adjust a Time Base Setting, click the Timing pull-down menu and select the desired time base setting. The time scale adjustment is automatic. When a file is open, an All Study option is available, allowing to automatically select the nearest time base interval that exhibits the entire study’s data on screen. 4.3.2 Scroll Bar Use the horizontal scroll bar and left and right scroll arrows at the bottom of the Trace Window to view the entire study. Scroll to the left to move backwards, and scroll to the right to move forward. As trace data appears in the Display Window, the data is saved in the Patient Information file. The study can be analyzed and reviewed off-line in either relative or absolute time modes. 4.4 Configuring the System The Setup menu is used to configure the system. To ensure that the Endo PATTM2000 system is ready for operation, the configuration of the signal channels and serial port is required. To Configure the System: 1. Verify that the Endo PATTM2000 device is properly connected to the PC and that it is switched on. Endo PATTM2000 Device 24 Operation Manual Itamar Medical Ltd. 2. Click PAT™ Control, and then select Setup. Figure 16 - The setup command 3. The following screen will appear: Figure 17 - The setup dialog box Endo PATTM2000 Device 25 Operation Manual Itamar Medical Ltd. 4. Click “Automatic Search (COM1-COM10)” to allow the system to automatically identify the COM port to which the Endo PATTM2000 device is connected. If the automatic search fails, you can select or type the correct COM port for the Endo PATTM2000 device manually in the relevant field. After selecting the desired COM port verify communication by clicking “Check COM”. 5. Fill the “Site Name”. This will turn off the dialog box asking to do it on system startup. 6. Select the Endothelial Function index that will be used. The options are the LnRHI or the previous index- the RHI. See section 7.4 for more information about the 2 indices. 7. In the “Cardiovascular Risk Factors” frame enter the default method for calculating risk factor to be used in the system. This method will be used as the default option, but can be changed per patient. Go to section 7.5 to read more about the different Risk Factors methods. 8. In the same frame also set the units to be used for cholesterol measurement by your health system. The options are mg/dL or mmol/L. This will be used in the Cardiovascular Risk Factor calculation only. 9. Registration reminder message is presented as long as you didn’t register the system and got a license file. As registering your system is optional, disabling this reminder is possible by turning this flag off. To read more about the registration process see section 3.6. 10. To enable the Manual Research mode, select the “Manual Research mode” checkbox. The entire “Test analysis” menu is enabled. See 7.5 below. 11. The Countdown Clock (timer) is set to “5” minutes by default. To change this value (1 through 15), select the appropriate value from the drop-down menu. 12. To configure the report press the “Report Setup” button. This will open the “report appearance” dialog. In this dialog the Clinique details (a logo and 3 text lines) can be updated. These details will be used as a header to all Endo PATTM reports. Notice that the logo size is limited: big images will be reduced to fit the page. Each of the 3 lines can contain up to 70 characters. Endo PATTM2000 Device 26 Operation Manual Itamar Medical Ltd. Figure 18 – Report Appearance dialog box Figure 19 - The example for report header 13. The name of the operator performing the Endo PATTM2000 study can be saved with the study data. The system offers the user to choose from a predefined list, or enter names manually, if the manually entered name doesn’t exist in the list it will be automatically added to the list of offered names. To create or change the master list from which the names are selected, click the “Set PATographer” to open the following dialog box: Endo PATTM2000 Device 27 Operation Manual Itamar Medical Ltd. Figure 20 - The PATographer Information dialog box Type the names of the PATographers in the top field and click “Add” after each one is entered. Once you finished entering all the names, click “OK” to save the information and exit. Click the “Cancel” button to exit without saving the changed information. You can remove unused names by selecting a name in the bottom field and clicking “Remove”. 14. In the “Pressure control” frame select whether the probe inflation pressure is set to a pressure that is dependent on the patient’s diastolic blood pressure (recommended mode) or to a fixed pressure. If a fixed pressure setting is selected, the inflation pressure can be changed from the default 50mmHg. NOTE If “Diastolic blood pressure dependent” is selected, the diastolic blood pressure of the patient must be entered prior to commencing the study. The study cannot start without this information. 15. When all the settings are correct, click OK. NOTE The default inflation pressure setting for the PAT™ Sensors is 50 mmHg in “fixed” mode. It is recommended that this is not exceeded, unless specified otherwise. Endo PATTM2000 Device 28 Operation Manual Itamar Medical Ltd. NOTE Setup can be opened while recording a study, however, during a recording the COM field and the Pressure Control fields are disabled and cannot be modified. Using the Timer (Countdown Clock) 4.5 Some phases in the study recording require strict timing. To operate the timer, refer to the following instructions: 4.6 To set the timer (the number of complete minutes it will count), refer to the Setup menu (section 4.4) To start the timer, click the icon. When the timer reaches “0”, the timer indicator at the bottom right of the screen blinks red. To stop the timer, click the To restart the timer, click the icon. The timer resets and starts counting, according to the set-up in the setup screen. icon again. The timer stops counting. Setting the Default Printer Setting the default printer is performed in the normal manner by accessing the Printer Setup window from the Windows desktop. Endo PATTM2000 Device 29 Operation Manual Itamar Medical Ltd. 5 Preparing for a Study 5.1 Preparing the System for a Study Accessories that are required beside the Endo PATTM2000 system: A set of two PAT probes and anchors Blood pressure cuff (capable of sustaining high pressures for 5 minutes) Adhesive tape Pair of arm supports Timer/stopwatch (optional) Switch on the computer, the Endo PATTM2000 device, and launch the Endo PATTM2000 software with the shortcut icon on the desktop. When the Endo PATTM2000 software is launched it performs an automatic COM port search and communication test with the device. If the software is unable to establish communication with the device, a COM-port search dialog box will open (Figure 21). While this dialog box is open the system continues trying to establish communication with the device, going through COM ports 1 to 10 in a cyclical manner. This continues until communication is established or “Work Disconnected” is selected. Figure 21 - COM port search 5.2 Connecting the PAT™ Probe Connect two new probes by inserting the connector tab into each probe slit (see Figure 22) and pressing the connector down onto the probe until the tab of the probe clicks into place (see Figure 23). Endo PATTM2000 Device 30 Operation Manual Itamar Medical Ltd. Figure 22 - Inserting into slit Figure 23 - Clicking in To remove probes, press the tab (clip) marked by the arrow in Figure 24, and then lift the connector away from the probe (Figure 25). Used probes should be disposed of properly. Figure 24 - Press to release 5.3 Figure 25 - Probe disconnected Creating a Patient File 1 Click the icon on the tool bar or activate from the Test Analysis menu the Patient Information dialog box. (See Figure 26) 2 All mandatory fields are highlighted in red and must be filled in order to proceed to the next step. The field description is as follows: Patient ID - Enter patient identification number (mandatory field). Endo PATTM2000 Device 31 Operation Manual Itamar Medical Ltd. Visit – Enter visit number or code. Up to 9 characters. This field should be used to distinguish between several tests by the same patient (with the same ID). The patient ID and visit are used to generate the file name used by the system. Patient First and Last name - Enter the patient's complete name, initials or other identifier, or it can be left empty (optional field). Age - Enter the patient's age. This can be done manually, or by pressing the arrow key until the correct age appears in the window (mandatory field). Gender - select either male or female (mandatory field). Patient Height and Weight - mandatory fields. Units are set according to the computer defaults – either centimeters and Kg or feet-inch and lbs. Diastolic Blood Pressure – mandatory field, unless the “Fixed pressure” mode was selected in the set-up screen (Figure 17). Systolic Blood Pressure – mandatory field, unless the “Fixed pressure” mode was selected in the set-up screen (Figure 17). Comments - optional field. User Field 1 (Temp.) - optional field. Up to 10 characters length of free text. Designed to enter the room temperature at the beginning of the test. User Field 2 (Nails) - optional field. Up to 10 characters length of free text. Designed to enter the patient’s nail length – OK or over 5 mm/one fifth of an inch, beyond the tip of the finger tissue. PATographer - optional field - select from the pick list, or type directly into the field the name of the PATographer to be associated with the study. Risk Factors… - this will open a dialog box about additional inputs required to calculate Cardio-vascular Risk Factor. See paragraph 3 below. “New Patient” button will clear the dialog and allow filling the dialog in preparation for the next recording. NOTE All text fields (ID, visit, patient name, comments, user fields and PATographer) should be entered using text letters and numbers. Endo PATTM2000 Device 32 Operation Manual Itamar Medical Ltd. Figure 26 - Patient information dialog box (metric version) NOTE Study data is saved in a data file that is automatically named with the Patient ID and Visit. If the patient ID is for example 12345, and the visit is V1 then the file name will be 12345_V1.s32. After clicking OK the Patient Information dialog box will be closed. NOTE The computer’s file system will not allow the same Patient ID and Visit for 2 different PAT™ studies. When attempting to use existing ID and Visit numbers, the following message appears: Figure 27 – “File ID exists” warning message A different ID or Visit must be entered before you can proceed. 3 Risk Factors: The Risk Factors dialog box enables entering additional data to be used in the calculation of Cardiovascular Risk. For more details about the different Risk calculations see section 7.5. Endo PATTM2000 Device 33 Operation Manual Itamar Medical Ltd. There are 3 possible methods for calculating the Cardiovascular Risk: Framingham Risk Score, SCORE Risk and Reynolds Risk Score. The default method is set in the setup (see 4.4), but it can be changed from patient to patient. A List of required parameters per calculation method can be found in Table 3. Mandatory fields are marked in red on the screen (per selected method). A warning will appear once patient information dialog is closed, if any of the mandatory fields is left blank. Calculated risk result in the report will not be available in such case. Required in Parameter remark Framingham SCORE Reynolds Total cholesterol HDL cholesterol Either mg/dL or mmol/L hsCRP Diabetic High sensitivity CRP Reynolds and Framingham doesn’t support diabetic patients. (*) the risk will be calculated only if positively indicating the patient is not diabetic. (*) Smoker CVD history All methods fit primary prevention. Risk will not be calculated for patients with CVD Either of the patient’s parent had a heart attack before they reached the age of 60. Family CVD history European risk region Low risk countries include: Belgium, France, Greece, Italy, Luxemburg, Spain, Switzerland and Portugal. Use high-risk option to other countries in Europe Treatment for hyper tension (HTN) Endo PATTM2000 Device 34 Operation Manual Itamar Medical Ltd. Age Gender Systolic blood pressure Taken from the patient information main dialog box Table 3 – Risk Factors mandatory fields Gray lines represent inputs that are used in the calculation of the Risk, but are part of the main Patient Information Dialog and not the Risk Factors Dialog. Figure 28 – Patient Information – Risk Factors Endo PATTM2000 Device 35 Operation Manual Itamar Medical Ltd. 6 Conducting an Endo PATTM2000 Study Pre-Study 6.1 6.1.1 General description The Endo PATTM system is comprised of a system console and two independent sensing probes coupled to connecting pneumo-electric tubing and foam finger mounting rings. The system console is connected to a computer loaded with a specific program for controlling the Endo PATTM system. The system console has two separate external switches for inflating and deflating the probes. The probes can be inflated and deflated via the computer program as well. The probes’ pressure and the setting of displayed signals are configured through the setup function in the “PAT™ Control” pull down menu (see Figure 16). Signal gain and time base are set through icons appearing on the Tool Bar (see section 4.3.1). If the probes’ pressure mode was initially configured to a “fixed pressure”, then the recommended pressure setting is 50mmHg. The eligibility of a patient for an Endo PATTM study is entirely at the discretion of the patient’s physician, and is generally based upon the following criteria: Symptoms and complaints Medical history Risk factors Current medications Restrictions on use (Section 1.5) 6.1.2 System warm up The system should be turned on and allowed to warm up for at least 20 minutes before commencing patients’ studies. It is recommended that the system would not be turned off until the last study for the day has been completed. 6.1.3 Pre-study adaptation period Thermoneutral room temperature must be maintained at all times: 21ºC-24ºC (70ºF-75ºF). Any restrictive clothing that could interfere with blood flow to the arms should be removed. Heavy coats or clothes with thick sleeves should not be worn. Watches or rings or other jewelry on the hands and fingers should be removed. The upper arm blood pressure cuff should be applied snuggly, but without excess pressure, which might hamper venous blood return, causing venous pooling in the arm (which is deleterious to the test performed). Endo PATTM2000 Device 36 Operation Manual Itamar Medical Ltd. The patient should then be comfortably seated or allowed to lie down in the study room and relax for at least 15 minutes or a sufficient period to reach a relaxed cardiovascular steady-state and to adjust to the room temperature. 6.1.4 Patient blood pressure measurement The blood pressure measurement procedure may affect the vascular conditions of the patient. Therefore, if blood pressure measurement needs to be taken prior to the Endo PATTM study, the following should be considered: The blood pressure should be measured from the patient’s control arm (the arm that is not occluded during the Endo PATTM study). It is recommended to allow 5 minutes to pass between the time of the blood pressure measurement and the commencement of the Endo PATTM baseline recording. 6.1.5 Positioning the patient The patient should sit or lie down comfortably. In either case the patients’ hands must be supported at approximately heart level. 6.1.6 Preparation of fingers and hands before a study The finger should be inspected for any deformities or injuries that could affect the study. The probe should not be used on a finger that is cut, injured or unusually sensitive. Fingernails should be trimmed and filed if necessary to avoid damaging the internal membranes of the PAT™ probes & displacing the finger from the sensing region of the probe, resulting in a smaller PAT™ signal and inaccurate results. The index finger is the recommended finger for the study, however if this finger is too large to comfortably fit into the probe or is otherwise unsuitable (see above), a different finger (except the thumb) may be used, as long as it is the same finger in both hands. WARNING ! Long nails may cause distorted PAT™ signals and may cause the study to fail. Before inserting the fingers into the probes, ensure all heavy clothes, tight fitting sleeves, rings, watches, and jewelry were removed from patient’s hands and arms. Endo PATTM2000 Device 37 Operation Manual Itamar Medical Ltd. 6.2 Patient and System Setup 6.2.1 Study conditions The study should be conducted in a quiet and relaxed atmosphere. Phones, beepers and other devices which can cause startling noises should be turned off; otherwise the startle effect on the patient might affect the test result. The patient should be kept comfortable and fully relaxed and asked to refrain from talking. Staff should avoid talking to the patient and between themselves as much as possible. These conditions should be kept throughout the entire study. To avoid communication problem, make sure there are no other applications running on the system’s computer, any wireless communication in the computer is turned off and the device is connected directly to the computer. 6.2.2 Initializing the Endo PAT™ system Activate the Endo PATTM2000 application. Enter patient details as required. Please note that the ID should be specifically assigned to the subject and is going to be allocated as the file name for the recorded Endo PAT™ study. Ensure that the pneumo-electric tubings are properly connected to the Endo PATTM2000 device, and a new set of probes is installed and ready for use. If the probes are not new, when you try to inflate the probes a warning dialog-box (Figure 29) will open. Figure 29 - Used probes warning WARNING ! The probes are single use and disposable: they will not work if they have already been used! 6.2.3 Patient preparation First, ensure that a blood pressure cuff is placed on the upper arm of the designated test arm. Then, the PAT™ probes should be placed inside the appropriate sockets of the arm- Endo PATTM2000 Device 38 Operation Manual Itamar Medical Ltd. supports (see Figure 30-1). Fully deflate the probes by clicking the or by pressing the “Deflate” button on the device. icon in the software Place the study fingers into the probes, making sure the fingers are inserted all the way to the end of the probe (see Figure 30-2). Inflate probes by pressing the Inflate button on the device or clicking the icon. NOTE The index fingers are preferred; however any finger (other than the thumb) may be used, provided that the same finger is used in both hands. Place the blue foam anchor ring on the adjacent finger to the one with the probe on, as near as possible to the finger’s root. The anchors should be placed as far back as possible on the finger so that they do not come in contact with the PAT probe (such contact may result in mechanical artifacts during recording) – see troubleshooting guide in section 9, Table 5. Figure 30 - Applying the PAT™ probes Make sure the tubing forms a loop from the probe, reaching half of the palm and back to the anchor (and attached to the anchor with the integral clip) as shown in Figure 30-3. Gently tape the tube to the tip of the anchor finger, over the finger-nail (Figure 30-4). The patient should be instructed to refrain from moving the fingers to the extent possible. Both patients’ forearms should be supported on the arm supports (alternatively, rolled towels or bed-sheets can be used). Make sure that the probes are free and not in contact with any object (including the supporting surface), as shown in Figure 31. Endo PATTM2000 Device 39 Operation Manual Itamar Medical Ltd. Figure 31 - Hands set-up Performing the Study 6.3 NOTE Do not change the time or date of the computer during the study. Changing the windows time while recording might result in corrupted study. 6.3.1 Recording baseline 1. Click the Stand By icon, from the main screen. The system will display the signals from the two PAT™ channels, allowing the user to check the signals and adjust the signal gain/scaling to properly visualize the PAT™ signals without saturating the screen. It is recommended to view the signal in a 1 minute screen (00:01:00). Signals from both PAT™ channels (Probe 1 and Probe 2) appear in the Trace Window (as well as the trend channels, if these are selected in the system setup). Visually inspect the PAT™ signal (see Figure 32) for at least 1 minute. If the signal seems noisy, make sure that the probes are not in touch with anything at all. As the system equilibrates, having a few leaks in the first few minutes is normal. If you encounter more than 2-3 leaks per minute, wait in Stand By mode for a few more minutes, until at least a minute passed since the last leak, or refer to the troubleshooting section (section 9). Endo PATTM2000 Device 40 Operation Manual Itamar Medical Ltd. NOTE If you are in the Stand By mode, it is possible to stop the test, deflate & re-inflate the probes without losing the usability of the probes. Once the is pressed the probes cannot be reused after button is pressed. Figure 32 - StandBy mode Endo PATTM2000 Device 41 Operation Manual Itamar Medical Ltd. NOTE While working in the Stand By mode, data is not recorded, and therefore it is impossible to review or save the study. The notification: “Stand By mode” (Figure 32) is displayed, and will disappear when the 2. button is clicked. Click the icon to begin study recording. Verify that the “recording” icon appears on the right hand side of the display (see the circled icon in Figure 33). NOTE Cold fingers & small fingers will have small PAT™ signals, with higher noise levels. 3. Initialize the stopwatch, by clicking the icon. Figure 33 - Recording Endo PATTM2000 Device 42 Operation Manual Itamar Medical Ltd. NOTE After starting the recording the time scale will be set automatically so the full window will contain 1 minute. 15 seconds periods will be marked by dotted lines. If the beginning of the recording is marked by patient motion artifacts or an unstable signal, consider troubleshooting procedures or extend the total period of baseline recording to give an overall period of at least 5 minutes of stable baseline data prior to the occlusion. 6.3.2 Performing arterial occlusion After a stable period of baseline signal recording, prepare for the occlusion: 1. Change the time scale to 15 seconds (00:00:15). 2. Amplify the signal gain of the occluded arm (either probe 1 OR probe 2) to 20,000. 3. If a stop watch will be used during the occlusion – set it for down counting from 5 minutes. 4. Explain the procedure to the patient, stressing the importance of remaining still during the test, despite the transient, strange sensations (i.e. numbness) they might feel in their arm. 5. Rapidly inflate the blood pressure cuff to a supra-systolic level (the recommended pressure is at least 60mmHg above systolic blood pressure and no less than 200mmHg). Verify total cessation of blood flow to the hand (total absence of PAT™ signal from the occluded hand). If the appearance of any PAT™ signal is noted, increase cuff pressure by an additional 50 mmHg and up to 300mmHg (See Figure 34). 6. Click the pressure. icon to start the timer, when the cuff reaches the target occlusion NOTE Without marking the beginning of the occlusion by starting the timer, you will not have any means of knowing when the occlusion period began. Thus you will not know when to release the occlusion. Endo PATTM2000 Device 43 Operation Manual Itamar Medical Ltd. Warning ! Inflating the BP cuff might cause some stress and discomfort to the patient. Pay attention the patient’s well-being. Maintain the arterial occlusion for exactly five minutes – periodically check the pressure in the occluding cuff to ensure proper inflation; increase pressure if required. NOTE Once the occlusion has been performed the test should not be re-started i.e. whatever problem occurs you should not stop the test and perform a new study on the same arm as vascular conditioning might have occurred. It is recommended to wait at least an hour prior to performing a new study and then to study the opposite arm. Left – complete occlusion Right – incomplete occlusion In both panels the bottom signal is the occluded arm. Figure 34 - Occlusion quality assessment 6.3.3 Post Occlusion period When exactly five minutes have passed, and the stopwatch indicator starts blinking red (the occlusion is complete), completely deflate the pressure cuff as quickly as possible. 1. Stop the stopwatch, by clicking the icon. 2. Click the icon to start the timer. Continue to maintain the relaxed conditions throughout this period to ensure proper recording. The patient will experience strange sensations after the cuff deflation & might feel an urge to move the test arm. This should be discouraged. Endo PATTM2000 Device 44 Operation Manual Itamar Medical Ltd. 3. When the stopwatch indicator starts blinking red (the post occlusion is complete), stop the stopwatch, by clicking the icon. 6.3.4 After the Study is Completed Click the icon to end the recording. This will also deflate automatically the probes, allowing their removal from the patient’s fingers. Carefully remove the tape, PAT™ probes, anchors and the occluding upper arm cuff from the patient. Disconnect the PAT™ probes and discard them. As it is impossible to visually differentiate used from unused probes, we recommend placing a piece of tape (the one taken off the adjacent finger) around each used probe prior to discarding the probes. Once you click the icon to end the recording the patient file will be automatically saved to the hard disk, with the previously entered patient ID as the file name. By default, the data folder is located in the data folder, in the Itamar Medical folder in C drive. NOTE If the probe doesn’t deflate after ending the study with the manually deflate via the deflate button on the device. It can also be accessed directly from the desktop by using the icon, icon. After finishing recording a study, open the recorded file for review (see next chapter). 6.3.5 Setting time markers Time markers can be inserted manually into the data while recording. This is used only for manual data analysis, as described in section 7.9. To insert a time marker press any of the 10 number keys on the keyboard. The time marker cannot be erased after it is set. However, it does not interfere with the data. You can set as many markers as you like. Endo PATTM2000 Device 45 Operation Manual Itamar Medical Ltd. 7 Review and Analysis During a PAT™ study, recorded signals are viewed in the display window and, based on the appearance of the traces, a qualitative evaluation can be performed. However, subsequent review of the study using the special features described in this chapter facilitates a quantitative analysis of the acquired data. It is recommended to review each study upon completion of its recording. 7.1 Study Data Retrieval From the toolbar click the dialog box appears: icon or select Open File from the menu bar. The following Figure 35 - Open file dialog box Select the desired file from the list (note that the file name is the same patient and visit ID used when entering the patient’s information) and click Open. 7.2 Automatic Analysis Click the Icon, or select Automatic Analysis from the Test Analysis menu. In the Endo PATTM2000 main screen, the test result’s value appears in the right column as shown in Figure 36. Endo PATTM2000 Device 46 Operation Manual Itamar Medical Ltd. Figure 36 - Automatic analysis NOTE The AI (Augmentation Index) is one of the additional / Research parameters, and it is calculated and presented only if enabled as part of the license. The automatic analysis identifies the occlusion borders and marks with two vertical blue lines its beginning and end, and also marks blue the whole signals area between these two lines. Proper identification of the occlusion area is critical for the automatic analysis to correctly select the regions and time references used in its calculations. The user should verify that the marking of the occlusion area appears properly. If the automatically marked occlusion area appears wrong, it can be manually corrected as described in section 7.2.1. NOTE After launching the Endo PATTM2000 software, you should wait 10 seconds before running the first test analysis. This is necessary to allow termination of background processes. The Endo PATTM2000 study results (LnRHI or RHI and Heart Rate) are presented on the right side of the screen (Figure 36). Endo PATTM2000 Device 47 Operation Manual Itamar Medical Ltd. The RHI (Reactive Hyperemia Index) or LnRHI (natural log of RHI) is the post-to-pre occlusion PAT™ signal ratio in the occluded arm, relative to the same ratio in the control arm, corrected for baseline vascular tone of the occluded arm where: Normal EndoScore™: Abnormal EndoScore™: RHI > 1.67 or LnRHI > 0.51 RHI ≤ 1.67 or LnRHI ≤ 0.51 The HR (Heart Rate) is calculated from the PAT™ signals in the baseline region of interest. 7.2.1 Manual Correction of the Occlusion Borders Click the icon to clear all markings from previous analyses. Select the occlusion borders using one of the following 3 alternative methods: 1. Position the mouse's cursor on the occluded PAT™ tracing so that it points at the beginning of the occlusion. Click and hold down the left mouse button and drag the cursor rightwards until it points at the end of the occlusion area. The selected area will have inverted colors and as you mark it, the length of the selected period will be marked just below Probe1 or Probe2 on the left hand side of the screen in blue. Release the mouse button. In the “Test Analysis” menu, select the “Select Occlusion Period” option to set the manually selected occlusion area. Occlusion markers (blue vertical lines) can be dragged to improve the fit of the occlusion area. Zoom-in to fine tune the location of the occlusion markers. 2. Position the mouse's cursor at the beginning of the occlusion area. Right click on the mouse will open a popup menu (Figure 37). Select “Set Automatic 5 min Occlusion” from the popup menu. A five minutes segment starting at the curser position will be marked in blue. Occlusion markers (blue vertical lines) can be dragged to improve the fit of the occlusion area. Zoom-in to fine tune the location of the occlusion markers. 3. Position the mouse's cursor at the beginning of the occlusion. Right click to open a popup menu (Figure 37). Figure 37 - Occlusion Popup Menu Select “Set Start Occlusion Marker”. Move to the location of the end of the occlusion period, right click, select “Set End Occlusion Marker”. Occlusion markers (blue vertical lines) can be dragged to improve the fit of the occlusion area. Zoom-in to fine tune the location of the occlusion markers. Endo PATTM2000 Device 48 Operation Manual Itamar Medical Ltd. NOTE It is recommended to change the time-base to a 1 minute screen (00:01:00) to make the identification of the occlusion borders easier. If the occlusion area extends beyond the edge of the window, the window will automatically scroll as you drag the mouse across its edge. The designated occluded probe is marked on screen by the blue text: “Occlusion duration:” under the Probe label, on the left side of the screen. The occluded probe is selected automatically by the software. It can be changed by right clicking on the mouse (anywhere in the signal window) and selecting the correct occluded probe (Figure 37). Once the manually selected occlusion is marked, click on the automatic analysis using the manually selected occlusion area. The manual changes of the occlusion borders can be saved by selecting the “Save” option from the “File” menu. These changes will be recorded into a file with an “M32” suffix, rather than the original raw data which will have the same file name, but an “S32” suffix (for example: johnSmith.S32 & johnSmith.M32). The M32 files are 1KB in size and only contain coordinates of the occlusion borders. icon to run the NOTE manual changes of the occlusion borders are automatically saved 7.3 To remove the manually added occlusion markings, right click on the mouse and select “Clear Occlusion” (Figure 37). Study Report To review the study report select the “View report” option in the Test Analysis pull down menu or click the icon. The report will be exported to a picture viewer (it will take a few seconds). There are several pages in the Report. The first page contains data about the patient, the study, traces of the signals and the basic results (RHI/LnRHI and HR). The second page is Risk Factor page (when the risk score is calculated). It contains information about the selected Risk Factor method, the patient information used in the calculation, the Risk Factor result, and the expected change in Risk with age. The 3rd and 4th pages contain data about the Augmentation Index and Hart Rate Variability (HRV) and will only be included in the report when these features are included in the license file and calculated. This report can be printed or exported to other formats (i.e. PDF). Endo PATTM2000 Device 49 Operation Manual Itamar Medical Ltd. 7.4 Endo PATTM2000 study results 7.4.1 EndoScore™ result: RHI and LnRHI The RHI (Reactive Hyperemia Index) is the post-to-pre occlusion PAT™ signal ratio in the occluded arm, relative to the same ratio in the control arm, corrected for baseline vascular tone of the occluded arm where: Normal: Abnormal: RHI > 1.67 RHI ≤ 1.67 This index and threshold were used in the validation study presented at section 1.2 of this manual and they reflect endothelial function. The LnRHI is a natural log transformation of the same index, where: Normal: LnRHI > 0.51 Abnormal: LnRHI ≤ 0.51 This transformation is a monotonic transformation; therefore it does not change the dichotomous diagnosis (normal/abnormal) for any individual test. LnRHI provides a better double sided distribution that is very close to normal distribution (Gaussian) in its nature. The histograms of RHI and LnRHI (based on the analysis of large dataset of nonselective populations) are shown in Figure 38 and Figure 39 respectively (blue represents the actual numbers and red represents the calculated equivalent normal distribution of the same mean and standard deviation). Figure 38 – non selective population histograms of RHI Endo PATTM2000 Device 50 Operation Manual Itamar Medical Ltd. Figure 39 - non selective population histograms of LnRHI The LnRHI distribution curve in a non-selected population is included in the report (Figure 40) and displays the LnRHI result in respect to non selected population. Figure 40 – LnRHI distribution in non-selective population The graph presents the distribution function of the LnRHI in the nonselected population. The data used is composed of nearly 10,000 data points collected from different study cohorts worldwide. The mean / median LnRHI in the population (0.7, marked in blue) and the dichotomy threshold for normal endothelial function (0.51, marked in red) are presented as vertical lines on the graph. The individual EndoScore™ result of the patient is presented on this graph (bold black line and a result frame) to aid assess the patient condition in respect to the dichotomous threshold and the general population. In case that Endothelial Function Index in the software is set to RHI and not to LnRHI, the same LnRHI graph will appear and the RHI values (threshold, population median/ mean, and study results) will appear in brackets next to the LnRHI values in the graph. 7.4.2 Heart Rate The HR (Heart Rate) is calculated from the PAT™ signals in the baseline region of interest. Endo PATTM2000 Device 51 Operation Manual Itamar Medical Ltd. 7.5 Cardiovascular Risk EndoPAT™ software enables the calculation of 3 types of Cardiovascular Risk. The software uses the information entered in the patient dialog box, and calculates the selected Risk. The result appears in the report, and in the tabular report. 7.5.1 Framingham Risk Score Framingham Risk Score estimates the risk of developing hard CHD adverse events (myocardial infarction or coronary death) over a course of 10 years (Adults Treatment Panel III, JAMA 2001). The risk is given in percentages. The Framingham Risk Score applies only to people without known heart disease or diabetes. For more information, visit http://www.framinghamheartstudy.org/risk/hrdcoronary.html 7.5.2 SCORE SCORE is the European risk prediction system providing a 10 year risk of fatal CVD. SCORE is representative of typical European populations, and the risk score system has been optimized for coronary prevention in European clinical practice. Risk may be higher than indicated in: Sedentary or obese subjects, especially those with central obesity. Those with a strong family history of premature CVD The socially deprived Subject with diabetes – risk may be 5 fold higher in women with diabetes and 3 fold higher in men with diabetes compared to those without diabetes. Those with low HDL cholesterol or high triglycerides. Asymptomatic subject with evidence of preclinical arthrosclerosis, for example reduced ankle-brachial index. The Endo PAT™ device is using the General version of the SCORE, using the low and high risk countries (and not national versions). For this use: European Low Risk: Belgium, France, Greece, Italy, Luxembourg, Spain, Switzerland, and Portugal. European High Risk All other European Countries For more information, search SCORE in: www.escardio.org Endo PATTM2000 Device 52 Operation Manual Itamar Medical Ltd. 7.5.3 Reynolds Risk Score Reynolds Risk Score is designed to predict the risk of having a future heart attack, stroke, or other major heart disease in the next 10 years. The Reynolds Risk Score is a newly developed score that includes information from the hsCRP blood test (a measure of inflammation) and whether or not either parents had a heart attack before age 60 ( genetic predisposition ) on top of the traditional risk factor analysis. Reynolds Risk Score applies only to healthy population without diabetics above the age of 45. Female/Male with diabetics should not be evaluated using Reynolds Risk Score as they are already considered to be a high-risk group for both heart disease and stroke. For more information visit: http://www.reynoldsriskscore.org/faq.aspx 7.6 Additional / Research Features NOTE Please note that the Endo PATTM analysis of Augmentation Index (AI), Heart Rate Variability (HRV) and FRHI are not FDA cleared and can be applied for clinical use out of the US only. NOTE To activate any Additional / Research Feature, you should submit a request to Itamar as part of the Registration process. See section 3.6 above. 7.6.1 Augmentation Index (AI) Augmentation index is a measure of arterial stiffness, calculated based on pulse wave analysis of the signal measured by the Endo PAT™ device. Arterial stiffness is an independent risk factor for later CVD events, it reflects the structural nature and basal tonus of the vessel, and is not necessarily correlated to endothelial function. AI in the Endo PAT™ is calculated from the PAT™ pulses at the base-line period of the occluded arm, by averaging multiple valid pulses and finding the systolic peak (P 1) and the backward reflected peak (P2) and then using the formula: (P2-P1)/P1. See Figure 41. As augmentation index is heart rate related, the result is then corrected to a standard of AI at heart rate of 75BPM (AI@75). Endo PATTM2000 Device 53 Operation Manual Itamar Medical Ltd. Figure 41 - AI calculation Lower AI values (including negative results) reflect better arterial elasticity. AI is usually increasing with age, and is higher in female. The AI section in the report includes the AI result relative to large gender matched non-selective population. Figure 42 – AI result from the report (female example) 7.6.2 Heart rate variability (HRV) Heart rate variability (HRV) is a measure of heart beat to beat variability in either time or frequency domain. HRV reflects the status of the autonomic nervous system (ANS) and particularly the balance between sympathetic and parasympathetic activities. Low HRV has been described as related to various pathological conditions. The Endo PAT™ HRV is calculated from the baseline period, based on the European Society of Cardiology and the North American Society of Pacing Electrophysiology task force standard. It requires 5.5 complete minutes of base line, and includes all the time and frequency domain that can be calculated from this short (5minutes) time period. Results are Endo PATTM2000 Device 54 Operation Manual Itamar Medical Ltd. available in the tabular report (Excel or HTML), and in the patient report as the last page which includes also some graphical results. See Figure 43and Figure 44 for the information presented in the report. Figure 43- Time domain HRV in the report Figure 44- Frequency domain HRV in the report 7.6.3 FRHI The Endo PAT™ device has been used in the Framingham Heart Studies for several years. 2008 Circulation paper by Hamburg et al (Cross-Sectional Relations of Digital Vascular Function to Cardiovascular Risk Factors in the Framingham Heart Study) presented an index to be used with the Endo PAT™ device, termed here as FRHI. Basically it is a natural log transform of the ratio between the post to pre occluded PAT™ amplitudes and the same ratio of the PAT™ amplitudes measured at the control arm. FRHI does not incorporate a correction to the baseline, and is using shorter post occlusion times (1.52minutes) than the RHI/LnRHI. Researchers that want to use this index for research purposes can ask Itamar Medical to enable this index as part of the registration process. The FRHI will be added to the tabular report (see Table 4). Endo PATTM2000 Device 55 Operation Manual Itamar Medical Ltd. 7.7 Tabular Report Click the icon to get tabular report. The table lists relevant study parameters and results, for all analyses performed to date, with the last line in the table containing data from the most recent analysis performed. Table 4 is a description of the information fields displayed in the table. NOTE TM Please note that the Endo PAT analysis of Augmentation Index (AI), Heart Rate Variability (HRV) and FRHI are not FDA cleared and can be applied for clinical use out of the US only. Endo PATTM2000 Device 56 Operation Manual Itamar Medical Ltd. A B C D E F G H I J K L M-AB AC-AD AE AF AG-AJ AK-AM AN AO-BB BC BD-BQ BR BS BT BU BV-BW BX BY BZ CA CB CC CD-CE CF-CK CL-CN ID FileName visit RHI: Reactive Hyperemia Index (EndoScore™ result) LnRHI: Natural Base log of Reactive Hyperemia Index (EndoScore™ result) BL HR: baseline heart-rate AI: Augmentation Index AI@75: Augmentation Index - normalized to HR 75bpm AI_N pulses: number of pulses averaged to calculate the AI AI_P1 AI_P2 Warnings/Errors Patient info: Diastolic and Systolic Pressures, Gender, Age, Height, Weight, BMI,… Risk method used and the calculated Risk %ValidBL ROI:% valid PAT™ signals in the Baseline region of interest %Valid Post Occ ROI:% valid signals in the post-occlusion region of interest Occlusion info – begin, end, duration and automatic/manual border detection Baseline duration, region of interest (ROI) duration, and total study duration MeanBL o - Mean PAT™ signal amplitude in the baseline region of interest value, for the occluded side (suffix “o”) Post-occlusion signal to baseline signal ratios, at 14 consecutive 30 sec time segments, for the occluded side (suffix “o”) MeanBL c - Mean PAT™ signal amplitude in the baseline region of interest value, for the control side (suffix “c”) Post-occlusion signal to baseline signal ratios, at 14 consecutive 30 sec time segments, for the control side (suffix “c”) RecordingTime: Date and time of test recording AnalysisTime: Date and time of test analysis RecordingVersion: The software version used for the recording AnalysisVersion: The software version used for the analysis Site name & PATographer identification Comment1 Comment2 UserField1 UserField2 FRHI HRV – error message HRV – general information HRV – time domain results HRV – frequency domain results Table 4 - Table information (Note: fields G to K and CB-CN contain additional / Research features restricted to non-US and in research versions only. They will be calculated based on the license file of the software) Endo PATTM2000 Device 57 Operation Manual Itamar Medical Ltd. Batch Analysis 7.8 The Endo PATTM2000 software allows the user to perform a batch automatic analysis on a group of studies as follows: The batch analysis command analyzes all the files located in a selected folder. If necessary, copy the files you wish to analyze to a new folder before proceeding. Select “Batch Analysis” From the Test Analysis menu. From the dialog box that opened, select the folder that contains the files you wish to analyze and click “OK”. The automatic analysis will run on all the files in the selected folder. Once completed, a table will open automatically, containing all the analysis parameters (as described in Table 4) for all the analyzed files. Manual Analysis (Manual Research Mode only) 7.9 NOTE Since the manual analysis (T/B) does not incorporate certain mandatory features of the automatic analysis (e.g. contra-lateral arm correction and base line correction), it can serve for research purposes only (not necessarily endothelial dysfunction applications). NOTE To enable the Manual Analysis functions, it is necessary to enable the Manual Research Mode. Refer to section 4.4. 7.9.1 Marking Segments and Artifacts Tool bar icons provide quick and easy access to the tools used to mark segments and artifacts in research studies, as well as to facilitate automatic ratio calculations between PAT™ traces recorded at different time segments. This feature can define any number of time intervals as artifacts, and thereby exclude them from the ratio calculations. You can mark segments in the Trace Window, identifying two segment types (later to be used in calculations): B (Baseline) segment T (Test) segment Endo PATTM2000 Device 58 Operation Manual Itamar Medical Ltd. NOTE While marking segments and artifacts, errors may be corrected by clicking the icon (“Clear all segments”). This will also erase the occlusion border markings. This tool should be used only when using the manual options described in this chapter. To Mark a Segment 1. In the Trace Window, position the mouse's cursor at the beginning of an interval to be marked. 2. Drag the cursor horizontally along the interval—the selected segment becomes highlighted. 3. Release the mouse button at the end of the desired interval—the selected segment remains highlighted. Time marker Baseline segment Test/Baseline ratio Test Segment Artifacts Figure 45 - Marking Segments and Artifacts 4. Set the highlighted segment to B, T or artifact, as appropriate: Endo PATTM2000 Device 59 Operation Manual Itamar Medical Ltd. Select a segment and click icon to mark it as the B segment - B segment traces are highlighted in green. Select a segment and click on the segment traces are highlighted in red. Select segments suspected as artifacts and click on the icon to mark as an artifact segment - multiple segments can be selected - artifact segment traces are highlighted in yellow. These segments (marked in yellow) are not used in the calculation process. icon to mark it as a T segment - T Marked segments remain highlighted in the Trace Window (Figure 45). NOTE If there are noise artifacts in the region of interest in the signal, you should first mark the artifacts as explained above. Then mark the B or T segment over the marked artifacts. If you do not mark the B or T segments over the artifact markings, the artifacts will not be edited out and will be calculated in the T/B analysis. 7.9.2 Analyzing PAT™ Ratios After the B and T segments are marked, their PAT™ ratios are automatically calculated displayed in the right side of the screen (Figure 45). Note that these results might be slightly different from the automated analysis, as this tool doesn’t include all the analysis logic. NOTE Automatically calculated segment ratios displayed in the right side of the screen (Figure 45) do not have clinical implication. This feature is used only for research purposes and should not be regarded as device output concerning Endothelial Dysfunction. Endo PATTM2000 Device 60 Operation Manual Itamar Medical Ltd. 7.10 Study printing You can print the displayed data at any time during off-line review and analysis. Clicking the icon (“Print”) will send the current screen to the default printer. 7.11 Uploading data to the server The software offers a quick link to the Itamar medical Uploading Service: from the Help menu, click on “Link to Itamar Medical Uploading Service”. Follow the instruction in the browser to upload files. This function requires a connection to the internet. The software will open the default browser with the correct link. Endo PATTM2000 Device 61 Operation Manual Itamar Medical Ltd. 8 Maintenance 8.1 Device maintenance This chapter describes preventive and regular maintenance for the Endo PATTM2000 system. Only qualified medical personnel should use this equipment. In the event of equipment malfunction all repairs should be executed by qualified Itamar Medical personnel or authorized service agents. Maintenance instructions should be followed closely to avoid unnecessary equipment failure or potential health hazards to the user or patient. 1. Inspect all cords and ensure they are not frayed or damaged. Verify that all plugs, connectors and cables are securely connected. 2. The Endo PATTM2000 device should be free of dirt and debris. Using a soft, slightly damp cloth, gently wipe the exterior of the Endo PATTM2000 device, avoiding contact with open vents and plugs. 3. Used probes should be discarded after each use and replaced with new ones. 4. Refer to the Endo PATTM2000 Service Manual for additional information and spare parts list 8.2 Probe data Probes’ information - Serial Number, Production batch number and Status (used/ not used) can be received by selecting “Probes Information” option from the “PAT™ Control” menu when the device is connected and the probes are attached to tubes. The following screen will appear with the probes’ information. Figure 46 - Probes Information Endo PATTM2000 Device 62 Operation Manual Itamar Medical Ltd. If a probe is missing or cannot be read, NA will appear instead of probe’s information. 9 Troubleshooting 1. 2. Description Possible Cause The Endo PATTM2000 device does not switch on (the orange LED on the device is not on) The Endo PATTM2000 device power is switched off. No communication between PC station and Endo PATTM2000 device (the green LED on the device is not lit, the Study-icon in the main screen remains dimmed or the PAT button on the bottom right of the S/W screen is red instead of green) Action Switch on the Endo PATTM2000 device. Power cable is not connected to the Endo PATTM2000 device. Endo PATTM2000 power switch is off. Switch off the Endo PATTM2000 device. Plug the power cable to the power outlet. Switch on the Endo PATTM2000 device. Switch off the Endo PATTM2000 device. Plug the power cable to the Endo PATTM2000 device. Switch on the Endo PATTM2000 device. Verify that the orange LED is on. Switch on the Endo PATTM2000 device. Power cable is not plugged to the power outlet. Communication cable between PC station and Endo PATTM2000 device is not connected. Another application (such as Palm Pilot Hot Sync) is assigned to the COM port. The communication cable is connected to the wrong COM port. USB to Serial adapter not installed, or installation did not complete properly. 3. Frequent pressure leaks during study The pneumatic probe cable is not well connected to the probe or to the Endo PATTM2000 device. Faulty probe. Faulty pneumatic cable. Endo PATTM2000 Device 63 Verify that the communication cable is connected properly. Close all background applications. Verify that the COM port connected to the Endo PATTM2000 device is not in use by another application. Plug communication cable into the other COM port. Try setting another COM port in the application. Follow instructions provided with the USB to Serial adapter to verify proper installation. Verify that the pneumatic probe cable is securely connected to the probe and to the EndoPATTM2000 device and that the connections are free from lint or other residues. Replace PAT™ probe. Replace pneumatic cable. Operation Manual Itamar Medical Ltd. 4. Description Possible Cause Action Noisy signal Something is in contact with the probes or the tubes 5. The probes do not deflate automatically after pressing stop Either you neglected to press “Go” (and thus still in the Stand By mode); or there is a software-hardware communication error 6. The signal looks flat and does not react to gain amplification The relevant PAT™ channel is not selected 7. License doesn’t fit the computer The registration request was done on a different computer, or change of hard disk 8. Software license expired The license file has expired. Redo the registration process and replace the license.lic file Contact Itamar Medical customer support. Redo the registration process and replace the license.lic file Verify proper connection of both tubes and probes. Deflate once from the software interface or using the button on top of the device then inflate All the capabilities enabled by the license will not work anymore 9. Very long inflate followed by Major Leak message Multiple deflates before inflate Make sure the probes are not touched by other fingers, that they are not rested on any surface and that the tube between the probe and foam anchor is not rested on the back of the hand. If the probe is in touch with the foam anchor on the adjacent finger you should either remove the foam anchor and trim its side on the diagonal, so it will not touch the probe or alternatively, place the foam anchor on the little finger and place a thin piece of rolled gauze as a separator between the test finger and the adjacent finger, securing it in place with some medical tape. Deflate manually by pressing the deflate button on the Endo PATTM2000 device. If you were in Stand By mode (= did not press “Go”) you should retest the patient. It is recommended to wait for an hour and switch the test arm before retesting. If you pressed “Go” make sure the study was recorded properly by opening it for analysis. Refer to section 4.4 item 6 and Figure 17 Table 5 - Troubleshooting Endo PATTM2000 Device 64 Operation Manual Itamar Medical Ltd. The following table provides a list of system error messages that the user may encounter when attempting to run the analysis. Some of the errors may be corrected after proper manual occlusion marking (if the errors are caused by a wrong automatic detection of the occlusion borders). However, some errors have no user corrective actions that can remedy these situations. All error messages indicate that the system could not complete the analysis of the study. Message Explanation Unable to open file (-n) The system cannot open the file. The code in parenthesis (n) provides additional information for technical support (call Itamar). Signal Length Less Than Minimum Required The recorded signal length is less than the minimum required to run an analysis (6 min). Signal Length More Than Maximum Allowed The recorded signal length is more than the maximum allowed to run an analysis (150 min). Signal is too noisy Noisy signal prevents proper operation of the analysis module. Allocation Problem Internal system failure (call Itamar Medical customer support). Baseline duration is shorter than minimum required Less than 2 min and 20 sec valid baseline signals. Occlusion Time less than minimum required Occlusion is 90 sec or less (might be rectified after manual occlusion marking). Occlusion Time too long More than 10 min occlusion (might be rectified after manual occlusion marking). Post Occlusion duration is shorter than minimum required” Post occlusion less than 2 min and 30 sec. (Might be rectified after manual occlusion marking). Undefined occlusion The system cannot identify the occluded section of the study (might be rectified after manual occlusion marking). Poor Occlusion Quality Poor occlusion quality due to too many valid pulses identified during the occlusion. Poor Signal Quality Poor signal quality in the post occlusion period used by the analysis (1.5 - 2.5 min post occlusion). Program Failure Any other problem that prevents the program to complete the analysis (call Itamar Medical customer support). Incomplete occlusion There are measured pulses during the occlusion in the occluded hand. Occlusion quality is too low for a good hyperemic response. Table 6 - Error messages Endo PATTM2000 Device 65 Operation Manual Itamar Medical Ltd. 10 Technical Information 10.1 System Minimum Requirements - An IBM® or compatible PC Pentium/Celeron/AMD 1000 MHz CPU or higher - Windows XP / Windows 7/ Windows 8 (x86/x64) operating system - Any Internet browser or Excel 2000 and above - 1 GB RAM for XP or 2 GB for Win7 / Win8 - 1 GB free hard disk space - XGA display (1024 x 768 pixels) or better - One available serial port, or one available USB port (with USB to Serial adapter installed) Optional Hardware - Large removable media, such as CD-R or DVD-R for storage of study files - Printer, higher resolution preferred. Color recommended 10.2 Operating System Windows XP / Windows 7/ Windows 8 (x86/x64). 10.3 Technical information about labeling Double isolation Date of manufacture Follow instructions for use Type BF applied part Endo PATTM2000 Device 66 Operation Manual Itamar Medical Ltd. The product is certified by CSA The product complies with the CE mark according to MDD (Medical Device Directive) and related standards. The product is marked with the CE logo. Use-by date Single use, do not re-use 40ºC Temperature limit 0ºC Medical device Manufacturer Catalogue Number Serial Number Endo PATTM2000 Device 67 Operation Manual Itamar Medical Ltd. 10.4 Labeling Label on the base of the Endo PATTM2000 device (main control unit): Packaging labels: The following labels are attached to the master package of the Endo PATTM2000 system: Endo PATTM2000 Device 68 Operation Manual Itamar Medical Ltd. Endo PATTM2000 Probe Package: Endo PATTM Pneumatic PATTM Probe Itamar Medical Ltd. Medes Ltd. 9 Halamish St, P.O.Box 3579 5 Beaumont Gate, Shenley Hill, Caesarea Ind. Park, 3088900, Israel Radlett, HertfordshireWD7 7AR. Tel: + 972 4 6177000 England Fax: + 972 4 6275598 Tel: +44 20 8123 8056 www.itamar-medical.com Tel / Fax: +44 1923859810 www.itamar-medical.com/images/licenseep.pdf Endo PATTM2000 Device 69 Operation Manual Itamar Medical Ltd. 10.5 Specifications for Endo PATTM2000 system Properties Description PAT™ Probe Itamar’s proprietary probe only Recording Time Limited by hard disk space, ~8MB per study of 20 minutes Sampling Resolution 12 bit Indications 2 LED’s - power supply and communication PAT™ Channel Power Supply Selective Gain 1÷50,000 Selectable Time Base 10 sec ÷ 2 hour per screen Bandwidth 30Hz Input 100-240 VAC 50/60 Hz Output 12V DC, 2A Operating Voltage Temperature 12 V Operation Room temperature Storage 0 to 40 0C Transportation – Device -20 to 60 0C Transportation – Probes 0 to 40 0C Humidity Operating & Storage 10% - 95% (non-condensing) Dimensions L x W x H (max) 240mm x 135 mm x 185 mm Weight 3.5 kg Table 7 - Specifications Endo PATTM2000 Device 70 Operation Manual Itamar Medical Ltd. Appendix A: License Agreement and Limited Warranty License to User from Itamar IMPORTANT - PLEASE READ THIS LICENSE AGREEMENT CAREFULLY BEFORE INSTALLING OR OTHERWISE USING THE LICENSED SOFTWARE (AS DEFINED BELOW) OR THE PRODUCT WITH WHICH YOU RECEIVED THIS LICENSE AGREEMENT. THIS LICENSE AGREEMENT APPLIES TO (a) ALL LICENSED SOFTWARE, (b) ALL LICENSED PRODUCTS (AS DEFINED BELOW), AND (c) ALL THIRD PARTY PRODUCTS (AS DEFINED BELOW). SHOULD YOU HAVE ANY QUESTIONS CONCERNING THIS LICENSE AGREEMENT, PLEASE CONTACT THE VENDOR FROM WHICH YOU PURCHASED THE LICENSED SOFTWARE, LICENSED PRODUCT, OR THIRD PARTY PRODUCT. YOU MAY ALSO CONTACT ITAMAR AT THE ADDRESS PROVIDED AT THE END OF THIS LICENSE AGREEMENT. This License Agreement is a legal agreement between you (as an individual, company, organization or other entity) and Itamar Medical Ltd. (“Itamar”). By installing, copying, or otherwise using the Licensed Software, and/or by using the Licensed Product or any Third Party Product, you agree to be bound by the terms of this License Agreement with respect to the Licensed Software and Licensed Products. If you do not agree to the terms of this License Agreement, INCLUDING, WITHOUT LIMITATION, THE LIMITATIONS ON USE AS PROVIDED IN SECTION 3.3 AND THE RESTRICTIONS ON USE AS PROVIDED IN SECTION 3.4, do not install, use or copy the Licensed Software or use the Licensed Product or the Third Party Product. For the avoidance of doubt, in the event that you have entered into an agreement in writing ("Subsequent Agreement") with Itamar covering the subject matter of this license, then to the extent that any terms or provisions of such Subsequent Agreement are in conflict with, different than, or additive to, the terms and provisions of this license, such terms and provisions of such Subsequent Agreement shall prevail. The Licensed Software and the Licensed Products are protected by US patent laws, trade secret laws, copyright laws, and international treaty provisions as well as other intellectual property laws and treaties. Therefore, you must treat the Licensed Software and the Licensed Products like any other copyrighted and protected material or product. All title to the Licensed Software and all intellectual property rights in and to the Licensed Software and the Licensed Products shall remain with Itamar. 1. Definitions 1.1. “Licensed Product(s)” means the Endo PATTM2000 devuce, the PATTMProbe and the corresponding components of any Third Party Product with which this License Agreement was received. Some Licensed Products are stand-alone products and some Licensed Endo PATTM2000 Device 71 Operation Manual Itamar Medical Ltd. Products are incorporated as components within Third Party Products, in each case sold or otherwise made available, by Itamar and/or third parties. If you have received this License Agreement with a Third Party Product, this License Agreement applies only to the Licensed Product incorporated as a component within such Third Party Product. 2. 1.2. “Licensed Software” means the Endo PATTM software, and the associated media and accompanying materials provided to you with such Endo PATTM software. Some Licensed Software is a stand-alone product and some Licensed Software is incorporated as a component within a Licensed Product, in each case sold or otherwise made available, by Itamar and/or third parties. If you have received this License Agreement with a Licensed Product, which incorporates the Licensed Software as a component within such Licensed Product, this License Agreement applies to the Licensed Software. 1.3. “Third Party Product” means any product into which a Licensed Product or Licensed Software is incorporated. LICENSE TO USE, LIMITATIONS AND RESTRICTIONS ON USE 2.1 LICENSE TO USE LICENSED SOFTWARE Itamar hereby grants you a nonexclusive right to use the Licensed Software (i) solely with the Licensed Product(s), and (ii) solely for its intended use in testing of endothelial function in accordance with the provisions of this License Agreement and the instructions provided in the documentation accompanying the Licensed Software and the Licensed Product, subject to the Limitations on Use as provided in Section 3.3 and the Restrictions on Use as provided in Section 3.4. You may make one copy of the Licensed Software solely for backup or archival purposes, or transfer the Licensed Software to a single hard disk, provided you keep the original solely for backup or archival purposes. However, you may not cause any Licensed Software, which is not designed for use on a server, to execute or be loaded into the active memory or media of more than one computer at any one time. 2.2 LICENSE TO USE LICENSED PRODUCTS Itamar hereby grants you a non-exclusive right to use the Licensed Product(s) (i) solely with the Licensed Software, and (ii) solely for its intended use in testing of endothelial function in accordance with the provisions of this License Agreement and the instructions provided in the documentation accompanying the Licensed Software and the Licensed Product, subject to the Limitations on Use as provided in Section 3.3 and the Restrictions on Use as provided in Section 3.4. 2.3 LIMITATIONS ON USE The licenses granted in Sections 2.1 and 2.2 above are for use in normal medical practice, and you are not licensed or authorized to include, or use in any manner, or to provide to any third party for such inclusion or use, any test results derived from the Endo PATTM2000 device and/or the Endo PATTM Software for the purpose of seeking or obtaining any regulatory approval from any governmental or Endo PATTM2000 Device 72 Operation Manual Itamar Medical Ltd. regulatory agency of any diagnostic or therapeutic claim, or medical device, pharmaceutical or other therapeutic or diagnostic product. Without derogating from the generality of the foregoing, the inclusion by you or any third party of any results of any type, derived through the use of the Endo PATTM2000 device and/or the Endo PATTM Software, in any regulatory filing for the purpose of supporting, or obtaining any such approval, without the prior written consent of Itamar is expressly prohibited. THIS LIMITATION REFERS SOLELY TO THE SEEKING OR OBTAINING OF DIAGNOSTIC OR THERAPEUTIC CLAIMS AND NOTHING IN THIS AGREEMENT, INCLUDING THIS LIMITATION ON USE, IS INTENDED, IN ANY MANNER, TO RESTRICT THE REPORTING OF INFORMATION REGARDING THE ETT_PAT2000 AND/OR THE ETT_PAT SOFTWARE IN ACCORDANCE WITH THE REPORTING REGULATIONS OF ANY GOVERNMENTAL OR REGULATORY AGENCY. 2.4 RESTRICTIONS ON USE Any use of the Licensed Software and/or Licensed Product other than as set forth in Sections 2.1 and 2.2 above, in each case as limited by Section 2.3 above, is strictly forbidden. Without derogating from the generality of the above, you may not: Distribute, reproduce, copy, assign, rent, lease, or otherwise transfer the rights granted to you under this License Agreement to any third party except explicitly as set forth in this License Agreement; Reverse engineer, decompile, or disassemble, as applicable, the Licensed Software or the Licensed Product, except as expressly permitted by applicable law; or Modify in any manner the Licensed Software and/or the Licensed Product unless obtaining the prior written consent of Itamar. 3. TRADEMARKS Cardio-PAT™, Endo PATTM2000, PATTM Probe and all trademarks and logos, which appear on or in connection with the Licensed Software and/or the Licensed Products, as may be amended from time to time, are, unless stated otherwise, trademarks of Itamar. No right, license, or interest to such trademarks are generated or granted hereunder other than the limited right to use provided herein, and you agree that no such right, license, or interest shall be asserted by you with respect to such trademarks. You may not remove or destroy any copyright, trademark, logo or other proprietary marking or legend placed on or contained in the Licensed Software or a Licensed Product. 4. LIMITED WARRANTIES AND DISCLAIMERS a. Against Infringement. Itamar hereby warrants to you that it has the right to grant you the license to use the Licensed Software and/or the Licensed Product and to enter into this License Agreement and that neither the Licensed Software nor the Licensed Product(s) infringes the intellectual property rights of any third party. Endo PATTM2000 Device 73 Operation Manual Itamar Medical Ltd. b. As to Licensed Product. Itamar warrants that the Licensed Product, with which this License Agreement was delivered, will be free from defects in design, materials, and workmanship for a period of one year from the date of delivery of the Licensed Product to you. If the Licensed Product contains a defect in design, materials or workmanship and such Licensed Product is returned to Itamar within one (1) year of delivery of the Licensed Product to you, Itamar will repair or replace the Licensed Product, or issue a credit for the purchase price of the Licensed Product, with the choice to repair, replace or credit being within the sole discretion of Itamar. The foregoing repair, replacement or credit remedy will be your sole remedy for breach of the warranty set forth in this Section 4(b). c. As to Licensed Software. Itamar warrants that for a period of ninety (90) days from the date of delivery of the Licensed Software to you, the Licensed Software will, under normal use, be free from defects in materials and workmanship, and will perform substantially as it is intended to perform. If during such ninety (90) day period, the Licensed Software has a defect in materials or workmanship or does not perform substantially as it is intended to perform, Itamar shall (a) attempt to correct or assist you around errors with efforts which Itamar believes suitable to the problem, (b) replace the Licensed Software with a functionally equivalent software, or (c) issue a credit for the purchase price of the Licensed Software, with the choice to correct or assist, replace or credit being within the sole discretion of Itamar. The foregoing correct or assist, replacement or credit remedy will be your sole remedy for breach of the warranty set forth in this Section 4(c). d. Limitation of Warranties. The warranties contained in Sections 4(b) and 4(c) above do not cover damage to the Licensed Products or the Licensed Software caused by accident, misuse, abuse, negligence, failure to install in accordance with Itamar’s installation instructions, failure to operate under conditions of normal use and in accordance with the terms of the documentation accompanying the Licensed Product and/or the Licensed Software, failure to maintain in accordance with applicable documentation accompanying the Licensed Product and/or the Licensed Software, alteration or any defects not related to materials or workmanship, or in the case of Licensed Products, design, materials or workmanship. This warranty does not cover damage, which may occur in shipment. This warranty does not apply to Licensed Products and/or Licensed Software not purchased new. This warranty does not apply to any Licensed Product or any individual parts of a Licensed Product which have been repaired or altered by anyone other than Itamar or a person or entity authorized by Itamar to repair Licensed Products. While every reasonable effort has been made to ensure that you will receive Licensed Software that you can use, Itamar does not warrant that the functions of the Licensed Software will meet your requirements or that the operation of the Licensed Software will be uninterrupted or error free. Itamar is not responsible for problems caused by changes in the operating characteristics of the hardware or operating system software you are using, nor for any problems in the interaction of the Licensed Software with non-Itamar software. ITAMAR HEREBY DISCLAIMS, WITH RESPECT TO THE LICENSED PRODUCTS AND THE LICENSED SOFTWARE, ALL OTHER WARRANTIES AND CONDITIONS, WHETHER EXPRESS OR IMPLIED, INCLUDING, BUT NOT LIMITED TO, ANY WARRANTIES OR CONDITIONS OF OR RELATED Endo PATTM2000 Device 74 Operation Manual Itamar Medical Ltd. TO MERCHANTABILITY, FITNESS FOR A PARTICULAR PURPOSE, ACCURACY OR COMPLETENESS OF INFORMATION, LACK OF NEGLIGENCE AND CORRESPONDENCE TO DESCRIPTION. 5. LIMITATION OF LIABILITY (A) TO THE MAXIMUM EXTENT PERMITTED BY APPLICABLE LAW, EXCEPT FOR DAMAGES ARISING UNDER SECTION 4(A) ABOVE, IN NO EVENT SHALL ITAMAR BE LIABLE TO YOU FOR DAMAGES IN EXCESS OF THE PURCHASE PRICE YOU PAID FOR THE LICENSED SOFTWARE, THE LICENSED PRODUCT OR THE APPLICABLE THIRD PARTY PRODUCT. THE FOREGOING LIMITATION SHALL BE APPLICABLE REGARDLESS OF WHETHER THE ACTION GIVING RISE TO SUCH DAMAGES IS IN TORT, CONTRACT, STRICT PRODUCTS LIABILITY, OR OTHERWISE. (B) IN NO EVENT SHALL ITAMAR BE LIABLE FOR ANY SPECIAL, INCIDENTAL, INDIRECT OR CONSEQUENTIAL DAMAGES WHATSOEVER ARISING OUT OF OR IN ANY WAY RELATED TO THE USE OF OR INABILITY TO USE THE LICENSED SOFTWARE AND/OR THE LICENSED PRODUCT AND/OR THE THIRD PARTY PRODUCT, OR THE PROVISION OF OR FAILURE TO PROVIDE SUPPORT SERVICES BY ITAMAR, EVEN IF ITAMAR HAS BEEN ADVISED OF THE POSSIBILITY OF SUCH CONSEQUENTIAL DAMAGES. THE FOREGOING DISCLAIMER OF CONSEQUENTIAL DAMAGES SHALL BE APPLICABLE REGARDLESS OF WHETHER THE ACTION GIVING RISE TO SUCH DAMAGES IS IN TORT, CONTRACT, STRICT PRODUCTS LIABILITY, OR OTHERWISE. (C) IN ORDER TO BE ENTITLED TO INDEMNIFICATION HEREUNDER IN CONNECTION WITH AN INFRINGEMENT CLAIM, YOU MUST (i) NOTIFY ITAMAR IN WRITING PROMPTLY UPON BECOMING AWARE OF AN INFRINGEMENT CLAIM OR THE POSSIBILITY THEREOF, (ii) GRANT ITAMAR SOLE CONTROL OF THE SETTLEMENT, COMPROMISE, NEGOTIATION AND DEFENSE OF ANY SUCH ACTION, AND (iii) PROVIDE ITAMAR WITH ALL INFORMATION RELATED TO THE ACTION THAT IS REASONABLY REQUESTED BY ITAMAR. NOTWITHSTANDING THE FOREGOING, ITAMAR SHALL HAVE NO INDEMNIFICATION OBLIGATIONS WITH RESPECT TO ANY INFRINGEMENT CLAIM TO THE EXTENT ARISING FROM YOUR USE OF THE LICENSED PRODUCT AND/OR LICENSED SOFTWARE IN CONJUNCTION WITH OTHER HARDWARE OR SOFTWARE WHERE USE WITH SUCH OTHER HARDWARE OR SOFTWARE GAVE RISE TO THE INFRINGEMENT CLAIM. 6. TERMINATION Without prejudice to any other rights or remedies, Itamar may terminate this License Agreement immediately if you fail to comply with any of its terms and conditions. In the event of such termination, you must, within ten (10) business days of receiving notice of Endo PATTM2000 Device 75 Operation Manual Itamar Medical Ltd. termination from Itamar, cease all use of the Licensed Software and destroy all copies thereof, and cease all use of the Licensed Product (including Licensed Product incorporated within Third Party Product). 7. TRANSFERABILITY You may only transfer or assign the rights and obligations hereunder together with the Licensed Software and/or the Licensed Product or Third Party Product as a whole, without retaining any rights or, subject to Sections 2 and 3 above, any obligations arising after the date of such transfer or assignment, or retaining any installed or uninstalled copy of the Licensed Software, the Licensed Product or the Third Party Product. Any attempt by you to rent, lease, sublicense, assign or transfer any of the rights, duties or obligations hereunder in any other way is forbidden and shall be null and void. 8. SEVERABILITY Should any term or provision of this License Agreement be declared void or unenforceable by any court of competent jurisdiction in any country or countries, such declaration shall have no effect on the remainder of this License Agreement in such country or countries, or on this License Agreement in other countries. 9. NO WAIVER The failure of either party to enforce any rights granted to it hereunder or to take action against the other party in the event of any breach hereunder shall not be deemed a waiver by that party as to subsequent enforcement actions in the event of future breaches. 10. GOVERNING LAW AND JURISDICTION This License Agreement is governed by the laws of the State of New York, excluding its conflict of laws principles. The United Nations Convention on Contracts for the International Sale of Goods shall not apply to any of the transactions contemplated by this License Agreement. 11. ENTIRE UNDERSTANDING This License Agreement represents the complete and exclusive understanding between you and Itamar concerning the license by Itamar to you of Licensed Software and Licensed Products and supersedes all prior agreements and representations between the parties with respect to the subject matter hereof, unless specifically stated otherwise in a writing signed by Itamar and you. This License Agreement may not be amended other than by a written agreement specifically intended for this purpose and signed by Itamar and you. Note: Should you have any questions concerning this License Agreement, or if you desire to contact Itamar for any reason, please write to: Itamar Medical Ltd., 9 Halamish St., Caesarea Ind. Park, 3088900, Israel, Facsimile: +972-4-627 5598, or visit Itamar’s web site at www.itamar-medical.com. Endo PATTM2000 Device 76 Operation Manual Itamar Medical Ltd. Appendix B: Regulatory Authorized Representative MEDES Ltd. 5 Beaumont Gate, Shenley Hill, Radlett, Hertfordshire WD7 7AR. England Tel: +44 20 8123 8056 Tel / Fax: +44 1923859810 Endo PATTM2000 Device 77 Operation Manual Itamar Medical Ltd. Appendix C: installing the USB adaptor for Windows XP This appendix describes how to install the MOXA adapter and driver for Windows XP Home and for Windows XP Pro editions NOTE The MOXA adapter must not be connected to the computer or to the Endo PATTM2000 device while the driver is installed. 1 Install the driver 1.1 Do not connect the USB adaptor to the computer yet. 1.2 Insert the “Moxa adapter drivers” CD into the CD-ROM drive. 1.3 Browse into CD-ROM-Drive :\XP 1.4 Double-click the mxusb_setup_1.3.exe file. 1.5 Complete the installation process by clicking ‘next’ on all screens, until the following screen is displayed. Figure 47 - MOXA USB Installation – XP1 Endo PATTM2000 Device 78 Operation Manual Itamar Medical Ltd. 1.6 Click “Install”. 1.7 The following screen is displayed: Figure 48 - MOXA USB Installation – XP2 1.8 Click “Continue Anyway” (you need to approve this warning twice). The following screen is displayed: Figure 49 - MOXA USB Installation – XP3 1.9 Click “Finish”. Endo PATTM2000 Device 79 Operation Manual Itamar Medical Ltd. 2. Configuring the MOXA Adapter 2.1 Plug in the adapter to your USB port. Figure 50 - MOXA Adapter 2.2 Wait for the following windows to appear. Figure 51 - MOXA Adapter Configuration – XP2 2.3 Select the “No, not this time” option, and click the “Next” button. The following window is displayed: Endo PATTM2000 Device 80 Operation Manual Itamar Medical Ltd. Figure 52 - MOXA Adapter Configuration – XP3 2.4 Select the “Install the software automatically (Recommended)” option, then click the “Next” button. The following window appears: Figure 53 - MOXA Adapter Configuration – XP4 2.5 Wait for the installation wizard to find the UPort 1110 driver; then, click the “Next” button. The following window is displayed: Endo PATTM2000 Device 81 Operation Manual Itamar Medical Ltd. Figure 54 - MOXA Adapter Configuration – XP5 2.6 Click the “Continue Anyway” button. The following window is displayed: Figure 55 - MOXA Adapter Configuration – XP6 2.7 Click the “Finish” button. 2.8 Repeat steps 2-7 again when the “Welcome to the found new hardware wizard” window appears in order to install the second driver (required to complete the installation). 2.9 Move the adapter between all the USB sockets and let the system identify it. Endo PATTM2000 Device 82 Operation Manual Itamar Medical Ltd. 3. Connecting the adapter to the Endo PATTM2000 device 3.1 Connect the MOXA Adapter to the COM TO COM cable and tightly screw the bolts. Figure 56- connect MOXA adaptor 3.2 Connect the COM TO COM cable to the Endo PATTM2000 device and tightly screw the bolts. Figure 57 – connect COM TO COM 3.3 Open the Endo PATTM2000 software and verify that the “PAT™” indicator on the bottom right is colored green. Endo PATTM2000 Device 83 Operation Manual Itamar Medical Ltd. Appendix D: installing the USB adapter for Windows 7 or 8 This appendix describes how to install the MOXA adapter and driver for Win7 and Win8. NOTE The MOXA adapter must not be connected to the computer or to the Endo PATTM2000 device while the driver is installed. 1. Installing the MOXA driver 1.1 Insert the CDROM media into your CDROM drive. 1.2 Start the installation by double clicking on the \Win_7_8\driv_win_uport1p_v1.6_build_09062913_whql file NOTE If the following window (Figure 58 or Figure 59) is opened, please press the Allow option. Figure 58 - Win Security Endo PATTM2000 Device 84 Operation Manual Itamar Medical Ltd. Figure 59 - Win7 Security 1.3 The following window will open, press the Next Button. Figure 60 - MOXA Uport driver installation 1.4 The following window will open, press the Next button. Endo PATTM2000 Device 85 Operation Manual Itamar Medical Ltd. Figure 61 - MOXA driver installation folder 1.5 The following window will open, press the Install button. Figure 62 - MOXA driver folder confirmation 1.6 Press the Finish button Endo PATTM2000 Device 86 Operation Manual Itamar Medical Ltd. Figure 63 - MOXA driver installation finish 2. Configuring the MOXA Adapter 2.1 Plug in the adapter to your USB port. Figure 64 - The MOXA Adapter 2.2 The following icon should appear at the window notification area zone while windows installs the driver needed for the MOXA adapter (this is done automatically). Endo PATTM2000 Device 87 Operation Manual Itamar Medical Ltd. 2.3 When the installation of the driver is done the following message should appear: Endo PATTM2000 Device 88 Operation Manual Itamar Medical Ltd. 3. Connecting the adapter to the Endo PATTM2000 device 3.1 Connect the MOXA Adapter to the COM TO COM cable and tightly screw the bolts. Figure 65- connect MOXA adaptor 3.2 Connect the COM TO COM cable to the Endo PATTM2000 device and tightly screw the bolts. Figure 66 – connect COM TO COM 3.3 Open the Endo PATTM2000 software and verify that the “PAT™” indicator on the bottom right is colored green. Endo PATTM2000 Device 89 Operation Manual