1
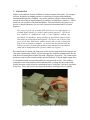
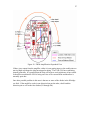
The Twiddler: A Haptic Teaching Tool:
Low-Cost Communication and Mechanical Design
Feb 18th, 2004
Michael Shaver
Karon MacLean
Department of Computer Science
University of British Columbia
Technical Report TR-2005-09
Updated 21 April, 2005
Abstract
The previous haptic interface in the research lab was prohibitively expensive for
distribution to a class of students and required a specialized Input/Output board. In order
to solve these problems a new device was designed with the stipulations that its interface
did not require an I/O board and that it have half the power of the previous device and
cost less than $400cdn. The resulting design is called the Twiddler. The Twiddler is a
single degree of freedom rotary haptic device. An electronic box and an electric DC
motor make up the Twiddler. The electronic box reads the current rotational position of
the motor sends it to the host PC through the Parallel Port. The algorithm for the output
force command as a function of the position is easily accessed and changed on the host
PC to make prototyping and development simple. The host sends the command through
the Parallel Port back to the electronic box. The command is converted to a motor
driving signal and sent to the motor. This loop happens ever millisecond so that reliable
haptic forces can be simulated on the rotational axis of the motor. The parts for the
Twiddler cost approximately $400 and the peak torque output is approximately 0.04 Nm
(or six oz-in). The software, mechanical and electrical designs are freely available for
reproduction.
Revision History:
Version 1.0 (MJS/Jan 2002): Twiddler version 1.x
Version 2.0 (MJS/Feb 2004): Twiddler version 2.x
Version 2.1 (KEM/Jan 2005): Updated for Windows XP, cpsc543
ii
Table of Contents
Abstract ........................................................................................................ ii
Table of Contents........................................................................................iii
List of Figures .............................................................................................. v
List of Tables ............................................................................................... v
Acknowledgements..................................................................................... vi
Using This Document .................................................................................. 1
1. Introduction............................................................................................ 2
2. System Overview................................................................................... 3
3. Control Loop.......................................................................................... 5
3.1 Position Input................................................................................ 5
3.2 Position Transmission................................................................... 5
3.3 Calculation of Desired Force ........................................................ 6
3.4 Force Command Transmission ..................................................... 6
3.5 PWM Wave Generation and Amplification.................................. 6
4. Communication: Driver Level ............................................................... 8
4.1 Parallel Port Background .............................................................. 8
4.2 Windows NT/2000/XP ................................................................. 9
4.3 Windows 98/ME ........................................................................... 9
4.4 Linux............................................................................................. 9
5. Example Host Software ....................................................................... 10
5.1 Initialization ................................................................................ 10
5.2 Timing......................................................................................... 10
5.3 Haptic Function........................................................................... 11
5.4 Code Changes for Configurations............................................... 11
5.4.1 Code Changes for Configuration B ................................... 12
5.4.2 Code Changes for Configuration C ................................... 12
6. Mechanical Design .............................................................................. 13
6.1 Specifications.............................................................................. 13
6.2 Stand Design ............................................................................... 13
7. Electrical Design.................................................................................. 14
7.1 Input/Output................................................................................ 14
7.2 PCB Design and Drawings ......................................................... 15
7.3 Version Information.................................................................... 16
7.4 Twiddler Configurations............................................................. 17
7.4.1 Configuration A (Standard): Incremental Encoding
with Full Position Resolution and Reduced Force
Resolution .......................................................................... 19
7.4.2 Configuration B: Incremental Encoding with Reduced
Position Resolution and Full Force Resolution ................. 19
7.4.3 Configuration C: Absolute Encoding with Full
Position Resolution and Full Force Resolution ................. 20
7.5 Debugging................................................................................... 21
7.5.1 Encoder Input Debugging.................................................. 22
7.5.2 Motor Output Debugging .................................................. 24
iii
Appendix A: Bill of Materials and Vendor List ........................................ 29
7.5.3 Electronic Components...................................................... 29
Appendix B: Design Extensions ................................................................ 32
B.1 Two Degrees of Freedom............................................................. 32
B.2 Sensor Input ................................................................................. 33
Appendix C: Mechanical Drawings........................................................... 34
iv
List of Figures
1.
2.
3.
4.
5.
6.
7.
8.
Figure 1. The Twiddler and Electronic Box Shown in Operation ................... 2
Figure 2. System Flow Diagram ...................................................................... 3
Figure 3: Encoder Decoder Connections .......................................................... 5
Figure 4. Example PWM Wave with a Duty Cycle of 0.25 ............................ 7
Figure 5. Host Software Program Flow ......................................................... 10
Figure 6. Twiddler Motor Stand and Knob.................................................... 13
Figure 7. Electrical Drawing Twiddler Version 2.1 ...................................... 15
Figure 8. Twiddler Version 2.1 Printed Circuit Board (a) Top of PCB, traces in
red (b) Bottom of PCB (flipped along long edge), Traces in Blue ................. 16
9. Figure 9. Corrections Required on Existing Blank Version 2.0 Boards........ 17
10. Figure 10. Jumper Locations.......................................................................... 18
11. Figure 11. Jumper Positions for Configuration A.......................................... 19
12. Figure 12. Jumper Positions for Configuration B.......................................... 20
13. Figure 13. Jumper Positions for Configuration C.......................................... 21
14. Figure 14. Example 12 MHz Oscillator Output Signal.................................. 21
15. Figure 15. Ground and Power Pins for Version 2.0....................................... 22
16. Figure 16. Value of 16-bit Encoder Count During Motor Operation in
Configuration A .............................................................................................. 23
17. Figure 17. Expected Signals From Encoder Input Hardware ........................ 24
18. Figure 18. PWM Generation Section Expected Signals ................................ 26
19. Figure 19. PWM Amplification Expanded View .......................................... 27
20. Figure B.1. Electrical Diagram for Implementation of 2 Degrees of Freedom32
21. Figure B.2. An Example of a 20-Bit External Sensor Implementation .......... 33
List of Tables
1. Table 1. Parallel Port Pin Assignments for a DB36 Connector ....................... 8
2. Table 2. Jumper Descriptions ........................................................................ 18
3. Table 3. Bill of Materials ............................................................................... 29
v
Acknowledgements
I would like to thank Prof. Karon MacLean for her support and the chance to work on this
great project. I would like to thank Bruce Dow for his technical expertise and moral
support. I would like to thank Afshin Mehin for his kind words and assistance, Dustin
Lang for a name. My lab mates Mario Enriquez, Tim Beamish, Iman Brouwer, Ben
Forsyth and Christian Chita for their help and advice. I would like to thank Alex Unden
and Lewis Johnson for the port to Linux and Colin Swindells for implementing an
optional sensor input. Last but not least I would like to thank Julia Buss for her undying
support.
vi
Using This Document
This is one document in a series of documents for the design, production and use of the
Twiddler.
Design manual:
This is the design manual and it should be used if your goal is to build a Twiddler or to
fix one.
User manual:
http://www.cs.ubc.ca/~cs554/physUI/hardware/hardware.html
This manual should be used if you have a Twiddler sitting on your desk and you want to
install and run it.
Example code:
http://www.cs.ubc.ca/~cs554/physUI/hardware/twiddlerDL-R3_0.zip
The MSVC++ code provides a couple of examples of how the Twiddler is interfaced with
a computer. This code is also referred to in the user manual (see above).
Installation instructions:
http://www.cs.ubc.ca/~cs554/physUI/hardware/documentation/install.txt
This document provides instructions for installing the demo code and hooking up the
Twiddler. It is designed for the example code above and also provided with that code.
1
2
1. Introduction
Haptics is the addition of tactile feedback to human-computer interaction. For example,
two uses for haptics are adding textures to virtual objects and providing additional
information through force feedback. One of the problems with the current technology
used in the lab is that the Input/Output (I/O) interface is prohibitively expensive. An I/O
board can cost upwards of one thousand dollars. The motivation for this project is to
provide a cheaper alternative for use in the classroom environment and for research
purposes.
The project’s goal was to design and build a low-cost single-degree of
freedom haptic display for research and teaching purposes. The device
was required to communicate with a host computer without any
specialized I/O hardware, and preferably no specialized software other
than what can be developed and supplied. The device was to have a unit
price of less than $400 and a student must be able to take it home and
plug it into an arbitrary computer. In terms of the mechanism itself, the
device was to have a motor and position sensor mounted on a mechanical
stand and be manipulated with a generic handle (see Figure 1.)
By removing the I/O board and doing more of the motor control in the host computer, the
cost can be significantly reduced. In such a design, the controller communicates directly
with the device through the Parallel Port with a frequency of one kHz. The current motor
position is read from the encoder and the decoder hardware. Then the haptic output force
is calculated from the current and possibly previous positions or time. The resulting
command is sent to the hardware and is translated into a voltage that drives the motor.
Finally the motor, which is held in a mechanical stand, “feeds back” the force or position
to the user. This is the basis for the design of the haptic teaching tool (or Twiddler)
Figure 1. The Twiddler and Electronic Box Shown in Operation
3
2. System Overview
There are some implicit constraints on any haptic device and specific ones for this device.
These constraints are described in the following paragraphs.
The communication loop from position information acquisition to force output must
occur every millisecond in order to maintain stability and reasonable force fidelity [3]. If
the frequency is slower than 1 kHz, the fidelity decreases to the point where the user can
begin to detect imperfections; i.e. the resulting feedback force becomes jittery.
The device-to-host communication must be fast enough to accommodate this required
loop speed. One alternative is to use an onboard micro-controller to handle the fast loop
and have slower controlling communication with the host. This is not acceptable for this
project because the micro-controller does not allow easy access to the force algorithm.
Because the device is for research, the force output algorithm must be easy to access and
modify. In this project, the output forces are updated by the host computer every
millisecond.
Furthermore, the system must accomplish the following three tasks within the onemillisecond loop for reliable haptic force feedback (see figure 2):
1) Read the encoder position
2) Calculate the output force
3) Send the force command to the motor
Figure 2. System Flow Diagram
The system functions in the following manner:
1)
The electronic hardware converts the encoder signals to a binary
number (Fig 2: ‘a’ to ‘b’),
4
2)
3)
4)
5)
The binary number is sent to the host computer via the Parallel Port
(Fig 2: ‘b’ to ‘c’).
A program running on the host computer reads the encoder value and
uses the position and previous positions to calculate the output force.
(Fig 2: ‘c’)
The motor command is sent back to the device via the Parallel Port
(Fig 2: ‘c’ to ‘d’).
The electrical hardware transforms the command into a pulse width
modulation wave and amplifies it to the level required by the motor
(Fig 2: ‘d’ to ‘e’).
The communication between the device and host computer is accomplished through the
Parallel Port. The host software is responsible for the force calculation, controlling the
Parallel Port and controlling the electrical hardware connected to the Parallel Port.
The electrical hardware is located on a Printed Circuit board attached to the Parallel Port
and the motor and encoder are connected to the board and held in a mechanical stand
(refer to Figure 1 on page 2).
5
3. Control Loop
The system must complete the haptic loop in one millisecond to maintain output force
fidelity. The haptic loop consists of the following steps:
a) Read the position of the motor with an encoder (decoded in hardware)
b) Transmit decoded position signal to host (Parallel Port)
c) Calculate the desired force output (host computer)
d) Transmit force command to hardware (Parallel Port)
e) Issue the command to the motor through an amplifier (hardware)
3.1
Position Input
The encoder consists of a disk attached to the motor shaft and two photosensitive
transistors. The disk has a number of evenly spaced lines cut into it. The two transistors
are offset by half a line so that they produce offset square waves as the disk turns with the
shaft and the lines break and allow light to reach the transistors. Depending on which
square wave goes to the high value first, the direction the disk is turning can be
determined. Also by counting the rising and falling edges of the two square waves, four
ticks are counted for each line of the physical disk. As a result the encoder has 500 lines
and produces 2000 divisions in 360 degrees.
Next come the encoder/decoder. The HTLC-2016 (U2) chip takes as inputs the two
square waves, ‘A’ and ‘B’, from the encoder and outputs a 16-bit binary number (see
Figure 3). The decoder counts the rising and falling edges and, depending on the
direction of the rotation of the shaft, adds or subtracts each tick from the internal stored
binary word.
Figure 3. Encoder Decoder Connections
3.2
Position Transmission
With two latch lines from the host computer, SEL and OE, the high byte and then the low
byte are read into the host through an eight-bit bus. The 16-bit number is then stored on
the host computer. In some cases SEL is held high and only the low bit of the position is
read
6
3.3
Calculation of Desired Force
The third step in the process is the calculation of the output force. The algorithm can be
anything from a mass spring damper simulation, to a surface texture. It can be anything
the experimenter desires, but it is generally a function of the position and/or time. The
goal of the project is to have the calculation be very easy to modify. The end user should
modify the algorithm in the example code where it says, “// **modify algorithm here **”.
The demonstration code provided with the device implements a spring simulation and a
sinusoidal texture. However, this code element is where a student user would make
modifications to experiment with new haptic rendering algorithms.
3.4
Force Command Transmission
Next the force command needs to be sent back to the hardware. The eight-bit command
is placed on the Parallel Port’s data bus and the Latch Enable line, LE, is pulsed high. It
needs to be held high for at least 30 microseconds because it is AND’ed with the counter
rollover pin, which pulses every 21 microseconds. This AND’ed signal is used as the
enable bit to catch the data in the latch. The PWM generation will be explained section
3.5, but the rollover pin insures that the command to the motor is only updated on the
hardware at the beginning of the PWM period. It is important that the command is
updated then to ensure the smoothest possible transition between each motor command.
In some cases the motor command is nine bits. The ninth bit is sent directly to the
direction control on the hardware through the Parallel Port's control bus, while the other
eight bits are sent through the data bus as described above.
3.5
PWM Wave Generation and Amplification
The motor output is the final step. The output command generated from the calculation is
a seven or eight-bit number and one bit for the direction. Once transmitted from the
computer, the command needs to be stored, converted to a Pulse Width Modulation
(PWM) wave, and then amplified and sent to the motor.
The command is stored using an eight-bit latch (see section 3.4) and the PWM wave is
generated with a counter (74F269:U6) and a comparator (74HC584:U7). Pulse Width
Modulation is the act of changing the percentage that the wave is in the high state
compared with the wave’s total period. This results in changing the signal’s average
voltage from zero to the high value of five volts. To accomplish this, the counter counts
from zero to 127 at 12 MHz. This results in a frequency of 94kHz (12MHz/128), which
is above the audible range of ~20kHz. When the counter value is below the command
value, the comparator output is high; when it passes the force command value, the
comparator output goes low. For example, when the command is 32, the wave is high for
a quarter of the time (from 0-32) and low for the rest (32-127). The average voltage is
1.25 volts ((32/127) * 5Volts). Thus, a 94 kHz PWM wave is created (see Figure 4).
7
Figure 4. Example PWM Wave with a Duty Cycle of 0.25
The PWM signal is sent through a switch controlled by the direction bit and then passed
to the amplifier (L298:U2). The L298 is configured to have two amplifiers. Depending
on which half the five-volt signal is sent to, the amplifier takes the five-volt PWM wave
and converts it to a 12-volt PWM wave with much higher current. The other half of the
amplifier has zero output. The two amplifier outputs are sent to either side of an h-bridge
circuit that is used for bi-directional control. As a result, the direction bit determines the
input that the PWM wave enters and, therefore, whether the motor turns clockwise or
counter-clockwise.
This completes the last step within the one-millisecond haptic loop.
8
4. Communication: Driver Level
To accomplish the control loop in one millisecond, two bytes of position information
need to be sent to the host and twelve bits need to be sent back to the device: eight bits
for the command and four for the latch and enable commands. This is four bytes/ms, or
four kilobytes/sec. The Parallel Port was chosen because it has a transfer rate of over one
Megabyte/sec and the Parallel Port is standard on most computers. The Parallel Port is
also advantageous because it doesn't require onboard intelligence, special device drivers,
or an I/O card [1].
4.1
Parallel Port Background
This is a brief summary of some information from Jan Axelson’s book, “Parallel Port
Complete”. Refer to the book if any additional information is required.
The Parallel Port was originally designed for use with printer devices. It was designed as
a one-directional communication port. Over the years, a number of improvements have
been made to the Parallel Port standards, including the addition of bi-directional
communication, interrupts and other advanced features. The name “Parallel Port” comes
from the fact that it has many lines for communicating in parallel. Unlike the serial port
where upstream and downstream transformations are required to convert the data to and
from a communicable form, the Parallel Port just sends an eight-bit word all at once.
This results in less communication hardware being required on the device.
The Parallel Port has seventeen communication pins, and depending on the size of the
device’s connector, a variable number of ground pins. Three registers control the
seventeen communication pins: the Data register, the Status register and the Control
register. The Data bus has eight bi-directional bits, the Status bus has five input bits and
the Control bus has four output bits. (See pin assignments in Table 1)
Table 1: Parallel Port Pin Assignments (Configuration A)
Register
Data Bus
Control
Bits
PP Pins Connection
0-7 2-9
Decoder Outputs and Latch Inputs
0
1
Decoder Select (SEL) pin
1
14
Decoder Output Enable (OE) Pin
2
31
Latch Input Enable (LE) Pin
3
36
Decoder Reset (RST) Pin
4 - 7 NC
NC
Status
0 - 2 NC
NC
3 - 7 10-13,32 No connection
Table 1. Parallel Port Pin Assignments for a DB36 Connector
For this project, the Parallel Port must be set in software to simple bi-directional mode
(referred to as PS/2). The most recent Parallel Port standard is Enhanced Parallel
9
Port/Extended Capabilities Port (EPP/ECP) and most Parallel Ports come in that mode.
An ECP port can emulate all the previous standards. An ECP port has three extra
registers dedicated to control and emulation for a total of six registers. The extra three
registers control more attributes of the port. The initialization function in the demo code
sets the corresponding bits in the ECR register (one of the extra three registers) to
emulate PS/2. Once the Parallel Port is set to PS/2, the Data bus becomes a tri-state bus
and the code can be run and its behavior will be predictable. If the port is not set to PS/2
the port will not be able to read in the data.
4.2
Windows NT/2000/XP
The NT operating system is designed to be more secure than previous versions of
windows. The operating system doesn’t allow user-level programs to write directly to the
registers. To write to the Parallel Port, direct register access is required. In order to get
the required access, a kernel driver that expands the user-level permission map must be
installed. Unfortunately, the six addresses used to control the ECP port are separated into
two sets of three, separated by 402h (baseAddress, +1h, +2h, +402h, +403h, +404h).
The Giveio.sys driver (included with the Twiddler demo software) allows access to the
ports. The installation instructions are provided in the Twiddler user manual and in the
Giveio documentation. Giveio simply gives access to a huge range of addresses. It was
obtained from a shareware permission map extender package called direct I/O. [4]
IMPORTANT
There are safer drivers that would just allow access to a specified set of required
addresses, however these drivers did not allow access to the second set of Parallel Port
addresses. As a result, Giveio was chosen and it makes the system vulnerable. Great
care must be taken when inputting the base address of the Parallel Port into the host
program otherwise random memory addresses will be overwritten.
When the host program runs, it checks to see if Giveio is installed and in working order
by attempting to read from one of the addresses. If Giveio is not installed, the program
will exit. There is currently Twiddler demo code implemented in Microsoft Visual C++.
The communication has been successfully tested on NT, 2000 and XP.
4.3
Windows 98/ME
The device has not been tested on Windows 98. It is assumed that, because Windows 98
does not require permission to write and read the ports, the host program would run
without requiring the Giveio driver.
4.4
Linux
There is also demo code to run the Twiddler in Linux. It was ported and written by
Lewis Johnson and Alex Unden.
10
5. Example Host Software
The host software, designed to run under Windows 2000 and implemented in MSVC++,
controls the hardware device. The program flow is depicted in Figure 5. Each section is
defined in greater detail in sub-sections 5.1 to 5.3.
Figure 5. Host Software Program Flow
5.1
Initialization
The program begins by initializing the window class and checking that the Giveio driver
is installed. If the driver is installed and running, it can write to the Parallel Port. If the
driver is not installed, the program exits. Then the callback timing function is started.
The callback function controls the timing of the haptic loop.
5.2
Timing
The callback function is set to generate an interrupt every millisecond. Each interrupt
triggers a single execution of the haptic function. On a 500MHz processor running
Win2000, the program averages 0.99 ms per loop. The worst-case scenario time depends
on the speed of the processor and the current load on the CPU.
11
5.3
Haptic Function & Parallel I/O
The first time through the haptic loop, the program sets the Parallel Port to PS/2 mode by
writing to the Extended Control Register (ECR). The ECR is one of the three extra
control registers that are associated with the EEP/ECP Parallel Port.
Each time the haptic loop is run, it executes the steps described in sections 3.2 – 3.4. In
order to read the position information from the Parallel Port, first the Data bus must be
set to input. The bus direction is set by writing to bit five of the Control register, which is
not connected to the output pins. Then both the Output Enable and the Select pin must be
driven low. They are connected to pin one and pin 14 on the Parallel Port connector,
which correspond to bits zero and one in the Control register. Then the most significant
eight bits of the sixteen-bit count are read from the Data register. The select pin is driven
high so that the low byte of the count will be placed on the bus. Then the Data register is
read again. The low byte and the high byte are combined to give the 16-bit encoder
count. If the position has increased since the last reset, the count is added to the previous
cumulative count on the computer and if the position has decreased since the last reset,
the count is subtracted. The resulting cumulative count is then ready to be used in the
force calculation. The bus direction is set back to output and the encoder value is reset to
zero by toggling the reset pin. The reset pin is connected to pin 36 on the Parallel Port,
which corresponds to bit three of the Control register.
Next, the force command is calculated. The demo code provides a simple spring force
simulation. A student or researcher using the program can implement a PID controller,
an arbitrary virtual model, or anything else they can imagine.
Once the force command has been computed, the seven-bits plus the direction are written
to the data address. This puts the data pins at the proper voltages. Then the enable is
held high for 30 microseconds. The enable pin is connected to pin 31 on the Parallel
Port, which corresponds to bit 2 of the Control register. The enable pin is AND’ed to the
carry look-ahead from the counter (74F269:U6). The carry look-ahead occurs every 21
microseconds for a duration of 80 nanoseconds. This results in the enable pin being
pulled high for 80 ns when the counter’s value goes from 255 to zero. Therefore, the
PWM wave is smoothly changed because the command is only updated on the
comparator (74HC684:U7) when the counter is at zero.
Finally, the haptic loop exits and the program waits for the next interrupt.
5.4
Code Changes for Configurations
The previous three sections define the example program for Configuration A. For the
other two configurations, slight modifications are required for the Twiddler to operate
properly. For a description of the two configurations, see sections7.4.2 and 7.4.3. The
code changes for configuration B and configuration C are presented in the following
sections.
12
5.4.1
Code Changes for Configuration B
Configuration B is described in section 7.4.2 and provides reduced position resolution
and full force resolution. As a result of the reduced position resolution, pin 14,
previously the SEL pin is now the RST pin. Also, pin 36, which was formerly RST, is
now the Direction pin. This means that one step in the 'readEncoder' function is skipped
and the high bit of the encoder does not need to be read. Instead the function returns zero
for the high bit. For the direction pin, each command to the control register must be bitwise OR'ed to the reverse mask. The reverse mask is and eight-bit number with all zeros
except the direction bit which is either one or zero. The reverse mask is updated by the
force function and therefore pin 36 is not changed by the 'readEncoder' function, just the
‘writeCommand’ function.
The motor command now has eight bits of resolution instead of seven. This means that
the max value of the output command must be changed in the software from 127 to 255.
The only other thing that must be changed is that in the 'zeroEncoder' function the RST
must be toggled on pin 14 not 36.
5.4.2
Code Changes for Configuration C
Configuration C is described in section 7.4.3 and provides absolute encoding as well as
full position and motor command resolution. The changes from configuration A to
Configuration C will be discussed here.
Absolute encoding means that the encoder decoder never needs to be reset. As a result,
the 'zeroEncoder' function is much less complicated. Instead of having to reset the
encoder and set the current stored position to zero, all which has to be done is to store the
current encoder position as the zero position.
Furthermore, pin 36, which was formerly RST, is now the direction pin. SEL and OE
and LE are left alone. In the 'readEncoder' function the reset step is skipped. Both the
high and low bytes of the position are read normally. Instead of adding the encoder count
to a previous cumulative count the value read from the encoder is the current raw
position. The stored zero position value is subtracted from the raw position to give the
current position. The current position is passed to the force calculation function.
A couple of things are the same as in configuration B. The reverse mask must be OR'ed
to each of the Control register commands. Also the motor command now has eight bits of
resolution instead of seven. This means that the max value of the output command must
be changed in the software from 127 to 255.
13
6. Mechanical Design
The mechanical design is composed of the motor-encoder pair and a stand to hold them
in the desired position.
6.1
Specifications
Motor specs: 12V 10A 24W 1.54 oz-in/A stall torque
Encoder:
500 CPR 3 lead
Power supply: Takes 120VAC 60Hz and produces 12VDC 6A
The motor was required to have half of the stall torque constant 3.3 oz-in/A (set by the
previous motor), low rotor inertia, and low cogging. Cogging is an irregularity in force
generated due to the rotor being attracted to the stator magnets, and can be felt as bumps
in a haptic force feedback application. Cogless motors have coreless rotor windings that
utilize the winding geometry to have many poles so the attraction to the stator is uniform
and can’t be detected. This typically makes the motor more expensive, as does low rotor
inertia. Thus, the most important selection criterion was the budget. It was difficult to
find a relatively inexpensive motor without sacrificing too much quality. The encoder
was a significant portion of the cost but it was deemed more efficient to purchase an
encoder pre-aligned and attached to the motor shaft. Some output force was sacrificed to
meet budgetary requirements.
6.2
Stand Design
The requirements for the stand design were that it firmly hold the motor, have a sturdy
mounting location, and allow the motor shaft to be fixed at any angle in a hemisphere.
The mechanical design (see Figure 6) is a modification of an existing design in the lab.
The design needed to be modified to fit the new motor. In the process it was also
modified to use standard angle iron sizes to reduce manufacturing costs and reduce the
number of parts. Adjustments were made for clearances and the mounting hole spacing.
See Appendix C for a complete set of mechanical drawings.
Figure 6. Twiddler Motor Stand and knob
14
7. Electrical Design
The electrical design was constructed out of a need to capture the encoder’s position,
send the position to the computer, and transform an eight-bit motor command into a
driving voltage.
7.1
Input/Output
The input consists of a 16-bit position value from the encoder. The encoder is connected
to a decoder (the HCTL-2016:U2). The 2016 takes the two square waves (A and B) from
the encoder and converts them to an unsigned 16-bit binary word. The word is read from
the 2016 on an eight-bit bus controlled by two command lines. The bus and the two
command lines are attached to the Parallel Port connector. For a method of adding an
additional sensor input see Appendix B.
The output consists of an 8-bit command sent to the PWM generation hardware. A latch
(the 74HC373:U3) is attached to the same eight-bit bus and is used for storing the motor
command. When the computer outputs the command, the latch is triggered by a control
line and captures the command until the next command is sent and the latch is updated.
The PWM generation process is discussed in section 3.3. The counter (the 74F269:U6) is
connected to the clock (U1) and set to count from zero to 127. The magnitude
comparator (the 74HC684:U7), compares the count (P) and the command (Q) and creates
a PWM wave on the '~(P>Q)' line. The command includes a direction bit and the PWM
wave is sent to either the CW or the CCW half of the motor driver (the L298:U8). The
motor driver amplifies the signal from five volts to 12V and, depending on the direction
bit, sends the output to the correct side of the H-bridge to drive the motor in the correct
direction.
For the complete electrical schematic of version 2.1 see Figure 7.
Note: the L298 was chosen because it could be configured to have two, four amp
amplifiers and drive an H-bridge motor circuit. The haptic device that was replaced used
a 4A power supply and motor pair with plenty of power. The power supplies for this
project were originally two amps and therefore the L298 was over designed but could still
be used with the four amp power supplies if necessary. It was decided that two amps
provided insufficient power and the power supplies were all upgraded to four amps. As a
result the L298 runs very hot and close to exceeding its operating requirements. This
does not seem to cause any problems with regular use although one user has reported the
L298’s overheat shutoff protection was activated once while the device was in use.
15
Figure 7. Electrical Drawing for Twiddler Version 2.1
7.2
PCB Design and Drawings
The PCB design was accomplished by drawing the schematic in Circuit Maker and
exporting the design to Trax Maker. Trax Maker allows the components to be placed and
then attempts to route the traces automatically. There are some problems and generally
the algorithm is unable to cleanly route all of the traces even though there is sufficient
space. Some hand routing is required to fix and fit all the traces on the board. It was
used because it is one of the most inexpensive electrical design packages that include
auto routing. When the PCB design is completed "Gerber and Drill" files are created and
sent to a PCB manufacturer. For a picture of the top and bottom of the completed PCB
design see Figure 8.
16
(a)
(b)
Figure 8. Twiddler Version 2.1 Printed Circuit Board (a) Top of PCB, traces in red (b)
Bottom of PCB (flipped along long edge), Traces in Blue
7.3
Version Information
Version 1.0 of the electrical design provided absolute position sensing from the encoder
without possibility of resetting the hardware position. This means that the position is
only zeroed on the hardware when the device is turned on. In order o get around the
problem of no hardware reset, when the position needs to be zeroed in software, the
current absolute position is recorded as zero and the virtual position is calculated from
there. The major disadvantage is that when the counter reaches its maximum position the
counter wraps around and the new virtual position is on the opposite side of zero. The
wrap around much harder to deal with in software and creates discontinuities in haptic
simulations. Also the PCB for version 1.0 has some mistakes. There were some
incorrect hole sizes, a few incorrectly route traces, a major interference problem and the
chip capacitors were left off of the initial schematic.
17
Version 2.0 was created to correct the absolute encoding problem. It was stipulated that
the software be able to reset the hardware zero to enable incremental encoding.
Unfortunately all the output lines were fully used in the original design so that some trade
off in performance needed to be made. A series of jumpers were added to the design to
allow the trade off to be optimized by the researcher. This redesign provided an
opportunity to fix the problems with the previous PCB. A grounding plane was added to
prevent the interference and the previous problems were fixed. Some new problems were
introduced. Again a few hole sizes were too small and a single trace was incorrectly
routed. In order to use the Version 2.0 the holes for D5, J4, J5, and J6 need to be
enlarged and top soldered and pin 1 on J4 needs to be connected to +5V instead of
ground (see Figure 9).
Note: the setups in the lab with Version 1.0 boards have all been upgraded to the standard
2.0 Configuration A. Serial numbers T0-T10 have Version 1.0 boards and #’s T11-T21
have Version 2.0. For a description of Configuration A see section 7.4.1.
Figure 9. Corrections Required on Existing Blank Version 2.0 Boards
Version 2.1 corrects the minor problems in 2.0 and the Gerber and Drill files will be
provided. Version 2.1 has not been manufactured and tested but the only changes needed
are depicted in Figure 9.
7.4
Twiddler Configurations
Version 2.0 of the Twiddler has been designed so that it can be easily reconfigured to
maximize the usage of the Parallel Port. Three jumper locations were added to the board
to enable reconfigurability (See figure 9).
18
J4
Pin Connection
1 + 5 Volts
2 SEL (pin 3) HCTL-2016
3 (Pin 14) Parallel Port
J5
Pin
Connection
1 (Pin 36) Parallel Port
2 RST (pin 5) HCTL-2016
3 + 5 Volts
J6
Pin
1
2
3
4
5
6
7
8
Figure 10. Jumper Locations
Connection
(Pin 36) Parallel Port
Direction control
Q7 (pin 19) 74HC373
Same as pin 2
Same as pin 3
Q7 (pin 18) 74684
Q7 (pin 10) 74269 counter
P7 (pin 17) 74684
Table 2. Jumper Descriptions
Table 2 shows the connections of each individual jumper pin.
In order to be flexible the four control pins must be used creatively. There are three pins
that can be used to gain additional functionality, but every pin involves a trade off.
1)
The SEL pin on the HCTL-2016 (sets the max value of encoder input).
If the SEL pin is disconnected from the Parallel Port pins, the maximum
encoder input value is reduced by a whole register because the SEL pin
is used to select the high and low bytes of the encoder position.
2)
The RST pin on the HCTL2016 (Incremental vs. Absolute encoding).
If the RST pin is disconnected from the Parallel Port, the encoder
cannot be zeroed in hardware and therefore the device must be switched
from incremental position sensing to absolute position sensing.
3)
The direction pin for the motor command. This command is essential
to the operation of the Twiddler, but the pin can be moved around.
Either the eighth-bit of the motor command or a dedicated direction pin
from the control pins can be used to control the direction of the motor.
19
If the eighth-bit is used one bit from the motor command is lost. This
translates into lost force resolution and NOT lost magnitude. I.e. you
get the same maximum force but it is distributed from 0-127 instead of
0-255 in each direction.
Thus three extra digital outputs are potentially available and a lot can be accomplished.
The following sections discuss the three standard configurations that employ these
tradeoffs in various ways.
7.4.1
Configuration A (Standard): Incremental Encoding with Full Position Resolution
and Reduced Force Resolution
This is the standard configuration of the Version 2.0 Twiddler as well as the current
hardware configuration of the Version 1.0 Twiddlers. The configuration uses incremental
encoding. The jumpers are set in the following manner (see Figure 11):
1)
2)
3)
4)
5)
SEL is tied to Pin 14 of the Parallel Port,
RST is tied to Pin 36 of the Parallel Port,
The eighth-bit of the motor command is tied to the Direction control,
The eighth-bit of the ‘P’ and ‘Q’ on the comparator are connected together and
The eighth-bit of the counter is not connected to anything.
Figure 11. Jumper Positions for Configuration A
Thus in this configuration 16 bits are used for the encoder position, 7 bits for the motor
command and the direction pin is controlled by the eighth-bit of the motor command.
7.4.2
Configuration B: Incremental Encoding with Reduced Position Resolution and
Full Force Resolution
Another configuration of the Version 2.0 Twiddler uses incremental encoding with less
range for the position and greater force resolution. The jumpers are set in the following
manner (See Figure 12):
20
1)
2)
3)
4)
SEL is tied to + five Volts,
RST is tied to Pin 14 of the Parallel Port,
The 36th pin of the Parallel Port is tied to the Direction control,
The eighth bit of the motor command is tied to the eighth bit of ‘Q’ on the
comparator,
5) And, the eighth bit of the counter is tied to the eighth bit of ‘P’ on the comparator.
Figure 12. Jumper Positions for Configuration B
Thus in this configuration eight-bits are used for the encoder position, eight-bits for the
motor command and the direction pin is controlled with a dedicated pin.
It is important to note that with the position reduced to only eight-bits the motor can
become unstable. The incremental encoding works for low speeds such as when being
driven by hand. Unfortunately, if the motor is allowed to spin freely the decoder may
exceed 128 counts within one servo cycle and in this case there is no way to detect the
encoder wrap around.
7.4.3
Configuration C: Absolute Encoding with Full Position Resolution and Full Force
Resolution
A third configuration of the Version 2.0 Twiddler employs absolute encoding. The
jumpers are set in the following manner (See Figure 13):
1)
2)
3)
4)
SEL is tied to Pin 14 of the Parallel Port,
RST is tied to + 5Volts,
The 36th pin of the Parallel Port is tied to the Direction control,
The eighth bit of the motor command is tied to the eighth bit of ‘Q’ on the
comparator,
5) And the eighth bit of the counter is tied to the eighth bit of ‘P’ on the comparator.
21
Figure 13. Jumper Positions for Configuration C
Thus in this configuration 16-bits are used for the encoder position, eight-bits for the
motor command and the direction pin is controlled with a dedicated pin
Absolute encoding has the problem that the zero is set, once, in hardware and after about
32 revolutions the counter wraps around. A “virtual zero” can be set in software and the
count is large enough that the wrap around can be detected. Unfortunately if a haptic
function is rendered near the wrap around point, the output gets messy. This was the
standard configuration of version 1.0. It was changed for version 2.0 because it is more
useful to measure the difference in position between the last and current time step and
keep track of an absolute position on the host.
7.5
Debugging
There are basically two major subsystems in the Twiddler’s electronic hardware.
Therefore the problem area can often be determined from the behavior of the software
and the motor output. The two subsystems are the encoder input and the motor output.
Before any other diagnostic steps are attempted it is generally a good idea to check the
following 3 things:
1) That the voltage regulator (the 7805:U10) is producing a nice five Volt signal.
2) That the signal from the Crystal Oscillator (U1) is a 12 MHz square wave (see
figure 14). Note that due to aliasing problems on the Tektronix TDS 420 the
12MHz signal can be misread as some where in the area of 70-130 Hz.
Figure 14. Example 12 MHz Oscillator Output Signal
3) That the GND, + 5 Volt and + 12 Volt pins in the area of the expected problem
are producing their expected values (See figure 15).
22
Figure 15. Ground and Power Pins for Version 2.1
If those three things are not the source of the problem, continue with the diagnostic steps.
More in depth debugging instructions on the two subsystems are provided in the
following sections.
Note that the following debugging instructions assume the Twiddler and software are in
the standard Configuration A, Incremental encoding. If the Twiddler needs to be used in
one of the other configurations and there are hardware problems, first debug in
configuration A and if the problem is only present in one of the other configurations, the
problem must be in the few electrical lines that are used differently (i.e. the different
jumper traces).
7.5.1
Encoder Input Debugging
The value that the host program should be receiving is between zero and approximately
200 for clockwise rotations and 65535 and ~65335 for counterclockwise rotations (See
Figure 16). Note: I am physically unable to hand turn the motor more than 40 ticks in
one millisecond and the 200 ticks are generated by a freely rotating motor. These
numbers are based on the current encoder resolution of 2000 ticks per revolution
23
Figure 16. Value of 16-bit Encoder Count During Motor Operation in Configuration A
(Count is read just prior to Reset, RST)
Ensure that the following things are true:
1) The jumpers on J4-6 are set according to Configuration A (section 7.4.1)
2) In htwiddler.h that ENC_TYPE is set to CONFIG_A
3) And, that in the “Twiddler Tester” program the “Force Source” is set to “Virtual
Model”. If the force source is set to “Static Force” the encoder will read larger
numbers because the time between encoder reads is increased to more than one
millisecond.
Note: if the problem is only present in another configuration and the Twiddler works in
Configuration A then the problem must be in the traces surrounding the jumpers.
There are a few things that can be wrong.
a) The signals (A and B) from the encoder should be a clean square wave
with a period that varies when the motor shaft is rotated.
b) The control signals SEL, OE and RST, for the HCTL-2016 (U2), should
be as shown in Figure 17
c) The HCTL-2016 should not be too hot to the touch. If it is it may be fried.
A fried chip can cause some erroneous signals or provide a current sink. It
may be a good idea to check the signals in step (b) directly on the Parallel
Port cable. When the cable is not connected to the Twiddler a fried chip
does not affect the signals.
d) The output signals are put onto the eight-bit bus. Each bus signal consists
mostly of a 0-3.4 Volt section that is the output and two short 0-5 Volt
sections that are the high and low encoder bytes being read into the
computer. Some random examples of bus signals (pins 1,9-15) are
provided next to pin 1 in Figure 17.
24
Figure 17. Expected Signals From Encoder Input Hardware
If the encoder value read into the host is limited to either 255 and down for CCW or
greater than 255 for CW, the problem is most likely that the SEL pin is accidentally tied
high or low.
If there is no output from the HCTL-2016 or the output is always the same number the
problem is most likely with OE or with the actual encoder lines (A and B) not working or
that the HCTL-2016 is fried.
If the encoder value is not being reset then RST is probably the problem.
Don’t forget to check the clock and the +5 volt power pins. The oscillator and the
HCTL-2016 are usually the first chips to blow in the event of a voltage higher than five.
7.5.2
Motor Output Debugging
Again, the debugging instructions from now on are assuming standard Configuration A.
Once you’ve established that the motor is not receiving the correct output command,
proceed with debugging.
25
Insure that the following things are true:
1) The jumpers on J4-6 are set according to Configuration A (section 7.4.1)
2) In htwiddler.h that ENC_TYPE is set to CONFIG_A
3) That in the “Twiddler Tester” program the “Force Enabled” box is checked.
The operation of the motor driver circuit is explained in Section 3.3. A summary of the
process is presented here. The motor command is compared with a counter of the same
number of bits. When the count is lower than the command the output is high (+5V) and
when the counter is higher than the command the motor output is low (0V). This output
is passed to the amplifier and the direction bit chooses which half of the amplifier
receives the PWM output wave. The amp boosts the signal to 12 Volts and passes it to
either the right or left of the motor driving it CW or CCW.
NOTE: It’s generally a good idea to debug the Twiddler using an oscilloscope with the
motor power cables disconnected from the box and the encoder cables still connected.
This reduces the strain on the motor and on the amplifier as the different possibilities for
the error are explored.
Problems can occur in many places but debugging will be broken down into PWM
generation and PWM amplification. In order to decide which one is the problem it is a
good idea to check the output of the ‘~(P>Q)’ pin on the comparator. It should generate a
five-volt PWM wave of frequency 95Hz. It should rise from almost zero (motor offset)
to fully on regardless of the intended direction of the force; an easy way to check this is
to connect the '~P>Q' line to the oscilloscope, zero the spring simulation and turn the
motor a revolution or two in either direction while observing the PWM wave. If the
PWM is fine the problem is either the direction pin or the amplifier: Proceed to section
7.5.2.2. If the PWM wave is not working properly then proceed to section 7.5.2.1.
7.5.2.1 PWM Generation Debugging
Again the Oscillator (U1) is an important part of the process because it drives the counter
(U6). Check to make sure that it is working (see Section 7.5).
The command coming from the eight-bit bus is stored in the data latch (74HC373: U3).
The outputs from the latch capture and hold the wider 0-3.4 Volt sections of the bus
signals (see Figure 17:bus). The Latch Enable pin (LE) is controlled by the Parallel Port
(pin 31) and the rollover pin (TC) on the counter (74269: U6); the two signals (LE and
TC) are AND’ed together. Thus, the command, in the latch, is only updated on the
hardware when the counter is at zero (see Figure 18). This results in smoother force
transitions.
26
Figure 18. PWM Generation Section Expected Signals
The outputs from the counter are square waves starting at 47.6 kHz and increasing by a
multiple of two up to six MHz. In Configuration A the 47.6 kHz wave is not used
because there are only seven bits of motor command.
The comparator (U7) takes as inputs the seven-bits from the latch (U3) and the seven-bits
from the counter (U6). The two eighth-bits on the comparator inputs are tied together so
that the comparator assumes they are always the same. The eighth-bits do not affect the
comparison as long as they are the same.
The most common problems in this area are with LE, TC and with fried chips.
7.5.2.2 PWM Amplification Debugging
Once there is an acceptable PWM wave it is sent to the amplifier. The PWM is sent to
two AND gates; one is AND’ed with the direction pin and one with the inverse of the
direction pin (see Figure 19). In this case the direction pin is the eighth-bit of the motor
command. The outputs of the two gates are sent to the two halves of the amplifier (L298:
U8). This insures that only one direction will be actuated at a time.
27
Figure 19. PWM Amplification Expanded View
If there is no output from the amplifier, either it is not getting input, or the enable pins are
not tied high or perhaps the chip has stopped working. The L298 (U8) has overheating
shutoff protection. It is possible that the chip will begin to work again once it has cooled.
It should be noted that the L298 is being run close to its current limits and therefore is
normally quite hot.
One other possible problem in this area is that one or more of the diodes in the H-bridge
are fried. If the amplifier works in one direction but not the other, check both the
direction pin as well as the four diodes (D1 through D4).
28
8.0 Summary
The Twiddler is a success. It accomplishes the haptic function every millisecond. It is
portable and can be plugged into any arbitrary computer with a Parallel Port. The
required data communication is well below the maximum capability for data transfer of
the Parallel Port. It has a unit price of approximately $400 (see appendix A for a bill of
materials). The PWM amplifier works without detectable jitter and the force algorithm is
easily accessible and adaptable. There are currently 22 Twiddlers constructed and in
working condition in the Sensory Perception and Interaction (SPIN) lab. They have been
used in Prof. Karon MacLean's graduate level course, CS554 "Physical User Interface
Design", as a tool to explore and develop haptic interfaces. The Twiddlers are also in
high demand in the SPIN lab for demonstrations and prototyping.
29
Appendix A: Bill of Materials and Vendor List
($CDN, 2003)
Twiddler Vendor
Part #
Part #
001
board
desig.
8324s005
002
Qty
Sub
/Device $/Item Total
Item Description
Pittman Motor and
encoder (Qty. 20)
Printed Circuit Board
(Qty. 18)
Purchase
company
1 190.00 190.00 Pittman
1
18.00
18.00 SMTH
- screws 4-40 socket cap 1/2 Flathead
4
0.06
0.24 Pacific
- nuts (small pattern)
4-40
4
0.03
0.12 Pacific
- spacers
1/4"
4
0.06
0.24 All
Mechanical Stand (mat,
parts & labor)
1
84.00
003
- Base
1
004
- Bracket
1
- Bracket Screw
005
- Knob
006
- Knob Set Screws
007
008
14-11N
009
010
#10-32
ctx131
102
U1
1
1
#4-40 x 1/4
0.05
0.10 Pacific
- Motor mounting screws #2-56 panhd
3
0.02
0.06 Pacific
Power Supply
12V 6A
1
35.00
35.00 All
Box
5 x 3.3 x 2 in
1
7.81
7.81 RP
- screws (come with box)
- screws Philips pan head
(for l298)
4-40 x 3/8
2
0.05
0.10 Pacific
- nuts
4-40
2
0.03
0.06 Pacific
- washer
4-40 locking
2
0.02
0.04 Pacific
- washer
4-40 flat
2
0.02
0.04 Pacific
1
11.00
11.00 Bookstore
Parallel Port Cable
101
8324s005
84.00 Focus
2
7.5.3
Company part#
Hammond 1411N
4
Electroni
c
Compone
nts
- Oscillator
12 MHz
1
4.00
4.00 Digikey
ctx131-nd
74HC373 U3
- 8-Bit Latch
3 state
1
1.00
1.00 Digikey
mm74hc373n-nd
103
74F269
- 8 Bit bi-dir Counter
1
3.00
3.00 Digikey
74f269spc-nd
104
74HC684 U7
- Magnitude Comparator
1
9.55
9.55 Digikey
296-8359-5-nd
105
74LS00
U4
- NAND (quad 2in)
1
0.50
0.50 Digikey
296-1626-5-nd
106
74LS04
U5
- NOT (hex inverter)
1
0.50
0.50 Digikey
296-1629-5-nd
U6
30
107
HCTL2016
U2
- Encoder Decoder
1
20.50
20.50 Future
6763874
108
L298
U8
- Motor Driver
1
4.25
4.25 Future
3319779
- Volt Regulator
- Connector (36 pos
centronic)
- 5 CIR HED.100
(encoder)
- 5 circuit terminal
housing
1
1.00
1.00 Main
rt ang fe
1
6.66
6.66 Digikey
1036rf-nd
rt ang frict loc
1
1.15
1.15 Digikey
wm4303-nd
0.100
1
0.55
0.55 Digikey
wm2003-nd
5
0.08
0.40 Digikey
wm2200-nd
1
0.39
0.39 Digikey
wm4640-nd
115
- Crimp terminal
0.100
- Header 2 pos frict lock
0.156
rt (motor)
- 2 circuit terminal
0.156
housing
1
0.20
0.20 Bruce
116
- Crimp terminal
0.156
2
0.08
0.16 Digikey
wm2300-ND
- Clip Fuse 10A
5x20mm PC
2
0.21
0.42 Digikey
f063-nd
- Fuse Fast blow
250V 5A
1
1.00
1.00 Digikey
283-2367-ND
109
7805 U10
110
J1
111
J2
112
113
114
J3
117
F1
118
7805
119
U9
- Power Jack
2.1mm PCB
1
0.55
0.55 Digikey
cp-202a-nd
120
S1
- Switch
spdt 6A
1
7.00
7.00 Digikey
360-1057-nd
D1-4
- Diode
20V 3A
4
0.67
2.68 Digikey
1N5820dict-nd
122
D5
- LED (red)
1
0.95
0.95 Bruce
123
C1
- Capacitor
100 uF 100V
1
0.50
0.50 Bruce
124
C3
- Capacitor
0.33 uF 100V
1
0.63
0.63 Digikey
399-2179-nd
125
C2,4-12 - Capacitor
100 nF 50V
10
0.13
1.30 Digikey
399-2127-nd
126
R2,R3
- Resistor 1/4 W
3.3k ohm
2
0.03
0.06 Bruce
127
R4
- Resistor 1/4 W
180 ohm
1
0.03
0.03 Bruce
128
R1
- Resistor 5W
1.75 ohm
2
0.75
1.50 Main
129
J4,5,6
- Header fricl lock
0.100
14
0.02
0.28 All
- Jumper
0.100
Electronic Components
Total
5
0.06
0.30 All
121
1N582
130
71.01
Total
All
(Electronics)
All Electronics Corp.
P.O. Box 567
Van Nuys, CA, 91408
1 (888) 826-5432
www.allcorp.com
Bruce
Bruce Dow: Lab's Electrical Engineer
Digikey
(Electronics)
Digi-Key Corporation
701 Brooks Ave. S.
P.O. Box 677
417.82
N/A
31
Thief River Falls, MN, 56701-0677
1 (800) 344-4539
www.digikey.com
Focus
(Machining CNC)
Focus Manufacturing
308-8495 Ontario St.
Vancouver, BC, Canada, V5X 3E8
(604) 322-3114
Future
(Electronics)
Future Electronics Corp.
41 Main Street E
Bolton, Mass, 01740
Tel (978) 7790-3000
Main
(Electronics)
Main Electronic Supplies Ltd.
4554 Main St.
Vancouver BC, Canada V5V 3R5
(604) 872-0267
www.mainelectronics.com
Pacific
(nuts and bolts)
Pacific Fasteners
3934 East 1st Ave.
Burnaby, BC Canada, V5C 5S3
(604) 294-9411
www.pacificfasteners.com
Pittman
(motors)
Pittman
343 Godshall Dr.
Harleysville, PA, 19438
(215)-256-6601
www.pittmannet.com
RP
(Electronics)
RP Electronic Components Ltd.
2060 Rosser Ave.
Burnaby BC, Canada, V5C 5Y1
(604) 738-6722
www.rpelectronics.com
SMTH
SMTH Circuits
(PCB Manufacturing) (604) 858-3970
ww.1pcb.com
Bookstore
UBC Bookstore
(Computer Supplies) 6200 University Boulevard,
Vancouver BC, V6T 1Z4
(604) 822-2665
http://www.bookstore.ubc.ca
32
Appendix B: Design Extensions
Depending on the desired application there are two design modifications that would be
advantageous but have not been implemented yet. It would be desirable to control two
devices with one Parallel Port and it would increase the functionality of the device to read
external force sensors.
B.1 Two Degrees of Freedom
For the implementation of two degrees of freedom, one control line is needed to index, or
toggle between, the two separate devices. This control line can be acquired from one of
the trade off pins described in the Twiddler Configuration sections (see section 7.4).
Either absolute encoding, reduced encoder resolution or reduced force output resolution
must be chosen for this sacrifice.
The eight-bit busses from the two devices are connected together and the new index pin is
AND’ed with the remaining control pins to latch the correct bits at the correct time (see
figure B.1). In the figure pin 36 has been used as the index. This means that the two
devices are in absolute encoding mode with 16 bits for position and seven bits for motor
command. No matter which tradeoff is used, it is recommend that the output resolution is
reduced because then the direction pin is located on the hardware latch. This ensures that
the direction is held constant while the other Twiddler is being accessed.
Figure B.1. Electrical Diagram for Implementation of 2 Degrees of Freedom
This design modification allows easy access to both Twiddlers. There is plenty of time to
access both Twiddlers. The changes required in the code are minimal. First, the index is
33
held to ‘Twiddler one’ and the same process as for a single Twiddler is executed.
Leaving out the reset part. Then, the index is held to ‘Twiddler two’ and the process is
repeated.
B.2 Sensor Input
The Status register is a dedicated five-input register that is not used in the current design.
Using one or two of the SEL and OE pins to address an input, up to 20 bits could be read
from a sensor (see Figure B.2).
Figure B.2. An Example of a 20-Bit External Sensor Implementation
Because the status bus is separate from the data bus the SEL and OE lines can be used as
dual-purpose control lines. The combination of OE and SEL go through four possible
logic combinations during each millisecond cycle. If a sensor had 20 dedicated outputs,
each of the logic combinations could be used to index five bits. The status bus can read
at the appropriate points in the usual millisecond loop without disturbing the data bus.
Colin Swindells has used the status register to read an eight-bit accelerometer through the
Twiddler on his project called the TorqueBAR. [2]
34
Appendix C: Mechanical Drawings
List of Drawings
a)
b)
c)
d)
Pittmann Stand: Assembly
Pittmann Stand: Base
Pittmann Stand: Bracket
Pittmann Stand: Knob
< for drawings see file: PittmannStand - AssemblyR11.pdf>
39
Appendix D: Data Sheets:
List of Data Sheets
a)
b)
c)
d)
e)
f)
g)
h)
i)
j)
k)
Part
Part#
Filename
Motor
Metal Case
Oscillator
8-Bit Latch
Counter
Comparator
Decoder
Amplifier
Voltage Reg.
PP Connector
Diodes
001
008
101
102
103
104
107
108
109
110
121
8324S005.pdf
1411N.pdf
co1100.pdf
MM74HC373.pdf
74F269.pdf
74LS682_684_688.pdf
HCTL2016.pdf
L298.pdf
ua7805.pdf
1036RF-ND.pdf
1N5821.pdf
Bibliography
[1] Axelson, Jan Parallel Port Complete: Programming, Interfacing & Using the PC'S
Parallel Printer Port Lakeview Research: Madison WI (1997)
http://www.lvr.com/parprtib.htm
[2] C. Swindells, A. Unden, T. Sang, "TorqueBAR: An Underground Haptic Feedback
Device" Yet to be published in the fifth International Conference on Multimodal
Interfaces (ICMI'03), Vancouver, BC, 2003.
[3] Computer Science and Telecommunications Board (CSTB), National Research
Council. More than Screen Deep: Toward an Every-Citizen Interface to the Nation's
Information Infrastructure. National Academy Press, Washington, DC, 1997. Cap, 3
http://www.nap.edu/readingroom/books/screen/3.html
[4] Direct I/O
The source of the permission map extender driver "giveio.sys"
http://www.direct-io.com/