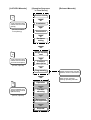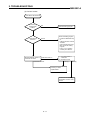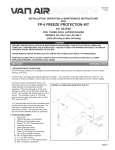
1
[Manual Makeup] There are three different manuals related to the A1FXCPU: setup, function description and maintenance manuals. Type A1FXCPU CPU module user's manual (Setup) Type A1FXCPU CPU module user's manual (Function description) Type A1FXCPU CPU module user's manual (Maintenance) (A5 size, included in the packing) (A4 size, optional) (A5 size, optional) 1) A1FXCPU user's manual (Setup) This manual provides procedures from product and accessory checkup to installation and wiring to be followed after you have purchased the A1FXCPU and unpacked the package. The setup manual describes the following items. ⋅ A1FXCPU performances (CPU section, power supply section, built-in functions) ⋅ Names of parts ⋅ Settings of parts (hardware settings) ⋅ I/O number assignment ⋅ EMC Directive, Low Voltage Directive ⋅ Installation of A1FXCPU ⋅ External wiring ⋅ Outline dimension drawings 2) A1FXCPU user's manual (Function description) This manual includes the explanation, data setting and programming of the built-in functions added to the A1FXCPU, I/O number assignment needed for I/O control, methods of communication with special modules/special blocks, error codes and other information. The function description manual describes the following items. ⋅ System configuration ⋅ Performances of A1FXCPU (CPU section, power supply section, built-in functions) ⋅ Built-in functions of A1FXCPU (simple inter-PC link, simple positioning, high-speed counter, external interrupt) ⋅ I/O number assignment ⋅ Communication with special modules/special blocks ⋅ Error codes ⋅ Special relays, special registers ⋅ Outline dimension drawings 3) A1FXCPU user's manual (Maintenance) This manual explains the inspection of a system using the A1FXCPU and troubleshooting at error occurrence. ⋅ Names of parts ⋅ Settings of parts ⋅ Maintenance and inspection ⋅ Troubleshooting ⋅ Special relays, special registers Refer to the ACPU programming manuals for the instructions needed for devices and programming of the A1FXCPU, and to the GPP function software package operating manuals for peripheral operation to be performed for programming. [A1FXCPU Manuals] 1) Type A1FXCPU CPU module user's manual (Setup) (A5 size, included in the packing) [Operation Sequence in Time Series] [Relevant Manuals] Product check Installation Connection Hardware setting 2) Type A1FXCPU CPU module user's manual (Function description) Single module test Function description (A4 size, optional) Programming ACPU programming manuals (Basics, common instructions) GPP function software packing operating manuals 3) Type A1FXCPU CPU module user's manual (Maintenance) Operation Troubleshooting (A5 size, optional) Maintenance and inspection Disposal About This Manuals The following product manuals are available. Please use this table as a reference to request the appropriate manual as necessary. Related Manuals Manual Name Manual No. (Model Code) type A1FXCPU module user's manual (Setup) Provides the specifications, installation, wiring and other information of the module for use of the A1FXCPU. (Option) IB-66839 (13JL57) type A1FXCPU module user's manual (Function description) Includes the system configuration, performance specifications, functions, handling, I/O number assignment and error codes of the A1FXCPU. (Option) SH-4002 (13JL59) type ACPU (Fundamentals) Programming Manual Offers programming methods, device names, parameters, program types, memory area makeup, etc. needed to write programs. (Option) IB-66249 (13J740) type ACPU (Common Instructions) Programming Manual Gives how to use sequence, basic and application instructions and microcomputer programs. (Option) IB-66250 (13J741) type MELSAP-II Programming Manual Provides specifications, functions, instructions, programming methods, etc. needed when the MELSAP-II is used for programming with SFC programs. (Option) IB-66361 (13JF40) type SW3IVD-GPPA (Supplement) Operating Manual Includes the detailed SW3IVD-GPPA system configuration, how to register (install) the software package to hard disk, GPP function startup procedure, basic usage of GPP functions, typical function operating methods, etc. (Option) BCN-85834 type SW3IVD-GPPA (GPP) Operating Manual Describes the system configuration, performance specifications, functions, system startup procedure, operation details of each GPP function, and error messages of the SW3IVD-GPPA. (Option) IB-66691 (13J906) Manual Name Manual No. (Model Code) type SW3IVD-GPPA (A6TEL) Operating Manual Gives the performance specifications, functions and operation methods of the A6TEL (telephone line) among the functions of the SW3IVD-GPPA. (Option) IB-66693 (13J908) type SW3IVD-GPPA (SFC) Operating Manual Offers the performance specifications, functions, system startup procedure, operation details and error messages of the SFC mode among the functions of the SW3IVD-GPPA. (Option) IB-66692 (13J907) POINT For the FX series, refer to the manual of the module used. • SAFETY PRECAUTIONS • (Always read these instructions before using this equipment.) Before using this product, please read this manual and the relevant manuals introduced in this manual carefully and pay full attention to safety to handle the product correctly. The instructions given in this manual are concerned with this product. For the safety instructions of the programmable controller system, please read the CPU module user's manual. In this manual, the safety instructions are ranked as "WARNING" and "CAUTION". DANGER Indicates that incorrect handling may cause hazardous conditions, resulting in death or severe injury. CAUTION Indicates that incorrect handling may cause hazardous conditions, resulting in medium or slight personal injury or physical damage. Note that the CAUTION level may lead to a serious consequence according to the circumstances. Always follow the instructions of both levels because they are important to personal safety. Please save this manual to make it accessible when required and always forward it to the end user. [Startup/Maintenance Instructions] WARNING • Do not touch the terminals while power is on. This can cause an electric shock or misoperation. • Connect the battery correctly. Do not recharge, disassemble, heat, short or solder the battery or throw it into fire. Improper handling of the battery may result in injury or fire due to heating, burst, combustion, etc. • Before starting cleaning or terminal screw retightening, always switch power off externally in all phases. Not doing so can cause an electric shock. Overtightening can cause a drop, short circuit or misoperation due to damaged screws or module. A-1 [Startup/Maintenance Instructions] CAUTION • Before starting online operation with the peripheral connected to the running CPU module (especially program modification, forced output, operating status change), carefully read the manual and fully ensure safety. Not doing so can cause machine damage or accident due to operational mistakes. • Do not disassemble or modify each module. This can cause a failure, misoperation, injury or fire. • The module case is made of resin. Do not drop it or give it hard impact. This can damage the module. • Before mounting or dismounting the module, always switch power off externally in all phases. Not doing so can cause the module to fail or misoperate. • When performing test operation for positioning, set a low speed, make preparations so that positioning can be stopped immediately when a hazardous condition occurs, and then make operation checks. [Disposal Instructions] CAUTION • When disposing of the product, handle it as industrial waste. A-2 Revisions *The manual number is noted at the lower left of the back cover. Print Date Feb.1998 *Manual Number SH(NA)-4003-A Revision First edition This manual confers no industrial property rights or any rights of any other kind, nor does it confer any patent licenses. Mitsubishi Electric Corporation cannot be held responsible for any problems involving industrial property rights which may occur as a result of using the contents noted in this manual. © 1998 Mitsubishi Electric Corporation Introduction Thank you for the Mitsubishi MELSEC-A Series of General Purpose Programmable Controllers. Please read this manual carefully so that equipment is used to its optimum. A copy of this manual should be forwarded to the end user. CONTENTS 1. NAMES OF PARTS AND THEIR SETTINGS ••••••••••••••••••••••••••••••••••••••••••••••••••••••••••••••••••••••••••••••••••1- 1 to 1- 4 1.1 Names of Parts •••••••••••••••••••••••••••••••••••••••••••••••••••••••••••••••••••••••••••••••••••••••••••••••••••••••••••••••••••••••••••••••••••••••• 1- 1 1.2 Settings •••••••••••••••••••••••••••••••••••••••••••••••••••••••••••••••••••••••••••••••••••••••••••••••••••••••••••••••••••••••••••••••••••••••••••••••••• 1- 3 2 1.2.1 RAM/E PROM operation setting •••••••••••••••••••••••••••••••••••••••••••••••••••••••••••••••••••••••••••••••••••••••••••••••••• 1- 3 1.2.2 Write protect switch setting ••••••••••••••••••••••••••••••••••••••••••••••••••••••••••••••••••••••••••••••••••••••••••••••••••••••••••• 1- 3 1.3 Latch Clear Operation ••••••••••••••••••••••••••••••••••••••••••••••••••••••••••••••••••••••••••••••••••••••••••••••••••••••••••••••••••••••••••••• 1- 4 2. INSPECTION AND MAINTENANCE •••••••••••••••••••••••••••••••••••••••••••••••••••••••••••••••••••••••••••••••••••••••••••••••••2- 1 to 2- 5 2.1 Daily Inspection ••••••••••••••••••••••••••••••••••••••••••••••••••••••••••••••••••••••••••••••••••••••••••••••••••••••••••••••••••••••••••••••••••••••• 2- 2 2.2 Periodic Inspection •••••••••••••••••••••••••••••••••••••••••••••••••••••••••••••••••••••••••••••••••••••••••••••••••••••••••••••••••••••••••••••••••• 2- 3 2.3 Battery Replacement •••••••••••••••••••••••••••••••••••••••••••••••••••••••••••••••••••••••••••••••••••••••••••••••••••••••••••••••••••••••••••••• 2- 4 2.3.1 Battery life •••••••••••••••••••••••••••••••••••••••••••••••••••••••••••••••••••••••••••••••••••••••••••••••••••••••••••••••••••••••••••••••••••••••• 2- 4 2.3.2 Battery replacement ••••••••••••••••••••••••••••••••••••••••••••••••••••••••••••••••••••••••••••••••••••••••••••••••••••••••••••••••••••••• 2- 5 3. TROUBLESHOOTING •••••••••••••••••••••••••••••••••••••••••••••••••••••••••••••••••••••••••••••••••••••••••••••••••••••••••••••••••••••• 3- 1 to 3- 23 3.1 Basic Troubleshooting •••••••••••••••••••••••••••••••••••••••••••••••••••••••••••••••••••••••••••••••••••••••••••••••••••••••••••••••••••••••••••• 3- 1 3.2 Troubleshooting ••••••••••••••••••••••••••••••••••••••••••••••••••••••••••••••••••••••••••••••••••••••••••••••••••••••••••••••••••••••••••••••••••••••• 3- 2 3.2.1 Troubleshooting flowcharts ••••••••••••••••••••••••••••••••••••••••••••••••••••••••••••••••••••••••••••••••••••••••••••••••••••••••••• 3- 2 3.2.2 "POWER" LED turned off •••••••••••••••••••••••••••••••••••••••••••••••••••••••••••••••••••••••••••••••••••••••••••••••••••••••••••••• 3- 3 3.2.3 "RUN" LED turned off •••••••••••••••••••••••••••••••••••••••••••••••••••••••••••••••••••••••••••••••••••••••••••••••••••••••••••••••••••• 3- 4 3.2.4 "RUN" LED flickers ••••••••••••••••••••••••••••••••••••••••••••••••••••••••••••••••••••••••••••••••••••••••••••••••••••••••••••••••••••••••• 3- 5 3.2.5 "ERROR" LED turned on ••••••••••••••••••••••••••••••••••••••••••••••••••••••••••••••••••••••••••••••••••••••••••••••••••••••••••••••• 3- 6 3.2.6 "ERROR" LED flickers ••••••••••••••••••••••••••••••••••••••••••••••••••••••••••••••••••••••••••••••••••••••••••••••••••••••••••••••••••• 3- 7 3.2.7 "LINK RUN" LED is off ••••••••••••••••••••••••••••••••••••••••••••••••••••••••••••••••••••••••••••••••••••••••••••••••••••••••••••••••••• 3- 8 3.2.8 Simple inter-PC link does not operate properly•••••••••••••••••••••••••••••••••••••••••••••••••••••••••••••••••••••••• 3- 10 3.2.9 Extension module/extension block input cannot be imported •••••••••••••••••••••••••••••••••••••••••••••••• 3- 12 3.2.10 Output cannot be provided to special module/special block •••••••••••••••••••••••••••••••••••••••••••••••• 3- 13 3.2.11 Communication cannot be made with special module/special block •••••••••••••••••••••••••••••••••• 3- 14 3.2.12 Program cannot be written •••••••••••••••••••••••••••••••••••••••••••••••••••••••••••••••••••••••••••••••••••••••••••••••••••••••• 3- 15 3.3 Error Code List ••••••••••••••••••••••••••••••••••••••••••••••••••••••••••••••••••••••••••••••••••••••••••••••••••••••••••••••••••••••••••••••••••••••• 3- 16 3.4 Extension Module/Extension Block Troubleshooting ••••••••••••••••••••••••••••••••••••••••••••••••••••••••••••••••••••••• 3- 22 3.4.1 Input circuit •••••••••••••••••••••••••••••••••••••••••••••••••••••••••••••••••••••••••••••••••••••••••••••••••••••••••••••••••••••••••••••••••••• 3- 22 3.4.2 Output circuit ••••••••••••••••••••••••••••••••••••••••••••••••••••••••••••••••••••••••••••••••••••••••••••••••••••••••••••••••••••••••••••••••• 3- 23 APPENDICES ••••••••••••••••••••••••••••••••••••••••••••••••••••••••••••••••••••••••••••••••••••••••••••••••••••••••••••••••••••••••••Appendix- 1 to 1- 22 Appendix 1 Special Relay and Special Register Lists •••••••••••••••••••••••••••••••••••••••••••••••••••••••••••••••••• Appendix -1 Appendix 1.1 Special relays M ••••••••••••••••••••••••••••••••••••••••••••••••••••••••••••••••••••••••••••••••••••••••••••••••••••••••• Appendix -1 Appendix 1.2 Special registers D•••••••••••••••••••••••••••••••••••••••••••••••••••••••••••••••••••••••••••••••••••••••••••••••••••Appendix -12 1. NAMES OF PARTS AND THEIR SETTINGS MELSEC-A 1. NAMES OF PARTS AND THEIR SETTINGS 1.1 Names of Parts Front view (1) (5) (6) (7) (8) (9) (10) (11) IN 0 1 2 3 4 5 6 7 8 9 A B C D INPUT/OUTPUT (2) (3) CPU POWER LINK RUN OUT 10 1112 13 RESET (14) RUN RUN SD STOP ERROR RD L CLR (4) EXT.CON. MELSEC A1FXCPU (12) (13) Left side view and the front view without cover (22) (15) (16) IN 0 1 2 3 4 5 6 7 8 9 A B C D INPUT/OUTPUT (21) CPU LINK RESET RUN RUN RUN SD STOP ERROR RD L CLR POWER OUT 10 111213 (17) (23) MELSEC A1FXCPU (1) (18) No. 1 Name Mounting hole (20) (19) Application Pear-shaped hole used to mount this module to a panel such as a control box. (For M4 screw) 2 "POWER" LED ⋅ 5VDC power indicator LED 3 "RUN" LED ⋅ On : Indicates that the RUN/STOP switch is in the "RUN" position and sequence program operation is being executed. (Remains on if an error defined to continue sequence program operation occurs.) ⋅ Off : Turns off when. ⋅ 100 to 240VAC is not supplied to the A1FXCPU. ⋅ The RUN/STOP switch is in the "STOP" position. ⋅ Remote STOP is performed. ⋅ Remote PAUSE is performed. ⋅ Flicker : Flickers when. ⋅ The self-diagnostic function detected an error defined to stop sequence program operation. ⋅ Latch clear operation is performed. 1-1 1. NAMES OF PARTS AND THEIR SETTINGS MELSEC-A No. Name Application ⋅ On 4 "ERROR" LED : Indicates that the self-diagnostic function detected an error. (Remains off when the error detected is the one preset to be turned off in the LED indication priority setting.) ⋅ Off : Indicates a normal status or that a failure was detected with the CHK instruction. ⋅ Flicker : Indicates that the annunciator (F) was switched on in the sequence program. 5 "LINK RUN" LED ⋅ On ⋅ Off 6 "SD" LED ⋅ Flicker : Indicates that data is being sent to the other station in simple inter-PC link. ⋅ Off : Indicates that data is not yet sent to the other station in simple inter-PC link. 7 "RD" LED ⋅ Flicker: Indicates that data is being received from the other station in simple inter-PC link. ⋅ Off : Indicates that data is not yet received from the other station in simple inter-PC link. 8 RESET switch ⋅ RESET: Hardware reset. Used to make a reset at occurrence of an operation fault and initialize operation. 9 RUN/STOP switch ⋅ RUN/STOP: Used to execute/stop sequence program operation. ⋅ LATCH CLEAR (L CLR): Used to clear (OFF or 0) latch clear data set in parameters. (LATCH CLEAR also clears data other than the latch clear data.) 10 Built-in function connector cover Cover for protection of the built-in function connector Indicator LEDs I/O indicator LEDs 11 12 : Indicates normal operation of simple inter-PC link. : Indicates a simple inter-PC link fault. When the connector is not used, put this cover on. Terminal block Cover for protection of the terminal block. Put this cover on except when making cover connections. Peripheral Connector cover for connection of a peripheral. connector cover When a peripheral is not used, put this cover on. 14 Protective cover Cover for protection of the battery, connector, etc. of the A1FXCPU. Open the protective cover to perform the following operations. ⋅ DIP switch setting ⋅ Connection to the battery connector ⋅ Battery replacement ⋅ Connection/disconnection to/from the extension block connector When the above operations are not performed, put this cover on. 15 Built-in function connector Connector for the high-speed counter, positioning output and external interrupt input. 16 Battery Used to back up program, latch range device, file register and other data. 17 Battery connector For connection of the battery side connector. 18 Terminal block Terminal block for AC power input, service power output and simple inter-PC link. 19 DIP switches Used to set memory protect and select between RAM and E PROM. 20 Peripheral connector (D sub-25 pins) Connector used to perform main program write/read, monitoring and test using a peripheral. 21 DIN rail catch Catch for mounting this module to a DIN rail. 22 Cover Do not open this cover. 23 Extension block Connector for connection of the FX0N and FX2N series extension modules, extension connector blocks, special modules and special blocks. 13 2 1-2 1. NAMES OF PARTS AND THEIR SETTINGS MELSEC-A 1.2 Settings 2 The A1FXCPU settings include RAM/E PROM operation and write protect settings. 2 1.2.1 RAM/E PROM operation setting 2 The memory operation system includes RAM and E PROM modes. Use the DIP switch (SW1) to select the memory operation system. SW1 is factory-set in the RAM operation (lower) position. ROM ROM 1 RAM 2 1 RAM Move SW1 to the lower position to set RAM operation. 2 Move SW1 to the upper position to set E2PROM operation. POINT 2 Before choosing the E PROM mode, read the contents of RAM with a peripheral. 1.2.2 Write protect switch setting 2 The write protect switch is used to prevent RAM and E PROM data from being rewritten by operation performed from a peripheral. Use this switch to prevent a program created from being rewritten or deleted, for example. When this function is used, RAM is write-protected in the RAM operation mode and 2 2 E PROM write-protected in the E PROM operation mode. Before making corrections to the RAM memory contents, clear write protect (move the switch to the upper position). Use the DIP switch (SW2) to select or clear write protect. SW2 is factory-set in the write protect clear (upper) position. 1 2 PROTECT Move SW2 to the lower position to select write protect. 1-3 1 2 PROTECT Move SW2 to the upper position to clear write protect. 1. NAMES OF PARTS AND THEIR SETTINGS MELSEC-A 1.3 Latch Clear Operation When performing latch clear using the RUN/STOP switch, perform operation in the following procedure. This operation also clears non-latched devices. (1) Move the RUN/STOP switch from the "STOP" position to the "L CLR" position several times to flicker the "RUN" LED. When the "RUN" LED flickers, latch clear is ready. (2) After the "RUN" LED has flickered, move the RUN/STOP switch from the "STOP" position to the L CLR" position again. Latch clear is then completed and the "RUN" LED goes off. To cancel the latch clear operation at any point, move the RUN/STOP switch to the "RUN" position to place the A1FXCPU in the RUN mode or press the RESET switch to reset the A1FXCPU. REMARKS Latch clear may also be done by GPP function operation. For example, latch clear from the A6GPP may be performed using the test function "device memory all clear" in the PC mode. For the operation method, refer to the GPP Function Operating Manual. 1-4 2. INSPECTION AND MAINTENANCE MELSEC-A 2. INSPECTION AND MAINTENANCE WARNING ! Do not touch the terminals while power is on. This can cause an electric shock or misoperation. ! Connect the battery correctly. Do not recharge, disassemble, heat, short or solder the battery or throw it into fire. Improper handling of the battery may result in injury or fire due to heating, burst, combustion, etc. ! Before starting cleaning or terminal screw retightening, always switch power off externally in all phases. Not doing so can cause an electric shock. Undertightening can cause a drop, short circuit or misoperation. Overtightening can cause a drop, short circuit or misoperation due to damaged screws or module. CAUTION ! Do not disassemble or modify the module. This can cause a failure, misoperation, injury or fire. ! Before mounting or dismounting the module, always switch power off externally in all phases. Not doing so can cause the module to fail or misoperate. ! Dispose of the product as industrial waste. To ensure proper use of the PC in the best conditions, you are requested to perform maintenance and inspection daily and periodically as described below. 2-1 2. INSPECTION AND MAINTENANCE MELSEC-A 2.1 Daily Inspection Table 2.1 provides inspection items to be observed daily. Table 2.1 Daily Inspection No. 1 2 3 Item Criteria Action The module/block is fitted completely. Mount on the DIN rail securely. Mounting condition Check for loose mounting on panel surface screws and covers. The module mounting screws are tightened securely. Retighten the screws. Make sure that the module/block is mounted on the DIN rail securely. The module/block is fitted completely. Mount on the DIN rail securely. Check for loose mounting screws and covers. The module mounting screws are tightened securely. The module mounting screws are tightened securely. Extension module, extension block, special module, special block mounting conditions Check for loose terminal screws. No loose screws. Retighten the terminal screws. Close solderless terminals. Proper intervals Correct. Check the extension cable connectors. No loose connectors. Plug the connectors securely. "POWER" LED Make sure that the LED is lit. Lit (Off indicates a fault.) Refer to Section 3.2.2. "RUN" LED Make sure that the LED is lit in the "RUN" mode. Lit. (Off/flicker indicates a fault.) Refer to Sections 3.2.3 and 3.2.4. "ERROR" LED Make sure that the LED is lit at error occurrence. Off. (On indicates error occurrence.) Refer to Sections 3.2.5 and 3.2.6. Make sure that the LED is lit and extinguished. Extinguished when simple inter-PC link is not used.(Without link setting program) Lit when simple inter-PC link is used. (Any condition other than the above indicates a fault.) Refer to Sections 3.2.7 and 3.2.8. "SD" LED Make sure that the LED is lit and extinguished. Extinguished when simple inter-PC link is not used. (Without link setting program) Lit/flickers when simple inter-PC link is used. (Any condition other than the above indicates a fault.) Refer to Section 3.2.8. "RD" LED Make sure that the LED is lit and extinguished. Connecting conditions Module indicator lamps "LINK RUN" LED 4 Description Make sure that the Mounting condition module/block is mounted on on DIN rail the DIN rail securely. Input LEDs Lit when the corresponding inputs turn on. Extinguished when the corresponding input signal turn off. Flickers when high-speed counter Refer to Section pulses are input signal. 3.2.9. (Any condition other than the above indicates a fault.) 2-2 2. INSPECTION AND MAINTENANCE MELSEC-A Table 2.1 Daily Inspection (Continued) 4 Item indicator No. Description Criteria Action Flickers when simple positioning Make sure that the LEDs are lit pulses are output. and extinguished. (Any condition other than the above indicates a fault.) Output LEDs Refer to Section 3.2.10. 2.2 Periodic Inspection The following table lists inspection items to be followed every six months to every year. This inspection should also be made when the equipment is moved or modified or wiring is changed. Table 2.2 Periodic Inspection 1 Item Ambient environment No. Method Ambient temperature Measure with Ambience thermometer/hygrometer. humidity Measure corrosive gas. 3 4 Power supply Measure voltage across 100 voltage check to 200VAC terminals. Move the module. Connecting conditions 2 Mounting conditions Atmosphere Looseness Dirt, foreign matter Loose terminal screws. Criteria 0 to 55°C 10 to 99%RH When the PC is used inside an enclosure, the ambient temperature is the temperature inside the No corrosive gas enclosure. 85AC to 264V Change supply voltage. The module should be mounted firmly. Retighten screws. Visual check. No contamination Remove and clean. Retighten with a screwdriver. No loose screws. Retighten. Visual check. Proper intervals Correct. Visual check. No loose connectors. Close solderless terminals. Loose connectors. Battery Retighten connector fixing screws. If there is no battery low Make sure that M9006 or 5 Action M9007 is off in the monitoring (Preventive maintenance) mode of the peripheral. indication, change the battery when the specified life is exceeded. 2-3 2. INSPECTION AND MAINTENANCE MELSEC-A 2.3 Battery Replacement WARNING CAUTION ! Connect the battery correctly. Do not recharge, disassemble, heat, short or solder the battery or throw it into fire. Improper handling of the battery may result in injury or fire due to heating, burst, combustion, etc. ! Dispose of the product as industrial waste. M9006 or M9007 are switched on to indicate that the voltage of the battery for program and power failure-compensated data backup has reduced. If this special relay is switched on, the programs and power failure-compensated data are not erased immediately. However, they may be erased if ON of the special relay is overlooked. Change the battery within the total power failure time after M9006 or M9007 is switched on, indicated in Table 2.4. The battery life guideline and changing procedure are given below. 2.3.1 Battery life Table 2.3 indicates the battery life. Table 2.3 Battery Life Battery Life CPU Type A1FXCPU Battery Life (Total power failure time) [Hr] Guaranteed time Actual operating After M9006/M9007 (Minimum) time (Typical) Switched On 4000 20000 100 *The actual operating time indicates an average value and the guaranteed time indicates a minimum value. The following preventive maintenance should be observed. [1] Replace any battery after 4 to 5 years if the total power failure time is less than the above guaranteed time. [2] Replace any battery when the total power failure time has exceeded the above guaranteed time and M9006 is on. 2-4 2. INSPECTION AND MAINTENANCE MELSEC-A 2.3.2 Battery replacement When the battery life has expired, change the battery in the following procedure. Without the battery, the capacitor provides memory backup for some time. However, the battery should be changed as soon as possible since memory contents may be erased if the changing time exceeds the guaranteed time indicated in Table 2.4. Battery replacement Table 2.4 Capacitor Backup Time Capacitor Backup Time [Min.] Switch PC power off. Guaranteed time (Minimum) Actual operating time (Typical) 10 36 Open the A1FXCPU module front cover. Remove the old battery from the holder and unplug the lead wires from the connector. Insert a new battery and plug the lead wires into the connector. (The red wire is a positive wire and the blue one a negative wire.) A1FXCPU A6BAT IN 0 1 2 3 4 5 6 7 8 9 A B C D OUT 10 11 12 13 Battery connector Red + (right) Close the A1FXCPU module front cover. Blue – (left) Switch PC power off. Using the peripheral, check whether M9006 is on or off. OFF ON Battery fault Complete 2-5 3. TROUBLESHOOTING MELSEC-A 3. TROUBLESHOOTING This chapter describes various errors which may occur during use of the system and how to clear up their causes and take proper actions. 3.1 Basic Troubleshooting To increase system reliability, important points are to use equipment having high reliability and to restore the system to normal as soon as possible when any fault has occurred. To restore the system to normal as soon as possible, the following troubleshooting basics must be observed: (1) Visual checks Check the following. (a) Machine motions (in stop and operating statuses) (b) Power supply on or off (c) I/O equipment status (d) Wiring conditions (I/O wires, cables) (e) Display states of various indicators (POWER, RUN, ERROR, I/O LEDs, etc.). 2 (f) Various switch settings (RAM/E PROM setting, memory protect, etc.) After completing the visual checks (a) to (f), connect the peripheral and monitor the PC operating status and program. (2) Fault check Observe any changes in the error condition during the following. (a) Set the RUN/STOP switch to [STOP]. (b) Reset the CPU with the RESET switch. (c) Switch power off and on. (3) Narrow down the possible causes. Deduce where the fault lies. (a) Inside or outside the PC. (b) Extension module, extension block or otherwise. (c) Sequence program. 3-1 3. TROUBLESHOOTING MELSEC-A 3.2 Troubleshooting This section explains how to clear up the causes of faults, the definitions of errors corresponding to error codes, and what actions to be taken. 3.2.1 Troubleshooting flowcharts Faults are described phenomenon by phenomenon. Occurrence of fault Section 3.2.2 "POWER" LED turned off "POWER" LED is off. Section 3.2.3 "RUN" LED turned off "RUN" LED is off. "RUN" LED flickers. Section 3.2.4 "RUN" LED flickers "ERROR" LED is on. Section 3.2.5 "ERROR" LED turned on "ERROR" LED flickers. Section 3.2.6 "ERROR" LED flickers "LINK RUN" LED is off. Section 3.2.7 "LINK RUN" LED is off "SD"/"RD" LED does not flicker. Section 3.2.8 Simple inter-PC link does not operate properly Extension module/extension block input cannot be imported. Section 3.2.9 Extension module/extension block input cannot be imported Output cannot be provided to extension module/ extension block. Section 3.2.10 Output cannot be provided to extension module/extension block Communication cannot be made with extension module/ extension block. Section 3.2.11 Communication cannot be made with extension module/extension block Program cannot be written. Section 3.2.12 Program cannot be written 3-2 3. TROUBLESHOOTING MELSEC-A 3.2.2 "POWER" LED turned off The following flowchart gives what to do when the "POWER" LED is extinguished at power-on or during operation. "POWER" LED turned off Is power supplied? NO Supply power. YES NO Is power supply voltage 85 to 264VAC? NO Is "POWER" LED lit? YES Correct supply voltage to within rated range. YES NO Is currentcarrying capacity within specification range? Is "POWER" LED lit? YES (1) Check current-carrying capacity and reduce excess current. (2) Switch input power off, then on. NO YES NO Consult your sales representative. Is "POWER" LED lit? YES Complete 3-3 3. TROUBLESHOOTING MELSEC-A 3.2.3 "RUN" LED turned off The following flowchart gives what to do when the "RUN" LED is extinguished during operation. "RUN" LED turned off Is error indicated on the peripheral connected? YES Correct according to error code list. NO (1) PC parts/contact or other fault (2) Excessive noise "RUN" LED lit. Reset A1FXCPU with RESET switch. Due to (1) "RUN" LED not lit. Due to (2) Move RUN/STOP switch of A1FXCPU to "STOP" position and write END to address 0 from peripheral. Move RUN/STOP switch to "RUN" position to start operation. Consult your sales representative. "RUN" LED not lit. "RUN" LED lit. Possible cause is PC program error. Connect CR or other surge suppression circuit to noise source. Check program and correct program error. 3-4 3. TROUBLESHOOTING MELSEC-A 3.2.4 "RUN" LED flickers The following flowchart gives what to do when the "RUN" LED flickers at power-on, at operation start or during operation. "RUN" LED flickers Hardware fault Check the error with peripheral. (Refer to Section 3.3.) Consult your sales representative. Reset A1FXCPU with RESET switch. Correct the error. (Refer to Section 3.3.) Move RUN/STOP switch to "RUN" position. Is "RUN" LED lit? YES Complete 3-5 NO 3. TROUBLESHOOTING MELSEC-A 3.2.5 "ERROR" LED turned on The following flowchart gives what to do when the "ERROR" LED is lit during operation. "ERROR" LED turned on NO Is M9008 on? YES Hardware error Which error cause? Check action in error code list. Software error Reset A1FXCPU with RESET switch. YES Move RUN/STOP switch of A1FXCPU to "STOP" position. Is error correctable by action? NO Take proper action. Correct the error. Move RUN/STOP switch of A1FXCPU to "RUN" position. YES Consult your sales representative. Is "ERROR" LED lit? NO Complete 3-6 3. TROUBLESHOOTING MELSEC-A 3.2.6 "ERROR" LED flickers The following flowchart gives what to do when the "ERROR" LED flickers during operation. "ERROR" LED flickers Is there 0 in special register D9124? 0 Other than 0 Consult your sales representative. Using RST F instruction, reset coil of annunciator switched on. Complete 3-7 3. TROUBLESHOOTING MELSEC-A 3.2.7 "LINK RUN" LED is off The following flowchart gives what to do when the "LINK RUN" LED is off during link operation. (1) For master station "LINK RUN" LED turned off Has link setting program been written? NO Write link setting program. YES Is there FFFFH in D9173? Check link setting program. · Is there LD M9038 at step 0? · Is MOV instruction used to set data? Use instruction other than MOV to end link setting program. · Is 0 set in D9176? · Is total number of slave stations set in D9177? FFFFH 0 Move RUN/STOP switch of A1FXCPU to "RUN". "LINK RUN" LED on (1) PC parts/contact or other fault (2) Excessive noise Due to (1) "LINK RUN" LED off Due to (2) Consult your sales representative. Connect CR or other surge suppression circuit to noise source. 3-8 3. TROUBLESHOOTING MELSEC-A (2) For local station "LINK RUN" LED turned off Has link setting program been written? NO Write link setting program. YES Is there FFFFH in D9173? Check link setting program. · Is there LD M9038 at step 0? · Is MOV instruction used to set data? Use instruction other than MOV to end link setting program. · Is any of 1 to 7 (station number) set in D9176? FFFFH 0 Move RUN/STOP switch of A1FXCPU to "RUN". "LINK RUN" LED on (1) PC parts/contact or other fault (2) Excessive noise Due to (1) "LINK RUN" LED off Due to (2) Consult your sales representative. Connect CR or other surge suppression circuit to noise source. 3-9 3. TROUBLESHOOTING MELSEC-A 3.2.8 Simple inter-PC link does not operate properly (1) The following flowchart provides what to do when simple inter-PC link does not operate properly. Simple inter-PC link does not operate properly For FX0M, FX2N For A1FXCPU Is "LINK" LED of master station on? Off To flowchart for use when "LINK RUN" LED is off (Refer to Section 3.2.7) On Does "SD" of master station flicker? Off Flickering Does "RD" of next station flicker? Off Flickering Does its "SD" flicker? Flickering 3 - 10 Off · For FX0N, FX2N, check Table 3.1. Check the link setting program. · For A1FXCPU, consult your sales representative. · Check wiring to preceding station. · Check link setting program of station 1. · Is there LD 9038 at step 0? · Is 1 set in D9176 with MOV instruction? · Check the total number of stations in link setting program of master station. · Check data sent by master station. 3. TROUBLESHOOTING MELSEC-A (2) When simple inter-PC link does not operate properly using the FX0N or FX2N, check the following items. Table 3.1 Actions for Use of FX0N/FX2N Item Action Version of all FX0N's and FX2N's connected to simple Is FX0N/FX2N version inter-PC link should be V.2.00 or later (simple inter-PC link V.2.00 or later? compatible). Is communication adaptor Connect FX0N-485ADP to the FX0N. 1 connected to FX0N/FX2N?* Connect FX0N-485ADP or FX2N-485ADP to the FX2N. Is FX2N-485ADP communication adaptor used For 50m or longer overall distance, use FX0N-485ADP with FX2N in 50m or longer communication adaptor with FX2N. overall distance? Is serial number of Use FX0N-485ADP of 7X**** or later since FX0N-485ADP of FX0N-485ADP 79**** or 79**** or earlier serial number cannot be used with simple 2 earlier?* inter-PC link. Is 24VDC supplied to Supply 24VDC as FX0N-485ADP operates on external FX0N-485ADP? 24VDC. Are M503 to M511 or D201 Use other devices because M503 to M511 and D201 to D255 to D255 used with FX0N? are occupied by simple inter-PC link in FX0N. REMARKS *1: The versions of the FX0N and FX2N are printed on the side face of the modules. *2: The serial number of the FX0N-485ADP is printed on the side face of the module. 3 - 11 3. TROUBLESHOOTING MELSEC-A 3.2.9 Extension module/extension block input cannot be imported The following flowchart provides what to do when extension module/extension block input cannot be imported. Extension module/ extension block input cannot be imported Is A1FXCPU in error? YES Check error code with peripheral and eliminate error. NO Check inputs (X) using batch monitoring of peripheral. Turned on If input numbers switched on/off are different from those used in the sequence, reexamine input numbers. Not turned on Is POWER LED of extension module on? Check whether 24VDC current consumption of extension block is within 24VDC service power supply capacity or not. Off On Is POWER LED of extension block on? Supply power to CPU preceding extension block or to extension module. Off On Are input LEDs on? Off Check wiring. On Are extension cables connected properly? NO YES Possible cause is extension module/extension block fault. Consult your sales representative. 3 - 12 Wire extension cables securely. 3. TROUBLESHOOTING MELSEC-A 3.2.10 Output cannot be provided to extension module/extension block The following flowchart offers what to do when output cannot be provided to extension module/extension block. Output load does not turn on Is output (Y) monitored by peripheral ON? NO YES Is POWER LED of extension module on? Off · If output (Y) is not on, check ON condition of output (Y). · Check whether output numbers are correct. Are input numbers used with outputs (Y)? When inputs and outputs are mixed, is number next to input used as output? · "STOP" A1FXCPU and switch on outputs in test mode of peripheral. Check whether 24VDC current consumption of extension block is within 24VDC service power supply capacity or not. On Is output LED of extension module/ extension block on? Off Supply power. On Is load power supply voltage applied? NO Check load power supply wiring and restore power. NO Check load wiring and load and restore power. NG Re-allocate output relay numbers to spread load currents safely. YES Is there voltage across each output and COM? YES Check the worst condition rush current. OK Possible cause is extension module/extension block fault. Consult your sales representative. 3 - 13 3. TROUBLESHOOTING MELSEC-A 3.2.11 Communication cannot be made with special module/special block The following flowchart deals with what to do when communication cannot be made with special module/special block. Communication cannot be made with special module/ special block Is there error in sequence program? YES Correct error. (Refer to Section 3.3.) NO Is FROM/TO instruction designated properly?* NO Correct program. YES Can communication be made with module preceding special module/special block? NO Reexamine module preceding special module/ special block. Off Supply power to special module. NO Connect extension cable securely. YES Is POWER LED of special module on? On Is extension cable connected properly? YES * For TO instruction Possible cause is special module/special block fault. Consult your sales representative. TO n1 n2 D n3 Set in which place the module is from A1FXCPU. 3 - 14 3. TROUBLESHOOTING MELSEC-A 3.2.12 Program cannot be written The following flowchart provides what to do when a program or other data cannot be written to the CPU. Program cannot be written Is RUN/STOP switch in STOP position? RUN Set RUN/STOP switch to STOP. STOP Can program be written? YES NO Reset CPU. NO Is "PROTECT" switch in upper (clear) position? NO Can program be written? YES Move "PROTECT" switch to upper (clear) position. YES NO Can program be written? YES Complete Consult your sales representative. 3 - 15 3. TROUBLESHOOTING MELSEC-A 3.3 Error Code List If an error occurs when the PC is run or while it is running, the self-diagnostic function causes the error to be displayed or the error code (including the step number) to be stored in the special register. Table 3.3 indicates how to read the error code at error occurrence, error causes, and how to take action. Take proper action to remove the error cause. Error messages, error codes, definitions and causes of errors, and corrective actions are given below. Table 3.3 Error Code List Error Message "INSTRUCT CODE ERR." "PARAMETER ERROR" "MISSING END INS." Content of Special CPU Register Status D9008 (BIN Value) 10 Stop 11 Stop 12 Stop Error and Cause Action An unrecognized instruction code is included in the program. (1) The program including an unrecognized instruction code was written from the peripheral. (2) Memory contents changed for some reason, causing the unrecognized instruction code to be included. (3) Though the DIP switch is set to 2 E PROM, the program is not written 2 to E PROM. (1) Read the error step with the peripheral and correct the program in that step. (2) Write the program to 2 E PROM. (3) Write the program from the 2 peripheral to E PROM. Parameter data in CPU memory changed due to noise. Read the parameter data of CPU memory with the peripheral, check and correct the data, and write them to memory again. There is no END (FEND) instruction in the program. Write END at the end of the program. 3 - 16 3. TROUBLESHOOTING MELSEC-A Table 3.3 Error Code List (Continued) Error Message Content of Special CPU Register Status D9008 (BIN Value) "CAN'T EXECUTE (P)" 13 Stop Error and Cause (1) No jump destination or several destinations specified for the CJ, SCJ, CALL(P) or JMP instruction. (2) The RET instruction has been executed with no corresponding CALL(P) instruction. (3) The CJ, SCJ, CALL(P) or JMP instruction has been executed with jump destination located after the END instruction. (4) The number of FOR instructions does not match that of NEXT instructions. (5) The JMP instruction is provided between FOR and NEXT to exit from FOR-NEXT. (6) Before the RET instruction is executed, the JMP instruction has been executed to exit from the subroutine. (7) The JMP instruction has been executed to jump into the step between FOR and NEXT or into the subroutine. 3 - 17 Action Read the error step with the peripheral and correct the program in that step. (Correct by inserting a jump destination or reducing destinations to one.) 3. TROUBLESHOOTING MELSEC-A Table 3.3 Error Code List (Continued) Error Message Content of Special CPU Register Status D9008 (BIN Value) "CHK FORMAT ERR." Error and Cause (1) The CHK instruction ladder block Action (1) Check for any of (1) to (7) contains an instruction (including error causes in the CHK NOP) other than LD X!, LDI X!, instruction ladder block. If AND X! and ANI X!. any, correct the fault with the (2) There are several CHK instructions. peripheral and restart (3) There are more than 150 contacts in operation. the CHK instruction ladder block. (4) The X device number in the CHK instruction ladder block is greater than X1FE. 14 Stop (5) There is no following ladder block before the CHK instruction ladder block. CJ (6) The device (number) of D1 in the CHK D1 D2 instruction is not the same as that of the contact before the CJ instruction. (7) Pointer P254 is not provided at the beginning of the CHK instruction ladder block. P254 "CAN'T EXECUTE (I)" "RAM ERROR" "OPE. CIRCUIT ERR." CHK D1 D2 (1) There are several interrupt pointer I numbers. (2) No IRET instruction in the interrupt program. (3) IRET instruction used outside the interrupt program. 15 Stop 20 Stop (1) The CPU could not access the data memory area of the CPU. Stop (1) The sequence processing operation circuit in the CPU does not operate properly. 21 3 - 18 (1) Create a corresponding number of interrupt programs or remove the same I numbers. (2) Check for IRET instruction in the interrupt program. If not found, write the IRET instruction. (3) Check for the IRET instruction outside the interrupt program. If found, delete the IRET instruction. CPU hardware fault, contact your sales representative. 3. TROUBLESHOOTING MELSEC-A Table 3.3 Error Code List (Continued) Error Message Content of Special CPU Register Status D9008 (BIN Value) "WDT ERROR" Error and Cause Action Stop (1) Calculate or check user program scan time and monitor time. reduce it using CJ instruction, (1) User program scan time has etc. increased. (2) Check for instantaneous (2) Instantaneous power failure during power failure by monitoring program scan has caused scan time special register D9005 with to increase. the peripheral. If the value is other than 0, power supply voltage is instable. Check the power supply and reduce voltage fluctuation. Stop (1) When executed, the END instruction (1) Reset the CPU and run it was read as another instruction again. If the error still code due to noise, etc. persists, it is a CPU hardware (2) The END instruction has changed fault. Consult your sales into another instruction code for representative. some reason. Stop The CJ instruction or like caused the sequence program to enter a loop, making the END instruction inexecutable. Scan time exceeds watchdog error 22 "END NOT EXECUTE" 24 "WDT ERROR" 25 3 - 19 Check for programs which may go into an endless loop and correct if any. 3. TROUBLESHOOTING MELSEC-A Table 3.3 Error Code List (Continued) Error Message Content of Special CPU Register Status D9008 (BIN Value) Error and Cause Action I/O data different from those at power-on. (1) Monitor the special register (1) The connection cable of extension D9116 (in blocks of 16 module, extension block, special points) with the peripheral to module or special block unplugged. check for "1" in the bit "UNIT VERIFY ERR." corresponding to the extension module, extension block, special module or special block resulting in verify error. Change the corresponding module or block. (2) Monitor the special register 31 Stop (Run) D9116 (in blocks of modules) with the peripheral to check for "1" in the bit corresponding to the extension module, extension block, special module or special block resulting in verify error. Change the corresponding module or block. (3) When the current module may be kept connected, reset the CPU with the RESET switch. (1) Power of the extension "FUSE BREAK OFF" module/special module not on. (1) The peripheral may also be used to check whether the power of the extension module/special module is off or not. Monitor the special 32 registers D9100-D9101 to Run (Stop) check for "1" in the bit corresponding to the extension module/special module resulting in power-off. (2) Check whether the power of the extension module/special module is on or off. 3 - 20 3. TROUBLESHOOTING MELSEC-A Table 3.3 Error Code List (Continued) Error Message Content of Special CPU Register Status D9008 (BIN Value) "CONTROL-BUS ERR." Error and Cause FROM and/or TO instruction not 40 Stop Action (1) Special module, CPU module executed. or extension cable hardware (1) Special module control bus error. fault. Change the module and check the faulty module. Consult your sales representative. "SP. UNIT ERROR" (1) Access to where no special module peripheral, and check and executed). correct the FROM/TO (2) Extension module/special block not 46 Stop (Run) (1) Read the error step with the exists (FROM/TO instruction supplied with power. instruction in that step with the peripheral. (2) Switch on power of special module. Switch on power of extension module which supplies power to special block. "LINK PARA. ERROR" (1) Link setting program setting data is 47 Run outside setting range. (1) Correct the link setting program. (LINK RUN LED flickers) "OPERATION ERROR" (1) BCD conversion result exceeded 50 Run (Stop) (1) Read the error step with the specified range (9999 or 99999999). peripheral, and check and (2) Setting in excess of specified device correct the program in that range made operation inexecutable. (3) File registers used in program without file register capacity being step. (Check device setting range, BCD conversion value, etc.) set. "MAIN CPU DOWN" (1) Interrupt (INT) instruction used in microcomputer program. 60 Stop (2) CPU misoperated due to noise, etc. (3) CPU hardware fault. (1) Remove INT instruction as it cannot be used in microcomputer program. (2) Eliminate noise. (3) Change CPU. "BATTERY ERROR" (1) Battery voltage dropped below 70 Run specified level. (2) Battery not connected. (1) Change battery. (2) Connect battery when built-in RAM memory or power failure compensation is used. 3 - 21 3. TROUBLESHOOTING MELSEC-A 3.4 Extension Module/Extension Block Troubleshooting This section describes possible problems with the extension module/extension block and their corrective actions. 3.4.1 Input circuit If the LED of the extension module/extension block is on or off but the corresponding input monitored by the programming panel is off or on, check to see if the input signal switch is on or off positively. (1) A contact fault is more likely to occur if the rated current-carrying capacity of the input switch is too large. A contact fault may have occurred due to oil ingress, etc. (2) When a resistor for turning on LED is provided in parallel with the input switch, the PC input may be activated through this parallel circuit if the input switch has turned off. (3) For input equipment such as an optical sensor, the input may not switch on positively because of its sensitivity change due to light emitter/receiver contamination, etc. (4) Inputs which switch on or off in a shorter time than the PC operation cycle may not be accepted. (5) If the output of 24VDC for sensor power supply is overloaded or shorted, the protective circuit is activated to drop the voltage of that output automatically, causing all PC inputs to be deactivated. In such a case, disconnect the wiring of the 24+ terminal. (6) Application of a different voltage to the input terminal may damage the input circuit. (7) As a possible cause is the contact fault of the input terminal connector on the extension module, unplug and plug the connector from and into the input terminal block. (8) Input circuit The input primary and secondary circuits are photocoupler isolated and the secondary circuit is provided with a C-R filter to prevent misoperation due to the chattering of input contacts and the entry of noise from input lines. For this reason, the PC is designed to delay approx. 10ms in response to input ON to OFF or OFF to ON changes. 3 - 22 3. TROUBLESHOOTING MELSEC-A 3.4.2 Output circuit If the LED of the extension module/extension block is on or off but the load does not switch on or off, it may be due to an open-circuit leakage current (triac output) or any of the following causes. (1) The relay output contacts may be fused due to overloading, load shorting, capacitance load's inrush current or like, or a contact fault may have occurred due to rough contact surfaces. Note that the life of the relay contacts will be considerably shortened if inrush overcurrent is shut off. (2) As a possible cause is the contact fault of the output terminal connector on the extension module, unplug and plug the connector from and into the input terminal block. (3) C-R absorbers are connected in parallel with the triac output terminals of the FX2N series extension module/extension block. Hence, an open-circuit leakage current of 1mA/100VAC or 2mA/200VAC flows. 3 - 23 APPENDICES MELSEC-A Appendix 1 Special Relay and Special Register Lists Appendix 1.1 Special relays M The special relays (M9000 to M9255) are internal relays which have predetermined applications in the PC. Therefore, the special relays not marked *1 and *2 should not be switched on-off in the program. The special relays not given in the table should not be switched on-off, either. Appendix Table 1.1 Special Relay List Number Name Description OFF : Normal 1 M9000* Power-off ON : Power-off in a module 1 M9002* 1 M9005* M9006 I/O module OFF : Normal verify error ON : Error AC DOWN detection Battery low 1 M9007* 1 M9008* OFF : AC supply normal ON : AC is down OFF : Normal ON : Battery low Battery low OFF : Normal latch ON : Battery low Self-diagnostic OFF : No error error ON : Error Details ⋅ Turned on when there is one or more extension modules whose external supply power is off. Remains on after normal status is restored. ⋅ Turned on when a module connected to the A1FXCPU is different from the one registered at power-on. Remains on after normal status is restored. ⋅ Turned on by a power failure of within 10ms. Reset when power goes from OFF to ON. ⋅ Turned on when battery voltage drops below that specified. Turned off when battery voltage is restored. ⋅ Turned on when battery voltage drops below that specified. Remains on after battery voltage is restored. ⋅ Turned on by self-diagnosed error. OFF : No annunciator Annunciator M9009 detection detected ON : Annunciator ⋅ Turned on when OUT F or SET F instruction is executed. Switched off when content of D9124 is reset to zero. detected Operation error OFF : No error M9010 flag 1 M9011* M9012 M9016 M9017 ON : Error Operation error OFF : No error flag Carry flag ON : Error OFF : Carry off ON : Carry on Data memory OFF : Ignore clear flag ON : Output clear Data memory OFF : Ignore clear flag ON : Output clear ⋅ Turned on by an application instruction processing error. Turned off when error is removed. ⋅ Turned on by an application instruction processing error. Remains on after normal status is restored. ⋅ Carry flag used in application instructions. ⋅ Clears all data memory (other than special relays and special registers) including the latch range in the remote run mode from a computer, etc. when M9016 is on. ⋅ Clears the unlatched data memory (other than special relays and special registers) in the remote run mode from a computer, etc. when M9017 is on. Appendix - 1 APPENDICES MELSEC-A Appendix Table 1.1 Special Relay List (Continued) Number M9020 clock No. 1 User timing n2 scans n2 scans DUTY User timing n1 n2 M9020 clock No. 3 User timing M9024 clock No. 4 2 M9025* M9026 2 M9028* Clock data set OFF: Ignore request ON : Set request Clock data OFF: No error error ON : Error Clock data OFF : Ignore read request ON : Read request 0.1 second ⋅ Writes clock data in D9025-D9028 to clock elements after END instruction is executed in a scan when M9025 changed from OFF to ON. ⋅ Turned on when error occurs in clock data (D9025-D9028). Off when there is no error. ⋅ Reads clock data in BCD to D9025-D9028 when M9028 is on. 0.05s 0.05s clock 0.2 second clock 0.1s 0.1s 0.5s 0.5s 1 second clock M9033 2 second clock 1s 1s M9034 1 minute clock 30s 30s M9036 Normally ON M9037 Normally OFF On only for 1 scan after run ⋅ Time dependent clock pulse: 0.1 second, 0.2 second, 1 second, 2 second, and 1 minute clocks. M9032 ⋅ Not scan dependent, i.e. will be switched during scan if corresponding time has elapsed. ⋅Off when power is turned on or CPU is reset. ⋅ Used as dummy contacts for initialization and application ON OFF ON OFF ON OFF instructions in sequence program. ⋅ M9036 and M9037 are turned on and off independently of the RUN/STOP switch position on the CPU. 1 scan RUN flag M9039 ⋅ Off when power is turned on or CPU is reset. ⋅ On and off periods are specified in the DUTY instruction. n1 scans clock No. 2 M9023 M9038 Details ⋅ Scan dependent clock pulse. User timing M9022 M9031 Description clock No. 0 M9021 M9030 Name User timing (off only for 1 scan after run) ON OFF ⋅ M9038 and M9039 change depending on the RUN/STOP switch position. M9038 and M9039 are switched off if the RUN/STOP switch is 1 scan in STOP position. M9038 is switched off (on for one scan only) and M9039 switched on (off for one scan only) if the RUN/STOP switch is not in STOP position. M9040 M9041 PAUSE enable coil PAUSE status contact OFF : PAUSE disabled ON : PAUSE enable OFF : Other than ⋅ If M9040 is on at the time when the remote pause contact has turned on, the PC enters the PAUSE mode and M9041 is turned on. pause ON : During pause Appendix - 2 APPENDICES MELSEC-A Appendix Table 1.1 Special Relay List (Continued) Number M9042 Name Description Stop status OFF : Other than stop contact ON : During stop OFF : During Sampling trace M9043 complete sampling trace ON : Sampling trace Details ⋅ Turned on when the switch is in STOP position. ⋅ Turned on to indicate that sampling trace has been recorded the specified number of times after execution of STRA instruction. Reset when STRAR instruction is executed. complete M9046 Sampling trace OFF : Trace inactive ON : Trace active ⋅ Switched on during sampling trace. OFF : Sampling trace Sampling trace M9047 ready ⋅ M9047 should be switched on to start sampling trace. By turning off M9047, sampling trace is stopped. ON : Sampling trace stop start Output M9049 character count changing OFF : Output of up to NULL code ON : 16 characters output ⋅ When M9049 is off, all characters up to NULL (00H) code are output at a time. ⋅ When M9049 is on, 16 characters are output in ASCII. OFF : 7 segment 2 M9052* SEG instruction display switching ON : Partial I/O Status latch OFF : Incomplete ⋅ Executed as 7-segment display instruction when M9052 is off. ⋅ Executed as I/O partial refresh instruction when M9052 is on. refresh M9055 completion flag ON : Complete OFF : Checks 2 M9084* Error check enabled ON : Checks disabled ⋅ Turned on when status latch is completed. Turned off by reset instruction. ⋅ Specify whether the following errors are to be checked or not after the END instruction is executed (to reduce END processing time). ⋅ Extension module/special module power off ⋅ I/O module verify error ⋅ Battery error SFC program M9100 presence/abse nce SFC program 2 M9101* run enable/disable OFF : SFC program absent ON : SFC program present OFF : SFC program disable ON : SFC program enable ⋅ Turned on when the SFC program is registered and the SFC program running work area can be reserved. Turned off when the SFC program is not registered or the SFC program running work area cannot be reserved. ⋅ Turned on by the user when executing the SFC program. Turning off M9101 turns off the operation output of the executed step and stops the SFC program. ⋅ Select the start step when M9101 is used to restart the SFC program. OFF 2 M9102* SFC program start status OFF : Initial start ON : Resumption : Running conditions at SFC program stop are all cleared and the SFC program is started at the initial step of block 0. ON : The SFC program is resumed at the step of the block executed at the time when it was stopped. ⋅ Since M9102 is automatically latched, it retains its value if power is switched off. Appendix - 3 APPENDICES MELSEC-A Appendix Table 1.1 Special Relay List (Continued) Number Name Description OFF : Continuous Continuous 2 M9103* transition enable/disable transition disable ON : Continuous transition enable Continuous M9104 transition obstruction flag OFF : At transition end ON : When there is no transition Details ⋅ Select whether the steps whose transition conditions have been satisfied within one scan are all executed or not when the transition conditions of consecutive steps have all been satisfied. ON : Executed consecutively (continuous transition enable) OFF : One step is executed per scan (continuous transition disable) ⋅ Turned on when continuous transition is not executed with continuous transition enabled. Turned off when one-step transition ends. By writing M9104 with AND as transition condition, continuous transition of corresponding steps can be obstructed. Step transition monitor timer 2 M9108* start (corresponding to D9108) Step transition monitor timer 2 M9109* start (corresponding to D9109) Step transition monitor timer 2 M9110* start (corresponding to D9110) Step transition monitor timer 2 M9111* OFF : Monitor timer reset start ON : Monitor timer (corresponding start to D9111) Turned on to start timing of the step transition monitor timer. Turned off to reset the monitor timer. Step transition monitor timer 2 M9112* start (corresponding to D9112) Step transition monitor timer 2 M9113* start (corresponding to D9113) Step transition monitor timer 2 M9114* start (corresponding to D9114) Appendix - 4 APPENDICES MELSEC-A Appendix Table 1.1 Special Relay List (Continued) Number Name Description Details Interrupt control during M9119 FROM/TO instruction OFF : Interrupt ⋅ OFF : Interrupt disabled during FROM/TO instruction execution disable ⋅ ON : Interrupt enabled during FROM/TO instruction execution ON : Interrupt enable execution Interrupt M9120 M9121 M9122 M9123 M9124 M9125 polarity setting Interrupt OFF : X1 leading polarity setting ⋅ OFF : Interrupt accepted on leading edge of X1 edge ⋅ ON : Interrupt accepted on trailing edge of X1 ON : X1 trailing edge Interrupt OFF : X2 leading pointer I1 polarity setting ⋅ OFF : Interrupt accepted on leading edge of X2 edge ⋅ ON : Interrupt accepted on trailing edge of X2 ON : X2 trailing edge Interrupt OFF : X3 leading pointer I2 polarity setting ⋅ OFF : Interrupt accepted on leading edge of X3 edge ⋅ ON : Interrupt accepted on trailing edge of X3 ON : X3 trailing edge Interrupt OFF : X4 leading pointer I3 polarity setting ⋅ OFF : Interrupt accepted on leading edge of X4 edge ⋅ ON : Interrupt accepted on trailing edge of X4 ON : X4 trailing edge Interrupt OFF : X5 leading pointer I4 pointer I5 polarity setting X-axis pulse M9126 output logic switching X-axis pulse M9127 method switching M9128 OFF : X0 leading ⋅ OFF : Interrupt accepted on leading edge of X0 edge ⋅ ON : Interrupt accepted on trailing edge of X0 ON : X0 trailing edge pointer I0 Enable/disable of X axis use ⋅ OFF : Interrupt accepted on leading edge of X5 edge ⋅ ON : Interrupt accepted on trailing edge of X5 ON : X5 trailing edge OFF : Negative logic ON : Positive logic ⋅ Set the pulse output logic (negative logic/positive logic) according to the servo amplifier and stepping motor driver used. OFF : CW/CCW ON : PULSE/SIGN ⋅ Set the pulse output method (CW/CCW, PULSE/SIGN). OFF : Disabled ON : Enabled ⋅ Turned off when the simple positioning function is not used. ⋅ Turned on when simple positioning is used. OFF : CW for forward rotation CCW for M9129 X-axis direction switching reverse ⋅ Set the direction of rotation. rotation ON : CW for reverse rotation CCW for forward rotation X-axis pulse M9130 output start signal X-axis M9131 deceleration-tostop signal Pulse output start ⋅ Turned on to start X-axis positioning. ⋅ Turned from off to on to start X-axis pulse output. OFF to ON: ⋅ Turned on to decelerate the X axis to a stop at any point during positioning. OFF to ON: Deceleration to stop ⋅ Turned from off to on to decelerate the X axis to a stop. ⋅ After a stop, turned off before starting positioning. Appendix - 5 APPENDICES MELSEC-A Appendix Table 1.1 Special Relay List (Continued) Number Name Description Details ⋅ Turned on to force the X axis to stop withoutdeceleration at any M9132 X-axis forced stop signal point during positioning. OFF to ON: Stop ⋅ Turned from off to on to stop the X axis immediately without deceleration. (Stopped during on) ⋅ After a stop, turned off before starting positioning. X- and Y-axis M9133 simultaneous OFF to ON: ⋅ Turned on to start the X and Y axes simultaneously. pulse output Pulse output start ⋅ Turned from off to on to start the pulse output of the X and Y axes. start signal ⋅ Turned on to decelerate the X and Y axes to a stop X- and Y-axis M9134 M9135 simultaneous OFF to ON: ⋅ Turned from off to on to decelerate the X and Y axes to a stop. stop signal ⋅ After a stop, turned off before starting positioning. X- and Y-axis ⋅ Turned on to force the X and Y axes to stop simultaneously without deceleration at any point during positioning. simultaneous forced stop OFF to ON: Stop signal Y-axis pulse M9136 output logic switching Y-axis pulse M9137 method switching M9138 simultaneously at any point during positioning. deceleration-to- Deceleration to stop Enable/disable of Y axis use ⋅ Turned from off to on to stop the X and Y axes immediately without deceleration. (Stopped during on) ⋅ After a stop, turned off before starting positioning. OFF : Negative logic ON : Positive logic ⋅ Set the pulse output logic (negative logic/positive logic) according to the servo amplifier and stepping motor driver used. OFF : CW/CCW ON : PULSE/SIGN ⋅ Set the pulse output method (CW/CCW, PULSE/SIGN). OFF : Disabled ON : Enabled ⋅ Turned off when the simple positioning function is not used. ⋅ Turned on when simple positioning is used. OFF : CW for forward rotation CCW for M9139 Y-axis direction switching reverse ⋅ Set the direction of rotation. rotation ON : CW for reverse rotation CCW for forward rotation Y-axis pulse M9140 output start signal Y-axis M9141 deceleration-tostop signal M9142 Y-axis forced stop signal output start ⋅ Turned on to start Y-axis positioning. ⋅ Turned from off to on to start Y-axis pulse output. OFF to ON: ⋅ Turned on to decelerate the Y axis to a stop at any point during positioning. OFF to ON: Pulse Deceleration to stop ⋅ Turned from off to on to decelerate the Y axis to a stop. ⋅ After a stop, turned off before starting positioning. ⋅ Turned on to force the Y axis to stop without deceleration at any point during positioning. OFF to ON: Stop ⋅ Turned from off to on to stop the Y axis immediately without deceleration. (Stopped during on) ⋅ After a stop, turned off before starting positioning. Appendix - 6 APPENDICES MELSEC-A Appendix Table 1.1 Special Relay List (Continued) Number M9143 M9144 Name X-axis pulse output status Y-axis pulse output status Description OFF : During stop ON : During pulse output OFF : During stop ON : During pulse output Details ⋅ Off while the X-axis pulse output is stopped. ⋅ On during X-axis pulse output. ⋅ Off while the Y-axis pulse output is stopped. ⋅ On during Y-axis pulse output. ⋅ Turned on if. X-axis setting data is outside range. M9145 X-axis setting error OFF : Normal ON : Outside data range Running frequency is lower than the start/stop frequency of the X axis. X-axis or simultaneous start pulse output start signal is turned on while the deceleration-to-stop/forced stop signal of the X axis is on. ⋅ Turned on if. Y-axis setting data is outside range. M9146 Y-axis setting error OFF : Normal ON : Outside data Running frequency is lower than the start/stop frequency of the range Y-axis or simultaneous start pulse output start signal is turned Y axis. on while the deceleration-to-stop/forced stop signal of the Y axis is on. Appendix - 7 APPENDICES MELSEC-A Appendix Table 1.1 Special Relay List (Continued) Number M9147 M9148 M9149 M9150 M9151 M9152 M9153 M9154 M9155 Name CH1 counter value greater ⋅ Turned on when CH1 counter value = set value (D9157, D9158). coincidence ⋅ Turned off when the coincidence signal reset command (M9151) is turned on. CH1 counter value less ⋅ Turned on when CH1 counter value < set value (D9157, D9158). CH1 external preset request detection M9158 M9159 ⋅ Turned on when a preset request is given by the external input (X8). ⋅ Turned off when the external preset detection signal reset (M9156) is turned on. CH1 coincidence signal ⋅ Signal used to reset the counter value coincidence signal. reset command ⋅ When M9151 is turned on, M9148 is turned off. CH1 preset command CH1 down count command CH1 count enable CH1 present value read request detection reset command M9157 ⋅ Turned on when CH1 counter value > set value (D9157, D9158). CH1 counter value CH1 external preset M9156 Description ⋅ Signal used to write the preset value stored in D9153 and D9152 (Valid when turned from off to on) ⋅ Signal used to set up/down count in the single-phase mode OFF : Up count ON : Down count ⋅ Turned on when count operation is performed. ⋅ Turned on when the present value of the high-speed counter is read to D9160 and D9161. (Valid when turned from off to on) ⋅ Turned on when the external preset request detection signal (M9150) is turned off. CH1 ring counter setting ⋅ Turned on when ring counter operation is performed. CH1 counting speed selection CH1 counter function selection start command ⋅ Used to change the counting speed of the high-speed counter. OFF : 60kpps in both 1- and 2-phase modes ON : 10kpps in 1-phase mode, 7kpps in 2-phase mode. OFF : Count operation is performed. OFF to ON : Counter's present value is latched. (D9159=1) ON : Count operation is stopped. (D9159=0) Appendix - 8 APPENDICES MELSEC-A Appendix Table 1.1 Special Relay List (Continued) Number Name CH2 counter value M9167 greater M9169 M9170 ⋅ Turned on when CH2 counter value = set value (D9167, D9168). ⋅ Turned off when the coincidence signal reset command (M9171) is turned on. CH2 counter value less ⋅ Turned on when CH2 counter value < set value (D9167, D9168). CH2 external preset ⋅ Turned on when a preset request is given by the external input (X9). ⋅ Turned off when the external preset detection signal reset (M9176) is turned request detection CH2 coincidence signal M9171 reset command M9172 CH2 preset command CH2 down count M9173 command M9174 CH2 count enable CH2 present value read M9175 request CH2 external preset M9176 ⋅ Turned on when CH2 counter value > set value (D9167, D9168). coincidence CH2 counter value M9168 Description detection reset command on. ⋅ Signal used to reset the counter value coincidence signal. ⋅ When M9171 is turned on, M9168 is turned off. ⋅ Signal used to write the preset value stored in D9162 and D9163 (Valid when turned from off to on) ⋅ Signal used to set up/down count in the single-phase mode OFF : Up count ON : Down count ⋅ Turned on when count operation is performed. ⋅ Turned on when the present value of the high-speed counter is read to D9170 and D9171. (Valid when turned from off to on) ⋅ Turned on when the external preset request detection signal (M9170) is turned off. CH2 ring counter setting ⋅ Turned on when ring counter operation is performed. M9177 CH2 counting speed M9178 selection CH2 counter function M9179 selection start command Step trace completion M9180 flag Step trace execution M9181 flag ⋅ Used to change the counting speed of the high-speed counter. OFF : 60kpps in both 1- and 2-phase modes ON : 10kpps in 1-phase mode, 7kpps in 2-phase mode. OFF : Count operation is performed. OFF to ON : Counter's present value is latched. (D9169=1) ON : Count operation is stopped. (D9169=0) ⋅ Turned on at completion of the step trace of all specified blocks. Turned off at start of step trace. ⋅ On during execution of step trace. Turned off at completion or stop of step trace. ⋅ Select enable/disable of step trace execution. ON : Step trace execution is enabled. 2 M9182* Step trace enable OFF : Step trace execution is disabled. When M9182 is turned off during step trace execution, trace is suspended. Appendix - 9 APPENDICES MELSEC-A Appendix Table 1.1 Special Relay List (Continued) Number Name Description/Details Relevant Station ⋅ Signal used in the local stations to check whether the master Data transmission M9183 sequence error (master station) station is normal or not. ⋅ Turned on when an error occurs in the master station during execution of data transmission sequence. Local station ⋅ Turned off when link is resumed after the faulty master station is restored from the error. (Master station normal) Data transmission M9184 sequence error (local station 1) Data transmission M9185 sequence error (local station 2) Data transmission M9186 sequence error (local station 3) Data transmission M9187 sequence error (local station 4) Data transmission M9188 sequence error ⋅ Signals used in the master and local stations to check whether the local station is normal or not. ⋅ Turned on when an error occurs in the corresponding local station during execution of data transmission sequence. ⋅ Turned off when link is resumed after the faulty local station is restored from the error. (Local station normal) (local station 5) M9189 M9190 Data transmission Master sequence error (local station 6) station Local Data transmission station sequence error (local station 7) ⋅ Signal used to check whether data transmission sequence is normal or not. (M9184 to M9190 are used to check whether the corresponding Data transmission M9191 sequence in progress local stations are normal or not.) ⋅ On while data transmission sequence is in normal progress. (Turned on when any one local station responds to a sending request.) ⋅ Turned off when the master station or all local stations become faulty. M9192 Error clear ⋅ While on, clears M9183 to M9190 and D9183 and D9198. ⋅ Signal used to make self-check. M9193 Loopback self-check ⋅ Turned on to start check. ⋅ Turned off to end check. ⋅ Select operation output at a block stop. ON : ON/OFF state of the coil used for operation output of the 2 M9196* Operation output at block stop step being executed at a block stop are held. OFF : All coil outputs are turned off. (Operation output by SET instruction is retained independently of whether M9196 is on or off.) Appendix - 10 APPENDICES MELSEC-A POINTS (1) All contents of special relays are switched "off" by any of power-off, latch clear and reset operations. When the RUN/STOP switch is moved to "STOP", contents are held. (2) Special relays marked *1 above are latched "on" and will remain "on" after normal status is restored. Switch them "off" as follows. (a) From the user program Use the ladder rung shown on the right and turn on the reset command contact to clear the special relay M. Reset command RST M9000 Specify the device to be reset. (b) From the peripheral equipment Use the test function of the peripheral to force-reset the special relay. For the operation procedure, refer to the corresponding peripheral manual. (c) Press the RESET switch on the CPU front to switch the special relays "off". (3) Special relays marked *2 are switched on/off in the sequence program. Appendix - 11 APPENDICES MELSEC-A Appendix 1.2 Special registers D The special registers are data registers having predetermined applications in the PC. Therefore, data should not be written to these registers (except those marked *1 and *2 in the table) in the program. Data should not be written to the registers not given in the table, either. Appendix Table 1.2 Special Register List Number Name Description Details ⋅ Indicates in hexadecimal the first I/O address of the lowest Module number D9000 Power-off location with power-off extension module number in which power switched off (e.g. "50" for an extension module having Y50-6F addresses). ⋅ Use the hexadecimal monitor function on the peripheral equipment to read the data. (Cleared when D9100 is reset to 0.) ⋅ Indicates in hexadecimal the first I/O address of the lowest I/O module D9002 verify error Module number location with I/O verify error extension module number whose data is different from that registered at power-on (address written as in D9000). ⋅ Use the hexadecimal monitor function on the peripheral equipment to read the data. (Cleared when D9116-D9123 are reset to 0.) 1 D9005* 1 D9008* AC DOWN counter ⋅ 1 is added each time the input voltage drops to 80% or less of AC DOWN count rated while the CPU module is operating, and the value stored in BIN. Self-diagnostic Self-diagnostic error error number ⋅ Records the self-diagnosed error number in BIN. ⋅ Records the number (in BIN) of the earliest annunciator coil (F) D9009 Annunciator detection F number whose external failure was detected to be switched on by OUT F or SET F . ⋅ D9009 can be cleared by executing the RST F or LEDR instruction.0 ⋅ If another F number has been detected, the clearing of D9009 causes the next number to be stored in D9009. D9010 Error step Step number location of operation error ⋅ Records the step number (in BIN) at which an application instruction processing error occurred. ⋅ D9010 data is updated each time operation error occurs. ⋅ Records the step number (in BIN) at which an application D9011 Error step Step number location of operation error instruction processing error occurred. ⋅ D9011 data cannot be updated until special relay M9011 is reset by the user program. D9014 I/O control I/O control mode mode number ⋅ Returns the preset I/O control mode with the following number. 3: Both input and output refresh Appendix - 12 APPENDICES MELSEC-A Appendix Table 1.2 Special Register List (Continued) Number Name Description Details ⋅ The operating status of the CPU is stored in D9015 as shown below. B15 to B12 B11 to B8 B7 to B4 B3 to CPU RUN/STOP Switch CPU operating D9015 status 0 RUN 1 STOP B0 No change in remote RUN/STOP Remote RUN/STOP by Parameter Setting CPU operating status 0 RUN 1 STOP 2 PAUSE *1 Status in Program 0 Other than below 1 STOP instruction executed Remote RUN/STOP by Computer 0 RUN 1 STOP 2 PAUSE *1 *1: The operation mode remains in the RUN mode if the switch is set to PAUSE when the CPU is running and M9040 is off. D9016 D9017 ROM/RAM 1: RAM setting 2: E PROM Scan time D9018 Scan time D9019 Scan time 2 Minimum scan time (in 10ms increments) Scan time (in 10ms increments) Maximum scan time (in 10ms increments) ⋅ Indicates the setting of memory selection switch and stores 1 or 2 in BIN. ⋅ Records the minimum program scan time as a BIN integer multiple of 10ms. ⋅ Records the program scan time as a BIN integer multiple of 10ms. ⋅ Records the maximum program scan time as a BIN integer multiple of 10ms. ⋅ Set the interval between consecutive program starts in multiples 1 D9020* Constant scan Constant scan time of 10ms. (Set by user in 10ms 0 increments) 1 to 200 : Set. : No setting ⋅ Program is executed at intervals of (set value) × 10ms. Appendix - 13 APPENDICES MELSEC-A Appendix Table 1.2 Special Register List (Continued) Number Name Description Details ⋅ Indicates the year (lower 2 digits) and month in BCD as shown below. B15 2 D9025* Clock data to B12 B11 to B8 B7 to B4 B3 to B0 Clock data (Year, month) Year Month Example: Year 87, July H8707 ⋅ Indicates the day and hour in BCD as shown below. B15 2 D9026* Clock data to B12 B11 to B8 B7 to B4 B3 to B0 Clock data (Day, hour) Day Hour Example: 31st, 10 o'clock H3110 ⋅ Indicates the minute and second in BCD as shown below. B15 2 D9027* Clock data to B12 B11 to B8 B7 to B4 B3 to B0 Clock data (Minute, second) Minute Second Example: 35 minutes, 48 seconds H3548 ⋅ Indicates the day of the week in BCD as shown below. B15 2 D9028* Clock data to B12 B11 to B8 B7 to B4 B3 to Clock data B0 Day of the week (0, day of the week) Always set "0". 0 Sunday 1 Monday 2 Tuesday 3 Wednesday 4 Thursday 5 Friday 6 Saturday ⋅ Set the element numbers of "ERROR" LED light-up (flickering) priority levels 1 to 4 (D9038) and level 5 (D9039) when an error occurs. B15 to B12 B11 to B8 B7 to B4 B3 to B0 – 2 LED display 2 priority D9038* D9039* Priority 1 to 4 Priority 5 – – 5 B15 to B12 B11 to B8 B7 to B4 B3 to B0 4 3 2 1 (Level) Priority If "0" is set, the error at which the CPU stops operation (including arameter setting) is displayed on the LED unconditionally. Default values D9038=H4321 D9039=H0006 Appendix - 14 Element Number Description 0. Not displayed 1. I/O verify, fuse blown 2. 3. Special module, link parameter, SFC parameter, SFC error CHK instruction error 4. Annunciator 6. Battery error APPENDICES MELSEC-A Appendix Table 1.2 Special Register List (Continued) Number Name SFC program D9049 executing work area Description Extension file register block No. used as SFC program executing work area Details ⋅ Stores the extension file register block No. (in BIN) used as SFC program executing work area. ⋅ Stores "0" when the 16k byte or less empty area which cannot be set as extension file register block No. 1 is used or M9100 is off. ⋅ Stores the error number (in BIN) produced in SFC program. 0 D9050 SFC program error number : No error 80 : SFC program parameter error Error number 81 : SFC code error generated in SFC 82 : Simultaneously executed step count excess program 83 : Block start error 84 : SFC program operation error (For error details, refer to the MELSAP-II (SFC) programming manual.) D9051 Error block Block number where error occurred ⋅ Stores the block number (in BIN) where error occurred in SFC program. For error 83, stores the block number of start source. ⋅ Stores the step number of operation output (in BIN) where error D9052 D9053 Error step Error transition Step number where ⋅ Stores "0" when error 80, 81 or 82 occurred. ⋅ Stores the block start step number when error 83 occurred. Transition condition ⋅ Stores the transition condition number (in BIN) where error 84 number where error occurred D9054 Error sequence step 84 occurred in SFC program. error occurred Sequence step number where error occurred occurred in SFC program. ⋅ Stores "0" when error 80, 81, 82 or 83 occurred. ⋅ Stores the sequence step number of transition condition or operation output (in BIN) where error 84 occurred in the transition condition or step where the error occurred in SFC program. Appendix - 15 APPENDICES MELSEC-A Appendix Table 1.2 Special Register List (Continued) Number Name Description Details ⋅ Indicates the extension module numbers whose external supply power is off (in blocks of 16 points). 1 D9100* D9101 Power-off Bit map of modules extension with power off in module blocks of 16 points 15 14 13 12 11 10 9 8 7 6 5 4 3 2 1 0 D9100 0 0 0 1 0 0 0 1 0 0 0 0 0 0 0 0 YCO D9101 Y80 1 0 0 0 0 1 0 0 0 0 0 0 0 0 0 0 Y1FO Y1AO Indicates external supply power is off. (Data is latched and must be cleared from the user program.) ⋅ Indicates the extension module numbers whose data are different from those registered at power-on (in blocks of 16 points). 1 D9116* D9117 I/O module verify error 15 14 13 12 11 10 9 8 7 6 5 4 3 2 1 0 D9116 0 0 0 0 0 0 0 0 0 0 0 0 0 0 0 1 Bit map of modules with verify errors in X/Y0 D9117 blocks of 16 points 0 0 0 0 0 0 1 0 0 0 0 0 0 0 0 0 X/Y 190 Indicates I/O module verify error. (Data is latched and must be cleared from the user program.) ⋅ 1 is added to the contents of D9124 each time any of F0 to F255 is switched on by Number of D9124 detected Number of detected annunciator annunciator signals signals or SET F . 1 is subtracted from OUT F the contents of D9124 each time an F coil is reset by or LEDR . ⋅ Indicates the number of coils switched on by OUT F RST F or up to 8. SET F ⋅ D9125 to D9132 record the annunciator (F) numbers in the order in which they occur on a first-in first-out basis. ⋅ Annunciator numbers are removed from any place in the queue by applying RST F . Subsequent entries then move up one place. ⋅ The annunciator number at the beginning of the queue is cleared by the D9125 D9128 D9129 D9130 D9131 D9132 instruction and subsequent entries move up one place. ⋅ The ninth annunciator number is ignored until there is room in D9126 D9127 LEDR Detected annunciator numbers the queue. Detected annunciator SET SET SET RST SET SET SET SET SET SET SET F50 F25 F99 F25 F15 F70 F65 F38 F110 F151 F210 LEDR numbers D9009 0 D9124 0 1 D9125 0 50 50 50 50 50 50 50 50 50 50 50 99 D9126 0 0 25 25 D9127 0 0 0 99 0 D9128 0 0 0 0 0 0 70 70 70 70 70 70 65 D9129 0 0 0 0 0 0 0 65 65 65 65 65 38 D9130 0 0 0 0 0 0 0 0 38 38 38 38 110 D9131 0 0 0 0 0 0 0 0 0 110 110 110 151 D9132 0 0 0 0 0 0 0 0 0 0 151 151 210 Appendix - 16 50 50 50 50 50 50 50 50 50 50 50 99 2 3 2 3 4 5 6 7 8 8 8 99 99 99 99 99 99 99 99 99 15 15 15 15 15 15 15 70 APPENDICES MELSEC-A Appendix Table 1.2 Special Register List (Continued) Number D9136 D9137 D9138 D9139 D9140 D9141 D9142 D9143 D9144 D9145 D9146 Name count (lower 16 bits) X-axis current output pulse Y-axis current output pulse count (lower 16 bits) Y-axis current output pulse D9149 X-axis start/stop frequency X-axis running frequency X-axis acceleration/ deceleration time (lower 16 bits) X-axis output pulse count Setting range: 0 to 60000 (Hz) ⋅ Set the running frequency (positioning speed) of the X axis. Setting range: 0 to 60000 (Hz) ⋅ Set the acceleration/deceleration time of the X axis. Setting range: 1 to 32767 (ms) ⋅ Set the number of output pulses (travel) of the X axis. Setting range: 0 to 16777215 (upper 8 bits) Y-axis start/stop frequency Y-axis running frequency acceleration/deceleration ⋅ Set the running frequency (bias speed) at start and stop of the Y axis. Setting range: 0 to 60000 (Hz) ⋅ Set the running frequency (positioning speed) of the Y axis. Setting range: 0 to 60000 (Hz) ⋅ Set the acceleration/deceleration time of the Y axis. Setting range: 1 to 32767 (ms) Y-axis output pulse count (lower 16 bits) Y-axis output pulse count ⋅ Set the number of output pulses (travel) of the Y axis. Setting range: 0 to 16777215 (upper 8 bits) PULSE/SIGN method selection Setup/hold time for Y-axis D9151 ⋅ Set the running frequency (bias speed) at start and stop of the X axis. X-axis output pulse count Setup/hold time for X-axis D9150 ⋅ Stores the number of pulses output from Y-axis pulse output start until now. count (upper 8 bits) time D9148 ⋅ Stores the number of pulses output from X-axis pulse output start until now. count (upper 8 bits) Y-axis D9147 Description/Details X-axis current output pulse PULSE/SIGN method selection ⋅ Set the setup/hold time when X-axis PULSE/SIGN method is selected. Setting range: 0 to 32767 (µs) ⋅ Set the setup/hold time when Y-axis PULSE/SIGN method is selected. Setting range: 0 to 32767 (µs) Appendix - 17 APPENDICES MELSEC-A Appendix Table 1.2 Special Register List (Continued) Number Name D9152 CH1 preset value (lower 16 bits) D9153 CH1 preset value (upper 8 bits) Description/Details ⋅ Stores the preset value of CH1 set when M9152 turns from off to on or X8 turns from off to on. Setting range: 0 to 16777215 ⋅ Set the pulse input method of CH1. D9154 0 : 1-phase input multiplied by 1 CH1 pulse input mode 2 : 2-phase input multiplied by 1 register 8 : 1-phase input multiplied by 2 10 : 2-phase input multiplied by 2 18 : 2-phase input multiplied by 4 D9155 CH1 present value read (lower 16 bits) D9156 CH1 present value read (upper 8 bits) ⋅ Stores the count value of CH1 read when M9155 turns from off to on. 0 to 16777215 CH1 coincidence output D9157 set value (lower 16 bits) CH1 coincidence output D9158 D9159 D9160 D9161 ⋅ Set the coincidence output set value of CH1. ⋅ M9148 turns on when the present value and set value of CH1 match. Setting range: 0 to 16777215 set value (upper 8 bits) CH1 counter function selection setting CH1 latch count value read (lower 16 bits) CH1 latch count value read (upper 8 bits) ⋅ Select the counter function of CH1. 0 : Count disable function 1 : Latch counter function ⋅ Stores the count value of CH1 latched when M9159 turns from off to on or X6 turns from off to on. 0 to 16777215 Appendix - 18 APPENDICES MELSEC-A Appendix Table 1.2 Special Register List (Continued) Number Name D9162 CH2 preset value (lower 16 bits) D9163 CH2 preset value (upper 8 bits) Description/Details ⋅ Stores the preset value of CH2 set when M9172 turns from off to on or X9 turns from off to on. Setting range: 0 to 16777215 ⋅ Set the pulse input method of CH2. D9164 0 : 1-phase input multiplied by 1 CH2 pulse input mode 2 : 2-phase input multiplied by 1 register 8 : 1-phase input multiplied by 2 10 : 2-phase input multiplied by 2 18 : 2-phase input multiplied by 4 D9165 CH2 present value read (lower 16 bits) D9166 CH2 present value read (upper 8 bits) ⋅ Stores the count value of CH2 read when M9175 turns from off to on. 0 to 16777215 CH2 coincidence output D9167 set value (lower 16 bits) CH2 coincidence output D9168 D9169 D9170 D9171 ⋅ Set the coincidence output set value of CH2. ⋅ M9168 turns on when the present value and set value of CH2 match. Setting range: 0 to 16777215 set value (upper 8 bits) CH2 counter function selection setting CH2 latch count value read (lower 16 bits) CH2 latch count value read (upper 8 bits) ⋅ Select the counter function of CH2. 0 : Count disable function 1 : Latch counter function ⋅ Stores the count value of CH2 latched when M9179 turns from off to on or X7 turns from off to on. 0 to 16777215 ⋅ Stores the statuses of CH1 and CH2. Unused B15 D9172 to B8 CH2 B7 B6 CH1 B5 B4 B3 B2 B1 B0 CH1, CH2 statuses 1 for error 1 for enable 1 for down counting Appendix - 19 1 for down counting 1 for enable 1 for error APPENDICES MELSEC-A Appendix Table 1.2 Special Register List (Continued) Number Name Description/Details D9173 Corresponding station number setting status ⋅ Stores the parameter setting status (corresponding station number). Station 0 to 7 D9174 Communication slave station setting status ⋅ Stores the parameter setting status (number of communication slave stations). 1 to 7 stations D9175 Refresh range setting status ⋅ Stores the parameter setting status (refresh range). 0: Pattern 00 1: Pattern 01 2: Pattern 02 D9176 Corresponding station number setting ⋅ Set the station number of the host station. 0 for master station, 1 to 7 for local stations. Station 0 to 7 (default value: FFFFh) D9177 Communication slave station count setting ⋅ Set the number of slave stations to communicate with. 1 to 7 stations (default value: 7) D9178 Refresh range setting ⋅ Set the refresh range pattern. 0: Pattern 00 1: Pattern 01 2: Pattern 02 (Default value: 0) D9179 Number of retries up to error detection ⋅ Master station: Set the number of retries up to error detection. ⋅ Local station: Stores the setting of the master station. 0 to 10 times (default value: 3 times) D9180 Monitoring time (10ms increments) ⋅ Master station: Set the local station no-response time (monitoring time A). ⋅ Local station: Stores the master station no-response time (monitoring time B) after calculating it from the master station setting. (B=A×2) (Default value: 50ms) D9181 Current link scan time ⋅ Stores link time (present value) during 1 cycle in 10ms increments. D9182 Maximum link scan time ⋅ Stores link time (maximum value) during 1 cycle in 10ms increments. D9183 Data transmission sequence error count (Master station) ⋅ Stores the number of errors which occurred in the master station (number of times when M9183 turned from off to on). ⋅ Turn on M9192 to clear D9183. D9184 Data transmission sequence error count (Local station 1) D9185 Data transmission sequence error count (Local station 2) D9186 Data transmission sequence error count (Local station 3) D9187 Data transmission sequence error count (Local station 4) Relevant Station Master station Local station Master station Master station Local station Master station ⋅ Stores the number of errors which occurred in the corresponding local station (number of times when any of M9184 to M9190 turned from off to on). Master ⋅ Turn on M9192 to clear D9184 to D9190. station Appendix - 20 station Local APPENDICES MELSEC-A Appendix Table 1.2 Special Register List (Continued) Number Name Description/Details Relevant Station Data transmission D9188 sequence error count (Local station 5) Data transmission D9189 sequence error count (Local station 6) Data transmission D9190 ⋅ Stores the number of errors which occurred in the corresponding local station (number of times when any of M9184 to M9190 Local turned from off to on). station ⋅ Turn on M9192 to clear D9184 to D9190. sequence error count (Local station 7) D9191 D9192 D9193 D9194 D9195 D9196 D9197 D9198 Data transmission error No.(Master station) ⋅ Stores the error No. detected by the master station. ⋅ Holds the error No. if link is resumed. Turn on M9192 to clear D9191. Local station Data transmission error No.(Local station 1) Data transmission error No.(Local station 2) Data transmission error No.(Local station 3) Data transmission error No.(Local station 4) Data transmission error ⋅ Stores the error No. detected by the corresponding local station. ⋅ Holds the error No. if link is resumed. Turn on M9192 to clear D9192 to D9198. No.(Local station 5) Data transmission error No.(Local station 6) Data transmission error No.(Local station 7) Appendix - 21 Master station Local station APPENDICES MELSEC-A POINTS (1) All contents of special registers are cleared by any of power-off, latch clear and reset operations. When the RUN/STOP switch is moved to "STOP", contents are held. (2) Special registers marked *1 above are latched and their data will remain unchanged after normal status is restored. Clear the registers as follows. (a) From the user program Use the ladder rung shown on the right and turn on the clear command contact to clear the register contents. Clear command RST D9005 Specify the device to be cleared. (b) From the peripheral equipment Use the test function of the peripheral to change the present value of the register to zero or force-reset the device to zero. For the operation procedure, refer to the corresponding peripheral manual. (c) By pressing the RESET switch on the CPU front, the special register is set to "0". (3) Write data to the special registers marked *2 using the sequence program. Appendix - 22