1
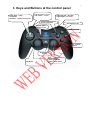
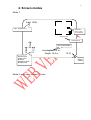
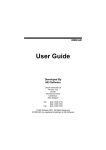
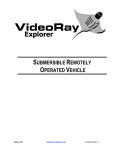
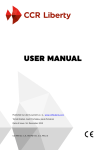
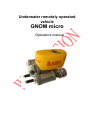
Underwater remotely operated
vehicle
GNOM micro
Operators manual
2
2008
Table of contents
1. Description
1.1
Purpose
2
1.2
Design
3
1.3
Technical specifications
5
2. User’s manual for operation with GNOM
6
3. Keys and Buttons at the control panel
9
4. Screen modes
10
5. Maintenance operation
11
6. Safety requirements
11
3
1. Description
1.1
Purpose
GNOM micro is a miniature underwater remotely operated vehicle.
ROV Gnom micro is intended for inspection of any underwater objects
such as wrecks, ship underwater parts, propellers and different
underwater constructions. The vehicle has horizontal and vertical
thrusters and can move underwater in all directions. The vehicle is
operated from the surface control unit via thin umbilical cable using
joystick based on video and data from depth sensor on a TV screen.
Maximum operation depth is 50 m. ROV Gnom micro has a tiny color
camera with the tilt function. Two clusters of ultra-bright LEDs are
installed at both sides of the vehicle.
The vehicle can be connected to video display, TV or/and video
recorder via standard cable.
12-24VDC or 230VAC power supply or battery can be used.
Maximum power consumption is 200 Watt. Battery operation (12 Ah) is
more than 1 hour.
The complete system is packed into two plastic cases. One case
contains the underwater vehicle and cable reel, another – control and
power supply module and joystick.
The size of operating area is limited by cable length (50 m in basic
set). It is possible to increase the cable length up to 75 m. The video
camera together with lights provides 15-20 m daylight visibility in the
transparent water. Maximum 3-4 m visibility can be reached during the
night.
LCD display ot videorecorder can be installed upon request.
For update info please visit our web site www.gnom-rov.com
4
1.2
Design
Basic set
1. Cable reel
2. Underwater vehicle
3. Power supply/control module
4. Joystick
5. Transportation cases
6. LCD
1.3 Technical specifications
5
19.
3 magnetically coupled thrusters
Operation time - 500 h
Speed:
- horizontal – up to 1 m/sec
- vertical - до 0,3 m/sec
Operation depth – 50 m, ( can be modified up to maximum depth – 100 m)
Cable length – 50 m
Cable is strengthened by the Kevlar threads and the additional polyethylene
shield, negatively buoyant
Cable diameter – 3.5 mm, breaking effort – 90 kg,
Two clusters of ultra-bright LEDs
Color camera PAL CCD 1/3", 450 TV Lines, 1 lux
Power supply and surface control unit.
Power supply – 12-24VDC or 230VAC or battery 12V/7(12Ah)
Voltage value is displayed on a screen
Operating environment humidity – up to 100%
Operating temperature range – -5 …+ 45º. С.
Complete system is packed in two high-performance waterproof
STORMCASE
ROV weight – 1.7 kg, full weight of system – 8 kg
Vehicle dimensions 210х185х150 mm
Depth sensor (sensibility 10 – 20 cm) with TV-text overlay on a screen,
autodepth mode
Vehicle has slight positive buoyancy, controlled by adding metal weights
2.
User’s manual for operation with GNOM
1.
2.
3.
4.
5.
6.
7.
8.
9.
10.
11.
12.
13.
14.
15.
16.
17.
18.
WARNING!
The central cable wire has 48V voltage! If any damages happened
you must repair or change the cable
2.1. Before using, please, check up all parts of vehicle especially propellers, cable
and dome. Clean the vehicle if necessary, check propeller rotation.
2.2. Adjust the buoyancy of the vehicle if necessary inserting additional weights into
plastic feet. (Note that cable weight in water is approximately 2 g/m)
2.3. Plug in 3-sockets connector to reel and video cable to monitor video input. If you
work from 239 VAC, connect AC power cable.
6
2.8. Operation
WARNING!
Do not rotate thrusters on air!
Do not switch lights on a full power on air!
Put the vehicle into the water. To start operation press key ANALOG (MODE for
wireless) on a joystick
All control functions are displayed on a console draw (see below).
To move vehicle Forward/Back and turn Right/Left use right joystick. You can
adjust speed gradually (128 grades) pressing the joystick. The direction and speed
are indicated on an overlay.
To move vehicle Up/Down use left joystick. Also press left joystick to adjust the
Jump mode.
Slow mode (SLOW). Press right joystick and adjust power gradually (50%, 75%,
100%).
To switch ON and adjust lighters use pads R1/R2. If press R1, R2 simultaneously
100% brightness turns on. By pressing R1 you can adjust the light intensity.
To tilt cam Up/Down press L1/L2 pads. If press L1, L2 simultaneously camera
goes to the median position.
Jump mode allows to push vehicle slightly for a distance 30 – 50 cm them stop. To
chose the jump direction press arrows (Left/Right, Up/Down). To adjust the jump
power use left joystick.
Autodepth mode. Press key ▲ to fix the vehicle at the depth you need. To change
the depth use left joystick. Autodepth mode and depth are indicated on an overlay.
You can choose the menu language (Russian/English)
2.12. Finishing the operation
To finish the operation switch power OFF then disconnect cables and pull into the
reel.
Try to avoid nods and twisting of the cable.
After operation please clean propellers and shafts of motors and wash the
vehicle in fresh water.
7
3. Keys and Buttons at the control panel
Jump Mode – jump
movement,
Tilt Mode – camera zoom/pan
Cam up/down - L1/L2
Cam center - L1+L2
lights ON/OFF - (R1+R2)
adjust lights - R1 or R2
Screen overerlays
Autodepth on/off
Select cams/
lasers on/off
Switch Tilt/Jump
Fix vertical
speed
Autoheading
on/off
Up/Down
Forward/Back
Turn Left/Right
Click - Slow speed
8
4. Screen modes
Mode 1
Light: 100%
Light brightness %
direction
and value
of heading
Autohead 150
Autohead on
The inquired depth
72
51
Autodepth: 10.0 m
Depth: 10.4 m
Direction and
speed of the
thrusters.
Disappears while
thrusters stop
Mode 2: only video without TV-text
12.1V
Battery
voltage
50
9
4.
Maintenance operation
To maintain the vehicle it is necessary:
•
•
•
to clean the propellers from alge, sand and mud
to rinse the vehicle in the fresh water after using in the sea
to inspect the cable after the operation. In case of any damages the cable must
be repaired or changed
to check the magnetic disk coupling regularly
•
5.
Safety requirements
WARNING!!!!
Do not use the system with the damaged cable.
Do not touch underwater vehicle and the cable if you are in water and the
power is turned ON.
3. Keep the control module and the cable reel dry.
4. When recharging the battery disconnect the vehicle and the cable reel.
1.
2.
Indel-Partner LTD
Nakhimovsky pr., 36, 117997, Moscow, RUSSIA
Tel/Fax +7(495)129-2045
[email protected]
http://gnom-rov.com