1
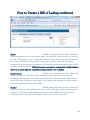
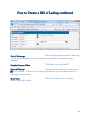
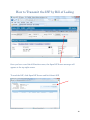
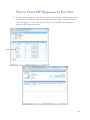
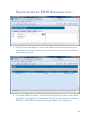
Import Security Filing
User Manual
10 + 2 Rule
Second Edition June 2009
Foreword
This document covers the 10+2 additional elements required by U.S. Customs
and Border Protection (CBP) effective January 26, 2009.
CBP will be requiring an Importer Security Filing (ISF) prior to vessel loading
at foreign ports. U.S. importers will be required to supply 10 additional data
elements. In addition 2 data elements will be required from carriers.
FROB, IE and T&E shipments will require 5 elements to be provided.
Only details on the above elements will be covered herein. For additional
information on how to enter data in AMS, please refer to our online AMS User
Manual.
2
Table of Contents
Log in Procedures……………………………………………………………………….4
How to Create a Customer…………………………………………………………..5
How to Create a Bill of lading……………………………………………………….7
How to Transmit the ISF by Bill of Lading…………………………………..18
How to Check ISF Responses by Bill of Lading…………………………….19
How to Transmit the ISF by Port Pair…………………………………………20
How to Check ISF Responses by Port/Pair………………………………….22
Requirements for FROB Shipments……………………………………………23
3
Log in Procedures
1. Use our web page www.artemus.us to link and log into AMS Customs Log In.
2. Enter your SCAC code, User ID and Password
ARTEMUS Customs Reporting System (ACRS)
SCAC
User ID
Password
Login
Reset
Email: [email protected]
4
How to Create a Customer
1. From the menu select Customer Profile
2. Click on the
button
3. Enter details in the appropriate fields or bill will be rejected. Example: City
must be in City field, not in the address field,
etc.
Customer Name:
Type the customer’s name (limit 35 characters)
Entity Identifier #:
Enter the IRS number, Employer Identification
Number (EIN), Social Security Number (SSN), Passport # (HHG, Personal Effects)
DUNS # (Dun & Bradstreet Universal Numbering System may be accepted as an
alternative to the name and address for the following elements: Seller, Buyer,
Manufacturer (or supplier), Ship To Party, Container Stuffing Location,
Consolidator (stuffer), and Booking Party. In addition CBP will accept FIRMS
5
codes (Facilities Information and Resources Management System codes for the Ship
To Party when applicable.)
How to Create a Customer continued
Also CBP assigned number of the entity liable for payment of all duties and
responsible for meeting all statutory and regulatory requirements as a result of
importation can be used. For goods intended to be delivered to an FTZ, the IRS
number, EIN, SSN, or CBP assigned number of the party filing the FTZ
documentation with CBP must be provided. The importer of record number for ISF
purposes is the same as “importer number” on CBP Form 3461.
Valid formats for entering numbers:
NN-NNNNNNNXX
IRS Number
YYDDPP-NNNNN
CBP Assigned Number
NNN-NN-NNNN
Social Security Number
N = number, X = alphanumeric, YY = last two digits of the calendar year when the
number is assigned, DDPP = the district/port code where the number is assigned.
Consignee #:
Enter the IRS number, EIN, SSN or CBP assigned
number of the individual(s) or firm(s) in the United States on whose account the
merchandise is shipped. This element is the same as the “consignee number” on
CBP Form 3461. Use the same format as for the Importer of Record number.
Address Type:
This field defaults to MAIN
Address (1):
Type the address (limit 35 characters)
Address (2):
Type the address (limit 35 characters)
City:
Type the city name
Country:
Initial letter search, just keep pressing the first
letter of the country until the correct country appears in the field.
State:
Initial letter search, just keep pressing the first
letter of the state until the correct state appears in the field.
Zip Code:
Type the zip code or postal code
6
Phone / Fax:
Click
Type the phone and fax numbers (optional)
button once the information has been entered.
How to Create a Bill of Lading
1. Select Bill of Lading and Bill Header from the menu and enter the
information in the appropriate fields.
Bill of Lading:
Enter your unique BL number minus your SCAC.
(maximum 12 characters, can be combination alpha/numeric)
Status:
Defaults to Complete. Leave as is
Bill Type:
Defaults to Waybill.
Leave as is
7
How to Create a Bill of Lading continued
NVO Type:
NVOCC or Non NVO (carrier).
You will be setup in the database as either a
How to Select the NVO Type
Non NVO:
Carriers select Non NVO (as shown in the
example on the previous page) when transmitting their regular bills.
Automated NVO:
If you are an Automated NVO, you will have 2
additional fields on the Bill Header to enter the carrier’s Master Bill of Lading
number.
SCAC:
Enter the carrier’s SCAC here.
Master Bill:
(maximum 12 characters)
Enter the carrier’s bill of lading number here
8
How to Create a Bill of Lading continued
Shipper:
name and click on the
Type at least 4 characters of the shipper’s
icon. If the shipper is not in the data base, click on the
icon and create and save a new customer.
Manufacturer:
Click on the Manufacturer tab and type in
same as above. Enter the name and address of the entity that last manufactures,
assembles, produces, or grows the commodity or name and address of the supplier of
the finished goods in the country from which the goods are leaving. If Manufacturer
is same as Shipper, simply click on the Manufacturer box after entering the
Shipper’s name and address and same will carry over as Manufacturer.
9
How to Create a Bill of Lading continued
Seller:
Follow same procedure as above. Enter the
name and address of the last known entity by whom the goods are sold or agreed to
be sold. If the goods are to be imported otherwise than in pursuance of a purchase,
the name and address of the owner of the goods must be provided. The party
required for this element is consistent with the information required on the invoice
of imported merchandise. If Seller is same as previous customer(s), simply click on
that box to select and the same information carries over as Seller.
Consolidator:
Follow same procedure as above. Enter the
name and address of the party who stuffed the container or arranged for the
stuffing of the container. For break-bulk shipments, the name and address of the
party who made the goods “ship ready” or the party who arranged for the goods to
be made “ship ready” must be provided.
Stuffer:
Follow same procedure as above. Enter the
name and address of the physical location(s) where the goods were stuffed into the
container. For break-bulk shipments, the name and address(es) of the physical
location(s) where the goods were made “ship ready” must be provided.
10
How to Create a Bill of Lading continued
Consignee:
Shipper’s name and address.
Follow same procedure as entering
Buyer:
Click on the Buyer tab and type in same
as above. Enter the name and address of the last known entity to whom the goods
are sold or agreed to be sold. If the goods are imported otherwise than in pursuance
of a purchase, the name and address of the owner of the goods must be provided.
The party required for this element is consistent with the information required on
the invoice of imported merchandise. If Buyer is same as Consignee, simply click on
the Buyer box after entering the Consignee’s name and address and same will carry
over as Buyer.
Notify:
Follow same procedure as above.
Ship To:
Follow same procedure as above. Enter
the name and address of the first deliver-to party scheduled to physically receive
the goods after the goods have been released from customs custody.
*Important Note: Shipper, Consignee, and Notify Party fields must not be left
blank. These fields are required by CBP or the bill will be rejected.
11
How to Create a Bill of Lading continued
Also Notify:
The SCAC will pull in from the vessel
table after you type in the Carrier (vessel) name.
Also Notify Parties:
Enter up to seven additional SCACs if
necessary. Click on the
icon and then the
icon. Type in the company name
for the SCAC you are searching and then click Accept.
12
How to Create a Bill of Lading continued
Carrier:
vessel name and click on the
Type at least the first 4 characters of the
icon.
Country of Origin:
By the dropdown arrow select the country
of manufacture, production, or growth of the article. This element is same as the
“country of origin” on CBP Form 3461.
Place of Receipt:
Type the actual place of receipt or in cases
of transshipments the country of origin.
Port of Loading:
You can begin typing the port of load or
click on the dropdown to select from the ports already set up in the voyage schedule.
13
How to Create a Bill of Lading continued
Port of Discharge:
You can begin typing the port of discharge
or click on the dropdown to select from the ports already set up in the voyage
schedule.
Canada Customs Office:
This field is not used for ISF.
Place of Delivery:
Type the place of delivery or click on the
icon to search. If there is no actual place of delivery you can enter the port of
discharge or leave blank.
Move Type:
choices and click to select.
Click on the down arrow to display
14
How to Create a Bill of Lading continued
When entering container info, follow the below steps. If you are entering bulk or
break-bulk cargo, skip to the Packages grid on the next page.
1. Click on the
icon.
2. Start by entering Item # 1. Each container number will receive a new item
number.
3. Enter the container number
4. Click on the down arrow to select the appropriate container size and type.
Click on the Accept icon.
Repeat steps to enter additional containers. Next one will be Item # 2 and so on.
5. In the Seal # grid, click on the
icon
6. Enter the seal number and click on the Accept icon. Seal number can be up
to 15 characters.
15
How to Create a Bill of Lading continued
1. Click on the
icon.
2. Enter an Item Number beginning with 1. If entering containers, the item
numbers should correspond with the same item number entered in the
Equipment grid. For bulk and break-bulk cargo, total all amounts under one
item only and make it Item #1.
3. Marks and Numbers defaults to read No Marks. Leave as is or add your own
marks and numbers. Do Not Leave Blank.
4. For Packages, click the down arrow for a display of the container number for
that item and select it to pull into the Equipment # field. For bulk and
break-bulk cargo, leave field blank.
5. Click on the Accept icon.
6. To input Attribute information, such as weights, measures, etc., select the
appropriate field by double clicking on the line to open it. Enter weights as
(I) Imperial or (M) Metric. Do same for other information you want to enter
and then click on the Accept icon.
Repeat the above steps for multiple items.
16
How to Create a Bill of Lading continued
To enter cargo details:
1. Click on the
icon and enter the Item number starting with 1.
2. For Description of Goods, type a precise cargo description
3. For Harmonized Code, click on the
icon and type in the commodity name
and hit search to find the harmonized code. You may also do the same search
by entering the harmonized number. The harmonized code is required to be
provided to the 6 digit level and may be provided up to the 10 digit level.
This element is the same as the “H.S. number” on CBP Form 3461 and can
only be used for entry purposes if it is provided at the 10 digit level or
greater.
After the bill has been completed, scroll back to the top of the Bill Header and click
on the
icon. The system will confirm all fields are validated and if so, will
advise you to click OK and you can continue to the next bill.
17
How to Transmit the ISF by Bill of Lading
Once you have saved the bill header screen, the Open ISF Screen message will
appear at the top right corner.
To send the ISF, click Open ISF Screen and hit Submit ISF.
18
How to Check ISF Responses by Bill of Lading
Go to the Bill Header and click on Open ISF Screen. This will allow you to see
responses. By clicking on the ISF transmission line you will be able to see all the
details. You will see when the ISF is transmitted, if accepted or not, and your
confirmation number from customs.
If the ISF is accepted, it will be displayed. If the ISF is rejected, it will also be
displayed. By double clicking on the line, you can see the rejection message and
what needs to be fixed.
Once the ISF has been sent, you will have additional tabs reading Delete ISF and
Amend ISF on the screen. After you have fixed any errors, you can resend the ISF
as an amendment or if the shipment is cancelled altogether, hit Delete and remove
the ISF filing. You should only use Delete if the shipment is cancelled completely,
otherwise send as an amendment.
19
How to Transmit the ISF by Port Pair
The ability to transmit ISFs by port pair is only available to users who have
transmitted their manifest through AMS. If you are not an AMS user, you can only
transmit the ISF by bill of lading from the Bill Header.
1. On the AMS Main Screen, enter your vessel and voyage. Select the load and
discharge ports or leave blank and click on Find.
2. The port/pairs will be displayed on the main screen. Select the port pair you
want to send the ISF by clicking on the line to highlight it.
20
How to Transmit the ISF by Port Pair cont…
3. At the bottom of the screen under ISF Functions, click on ISF Transmission
Screen, a screen will pop up displaying all the bills for that port/pair.
4. Status will show bills that the ISF was transmitted or will read No ISF
message transmitted. Select the bills you want to send by clicking on the box
directly in front of the bill number or select the entire row of bills by clicking
on the single box in the menu header next to Bill Number.
5. At the bottom of this screen click on Submit Bills and transmit the ISF. The
status will indicate when the ISF is sent and if accepted or rejected.
21
How to Check ISF Responses by Port Pair
6. On this same screen you can double click on an individual bill number and it
will display the ISF transmission details, time and date, accepted, batch #
and transaction #. User also has the ability to send ISF amendments or
delete an ISF from this screen.
22
Requirements for FROB Shipments
The 5 elements required for FROB shipments are:
1. Booking Party name and address. This is the party who is paying for the
transportation of the goods.
2. Foreign Port of Unlading. Port code for the foreign port of unlading at the
intended final destination. (Schedule K in Locations Table)
3. Place of Delivery. City code for the place of delivery.
23
Requirements for FROB Shipments cont…
4. Ship To Name and Address. Name and address of the first deliver-to party
scheduled to physically receive the goods after the goods have been released
from customs custody.
5. Commodity HTSUS number. Duty/statistical reporting number under which
the article is classified in the harmonized tariff schedule of the United States
(HTSUS). The HTSUS number must be provided to the 6 digit level.
24