1
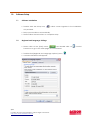
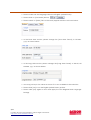
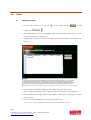
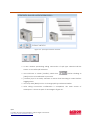
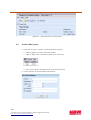
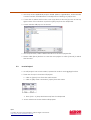
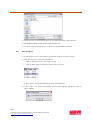
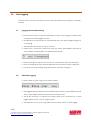
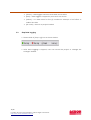
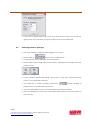
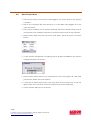
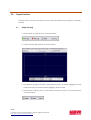
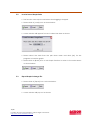
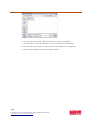
Integrated Computing Engine
Interceptor Version 1.0
User Manual
1/19
For help and support information, please login to E-Service.
http://www.acson-international.com/
Interceptor
Contents
1.0
2.0
3.0
4.0
5.0
6.0
Software Setup
1.1
Software Installation
1.2
Regional and Language Settings
Project
2.1
Starting Interceptor
2.2
Create a New Project
2.3
Load a Project
2.4
Save a Project
Data Logging
3.1
Logging Interval Time Setting
3.2
Start Data Logging
3.3
Stop Data Logging
Function & Settings
4.1
Unit Conversion
4.2
Communication Settings
4.3
Switching between Split Type
4.4
Extracting Project Data
Graph Function
5.1
Graph Viewing
5.2
Load Saved Graph Data
5.3
Exporting Graph to Image File
Contact Us
2/19
For help and support information, please login to E-Service.
http://www.acson-international.com/
1.0
Software Setup
1.1
Software Installation
➢ Double click the Setup icon,
which comes together in the installation
CD provided.
➢ Setup process will run automatically.
➢ Please follow the instructions to complete setup.
1.2
Regional and Language Settings
➢ Please click at the [Start] menu,
and double click at
Panel icon to go to the main page of Control Panel.
➢ Double click [Regional and Language Options] icons,
➢ A window like below will appear.
3/19
For help and support information, please login to E-Service.
http://www.acson-international.com/
.
Control
➢ Please make sure the language selected is English (United States).
➢ Please click on [Customize] button,
.
➢ Please select on [Date] Tab on the newly appear window as shown below.
➢ In the Short date section, please change the [short date format] to 'dd-MM-
yyyy' as shown below.
➢ In the long date section, please change the [long date format] to 'dddd, dd
MMMM, yyyy' as shown below.
➢ User may just key-in the values as shown if it is not available in the selection.
➢ Please click [OK] to set the English (United States) options.
➢ Please click [OK] again to close and apply the new Regional and Language
Settings.
4/19
For help and support information, please login to E-Service.
http://www.acson-international.com/
2.0
Project
2.1
Starting Interceptor
➢ Locate the shortcut icon for ICE,
Programs],
in the [Start] Menu,
in [All
.
➢ Click [Integrated Computing Engine (ICE) – Interceptor] menu shown in [All
Programs] to start the program.
➢ Please login as [General User] from login screen by clicking at [General User]
button.
➢ User may enter details by filling up the table and save the user list.
➢ Then, program will bring user to split type selection window, as in Figure 2.0.
➢ Please select either single split or multi split by clicking at the image and click
[Next] button.
➢ User may click at [Back] button to switch type of user.
NOTE : This can only be changed at the beginning stage of software activation
5/19
For help and support information, please login to E-Service.
http://www.acson-international.com/
Figure 2.0 : Split Type Selection window.
➢ A new window previewing wiring connection of split type selected will be
shown to user after split selection.
➢ User will have to check [Confirm] check box,
before clicking at
[Next] button to be allowed to proceed.
➢ [Confirm] is put in as safety measure to ensure that the wiring is correct before
logging data.
➢ User may click [Back] button to change split type selected earlier.
➢ After wiring connection confirmation is completed, the main screen of
Interceptor is shown as part of the image in Figure 2.1.
6/19
For help and support information, please login to E-Service.
http://www.acson-international.com/
Figure 2.1 : Main interface of Interceptor
2.2
Create a New Project
➢ There are 3 ways to create a new Interceptor project:
➢ Click at [New] icon from the main screen
➢ Click at [File] menu and select [New] from the menu
➢ Press [Ctrl + N] keys simultaneously from the keyboard
➢ A new window as shown below will appear.
7/19
For help and support information, please login to E-Service.
http://www.acson-international.com/
➢ User may enter applicable project details (Name, Organization, Indoor Model,
Outdoor Model, Serial Number of Model) before clicking at [OK] button.
➢ If user wish to abort this function, user may click at the red [X] icon at the top
right corner of the window or press the [ESC] key from the keyboard.
➢ A new window will pop-out as shown:
➢ User may browse / select desired location to save the project file.
➢ Please click [Save] button to save the new project or click [Cancel] to abort
the function.
2.3
Load a Project
➢ An ICE project has to be loaded / opened in order to use logging function.
➢ There are 3 ways to load an ICE project:
➢ Click at [Open] icon from the main screen
➢ Click at [File] menu and select [Open] from the menu
➢ Press [Ctrl + O] keys simultaneously from the keyboard
➢ A new window as shown below will appear.
8/19
For help and support information, please login to E-Service.
http://www.acson-international.com/
➢ Please choose a saved ICE project (a *.ice file) and click [Open] button.
➢ ICE program will load the project selected by user.
➢ User may click [Cancel] button to abort the open project function.
2.4
Save a Project
➢ An ICE project has to be loaded / opened in order to use this function.
➢ There are 3 ways to save an ICE project:
➢ Click at [Save] icon from the main screen
➢ Click at [File] menu and select [Save] from the menu
➢ Press [Ctrl + S] keys simultaneously from the keyboard
➢ If the project has been successfully saved, ICE program will inform user as
shown below:
9/19
For help and support information, please login to E-Service.
http://www.acson-international.com/
3.0
Data Logging
Functions in this section can only be used / activated after an ICE project is opened /
loaded.
3.1
Logging Interval Time Setting
➢ Interval time refers to lag time between rounds of ICE program taking data
returned from data logger function.
➢ Modification of interval time is only allowed when the data logger program is
not running.
➢ The default interval time is one (1) second.
➢ Please tick / check the check box with the name [Personalized Interval] as
shown below to personalize / set desired interval time.
➢ Please change the value in the text box to user desired value (no limitation).
➢ Note : Increasing the time interval will reduce the number of data collected.
➢ User may save the settings using the function 2.4 (Save a Project).
3.2
Start Data Logging
➢ Please click at [Start Log] icon as shown below.
➢ The logging will start based on the default interval time or personalized interval
time if [Personalized Interval] check box is ticked by user.
➢ The date and time of previous successful data that is returned by a data
logger will be shown at [Last Log] location.
➢ The indicator next to [Last Log] will show the current status of data logger:
10/19
For help and support information, please login to E-Service.
http://www.acson-international.com/
➢ [Green] – data logger has been activated and is active
➢ [Red] – data logger is stopped by user and is not active
➢ [Yellow] – no data return for five (5) continuous attempts of ICE effort to
collect the data
➢ [No color] – there is no project loaded
3.3
Stop Data Logging
➢ Please click at [Stop Log] icon as shown below.
➢ After data logging is stopped, user can saved the project or change the
settings if desired.
11/19
For help and support information, please login to E-Service.
http://www.acson-international.com/
4.0
Function & Settings
Most of the functions in this section can be used / activated after an ICE project is
opened / loaded and when data logger is not active.
4.1
Unit Conversion
➢ Unit conversion can be changed if data logger is not active.
NOTE : changes of unit will reset the graph
➢ Please select the unit using [Setting] menu and click at the unit (Celcius or
Fahrenheit) as shown below
➢ The unit will be changed according to user's selection.
4.2
Communication Settings
➢ Communication settings can be changed if data logger is not active.
➢ There are 2 ways to change the communication settings:
➢ Please click at [Setting] menu and select [Communication Setting] from the
menu
➢ Press [Ctrl + C] keys simultaneously from the keyboard
➢ A new window as shown below will appear
➢ Please select the appropriate values and click [OK] to update communication
settings.
12/19
For help and support information, please login to E-Service.
http://www.acson-international.com/
➢ If user wish to abort this function, user may click at the red [X] icon at the top
right corner of the window or press the [ESC] key from the keyboard.
4.3
Switching between Split Type
➢ Split type can be changed if data logger is not active.
➢ Please click at
icon from the main screen.
➢ A new window of Unit Selection that will appear.
➢ Please select either single split or multi split by clicking at the image and click
[Next] button.
➢ A new window previewing wiring connection of split type selected will be
shown to user after split selection.
➢ User will have to check [Confirm] check box,
before clicking at
[Next] button to be allowed to proceed.
➢ User may click [Back] button to change split type selected earlier.
➢ After confirming the connection, user will be taken back to the main screen of
the software.
13/19
For help and support information, please login to E-Service.
http://www.acson-international.com/
4.4
Extract Project Data
➢ This function can be activated if data logger is not active and an ICE project
is loaded.
➢ Size of an ICE project file may reach up to a few MB if data logged of a few
days are saved.
➢ This function enables user to extract selected data from all data and save as
another file to be emailed or passed to another person who has this software.
➢ Please select [File] from the top menu and select [Save As] menu as shown
below
➢ A new window will appear containing a list of all data available in the current
loaded ICE project as shown:
➢ Please select which data to be included into ICE new project file and click
[OK] button, below the new window.
➢ If user wish to abort this function, user may click at the red [X] icon at the top
right corner of the window or press the [ESC] key from the keyboard.
➢ A new window will pop-out as shown:
14/19
For help and support information, please login to E-Service.
http://www.acson-international.com/
➢ User may browse / select desired location to save the new project.
➢ Please click [Save] button to save the new project with the few selected data
or click [Cancel] to abort the function.
15/19
For help and support information, please login to E-Service.
http://www.acson-international.com/
5.0
Graph Function
Functions in this section can only be used / activated after an ICE project is opened /
loaded.
5.1
Graph Viewing
➢ Please click at [Graph] icon as shown below:
➢ Graph window will appear as shown below:
➢ The graph is updated if there is data returned from an active logging or if user
load previously saved data when logging is deactivated.
➢ Please click at [Back] icon to exit Graph function to return to the main screen
as shown below:
16/19
For help and support information, please login to E-Service.
http://www.acson-international.com/
5.2
Load a Saved Graph Data
➢ This function can only be used when data logging is stopped.
➢ Please click at [Load] icon as shown below:
➢ A new window will appear for user to select the date as shown:
➢ Please select the date from the pull down menu and click [OK] for the
program to load the graph.
➢ Please click at [Back] icon to exit Graph function to return to the main screen
as shown below:
5.3
Export Graph to Image File
➢ Please click at [Export] icon as shown below:
➢ A new window will pop-out as shown:
17/19
For help and support information, please login to E-Service.
http://www.acson-international.com/
➢ User may browse / select desired location to save the image file.
➢ User can also to save as a Bitmap or a JPEG format of the image file.
➢ Please click [Save] button to export the current graph to an image file.
➢ Please click at [Back] icon to exit Graph window.
18/19
For help and support information, please login to E-Service.
http://www.acson-international.com/
6.0
Contact Information
For help and support information, please login to E-Service.
http://www.acson-international.com/
19/19
For help and support information, please login to E-Service.
http://www.acson-international.com/