1
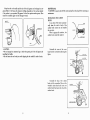
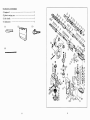
HAMMER DRILL
USER'S MANUAL
DOUBLE INSULATED
Specification
ddl Fapaw
Util bk Diameter
1 drill hdes Diameler
rotate sped
(per
I
Impd rate
(pra mn)
'The pr&ucer reserves the right of specification alteration without notiiication.
*Note: The specAieation may change accordingly wRh the different couMes to which the
product sells.
KEY SECURITY NOTES
( For All Tools)
Note: The following listen security item are to be noted to reduce the fire, electric
shock, injury and other accidents when using the electric tools.
1, Keep the work area clean. No use of the electirc tools in a disorderly work area
or table-board, which is likely to cause accidents.
2. Pay attention So the environment of the work area, No use of the electric tools
in damp sile, or where there is rain fall, flammable liquid or combustible gas.
3. Access of children and entrance of persons not concerned to the work area
are prohibited. The electric tools and power supply conducting wires shall be free
from the access and touth of persons not concerned.
4. Store the tools. The electric tools shdl be packed away in a dry locale which will
not be reached by children, and ought to be locked.
5, Don't use the tools without enough load capacity. The electric tools should be
oper~tedwithin the specified load capacity to achieve good effect and safety.
6. Adequate use af the tools, No use of small knives or equipment for workpieces to
be processed by large ones, No application of knives desired for other uses.
7. Watch clothing. I r is most dangerous to operate ihe electric mls in loose dreas
which could be twined into the speedy rotating machine. Rubber gloves and shoes
without holes shall be worn in outdoor work. And wearing caps is preferred at work.
8. Wear safety glasses. It is necessary to wear a respirabor when there are dusts out
of planing scraps.
9. Don't spoil the conducting wires. Do not move the tools with the conducting
wire onl or pull out the plug by drawing the wire. Conducting wires should also be
kept frum objects of high temperature, sharp rim of metal or grease.
10. Fix the workpiece. It is safer to hold tbe processing workpiece with pincers
instead of hands.
11. proper pasture is to be held at w o r k Stand steadily and never extend the
hands over the tools to fetch or process something.
12. Maintain the tools adequately. The tools shall be kept sharp to acquire good
performance and safety. Lubricate and exchange fittings up to the rules. Check the
conducting wires regularly and repair the broken one in the special repairing center. Renew the extended conductor immediately once it is broken. Keep the handle
dry and clean, and free from grease.
13. While the twls are not working, under maintenance, or replacing the clamp or
cutter, the plug must be puIled put.
14. Remember to remove the regulating tool and the spnner, etcr. 130 not forget
to check whether the regulating too1 and fixing spanner have been removed before
turn on the switch to run the machine. It is a habit to be cultivated off.
15. Prevent accidental start-up. Before plug in the machine, make sure that the
switch is turned off.
16. Use exieded conductor ~ M o o r s Extended
.
conducting wires musl be used when using the
tmls outdom,
I?. Keep cool-minded at work Concentrate on the workpiece and the tools when performing the
jab. Never use the tools with fatigue.
18. Check the broken part Before u w the tools again, check carefully whether there is any damage
to rhe protecting wver or other pads of the tool, and whether the damage is mere enough to affect
the m a 1 operation of the tool. Check whe~herall the movable pa- are in place, and ell the parts
to be fixed are fixed. AU parts that may influence the normal operation should be checked.Tbe
protecting cover or other parts, if broken, shwld be repaired or replaced in the special store. While
d replaced in the special service centhe switch or the tool, ir anything wrong, ~ h l be
ter. Never use the broken switch to run the tool.
19. Avoid eIectric shock. Do not touch the grounded metal with body, such as iron
pipe, radiator, relrigerating unit, etc.
20. Replace the parts, Choose the parts specified by the manufacturer and have
them replaced by the special repairing center.
Mind the voltage of the power supply: Make sure the voltage of the power supply
is the same as that indicated on the board of the tool. When the former is higher than
the latter, grave accidents would happen to the user, as well as ruin to the tool itself. Therefore never plug in before confirm the voltage of the power supply. On the
other side, if the former is lower than the latter, it will be harmful to the engine.
AMENDMENT TO THE S E C U R NOTES OF THE ROTARY HAMMER
I. Use safety helmet and ear protectors.
2. Always inspect drill bit before using the machine.
INSTALL OR UNINSTALL THE DRILL BIT
CAUTION: Make sure shut off the switch and pull out the plug before installing or
uninstaIIing the drill bit.
You shau1d clean the drill bit handle and smear the engine oil before
installing the drill bit.
*
3. Inspect the screw to avoid accident because the tool will librate under the normal
working state.
4. Make the tool running a while
at
no-load speed in order to operate it easily.
5. Make sure that n o m y stands there when you use the tool on high, the work place
must be safe and reliable.
6. Hold the tool by both hands. Be sure to use the side handle.
7. Keep away your hmds fmm the rotary parts.
8.
Do not keep the tool rotating continody after using. You can only operate it when
holding tightly.
Insert the drill bit to its body, then
revolve and thrust it in, make the drill
bit and the chuck lock together.
9. All visitors should be kept away from work place. The drill bit may be fly off and
make somebody injury.
10. The tool will touch the live line when drilling the wall, floor or other place. So do
not touch the metal parts of the tool. You
should hold the plastic or side handle to
avoid electric shock.
11. Do not touch the drill Bit or surrounding parts at once after using. These parts will
scald your skin.
12. Pay attention not to bruise somebody or damage goods after installing the sill
anchor or knocking the top with hammer.
KEEP THE INSTRUCTION MANUAL.
If the drill bit can not be thrusted
in, uninstall it and drag down the chuck
several times, then insert the drill bit
again, revolve it and thmsr it to lock
together.
chuck plate
You should pull the the drill bit
after installing to ensure that it is fixed
compIetly, drag down the chuck sheel
ANGLE OF THE DRILL BIT (When cutting, planing, casting)
*CAUTION: Make sure shut off the switch and pull out the plug before changing the
angle of the drill bit.
and pull out the drill bit before uninstalling it.
The drill bit can be
fixed through
tweleve angles. Depress the locking
press button, make the pointer to the
side of 0 through revolve the conversion md, then revolve the drill bit to
proper angle.
CHOOSE A MOVEMENT WAY
HAMMER REVOLVING
Depress the locking press button
when drilling on the concrete or brick,
keep the pointer to the side of
qa
though revolving the conversion
rod. You should use the tungsten hard
alloy drill bit.
Depress the Iocking press button,
Make the pointer ro the side of the
through revolve the conversion rod.
Then revolve the drill bit to ensuer it
lies in the reliable position.
SIMPLE HAMMERING
Depress the locking press button when cutting, planing, casting, keep the pointer
to the side of through revolving the conversion A. You should use the topquality
wld chisel, plane chisel etc.
I
I
SIDE HANDGRIP( ACCESSORIAL
HANDGRIP)
CAUTION:
Do not revolve the conversion rod at no - load speed to avoid damaging the tool.
Keep the conversion rod lies in the one of the two kinds of mode to avoid wearing the
interconversion mechanism.
The side handgrip can be revolved
in 360 positions of vertical direction
and fixed in freewill positions. At the
same time it can be fixed in 8 positions
of horizontal direction. h s e n the
clamp nut, revolve the side handle to
proper position then fasten the clamp
side handle
nut.
fasten
SIDE HANDLE
You can loosen the side handle to
proper position as long as you laosen it
to left (anticlockwise), then faslten be
side handle tightly.
OPERATING THE DRILL HOLES
Keep the cornersion rod setting on
the side of
Keep the drill bit to drill holes position, then depress the trigger.
Do not force the tool, you should
operate it softly. Make sure the tool can
not deviate the drill holes position.
Do not drill ulteriorly when the drill
holes is stopped by the chip or powdered scrap, you should keep the tool
rotating sIowly and pull out from the
drill holes, do i t several times you can
clean the drill holes,
OPERATING THE SWITCH
Depress the trigger switch to start
the tool, release the trigger to stop the
TORQUELIMITER
rg .
Torque limiter will work when it has stated torque distance. The motor will break
away the output shaft and the drill bit will atop revolving.
CAUTION: It must be shut off the switch as long as the torque limiter works to
avoid wearing.
*
tool.
*
CAUTION:Inspect the switch before
inserting the power, depress the trigger
switch then release it to see whether it
can bounds to home position (OFF)
DEPTHOMETER
The drill holes is
clamp screw
by
depthometer. Release: the clamp screw,
adjust the depthometer, then fasten the
clamp screw.
same
CHANGING THE SPEED
Adjust the rotate speed and impact
number through revolving the adjusting
dial.
It marks ](the Iowest speed) to 6
(top speed)on did.
kefer to the following list about the
r e h i o n between the figure and the roI
tale speed/impact number.
I
numkr
sd
imps" number
(per minj
,dl,,,,,,
d;,~
CUmING/PLANING/CASTING
Setting the conversion rod on the
side of
. Hold the too1 by both
\ I
hands, start the tool and clamp down
the tool slightly to avoid buncing or
running away. Farce overly can not
improve the working efficiency.
INDICATORLTGHT
Green indicator jight will give out
repairing indiestM light ( red 1
Iight when operating the tml, if the
indicator light is Iight but the tool can
not start which indicate the carhn
brush may be wear out or circuit, motor appears faults. The indicator light
I s dark and the too1 can not start
which indicate it lies in ON/OFF position, the switch or the power Iine
LUBRICATING
The tool need not lubricate every
hour or every day for its grease system, but it must be lubricated once six
months. Please operate it as following
the process:
Running the tool several minutes
and preheat, then shut off the switch
and p l l out the power supply.
Back off six bolts, uninstall the
handle. The top bolt is diffrent from
others boIts.
appears faults.
Red indicator light will give out the light when the carbon brush almost wears
out which indicate the tml must be repaired. The motor will shut off automatically
when the toot working about eight hours constantly.
Pull out two connector lug( white
and blak ) and break up them.
Uninstall the cranklid with hexagon
wrench.
Keep the tool on the table and the tip of the old grease and rechange the new
grease ( 30g). It will cause the hammer working abnormally or the machine failurly
if its number is over apointed 30g grease. So feed into apoint number grease. Then
instaIl the cranklid again with the hexagon wrench.
engine ail
MAWTENANCE
* CAUTION:It must be shut off the switch and pull out the plug before inspecting or
maintenance.
RECHANGING THE CARBON
BRUSH
It can shut off the motor autornati-
cally when the resin's head of the
carbon brush comes out and touches
the converter.
When it appears this suitation, the
carbon brush should be replaced.
* CAUTION:
*Not to damage the connector lug or lead when getting rid of the old grease and
installing the handle.
Do not fasten the tool overly to avoid chipping for the cranklid is made of resin.
*
Uninslall the screw af the cover
board with the screwdrive, following the
figure.
Uninstall the clip of the carbon
brush with the screwdrive. Take out the
wearable carbon brush and insert new
carbon brush then fasten the clip of the
carbon brush.
STANDARD ACCESSORIES
( 1 )enf$ne oil
(2)plastic
...............................................................
1
case ...............
....M............~aa~a~.m..m~.-*...l
(3Sside handle
(4),jepthometer
............................................................1
............................................................1